
L102W - Video projector NEC - Free user manual and instructions
Find the device manual for free L102W NEC in PDF.


| Product Type | Video Projector |
| Model | L102W |
| Brand | NEC |
| Resolution | 1024 x 768 (XGA) |
| Brightness | 2000 ANSI Lumens |
| Contrast Ratio | 400:1 |
| Lamp Life | Approx. 2000 hours (Normal Mode) |
| Lamp Type | 150W UHP |
| Projection Distance | 1.2 – 12.0 m |
| Screen Size | 0.76 – 7.62 m (30 – 300 inches) |
| Keystone Correction | Vertical ±30 degrees |
| Input Interfaces | VGA, S-Video, Composite Video, Audio (3.5mm) |
| Dimensions (W x D x H) | 310 x 230 x 85 mm |
| Weight | 2.5 kg |
| Power Consumption | 230W (Standby 4W) |
| Power Supply | AC 100-240V, 50/60Hz |
| Noise Level | 35 dB (Normal Mode) |
| Maintenance | Clean air filter every 100 hours, replace lamp when needed |
| Safety | Do not look directly into the lens; ensure proper ventilation |
| Spare Parts | Replacement lamp (PN: 50019700), air filter (PN: 6000000) |
| Reparability | Replaceable lamp and filter; service by qualified personnel |
| Included Accessories | Remote control, batteries, power cord, VGA cable, user manual |
Frequently Asked Questions - L102W NEC
User questions about L102W NEC
0 question about this device. Answer the ones you know or ask your own.
Ask a new question about this device
Download the instructions for your Video projector in PDF format for free! Find your manual L102W - NEC and take your electronic device back in hand. On this page are published all the documents necessary for the use of your device. L102W by NEC.
USER MANUAL L102W NEC
- DLP, DLP logo, DLP Link, and BrilliantColor are trademarks or registered trademarks of Texas Instruments.
- IBM is a trademark or registered trademark of International Business Machines Corporation.
- Apple, iPhone, iPad, iTunes, Macintosh, Mac, and Mac OS are trademarks of Apple Inc., registered in the U.S. and other countries.
- IOS is a trademark or registered trademark of Cisco Systems, Inc. in the U.S. and other countries.
- Microsoft, Windows, Windows Vista, and PowerPoint are either a registered trademark or trademark of Microsoft Corporation in the United States and/or other countries.
- Adobe, Adobe PDF, Adobe Reader, and Acrobat are either registered trademarks or trademarks of Adobe Systems Incorporated in the United States and/or other countries.
- Google and Android are registered trademarks or trademarks of Google Inc.
- MicroSaver is a registered trademark of Kensington Computer Products Group, a division of ACCO Brands.
- HDMI, the HDMI Logo and High-Definition Multimedia Interface are trademarks or registered trademarks of HDMI Licensing LLC.

- Blu-ray is a trademark of Blu-ray Disc Association
- SDHC, SD, microSD and microSDHC logo is a trademark of SD-3C, LLC.
- Linux is a registered trademark of Linus Torvalds in the U.S. and other countries.
- Other product and company names mentioned in this user's manual may be the trademarks or registered trademarks of their respective holders.
• GPL/LGPL Software Licenses
The product includes software licensed under GNU General Public License (GPL), GNU Lesser General Public License (LGPL), and others.
For more information on each software, see “readme.pdf” inside the “about GPL&LGPL” folder on the supplied CD-ROM. - IPA Font License
The product uses the IPA Font license font.
For license information, refer to "IPA Font License Agreement v1.0" in the "about GPL&LGPL" folder on the supplied CD-ROM. - IPA Font is a registered trademark of IPA in Japan and other countries.
NOTES
(1) The contents of this user's manual may not be reprinted in part or whole without permission.
(2) The contents of this user's manual are subject to change without notice.
(3) Great care has been taken in the preparation of this user's manual; however, should you notice any questionable points, errors or omissions, please contact us.
(4) Notwithstanding article (3), NEC will not be responsible for any claims on loss of profit or other matters deemed to result from using the Projector.
Safety Cautions
Precautions
Please read this manual carefully before using your NEC projector and keep the manual handy for future reference.
CAUTION

To turn off main power, be sure to remove the plug from power outlet.
The power outlet socket should be installed as near to the equipment as possible, and should be easily accessible.
CAUTION

TO PREVENT SHOCK, DO NOT OPEN THE CABINET.
THERE ARE HIGH-VOLTAGE COMPONENTS INSIDE.
REFER SERVICING TO QUALIFIED SERVICE PERSONNEL.

This symbol warns the user that uninsulated voltage within the unit may be sufficient to cause electrical shock. Therefore, it is dangerous to make any kind of contact with any part inside of the unit.

This symbol alerts the user that important information concerning the operation and maintenance of this unit has been provided.
The information should be read carefully to avoid problems.
WARNING: TO PREVENT FIRE OR SHOCK, DO NOT EXPOSE THIS UNIT TO RAIN OR MOISTURE. DO NOT USE THIS UNIT'S PLUG WITH AN EXTENSION CORD OR IN AN OUTLET UNLESS ALL THE PRONGS CAN BE FULLY INSERTED.
DOC Compliance Notice (for Canada only)
This Class B digital apparatus complies with Canadian ICES-003.
Machine Noise Information Regulation - 3. GPSGV,
The highest sound pressure level is less than 70 dB (A) in accordance with EN ISO 7779.
Disposing of your used product

EU-wide legislation as implemented in each Member State requires that used electrical and electronic products carrying the mark (left) must be disposed of separately from normal household waste. This includes projectors and their electrical accessories. When you dispose of such products, please follow the guidance of your local authority and/or ask the shop where you purchased the product.
After collecting the used products, they are reused and recycled in a proper way. This effort will help us reduce the wastes as well as the negative impact to the human health and the environment at the minimum level. The mark on the electrical and electronic products only applies to the current European Union Member States.
WARNING TO CALIFORNIA RESIDENTS:
Handling the cables supplied with this product will expose you to lead, a chemical known to the State of California to cause birth defects or other reproductive harm. WASH HANDS AFTER HANDLING.
RF Interference (for USA only)
WARNING
The Federal Communications Commission does not allow any modifications or changes to the unit EXCEPT those specified by NEC Display Solutions of America, Inc. in this manual. Failure to comply with this government regulation could void your right to operate this equipment. This equipment has been tested and found to comply with the limits for a Class B digital device, pursuant to Part 15 of the FCC Rules.
These limits are designed to provide reasonable protection against harmful interference in a residential installation. This equipment generates, uses, and can radiate radio frequency energy and, if not installed and used in accordance with the instructions, may cause harmful interference to radio communications.
However, there is no guarantee that interference will not occur in a particular installation.
If this equipment does cause harmful interference to radio or television reception, which can be determined by turning the equipment off and on, the user is encouraged to try to correct the interference by one or more of the following measures:
- Reorient or relocate the receiving antenna.
- Increase the separation between the equipment and receiver.
- Connect the equipment into an outlet on a circuit different from that to which the receiver is connected.
- Consult the dealer or an experienced radio / TV technician for help.
For UK only: In UK, a BS approved power cord with moulded plug has a Black (five Amps) fuse installed for use with this equipment. If a power cord is not supplied with this equipment please contact your supplier.
Important Safeguards
These safety instructions are to ensure the long life of your projector and to prevent fire and shock. Please read them carefully and heed all warnings.

Installation
- Do not place the projector in the following conditions:
- on an unstable cart, stand, or table.
- near water, baths, or damp rooms.
- in direct sunlight, near heaters, or heat radiating appliances.
- in a dusty, smoky or steamy environment.
- on a sheet of paper or cloth, rugs or carpets.
WARNING
- Do not use any other object than the projector's sliding lens cover to cover the lens while the projector is on. Doing so can cause the object to get extremely hot, and possibly resulting in a fire or damage due to the heat emitted from the light output.
- Do not place any objects, which are easily affected by heat, in front of the projector lens. Doing so could lead to the object melting from the heat that is emitted from the light output.
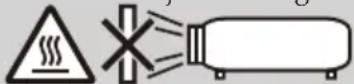
- Do not spray flammable gas to get rid of dust and dirt that accumulate in the lens. Doing so could cause a fire.

Fire and Shock Precautions

- Ensure that there is sufficient ventilation and that vents are unobstructed to prevent the build-up of heat inside your projector. Allow at least 4 inches (10cm) of space between your projector and a wall.
- Do not try to touch the exhaust vents as it can become heated while the projector is turned on and immediately after the projector is turned off.
- Prevent foreign objects such as paper clips and bits of paper from falling into your projector. Do not attempt to retrieve any objects that might fall into your projector. Do not insert any metal objects such as a wire or screwdriver into your projector. If something should fall into your projector, disconnect it immediately and have the object removed by a qualified service personnel.
- Do not place any objects on top of the projector.
- Do not touch the power plug during a thunderstorm. Doing so can cause electrical shock or fire.
- The projector is designed to operate on a power supply of 100-240V AC 50/60 Hz. Ensure that your power supply fits this requirement before attempting to use your projector.
- Do not look into the lens while the projector is on. Serious damage to your eyes could result.
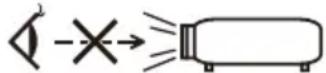
- Keep any items (magnifying glass etc.) out of the light path of the projector. The light path being projected from the lens is extensive, therefore any kind of abnormal objects that can redirect light coming out of the lens, can cause unpredictable outcome such as a fire or injury to the eyes.
- Do not block the light path between the light source and the lens with any objects. Doing so could cause the object to catch on fire.
- Handle the power cord carefully. A damaged or frayed power cord can cause electric shock or fire.
- Do not use any power cord other than the one supplied.
- Do not bend or tug the power cord excessively.
- Do not place the power cord under the projector, or any heavy object.
- Do not cover the power cord with other soft materials such as rugs.
- Do not heat the power cord.
- Do not handle the power plug with wet hands.
- Turn off the projector, unplug the power cord and have the projector serviced by a qualified service personnel under the following conditions:
- When the power cord or plug is damaged or frayed.
- If liquid has been spilled into the projector, or if it has been exposed to rain or water.
- If the projector does not operate normally when you follow the instructions described in this user's manual.
- If the projector has been dropped or the cabinet has been damaged.
- If the projector exhibits a distinct change in performance, indicating a need for service.
- Disconnect the power cord and any other cables before carrying the projector.
- Turn off the projector and unplug the power cord if the projector is not to be used for an extended period of time.
- Do not send the projector in the soft case by parcel delivery service or cargo shipment. The projector inside the soft case could be damaged.

Remote Control Precautions
- Handle the remote control carefully.
- If the remote control gets wet, wipe it dry immediately.
- Avoid excessive heat and humidity.
- Do not short, heat, or take apart battery.
- Do not throw battery into fire.
- If you will not be using the remote control for a long time, remove the battery.
- Dispose of used battery according to your local regulations.
- Do not place the battery upside down.
NOTE:
* Keep the coin cell battery out of reach of children so as not to allow them to swallow the cell battery.

Health precautions to users viewing 3D images
-
Before viewing, be sure to read health care precautions that may be found in the user's manual included with your LCD shutter eyeglasses or your 3D compatible content such as DVDs, video games, computer's video files and the like.
To avoid any adverse symptoms, heed the following: -
Do not use LCD shutter eyeglasses for viewing any material other than 3D images.
- Allow a distance of 2 m/7 feet or greater between the screen and a user. Viewing 3D images from too close a distance can strain your eyes.
- Avoid viewing 3D images for a prolonged period of time. Take a break of 15 minutes or longer after every hour of viewing.
- If you or any member of your family has a history of light-sensitive seizures, consult a doctor before viewing 3D images.
- While viewing 3D images, if you get sick such as nausea, dizziness, queasiness, headache, eyestrain, blurry vision, convulsions, and numbness, stop viewing them. If symptoms still persist, consult a doctor.
Auto Power Off (min) (Factory preset: 30 minutes)
- To reduce power consumption, [Auto Power Off (min)] is factory-preset for 30 minutes. When [30] is selected for [Auto Power Off (min)], you can enable the projector to automatically turn off in 30 minutes if there is no signal received by any input or if no operation is performed. To disable Auto Power Off (min), select [0].
- The [Auto Power Off (min)] function will not work when [Multimedia] is selected with the SOURCE button on the control panel.
About High Altitude mode
- Set [Fan Mode] to [High] when using the projector at altitudes approximately 2500 feet/760 meters or higher.
- Using the projector at altitudes approximately 2500 feet/760 meters or higher without setting to [High] can cause the projector to overheat and the projector could shut down. If this happens, wait a couple minutes and turn on the projector.
About Copyright of original projected pictures:
Please note that using this projector for the purpose of commercial gain or the attraction of public attention in a venue such as a coffee shop or hotel and employing compression or expansion of the screen image with the following functions may raise concern about the infringement of copyrights which are protected by copyright law. [Aspect Ratio], [Keystone], [D-ZOOM] feature and other similar features.
Table of Contents
Table of Contents....1
Usage Notice 2
Precautions 2
Introduction 4
Product Features ....4
Package Overview ....5
Product Overview ......6
Projector 6
Connection Ports 7
Control Panel.... 8
Remote Control 9
Battery Installation 11
Installation 12
Connecting the Projector ...... 12
Connect to Computer/Notebook 12
Connect to Video Sources 13
Powering On/Off the Projector .....14
Powering On the Projector 14
Powering Off the Projector 15
Warning Indicator 16
Adjusting the Projected Image .....17
Adjusting the Height of Projector Image 17
Adjusting the Projector Focus 18
Adjusting Projection Image Size...... 18
User Controls....19
On Screen Display 19
How to operate 19
Menu Tree 20
IMAGE 22
IMAGE | Advanced 24
SCREEN 26
SCREEN | 3D Settings 27
SETTING 28
SETTING | Signal (RGB) 30
SETTING | Advanced 31
OPTIONS 32
OPTIONS | Information 34
OPTIONS | Advanced 35
Using Multimedia 36
How to operate 37
Multimedia Menu Tree 38
Supported Formats 39
Using the Projector as a Storage
Device 41
Projecting Your Computer's Screen
Image from the Projector via the USB
Cable (USB Display) 43
Wireless Projection 44
Appendices 45
Troubleshooting 45
Specifications 49
Compatibility Modes ....51
Analog RGB 51
Component 51
3D 51
HDMI 52
Composite Video 52
Tripod Stand Installation ....53
Cabinet Dimensions 54
Pin Assignments of D-Sub
COMPUTER Input Connector .....55
Troubleshooting Check List......56
REGISTER YOUR PROJECTOR! (for residents in the United States, Canada, and Mexico) 58
Usage Notice
Precautions

Follow all warnings, precautions and maintenance as recommended in this user's guide to maximize the life of your unit.
■ Warning- Turn on the projector first and then the signal sources.
High gain type screens are not optimal for use with this projector. The lower the screen gain (i.e., screen gain on the order of 1), the better the appearance of the projected image.
Usage Notice
Do:
■ Turn off the product before cleaning.
- Use a soft cloth moistened with mild detergent to clean the cabinet.
- Disconnect the power plug from AC outlet if the product is not being used for a long period of time.
If the lens is soiled, use a commercially available cleaning cloth for lens.
Do not:
■ Use abrasive cleaners, waxes or solvents to clean the unit.
■ Use under the following conditions:
- Extremely heat, cold or humidity.
- In areas susceptible to excessive dust and dirt.
- In direct sunlight.
- Apply excessively strong pressure against the lens.
Product Features
This product is a WXGA single chip 0.45" DLP® projector.
Features you'll enjoy:
■ Light and small LED projector
The projector uses LED as a light source instead of lamp.
■ Display popular wide screen
High resolution display - 1,039,680 pixels (16:10 WXGA equivalent)
■ Quick start (4 seconds), Quick Power Off (1 second), Direct Power Off
4 seconds after turning on the power, the projector is ready to display PC or video images.
The projector can be put away immediately after the projector is powered down. No cool down period is required after the projector is turned off from the remote control or cabinet control panel.
The projector has a feature called "Direct Power Off". This feature allows the projector to be turned off (even when projecting an image) by disconnecting the AC power supply.
To turn off the AC power supply when the projector is powered on, use a power strip equipped with a switch and a breaker.
■ 0.5W in standby condition with energy saving technology
The projector consumes only 0.5W in standby mode.
■ Eco Mode
This feature will save electricity cost when "Eco Mode" is set to "On" in the Options menu.
■ HDMI input port provides digital signal
The HDMI input provides HDCP compatible digital signals. The HDMI input also supports audio signal.
■ 2W built-in speaker for an integrated audio solution
Monaural 2 watt speaker provides volume.
■ USB Display
Using a commercially available USB cable (compatible with USB 2.0 specifications) to connect the computer with the projector allows you to send your computer screen image to the projector without the need of a traditional computer cable (VGA)
■ Multimedia
This allows you to view photo, music, video, or Office Reader supported file (Adobe PDF or Microsoft Word/Excel/PowerPoint) stored in SD card or USB memory device.
This also allows you to use part of the memory inside the projector as your storage device.
■ Auto Power On and Auto Power Off features
The Auto Power On, Auto Power Off, and Off Timer features eliminate the need to always use the POWER button on the remote control or projector cabinet.
■ 3D images (DLP® Link™) supported
The projector provides 3D images to a user wearing commercially available DLP ^® Link ^TM compatible LCD shutter eyeglasses.
■ Wireless projection capability
The optional Wireless LAN Unit (NP03LM/NP02LM) allows you to send your computer screen, photos, or files (Microsoft Office, PDF, and text) stored on your smartphone (Android), iPhone or tablet(Android/iOS) wirelessly to the projector by using some dedicated apps for Android and iOS.
Introduction

Please save the original box and packing materials if you ever need to ship your projector.
Package Overview
This projector comes with all the items shown below. Check to make sure your unit is complete. Contact your dealer immediately if anything is missing.
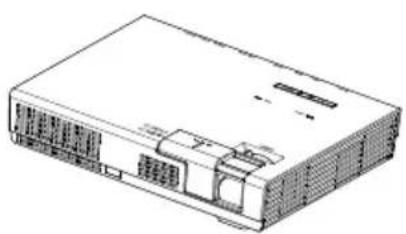
natural_image
Line drawing of a rectangular electronic device with internal components and ventilation grilles (no text or symbols)Projector
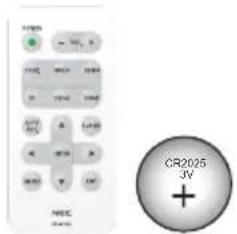
Remote Control (P/N:79TC5091) Battery (CR2025)
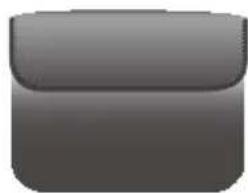
natural_image
Gray rounded rectangle shape with no text or symbolsInner Case (P/N: 79TC6611)
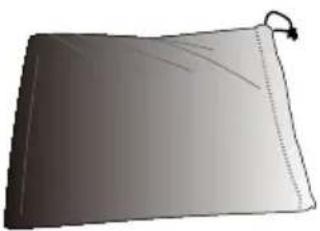
natural_image
Simple illustration of a folded paper or sheet with a bookmark (no text or symbols)Bag for Cables (P/N:79TC6601)
US (P/N:79TC5021) EU (P/N:79TC5031)
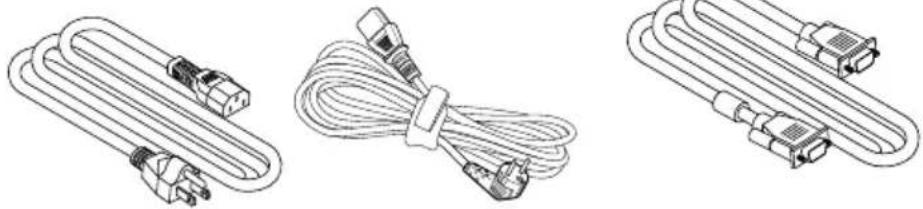
natural_image
Three types of U-shaped electrical connectors with metallic connectors and connectors, shown in line drawings without any text or symbols.Power Cord x1 Computer Cable (VGA)
(P/N:79TC5061)

Due to the difference in applications for each country, some regions may have different accessories.
Documentation:
□ NEC Projector CD-ROM
(P/N: 7N952011)
☐ Quick Setup Guide (P/N: 7N8N4551)
☐ Important Information (P/N: 7N8N4541))
For North America:
□ Limited Warranty
For Europe:
For customers in Europe: You will find our current valid Guarantee Policy on our Web Site: www.nec-display-solutions.com
Product Overview
Projector
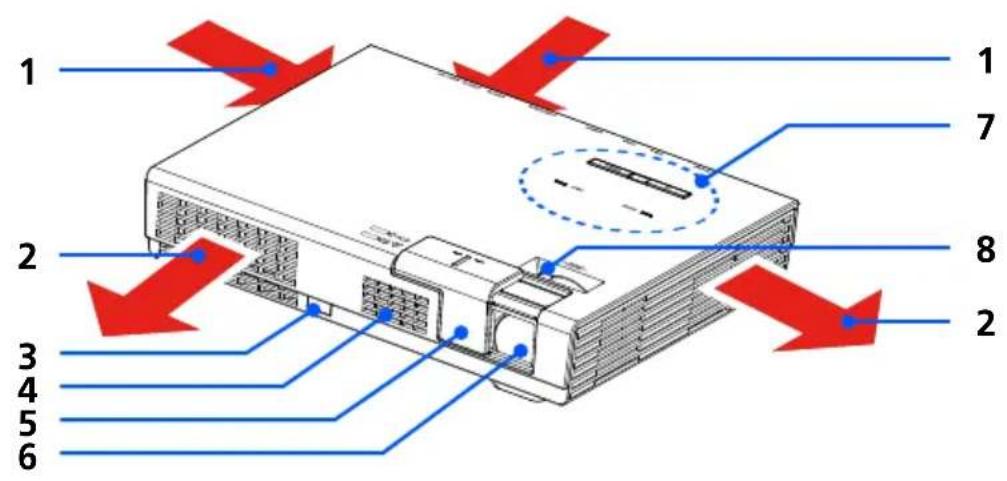
Ventilation (intake)1.
Ventilation (exhaust)2.
Remote Sensor3.
Speaker4.
Lens Cover5.
Lens6.
Control Panel7.
Focus Lever8.
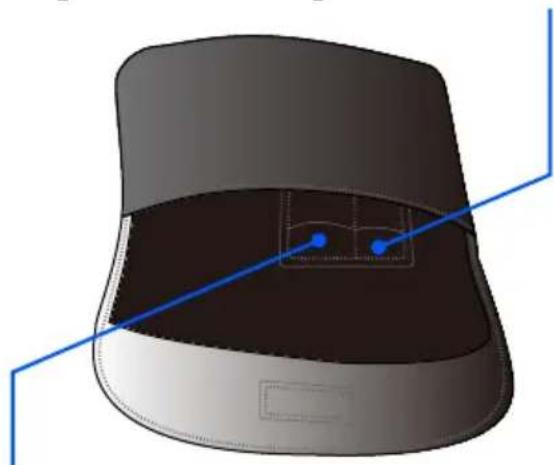
Inside pocket for the optional wireless LAN unit
natural_image
3D rendered illustration of a computer mouse with a blue alignment line overlay (no text or symbols)Inside pocket for the remote control
Connection Ports

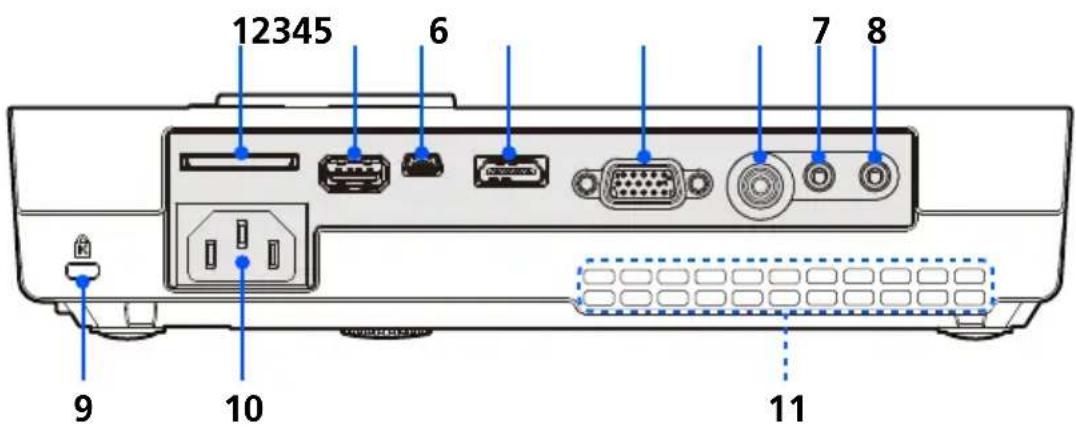

We do not warrant that the projector supports all SD cards and all USB devices in the market.
Mobile phones or iPod cannot be connected to the USB-A port.

(*) For more information, refer to "Application Guide" included on the supplied CD-ROM.
SD CARD Slot1.
Used for Multimedia.
Insert the SD card into this slot with the label facing up.
Note:
Supported SD card types are:
- SD card up to 2 GB
- SDHC card up to 32 GB
Does not support SDHC card compatible with SD3.0
(Mini/Micro SD and Mini/Micro SDHC cards require an adapter.)
USB-A Port2.
- Connect a commercially available USB device. Used for Multimedia.
- Connect the optional wireless LAN unit (NP03LM/NP02LM).
AWIND Inc. applications can be used connected to the projector by wireless LAN (*).
USB-B Port3.
Used for Multimedia and USB Display.
HDMI IN Connector4.
COMPUTER IN Connector5.
VIDEO IN Connector6.
AUDIO IN Connector7.
AUDIO OUT Connector8.
Kensington9. Lock Port (This security slot supports the
MicroSaver ^® Security System)
AC IN10.
Ventilation (intake)11.
Introduction
Control Panel
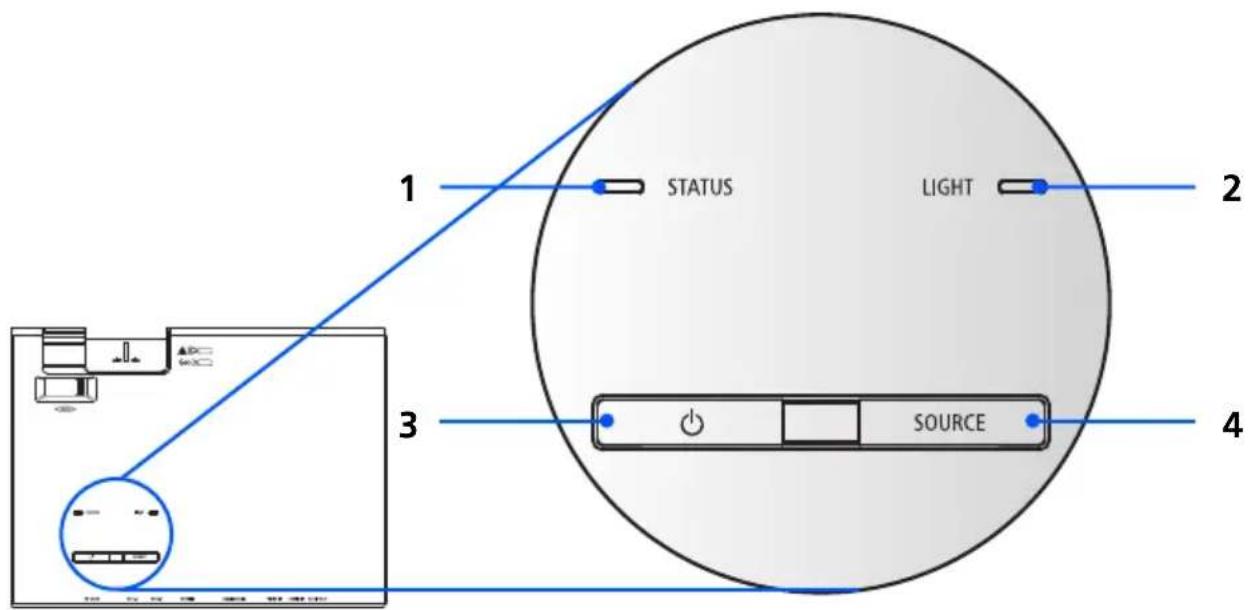
| 1STATUS indicator | Indicate the projector's temperature status and Control Panel Lock is enabled. Refer to the Status Indicator on page 48. |
| 2LIGHT indicator | Indicate the projector's light source (LED) status. Refer to the LIGHT Indicator on page 48. |
| 3POWER and indicator | Press the “button to turn on the projector. Refer to the “Power On/Off the Projector” section on pages 14-15. |
| 4 SOURCE Press “SOURCE” to select an input signal. | |
Remote Control

Before using the remote control for the first time, remove the transparent insulation tape. See page 11 for battery installation.
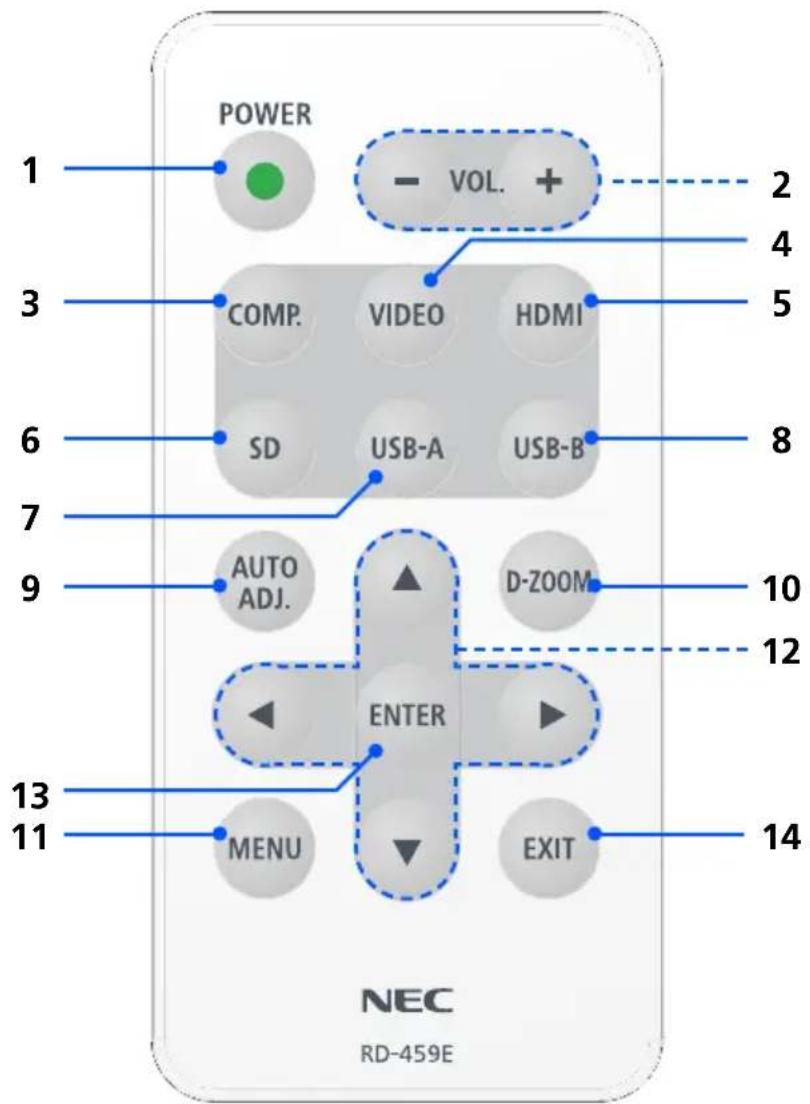
1POWER Refer to the "Power On/Off the Projector" section on pages 14-15
2VOL. +/- Increase/decrease speaker volume.
3COMP. Press "COMP." to choose COM- PUTER IN connector.
4 VIDEO Press "VIDEO" to choose the VIDEO IN connector.
5 HDMI Press "HDMI" to choose the HDMI IN connector.
Introduction
| 6 SD Press “SD” to choose the SDCARD slot. Multimedia willstart. | ||
| 7 USB-A Press “USB-A” to choose theUSB-A port. Multimedia willstart. With the optional wire-less LAN unit connected to theUSB-A port, the wireless LANstandby screen will be displayed. | ||
| 8 USB-B Press “USB-B” to choose theUSB-B port. (USB Display) | ||
| 9 AUTO ADJ. Optimizing a computer imageautomatically. | ||
| 10D-ZOOM Zoom in/out the projected im-age. | ||
| 11MENU Press “MENU” to launch theOnscreen display (OSD), back tothe top level of OSD for the OSDmain menu operation | ||
12Fo | DirectionalSelect Buttons | Use ▲ or ▼ to ▶lectitems or make adjustments toyour selection. |
| 13ENTER Confirm your section of items insub menu operation. | ||
| 14 EXIT Exit the settings. | ||
Battery Installation
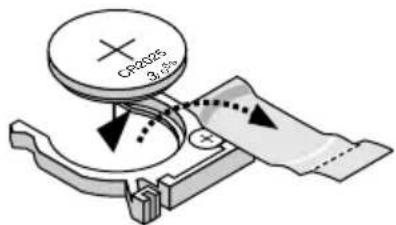
- Press firmly and slide the battery cover off.
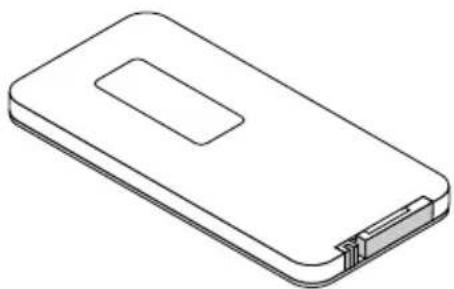
natural_image
Line drawing of a rectangular electronic device with a slot and connector port (no text or symbols)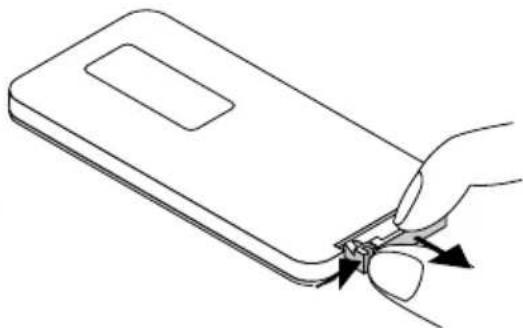
natural_image
Line drawing of a hand inserting a small object into a device (no text or symbols)
The infrared signal operates by line-of-sight up to a distance of about 22 feet/7 m and within a 60-degree angle of the remote sensor on the projector cabinet.
The projector will not respond if there are objects between the remote control and the sensor, or if strong light falls on the sensor. Weak battery will also prevent the remote control from properly operating the projector.
Keep the coin cell battery out of reach of children so as not to allow them to swallow the cell battery.
- Remove the old Lithium coin cell and install new one (CR2025). Ensure that the side with a “+” is facing up.
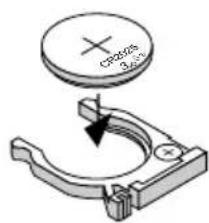
- Put the cover back.
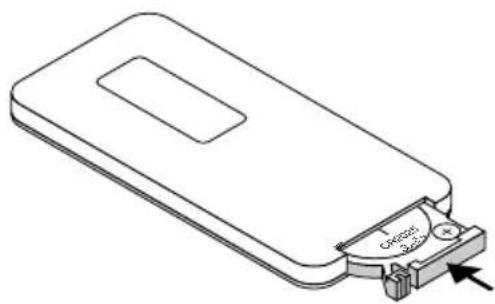
natural_image
Line drawing of a device casing with a labeled component (no text or symbols present)Remote Control Precautions
- Handle the remote control carefully.
- If the remote control gets wet, wipe it dry immediately.
- Avoid excessive heat and humidity.
- Do not place the battery upside down.

CAUTION:
Danger of explosion if battery is incorrectly replaced. Replace only with the same or equivalent type recommended by the manufacturer. Dispose of used batteries according to your local regulations.
Connecting the Projector
Connect to Computer/Notebook

Make sure that the power plug is fully inserted into both the projector AC inlet and the wall outlet.
To the wall outlet
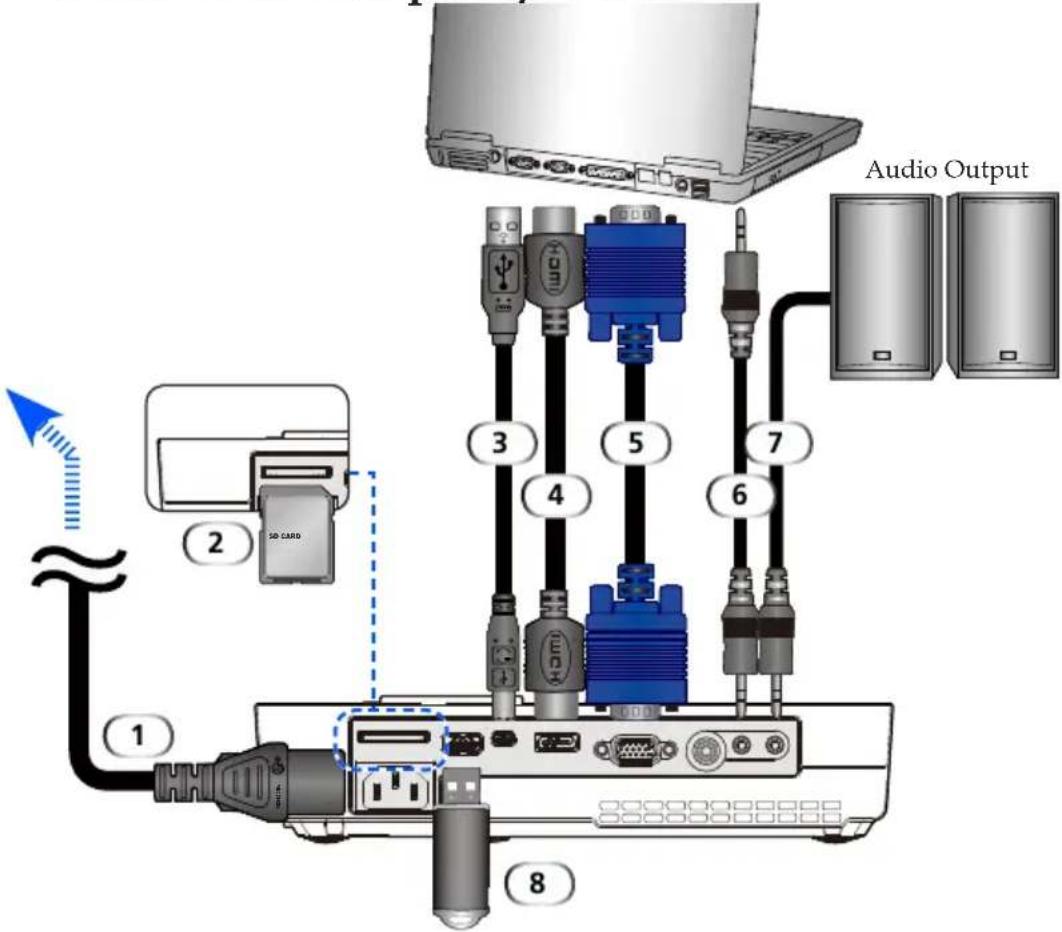
Note:
When Viewing a DVI Digital Signal
- Use a DVI-to-HDMI cable compliant with DDWG (Digital Display Working Group) DVI (Digital Visual Interface) revision 1.0 standard. The cable should be within 197^ / 5m long.
- Turn off the projector and the PC before connecting the DVI-to-HDMI cable.
- To project a DVI digital signal: Connect the cables, turn the projector on, then select the HDMI input. Finally, turn on your PC.
Failure to do so may not activate the digital output of the graphics card resulting in no picture being displayed. Should this happen, restart your PC. - Some graphics cards have both analog RGB (15-pin D-Sub) and DVI (or DFP) outputs. Use of the 15-pin D-Sub connector may result in no picture being displayed from the digital output of the graphics card.
- Do not disconnect the DVI-to-HDMI cable while the projector is running.
1....Power cord (supplied)
2. SD Card
3......HDMI cable
4. Computer cable (VGA) (supplied)
5....Audio in cable
6....USB cable
7. Audio out cable
8....USB memory device
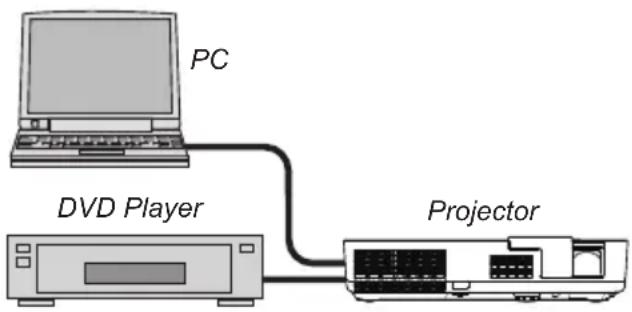
Connect to Video Sources

Make sure that the power plug is fully inserted into both the projector AC inlet and the wall outlet.
DVD Player, Blu-ray Player, Set-top Box, HDTV receiver
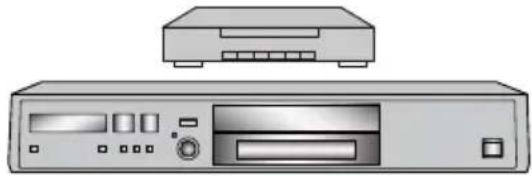
natural_image
Illustration of a desktop computer chassis with front panel, drive, and top unit (no text or symbols)To the wall outlet

Due to the difference in applications for each country, some regions may have different accessories.
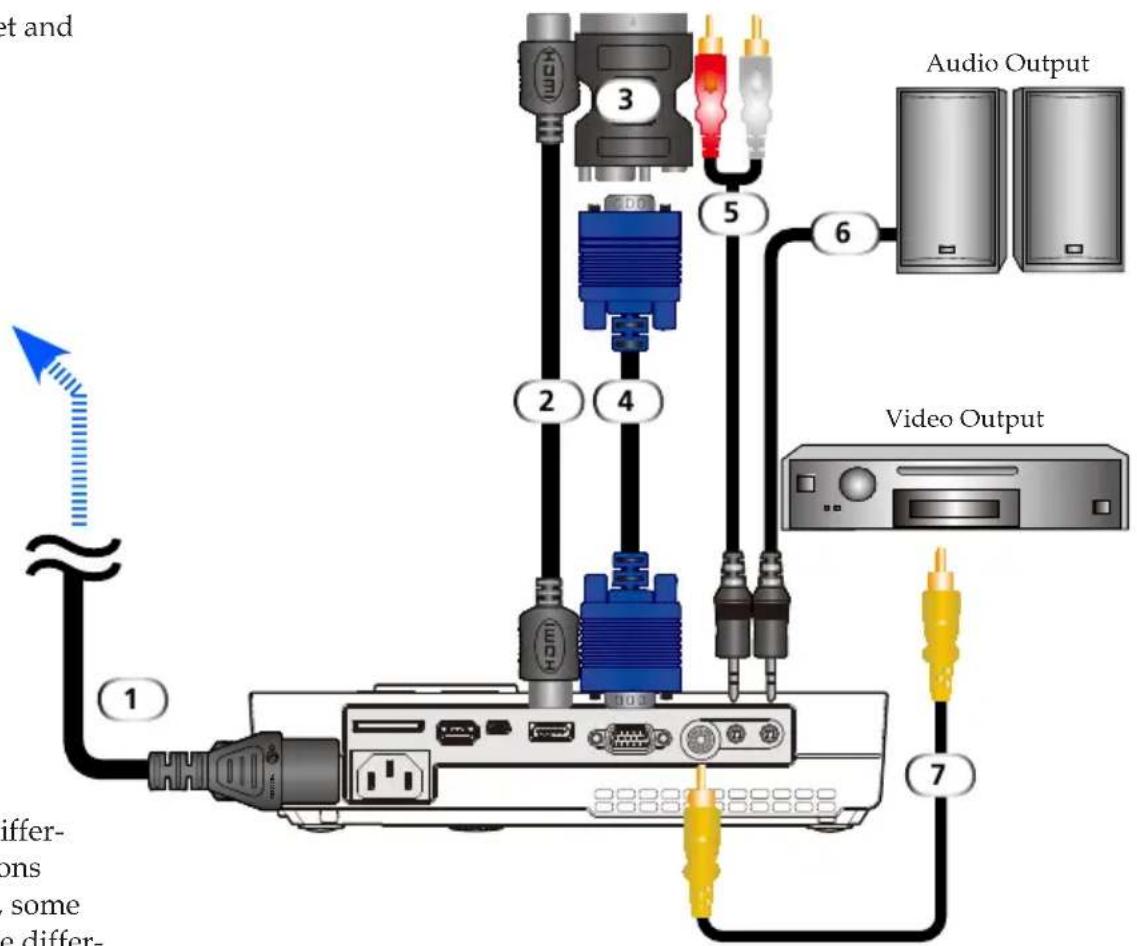
1....Power cord (supplied)
2......HDMI cable
3....VGA adaptor
4.... Computer cable (VGA) (supplied)
5. Audio in cable
6. Audio out cable
7. Composite video cable
Powering On/Off the Projector
Powering On the Projector

When you first turn on the projector, you will get the Startup menu. This menu gives you the opportunity to select the menu languages. To select the language, use the ▲
, ▼, ⬆ button on the remote control. Select your language. Refer to Language on page 28.
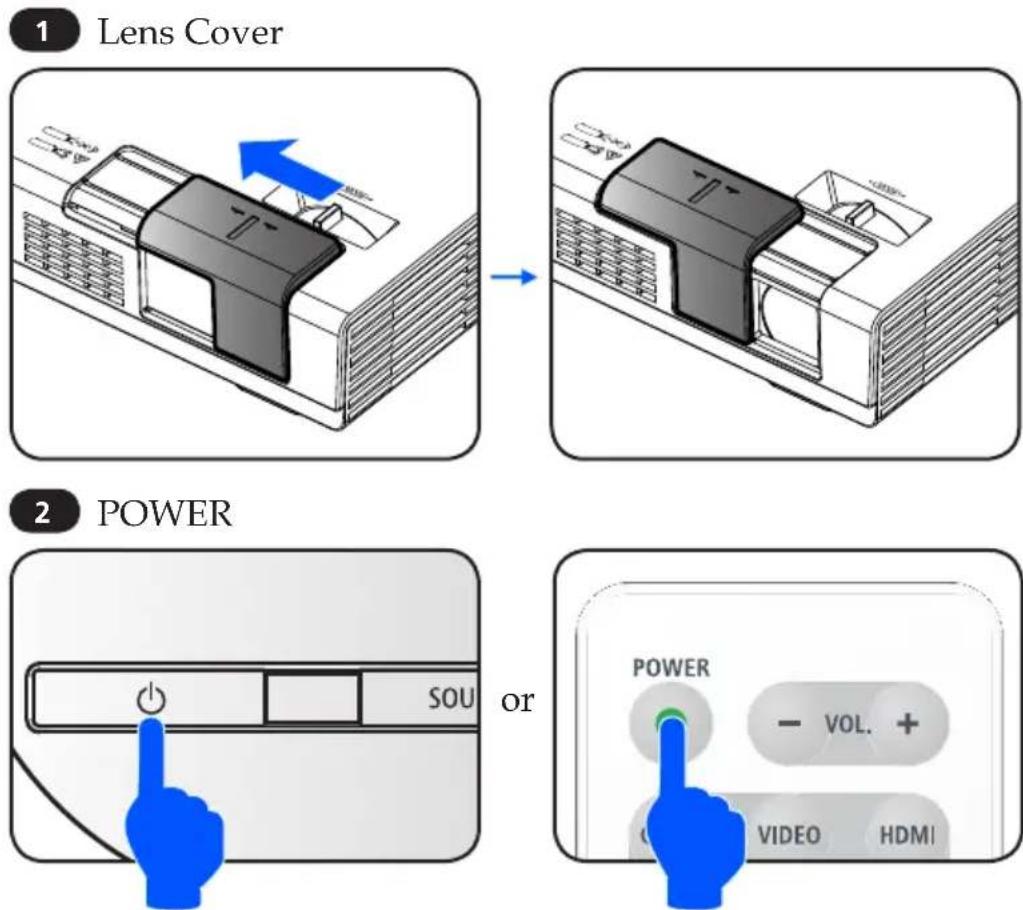
- Slide the lens cover. ①
- Ensure that the power cord and signal cable are securely connected. The Power indicator will turn red.
- Turn on the projector by pressing "POWER" on the remote control or on the control panel. ② The Power indicator will flash blue. The startup screen (NEC logo) will be displayed. and the Power indicator will turn steady blue.
Turn on your source (computer, notebook, video player, etc.) The projector will detect your source automatically.

✿Turn on the projector first and then the signal sources.
If you connect multiple sources at the same time, use the "SOURCE" button on the control panel or use "COMP.", "VIDEO", "HDMI", "SD", "USB-A", "USB-B" on the remote control to switch inputs.
Powering Off the Projector

In some cases the POWER indicator can stay light for a certain period of time after the power cord is unplugged.
This is not a fault. Press the POWER button again with the power cord unplugged and the indicator light will go off.
- Press the "POWER" button on the remote control or the button on the control panel to turn off the projector, you will see a message as below on the on-screen display.
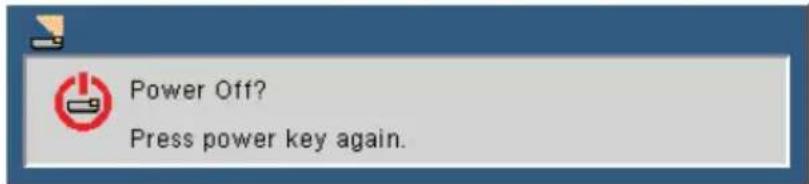
-
Press the "POWER" button again to confirm. When the light turns red, the projector has entered standby mode.
-
Disconnect the power cord from the electrical outlet and the projector.
-
Do not turn on the projector immediately following a power off procedure.
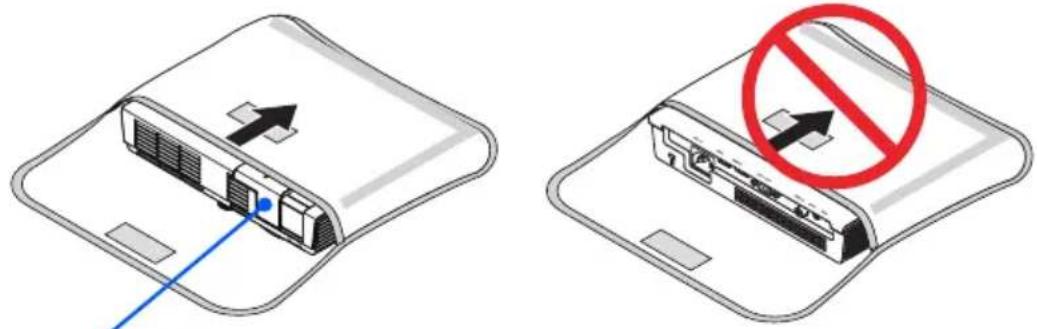
After Use
When storing the projector in the supplied soft case, insert the projector with the top cabinet facing upward.
The remote control can be stored in the inner pocket inside the soft case.
natural_image
Two technical diagrams showing a device with an arrow pointing to the internal structure and a red prohibition symbol (no text or labels present)Lens cover
Installation
Warning Indicator
When the "STATUS" indicator flashes red in two cycles, it indicates the projector has overheated. The projector will automatically shut itself down.
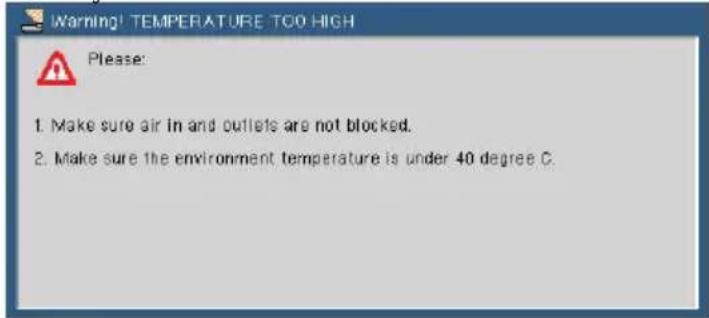
When the "STATUS" indicator flashes red in four cycles and the message below displays on-screen, it indicates the fan failed. Stop using the projector and disconnect the power cord from the electrical outlet, then contact your local dealer or our service center.

Adjusting the Projected Image
Adjusting the Height of Projector Image
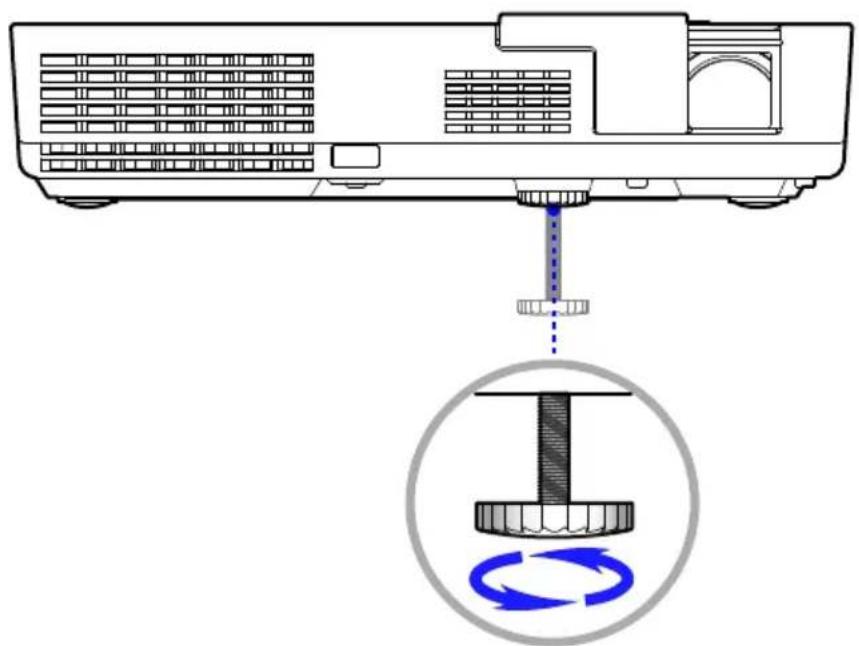
The projector is equipped with an adjustable foot to raise and lower the image to fill the screen.
Rotate the tilt adjustable foot counter clockwise to raise the projector or clockwise to lower it.
natural_image
Diagram of a projector with a rotating button and blue circular motion indicator (no text or symbols)Tilt adjusting foot

The tilt adjusting foot can be extended up to 0.4 inch/10 mm.
There is approximately 4 degrees (up) of adjustment for the front of the projector.
Do not extend the tilt adjusting foot beyond its height limit (0.4 inch/10 mm). Doing so may cause the tilt adjusting foot to come out of the projector.
Installation
Adjusting the Projector Focus
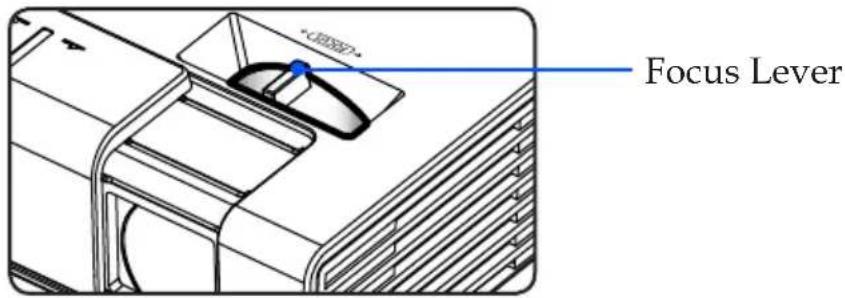
To focus the image, rotate the focus lever until the image is clear.
The projector will focus at distances from 20.5" to 118.1"/52 to 300 cm.
Adjusting Projection Image Size
Projection Image Size from 17" to 100" (0.43 to 2.540 meters).
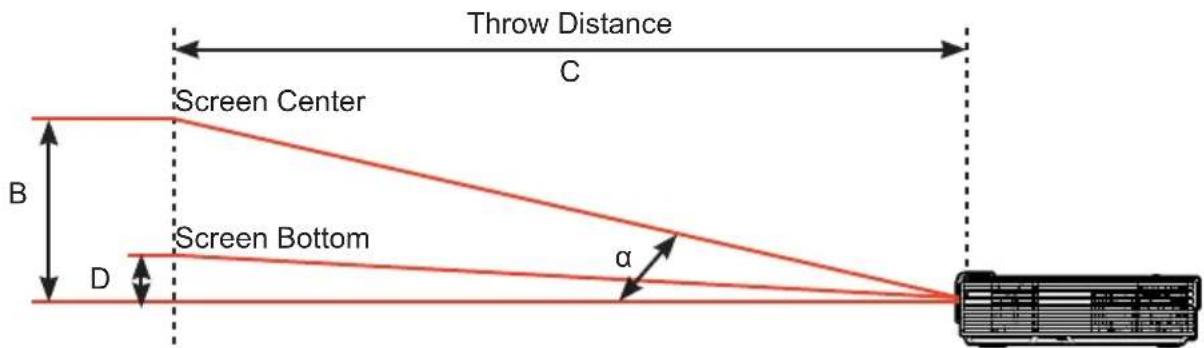
| Screen | B C D α | |||||||||||
| Diagonal Width Height | ||||||||||||
| inch mm inch mm inch | mm inch mm inch mm inch mm degree | |||||||||||
| 17 432 15 371 | 9 232 5 | 128 20 | 520 0.5 | 12 13.8 | ||||||||
| 30 762 26 650 | 16 406 | 9 223 36 | 910 0.8 | 20 13.8 | ||||||||
| 40 | 1,016 | 34 | 861 | 21 | 539 | 12 | 297 | 48 | 1,210 | 1.1 | 27 | 13.8 |
| 60 | 1,524 | 51 | 1,292 | 32 | 808 | 17 | 444 | 71 | 1,810 | 1.6 | 40 | 13.8 |
| 80 | 2,032 | 68 | 1,723 | 42 | 1,077 | 23 | 593 | 95 | 2,410 | 2.1 | 54 | 13.8 |
| 100 | 2,540 | 84 | 2,143 | 53 | 1,340 | 29 | 737 | 118 | 3,000 | 2.6 | 67 | 13.8 |
| B=Vertical distance between lens center and screen centerC=Throw distanceD=Vertical distance between lens center and bottom of screenα=Throw angle | ||||||||||||
This graph is for user's reference only.
On Screen Display
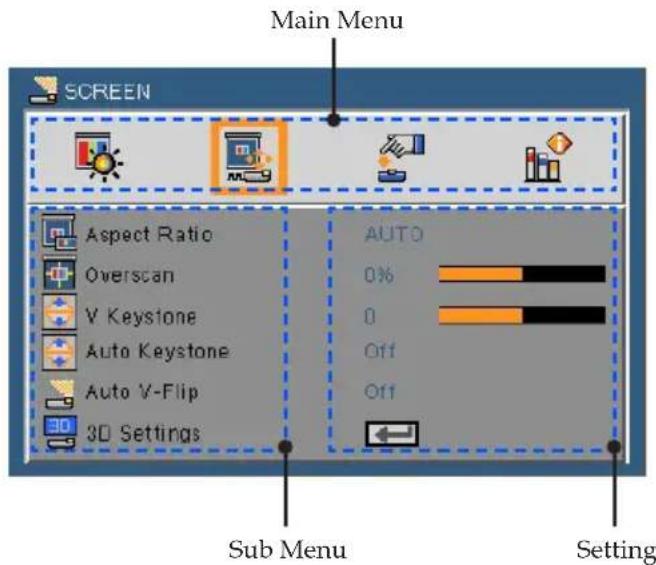
The Projector has a multilingual On Screen Display (OSD) that allows you to make image adjustments and change a variety of settings. The projector will automatically detect the source.

When "Advanced", "Signal", or "Information" is selected for the sub menu, you cannot select any item in the main menu.
How to operate
-
To open the OSD, press the MENU button on the remote control.
-
When OSD is displayed, use the ◀▶ buttons to select any item in the main menu. While making a selection on a particular page, press the ▼ button to enter sub menu.
-
Use the ▲▼ buttons to select the desired item in the sub menu and adjust the settings by using the ◀ or ▶ button.
-
If the setting has icon, you could press the ENTER button to enter another sub menu. Press the MENU button to close the sub menu after adjustment.
-
After adjusting the settings, press the MENU button to go back to the main menu.
-
To exit, press the MENU button again. The OSD will be closed and the projector will automatically save the new settings.

If no button operation is made for 30 seconds, the OSD will be closed automatically.
User Controls
Menu Tree
| Main Menu Sub Menu | Settings | ||
| IMAGE | Picture Mode Presentation / High-Bright / Video / Movie /sRGB / Blackboard / Color Extension /User | ||
| Wall Color Off / Red / Green / Blue / Cyan / Magenta /Yellow | |||
| Brightness 0 to 100 | |||
| Contrast 0 to 100 | |||
| Sharpness 0 to 31 | |||
| Saturation 0 to 100 | |||
| Hue 0 to 100 | |||
| Advanced Gamma Film / Video / Graphics / PC / Blackboard | |||
| Exit | |||
| SCREEN | Aspect Ratio AUTO / 4:3 / 16:9 / Fill | ||
| Overscan | 0%/5%/10% | ||
| V Keystone | -40 to 40 | ||
| Auto Keystone | Off / On | ||
| Auto V-Flip | Off / On | ||
| 3D Settings | 3D Off / On | ||
| 3D Invert Off / On | |||
| Exit | |||
| SETTING | Language | English / Deutsch / Français / Italiano /Español / Português / Polski / Русский/Svenska / Norsk / Türkçe /Nederlands / ελληνικά / Čeština / ερίβ /繁體中文 / 筒体中文 / 日本語 / 印刷어 Indonesia / Suomi | |
| Image Flip | |||
| Menu Location | |||
| Signal | Phase 0 to 31 | ||
| Clock -5 to 5 | |||
| H. Position -10 to 10 | |||
| V. Position -10 to 10 | |||
| Exit | |||
| Mute | Off / On | ||
| Volume | #1 0 to 20 | ||
| Advanced | Logo Off / On | ||
| Closed Caption Off / CC1 / CC2 / CC3 / CC4 | |||
| Video Level AUTO / Normal / Enhance | |||
| Dynamic Contrast Off / On | |||
| Exit | |||
| OPTIONS | Input Search Off / On | ||
| Fan Mode AUTO / High Speed | |||
| Eco Mode Off / On | |||
| Information Hide Off / On | |||
| Background Color Black / Blue | |||
| Information Model No. | |||
| Serial Number | |||
| Source | |||
| Resolution | |||
| Software Version | |||
| Software2 Version | |||
| Aspect Ratio | |||
| Color Space | |||
| Projector Hours Used | |||
| Exit | |||
| Advanced Direct Power On Off / On | |||
| Auto Power Off (min.) 0 to 60 | |||
| Off Timer (min.) 0 to 995 | |||
| Control Panel Lock Off / On | |||
| Exit | |||
| Reset | No / Yes | ||

Please note that the on-screen display (OSD) menus vary according to the signal type selected and the projector model you are using.
(#1) 10 at factory default
IMAGE
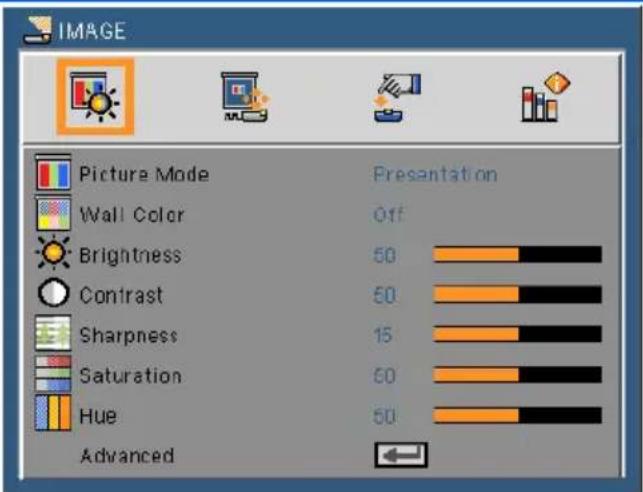
Picture Mode
There are many factory presets optimized for various types of images. Use the ◄ or ▶ button to select the item.
Presentation: For computer or notebook.
▶ High-Bright: Maximum brightness from PC input.
Video: This mode is recommended for typical TV program viewing.
▶ Movie: For home theater.
sRGB: Standardized accurate color.
Blackboard: This mode should be selected to achieve optimum color settings when projecting onto a blackboard (green).
Color Extension: Color Extension mode has a wider gamut color space than sRGB for vivid color reproduction.
▶ User: Memorize user's settings.

The Wall Color function does not work for Video signals.
Wall Color
Use this function to choose a proper color according to the wall. It will compensate the color deviation due to the wall color to show the correct image tone.
Brightness
Adjust the brightness of the image.
Press the ◀ button to darken image.
▶ Press the ▶ button to lighten the image.
Contrast
The contrast controls the degree of difference between the lightest and darkest parts of the picture. Adjusting the contrast changes the amount of black and white in the image.

Press the ◀ button to decrease the contrast.
Press the button to increase the contrast.
“Sharpness”, “Saturation” and “Hue” functions are only supported under Video mode.
Sharpness
Adjust the sharpness of the image.
Press the ◀ button to decrease the sharpness.
Press the button to increase the sharpness.
Saturation
Adjust a video image from black and white to fully saturated color.
Press the button to decrease the amount of saturation in the image.
Press the button to increase the amount of saturation in the image.
Hue
Adjust the color balance of red and green.
Press the ◀ button to increase the amount of green in the image.
Press the button to increase the amount of red in the image.
Advanced
Refer to next page.
IMAGE | Advanced
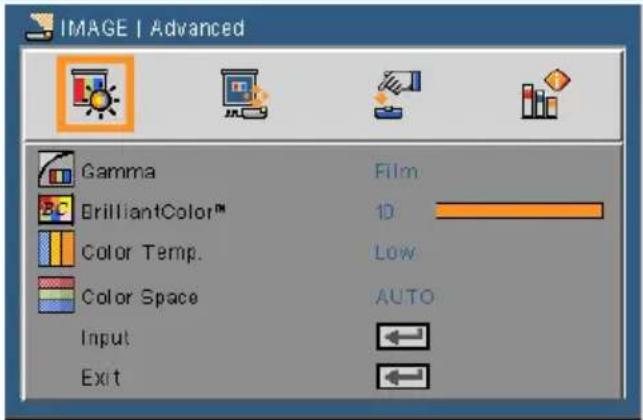
Gamma
This allows you to choose a gamma table that has been fine-tuned to bring out the best image quality for the input.
▶ Film: for home theater.
▶ Video: for video or TV source.
▶ Graphics: for image source.
PC: for PC or computer source.
Blackboard: This mode should be selected to achieve optimum color settings when projecting onto a blackboard (green).
BrilliantColor™
This adjustable item utilizes a new color-processing algorithm and system level enhancements to enable higher brightness while providing true, more vibrant colors. The range is from "0" to "10". If you prefer a stronger enhanced image, adjust toward the maximum setting. For a smoother, more natural image, adjust toward the minimum setting.
Color Temp.
Adjust the color temperature. At higher temperature, the screen looks colder; at lower temperature, the screen looks warmer.
Color Space
Select an appropriate color matrix type from AUTO, RGB or YUV.
User Controls
Input
Use this option to enable / disable input sources. Press ← to enter the sub menu and select which sources you require. Press the EN-TER button to finalize the selection. The projector will not search for inputs that are not selected.
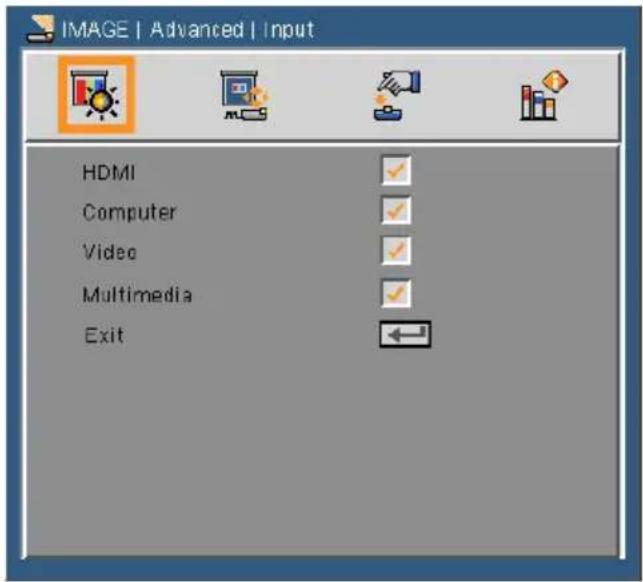
Exit
Press to return to the previous menu.
User Controls
SCREEN
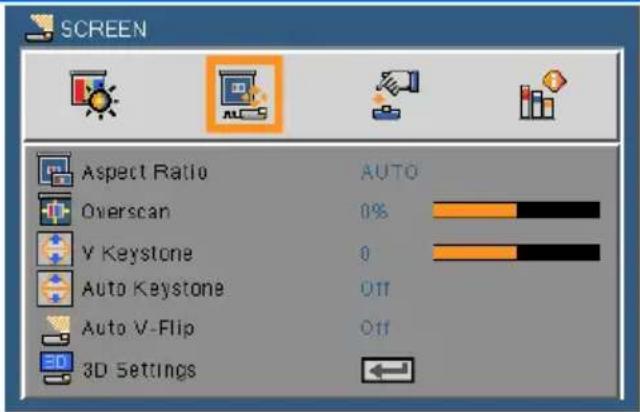
Aspect Ratio
Use this function to choose your desired aspect ratio.
AUTO: Automatically selects the appropriate display format.
4:3: This format is for 4 × 3 input sources.
16:9: This format is for 16×9 input sources, like HDTV and DVD enhanced for Wide screen TV.
▶ Fill: for Fullscreen.
Overscan
Press the or Button to overscan the image to remove video encoding noise on the edge of video source.
V Keystone
Press the ◀ or ▶ button to adjust image distortion vertically. If the image looks trapezoidal, this option can help make the image rectangular.
Auto Keystone
Automatically adjusts vertical image distortion.
Auto V-Flip
Automatically flip vertical image.

natural_image
Two geometric shapes with pink outlines and a blue arrow, no text or symbols present3D Settings
Refer to next page.
SCREEN | 3D Settings
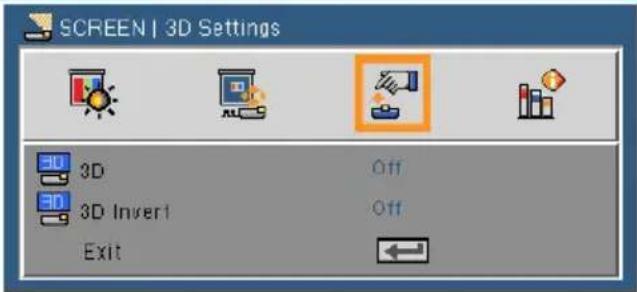

The projector will work only with the DLP Link 3D glasses.
- "3D Invert" is only available when 3D is enabled.
Compatible 3D source, 3D content and active shutter glasses are required for 3D viewing.
This setting may need to change when re-start running 3D movie.
HDMI input of the projector does not support 3D image transmission in HDMI standard. 3D image can't be displayed when a 3D Blu-ray disc player is directly connected to the HDMI terminal.
3D
Off: Choose "Off" to display normal (2D) picture.
On: Choose "On" to display 3D format.
3D Invert
Off: Choose "Off" for default frame contents.
On: Choose "On" to invert left and right frame contents. Choose "On" if viewing image is not natural or felt 3D incorrect.
The projector provides 3D images to a user wearing the DLP® Link 3D glasses.
Optional NP02GL or DLP ^® Link compatible 3D eyeglasses manufactured by XPAND (recommended) You can use commercially available DLP ^® Link compatible LCD shutter eyeglasses.
User Controls
SETTING
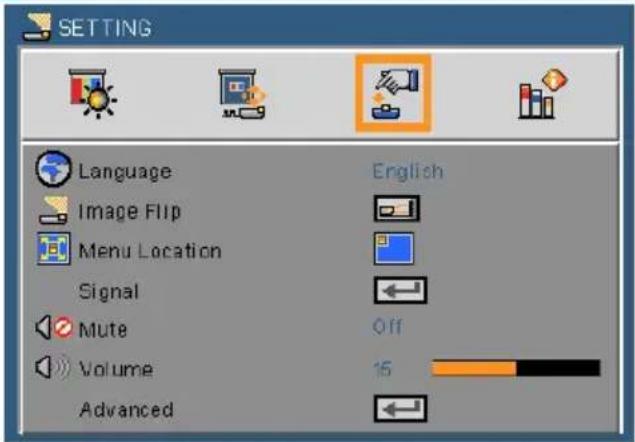

The rear projection is to be used with a translucent screen.
Language
Choose the multilingual OSD menu. Press the ▶ or ▶ button into the sub menu and then use the ▶ or ▶ button to select your preferred language. Press ▶ to finalize the selection.
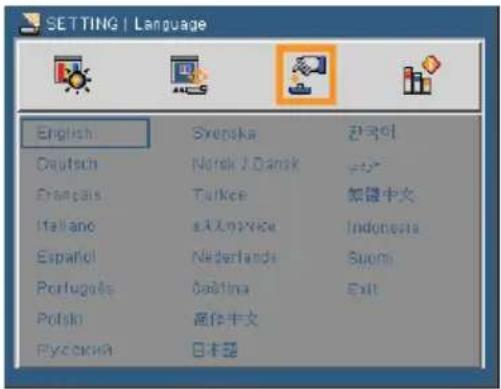
Image Filp
Standard: Normal screen.
▶ H: Flip: Horizontally flip the image.
▶ V Flip: Vertically flip the image.
H+V Flip: Flip the image by horizontal and vertical.
User Controls
| Standard V Flip | ||
 |  | |
| H Flip H+V Flip | ||
 |  | |
Menu Location
Choose the menu location on the display screen.
Signal
Refer to next page.
Mute
Choose "On" to turn mute on.
Choose "Off" to turn mute off.
Volume
Press the ◀ button to decrease the volume.
Press the button to increase the volume.
Advanced
Refer to page 31.
SETTING | Signal (RGB)

"Signal" is only supported in Analog VGA (RGB) signal.
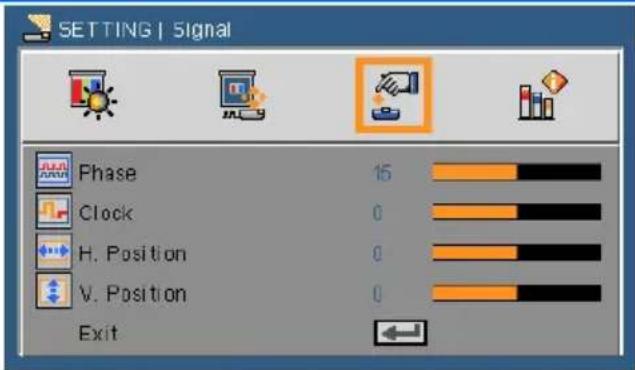
Phase
Synchronize the signal timing of the display with the graphic card. If the image appears to be unstable or flickers, use this function to correct it.
Clock
Change the display data frequency to match the frequency of your computer's graphic card. Use this function only if the image appears to flicker vertically.
H. Position
Press the ◀ button to move the image left.
Press the button to move the image right.
V. Position
Press the ◀ button to move the image down.
Press the button to move the image up.
Exit
Press ◀ to return to the previous menu.
SETTING | Advanced
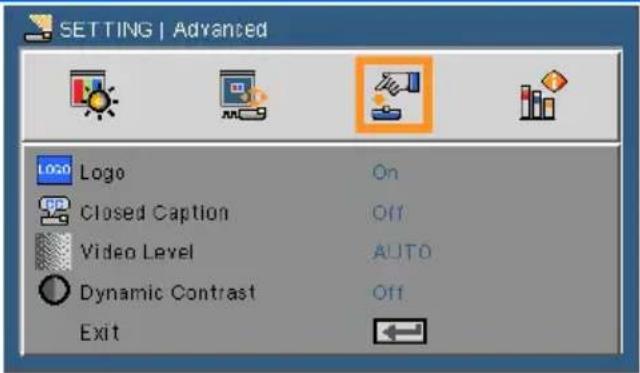
Logo
Use this function to display the startup screen (NEC logo).
On: Displays the NEC logo.
▶ Off: No logo is displayed.
Closed Caption
Use this function to enable close caption and activate the closed caption menu. Select an appropriate closed captions option: Off, CC1, CC2, CC3 and CC4.
Video Level
Select "AUTO" to automatically detect video level. If automatic detection may not work well, select "Normal" to disable the "Enhance" feature of your HDMI equipment or select "Enhance" to improve image contrast and increase detail in the dark areas.
Dynamic Contrast
On: The pictures with the optimum contrast will be displayed by automatically providing aperture compensation and signal compensation to suit the pictures concerned.
▶ Off: Turn off this function.
Exit
Press ◀ to return to the previous menu.

"Video Level" is only supported under HDMI source.
User Controls
OPTIONS
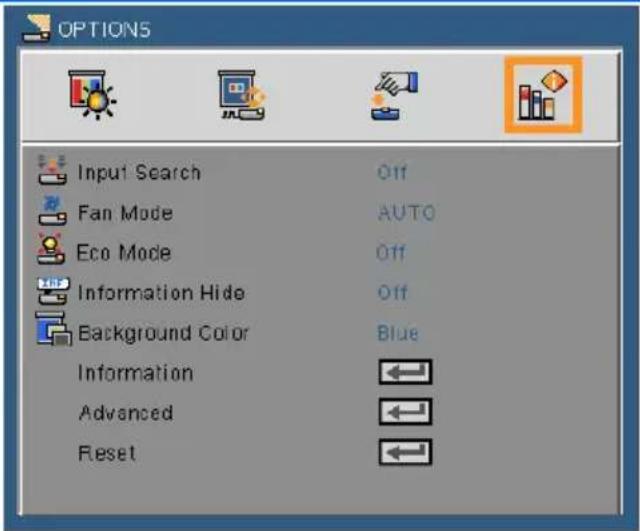
Input Search
On: The projector will search for other signals if the current input signal is lost.
▶ Off: The projector will only search current input connection.
Fan Mode
▶ AUTO: The built-in fans automatically run at a variable speed according to the internal temperature.
▶ High Speed: The built-in fans run at high speed.
The built-in fans run at a high speed. Select this option when using the projector at altitudes approximately 2500 feet/760 meters or higher.
Eco Mode
On: Dim the projector light source which will lower power consumption and extend the light source life.
Off: Normal mode.
Information Hide
On: Choose "On" to hide the info message.
Off: Choose "Off" to show the "searching" message.
Background Color
Use this feature to display a "Black" or "Blue" screen when no signal is available.
User Controls
Information
Refer to next page.
Advanced
Refer to page 35.
Reset
Choose "Yes" to return the display parameters on all menus to the factory default settings.
OPTIONS | Information
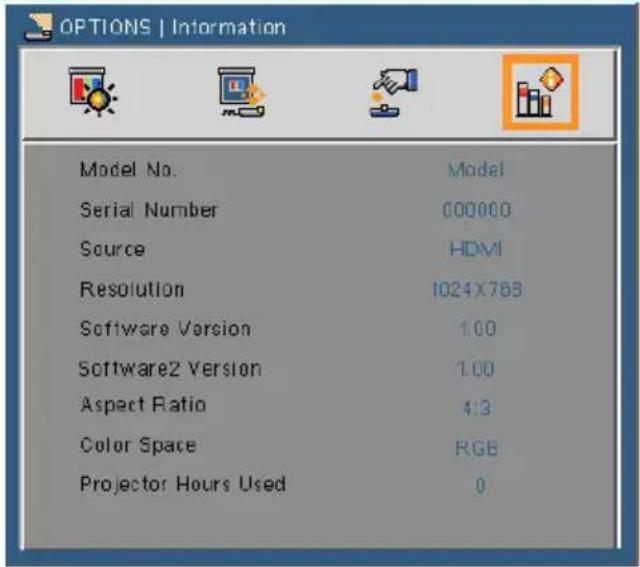

Information
To display the projector information for source, resolution, and software version on the screen.
- "Aspect Ratio", and "Color Space" are only supported under HDMI source.
OPTIONS | Advanced
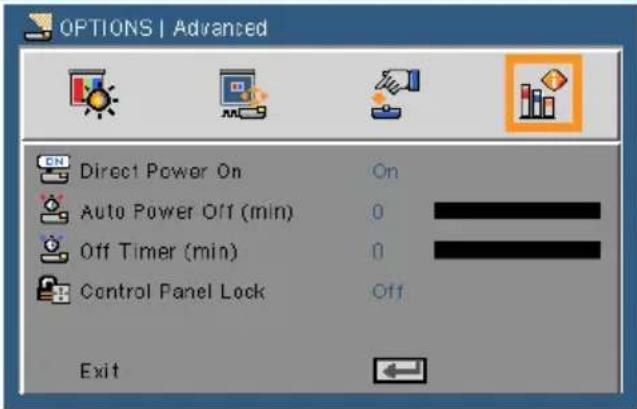
Direct Power On
Choose "On" to activate Direct Power mode. The projector will automatically power on when AC power is supplied, without pressing the button on the projector control panel or the POWER ON button on the remote control.

To reduce power consumption, [Auto Power Off (min)] is factory-preset for 30 minutes. When [30] is selected for [Auto Power Off (min)], you can enable the projector to automatically turn off in 30 minutes if there is no signal received by any input or if no operation is performed. To disable Auto Power Off (min), select [0].
The [Auto Power Off (min)] function will not work when [Multimedia] is selected with the SOURCE button on the control panel.
Auto Power Off (min)
Sets the countdown timer interval. The countdown timer will start, when there is no signal being sent to the projector. The projector will automatically power off when the countdown has finished (in minutes).
Off Timer (min)
Sets the countdown timer interval. The countdown timer will start, with or without a signal being sent to the projector. The projector will automatically power off when the countdown has finished (in minutes).
Control Panel Lock
When the keypad lock function is "On", the control panel will be locked however, the projector can be operated by the remote control. By selecting "Off", you will be able to reuse the control panel. Press and hold the SOURCE button on the projector cabinet for about 10 seconds to turn off "Control Panel Lock".
User Controls
Using Multimedia
Multimedia is an interactive PC-less presentation solution. It equipped several mode (Photo, Video, Music, Office Reader, and Setting) with user-friendly user interface.
To display the main menu of the Multimedia, press the USB-A, USB-B or SD button on the remote control or press the SOURCE button.
Layer1: Main Menu
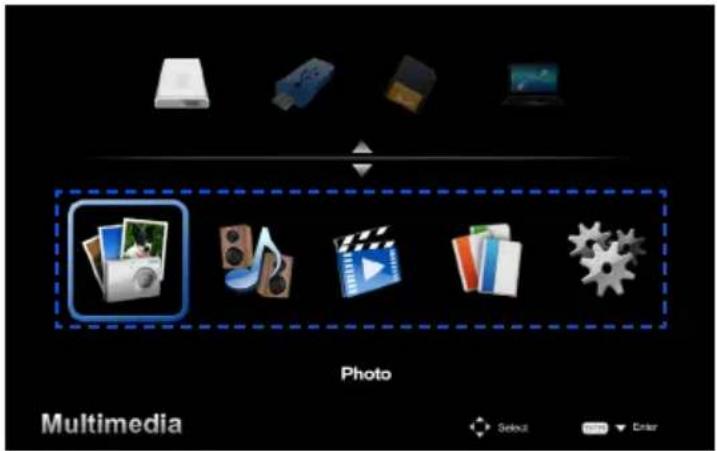
Layer2: Sub Menu

flowchart
graph LR
    A["Photo"] --> B["Music"]
    B --> C["Video"]
    C --> D["Office Reader"]
    D --> E["Setup"]

    subgraph Photo
        A1["Image: 1234.fPG"]
        A2["Image: 1234.fPG"]
        A3["Image: 1234.fPG"]
        A4["Image: 1234.fPG"]
        A5["Image: 1234.fPG"]
        A6["Image: 1234.fPG"]
        A7["Image: 1234.fPG"]
    end

    subgraph Music
        B1["Image: 1234.fPG"]
        B2["Image: 1234.fPG"]
        B3["Image: 1234.fPG"]
        B4["Image: 1234.fPG"]
        B5["Image: 1234.fPG"]
        B6["Image: 1234.fPG"]
        B7["Image: 1234.fPG"]
    end

    subgraph Video
        C1["Image: 1234.fPG"]
        C2["Image: 1234.fPG"]
        C3["Image: 1234.fPG"]
        C4["Image: 1234.fPG"]
        C5["Image: 1234.fPG"]
        C6["Image: 1234.fPG"]
    end

    subgraph Office Reader
        D1["Image: 1234.ppt"]
        D2["Image: 1234.ppt"]
        D3["Image: 1234.ppt"]
        D4["Image: 1234.ppt"]
        D5["Image: 1234.ppt"]
        D6["Image: 1234.ppt"]
    end

    subgraph Setup
        E1["Image: View Setting"]
        E2["Image: View Setting"]
        E3["Image: View Setting"]
        E4["Image: View Setting"]
        E5["Image: View Setting"]
    end

    A -->|Date: Sat Jun 25 13:04 18 2011
Size: 3/13 MB|
    B -->|Date: Sat Jun 25 13:04 18 2011
Size: 3/13 MB|
    C -->|Date: Sat Jun 25 13:04 18 2011
Size: 3/13 MB|
    D -->|Date: Sat Jun 25 13:04 18 2011
Size: 3/13 MB|
    E -->|Price Setting
View Setting
Video Setting
Hardware Logistics
Size: 3/13 MB|
Layer3: Setting

| Photo | Min:64x64, Max: Over 4000x4000 |
| Music | File size: Max. 2GB |
| Video | File size: Max. 2GB |
| OfficeReader | Support Word/Excel/PowerPoint/Adobe PDF playback |
| Settings | Photo/Music/Video/Office Reader settings |
User Controls
flowchart
graph TD
    A["ENTER"] --> B["AUTO ADJ."]
    A --> C["D-ZOOM"]
    A --> D["MENU"]
    A --> E["EXIT"]
How to operate
-
To open the OSD, press the MENU button on the remote control.
-
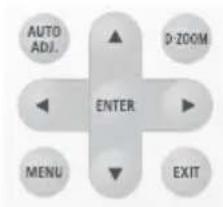
When OSD is displayed, use the ◀▶ buttons to select any item in the main menu. While making a selection on a particular page, press the ENTER button to enter sub menu.
-
Use the ▲▼ buttons to select the desired item in the sub menu and adjust the settings by using the ◀ or ▶ button.
-
After adjusting the settings, press the EXIT button to go back to the main menu.
-
To exit, press the MENU button again. The OSD will be closed and the projector will automatically save the new settings.
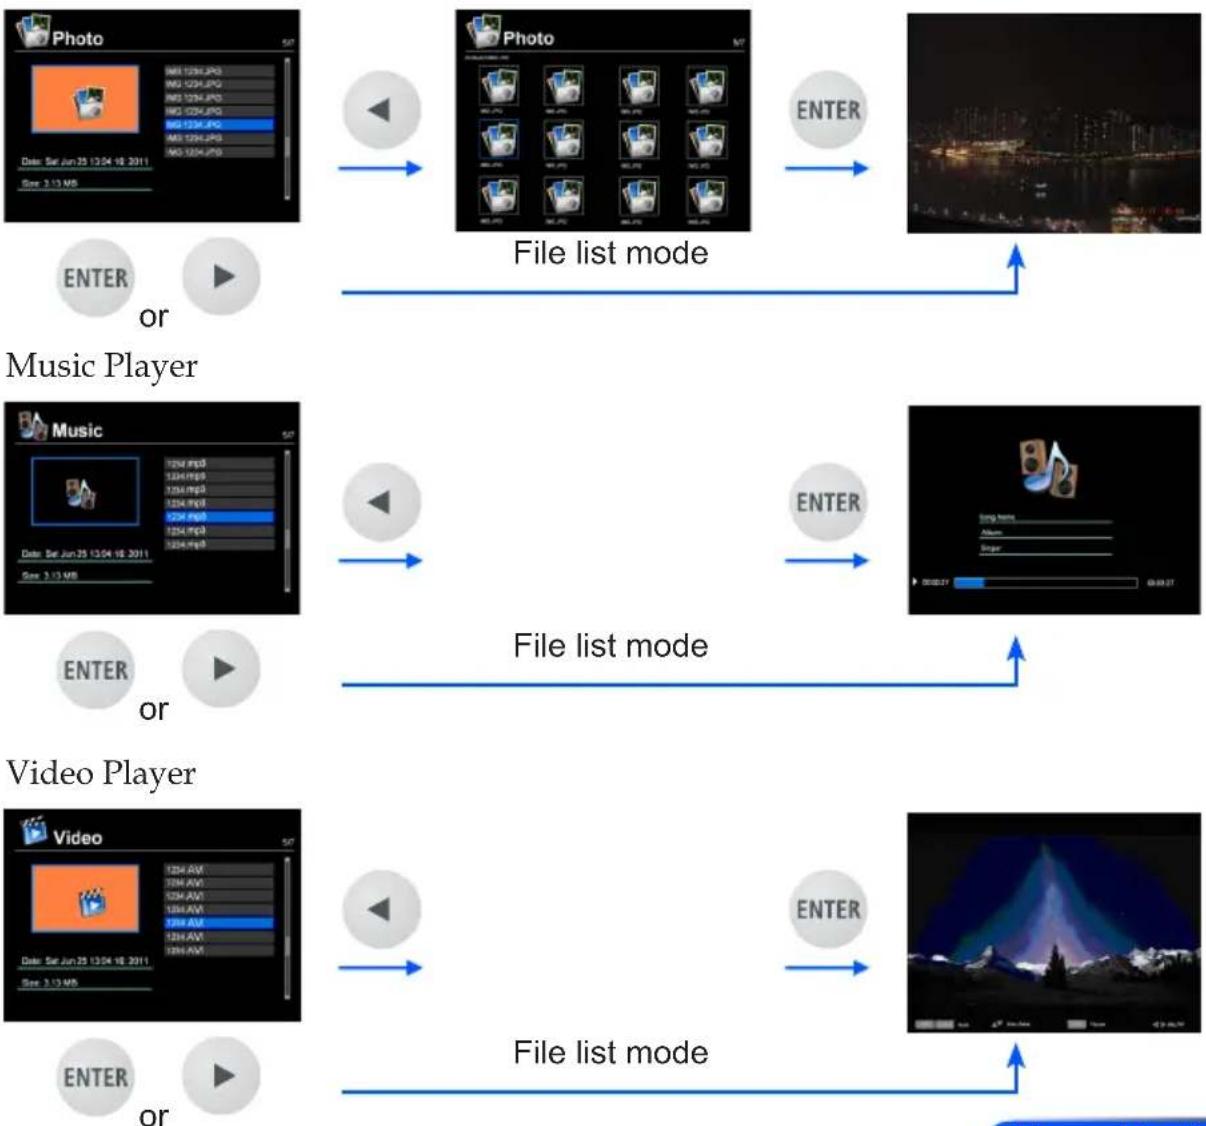
Photo Viewer
flowchart
graph TD
    A["Photo"] --> B["File list mode"]
    B --> C["ENTER"]
    D["Music Player"] --> E["File list mode"]
    E --> F["ENTER"]
    G["Video Player"] --> H["File list mode"]
    H --> I["ENTER"]
    J["ENTER"] --> K["File list mode"]
    K --> L["ENTER"]
    style A fill:#f9f,stroke:#333
    style D fill:#f9f,stroke:#333
    style G fill:#f9f,stroke:#333
    style J fill:#f9f,stroke:#333
User Controls
Office Reader
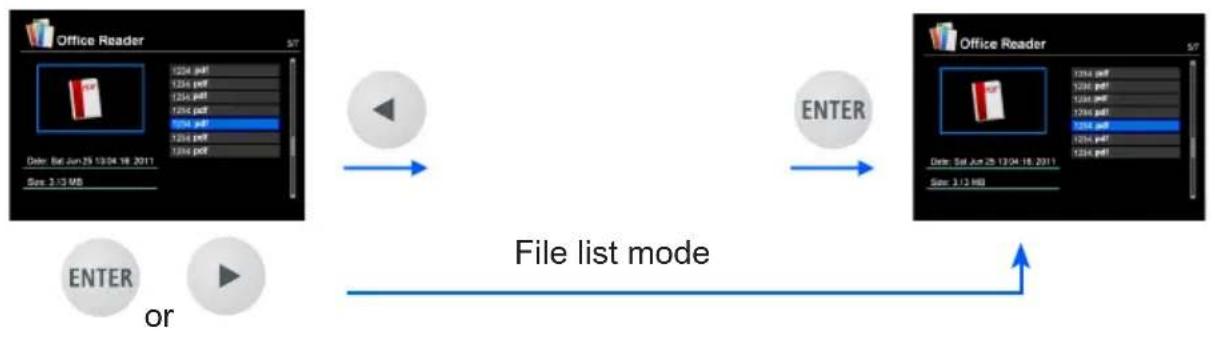
flowchart
graph LR
    A["ENTER"] --> B["File list mode"]
    B --> C["ENTER"]
    style A fill:#f9f,stroke:#333
    style C fill:#bbf,stroke:#333
Setup
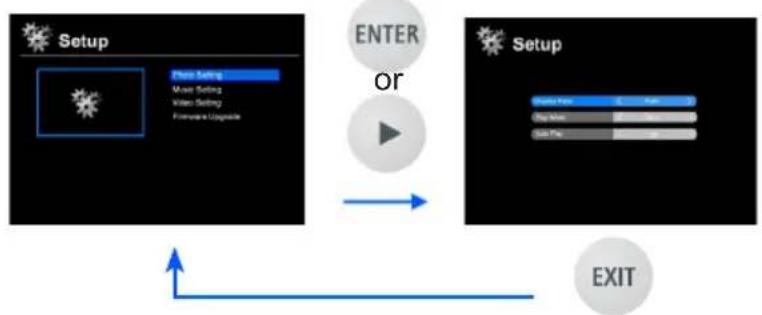
flowchart
graph TD
    A["Setup"] --> B["Enter"]
    B --> C["SETUP"]
    C --> D["EXIT"]
    style A fill:#f9f,stroke:#333
    style C fill:#ccf,stroke:#333
    style D fill:#cfc,stroke:#333
Multimedia Menu Tree
| Level 1 Level | 2 Level 3 Level 4 | ||
| Settings | Photo Setup Display Ratio Auto/Full | ||
| Slideshow Duration | 5 sec./15 sec./30 sec./1 min./5 min./15 min. | ||
| Slideshow Repeat On/Off | |||
| Slideshow Effect | Random/Snake/Partition/Erase/Blinds/Lines/GridCross/Cross/Spiral/Rect/Off | ||
| Music Setup Play Mode Once/Repeat Once/Repeat/Random | |||
| Show Spectrum On/Off | |||
| Auto Play On/Off | |||
| Video Setup Display Ratio Auto/Original Size | |||
| Play Mode Once/Repeat Once/Repeat/Random | |||
| Auto Play On/Off | |||
| Firmware Upgrade Yes/No | |||

To upgrade the firmware, visit at: http://www.nec-display.com/dl/en/index.html
To check the version of your projector, from the menu, select [Options] -> [Information] -> [Software2
Version].
Supported Formats
■ Supported graphic formats:
JPG, BMP
JPG file supports JPEG Baseline and progressive JPEG.
BMP file supports full color only.
- Some files supported by the above requirements may not be displayed
■ Supported audio formats:
WAV, MP3, WMA, OGG
WAV supports PCM and AD-PCM.
- Some files supported by the above requirements may not be played.
■ Supported video formats:
AVI, MOV, MPG, MP4, WMV, MKV
MPEG 1/2/4, H.264/AVC, WMV9, Xvid, MJPEG@1080p
- Some files supported by the above requirements may not be played.
■ Supported formats for Office Reader:
- Microsoft Word
97/2000/XP/2003/2007/2010
- Microsoft Excel
97/2000/XP/2003/2007/2010
• Microsoft PowerPoint
97/2000/XP/2003/2007/2010
• PDF
1.0/1.1/1.2/1.3/1.4
Restrictions on displaying Microsoft Office files and PDF files
The Office Reader allows you to give a simplified display of a Microsoft Office file or PDF file.
Due to simplified display, however, actual display may be different from the one on your computer application program.
■ Some restrictions on Microsoft Office files
- Fonts will be automatically converted to the fonts installed in the projector. Fonts can vary in size or width, causing layout corruption.
Some characters or fonts may not be displayed.
- Some functions included in the file are not supported.
Example: There are some restrictions on animation, screen switching, font embedding, hyperlink, Word Arts, or some graphs.
- It may take longer time to feed pages compared with a computer
- In some cases Microsoft Office 97-2007 format files may not be displayed.
■ Some restrictions on PDF files
- Fonts not embedded at the time of PDF creation may not be displayed.
- Some functions included in the file are not supported.
Example: There are some restrictions on bookmark, image deforming, or screen switching.
- It may take longer time to feed pages compared with a computer
- In some cases Adobe Acrobat format files may not be displayed.
Using the Projector as a Storage Device
Important:
- Use the projector's storage area as a temporary storage.
Back up your data on your computer's hard disk drive before using the projector as a storage device. We will not be liable for any data loss or damage that could result from using the projector.
If your data is not to be used for a long period time, delete them from the projector's storage area.
- We will not be liable for any data loss or damage that could result from the projector's failure or any cause, and we will not be liable for your loss of business arising from the data loss or damage.
Our service includes hardware only (not including data recovery).
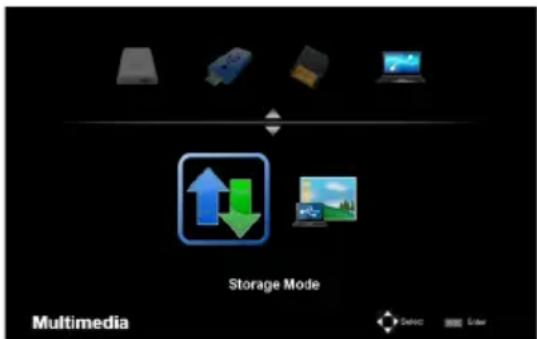
You can use part of the memory inside the projector as your storage device.
This memory area can be used for saving and loading your photos, audio, video, and Office Reader files.
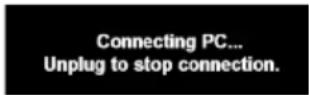
- Turn on the projector.
- Press the USB-B button to display the Multimedia and select USB-B (Connect PC) source.
- Use a commercially available USB cable to connect the USB-B port of the projector and the USB port (A type) of your computer.
- Press the button to select "Storage Mode" and then press "ENTER".
When you see a message as left, the drive has been added to your computer. This allows you to read and write files to the drive of the projector.
- Double clicks the drive of the projector on the Windows "Computer" or "My Computer" on your computer.
You can access two drives of the projector to read or write files.
Note:
- PtG2-setup.exe"is stored on one drive. You cannot store files to this drive. This drive is read-only. Use the other drive as a storage drive.
- For more information on "PtG2-setup.exe", refer to "Application Guide" on the supplied CD-ROM.
User Controls
Note:
- Wait at least 5 seconds after disconnecting a USB memory device before reconnecting it and vice versa. The computer may not identify the USB memory device if it is repeatedly connected and disconnected in rapid intervals.
- To disconnect the USB cable from the projector, first click the USB icon on the Windows taskbar on your computer.
- Do not disconnect the power cord during data writing.
- Files in the drive of the projector will not be affected even when "Reset" is done from the menu.
- Data of up to 1GB can be stored in the drive of the projector.
Projecting Your Computer's Screen Image from the Projector via the USB Cable (USB Display)
Using a commercially available USB cable (compatible with USB 2.0 specifications) to connect the computer with the projector allows you to send your computer screen image to the projector for displaying. Power On/Off and source selection of the projector can be done from your computer without connecting a computer cable (VGA).
Note:
- To make USB DISPLAY available on Windows XP, the Windows user account must have "Administrator" privilege.
- USB Display will not work in standby condition.
- Turn on the projector.
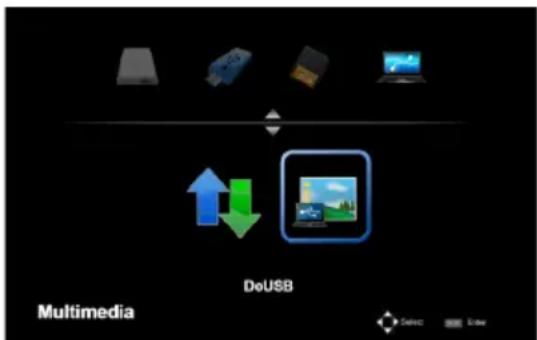
- Press the USB-B button to display the Multimedia and select USB-B (Connect PC) source.
- Use the USB cable to connect the USB-B port of the projector and the USB port (A type) of your computer.
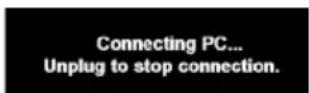
- Press the ▼ and button to select "DoUSB" and then press "ENTER".
When you see a message as left; Wait at least 10 seconds. This allows you to project your computer's screen image.

To use wireless LAN projection, the optional wireless LAN unit (NP03LM, NP02LM1, NP02LM2, and NP02LM3) is required. Although the NP03LM supports most countries, some countries are not supported by NP03LM. In that case, you may be able to use NP02LM.
For more information on the list of countries supported by the optional wireless LAN units, visit our website at http://www.nec-display.com/ap/en_projector/others/wlan.html.
Wireless Projection
The optional Wireless LAN Unit (NP03LM/NP02LM) allows you to send your computer screen, photos or files (Microsoft Office, PDF, and text) stored on your smartphone (Android), iPhone or tablet(Android/iOS) wirelessly to the projector by using some dedicated apps for Android and iOS.
This section refers to the outline of wireless LAN connection. For more detailed information, refer to the separate Application Guide included in the supplied CD-ROM.
The projector supports only applications developed by Awind Inc.
(For information on applications supported by the projector, refer to "Application Guide" included on the supplied CD-ROM.)
To connect the projector with your computer over a wireless LAN.
- Connect the wireless LAN unit with the USB-A port of the projector with the power turned off.
- Turn on the projector and project an image.
- Press the USB-A button on the remote control.
- Select "USB" in the Multimedia screen and press the ENTER button on the remote control.
- Display the wireless LAN standby screen on the projector.
- Display the wireless network setting screen of your computer.
- Select "NECPJ" (initial setting) for your network.
- Open the Web browser to change the network settings for the projector.
Troubleshooting
If you experience trouble with the projector, refer to the following information. If the problem persists, please contact your local dealer or service center.
Problem: No image appears on screen
Ensure all the cables and power connections are correctly and securely connected as described in the "Installation" section.
▶ Ensure the pins of connectors are not crooked or broken.
Make sure the projector is switched on.
Problem: Partial, scrolling or incorrectly displayed image
Press "AUTO ADJ." on the remote control.
▶ If you are using a PC:
For Windows 95, 98, 2000, XP, Windows 7:
- From the "My Computer" icon, open the "Control Panel" folder, and double click the "Display" icon.
- Select the "Settings" tab
- Click on the "Advanced Properties".
For Windows Vista:
- From the "My Computer" icon, open the "Control Panel" folder, and double click the "Appearance and Personalization"
- Select "Personalization"
- Click "Adjust screen resolution" to display "Display Settings". Click on the "Advanced Settings".
If the projector is still not projecting the whole image, you will also need to change the monitor display you are using. Refer to the following steps.
-
Verify the resolution setting is less than or equal to 1280 × 1024 resolution.
-
Select the "Change" under the "Monitor" tab.
-
Click on "Show all devices". Next, select "Standard monitor types" under the SP box; choose the resolution mode you need under the "Models" box.
▶ If you are using a Notebook:
-
First, follow the steps above to adjust resolution of the computer.
-
Press the toggle output settings. example: [Fn]+[F4]
Compaq => [Fn]+[F4] Hewlett
Dell => [Fn]+[F8] Packard => [Fn]+[F4]
Gateway => [Fn]+[F4] NEC => [Fn]+[F3]
IBM => [Fn]+[F7] Toshiba => [Fn]+[F5]

Macintosh Apple:
System Preference-->Display-->Arrangement-->Mirror display
If you experience difficulty changing resolutions or your monitor freezes, restart all equipment including the projector.
Problem: The screen of the Notebook or PowerBook computer is not displaying a presentation
If you are using a Notebook PC:
Some Notebook PCs may deactivate their own screens when a second display device is in use. Each has a different way to be reactivated. Refer to your computer's documentation for detailed information.
Problem: Image is unstable or flickering
Adjust the “Phase” to correct it. Refer to the “SETTING” section for more information.
Change the monitor color setting from your computer.
Problem: Image has vertical flickering bar
▶ Use "Clock" to make an adjustment.
▶ Check and reconfigure the display mode of your graphic card to make it compatible with the product.
Appendices
Problem: Image is out of focus
Adjust the Focus Lever on the projector lens.
Make sure the projection screen is between the required distance 20.5" to 118.1"/52 to 300 mm from the projector (refer to page 18).
Problem: The image is stretched when displaying 16:9 DVD
The projector automatically detects 16:9 DVD and adjusts the aspect ratio by digitizing to full screen with 4:3 default setting.
If the image is still stretched, you will also need to adjust the aspect ratio by referring to the following:
Please select 4:3 aspect ratio type on your DVD player if you are playing a 16:9 DVD.
If you can't select 4:3 aspect ratio type on your DVD player, please select 4:3 aspect ratio in the on screen menu.
Problem: Image is reversed
Select "SETTING-->Image Flip" from the OSD and adjust the projection direction.
Problem: Message Reminders
Over temperature - the projector has exceeded its recommended operating temperature and must be allowed to cool down before it may be used.
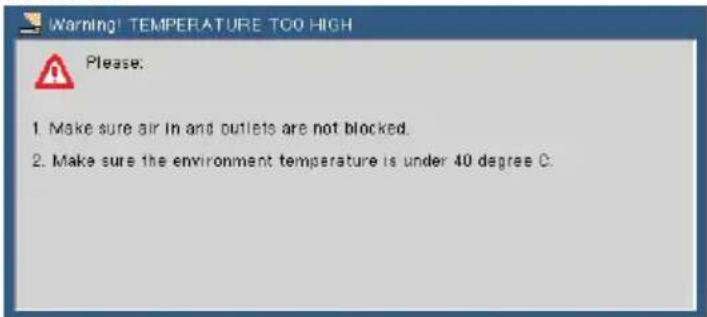
Fan failed - the system fan is not working.

Appendices
Problem: Indicator lighting message
Power Indicator
| Indicator Condition Projector Condition Note | ||||
| Off The main power is off -- | ||||
| Blinking lightBlue0.5 sec | On, | 0.5 sec Off | The projector is getting ready to turn on. Wait for a moment. | |
| 2.5 sec On,0.5 sec Off | Off Timer is enabled. -- | |||
| Steady lightBlueThe projector is turned on. -- | ||||
| Red The projector is in standby. -- | ||||
Status Indicator
| Indicator Condition Projector Condition Note | ||||
| Off Normal -- | ||||
| Blinking light Red 1 cycle | 0.5 sec | On, 0.5 sec Off) | light source error | Light source fails to light. Wait for a moment. |
| 2 cycle (0.5 sec On, 0.5 sec Off) | Temperature error | The projector is overheated. Move the projector to a cooler location. | ||
| 4 cycle (0.5 sec On, 0.5 sec Off) | Fan error | Fans will not work correctly. Contact your dealer. | ||
| Steady light | Red | Control Panel Lock is enabled. | To disable Control Panel Lock, see page 35. | |
LIGHT Indicator
| Indicator Condition Projector Condition Note | ||||
| Off Normal -- | ||||
| Blinking light | Red | LED light source fails to light. | Try to turn on the projector again. If the problem still remains unsolved, contact your dealer. | |
Specifications
| Model Number NP-L102W | |
| Optical | |
| Projection System Single DLP® chip (0.45", aspect ratio 16:10) | |
| Resolution *1 | 1,039,680 pixels (16:10 WXGA) |
| Lens Fixed lens, manual focus | |
| Light Source 3 LEDs | |
| Image Size (Diagonal) Minimum: 43.2 cm/17 inches to maximum: 254 cm/100 inches | |
| Projection Distance (mini. - max.) | 0.52 m /20.5 inches to 3.0 m/118 inches |
| Light Output *2*3 | 1000 lumens |
| Contrast Ratio *3 (full white:full black) | 10,000:1 |
| *1 Effective pixels are more than 99.99%.*2 This is the light output value (lumens) when [Picture Mode] is set to [High-Bright] in the menu. If any other mode is selected as [Picture Mode], the light output value may drop slightly.*3 Compliance with ISO21118-2005 | |
| Electrical | |
| Inputs 1 x RGB/Component (D-Sub 15P), 1 x HDMI (19P) HDCP supported *4, 1 x SD Slot, 1 x Video (RCA), 1 x USB Type-A, 1 x USB mini-B, 1 x Stereo Mini Audio | |
| Output 1 x Stereo Mini Audio | |
| Service Port 1 x mini-B USB (for service purpose /shared with USB Display) | |
| Color Reproduction 16.7 million colors simultaneously, Full color | |
| Compatible Signals *5 | Analog: VGA/SVGA/XGA/WXGA/Quad-VGA/SXGA/SXGA+/WSXGA+/480i/480p/576i/576p/720p/1080i/1080pHDMI: VGA/SVGA/XGA/WXGA/Quad-VGA/SXGA/SXGA+/WSXGA+/480p/576p/720p/1080i/1080p |
| Horizontal Resolution 540 | TV lines: NTSC/NTSC4.43/PAL/PAL-M/PAL-N/PAL60300 TV lines: SECAM |
| Scan Rate Horizontal: 30k | Hz to 100kHzVertical: 50 Hz to 85 Hz (120Hz for 3D signal) |
| Built-in Speaker 2W (monaural) | |
| Power Requirement 100 - | 240V AC, 50/60 Hz |
| Input Current 100 - 240V | AC, 50-60Hz, 1.3-0.5A |
| Power Consumption(Typical value) | Eco Mode: Off110W@ 110V AC(100-130V) / 107W@ 220V AC(200-240V)Eco Mode: On72W@ 110V AC(100-130V) / 71W@ 220V AC(200-240V)Standby: <0.5W (100-130V)/ <0.5W (200-240V) |
Appendices
| Electrical | |
| *4 HDMP (Deep Color) with HDCPWhat is HDCP/HDCP technology?HDCP is an acronym for High-bandwidth Digital Content Protection. High bandwidth Digital Content Protection (HDCP) is a system for preventing illegal copying of video data sent over a Digital Visual Interface (DVI).If you are unable to view material via the HDMI input, this does not necessarily mean the projector is not functioning properly. With the implementation of HDCP, there may be cases in which certain content is protected with HDCP and might not be displayed due to the decision/intention of the HDCP community (Digital Content Protection, LLC).*5 An image with any resolution will be displayed with scaling technology. | |
| Mechanical | |
| Dimensions 9.38”(W) x 2.15”(H) x 6.98”(D) / 238mm(W) x 55mm(H) x 177mm(D)9.38”(W) x 1.71”(H) x 6.98”(D) / 238mm(W) x 44mm(H) x 177mm(D) (without protrusions) | |
| Weight 3.1 lb / 1.4 kg | |
| Environmental Considerations | Operational Temperatures “: 41° to 104°F (5° to 40°C),20% to 80% humidity (non-condensing)Storage Temperatures : -4° to 140°F (-20° to 60°C),20% to 80% humidity (non-condensing)Operating Altitude : 0 to 10000 ft/3000 m (HIG SPEED: 2500 feet/760 m to 10000 ft/3000 m) |
| Regulations UL/C-UL Approved | Approved (UL 60950-1, CSA 60950-1)Meets DOC Canada Class B requirementsMeets FCC Class B requirementsMeets AS/NZS CISPR.22 Class BMeets EMC Directive (EN55022, EN55024, EN61000-3-2, EN61000-3-3, EN62301)Meets Low Voltage Directive (EN60950-1, TÜV GS Approved)CE |
*6 Operational temperatures
0 to 2500 feet/760 m in the range of 41° to 104°F (5° to 40°C)
2500 feet/760 m to 5000 feet/1500 m in the range of 41° to 95°F (5 to 35°C)
5000 feet/1500 m to 10000 feet/3000 m in the range of 41° to 86°F (5 to 30°C)
For additional information visit:
US: http://www.necdisplay.com/
Europe: http://www.nec-display-solutions.com/
Global: http://www.nec-display.com/global/index.html
For information on our optional accessories, visit our website or see our brochure.
The specifications are subject to change without notice.
Compatibility Modes
Analog RGB
| Signal Resolution (dots) | Aspect Ratio | Refresh Rate (Hz) | |
| VGA 640x480 4:3 60/72 | 75/85 | ||
| SVGA 800x600 4:3 56/60 | 72/75/85 | ||
| XGA 1024x768 4:3 60/70 | 75/85 | ||
| XGA+ 1152x864 4:3 70 | 75/85 | ||
| HD 1280x720 16:9 60 | |||
| WXGA | 1280x768 15:9 60/75/85 | ||
| 1280x800 16:10 60 | |||
| 1366x768 16:9 60 | |||
| Quad-VGA 1280x960 4:3 60/75 | |||
| SXGA 1280x1024 5:4 60 | 72/75 | ||
| SXGA+ 1400x1050 4:3 60 | |||
| WXGA+ 1440x900 16:10 60 | |||
| WXGA++ | 1600x900 16:9 60 | ||
| 1680x1050 16:10 60 | |||
| 1920x1080 16:9 60 | (*) | ||
| MAC 13" 640x480 4:3 60/67 | |||
| MAC | 800x600 4:3 60 | ||
| MAC 19" 1024x768 4:3 60/75 | |||
| MAC 21" 1152x870 4:3 75 | |||
| MAC | 1280x960 4:3 75 | ||
Component
| Signal Resolution (dots) | Aspect Ratio | Refresh Rate (Hz) | |
| HDTV(1080i) | 1920x1080 16:9 50/60 | ||
| HDTV(1080p) | 1920x1080 16:9 60 | ||
| HDTV(720p) 1280x720 | 16:9 50/60 | ||
| SDTV(480p) 720x480 4:3/16:9 60 | |||
| SDTV(576p) 720x576 4:3/16:9 50 | |||
| SDTV(480i) | 720x480 4:3/16:9 | 60 | |
| SDTV(576i) | 720x576 4:3/16:9 | 50 | |
3D

(*) Reduce Blanking (RB) signal.
| Signal Resolution (dots) | Aspect Ratio | Refresh Rate (Hz) |
| VGA 640x480 4:3 120 | ||
| SVGA 800x600 4:3 120 | ||
| XGA 1024x768 4:3 120 | ||
| 1280x720 | 1280x720 16:9 120 | |
| WXGA | 1280x800 16:9 120 |
HDMI
| Signal Resolution (dots) | Aspect Ratio | Refresh Rate (Hz) | |
| VGA 640x480 4:3 60/72/75/85 | |||
| SVGA 800x600 4:3 56/60/72/75/85 | |||
| XGA 1024x768 4:3 60/70/75/85 | |||
| XGA+ 1152x864 4:3 70/75/85 | |||
| HDTV(1080p) 1920x1080 16:9 50/60 | |||
| HDTV(1080i) 1920x1080 16:9 50/60 | |||
| HDTV(720p) | 1280x720 16:9 50/60 | ||
| SDTV(480p) | 720x480 4:3/16:9 | 60 | |
| SDTV(576p) | 720x576 4:3/16:9 | 50 | |
| WXGA | 1280x768 15:9 60/75/85 | ||
| 1280x800 16:10 | 60 | ||
| 1366x768 16:9 60 | |||
| Quad-VGA | 1280x960 4:3 60/75 | ||
| SXGA 1280x1024 5:4 60/72/75 | |||
| SXGA+ | 1400x1050 4:3 60 | ||
| WXGA+ | 1440x900 16:10 | 60 | |
| WSXGA+ 1680x1050 16:10 60 | |||
| Full HD | 1920x1080 16:9 60 | ||
Composite Video
| Signal Aspect | Ratio | Refresh Rate (Hz) |
| NTSC 4:3 60 | ||
| PAL 4:3 50 | ||
| PAL60 4:3 60 | ||
| SECAM 4:3 50 |
TIP:
- An image with any resolution will be displayed with scaling technology.
- Sync on Green and Composite sync signals are not supported.
- Signals other than those specified in the table above may not be displayed correctly. If this should happen, change the refresh rate or resolution on your PC. Refer to Display Properties help section of your PC for procedures.
Tripod Stand Installation
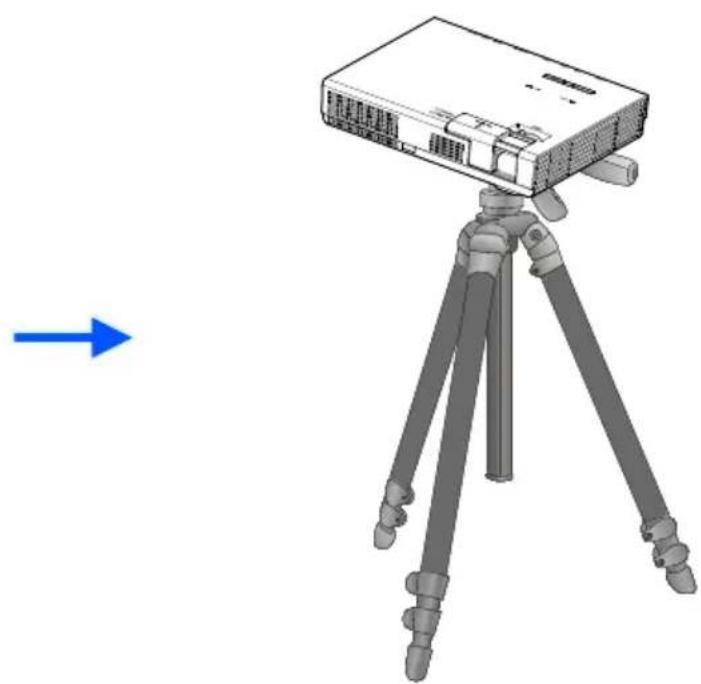
- You can install this projector using a camera tripod.
- The tripod specifications:
Type: 1/4"-20UNC

CAUTION:
- Do not use on an unstable surface. Doing so may cause the tripod to fall over, resulting in damage.
- Refer to the user's manual packaged with your tripod.
- Use a tripod with 1.4 kg or over of maximum load.
- Spread the legs wide open and evenly when mounting or installing the projector.
- Do not extend the feet when using the elevator tripod.
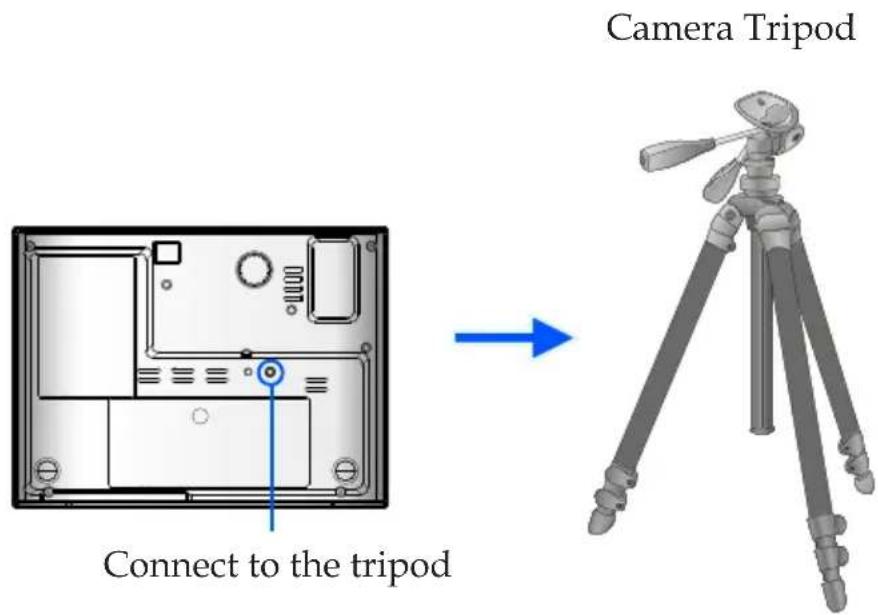
natural_image
3D illustration of a tripod-mounted projector with three legs, shown with a blue arrow pointing to it (no text or symbols on the device itself)Appendices
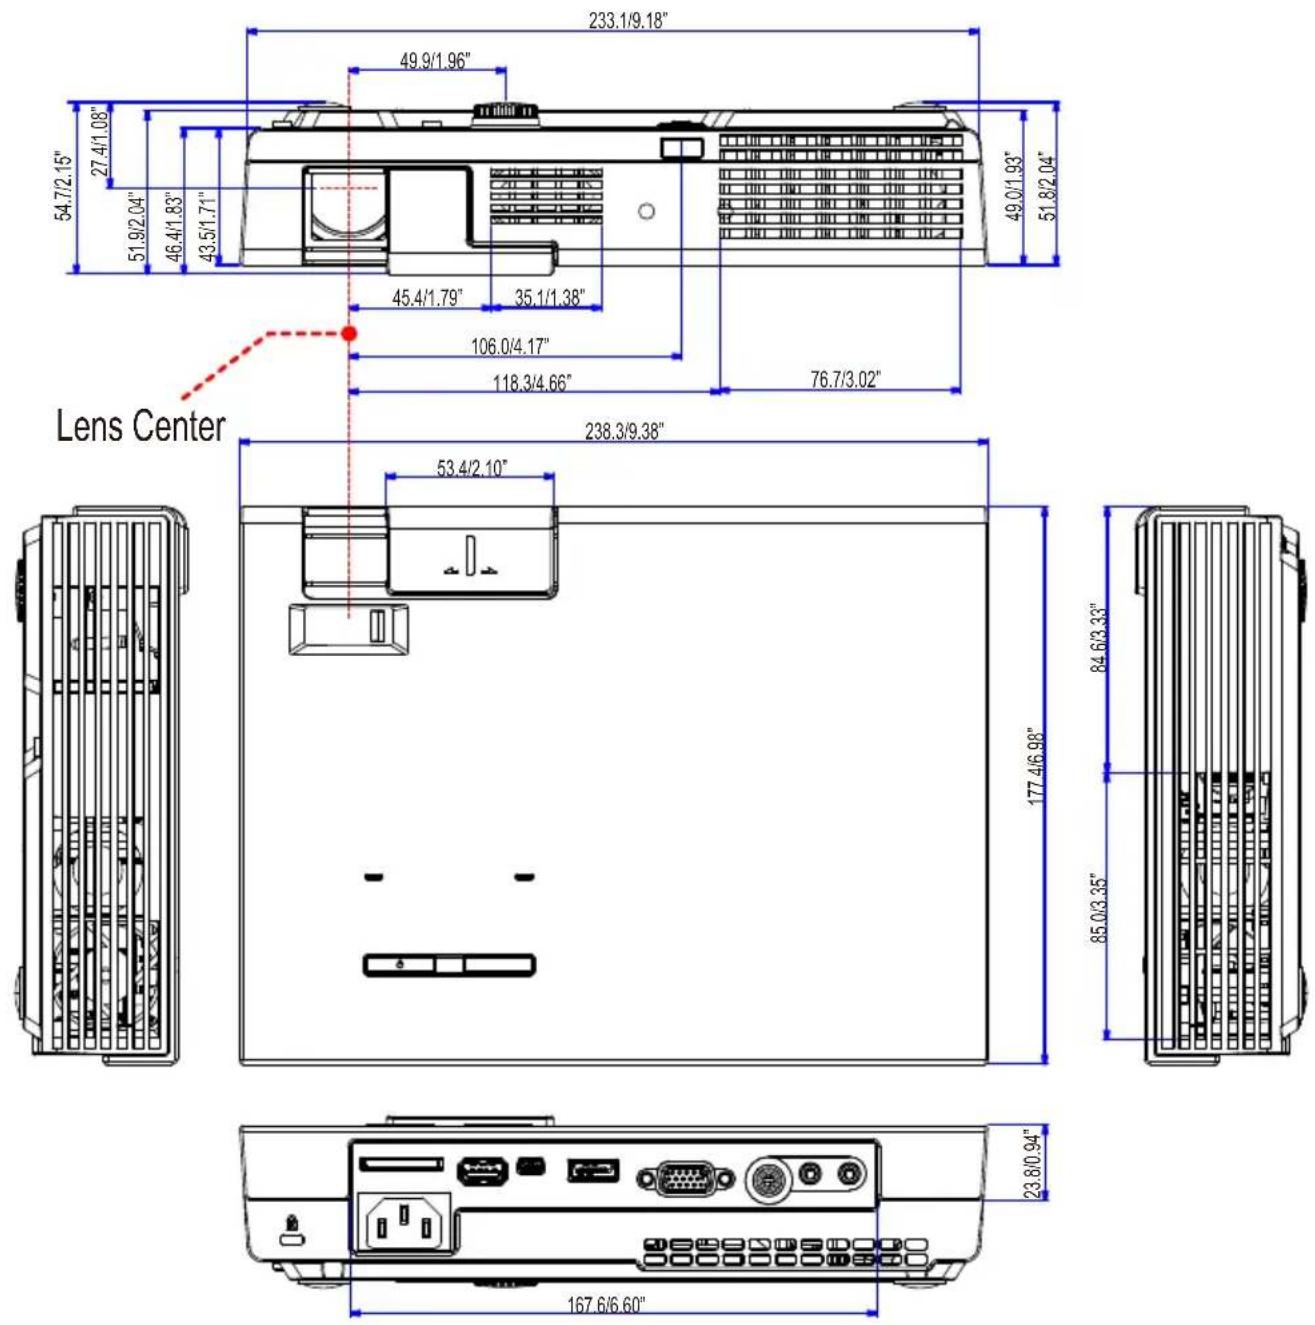
Cabinet Dimensions
Unit: mm/inch
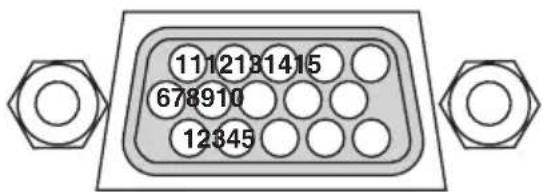
Pin Assignments of D-Sub COMPUTER Input Connector
Mini D-Sub 15 Pin Connector
Signal Level
Video signal : 0.7Vp-p (Analog)
Sync signal : TTL level
| Pin No. | RGB Signal (Analog) YCbCr Signal | |
| 1 Red | Cr | |
| 2 Green Y | ||
| 3 Blue | Cb | |
| 4 Ground | ||
| 5 Ground | ||
| 6 Red | Ground Cr Ground | |
| 7 Green Gro Y Ground | ||
| 8 Blue | Ground Cb Ground | |
| 9 No | Connection | |
| 10 Sync | Signal Ground | |
| 11 No | Connection | |
| 12 Bi-directional DATA (SDA) | ||
| 13 Horizontal Sync | ||
| 14 Vertical Sync | ||
| 15 Data Clock | ||
Troubleshooting Check List
Before contacting your dealer or service personnel, check the following list to be sure repairs are needed also by referring to the “Troubleshooting” section in your user’s manual. This checklist below will help us solve your problem more efficiently.
* Print the following pages.
Frequency of occurrence □ always □ sometimes (How often?____) □ other (____)
Power
No power (POWER indicator does not light blue).
Power cable's plug is fully inserted into the wall outlet.
No power even though you press and hold the POWER button for a minimum of 1 second.
Shut down during operation.
Power cable's plug is fully inserted into the wall outlet.
Power Management is turned off (only models with the Power Management function).
Video and Audio
No image is displayed from your PC or video equipment to the projector.
Still no image even though you connect the projector to the PC first, then start the PC.
Enabling your notebook PC's signal output to the projector.
- A combination of function keys will enable/disable the external display. Usually, the combination of the "Fn" key along with one of the 12 function keys turns the external display on or off.
No image (blue background).
Still no image even though you press the AUTO ADJ. button.
Still no image even though you carry out [RESET] in the projector's menu.
Signal cable's plug is fully inserted into the input connector □ A message appears on the screen.
The source connected to the projector is active and available.
Still no image even though you adjust the brightness and/or the contrast.
Input source's resolution and frequency are supported by the projector.
Image is too dark.
Remains unchanged even though you adjust the brightness and/or the contrast.
Image is distorted.
Image appears to be trapezoidal (unchanged even though you carry out the [KEYSTONE] adjustment).
Parts of the image are lost.
Still unchanged even though you press the AUTO ADJ. button.
Still unchanged even though you carry out [RESET] in the projector's menu.
Image is shifted in the vertical or horizontal direction.
Horizontal and vertical positions are correctly adjusted on a computer signal.
Input source's resolution and frequency are supported by the projector.
Some pixels are lost.
Image is flickering.
Still unchanged even though you press the AUTO ADJ. button.
Still unchanged even though you carry out [RESET] in the projector's menu.
Image shows flickering or color drift on a computer signal.
Image appears blurry or out of focus.
Still unchanged even though you checked the signal's resolution on PC and changed it to projector's native resolution.
Stillunchanged even though you adjusted the focus.
No sound.
Audio cable is correctly connected to the audio input of the projector.
Still unchanged even though you adjusted the volume level.
Other
Remote control does not work.
No obstacles between the sensor of the projector and the remote control.
Projector is placed near a fluorescent light that can disturb the infrared remote controls.
Batteries are new and are not reversed in installation
Buttons on the projector cabinet do not work.
[CONTROL PANEL LOCK] is not turned on in the menu.
Still unchanged even though you press and hold the SOURCE button on the cabinet for minimum of 10 seconds.
In the space below please describe your problem in detail.
Information on application and environment where your projector is used
Projector
Model number:
Serial No.:
Date of purchase:
Information on input signal:
Horizontal synch frequency [ ] kHz
Vertical synch frequency [ ] Hz
Synch polarity H (+) (-) □ □
V (+) (-) □ □
Synch type Separate Composite □
Sync on Green □
STATUS Indicator:
Steady light/Flashing light [ ] cycles
Remote control model number:
Signal cable
NEC standard or other manufacturer's cable?
Model number: Length: inch/m
Distribution amplifier
Model number:
Switcher
Model number:
Adapter
Model number:
Installation environment
Screen size: inch
Screen type: White matte Beads Polarization
Wide angle □ High contrast □
Throw distance: feet/inch/m
Orientation: Desktop Other □
Power outlet connection:
☐ Connected directly to wall outlet
☐ Connected to power cord extender or other (the number of connected equipment____)
☐ Connected to a power cord reel or other (the number of connected equipment____)
Computer
Manufacturer:
Model number:
Notebook PC □/Desktop □
Native resolution:
Refresh rate:
Video adapter:
Other:
Video equipment
VCR, DVD player, Video camera, Video game or other
Manufacturer:
Model number:
REGISTER YOUR PROJECTOR! (for residents in the United States, Canada, and Mexico)
Please take time to register your new projector. This will activate your limited parts and labor warranty and InstaCare service program.
Visit our web site at www.necdisplay.com, click on support center/register product and submit your completed form online.
Upon receipt, we will send a confirmation letter with all the details you will need to take advantage of fast, reliable warranty and service programs from the industry leader, NEC Display Solutions of America, Inc.
NEC
- NOTES
- Safety Cautions
- Precautions
- CAUTION
- DOC Compliance Notice (for Canada only)
- Machine Noise Information Regulation - 3. GPSGV,
- Disposing of your used product
- WARNING TO CALIFORNIA RESIDENTS:
- RF Interference (for USA only)
- WARNING
- Important Safeguards
- Installation
- Fire and Shock Precautions
- Remote Control Precautions
- NOTE:
- Health precautions to users viewing 3D images
- Auto Power Off (min) (Factory preset: 30 minutes)
- About High Altitude mode
- About Copyright of original projected pictures:
- Table of Contents
- Table of Contents....1
- Usage Notice 2
- Introduction 4
- Installation 12
- User Controls....19
- Appendices 45
- Usage Notice
- Do:
- Do not:
- Product Features
- Introduction
- Package Overview
- Documentation:
- For North America:
- For Europe:
- Product Overview
- SD CARD Slot1.
- Battery Installation
- CAUTION:
- Connecting the Projector
- Connect to Computer/Notebook
- Connect to Video Sources
- Powering On/Off the Projector
- Powering On the Projector
- Powering Off the Projector
- After Use
- Warning Indicator
- Adjusting the Projected Image
- Adjusting the Height of Projector Image
- Adjusting the Projector Focus
- Adjusting Projection Image Size
- On Screen Display
- How to operate
- User Controls
- IMAGE
- Picture Mode
- Wall Color
- Brightness
- Contrast
- Sharpness
- Saturation
- Hue
- Advanced
- IMAGE | Advanced
- Gamma
- BrilliantColor™
- Color Temp.
- Color Space
- Input
- Exit
- SCREEN
- Aspect Ratio
- Overscan
- V Keystone
- Auto Keystone
- Auto V-Flip
- 3D Settings
- SCREEN | 3D Settings
- 3D
- 3D Invert
- The projector provides 3D images to a user wearing the DLP® Link 3D glasses.
- SETTING
- Language
- Image Filp
- Menu Location
- Signal
- Mute
- Volume
- SETTING | Signal (RGB)
- Phase
- Clock
- Position
- Position
- SETTING | Advanced
- Logo
- Closed Caption
- Video Level
- Dynamic Contrast
- OPTIONS
- Input Search
- Fan Mode
- Eco Mode
- Information Hide
- Background Color
- Information
- Reset
- OPTIONS | Information
- OPTIONS | Advanced
- Direct Power On
- Auto Power Off (min)
- Off Timer (min)
- Control Panel Lock
- Using Multimedia
- Supported Formats
- Restrictions on displaying Microsoft Office files and PDF files
- Using the Projector as a Storage Device
- Important:
- Projecting Your Computer's Screen Image from the Projector via the USB Cable (USB Display)
- Wireless Projection
- Troubleshooting
- Problem: No image appears on screen
- Problem: Partial, scrolling or incorrectly displayed image
- Problem: The screen of the Notebook or PowerBook computer is not displaying a presentation
- Problem: Image is unstable or flickering
- Problem: Image has vertical flickering bar
- Appendices
- Problem: Image is out of focus
- Problem: The image is stretched when displaying 16:9 DVD
- Problem: Image is reversed
- Problem: Message Reminders
- Problem: Indicator lighting message
- Compatibility Modes
- TIP:
- Tripod Stand Installation
- Pin Assignments of D-Sub COMPUTER Input Connector
- Troubleshooting Check List
- Power
- Video and Audio
- Other
- Projector
- Signal cable
- Installation environment
- Computer
- Video equipment
- REGISTER YOUR PROJECTOR! (for residents in the United States, Canada, and Mexico)
- NEC
Brand : NEC
Model : L102W
Category : Video projector