
CEN-TRACK - Audio tuner Crestron - Free user manual and instructions
Find the device manual for free CEN-TRACK Crestron in PDF.


| Product Type | Audio Tuner |
| Brand | Crestron |
| Model | CEN-TRACK |
| Dimensions (H x W x D) | 1.72 x 17.2 x 8.1 in (43 x 437 x 206 mm) |
| Weight | 3.5 lb (1.6 kg) |
| Power Supply | 100-240V AC, 50/60 Hz, 15W |
| Frequency Range (FM) | 87.5 - 108 MHz |
| Frequency Range (AM) | 520 - 1710 kHz |
| Preset Stations | 20 (10 FM, 10 AM) |
| Audio Outputs | Unbalanced RCA, Balanced XLR, Digital Coaxial, Optical |
| Antenna Input | F-type for FM, AM loop antenna |
| Control Interface | Ethernet, RS-232, IR, Cresnet |
| Rackmountable | Yes, 1U rackmount with included brackets |
| Signal to Noise Ratio (FM) | >70 dB |
| Harmonic Distortion (FM) | <0.05% |
| Maintenance & Cleaning | Disconnect power; clean with soft dry cloth. Do not use solvents. |
| Safety | Do not expose to moisture or extreme temperatures. Use only provided power supply. |
| Spare Parts & Repairability | Contact Crestron or authorized service center for spare parts or repairs. |
| General Information | High-performance AM/FM tuner for Crestron control systems. |
Frequently Asked Questions - CEN-TRACK Crestron
User questions about CEN-TRACK Crestron
0 question about this device. Answer the ones you know or ask your own.
Ask a new question about this device
Download the instructions for your Audio tuner in PDF format for free! Find your manual CEN-TRACK - Crestron and take your electronic device back in hand. On this page are published all the documents necessary for the use of your device. CEN-TRACK by Crestron.
USER MANUAL CEN-TRACK Crestron
Regulatory Compliance
As of the date of manufacture, the CEN-TRACK has been tested and found to comply with specifications for CE marking and standards per EMC and Radiocommunications Compliance Labelling.

Federal Communications Commission (FCC) Compliance Statement
This device complies with part 15 of the FCC Rules. Operation is subject to the following conditions: (1) This device may not cause harmful interference and (2) this device must accept any interference received, including interference that may cause undesired operation.
CAUTION: Changes or modifications not expressly approved by the manufacturer responsible for compliance could void the user's authority to operate the equipment.
NOTE: This equipment has been tested and found to comply with the limits for a Class B digital device, pursuant to part 15 of the FCC Rules. These limits are designed to provide reasonable protection against harmful interference in a residential installation. This equipment generates, uses and can radiate radio frequency energy and, if not installed and used in accordance with the instructions, may cause harmful interference to radio communications. However, there is no guarantee that interference will not occur in a particular installation. If this equipment does cause harmful interference to radio or television reception, which can be determined by turning the equipment off and on, the user is encouraged to try to correct the interference by one or more of the following measures:
• Reorient or relocate the receiving antenna
- Increase the separation between the equipment and receiver
- Connect the equipment into an outlet on a circuit different from that to which the receiver is connected
- Consult the dealer or an experienced radio/TV technician for help
Industry Canada (IC) Compliance Statement
Operation is subject to the following two conditions:
- This device may not cause interference, and
- This device must accept any interference, including interference that may cause undesired operation of the device.
This device includes an aggregation of separate independent works that are each generally copyrighted by Crestron Electronics, Inc., with all rights reserved. The Linux Kernel 2.6.22 (as modified by Freescale), Mplayer, and Busybox are copyrighted under the GNU GENERAL PUBLIC LICENSE, Version2, reproduced in "GNU General Public License" on page 55, where the corresponding source code is available at: ftp://ftp.crestron.com/gpl.
The specific patents that cover Crestron products are listed at patents.crestron.com.
Crestron, the Crestron logo, Cresnet, Crestron e-Control, Crestron Toolbox, and SystemBuilder are either trademarks or registered trademarks of Crestron Electronics, Inc. in the United States and/or other countries. Windows is either a trademark or registered trademark of Microsoft Corporation in the United States and/or other countries. Pandora is either a trademark or registered trademark of Pandora Media, Inc. in the United States and/or other countries. SiriusXM and XM are either trademarks or registered trademarks of Sirius XM Radio Inc. in the United States and/or other countries. Other trademarks and trade names may be used in this document to refer to either the entities claiming the marks and names or their products. Crestron disclaims any proprietary interest in the marks and names of others.
©2012 Crestron Electronics, Inc.
Contents
TunerRack Modular Multi-Tuner: CEN-TRACK 1
Introduction .... 1
Features and Functions....1
Specifications 3
Physical Description....5
Setup....9
Network Wiring....9
Identity Code....9
Installation....9
Hardware Hookup 11
Programming Software....13
Earliest Version Software Requirements for the PC 13
Programming with SystemBuilder 13
Programming with SIMPL Windows 13
Uploading and Upgrading....17
Establishing Communication....17
Programs and Firmware 18
Program Checks 18
Configuration....19
"Installer Tools" Menu 19
Exit the "Installer Tools" Menu....27
Additional Configuration....27
Operation 34
Control the AM/FM Tuner 34
Control the SIRIUS Tuner 36
Control the XM Tuner....42
Control the Internet Radio Tuner....46
Problem Solving 52
Troubleshooting....52
Reference Documents....53
Notes on Internet Radio....53
Further Inquiries....53
Future Updates 53
Return and Warranty Policies....54
Merchandise Returns / Repair Service 54
Crestron Limited Warranty....54
GNU General Public License 55
TunerRack Modular Multi-Tuner: CEN-TRACK
Introduction
The CEN-TRACK is a modular multi-tuner capable of providing up to six independent radio tuners for use in a Crestron® multiroom audio distribution system. Control of each tuner is available through the LCD front panel, as well as from Crestron touch screens, computers and mobile devices via a Crestron control system.
The CEN-TRACK is available in three different models.
Models
| MODEL NUMBER DESCRIPTION | |
| CEN-TRACK-AMFM2 TunerRack Modular Multi-Tuner with Dual AM/FM Tuner Card | |
| CEN-TRACK-AMFMXMD TunerRack Modular Multi-Tuner with AM/FM & XM®Satellite Radio Tuner Card | |
| CEN-TRACK-AUDIONET TunerRack Modular Multi-Tuner with Internet Radio Tuner Card |
For simplicity within this guide, the term “CEN-TRACK” is used except where noted.
Features and Functions
- Rack-mountable modular multi-tuner
- Accepts up to three ATC-Series tuner cards
- Tuner card options include dual AM/FM, AM/FM + XM ® satellite radio 1 , or Internet radio
• Enables interactive control using touch screens and mobile devices - Rich search capabilities find favorite radio stations, programs, and music with case
- Support for metadata enables display of station names, song titles, artists, and other details
- Includes balanced, unbalanced, and digital audio outputs 2
- Native Crestron system integration via Ethernet
-
Easy setup from front panel or software
-
XM Satellite Radio and SiriusXM Internet Radio each require a paid subscription. Contact Sirius XM Radio Inc. for details.
-
The number of outputs and digital output capability are dependent upon the tuner cards installed. Consult the specifications for each tuner card model for complete details.
Modular Tuner Cards
Up to three ATC-Series tuner cards can be installed in the CEN-TRACK to enable combinations of AM/FM terrestrial radio, XM satellite radio, and Internet radio tuners. The modular card-based design makes it easy to change or expand the tuner configuration as needs change, or upgrade any tuner card as new features and services become available. Each CEN-TRACK model comes with one tuner card included.
Choose any combination of up to three tuner cards:
- Dual AM/FM Radio — Each ATC-AMFM2 tuner card provides two completely independent AM/FM tuners with RDS/RBDS to support two separate listening zones.
- AM/FM & XM Satellite Radio — Each ATC-AMFMXMD tuner card provides one XM satellite radio tuner and one AM/FM tuner with RDS/RBDS to support two separate listening zones. 1
- Internet Radio — Each ATC-AUDIONET tuner card provides a single Internet radio tuner for streaming over 15,000 available online radio stations and podcasts from around the world including Pandora ® and SiriusXM ® Internet Radio. 1
Multiple Outputs
Up to six independent audio outputs allow for connection to any multi-room audio distribution system, letting listeners in different rooms each enjoy their own choice of music, news, sports and talk. Both balanced and unbalanced analog outputs are provided, making the CEN-TRACK ideal for use in all types of professional and commercial applications as well as the finest residential installations. Digital outputs are also included to deliver the highest quality audio interface from satellite and Internet radio sources. 2
Metadata Display
Satellite radio services, as well as many FM and Internet radio stations, send text information called “metadata” as part of their broadcast signals. Metadata can include the radio station name, program or song title, artist name, category, traffic, weather, and phone numbers. All of this information is displayed on the TunerRack’s front panel LCD screen. Furthermore, it can also be displayed on any Crestron touch screen or APAD controller, providing useful information to the listener at any location throughout the home or office.
Program Guide
Each satellite and Internet radio tuner supports powerful browsing capabilities through an extensive program guide, which can be customized for display on any Crestron touch screen or computer, listing every available channel and what is currently playing on each channel. Versatile search options make it fun and easy to locate whatever users want to hear. Multiple users can each have full access to browse any of the available tuner program guides simultaneously without conflict, and favorite stations can be saved as presets for quick and easy recall.
- XM Satellite Radio and SiriusXM Internet Radio each require a paid subscription. Contact Sirius XM Radio Inc. for details.
- The number of outputs and digital output capability are dependent upon the tuner cards installed. Consult the specifications for each tuner card model for complete details.
Ethernet Control
The CEN-TRACK communicates with a Creston control system via high speed Ethernet, ensuring full bandwidth to support multiple users and touch screens. The control system's clock may also be synchronized to any digital radio tuner card that provides a time signal. Full setup and diagnostics may be performed from the front panel or Crestron Toolbox™ software. Additionally, the antenna signal strength and subscription activation codes can also be displayed on a touch screen for easy troubleshooting.
Specifications
Specifications for the CEN-TRACK are listed in the following table.
CEN-TRACK Specifications
| SPECIFICATION | DETAILS |
| Communications | |
| Ethernet | 10/100 Mbps, auto-switching, auto-negotiating, auto-discovery, full/half duplex, DHCP |
| USB USB device port for computer console | |
| Power Requirements | |
| Power Pack | 2 Amps @ 24 Volts DC; 100-250 Volts AC, 50/60 Hz power pack, included |
| Minimum 2-Series Control System Update File1,2 | Version 3.155.1240 or later |
| Environmental | |
| Temperature 41° to 104°F (5° to 40°C) | |
| Humidity 10% to 90% RH (non-condensing) | |
| Heat Dissipation 110 BTU/Hr | |
| Enclosure | |
| Chassis | Metal, black finish, convection-cooled, vented top and sides |
| Faceplate | Extruded aluminum, black finish with polycarbonate label overlay |
| Mounting | Freestanding or 2U 19-inch rack mountable (adhesive feet and rack ears included) |
| Dimensions | |
| Height | 3.56 in (91 mm) with feet3.47 in (88 mm) without feet |
| Width | 17.03 in (433 mm) without ears19.00 in (483 mm) with ears |
| Depth 10.30 in (262 mm) | |
| Weight 6.8 lbs (3.1 kg) including one tuner card | |
| Available Models | |
| CEN-TRACK-AMFM2 | TunerRack Modular Multi-Tuner with Dual AM/FM Tuner Card |
| CEN-TRACK-AMFMXMD | TunerRack Modular Multi-Tuner with AM/FM & XM Satellite Radio Tuner Card |
| CEN-TRACK-AUDIONET | TunerRack Modular Multi-Tuner with Internet Radio Tuner Card |
| Included Accessories | |
| ATC-AMFM2 | Dual AM/FM Radio Tuner Card; Included quantity for CEN-TRACK-AMFM2: 1 |
| ATC-AMFMXMD | AM/FM and XM Satellite Radio Tuner Card; Included quantity for CEN-TRACK-AMFMXMD: 1 |
| ATC-AUDIONET | Internet Radio Tuner Card; Included quantity for CEN-TRACK-AUDIONET: 1 |
| Power Pack | Included quantity for CEN-TRACK-AMFM2, CEN-TRACK-AMFMXMD, CEN-TRACK-AUDIONET: 1 |
| Available Accessories | |
| ATC-AMFM2 Dual AM/FM Tuner Card | |
| ATC-AMFMXMD AM/FM and XM Satellite Radio Tuner Card | |
| ATC-AUDIONET Internet Radio Tuner Card | |
| C2N-TXM-C50 Antenna Extension Cable for XM Radio | |
| CBL-Series Crestron Certified Interface cables | |
| SRD Series | Satellite Radio Antenna Distribution Products |
-
The latest software versions can be obtained from the Crestron Web site. Refer to the NOTE following these footnotes.
-
Crestron 2-Series control systems include the AV2 and PRO2. Consult the latest Crestron Product Catalog for a complete list of 2-Series control systems.
NOTE: Crestron software and any files on the Web site are for authorized Crestron dealers and Crestron Authorized Independent Programmers (CAIPs) only. New users must register to obtain access to certain areas of the site (including the FTP site).
Physical Description
This section provides information on the connections, controls and indicators available on the CEN-TRACK.
CEN-TRACK Physical View (Front)

CEN-TRACK Physical View (Rear - Shown with ATC-AMFM2 Card Installed)
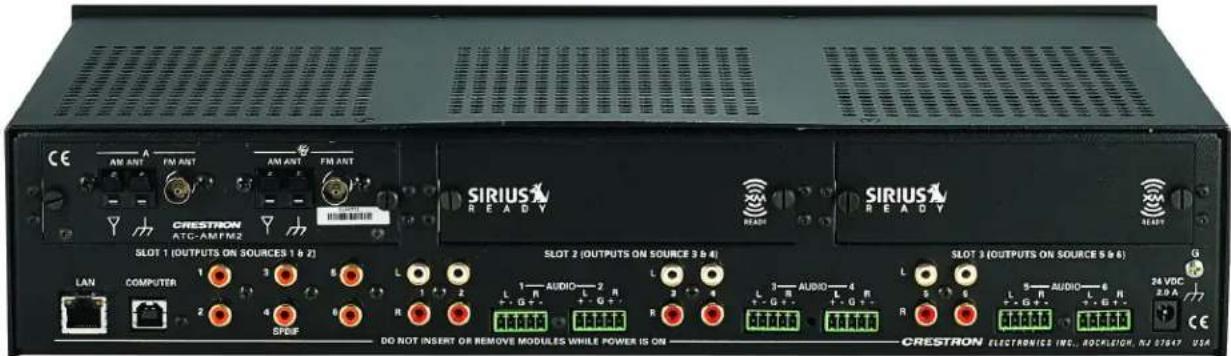
CEN-TRACK Overall Dimensions (Top, Front, and Rear View)

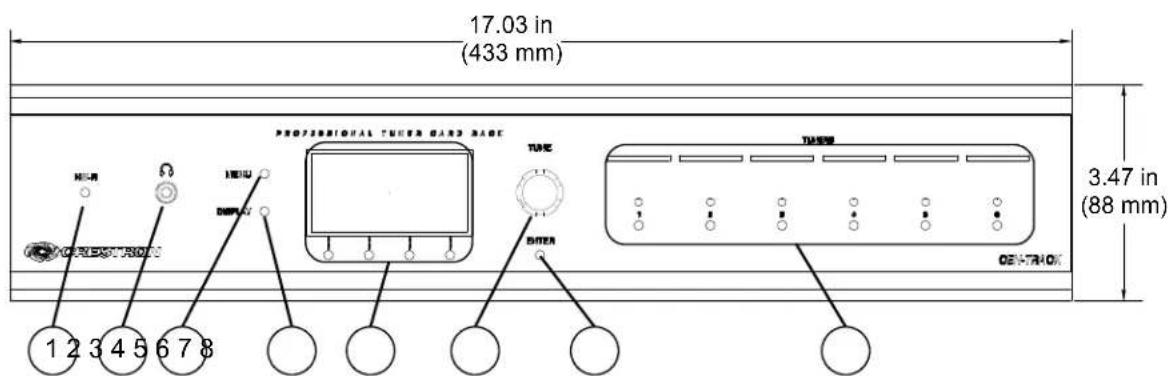

Connectors, Controls & Indicators
| # | CONNECTORS1, CONTROLS & INDICATORS | DESCRIPTION |
| 1 | HW-R | (1) Recessed miniature push button for hardware reset, reboots the unit |
| 2 | HeadphonesX3AH | (1) 3.5 mm mini TRS phone jack |
| 3 | MENU2 (1) Push | button, steps menu back one level |
| 4 DISPLAY2 | (1) Push button, toggles information displayed on the LCD screen | |
| 5 | LCD Display & Buttons | Green LCD dot matrix, 128 x 64 resolution, adjustable LED backlight;Displays tuner settings, metadata, and setup menus(4) LCD display driven push buttons, select/activate various menu functions |
| 6 TUNE | (1) Continuous turn rotary encoder; scrolls through channels, presets and other menu lists; adjusts selected parameters | |
| 7 | ENTER2 | (1) Push button, executes value set by the TUNE knob |
| 8 TUNERS | (6) Push buttons, (6) red LEDs and (6) 3/8" label slots; select which tuner is being displayed and adjusted | |
| 9 | SLOT (1-3)(3) Tuner card slots; Accept choice of ATC-series tuner cards | |
| 10 | LANGreen AmberLED  Pin 8 Pin 1 Pin 8 Pin 1 | (1) 8-wire RJ-45 female (8P8C modular jack);10BASE-T/100BASE-TX Ethernet port;Green LED indicates link status;Yellow LED indicates Ethernet activity |
| TYPE PIN SIGNALS | ||
| 8-PositionRJ-451 TD+2 TD-3 RD+4 Connected to pin 55 Connected to pin 46 RD-7 Connected to pin 88 Connected to pin 7 | ||
| 11 | COMPUTERPin 2 Pin 1 Pin 3 Pin 4 Pin 3 Pin 4 | (1) USB Type B female;USB computer console port(cable included) |
| PIN DESCRIPTION | ||
| 1 +5 VDC2 Data -3 Data +4 Ground | ||
| # | CONNECTORS 1 ,CONTROLS & INDICATORS | DESCRIPTION |
| 12 | SPDIF (1-6) 3  | (6) RCA female;S/PDIF coaxial digital audio outputs |
| 13 | AUDIO (1-6, RCA) | (12) RCA female;Provide (6) unbalanced stereo line level audio outputs;Output impedance: 100 Ohms;Maximum output level: 2 Vrms |
| 14 | AUDIO(1-6, Terminal) | (6) 5-pin 3.5 mm detachable terminal blocks;Balanced/unbalanced stereo line level outputs;Output impedance: 200 Ohms balanced,100 Ohms unbalanced;Maximum output level: 4 Vrms balanced,2 Vrms unbalanced |
| 15 | 24 VDC 2.0A | (1) 2.1 mm barrel DC power jack;24 Volt DC power input(power pack included) |
| 16 | G | (1) 6-32 screw, chassis ground lug |
-
Interface connectors for AUDIO (1-6 terminal) ports are provided with the unit.
-
Pressing and holding MENU, DISPLAY and ENTER for five seconds initiates a software reset.
-
The number of outputs and digital output capability are dependent upon the tuner cards installed. Consult the specifications for each tuner card model for complete details.
Setup
Network Wiring
When wiring the Ethernet network, consider the following:
- Use Crestron power supplies for Crestron equipment.
- Provide sufficient power to the system.
CAUTION: Insufficient power can lead to unpredictable results or damage to the equipment. Please use the Crestron Power Calculator to help calculate how much power is needed for the system (www.crestron.com/calculators).
Unlike other Crestron network devices, the CEN-TRACK does not use Cresnet ® for communications between the device and the control system. The CEN-TRACK requires the use of a high-speed Ethernet connection for control system communications.
For information on connecting Ethernet devices in a Crestron system, refer to the latest version of the Crestron c-Control ® Reference Guide (Doc. 6052), which is available from the Crestron Web site (www.crcstron.com/manuals).
Identity Code
IP ID
The IP ID is set within the CEN-TRACK's table using the CEN-TRACK's Installer Tools utility or Crestron Toolbox. For information on setting an IP ID using Installer Tools, refer to "Network Settings" which starts on page 21. For information on setting an IP table, refer to the Crestron Toolbox help file. The IP IDs of multiple CEN-TRACK devices in the same system must be unique.
When setting the IP ID, consider the following:
- The IP ID of each unit must match an IP ID specified in the SIMPL Windows program.
- Each device using IP to communicate with a control system must have a unique IP ID.
NOTE: If an ATC-AUDIONET is installed, it also requires an IP ID to be assigned. Its IP ID is set using the CEN-TRACK's Installer Tools utility or Crestron Toolbox. For information on setting the IP ID with Installer Tools, refer to "Network Settings" which starts on page 21 or the Crestron Toolbox help file. The IP IDs of multiple ATC-AUDIONET devices in the same system must be unique.
Installation
Ventilation
The CEN-TRACK should be used in a well-ventilated area. The venting holes should not be obstructed under any circumstances.
To prevent overheating, do not operate this product in an area that exceeds the environmental temperature range listed in the table of specifications. Consider using forced air ventilation, incrementing the spacing between units, or both to reduce overheating. Consideration must be given if installed in a closed or multi-unit rack assembly since the operating ambient temperature of the environment may be greater
Rack Mounting
than the room ambient temperature. Contact with thermal insulating materials should be avoided on all sides of the unit.
The CEN-TRACK can be mounted in a rack or stacked with other equipment. Two "ears" are provided with the CEN-TRACK so that the unit can be rack mounted. These ears must be installed prior to mounting. Complete the following procedure to attach the ears to the unit. The only tool required is a #1 or #2 Phillips screwdriver.
WARNING: To prevent bodily injury when mounting or servicing this unit in a rack, observe the following guidelines:
- When mounting this unit in a partially filled rack, load the rack from the bottom to the top with the heaviest component at the bottom of the rack.
- If the rack is provided with stabilizing devices, install the stabilizers before mounting or servicing the unit in the rack.
NOTE: If rack mounting is not required, rubber feet are provided for tabletop mounting or stacking. Apply the feet near the corner edges on the underside of the unit.
NOTE: Reliable earthing of rack-mounted equipment should be maintained. Particular attention should be given to supply connections other than direct connections to the branch circuit (e.g. use of power strips).
To install the ears:
-
There are screws that secure each side of the CEN-TRACK top cover. Using a #1 or #2 Phillips screwdriver, remove the three screws closest to the front panel from one side of the unit. Refer to the diagram following step 3 for a detailed view.
-
Position a rack ear so that its mounting holes align with the holes vacated by the screws in step 1.
-
Secure the ear to the unit with three screws from step 1, as shown in the following diagram.
Ear Attachment for Rack Mounting

natural_image
Technical line drawing of a server rack unit with ventilation grilles and ports (no text or labels)- Repeat procedure (steps 1 through 3) to attach the remaining ear to the opposite side.
Stacking
Four "feet" are provided with the CEN-TRACK so that if the unit is not rack mounted, the rubber feet can provide stability when the unit is placed on a flat surface or stacked. These feet should be attached prior to the hookup procedure.
NOTE: No more than two CEN-TRACK units should be stacked.
Hardware Hookup
Connect the Device
Make the necessary connections as called out in the illustration that follows this paragraph. Apply power after all connections have been made.
When making connections to the CEN-TRACK, use Crestron power supplies for Crestron equipment.
Hardware Connections for the CEN-TRACK
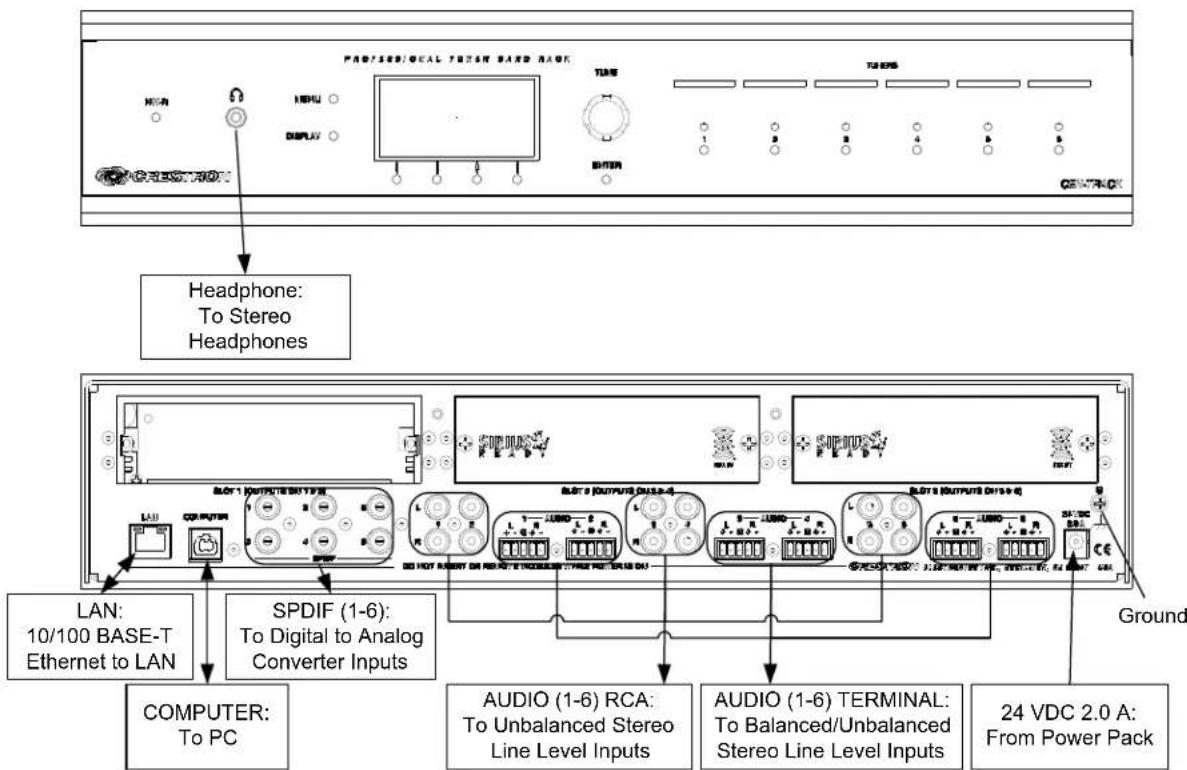
NOTE: Ensure the unit is properly grounded by connecting the chassis ground lug to an earth ground (building steel).
NOTE: To prevent overheating, do not operate this product in an area that exceeds the environmental temperature range listed in the table of specifications.
Six balanced/unbalanced audio outputs are provided, utilizing five-pin terminal block connectors. For connection details, refer to the following table and diagrams.
Audio Connections
| SIGNAL NAME | BALANCED AUDIO OUTPUT | UNBALANCED AUDIO OUTPUT |
| + L + L + Out | ||
| - L - Open | ||
| G | Shield/ground | Common |
| + R + R + Out | ||
| - | R | - |
ground
Open
Typical Balanced/Unbalanced Outputs

Label the Buttons
Use Crestron Engraver software to print custom labels for the CEN-TRACK's front panel buttons and LEDs. Crestron recommends printing on 100-pound paper. Paper weighing less than 100 pounds tends to crumple while sliding in, while paper weighing more than 100 pounds may not fit.
Programming Software
Have a question or comment about Crestron software?
Answers to frequently asked questions (FAQs) can be viewed in the Online Help section of the Crestron Web site. To post a question or to view questions submitted to Crestron's True Blue Support, log in at www.crestron.com/onlinehelp First-time users must establish a user account to fully benefit from all available features.
Earliest Version Software Requirements for the PC
NOTE: The latest software can be downloaded from the Crestron Web site (www.crestron.com/software).
Crestron provides an assortment of Windows ® -based software tools to develop a customized system. Use SystemBuilder TM or SIMPL Windows to create a program to control the CEN-TRACK.
Programming with SystemBuilder
SystemBuilder is a comprehensive programming environment. Appropriate for most systems, it can quickly and easily generate a complete working program including both control processor logic and touch screen graphics.
Programming with SIMPL Windows
NOTE: While SIMPL Windows can be used to program the CEN-TRACK, it is recommended to use SystemBuilder for configuring a system.
SIMPL Windows is Crestron's premier software for programming Crestron control systems. It is organized into two separate but equally important “Managers”: Configuration and Program.
Configuration Manager
Configuration Manager is the view where programmers “build” a Crestron control system by selecting hardware from the Device Library.
- To incorporate the CEN-TRACK into the system, drag the CEN-TRACK from the Ethernet Control Modules | Ethernet Audio Modules folder of the Device Library and drop it in the System Views.
Locating the CEN-TRACK and Tuner Cards in the Device Library

Tuner cards and Browse Context modules must also be added:
- Tuner Cards: Drag the control cards for the installed tuner(s) from the Plug-in Control Cards | Cards (CEN-TRACK) folder of the Device Library and drop it (or them) on the CEN-TRACK.
- Browse Context Modules: Drag one or more CEN-TRACK Browse Contexts from the Ethernet Control Modules | Ethernet Audio Modules folder of the Device Library and drop it (or them) on the CEN-TRACK.
NOTE: The Browse Contexts are designed to communicate with a single user interface, either a touch screen or an APAD. If necessary, add a Browse Context for each interface. Use CEN-TRACK GUI Browse Context(s) for touch screens. Use CEN-TRACK Simple Browse Context(s) for the APAD.
The system tree of the control system displays the device in the appropriate slot with a default IP ID as shown in the following illustration.
C2ENet-2 Device, Slot 8

flowchart
graph TD
    A["PRO2"] --> B["Slot 1: {Empty C2Y Card Slot}"]
    A --> C["Slot 2: {Empty C2Y Card Slot}"]
    A --> D["Slot 3: {Empty C2Y Card Slot}"]
    A --> E["Slot 4: C2I-COM6"]
    A --> F["Slot 5: C2I-IR8"]
    A --> G["Slot 6: C2I-IO8"]
    A --> H["Slot 7: C2I-RY8"]
    A --> I["Slot 8: C2ENET-2"]
    A --> J["IP-ID 03: CEN-TRACK"]
    A --> K["Slot 1: CEN-TRACK-AMFM2"]
    K --> L["Slot 1: CEN-TRACK-FM"]
    K --> M["Slot 2: CEN-TRACK-FMRDS"]
    K --> N["Slot 3: CEN-TRACK-AM"]
    K --> O["Slot 4: CEN-TRACK-FM."]
    K --> P["Slot 5: CEN-TRACK-FMRDS"]
    K --> Q["Slot 6: CEN-TRACK-AM"]
    K --> R["Slot 2: {Empty CEN-TRACK Expansion Slot}"]
    K --> S["Slot 3: {Empty CEN-TRACK Expansion Slot}"]
    K --> T["Slot 4: CEN-TRACK System Controls"]
    K --> U["Slot 5: CEN-TRACK GUI Browse Context"]
    U --> V["Slot 1: CEN-TRACK AMFM GUI Browse Context"]
    U --> W["Slot 2: CEN-TRACK XM GUI Browse Context"]
    U --> X["Slot 3: CEN-TRACK Sirius GUI Browse Context"]
    U --> Y["Slot 6: {Empty CEN-TRACK Browse Context Slot}"]
    U --> Z["Slot 54: {Empty CEN-TRACK Browse Context Slot}"]
    U --> AA["IP-ID 04: {EMPTY}"]
    U --> AB["IP-ID FE: {EMPTY}"]
    A --> AC["Slot 9: C2Net-Device"]
    A --> AD["Slot 10: C2I-PRO2-LCDPANEL"]
-
If additional CEN-TRACK devices are to be added, repeat step 1 for each device. Each CEN-TRACK is assigned a different IP ID number as it is added.
-
If necessary, double click a device to open the "Device Settings" window and change the IP ID, as shown in the following illustration.
"Device Settings: Crestron CEN-TRACK" Window
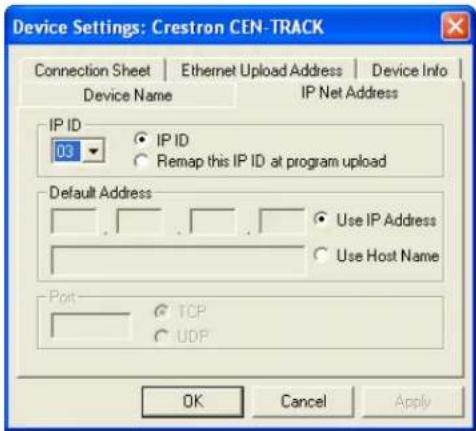
NOTE: The IP ID specified in the SIMPL Windows program must match the IP ID of each unit. Refer to "Identity Code" on page 9.
Program Manager
Program Manager is the view where programmers "program" a Crestron control system by assigning signals to symbols.
The symbol can be viewed by double clicking on the icon or dragging it into Detail View. Each signal in the symbol is described in the SIMPL Windows help file (F1).
Uploading and Upgrading
Crestron recommends using the latest programming software and that each device contains the latest firmware to take advantage of the most recently released features. However, before attempting to upload or upgrade it is necessary to establish communication. Once communication has been established, files (for example, programs or firmware) can be transferred to the control system (or device). Finally, program checks can be performed (such as changing the device ID or creating an IP table) to ensure proper functioning.
Establishing Communication
Use Crestron Toolbox for communicating with the CEN-TRACK; refer to the Crestron Toolbox help file for details. There are two methods of communication: USB and TCP/IP.
USB
NOTE: Required for initial setup of Ethernet parameters.
USB Communication

flowchart
graph LR
    A["PC Running Crestron Toolbox"] <-->|USB| B["CEN-TRACK"]
The COMPUTER port on the CEN-TRACK connects to the USB port on the PC via the included Type A to Type B USB cable:
- Use the Address Book in Crestron Toolbox to create an entry using the expected communication protocol (USB). When multiple USB devices are connected, identify the CEN-TRACK by entering "CEN-TRACK" in the Model textbox, the unit's serial number in the Serial textbox or the unit's hostname in the Hostname textbox. The hostname can be found in the "System Info" window in the section marked Ethernet however, communications must be established in order to see this information in the "System Info" window.
- Display the CEN-TRACK's "System Info" window (click the i icon); communications are confirmed when the device information is displayed.
TCP/IP
NOTE: Required for operation with a Crestron control system.
Ethernet Communication

flowchart
graph LR
    A["PC Running Crestron Toolbox"] <--> B["LAN"]
    B --> C["CEN-TRACK"]
The CEN-TRACK connects to PC via Ethernet:
-
Establish USB communication between CEN-TRACK and PC.
-
Enter the IP address, IP mask and default router of the CEN-TRACK via Crestron Toolbox (Functions | Ethernet Addressing); otherwise enable DHCP.
NOTE: Use the Device Discovery Tool in Crestron Toolbox to detect all Ethernet devices on the network and their IP configuration. The tool is available in Toolbox version 1.15.143 or later.
- Confirm Ethernet connection between CEN-TRACK and PC. If connecting through a hub or router, use CAT5 straight through cables with 8-pin RJ-45 connectors. Alternatively, use a CAT5 crossover cable to connect the two LAN ports directly without using a hub or router.
- Use the Address Book in Crestron Toolbox to create an entry for the CEN-TRACK with the CEN-TRACK's TCP/IP communication parameters.
- Display the "System Info" window (click the icon) and select the CEN-TRACK entry.
Programs and Firmware
Program or firmware files may be distributed from programmers to installers or from Crestron to dealers. Firmware upgrades are available from the Crestron Web site as new features are developed after product releases. One has the option to upload programs via the programming software or to upload and upgrade via the Crestron Toolbox. For details on uploading and upgrading, refer to the SIMPL Windows help file or the Crestron Toolbox help file.
SIMPL Windows
Firmware
If a SIMPL Windows program is provided, it can be uploaded to the control system using SIMPL Windows or Crestron Toolbox.
Check the Crestron Web site to find the latest firmware. (New users may be required to register to obtain access to certain areas of the site, including the FTP site.)
Upgrade CEN-TRACK firmware via Crestron Toolbox.
- Establish communication with the CEN-TRACK and display the "System Info" window.
- Select Functions | Firmware... to upgrade the CEN-TRACK firmware.
Program Checks
Using Crestron Toolbox, display the "System Info window (click the j icon) and select the Functions menu to display actions that can be performed on the CEN-TRACK.
Be sure to use Crestron Toolbox to create the CEN-TRACK IP table.
- Select Functions | IP Table Setup.
- Add, modify or delete entries in the IP table. The CEN-TRACK can have only one IP table entry.
- A defined IP table can be saved to a file or sent to the device.
Edit the control system's IP table to include an entry for the CEN-TRACK. The entry should list the CEN-TRACK's IP ID (specified on the CEN-TRACK's IP table) and the internal gateway IP address 127.0.0.1.
NOTE: If an ATC-AUDIONET is installed, its IP table must also be created.
Configuration
Use Crestron Toolbox or the front panel of the CEN-TRACK to configure the CEN-TRACK for operation.
When the CEN-TRACK is first powered up, the following is displayed:
"Loading..." Screen
Loading...
"CEN-TRACK Choose a tuner to proceed" Screen
CEN-TRACK
Choose a tuner to proceed
For information on using a tuner, refer to "Operation" on page 34.
"Installer Tools" Menu
Use the "Installer Tools" menu to configure the CEN-TRACK.
To open the “Installer Tools” menu, press and hold MENU and DISPLAY for five seconds. A menu of options is displayed.
"Installer Tools" Menu
Installer Tools
Select Tuner Format Configure Front Panel Network Settings

The following controls are used to navigate through the "Installer Tools" menu:
- TUNE Knob – Turn the TUNE knob to highlight the desired option. The highlighted option is underlined.
- ENTER Button – Press the ENTER button to select a highlighted item or to store a setting.
- MENU Button – Press the MENU button to return to the previous menu.
The “Installer Tools” menu presents several parameters to configure. Turn the TUNE knob to view the options.
- Select Tuner Format – Specifies the North American or European tuning format when using a tuner card.
- Configure Front Panel – Used to lock or unlock the front panel.
- Network Settings – Configures the CEN-TRACK to communicate with a control system over Ethernet. If an ATC-AUDIONET is installed, this section is also used to configure the card's network settings.
- Name Sources – Allows custom naming of cards installed in the CEN-TRACK.
- Set Headphone Volume – Sets the headphone volume level.
- About – Provides information about the CEN-TRACK such as IP data and firmware version.
To configure a specific parameter, turn the TUNE knob to highlight an option and press ENTER.
To exit the "Installer Tools" menu and save changes to the CEN-TRACK's configuration, press the MENU button.
Select Tuner Format
Select the tuning format to specify the tuning method used by an installed AM/FM tuner. When using the North American tuner format, the device tunes FM frequencies in 100 kHz steps and AM frequencies in 10 kHz steps. When using the European tuner format, the device tunes FM frequencies in 50 kHz steps and AM frequencies in 9 kHz steps.
- Open the "Installer Tools" menu as described on page 19.
- Turn the TUNE knob to highlight Select Tuner Format, and press ENTER.
"Select Tuner Format" Screen
Select Tuner Format
North American
European
- Turn the TUNE knob to highlight a tuner format. To cancel and return to the "Installer Tools" menu, press MENU.
- To confirm, press ENTER and return to the "Installer Tools" menu.
Configure Front Panel
The “Configure Front Panel” screen is used to lock or unlock the front panel controls.
- Open the "Installer Tools" menu as described on page 19.
- Turn the TUNE knob to highlight Configure Front Panel, and press ENTER.
"Configure Front Panel" Screen
Configure Front Panel
Unlock Lock
- Turn the TUNE knob to highlight the desired setting. To cancel and return to the "Installer Tools" menu, press MENU.
- To confirm, press ENTER and return to the "Installer Tools" menu.
Network Settings
NOTE: Changes to network settings take effect when the “Installer Tools” menu is exited. Refer to the “Exit the “Installer Tools” Menu” on page 27.
The network settings menu is used to configure the CEN-TRACK's and ATC-AUDIONET's (if installed) network settings. To display the network settings menu:
- Open the "Installer Tools" menu as described on page 19.
- Turn the TUNE knob to highlight Network Settings and press ENTER.
If an ATC-AUDIONET is installed, the menu below is displayed.
"Select Device To Setup" Menu
Select Device To Setup
CEN-TRACK Slot 1 ATC-Audionet
Otherwise, the "CEN-TRACK Setup" menu is displayed.
"CEN-TRACK Setup" Menu
CEN-TRACK Setup
IP Address Subnet Mask Default Router
- If an ATC-AUDIONET is not installed, skip to step 4.
If an ATC-AUDIONET is installed, turn the TUNE knob to highlight the device to configure, press ENTER, and continue to step 4.
- Turn the TUNE knob to highlight the parameter to be adjusted or viewed and press ENTER.
Set the IP Address
The CEN-TRACK and ATC-AUDIONET use TCP/IP communications for communications between a control system and a PC. The IP address can be manually set or obtained from a DHCP server. For information on enabling DHCP to obtain an IP address, refer to “Enable/Disable DHCP” on page 23. To manually set an IP address:
-
Disp lay the network settings menu as described on page 21.
-
Turn the TUNE knob to highlight IP Address and press ENTER. If DHCP is enabled, the IP address is displayed. Otherwise, the "Edit IP Address" screen is displayed.
"Edit IP Address" Screen
Edit IP Address
Use Softbutton to select.
Then use Knob to edit.
Press ENTER to accept.
[000] 000. 000. 000
-
Turn the TUNE knob to set the first octet of the IP address.
-
Press the button under the next octet (or press ENTER to move to the next octet) to select it for editing.
-
Repeat steps 3 and 4 for each octet.
-
To save the IP address, move the cursor to the right-most octet and press ENTER. To cancel the operation and return to the network settings menu, press MENU.
Set the Subnet Mask
The subnet mask can be manually set or obtained from a DHCP server. For information on enabling DHCP to obtain a subnet mask, refer to “Enable/Disable DHCP” on page 23. To manually set the subnet mask:
-
Disp lay the network settings menu as described on page 21.
-
Turn the TUNE knob to highlight Subnet Mask and press ENTER. If DHCP is enabled, the subnet mask is displayed. Otherwise, the "Edit Subnet Mask" screen is displayed.
"Edit Subnet Mask" Screen
Edit Subnet Mask
Use Softbutton to select.
Then use Knob to edit.
Press ENTER to accept.
[000] 000. 000. 000
-
Turn the TUNE knob to set the first octet of the subnet mask.
-
Press the button under the next octet (or press ENTER to move to the next octet) to select it for editing.
- Repeat steps 3 and 4 for each octet.
- To save the subnet mask, move the cursor to the right-most octet and press ENTER. To cancel the operation and return to the network settings menu, press MENU.
Set the Default Router
The default router can be manually set or obtained from a DHCP server. For information on enabling DHCP to obtain a default router, refer to “Enable/Disable DHCP” below. To manually set the default router:
- Disp lay the network settings menu as described on page 21.
- Turn the TUNE knob to highlight Default Router and press ENTER. If DHCP is enabled, the default router is displayed. Otherwise, the "Edit Default Router" screen is displayed.
"Edit Default Router" Screen
Edit Default Router
Use Softbutton to select. Then use Knob to edit. Press ENTER to accept.
[000] 000. 000. 000
- Turn the TUNE knob to set the first octet of the default router.
- Press the button under the next octet (or press ENTER to move to the next octet) to select it for editing.
- Repeat steps 3 and 4 for each octet.
- To save the default router, move the cursor to the right-most octet and press ENTER. To cancel the operation and return to the network settings menu, press MENU.
Enable/Disable DHCP
The CEN-TRACK and ATC-AUDIONET can obtain an IP address, subnet mask, default router, and DNS server information (ATC-AUDIONET only) from a DHCP server. To enable or disable DHCP:
- Display the network settings menu as described on page 21.
- Turn the TUNE knob to highlight DHCP and press ENTER. The "Edit DHCP" screen is displayed.
"Edit DHCP" Screen
Edit DHCP
* Off On
The current setting is indicated with an asterisk (*).
- Turn the TUNE knob to highlight the desired setting and press ENTER to select it. The display returns to the previous screen. To cancel the operation and return to the network settings menu, press MENU.
View or Set the Hostname
The CEN-TRACK and ATC-AUDIONET can be identified by a hostname instead on an IP address. To view or set the hostname:
- Display the network settings menu as described on page 21.
- Turn the TUNE knob to highlight Hostname and press ENTER. The "Edit Hostname" screen is displayed.
"Edit Hostname" Screen

- Turn the TUNE knob clockwise or counterclockwise to select a new letter (uppercase or lowercase) or number and press ENTER. Move the cursor by pressing the buttons labeled < or >. The hostname can be up to 64 characters in length. To delete a character, position the cursor under the character to be deleted and press the button labeled Del. To cancel the operation and return to the previous screen, press MENU.
- Press the button labeled Done to save the hostname. To cancel the operation and return to the network settings menu, press MENU.
Specify DNS Servers (ATC-AUDIONET Only)
The ATC-AUDIONET uses DNS servers to download Internet radio artwork for display in a touch screen project. DNS servers should only be specified when using static IP addressing (DHCP disabled). To specify a DNS Server:
- Display the network settings menu as described on page 21.
- Turn the TUNE knob to highlight DNS Server and press ENTER. The "DNS Servers" screen is displayed.
"DNS Servers" Screen

- To delete an entry, turn the TUNE knob to the entry to be deleted and press the button labeled Delete.
- To add an entry:
a. Press the button labeled Add.
"Enter New DNS Server" Screen
Enter New DNS Server
Use Softbutton to select.
Then use Knob to edit.
Press ENTER to accept.
[000] 000. 000. 000
b. Turn the TUNE knob to set the first octet of the DNS server.
c. Press the button under the next octet (or press ENTER to move to the next octet) to select it for editing.
d. Repeat steps b and c for each octet.
c. To save the DNS server address, move the cursor to the right-most octet and press ENTER. To cancel the operation and return to the previous screen, press MENU.
- Press MENU to return to the previous screen.
View or Set IP ID
The CEN-TRACK and ATC-AUDIONET are identified to a control system by an IP ID. For additional information on IP IDs, refer to "Identity Code" on page 9.
To set the IP ID:
- Display the network settings menu as described on page 21.
- Turn the TUNE knob to highlight Control System IP ID and press ENTER. The "Edit Control Sys IP ID" screen is displayed with the current IP ID.
"Edit Control Sys IP ID" Screen
Edit Control Sys IP ID
03
- Turn the TUNE knob to display the desired IP ID and press ENTER to select it. The display returns to the previous screen. To cancel the operation and return to the network settings menu, press MENU.
Set Control System IP Address
The IP address of the master control system must be specified. To specify an IP address:
- Display the network settings menu as described on page 21.
- Turn the TUNE knob to highlight Control System IP Address and press ENTER. The "Edit Ctrl Sys IP Address" screen is displayed.
"Edit Ctrl Sys IP Address" Screen
Edit Ctrl Sys IP Address
Use Softbutton to select. Then use Knob to edit. Press ENTER to accept.
[000] 000. 000. 000
- Turn the TUNE knob to set the first octet of the IP address.
- Press the button under the next octet (or press ENTER to move to the next octet) to select it for editing.
- Repeat steps 3 and 4 for each octet.
- To save the IP address, move the cursor to the right-most octet and press ENTER. To cancel the operation and return to the network settings menu, press MENU.
View MAC Address
To view the CEN-TRACK or ATC-AUDIONET's MAC address:
- Display the network settings menu as described on page 21.
- Turn the TUNE knob to highlight MAC Address and press ENTER. The MAC address is displayed.
- Press MENU to return to the network settings menu.
Name Sources
The “Name Sources” tool is used to assign names to cards installed in the CEN-TRACK.
- Open the "Installer Tools" menu as described on page 19.
- Turn t he TUNE knob to highlight Name Sources, and press ENTER.
"Select Source To Name" Menu
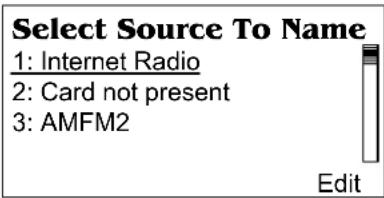
- Turn the TUNE knob to highlight the source to name and press ENTER or the button labeled Edit. To cancel and return to the "Installer Tools" menu, press MENU.
- Turn the TUNE knob to scroll through one of the built-in names and press ENTER. To create a custom name, turn the TUNE knob to highlight [Custom Name] and press ENTER.
"Enter Source 1 Name" Screen

To enter a custom name:
a. Select letters (upper and lower-case), numbers, or other characters by turning the TUNE knob until the desired letter, number, or other character is displayed on the LCD. Move the cursor to another position by pressing the buttons labeled < and >. To delete a character, press the button labeled Del.
NOTE: The maximum length for any source name is 16 characters.
b. After entering the new source name, press the button labeled Done to save the name and return to the list of sources.
- Rename other sources if desired. If all of the sources have been named/renamed, press MENU to return to the "Installer Tools" menu.
Set Headphone Volume
The “Set Headphone Volume” tool is used to adjust the volume level at the headphone jack.
- Open the "Installer Tools" menu as described on page 19.
- Turn the TUNE knob to highlight Set Headphone Volume, and press ENTER.
"Set Headphone Volume" Screen
| Set Headphone Volume86% | |
| Down | Up |
- To lower the volume, press the button labeled Down. To raise the volume, press the button labeled Up.
- Press ENTER to return the "Installer Tools" menu.
About
The "About" tool is used to display information about the CEN-TRACK.
- Open the "Installer Tools" menu as described on page 19.
- Turn the TUNE knob to highlight About, and press ENTER.
- Turn the TUNE knob to scroll through the available information.
- Press MENU to return to the "Installer Tools" menu.
Exit the "Installer Tools" Menu
To exit the "Installer Tools" menu:
- Press MENU.
"Exit Confirmation" Screen
Exit Confirmation
Exit Installer Tools?
Yes No
- Press the button labeled Yes to exit or press the button labeled No to return the "Installer Tools" menu.
Additional Configuration
To use the CEN-TRACK for Internet radio services such as Pandora or SiriusXM Internet Radio, some additional steps are required. Use the front panel controls to setup Pandora and SiriusXM Internet Radio, enable/disable providers, and provide secure access to the ATC-AUDIONET's multimedia memory card (MMC).
Pandora
Use of the Pandora service requires a user account. The first time the Pandora service is selected for listening, a user account must be entered or created.
- Press the TUNERS button for an installed Internet radio tuner.
If the tuner is already in use, options are displayed in the following menu.
Internet Radio Tuner Menu
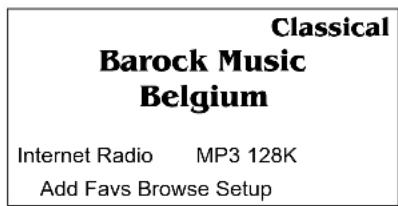
Otherwise, the "Favorites" menu is displayed.
"Favorites" Menu

- Press the button labeled Browse.
- Turn the TUNE knob to highlight Pandora and press ENTER.
- Log into the Pandora service using an existing Pandora account (starting below) or create a new one as shown on page 29.
"Pandora Setup" Menu

NOTE: The ATC-AUDIONET can be used to access the free (Pandora) or pay (Pandora One) service. It can also be used to create an account for the free service. However, it cannot be used to create an account for the pay service.
Use an Existing Pandora Account
To use an existing Pandora account:
- Turn the TUNE knob to highlight I have a Pandora account and press ENTER. The "Enter username (email address)" screen is displayed.
"Enter username (email address)" Screen
Enter username (email a

Back Delete
- Turn the TUNE knob to display the first letter of the account's email address and press ENTER. To delete a letter, press the button labeled Delete. To return to the previous screen, press the button labeled Back.
- Repeat step 2 for each letter in the account's email address and press ENTER.
- Press the button labeled Submit to continue. The "Enter password" screen is displayed.
"Enter password" Screen
Enter password:

Back Delete
- Turn the TUNE knob to display the first letter of the account's password and press ENTER. To delete a letter, press the button labeled Delete. To return to the previous screen, press the button labeled Back.
NOTE: The password is case-sensitive.
- Repeat step 5 for each letter in the account's password and press ENTER.
- Press the button labeled Submit to continue. A list of Pandora stations is displayed.
Create a New Pandora Account
To create a new Pandora account:
- Turn the TUNE knob to highlight I am new to Pandora and press ENTER. The display shows an activation code and a Web site address.
- From a computer, open a Web browser and go to the Web site www.pandora.com/crestron.
- Enter the activation code and follow the instructions for creating a new account.
- On the CEN-TRACK, turn the TUNE knob clockwise to select the last line of the displayed message and press ENTER. The "Pandora Setup" menu is displayed.
- Log in to the Pandora service as described in "Use an Existing Pandora Account" which starts on page 28.
Log Out from Pandora
To use a different Pandora account, the current user account must be logged out. To log out the current Pandora user account:
- Select the ATC-AUDIONET as the source to control.
- Press MENU.
- Press the button labeled Setup.
- Turn the TUNE knob to highlight Setup Pandora and press ENTER.
- Press ENTER. To cancel, press the button labeled Back.
- To confirm, turn the TUNE knob to highlight Yes and press ENTER. To cancel, turn the TUNE knob to highlight No and press ENTER.
Other Services/Functions
The Internet tuner's "Setup" menu is used to setup SiriusXM Internet Radio and select which Internet radio services are displayed to the user. To use the "Setup" menu for configuration:
- Press the TUNERS button for an installed Internet radio tuner.
If the tuner is already in use, options are displayed in the following menu.
Internet Radio Tuner Menu

Otherwise, the "Favorites" menu is displayed.
"Favorites" Menu

- If the tuner is already in use, press the button labeled Setup.
If the “Favorites” menu is displayed, press the button labeled Browse, then press the button labeled Setup. The “Setup” menu is displayed.
"Setup" Menu

- Turn the TUNE knob to highlight the parameter to configure and press ENTER.
Setup SiriusXM Online
To setup SiriusXM Online, select Setup Sirius and press ENTER. Then set the username and password used to login to the SiriusXM online service.
NOTE: A paid subscription to online access is required. Free trial accounts are not supported.
NOTE: If the user does not use the SiriusXM online service, disable the service as described in "Enable/Disable Providers" on page 32.
"Setup Sirius" Menu
Setup Sirius
Set Username
Set Password
Back

-
If there is no SiriusXM streaming account, go to www.siriusxm.com to set one up.
-
Turn the TUNE knob to highlight Set Username and press ENTER.
-
Enter the username.
NOTE: The username is case-sensitive.
"Enter username" Screen (SiriusXM Online)
Enter username:

Back Delete
a. Turn the TUNE knob to display the first letter of the username and press ENTER. To delete a letter, press the button labeled Delete. To return to the previous screen, press the button labeled Back.
b. Repeat step a for each letter in the username and press ENTER.
c. Press the button labeled Submit to enter the username. A confirmation screen is displayed.
"Set Username (Username Saved)" Screen
Set Username
Username saved.
Back
d. Press the button labeled Back to return to the "Setup Sirius" menu.
- Turn the TUNE knob to highlight Set Password and press ENTER.
NOTE: The password is case-sensitive.
"Enter password" Screen (SiriusXM Online)
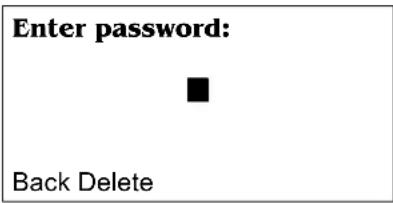
a. Turn the TUNE knob to display the first letter of the password and press ENTER. To delete a letter, press the button labeled Delete. To return to the previous screen, press the button labeled Back.
b. Repeat step a for each letter in the password and press ENTER.
c. Press the button labeled Submit to enter the password. A confirmation screen is displayed.
"Set Password (Password Saved)" Screen

d. Press the button labeled Back to return to the "Setup Sirius" menu.
- Press the button labeled Back to return to the previous screen.
Enable/Disable Providers
To specify which services are displayed in the Internet Radio tuner's “Browse” menu, select Enable/Disable Providers from the “Setup” menu. A list of providers and their respective status is displayed.
"Enable/Disable Provider" Screen

Enabled providers are displayed in the “Browse” menu while disabled providers are hidden in the “Browse” menu.
- Turn the TUNE knob to highlight the service to be enabled or disabled and press ENTER.
Provider Status (Sirius) Screen

- Turn the TUNE knob to highlight the desired setting and press ENTER. To return to the previous screen, press the button labeled Back.
- Press the button labeled Back to return to the previous screen.
Setup Samba Password
Use the Setup Samba Password option from the "Setup" menu to create a password to secure access to the ATC-AUDIONET's memory card.
"Enter password" Screen (Samba)
Enter password:

Back Delete
- Turn the TUNE knob to display the first letter of the password and press ENTER. To delete a letter, press the button labeled Delete. To return to the previous screen, press the button labeled Back.
- Repeat step 1 for each letter in the password and press ENTER.
- Press the button labeled Submit to enter the password.
- Press the button labeled Back to return to the previous screen.
Logout from Pandora
To change the Pandora account that is being used, the current user account must be logged out. To log out the current Pandora user account:
- Turn the TUNE knob to highlight Setup Pandora and press ENTER. The display shows Log Out as the highlighted option.
- Press ENTER to continue or press the button labeled Back to return to the previous screen.
- To complete the log out procedure, turn the TUNE knob to highlight Yes and press ENTER. To cancel, turn the TUNE knob to highlight No and press ENTER.
Operation
This section describes use of the front panel to control a tuner card installed in the CEN-TRACK.
To select a tuner, press one of the six buttons labeled TUNERS. The options for the selected tuner are displayed. If there is no tuner installed in the selected slot, the CEN-TRACK displays the following screen:
"There is no tuner installed in this location" Screen
There is no tuner installed in this location
Control the AM/FM Tuner
The AM/FM tuner controls allow the user to tune and scan stations, change bands between AM and FM and store and recall presets.
To select an AM/FM tuner, press the TUNERS button for an installed AM/FM tuner card.
AM/FM Tuner Options, FM Station Menu
88.00 FM Stereo
AMFM 1 Preset Manual Tech
Manual Tuning
To manually tune a station.
- Press the button labeled Manual.
Manual Tuning Screen

- Press the button labeled Band to switch between the AM and FM bands.
- Tune a station by either:
- Turning the TUNE knob to the desired station.
- Pressing the buttons labeled ◀ or ▶ to scan to the next station in either direction.
- Press MENU to exit from manual tuning.
Store and Clear Presets
The store a preset:
- Tune a radio station as described in "Manual Tuning" which starts on page 34.
- Press the button labeled Preset. The "Presets" screen is displayed. The following illustration shows FM presets.
"FM Presets" Screen
| FM Presets | ||
| 1. 88.00 | ||
| 2. 88.00 | ||
| 3. 88.00 | ||
| Band | Clear | Save |
- Turn the TUNE knob to highlight a preset location.
- Press the button labeled Save to store the preset.
"Replace preset with..." Screen
| Replace preset with...88.30 FM | |
| OK Cancel | |
- Press the button labeled OK to store the preset. To cancel, press the button labeled Cancel.
To clear an existing preset:
- Press the button labeled Preset. The "Presets" screen is displayed. The following illustration shows FM presets.
"FM Presets" Screen
| FM Presets | ||
| 1. 88.30 | ||
| 2. 88.00 | ||
| 3. 88.00 | ||
| Band | Clear | Save |
- Turn the TUNE knob to highlight the preset to be cleared.
- Press the button labeled Clear. The display shows a screen asking for confirmation to clear the preset.
"Are you sure you want to clear this preset?" Screen
Are you sure you want to clear this preset?
OK Cancel
- Press the button labeled OK to clear the preset or press the button labeled Cancel to cancel.
Recall Presets
To recall a preset:
- Press the button labeled Preset. The "Presets" screen is displayed. The following illustration shows FM presets.
"FM Presets" Screen
FM Presets
1.88.30
2.89.90
3.99.50
Band Clear Save
- To change bands, press the button labeled Band.
- Turn the TUNE knob to highlight the preset station to be recalled.
- Press ENTER.
Press the button labeled Tech to view the signal strength.
"FM Signal Strength" Screen
FM Signal Strength: 98%
AMFM1
Stereo Mono
NOTE: Signal strength information is not available on the ATC-AMFMXMD.
Control the SIRIUS Tuner
The SIRIUS tuner controls allow the user to tune stations and store and recall presets. It also provides options to apply a parental lock to selected stations or hide selected stations from the channel list.
To select a SIRIUS tuner, press the TUNERS button for an installed SIRIUS tuner.
Store and Clear Presets
To store a station as a preset:
- Turn the TUNE knob to select the desired station.
- Press the button labeled Preset. The "Presets" screen is displayed.
"Presets" Screen (Sirius)
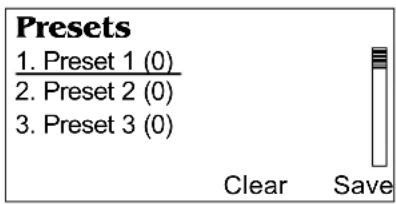
- Turn the TUNE knob to highlight a preset location.
- Press the button labeled Save to store the preset.
"Replace preset with..." Screen

- Press the button labeled OK to store the preset. To cancel, press the button labeled Cancel.
To clear an existing preset:
- Press the button labeled Preset. The "Presets" screen is displayed.
"Presets" Screen (Sirius)

- Turn the TUNE knob to highlight the preset to be cleared.
- Press the button labeled Clear. The display shows a screen asking for confirmation to clear the preset.
"Are you sure you want to clear this preset?" Screen
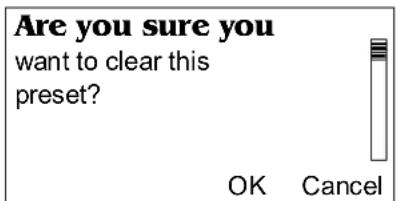
- Press the button labeled OK to clear the preset or press the button labeled Cancel to cancel.
Recall Presets
To recall a preset:
- Press the button labeled Preset. The "Presets" screen is displayed.
"Presets" Screen (Sirius)

- Turn the TUNE knob to highlight the preset station to be recalled.
- Press ENTER.
View Categories
To view stations by category:
- Press the button labeled Cat. The display shows a list of categories.
"Categories" Menu

- Turn the TUNE knob to highlight the desired category.
- Press ENTER to select the highlighted category.
"Pop Channels" Screen
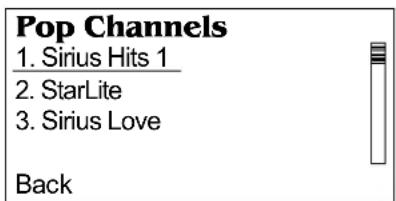
- Turn the TUNE knob to highlight the desired station.
NOTE: Press the DISPLAY button to view any additional information regarding a station in the list.
- Press ENTER to select the station.
View Channels
To view stations by channel:
- Press the button labeled Chan. The display shows a list of channels.
"Channels" Screen
Channels
- Broadway's Best
- Symphony Hall
- Met Opera Radio

- Turn the TUNE knob to highlight the desired station.
NOTE: Press the DISPLAY button to view any additional information regarding a station in the list.
- Press ENTER to select the station.
View Channel Information
To view additional information (artist or song title) about a station:
- While viewing a list of stations, turn the TUNE knob to highlight a station in a station list.
- Press the DISPLAY button to view any additional information regarding a station.
"Presets" Screen (Shown with Additional Station Information)

View Information and Setup
To view the signal strength, information about the tuner, setup channels, or change the Personal Identification Number (PIN), press the button labeled Tech. The signal strength and radio ID are displayed.
Technical Information Screen

- About the Tuner:
To view information about the tuner:
- Press the button labeled About.
"About" Screen

- Press the buttons labeled < and > to view additional information.
- Press MENU to return to the previous screen.
- Lock and Hide/Unhide Channels:
Channels can be locked, hidden, and unhidden from the channel lineup.
NOTE: When a channel is locked, it can be tuned by entering a PIN with the front panel controls. When a channel is hidden, it cannot be tuned.
To lock, unlock, hide, or unhide channels from the channel lineup:
- Press the button labeled Setup. A screen to enter a (PIN) is displayed.
"Please enter PIN" Screen

- Turn the TUNE knob to display the first digit of the PIN (the factory default is 1234).
- Press the buttons labeled < or > to move the cursor to the previous or next digit and enter the rest of the PIN.
- When the PIN is displayed, press the button labeled Enter to open the "Setup" menu.
"Setup" Menu
Setup Setup Channels Change PIN
- Turn the TUNE knob to highlight Setup Channels and press ENTER. The channel list is displayed.
"Setup Channels" Screen

- Turn the TUNE knob to highlight a channel for setup and press ENTER. The setup screen for the selected channel are displayed.
Channel Setup Screen
| PureJazz | 72 |
| Parental Lock:Off | |
| Hide Channel:No | |
| Lock | Hide |
-
To lock the channel (if unlocked), press the button labeled Lock. To unlock the channel (if locked), press the button labeled Unlock (not shown). To hide the channel from the channel lineup (if revealed), press the button labeled Hide. To reveal the channel in the channel lineup (if hidden), press the button labeled Unhide (not shown).
-
Press MENU to return to the previous screen.
- Change PIN
The PIN used to tune a locked station and setup stations can be changed from the front panel. To change the PIN:
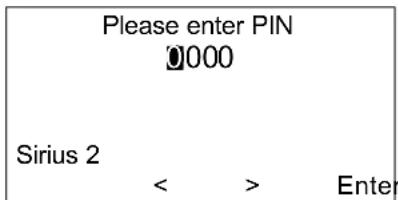
- Press the button labeled Setup. A screen to enter a Personal Identification Number (PIN) is displayed.
"Please enter PIN" Screen
-
Turn the TUNE knob to display the first digit of the PIN (the factory default is 1234).
-
Press the buttons labeled < or > to move the cursor to the previous or next digit and enter the rest of the PIN.
-
When the PIN is displayed, press the button labeled Enter to open the "Setup" menu.
"Setup" Menu
Setup Setup Channels Change PIN
- Turn the TUNE knob to highlight Change PIN and press ENTER. A screen for changing the PIN is displayed.
Change Pin Screen

- Turn the TUNE knob to display the first digit of the new PIN.
- Press the buttons labeled < or > to move the cursor to the previous or next digit and enter the rest of the PIN.
- When the PIN is displayed, press the button labeled Enter to save the PIN. To cancel, press the button labeled Cancel.
- Press MENU to return to the previous screen.
Control the XM Tuner
The XM tuner controls allow the user to tune stations and store and recall presets. It also provides an option to hide selected stations from the channel list.
To select an XM tuner, press the TUNERS button for an installed XM tuner.
Store and Clear Presets
To store a station as a preset:
- Turn the TUNE knob to select the desired station.
- Press the button labeled Preset. The "Presets" screen is displayed.
"Presets" Screen (XM)

- Turn the TUNE knob to highlight a preset location.
- Press the button labeled Save to store the preset.
"Replace preset with..." Screen
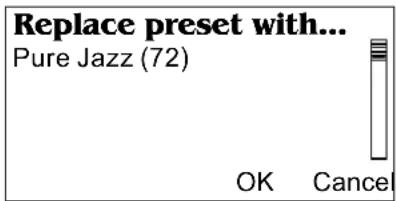
- Press the button labeled OK to store the preset. To cancel, press the button labeled Cancel.
To clear an existing preset:
- Press the button labeled Preset. The "Presets" screen is displayed.
"Presets" Screen (XM)

-
Turn the TUNE knob to highlight the preset to be cleared.
-
Press the button labeled Clear. The display shows a screen asking for confirmation to clear the preset.
"Are you sure you want to clear this preset?" Screen

- Press the button labeled OK to clear the preset or press the button labeled Cancel to cancel.
Recall Presets
To recall a preset:
- Press the button labeled Preset. The "Presets" screen is displayed.
"Presets" Screen (XM)

-
Turn the TUNE knob to highlight the preset station to be recalled.
-
Press ENTER.
View Categories
To view stations by category:
- Press the button labeled Cat. The display shows a list of categories.
"Categories" Menu

- Turn the TUNE knob to highlight the desired category.
- Press ENTER to select the highlighted category.
"Decades Channels" Screen

- Turn the TUNE knob to highlight the desired station.
NOTE: Press the DISPLAY button to view any additional information regarding a station in the list.
- Press ENTER to select the station.
View Channels
To view stations by channel:
- Press the button labeled Chan. The display shows a list of channels.
"Channels" Screen

- Turn the TUNE knob to highlight the desired station.
NOTE: Press the DISPLAY button to view any additional information regarding a station in the list.
- Press ENTER to select the station.
View Channel Information
To view additional information about a station:
- While viewing a list of stations, turn the TUNE knob to highlight a station in a station list.
- Press the DISPLAY button to view any additional information regarding a station.
"Presets" Screen (Shown with Additional Station Information)

View Information and Setup
To view information about the signal strength, access information about the tuner, and determine which channels are visible in the channel lineup, press the button labeled Tech. The signal strength and radio ID are displayed.
Technical Information Screen
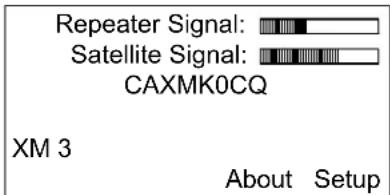
- About the Tuner:
To view information about the tuner:
- Press the button labeled About.
"About" Screen

- Press the buttons labeled < and > to view additional information.
- Press MENU to return to the previous screen.
- Hide/Unhide Channels:
Channels can be hidden and unhidden from the channel lineup.
- Press the button labeled Setup.
"Setup Channels" Screen
Setup Channels
-
Radio ID: CAXMK0C
-
XM Preview
- POTUS 08

- Turn the TUNE knob to highlight a channel for setup and press ENTER. The channel's setup options are displayed.
Setup Options Screen
POTUS 08 130
Hide Channel: No
Hide
-
To hide the channel from the channel lineup (if revealed), press the button labeled Hide. To reveal the channel in the channel lineup (if hidden), press the button labeled Unhide (not shown).
-
Press MENU to return to the previous screen.
Control the Internet Radio Tuner
The Internet radio tuner controls allow the user to tune Internet radio stations, Pandora Internet Radio, SiriusXM Internet Radio, and listen to audiobooks from Librivox.
NOTE: To ensure proper operation, download and install the latest CEN-TRACK firmware from http://crestron.com/firmware.
To select an Internet radio tuner, press the TUNERS button for an installed Internet radio tuner.
If the tuner is already in use, options are displayed in the following menu.
Internet Radio Tuner Menu

Otherwise, the "Favorites" menu is displayed.
"Favorites" Menu

Continue reading below for instructions on browsing Internet radio, Pandora Internet Radio, SiriusXM Internet Radio, and audiobooks from Librivox. For information on favorites, refer to “Favorites (Internet Radio & SiriusXM Only)”, which starts on page 50.
Browse
Browse Internet radio stations, Pandora Internet Radio, SiriusXM Internet Radio, and Librivox audiobooks.
Internet Radio
The Internet Radio option allows the user to search for Internet radio stations and podcasts or browse Internet radio stations.
- Press the button labeled Browse.
- Turn the TUNE knob to highlight Internet Radio and press ENTER.
- Turn the TUNE knob to highlight a browsing method and press ENTER.
- Select Search Stations or Search Podcasts to search for Internet radio stations or podcasts by name.
"Enter search string" Screen
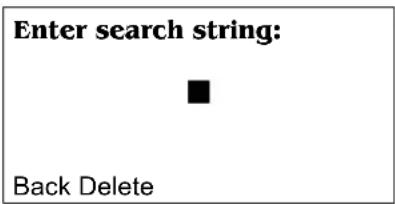
a. Turn the TUNE knob to display the first letter of the search string and press ENTER. To delete a letter, press the button labeled Delete. To return to the previous screen, press the button labeled Back.
b. Repeat step 1 for each letter in the search string and press ENTER.
c. Press the button labeled Submit to begin the search. A list of stations/podcasts matching the search string is displayed.
d. Turn the TUNE knob to highlight the desired station/podcast and press ENTER to select.
- Highlight Local Stations and press ENTER to display stations near the user's geographic location.
-
Highlight Recently Played and press ENTER to display stations that were recently played.
-
Highlight Location and press ENTER to display stations or podcasts near a specific location.
- Highlight Genre and press ENTER to display stations or podcasts within a specific genre.
- Highlight Newly Added and press ENTER to display stations that were recently added.
- Highlight Popular and press ENTER to display the most popular Internet radio statons.
While listening to an Internet radio station, the user can add it to a group of favorite stations, view the list of favorite stations, browse for another station, or configure the ATC-AUDIONET.
- Press the button labeled Add to add the current Internet radio station to the list of favorites (not used for Sirius, Librivox, or Pandora).
- Press the button labeled Favs to display the list of favorite stations.
- Press the button labeled Browse to browse through the available stations and other Internet radio feeds.
- Press the button labeled Setup to configure the ATC-AUDIONET.
Pandora Internet Radio
Choose the Pandora option to create and listen to Pandora Internet Radio stations.
Create a Station
To create a Pandora station:
- Press the button labeled Browse.
- Turn the TUNE knob to highlight Pandora and press ENTER. A list of Pandora stations is displayed.
"Pandora" Station Menu

NOTE: If Pandora is being used for the first time (or no one has logged in), options for logging in or creating a Pandora account are displayed. Refer to "Pandora" on page 28 for details.
- Press the button labeled Create.
"Enter an artist, song or composer" Screen
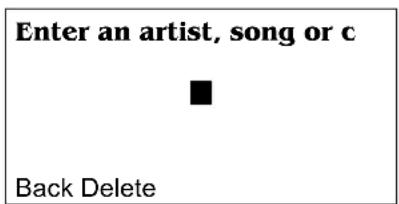
- Turn the TUNE knob to display the first letter of the search term and press ENTER. To delete a letter, press the button labeled Delete. To return to the previous screen, press the button labeled Back.
- Repeat step 4 for each letter in the search term and press ENTER.
- Press the button labeled Submit to continue. Options are displayed.
"Songs or Artists" Screen
Songs or Artists
Display Songs
Display Artists
Back Create

- Turn the TUNE knob to highlight the desired option and press ENTER. Selections that correlate to the search term are displayed.
- Turn the TUNE knob to highlight the desired selection and press ENTER to add the Pandora station.
Listen to Station
To listen to a Pandora station:
- Press the button labeled Browse.
- Turn the TUNE knob to highlight Pandora and press ENTER. A list of Pandora stations is displayed.
"Pandora" Station Menu
Pandora
QuickMix
U2 & Green Day Radio
Yesterday Radio
Back Create

- Turn the TUNE knob to highlight the desired station and press ENTER. The station starts playing.
Rate or Bookmark
While a song is playing, the song can be rated or bookmarked. To rate a song or bookmark the song or artist:
- Press the button labeled Rate.
- Turn the TUNE knob to the desired function and press ENTER.
SiriusXM Internet Radio
Choose the Sirius option to listen to the online feed from SIRIUS Satellite radio stations (subscription to online access required). To access the SIRIUS online feed:
- Press the button labeled Browse.
- Turn the TUNE knob to highlight Sirius and press ENTER.
- Turn the TUNE knob to highlight the desired category or channel and press ENTER.
- Press the button labeled Back to return to the previous screen.
Librivox Audiobooks
Choose the Librivox Audiobooks option to listen to free audiobooks from www.librivox.org. To select a file for listening:
- Press the button labeled Browse.
- Turn the TUNE knob to highlight Librivox Audiobooks and press ENTER.
- Turn the TUNE knob to highlight the desired file and press ENTER.
Favorites (Internet Radio & SiriusXM Only)
While listening to Internet radio or SiriusXM, favorite stations can be recalled, cleared, and stored.
Recall or Clear Favorite Stations
To recall or clear a favorite station:
- Press the button labeled Favs. A list of favorite categories is displayed.
"Favorites" Menu
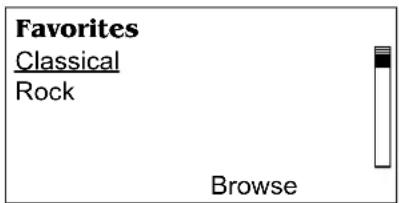
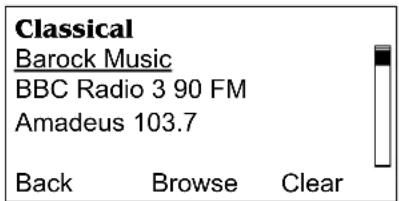
- Turn the TUNE knob to highlight a favorite category and press ENTER. A list of stations within the category is displayed.
"Classical" Favorite Stations Screen
-
Turn the TUNE knob to highlight the station to be tuned and press ENTER.
-
Press the button labeled Back to return to the previous screen.
- Press the button labeled Browse to browse stations.
- Press the button labeled Clear to remove the highlighted station from the list of favorites.
Add a Favorite Station
To add a favorite station:
- Tune an Internet radio station or SIRIUS station as described in "Browse" on page 47. The station information is displayed.
Internet Radio Tuner Menu
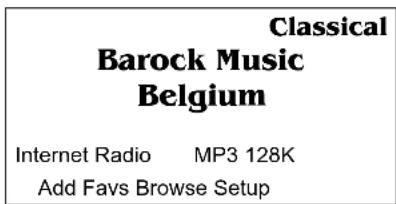
- Press the button labeled Add.
- Turn the TUNE knob to highlight the group where the favorite station is to be stored or highlight Add New Group to create a new favorite group.
"Enter new group name" Screen
Enter new group name:

Back Delete
a. Turn the TUNE knob to display the first letter of the group name and press ENTER. To delete a letter, press the button labeled Delete. To return to the previous screen, press the button labeled Back.
b. Repeat step a for each letter in the username and press ENTER.
c. Press the button labeled Submit to enter the group name and save the station (skip step 4).
- Press ENTER to save the favorite station.
NOTE: Favorite stations can also be saved online at radio.crestron.com. For more information, refer to the latest versions of the ATC-AUDIONET Operations & Installation Guide (Doc. 6933) or the ATC-AUDIONET Quickstart guide (Doc. 6931).
Problem Solving
Troubleshooting
The following table provides corrective action for possible trouble situations. If further assistance is required, please contact a Crestron customer service representative.
CEN-TRACK Troubleshooting
| TROUBLE POSSIBLE CAUSE(S) CORRECTIVE ACTION | ||
| Device does not function. | Device is not receiving power from a Crestron power source. | Use the provided Crestron power source. Verify connections. |
| Device is not communicating with the control system. | The IP address for the control system is invalid or the IP ID does not match the one defined in the SIMPL program. | |
| Tuner card does not function. | Tuner card not properly installed. | Refer to the installation instructions in the guide that came with the tuner card. |
| Cannot access tuner card controls from front panel. | Dusty contacts on tuner card. | Clean contacts with cotton swab or clean cloth. |
| No sound from tuner. | Antenna not connected or not connected properly. | Verify antenna connection. |
| Station detuned or weak. | Tune station; adjust antenna. | |
| Unsubscribed tuner not on preview channel. | If unsubscribed, be sure tuner is on preview channel. | |
| Subscribed tuner not on a subscribed channel. | If subscribed, be sure tuner is on a subscribed channel. | |
| Noisy AM/FM reception. | Improper antenna connection. | Verify antenna connection. |
| Tuned station does not produce sound (Internet radio only). | Firewall settings prevent reception of streaming audio. | Change firewall port settings or contact network administrator. |
| Cannot receive SiriusXM streaming content. | Subscription required to stream SiriusXM content. | Subscribe to SiriusXM streaming content at www.sirius.com. |
| Incorrect login information entered. | Correctly enter username and password (case-sensitive) on CEN-TRACK front panel. | |
| Scan does not operate. | Signal strength too weak. | Check antenna placement and orientation for good signal strength. |
| Loss of functionality due to electrostatic discharge. | Improper grounding. | Check that all ground connections have been made properly. |
Reference Documents
The latest version of all documents mentioned within the guide can be obtained from the Crestron Web site (www.crestron.com/manuals).
List of Related Reference Documents
DOCUMENT TITLE
ATC-AUDIONET
Crestron e-Control Reference Guide
Notes on Internet Radio
- Internet radio stations can only support a limited number of listeners at any time. If the station's servers have reached their limit of listeners, the ATC-AUDIONET is not able to connect. To resolve the problem try to connect again.
- Some radio station servers that have too much traffic may choose to "bump" people off the stream. If this happens, try to connect to the station again.
- If a station stops broadcasting, it is removed from the list of available stations.
- A station may go offline before it has been removed from the list. Offline stations do not produce a signal.
- Some stations may not appear on the list of stations if they broadcast in a format that is not supported by the ATC-AUDIONET. For a list of supported formats, refer to latest revision of the ATC-AUDIONET Operations & Installation Guide (Doc. 6933).
Further Inquiries
To locate specific information or resolve questions after reviewing this guide, contact Crestron's True Blue Support at 1-888-CRESTRON [1-888-273-7876] or refer to the listing of Crestron worldwide offices on the Crestron Web site (www.crestron.com/offices) for assistance within a particular geographic region.
To post a question about Crestron products, log onto the Online Help section of the Crestron Web site (www.crestron.com/onlinehelp). First-time users must establish a user account to fully benefit from all available features.
Future Updates
As Crestron improves functions, adds new features and extends the capabilities of the CEN-TRACK, additional information may be made available as manual updates. These updates are solely electronic and serve as intermediary supplements prior to the release of a complete technical documentation revision.
Check the Crestron Web site periodically for manual update availability and its relevance. Updates are identified as an “Addendum” in the Download column.
Return and Warranty Policies
Merchandise Returns / Repair Service
- No merchandise may be returned for credit, exchange or service without prior authorization from Crestron. To obtain warranty service for Crestron products, contact an authorized Crestron dealer. Only authorized Crestron dealers may contact the factory and request an RMA (Return Merchandise Authorization) number. Enclose a note specifying the nature of the problem, name and phone number of contact person, RMA number and return address.
- Products may be returned for credit, exchange or service with a Crestron Return Merchandise Authorization (RMA) number. Authorized returns must be shipped freight prepaid to Crestron, 6 Volvo Drive, Rockleigh, N.J. or its authorized subsidiaries, with RMA number clearly marked on the outside of all cartons. Shipments arriving freight collect or without an RMA number shall be subject to refusal. Crestron reserves the right in its sole and absolute discretion to charge a 15% restocking fee plus shipping costs on any products returned with an RMA.
- Return freight charges following repair of items under warranty shall be paid by Crestron, shipping by standard ground carrier. In the event repairs are found to be non-warranty, return freight costs shall be paid by the purchaser.
Crestron Limited Warranty
Crestron Electronics, Inc. warrants its products to be free from manufacturing defects in materials and workmanship under normal use for a period of three (3) years from the date of purchase from Crestron, with the following exceptions: disk drives and any other moving or rotating mechanical parts, pan/tilt heads and power supplies are covered for a period of one (1) year; touch screen display and overlay components are covered for 90 days; batteries and incandescent lamps are not covered.
This warranty extends to products purchased directly from Crestron or an authorized Crestron dealer. Purchasers should inquire of the dealer regarding the nature and extent of the dealer's warranty, if any.
Crestron shall not be liable to honor the terms of this warranty if the product has been used in any application other than that for which it was intended or if it has been subjected to misuse, accidental damage, modification or improper installation procedures. Furthermore, this warranty does not cover any product that has had the serial number altered, defaced or removed.
This warranty shall be the sole and exclusive remedy to the original purchaser. In no event shall Crestron be liable for incidental or consequential damages of any kind (property or economic damages inclusive) arising from the sale or use of this equipment. Crestron is not liable for any claim made by a third party or made by the purchaser for a third party.
Crestron shall, at its option, repair or replace any product found defective, without charge for parts or labor. Repaired or replaced equipment and parts supplied under this warranty shall be covered only by the unexpired portion of the warranty.
Except as expressly set forth in this warranty, Crestron makes no other warranties, expressed or implied, nor authorizes any other party to offer any warranty, including any implied warranties of merchantability or fitness for a particular purpose. Any implied warranties that may be imposed by law are limited to the terms of this limited warranty. This warranty statement supersedes all previous warranties.
GNU General Public License
Version 2, June 1991
Copyright (C) 1989, 1991 Free Software Foundation, Inc., 51 Franklin Street, Fifth Floor, Boston, MA 02110-1301 USA Everyone is permitted to copy and distribute verbatim copies of this license document but changing it is not allowed.
PREAMBLE
The licenses for most software are designed to take away your freedom to share and change it. By contrast, the GNU General Public License is intended to guarantee your freedom to share and change free software--to make sure the software is free for all its users. This General Public License applies to most of the Free Software Foundation's software and to any other program whose authors commit to using it. (Some other Free Software Foundation software is covered by the GNU Lesser General Public License instead.) You can apply it to your programs too.
When we speak of free software, we are referring to freedom, not price. Our General Public Licenses are designed to make sure that you have the freedom to distribute copies of free software (and charge for this service if you wish), that you receive source code or can get it if you want it, that you can change the software or use pieces of it in new free programs and that you know you can do these things.
To protect your rights, we need to make restrictions that forbid anyone to deny you these rights or to ask you to surrender the rights. These restrictions translate to certain responsibilities for you if you distribute copies of the software or if you modify it.
For example, if you distribute copies of such a program, whether gratis or for a fee, you must give the recipients all the rights that you have. You must make sure that they too receive or can get the source code. And you must show them these terms so they know their rights.
We protect your rights with two steps: (1) copyright the software, and (2) offer you this license which gives you legal permission to copy, distribute and/or modify the software.
Also, for each author's protection and ours, we want to make certain that everyone understands that there is no warranty for this free software. If the software is modified by someone else and passed on, we want its recipients to know that what they have is not the original, so that any problems introduced by others will not reflect on the original authors' reputations.
Finally, any free program is threatened constantly by software patents. We wish to avoid the danger that redistributors of a free program will individually obtain patent licenses, in effect making the program proprietary. To prevent this, we have made it clear that any patent must be licensed for everyone's free use or not licensed at all.
The precise terms and conditions for copying, distribution and modification follow.
GNU GENERAL PUBLIC LICENSE TERMS AND CONDITIONS FOR COPYING, DISTRIBUTION AND MODIFICATION
- This License applies to any program or other work which contains a notice placed by the copyright holder saying it may be distributed under the terms of this General Public License. The "Program" below refers to any such program or work, and a "work based on the Program" means either the Program or any derivative work under copyright law: that is to say, a work containing the Program or a portion of it, either verbatim or with modifications and/or translated into another language. (Hereinafter, translation is included without limitation in the term "modification".) Each licensee is addressed as "you".
Activities other than copying, distribution and modification are not covered by this License; they are outside its scope. The act of running the Program is not restricted, and the output from the Program is covered only if its contents constitute a work based on the Program (independent of having been made by running the Program). Whether that is true depends on what the Program does.
- You may copy and distribute verbatim copies of the Program's source code as you receive it, in any medium, provided that you conspicuously and appropriately publish on each copy an appropriate copyright notice and disclaimer of warranty; keep intact all the notices that refer to this License and to the absence of any warranty; and give any other recipients of the Program a copy of this License along with the Program.
You may charge a fee for the physical act of transferring a copy and you may at your option offer warranty protection in exchange for a fee.
- You may modify your copy or copies of the Program or any portion of it, thus forming a work based on the Program, and copy and distribute such modifications or work under the terms of Section 1 above, provided that you also meet all of these conditions:
a) You must cause the modified files to carry prominent notices stating that you changed the files and the date of any change.
b) You must cause any work that you distribute or publish, that in whole or in part contains or is derived from the Program or any part thereof, to be licensed as a whole at no charge to all third parties under the terms of this License.
c) If the modified program normally reads commands interactively when run, you must cause it, when started running for such interactive use in the most ordinary way, to print or display an announcement including an appropriate copyright notice and a notice that there is no warranty (or else, saying that you provide a warranty) and that users may redistribute the program under these conditions, and telling the user how to view a copy of this License. (Exception: if the Program itself is interactive but does not normally print such an announcement, your work based on the Program is not required to print an announcement.)
These requirements apply to the modified work as a whole. If identifiable sections of that work are not derived from the Program and can be reasonably considered independent and separate works in themselves, then this License and its terms do not apply to those sections when you distribute them as separate works. But when you distribute the same sections as part of a whole which is a work based on the Program, the distribution of the whole must be on the terms of this License, whose permissions for other licensees extend to the entire whole and thus to each and every part regardless of who wrote it.
Thus, it is not the intent of this section to claim rights or contest your rights to work written entirely by you; rather, the intent is to exercise the right to control the distribution of derivative or collective works based on the Program.
In addition, mere aggregation of another work not based on the Program with the Program (or with a work based on the Program) on a volume of a storage or distribution medium does not bring the other work under the scope of this License.
- You may copy and distribute the Program (or a work based on it, under Section 2) in object code or executable form under the terms of Sections 1 and 2 above provided that you also do one of the following:
a) Accompany it with the complete corresponding machine-readable source code, which must be distributed under the terms of Sections 1 and 2 above on a medium customarily used for software interchange; or,
b) Accompany it with a written offer, valid for at least three years, to give any third party, for a charge no more than your cost of physically performing source distribution, a complete machine-readable copy of the corresponding source code, to be distributed under the terms of Sections 1 and 2 above on a medium customarily used for software interchange; or,
c) Accompany it with the information you received as to the offer to distribute corresponding source code. (This alternative is allowed only for noncommercial distribution and only if you received the program in object code or executable form with such an offer, in accord with Subsection b above.)
The source code for a work means the preferred form of the work for making modifications to it. For an executable work, complete source code means all the source code for all modules it contains, plus any associated interface definition files, plus the scripts used to control compilation and installation of the executable. However, as a special exception, the source code distributed need not include anything that is normally distributed (in either source or binary form) with the major components (compiler, kernel and so on) of the operating system on which the executable runs, unless that component itself accompanies the executable.
If distribution of executable or object code is made by offering access to copy from a designated place, then offering equivalent access to copy the source code from the same place counts as distribution of the source code, even though third parties are not compelled to copy the source along with the object code.
-
You may not copy, modify, sublicense or distribute the Program except as expressly provided under this License. Any attempt otherwise to copy, modify, sublicense or distribute the Program is void and will automatically terminate your rights under this License. However, parties who have received copies or rights, from you under this License will not have their licenses terminated so long as such parties remain in full compliance.
-
You are not required to accept this License, since you have not signed it. However, nothing else grants you permission to modify or distribute the Program or its derivative works. These actions are prohibited by law if you do not accept this License. Therefore, by
modifying or distributing the Program (or any work based on the Program), you indicate your acceptance of this License to do so and all its terms and conditions for copying, distributing or modifying the Program or works based on it.
-
Each time you redistribute the Program (or any work based on the Program), the recipient automatically receives a license from the original licensor to copy, distribute or modify the Program subject to these terms and conditions. You may not impose any further restrictions on the recipients' exercise of the rights granted herein. You are not responsible for enforcing compliance by third parties to this License.
-
If, as a consequence of a court judgment or allegation of patent infringement or for any other reason (not limited to patent issues), conditions are imposed on you (whether by court order, agreement or otherwise) that contradict the conditions of this License, they do not excuse you from the conditions of this License. If you cannot distribute so as to satisfy simultaneously your obligations under this License and any other pertinent obligations, then as a consequence you may not distribute the Program at all. For example, if a patent license would not permit royalty-free redistribution of the Program by all those who receive copies directly or indirectly through you, then the only way you could satisfy both it and this License would be to refrain entirely from distribution of the Program.
If any portion of this section is held invalid or unenforceable under any particular circumstance, the balance of the section is intended to apply and the section as a whole is intended to apply in other circumstances.
It is not the purpose of this section to induce you to infringe any patents or other property right claims or to contest validity of any such claims; this section has the sole purpose of protecting the integrity of the free software distribution system, which is implemented by public license practices. Many people have made generous contributions to the wide range of software distributed through that system in reliance on consistent application of that system; it is up to the author/donor to decide if he or she is willing to distribute software through any other system and a licensee cannot impose that choice.
This section is intended to make thoroughly clear what is believed to be a consequence of the rest of this License.
-
If the distribution and/or use of the Program is restricted in certain countries either by patents or by copyrighted interfaces, the original copyright holder who places the Program under this License may add an explicit geographical distribution limitation excluding those countries, so that distribution is permitted only in or among countries not thus excluded. In such case, this License incorporates the limitation as if written in the body of this License.
-
The Free Software Foundation may publish revised and/or new versions of the General Public License from time to time. Such new versions will be similar in spirit to the present version but may differ in detail to address new problems or concerns.
Each version is given a distinguishing version number. If the Program specifies a version number of this License which applies to it and "any later version", you have the option of following the terms and conditions either of that version or of any later version published by the Free Software Foundation. If the Program does not specify a version number of this License, you may choose any version ever published by the Free Software Foundation.
- If you wish to incorporate parts of the Program into other free programs whose distribution conditions are different, write to the author to ask for permission. For software which is copyrighted by the Free Software Foundation, write to the Free Software Foundation; we sometimes make exceptions for this. Our decision will be guided by the two goals of preserving the free status of all derivatives of our free software and of promoting the sharing and reuse of software generally.
NO WARRANTY
-
BECAUSE THE PROGRAM IS LICENSED FREE OF CHARGE, THERE IS NO WARRANTY FOR THE PROGRAM, TO THE EXTENT PERMITTED BY APPLICABLE LAW. EXCEPT WHEN OTHERWISE STATED IN WRITING THE COPYRIGHT HOLDERS AND/OR OTHER PARTIES PROVIDE THE PROGRAM "AS IS" WITHOUT WARRANTY OF ANY KIND, EITHER EXPRESSED OR IMPLIED, INCLUDING BUT NOT LIMITED TO, THE IMPLIED WARRANTIES OF MERCHANTABILITY AND FITNESS FOR A PARTICULAR PURPOSE. THE ENTIRE RISK AS TO THE QUALITY AND PERFORMANCE OF THE PROGRAM IS WITH YOU. SHOULD THE PROGRAM PROVE DEFECTIVE, YOU ASSUME THE COST OF ALL NECESSARY SERVICING, REPAIR OR CORRECTION.
-
IN NO EVENT UNLESS REQUIRED BY APPLICABLE LAW OR AGREED TO IN WRITING WILL ANY COPYRIGHT HOLDER OR ANY OTHER PARTY WHO MAY MODIFY AND/OR REDISTRIBUTE THE PROGRAM AS PERMITTED ABOVE, BE LIABLE TO YOU FOR DAMAGES, INCLUDING ANY GENERAL, SPECIAL, INCIDENTAL OR CONSEQUENTIAL DAMAGES ARISING OUT OF THE USE OR INABILITY TO USE THE PROGRAM (INCLUDING BUT NOT LIMITED TO LOSS OF DATA OR DATA BEING RENDERED INACCURATE OR LOSSES SUSTAINED BY YOU OR THIRD PARTIES OR A FAILURE OF THE PROGRAM TO OPERATE WITH ANY OTHER PROGRAMS), EVEN IF SUCH HOLDER OR OTHER PARTY HAS BEEN ADVISED OF THE POSSIBILITY OF SUCH DAMAGES.
This page is intentionally left blank.
This page is intentionally left blank.

CRESTRON®
Crestron Electronics, Inc. Operations Guide - DOC. 6646C
15 Volvo Drive Rockleigh, NJ 07647 (2019916)
Tel: 888.CRESTRON 07.12
Fax: 201.767.7576 Specifications subject to
www.crestron.com change without notice.
- Regulatory Compliance
- Federal Communications Commission (FCC) Compliance Statement
- Industry Canada (IC) Compliance Statement
- Contents
- TunerRack Modular Multi-Tuner: CEN-TRACK 1
- TunerRack Modular Multi-Tuner: CEN-TRACK
- Introduction
- Features and Functions
- Modular Tuner Cards
- Multiple Outputs
- Metadata Display
- Program Guide
- Ethernet Control
- Specifications
- Physical Description
- Setup
- Network Wiring
- Identity Code
- Installation
- Rack Mounting
- To install the ears:
- Stacking
- Hardware Hookup
- Connect the Device
- Programming Software
- Earliest Version Software Requirements for the PC
- Programming with SystemBuilder
- Programming with SIMPL Windows
- Program Manager
- Uploading and Upgrading
- Establishing Communication
- Programs and Firmware
- Program Checks
- Configuration
- "Installer Tools" Menu
- Installer Tools
- Select Tuner Format
- Configure Front Panel
- Network Settings
- Select Device To Setup
- CEN-TRACK Setup
- Set the IP Address
- Edit IP Address
- Set the Subnet Mask
- Edit Subnet Mask
- Set the Default Router
- Edit Default Router
- Enable/Disable DHCP
- Edit DHCP
- View or Set the Hostname
- Enter New DNS Server
- Edit Control Sys IP ID
- Edit Ctrl Sys IP Address
- View MAC Address
- Name Sources
- Set Headphone Volume
- About
- Exit the "Installer Tools" Menu
- Exit Confirmation
- Additional Configuration
- Pandora
- Use an Existing Pandora Account
- Enter username (email a
- Enter password:
- Create a New Pandora Account
- Log Out from Pandora
- Other Services/Functions
- Setup SiriusXM Online
- "Setup Sirius" Menu
- Setup Sirius
- "Enter username" Screen (SiriusXM Online)
- Enter username:
- Back Delete
- Set Username
- Operation
- Control the AM/FM Tuner
- Manual Tuning
- Store and Clear Presets
- The store a preset:
- Are you sure you want to clear this preset?
- FM Presets
- Control the SIRIUS Tuner
- Recall Presets
- View Categories
- View Channels
- Channels
- View Channel Information
- View Information and Setup
- - About the Tuner:
- - Lock and Hide/Unhide Channels:
- - Change PIN
- Control the XM Tuner
- Technical Information Screen
- - Hide/Unhide Channels:
- Setup Channels
- Control the Internet Radio Tuner
- Browse
- Internet Radio
- Pandora Internet Radio
- Songs or Artists
- SiriusXM Internet Radio
- Librivox Audiobooks
- Favorites (Internet Radio & SiriusXM Only)
- Recall or Clear Favorite Stations
- Add a Favorite Station
- Enter new group name:
- Problem Solving
- Troubleshooting
- Reference Documents
- DOCUMENT TITLE
- Notes on Internet Radio
- Further Inquiries
- Future Updates
- Return and Warranty Policies
- Merchandise Returns / Repair Service
- Crestron Limited Warranty
- GNU General Public License
- PREAMBLE
- GNU GENERAL PUBLIC LICENSE TERMS AND CONDITIONS FOR COPYING, DISTRIBUTION AND MODIFICATION
- NO WARRANTY
- CRESTRON®
Brand : Crestron
Model : CEN-TRACK
Category : Audio tuner