
Aorus FI27Q-EK - Screen GIGABYTE - Free user manual and instructions
Find the device manual for free Aorus FI27Q-EK GIGABYTE in PDF.


| Product Type | Monitor |
| Brand | Gigabyte |
| Model | Aorus FI27Q-EK |
| Screen Size | 27 inches |
| Resolution | 2560 x 1440 (QHD) |
| Refresh Rate | 165 Hz |
| Panel Type | IPS |
| Response Time | 1 ms (MPRT) |
| Brightness | 350 cd/m² |
| Contrast Ratio | 1000:1 |
| Color Support | 16.7 million colors |
| Dimensions (with stand) | 615 x 404 x 200 mm |
| Weight (with stand) | 6.5 kg |
| Power Consumption (typical) | 65 W |
| Stand Adjustments | Tilt, Swivel, Height, Pivot |
| Connectivity | 2x HDMI, 1x DisplayPort, 2x USB 3.0, Audio Out |
| Key Features | FreeSync Premium, G-Sync Compatible, HDR Ready, OSD Sidekick |
| Care Instructions | Clean with a soft dry cloth; avoid liquids |
| Safety Certification | CE, FCC, RoHS |
| Spare Parts Availability | Contact Gigabyte support for power adapter, stand, or cables |
Frequently Asked Questions - Aorus FI27Q-EK GIGABYTE
User questions about Aorus FI27Q-EK GIGABYTE
0 question about this device. Answer the ones you know or ask your own.
Ask a new question about this device
Download the instructions for your Screen in PDF format for free! Find your manual Aorus FI27Q-EK - GIGABYTE and take your electronic device back in hand. On this page are published all the documents necessary for the use of your device. Aorus FI27Q-EK by GIGABYTE.
USER MANUAL Aorus FI27Q-EK GIGABYTE
© 2019 GIGA-BYTE TECHNOLOGY CO., LTD. All rights reserved.
The trademarks mentioned in this manual are legally registered to their respective owners.
Disclaimer
Information in this manual is protected by copyright laws and is the property of GIGABYTE.
Changes to the specifications and features in this manual may be made by GIGABYTE without prior notice.
No part of this manual may be reproduced, copied, translated, transmitted, or published in any form or by any means without GIGABYTE's prior written permission.
- In order to assist in the use of this monitor, carefully read the User Guide.
• For more information, check on our website at: https://www.gigabyte.com
SAFETY INFORMATION
Regulatory Notices
United States of America, Federal Communications Commission Statement
Supplier's Declaration of Conformity 47 CFR § 2.1077 Compliance Information
Product Name: LCD monitor
Trade Name: GIGABYTE
Model Number: AORUS FI27Q
Responsible Party – U.S. Contact Information: G.B.T. Inc.
Address: 17358 Railroad street, City Of Industry, CA91748
Tel.: 1-626-854-9338
Internet contact information: https://www.gigabyte.com
FCC Compliance Statement:
This device complies with Part 15 of the FCC Rules, Subpart B, Unintentional Radiators.
Operation is subject to the following two conditions: (1) This device may not cause harmful interference, and (2) this device must accept any interference received, including interference that may cause undesired operation.
This equipment has been tested and found to comply with the limits for a Class B digital device, pursuant to Part 15 of the FCC Rules. These limits are designed to provide reasonable protection against harmful interference in a residential installation. This equipment generates, uses and can radiate radio frequency energy and, if not installed and used in accordance with manufacturer's instructions, may cause harmful interference to radio communications. However, there is no guarantee that interference will not occur in a particular installation. If this equipment does cause harmful interference to radio or television reception, which can be determined by turning the equipment off and on, the user is encouraged to try to correct the interference by one or more of the following measures:
• Reorient or relocate the receiving antenna.
- Increase the separation between the equipment and receiver.
- Connect the equipment to an outlet on a circuit different from that to which the receiver is connected.
• Consult the dealer or an experienced radio/TV technician for help.
Canadian Department of Communications Statement
This digital apparatus does not exceed the Class B limits for radio noise emissions from digital apparatus set out in the Radio Interference Regulations of the Canadian Department of Communications. This class B digital apparatus complies with Canadian ICES-003.
European Union (EU) CE Declaration of Conformity
This device complies with the following directives: Electromagnetic Compatibility Directive 2014/30/EU, Low-voltage Directive 2014/35/EU, ErP Directive 2009/125/EC, RoHS directive (recast) 2011/65/EU.
This product has been tested and found to comply with all essential requirements of the Directives.
European Union (EU) RoHS (recast) Directive 2011/65/EU & the European Commission Delegated Directive (EU) 2015/863 Statement
GIGABYTE products have not intended to add and safe from hazardous substances (Cd, Pb, Hg, Cr ^+6 , PBDE, PBB, DEHP, BBP, DBP and DIBP). The parts and components have been carefully selected to meet RoHS requirement. Moreover, we at GIGABYTE are continuing our efforts to develop products that do not use internationally banned toxic chemicals.
European Union (EU) Community Waste Electrical & Electronic Equipment (WEEE) Directive Statement
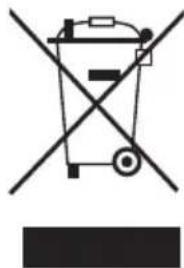
GIGABYTE will fulfill the national laws as interpreted from the 2012/19/EU WEEE (Waste Electrical and Electronic Equipment) (recast) directive. The WEEE Directive specifies the treatment, collection, recycling and disposal of electric and electronic devices and their components. Under the Directive, used equipment must be marked, collected separately, and disposed of properly.
WEEE Symbol Statement
natural_image
Symbol of a trash bin crossed out by a diagonal line, with no text or labels present.The symbol shown below is on the product or on its packaging, which indicates that this product must not be disposed of with other waste. Instead, the device should be taken to the waste collection centers for activation of the treatment, collection, recycling and disposal procedure.
For more information about where you can drop off your waste equipment for recycling, please contact your local government office, your household waste disposal service or where you purchased the product for details of environmentally safe recycling.
End of Life Directives-Recycling

The symbol shown below is on the product or on its packaging, which indicates that this product must not be disposed of with other waste. Instead, the device should be taken to the waste collection centers for activation of the treatment, collection, recycling and disposal procedure.
Japan Class 01 Equipment Statement
安全にご使用いただくために
Japan VCCI Class B Statement
クラスB VCCI 基準について
China RoHS Compliance Statement
Environment-friendly Use Period

Declaration of the Presence Condition of the Restricted Substances Marking
| 設備名稱:液晶顯示器,型號(型式):AORUS FI27QEquipment name:Type designation (Type): | ||||||
| 單元Unit | 限用物質及其化學符號Restricted substances and its chemical symbols | |||||
| 鉛Lead(Pb) | 汞Mercury(Hg) | 鎘Cadmium(Cd) | 六價鉻Hexavalent chromium( Cr^+6 ) | 多溴聯苯Polybrominated biphenyls(PBB) | 多溴二苯醚Polybrominated diphenyl ethers(PBDE) | |
| 塑料外框 | ○ ○ | ○ ○ | ○ ○ | |||
| 後殼 | ○ ○ | ○ ○ | ○ ○ | |||
| 液晶面板 | - ○ | ○ ○ | ○ ○ | |||
| 電路板組件 | - ○ | ○ ○ | ○ ○ | |||
| 底座 | ○ ○ | ○ ○ | ○ ○ | |||
| 電源線 | - ○ | ○ ○ | ○ ○ | |||
| 其他線材 | - ○ | ○ ○ | ○ ○ | |||
| 備考1.“超出0.1 wt %”及“超出0.01 wt %”係指限用物質之百分比含量超出百分比含量基準值。Note 1: “Exceeding 0.1 wt %” and “exceeding 0.01 wt %” indicate that the percentage content of the restricted substance exceeds the reference percentage value of presence condition.備考2.“○”係指該項限用物質之百分比含量未超出百分比含量基準值。Note 2: “○” indicates that the percentage content of the restricted substance does not exceed the percentage of reference value of presence.備考3.“-”係指該項限用物質為排除項目。Note 3:“-”indicates that the restricted substance corresponds to the exemption. | ||||||
Safety Precautions
Read through the following Safety Precautions before using the monitor.
- Only use the accessories that are provided with the monitor or that which are recommended by the manufacturer.
- Keep the plastic packaging bag for the product in a place that cannot be reached by children.
- Before connecting the monitor to the power outlet, make sure that the voltage rating of the power cable is compatible with the power specification in the country where you are located.
- The power cord plug must be connected to a properly wired and grounded power outlet.
- Do not touch the plug with wet hands, otherwise easily cause electric shock.
- Place the monitor in a stable and well-ventilated place.
- Do not place the monitor near any heat sources such as electric radiators or direct sunlight.
- The holes or openings on the monitor are for ventilation. Do not cover or block the ventilation holes with any objects.
- Do not use the monitor near water, drinks, or all types of liquids. Failure to do so may result in electric shock or damage to the monitor.
• Make sure to unplug the monitor from the power outlet before cleaning.
- As the screen surface is easy to be scratched, avoid touching the surface with any hard or sharp object.
- Use a soft lint-free cloth instead of a tissue to wipe the screen. You may use a glass cleaner to clean the monitor if required. However, never spray the cleaner directly onto the screen.
- Disconnect the power cable if the monitor is not being used for a long period of time.
• Do not attempt to disassemble or repair the monitor yourself.
CONTENTS
Safety Information ....3
Regulatory Notices....3
Safety Precautions....9
Introduction....11
Unpacking....11
Package Contents....13
Product Overview....14
Getting Started....16
Installing the Monitor Base 16
Adjusting the Viewing Angle....18
Installing a Wall-Mount Bracket (Optional) 20
Making Connections 22
Using the Device....23
Turning the Power On/Off 23
Managing the Cables 24
User Comfort Recommendations....24
Selecting the Input Source....25
Operations 26
Quick Menu....26
Configure the Device Settings....31
Appendices....41
Specifications 41
Supported Timing List....42
Troubleshooting....43
Basic Care....44
Notes on USB Charging 44
GIGABYTE Service Information....44
INTRODUCTION
Unpacking
-
Open the upper cover of the packaging box. Then observe the unpacking label attached on the inner cover.
-
Making sure the box is in the correct orientation, carefully lay the box on the stable surface.
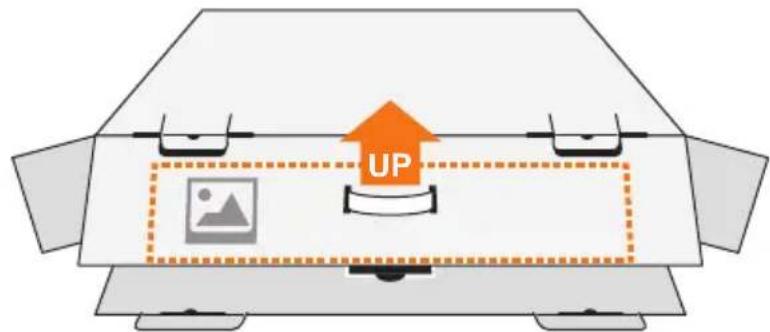
- Open the inner cover.
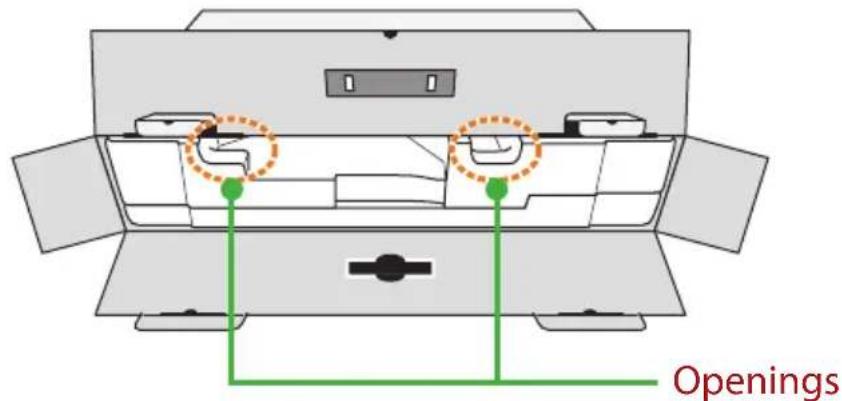
- Grab the EPS foam assembly (through the openings) to pull it out of the box.
natural_image
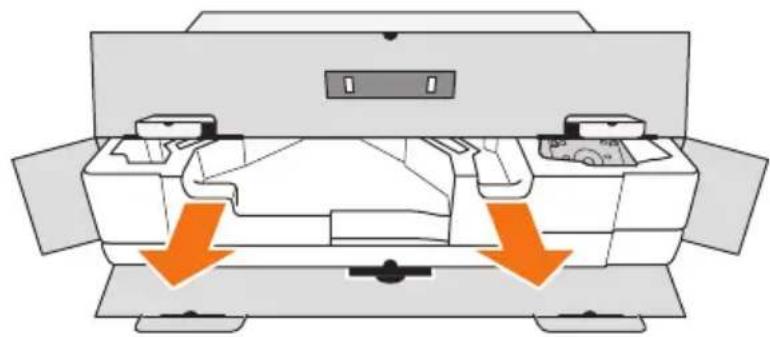
Diagram of a mechanical device with orange arrows indicating downward motion or force direction (no text or symbols present)- Remove the items from the upper EPS foam.
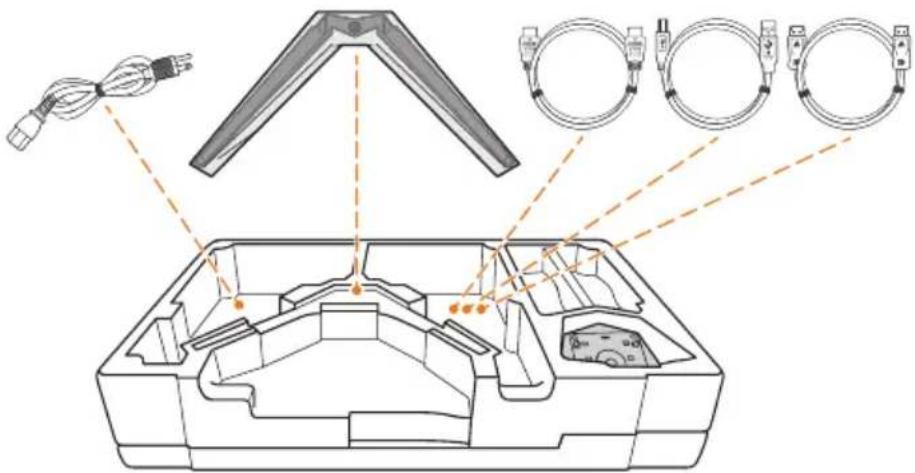
- Remove the upper EPS foam. Then you can remove the monitor from the lower EPS foam.
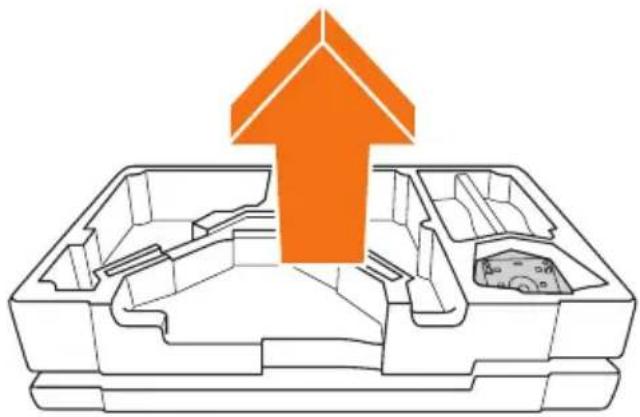
natural_image
Cross-sectional diagram of a mechanical or electronic component with an orange upward arrow indicating growth or direction (no text or symbols present)Package Contents
The following items come with your packaging box. If any of them is missing, please contact your local dealer.
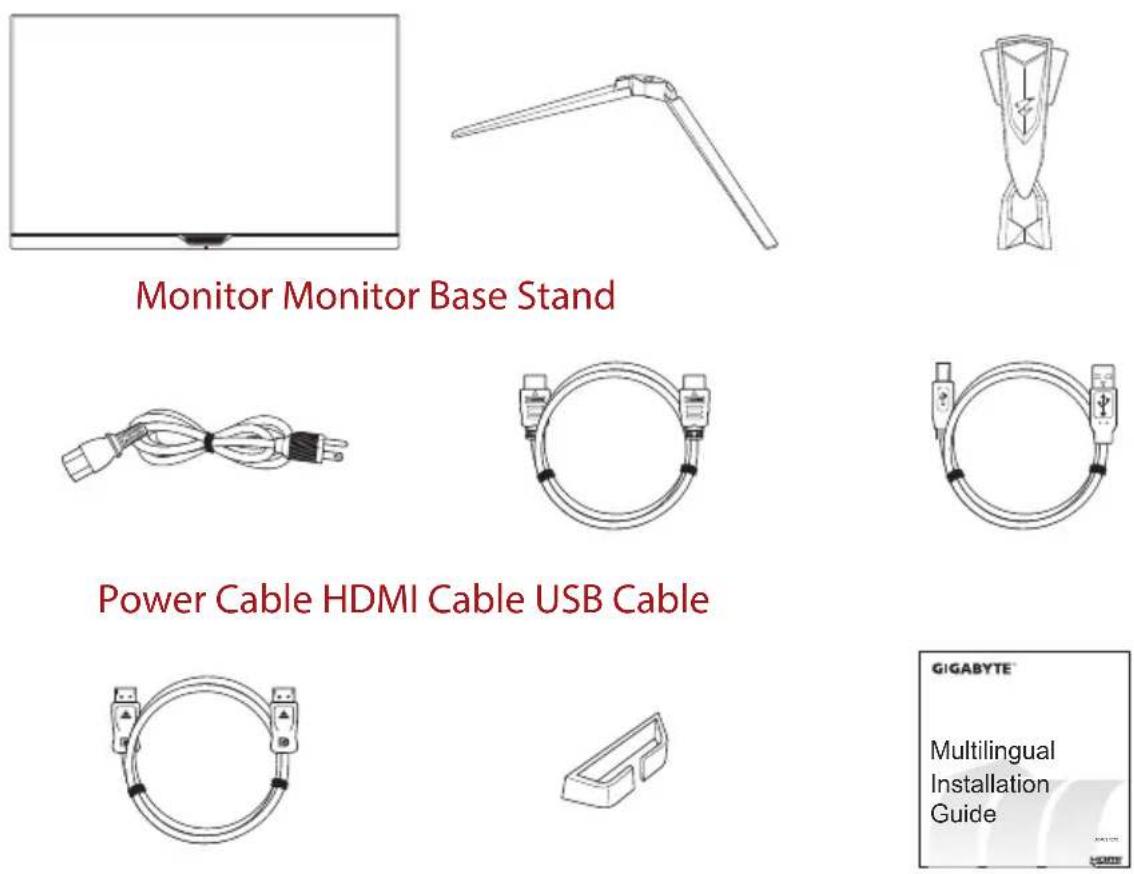
DP Cable Cable Holder Quick Start Guide
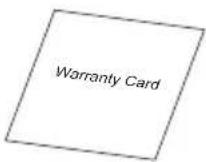
Warranty Card
Note: Please keep the packaging box and packing materials for future transportation of the monitor.
Product Overview
Front View
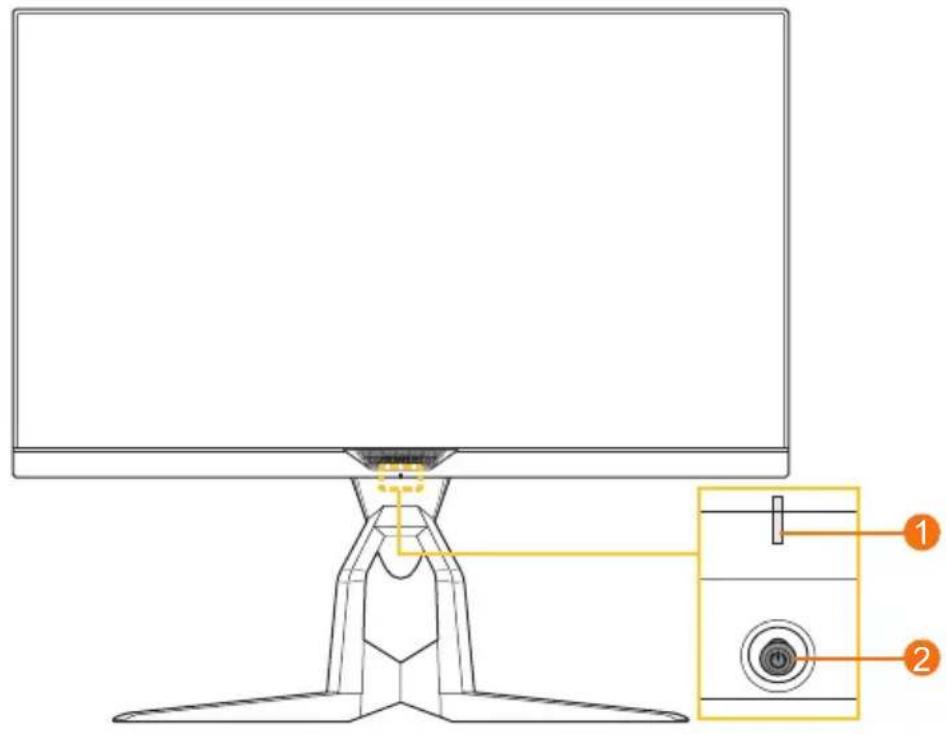
1 Power LED 2 Control button
Rear View
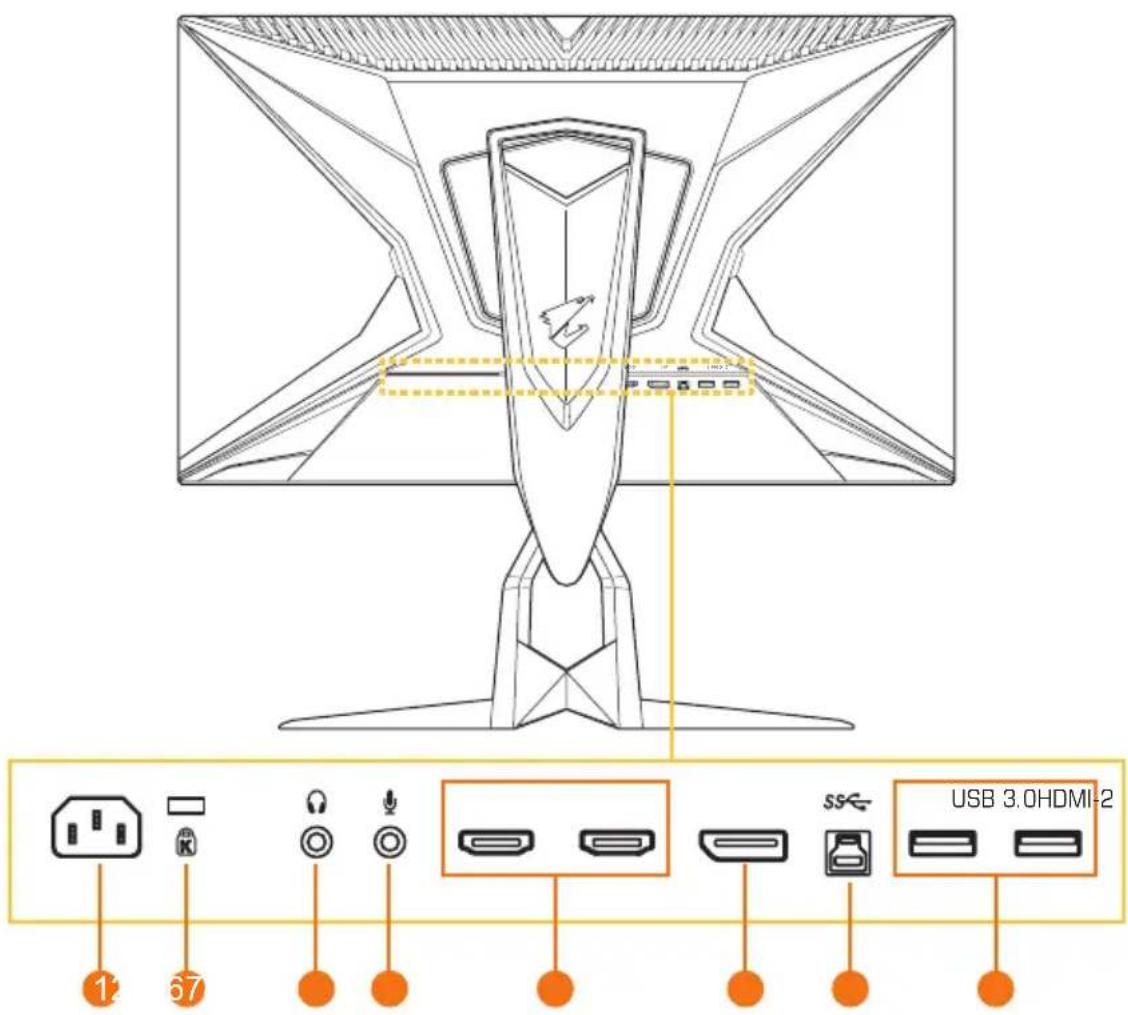
D PH[
1 AC IN jack
2 Kensington lock
3 Headphone jack
4 Microphone jack
5 HDMI ports (x2)
6 DisplayPort
7 USB upstream port
8 USB 3.0 ports (x2)
GETTING STARTED
Installing the Monitor Base
-
Place the monitor on the lower EPS foam, with the screen facing down.
-
Align and slide the hooks of the stand into the mounting slots on the rear of the screen.
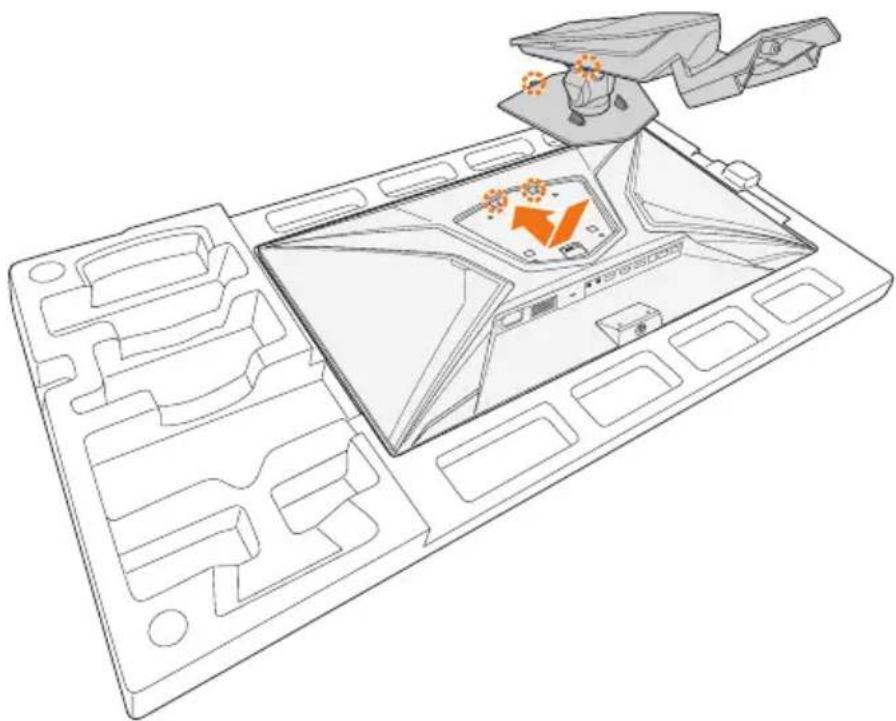
natural_image
Line drawing of a device interior with labeled components and orange arrows indicating flow or movement (no text or symbols)- Align the monitor base with the standoff underneath the stand. Then attach the base onto the stand.
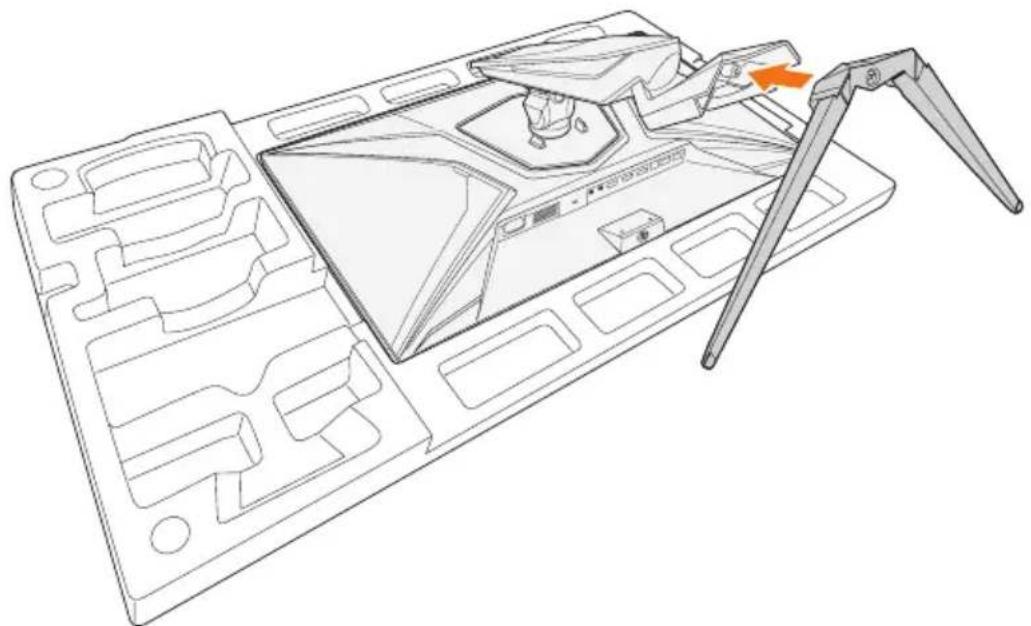
natural_image
Line drawing of a computer monitor with a handle and screen, showing internal components and a highlighted orange arrow (no text or symbols)- Tighten the screw to secure the monitor base in place.
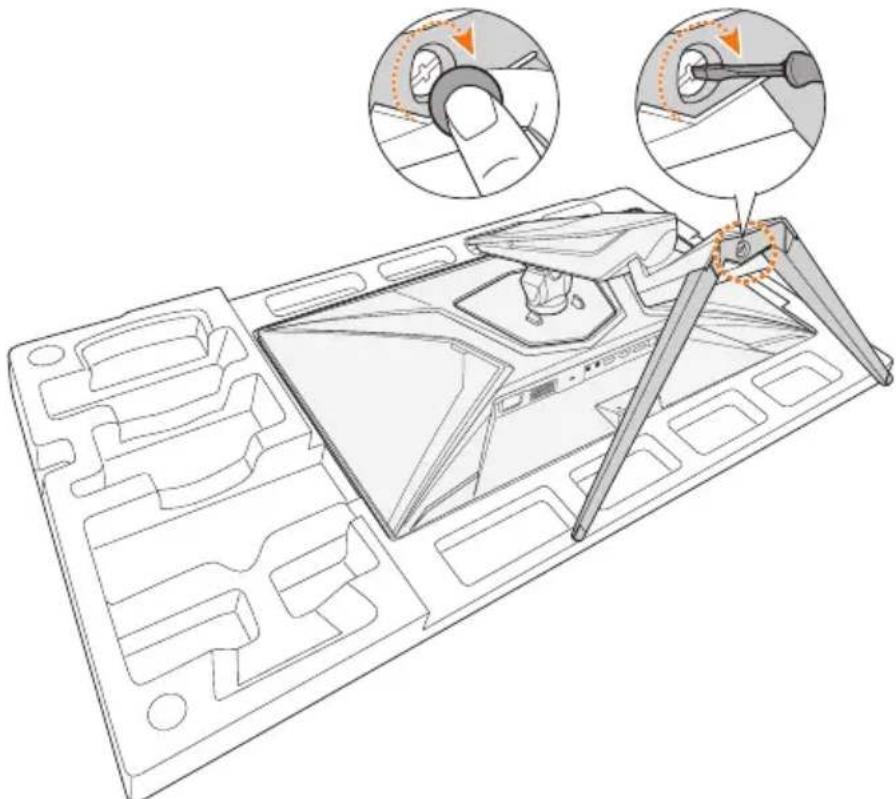
Note: You can either use a coin or a small flathead screwdriver to tighten the screw.
- Lift the monitor to an upright position and place it on a table.
Adjusting the Viewing Angle
Note: Hold the monitor base so that the screen does not topple when you make the adjustment.
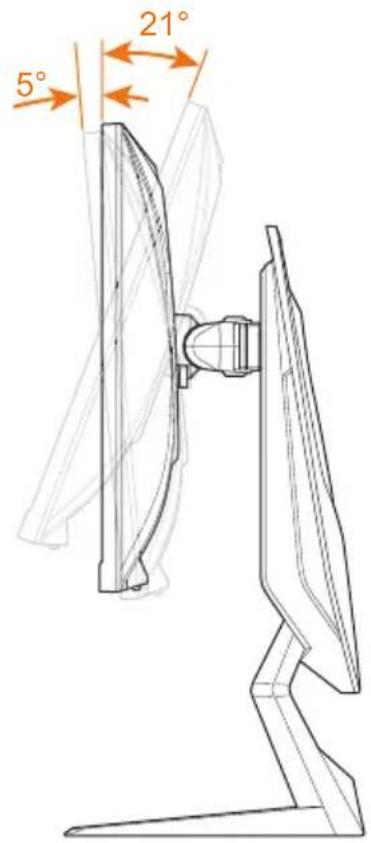
Adjusting the Tilt Angle
Tilt the screen forward or backward to the desired viewing angle (-5° to 21°).
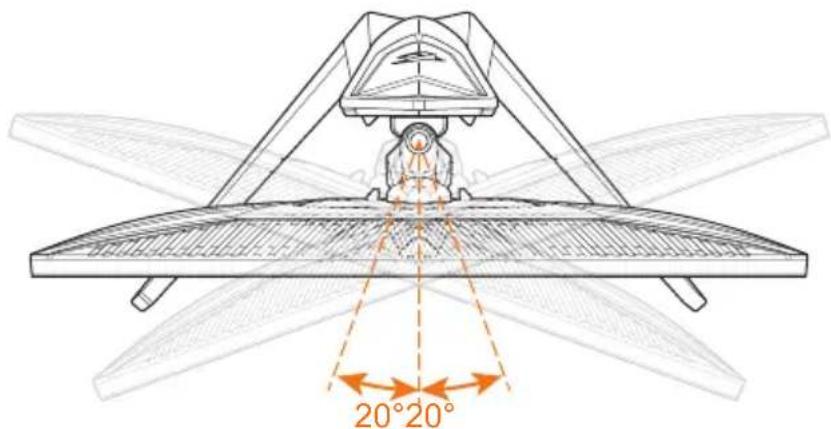
Adjusting the Swivel Angle
Swivel the screen to the left or right for the desired viewing angle (20°).
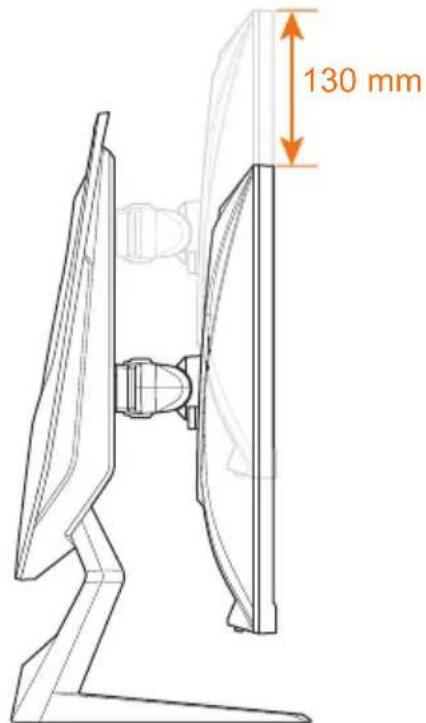
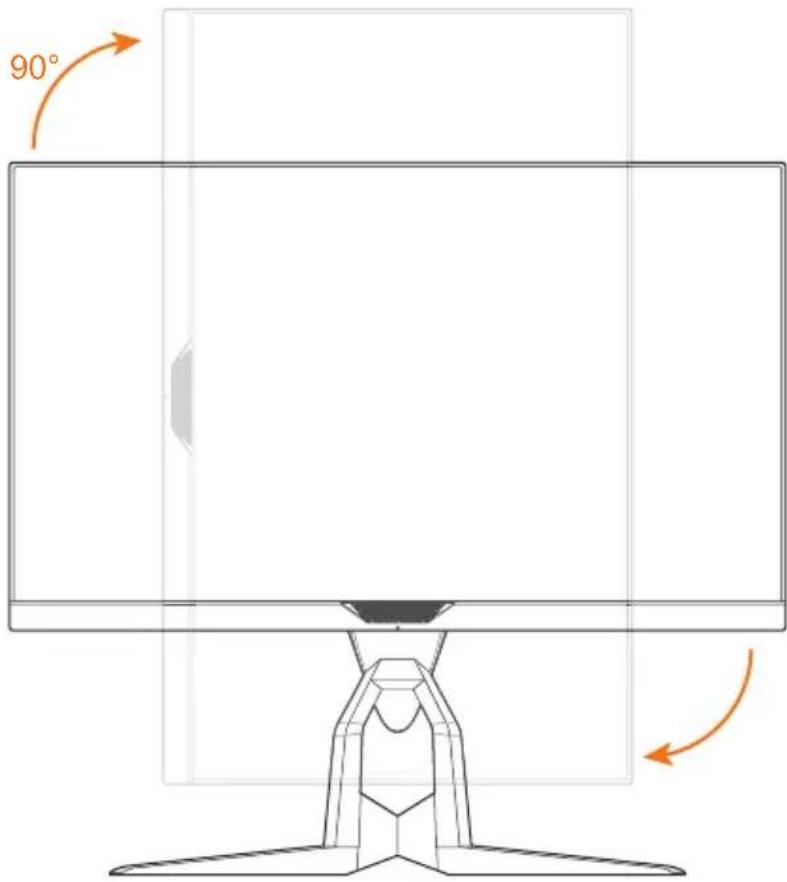
Changing the Screen Orientation
- Raise the screen to the highest position (130mm).
- Rotate the monitor (90° clockwise) to portrait orientation.
Installing a Wall-Mount Bracket (Optional)
Use only the 100 x 100 mm wall mount kit recommended by the manufacturer.
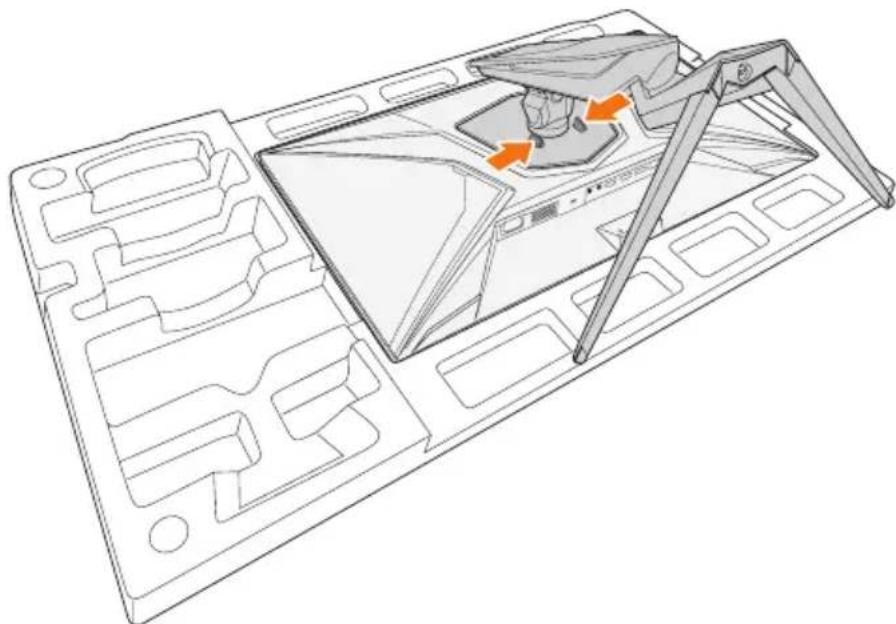
- Place the monitor on the lower EPS foam, with the screen facing down.
- Push the locking clips inward to detach the stand from the monitor.
natural_image
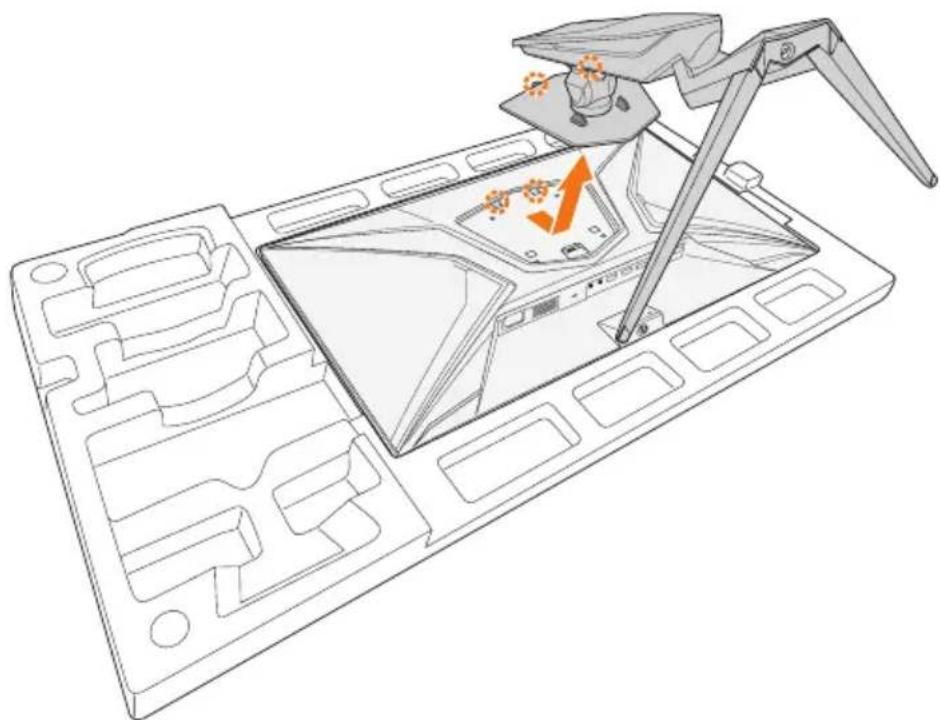
Technical line drawing of a mechanical assembly with orange arrows indicating motion or force (no text or symbols)- Pull down the stand slightly to disengage the hooks. Then remove the stand.
natural_image
Technical line drawing of a mechanical assembly with a lever and internal components (no text or symbols)- Attach the mounting bracket to the mounting holes at the rear of the monitor. Then use the screws to secure the bracket in place.
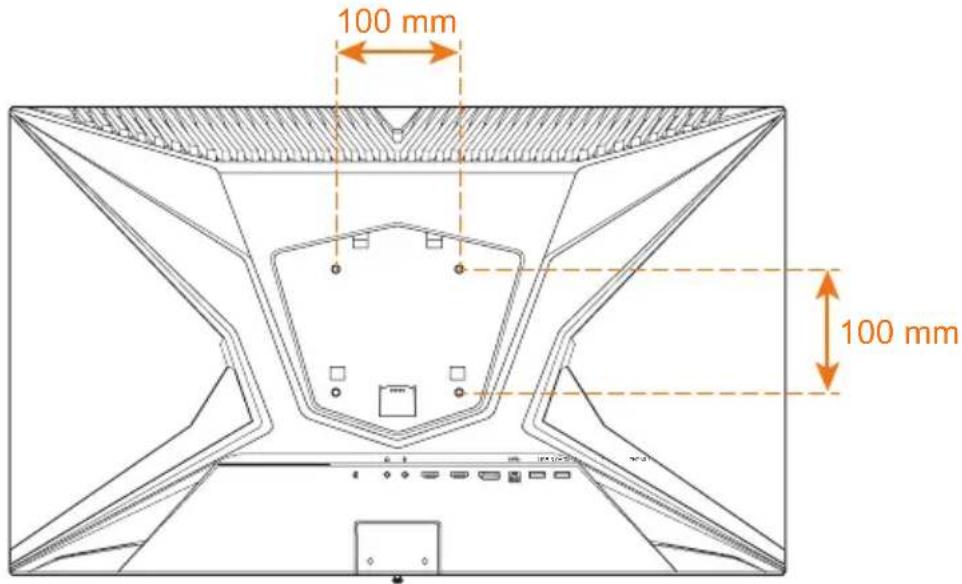
Note: To mount the monitor on the wall, refer to the installation guide that is included in the wall-mount bracket kit.
Making Connections
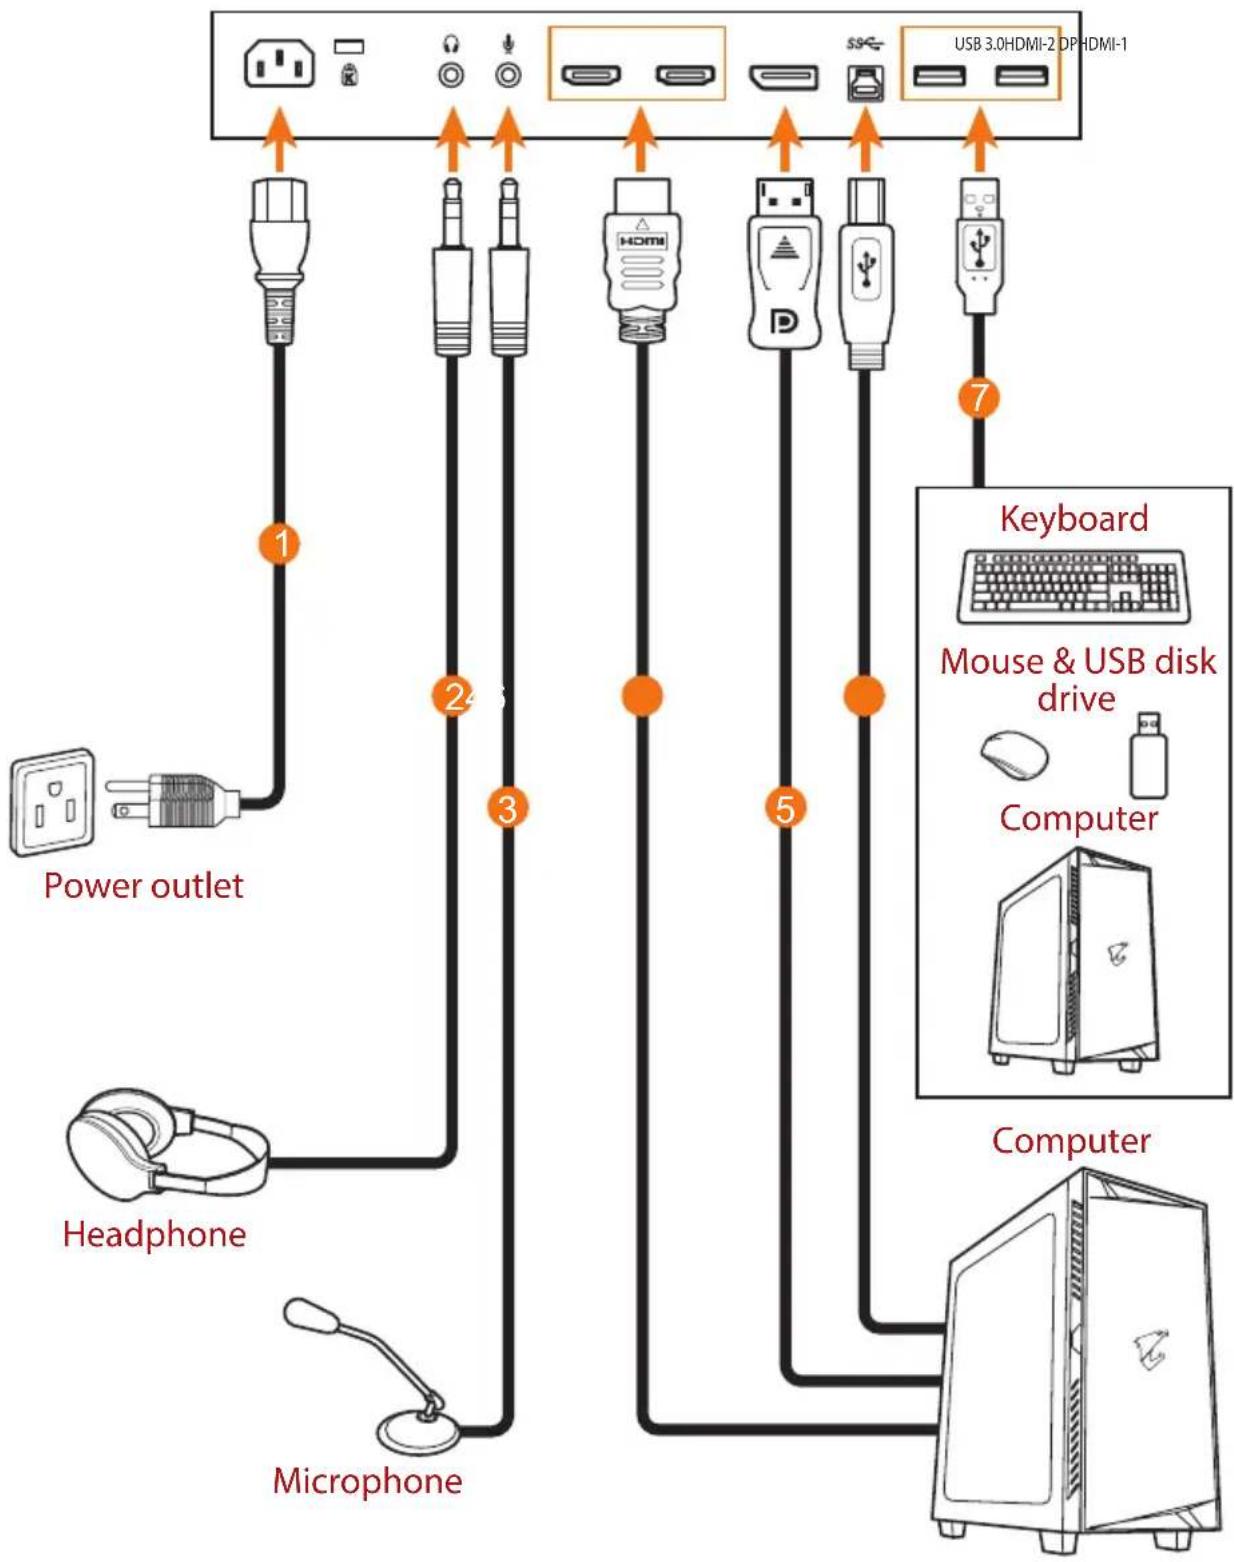
flowchart
graph TD
    A["Power outlet"] -->|1| B["USB 3.0HDMI-2 DP HDMI-1"]
    C["Headphone"] -->|2| B
    D["Microphone"] -->|3| B
    B -->|4| E["USB HDI"]
    B -->|5| F["USB HDI"]
    B -->|6| G["USB HDI"]
    B -->|7| H["USB HDI"]
    I["Keyboard Mouse & USB disk drive"] --> J["Computer"]
    K["Computer"] --> L["Computer"]
1 Power cable
2 Headphone cable
3 Microphone cable
4 HDMI cable
5 DisplayPort cable
6 USB (A-Male to B-Male) cable
7 USB cable
USING THE DEVICE
Turning the Power On/Off
Power On
- Connect one end of the power cable to the AC IN jack at the rear of the monitor.
- Connect other end of the the power cable to a power outlet.
- Press the Control button to turn on the monitor. The Power LED will light in white, indicating the monitor is ready to use.
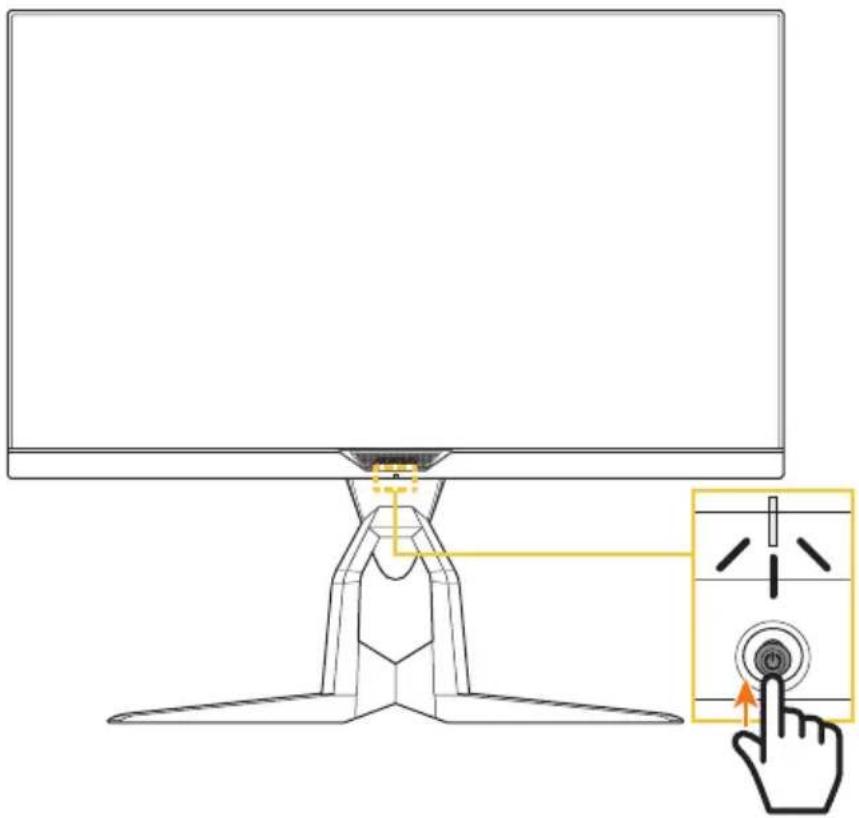
Note: If the Power LED remains off after you turn on the monitor, please check the LED Indicator setting in the Settings menu. Refer to page 38.
Power Off
Press the Control button for 2 seconds to turn off the monitor.
Note: When the Main menu appears on the screen, you can also turn off the monitor by moving the Control button down (◀). Refer to page 28.
Managing the Cables
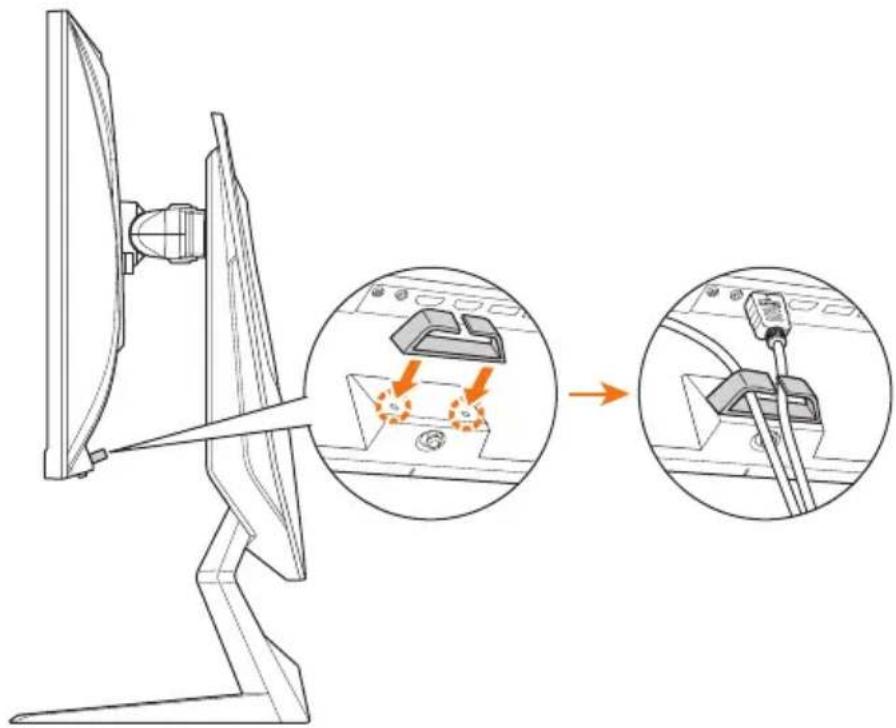
-
Align the cable clip with the clip holes at the rear of the monitor.
-
Press the cable clip firmly until it is fully seated. Then route the connected cables through the clip.
User Comfort Recommendations
The following are some tips for comfortable viewing of your monitor:
- Optimal viewing distances for monitors range from approximately 510 mm to 760 mm (20" to 30").
- A general guideline is to position the monitor such that the top of the screen is at or slightly below your eye-height when you are comfortably seated.
• Use adequate lighting for the type of work you are performing.
• Take regular and frequent breaks (at least for 10 minutes) every half-hour.
- Be sure to periodically look away from your monitor screen and focus on a far object for at least 20 seconds during the breaks.
- Eye exercise can help reduce eye strain. Repeat these exercises frequently: (1) look up and down (2) slowly roll your eye (3) move your eyes diagonally.
Selecting the Input Source
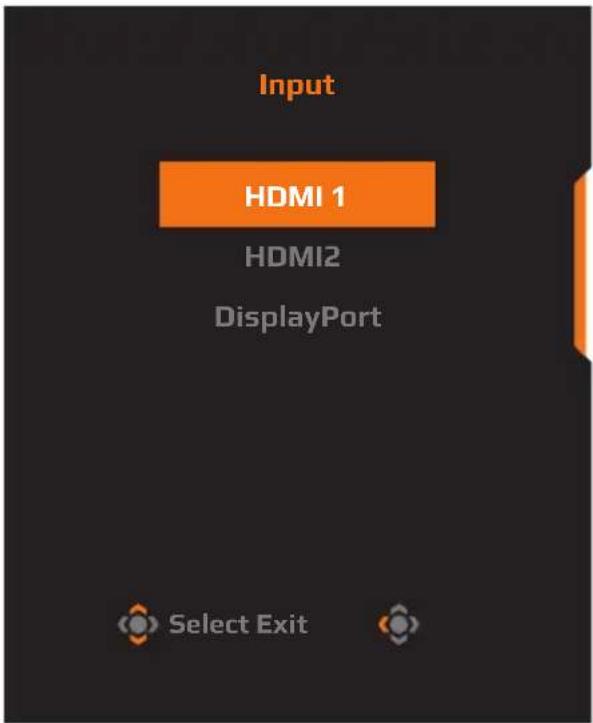
- Move the Control button right () to enter the Input menu.
- Move the Control button up/down () to select the desired input source. Then press the Control button to confirm.
OPERATIONS
Quick Menu
Hot Key
By default, the Control button has been assigned with the specific function.
Note: To change the preset hot key function, refer to the "Quick Switch" section on page 38.
To access the hot key function, do the following:
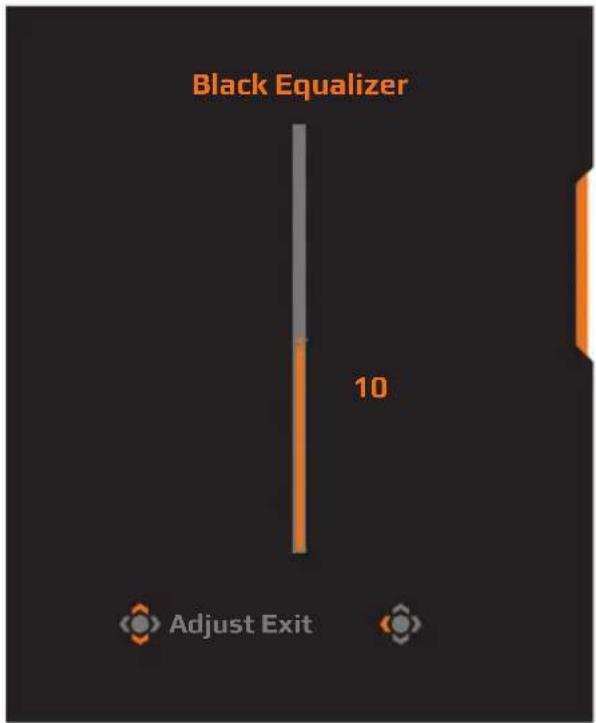
- Move the Control button up (◀) to enter the Black Equalizer menu.
Move the Control button up/down () to adjust the setting and press the Control button to confirm.
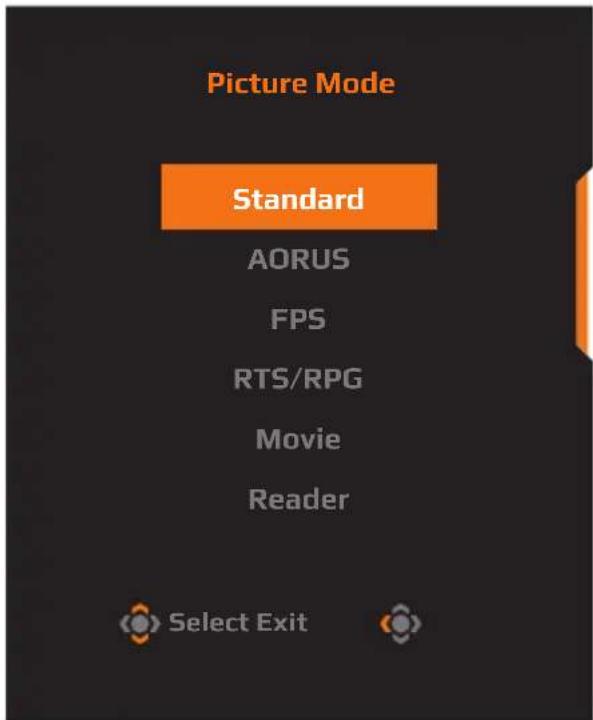
- Move the Control button down (◀) to enter the Picture Mode menu.
Move the Control button up/down () to select the desired option and press the Control button to confirm.
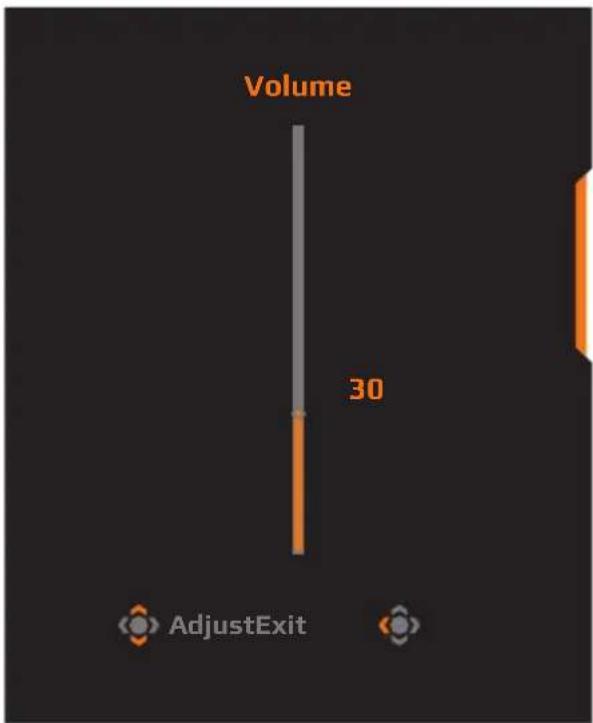
- Move the Control button left (◀) to enter the Volume menu.
Move the Control button up/down () to adjust the headphone volume level and press the Control button to confirm.
- Move the Control button right (◀) to enter the the Input menu. Refer to the "Selecting the Input Source" section.
Note: To close the menu, move the Control button left (☐).
Function Key Guide
Press the Control button to display the Main menu.
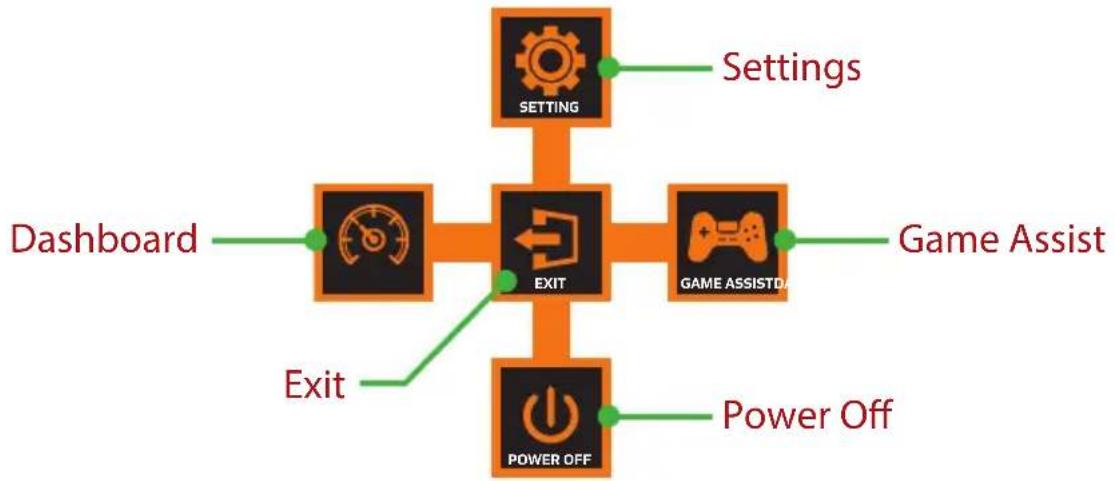
flowchart
graph TD
    A["SETTINGS"] --> B["EXIT"]
    C["GAME ASSISTDA"] --> B
    D["POWER OFF"] --> B
    E["Dashboard"] --> B
    F["Exit"] --> B
    G["Settings"] --> B
    H["Game Assist"] --> B
    I["Power Off"] --> B
Then use the Control button to select the desired function and configure the related settings.
Dashboard
When the Main menu appears on the screen, move the Control button left ( ) to enter the Dashboard menu.
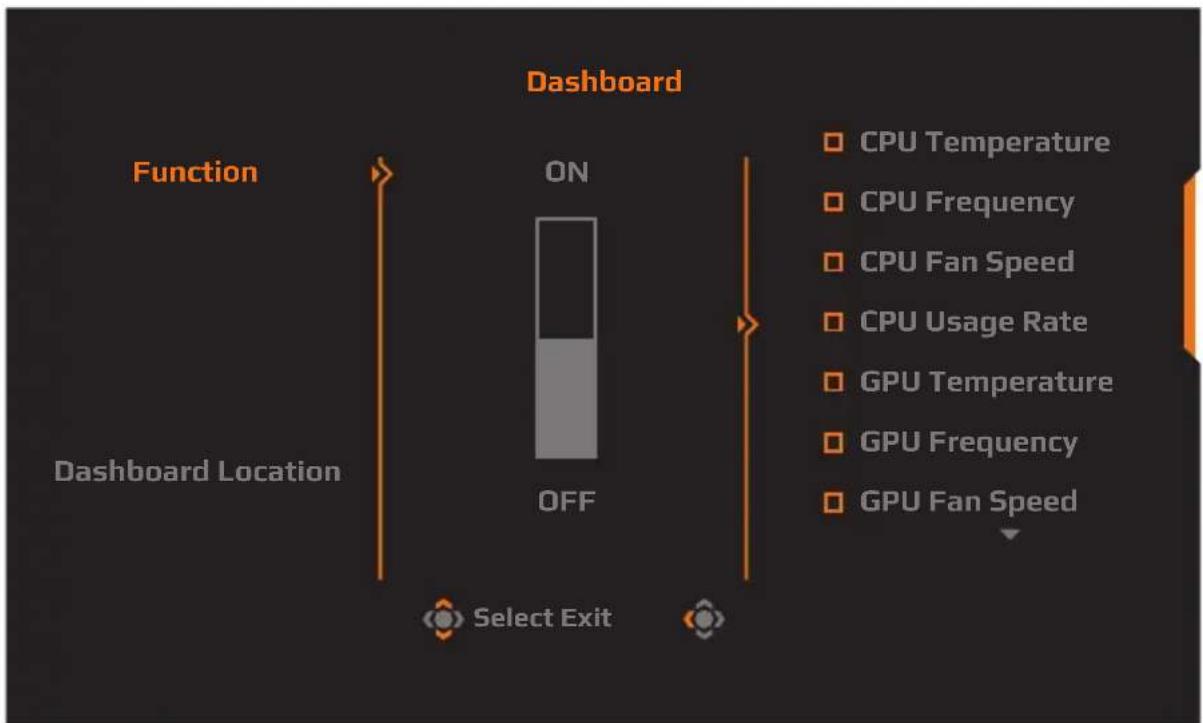
flowchart
graph LR
    A["Start"] --> B{Function}
    B -->|ON| C["Select Exit"]
    B -->|OFF| D["End"]
    C --> E["CPU Temperature"]
    C --> F["CPU Frequency"]
    C --> G["CPU Fan Speed"]
    C --> H["CPU Usage Rate"]
    C --> I["GPU Temperature"]
    C --> J["GPU Frequency"]
    C --> K["GPU Fan Speed"]
• Function: Enable/Disable the function. When enabled, you can select the desired option(s) to be shown on the screen.
- Dashboard Location: Specify the location of the Dashboard information to be shown on the screen.
Once the Dashboard configuration is complete, it will transfer the system data to the SOC through the USB port and display the value of the selected function(s) on the screen.
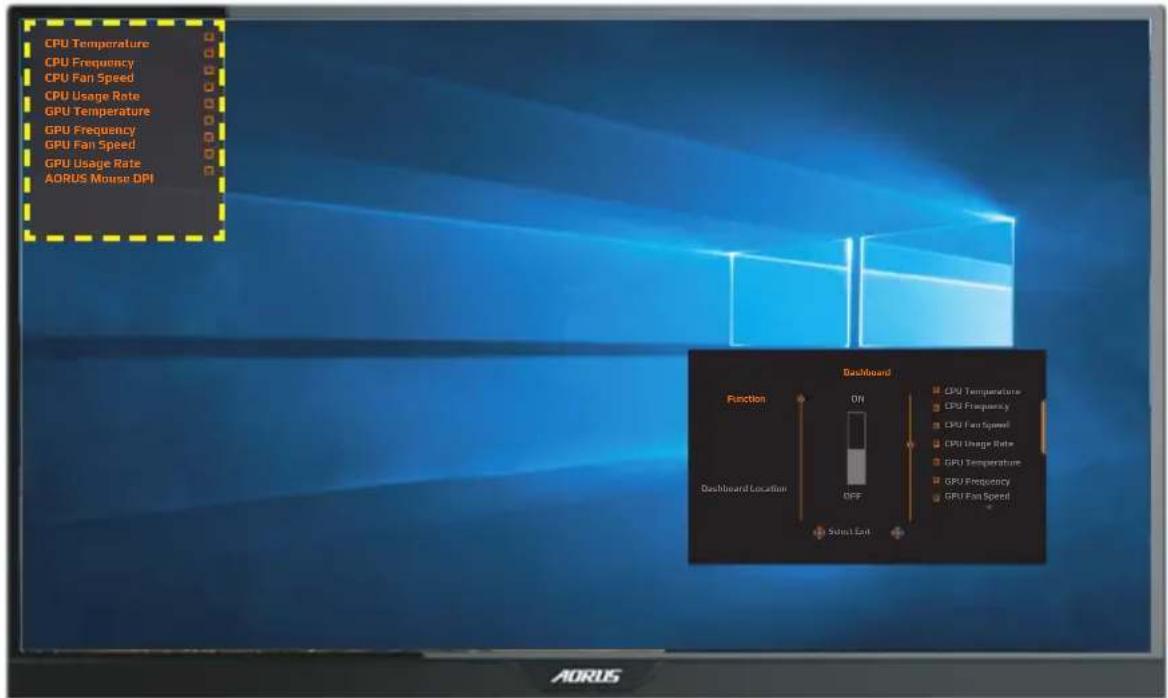
Note: Make sure the USB cable is properly connected to the USB upstream port of the monitor and the USB port of your computer.
Game Assist
When the Main menu appears on the screen, move the Control button right ( ) to enter the Game Assist menu.
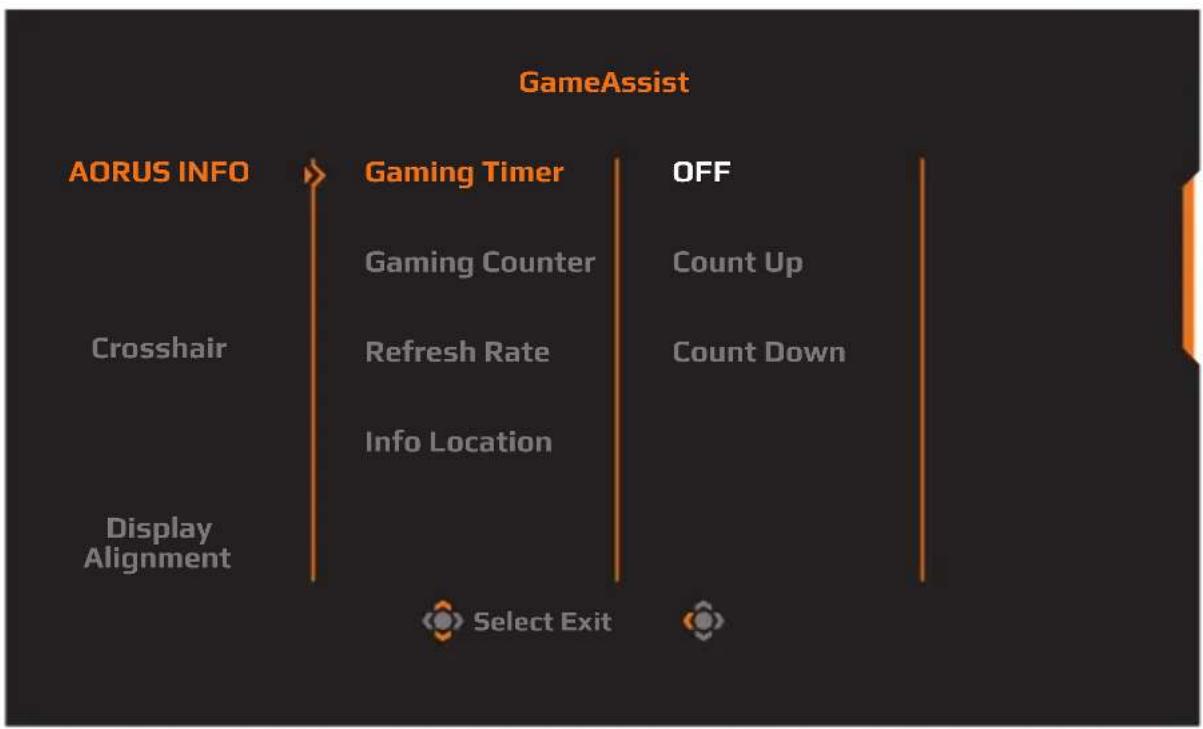
flowchart
graph TD
    A["AORUS INFO"] --> B["Gaming Timer"]
    B --> C["OFF"]
    D["Crosshair"] --> E["Gaming Counter"]
    E --> F["Count Up"]
    D --> G["Refresh Rate"]
    G --> H["Count Down"]
    I["Display Alignment"] --> J["Info Location"]
    J --> K["Select Exit"]
- AORUS INFO: Configure the FPS (First Person Shooting) game related settings.
√ Select Gaming Timer to select countdown timer mode. To disable this function, set the setting to OFF.
√ Select Gaming Counter or Refresh Rate to enable/disable the gaming counter or real-time refresh rate setting.
√ Select Info Location to specify the location of the information to be shown on the screen.
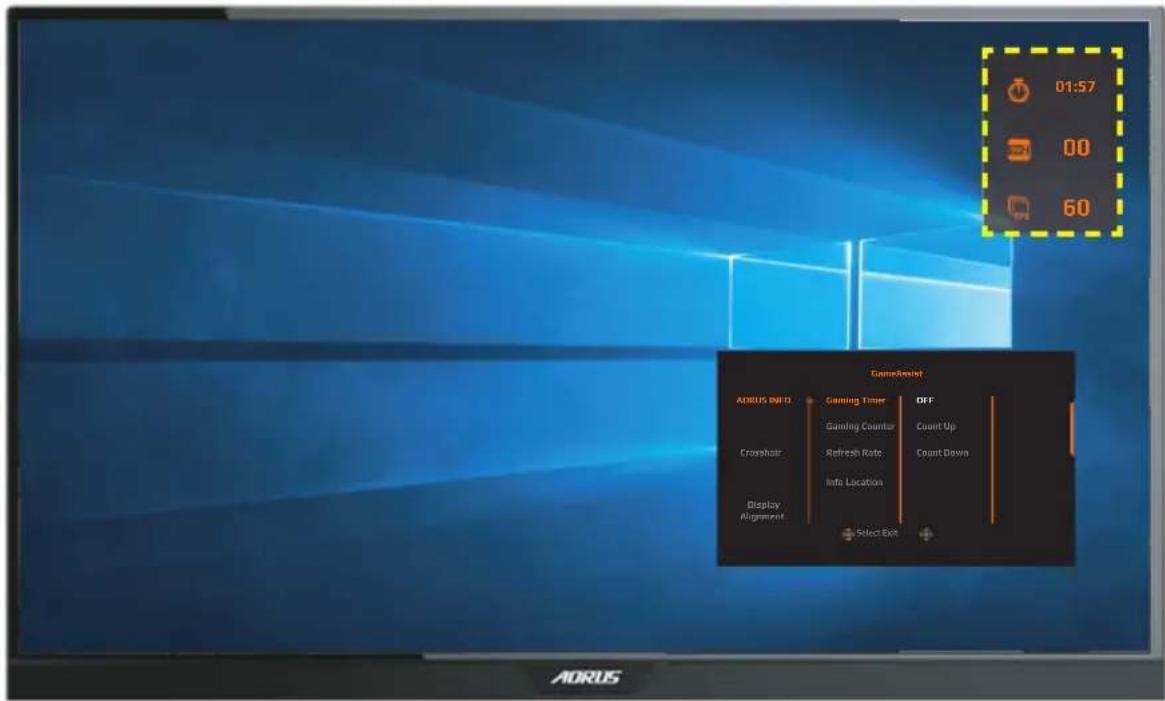
- Crosshair: Select the desired crosshair type to suit your gaming environment. It makes aiming much easier.
- Display Alignment: When the function is enabled, it displays the alignment lines on the four sides of the screen, providing handy tool for you to line up multiple monitors perfectly.
Configure the Device Settings
When the Main menu appears on the screen, move the Control button up () to enter the Settings menu.
Note: Use the Control button to navigate through the menu and make adjustments.
Gaming
Configure the game related settings.
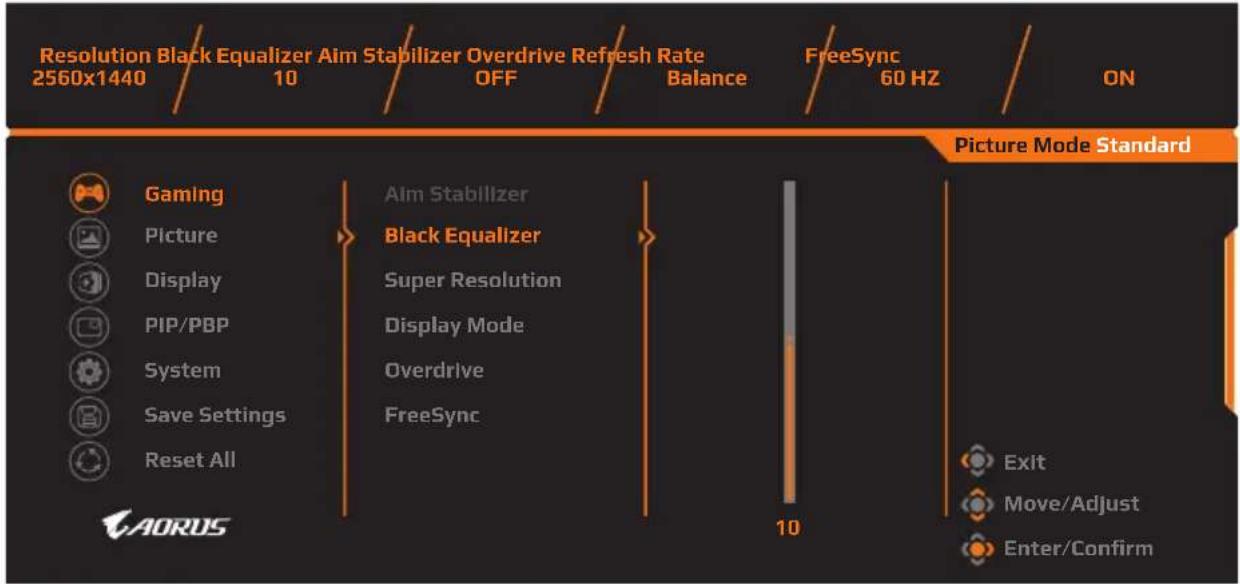
| Item | Description |
| Aim Stabilizer | When this function is enabled, it reduces the motion blur in a fast moving games.Note: This function is not available under the following conditions:- when the frequency setting is lower than 100Hz.- when the FreeSync function is activated. |
| Item Description | |
| Black Equalizer | Adjust the brightness of the black areas. |
| Super Resolution | Sharpen the low resolution images. |
| Display Mode Select the aspect ratio of the screen.Full: Scale the input image to fill the screen. Ideal for 16:9 aspect images.Aspect: Display the input image without geometric distortion filling as much of the screen as possible.1:1: Display the input image in its native resolution without scaling.22"W (16:10): Display the input image as if on a 22"W monitor of 16:10 aspect ratio.23"W (16:9): Display the input image as if on a 23"W monitor of 16:9 aspect ratio.23.6"W (16:9): Display the input image as if on a 23.6"W monitor of 16:9 aspect ratio.24"W (16:9): Display the input image as if on a 24"W monitor of 16:9 aspect ratio.Note: This option is not compatible with FreeSync function. | |
| Overdrive Improve the response time of the LCD monitor. | |
| FreeSync When this function is enabled, it eliminates the screen lag and tearing while playing games. | |
Picture
Configure the image related settings.
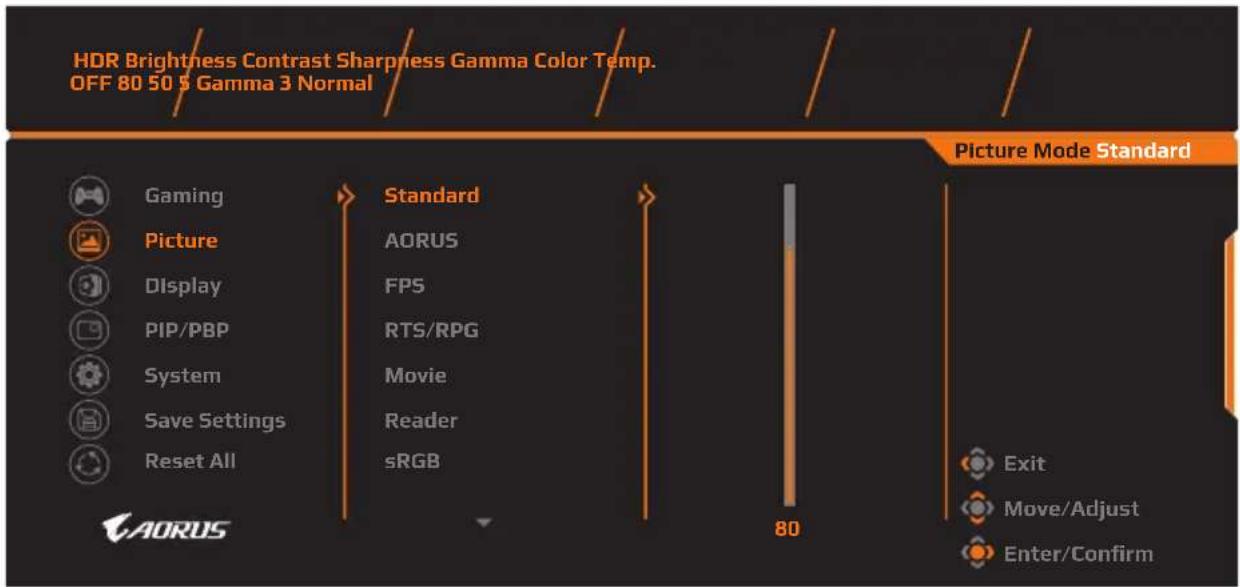
Select the one of the preset picture mode.
• Standard: For editing documents or browsing websites.
• AORUS: For playing AORUS GAMER games.
• FPS: For playing FPS (First Person Shooting) games.
- RTS/RPG: For playing RTS (Real-Time Strategy) or RPG (Role-Playing Game) games.
• Movie: For watching movies.
- Reader: For viewing documents.
• sRGB: For viewing photos and graphics on the computer.
- Custom 1: Customized picture mode settings.
- Custom 2: Customized picture mode settings.
- Custom 3: Customized picture mode settings.
Then you can configure the following image settings.
| Item Description | |
| Brightness Adjust the brightness of the image. | |
| Contrast | Adjust the contrast of the image. |
| Color Vibrance | Adjust the intensity of the more muted colors. |
| Sharpness | Adjust the sharpness of the image. |
| Gamma | Adjust the middle level of luminance. |
| Color Temperature | Select the color temperature.Note: Select User Defineto customize the color temperature by adjusting the red (R), green (G), or blue (B) level according to your preference. |
| Low Blue Light | Reduce the amount of blue light exposure from the screen.Level 0: No change.Level 1~10: The higher the level, the more blue light will be reduced.Note:Level 10 is optimized setting. It is compliance with TUV Low Blue Light Certification. |
| Dynamic Contrast | Adjust the black level of the image to achieve the optimum contrast. |
| Senseye Demo | Split the screen in half (2 windows).The image of the selected mode with its default settings will appear on the left window and the adjusted image with the new settings will appear on the right window. |
| Reset Picture Reset all Picture settings to the default settings. | |
Display
Configure the display screen related settings.
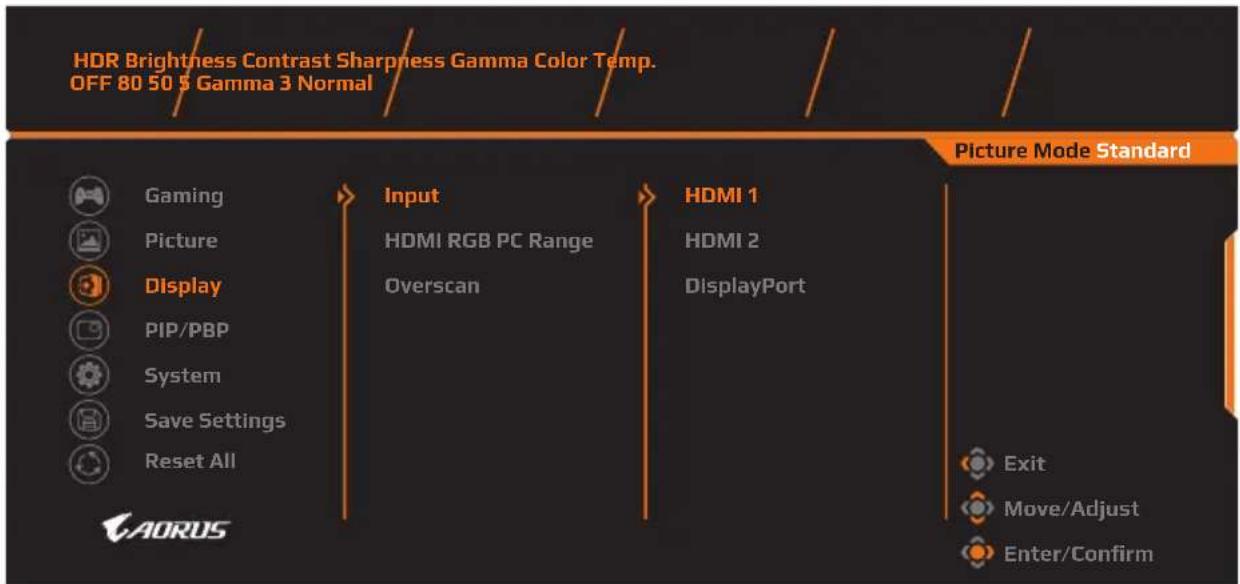
| Item Description | |
| Input Select the | input source. |
| HDMI RGB PC Range | Select an appropriate RGB range setting or let the monitor to detect it automatically.Note: This option is only available for HDMI input. |
| Overscan When | this function is enabled, it slightly enlarges the input image to hide the outermost edges of the image.Note: This option is only available for HDMI input. |
PIP/PBP
Configure the multi-picture related settings.
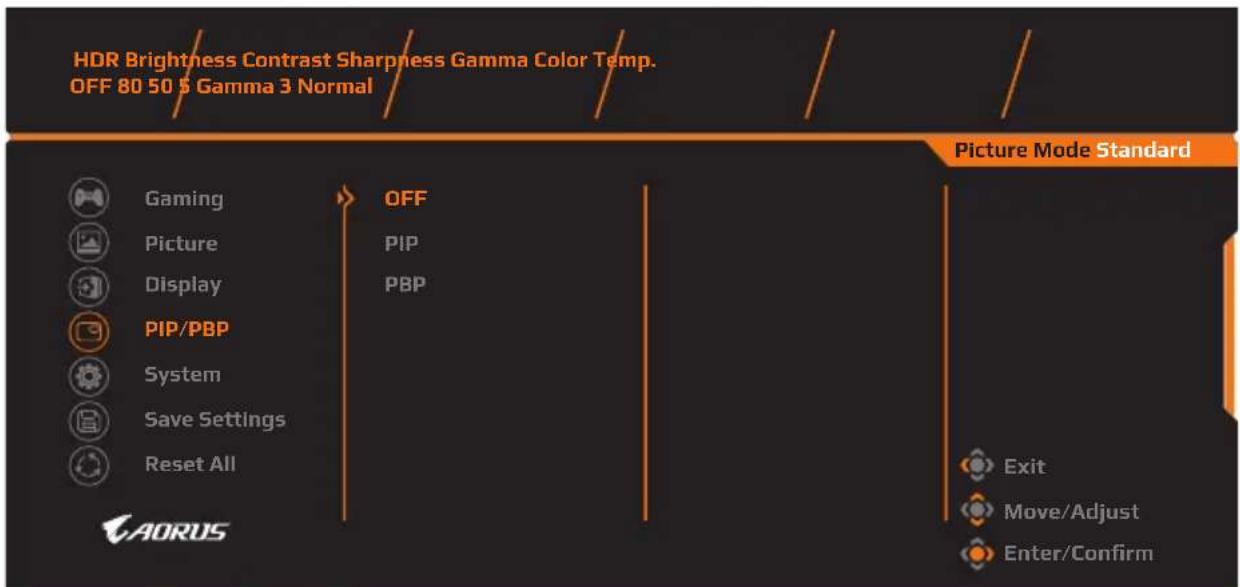
| Item Description | |
| OFF Disable the | PIP/PBP function. |
| PIP Split the screen into 2 parts (main window and inset window).Source: Change the input source for the inset window.PIP Size: Adjust the inset window size.Location: Move the inset window position.Display Switch: Swap the two windows.Audio Switch: Select which audio source you want to hear the sound from. | |
| PBP Display 1x1 | split screen (left and right windows).Source: Change the input source for the right window.PBP Size: Adjust the window size.Display Switch: Swap the two windows.Audio Switch: Select which audio source you want to hear the sound from. |
Note: PIP/PBP is not compatible with HDR and FreeSync functions.
System
Configure the system related settings.
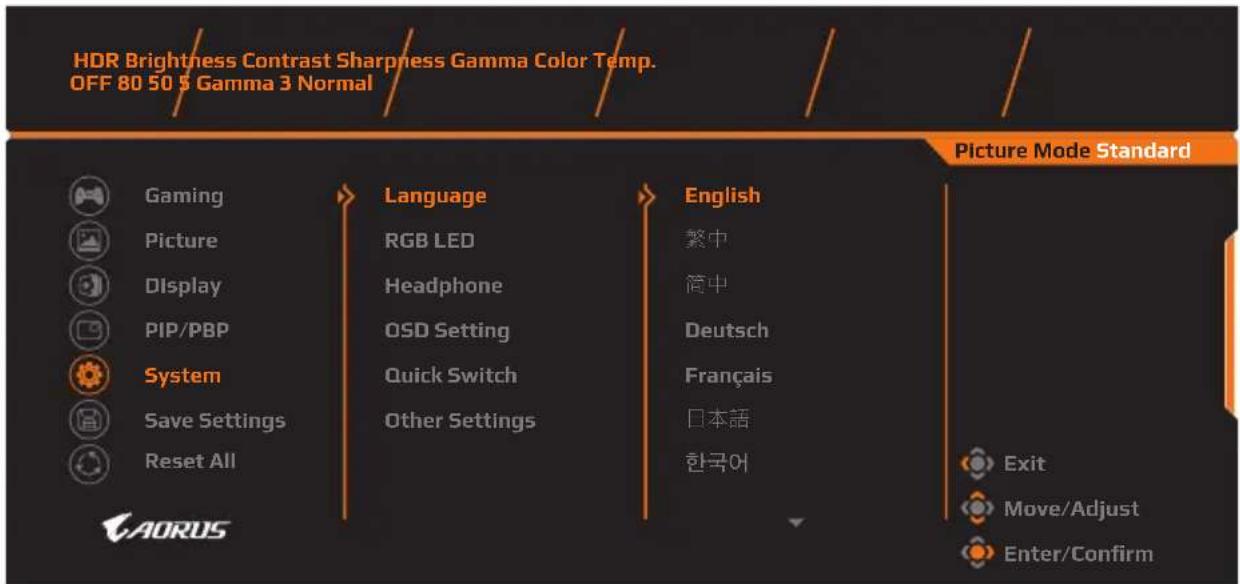
| Item Description | |
| Language Select | an available language for the OSD menu. |
| RGB LED When | this function is enabled, you can select the preset LED color and effect to be displayed on the rear of the monitor. |
| Headphone Configure the headphone settings.Volume: Adjust the volume level.Mute: Enable/Disable the mute function. | |
| OSD Settings | Configure the on-screen display (OSD) menu related settings.Display Time: Set the length of time the OSD menu remains on the screen.OSD Transparency: Adjust the OSD menu transparency.OSD Lock: When this function is enabled, no OSD adjustment is allowed.Note: To disable the OSD lock function, press theControlkey. When the message appears on the screen, selectYesto confirm.The button is locked, confirm to unlock OSD.No Yes |
| Quick Switch Assign the function of the hot keys.Available options: Aim Stabilizer, Black Equalizer, Low Blue Light, Volume, Input, Contrast, Brightness, and Picture Mode.The default setting of the hot keys as below:⇒ Up(): Black Equalizer⇒ Down(): Picture Mode⇒ Right(): Input⇒ Left(): Volume | |
| Other Settings• | Resolution Notice: When this function is enabled,the recommended resolution message will appear on the screen when the monitor switches to another input source.Input Auto Switch: When this function is enabled,it automatically switches to an available input source.Auto Power OFF: When this function is enabled,the monitor will automatically turn off after a certain amount of time.LED Indicator: By default, the LED indicator is set to ON.⇒ ON: The Power LED lights white during operation and lights orange in standby mode.⇒ OFF: Turn off the Power LED.⇒ Friendly: The Power LED lights orange in standby mode.⇒ When the power supply is switched off, the Power LED will remain off. |
| Other Settings (continue) | DisplayPort Ver.: Set the DisplayPort version to 1.1, 1.2, or 1.2+HDR.Note:To enable the HDR effect for the DP port, you may need to set the DP1.2 and enable the 8-bit color output in your graphics card.Make sure to configure this option based on the DisplayPort version supported by your graphics card. |
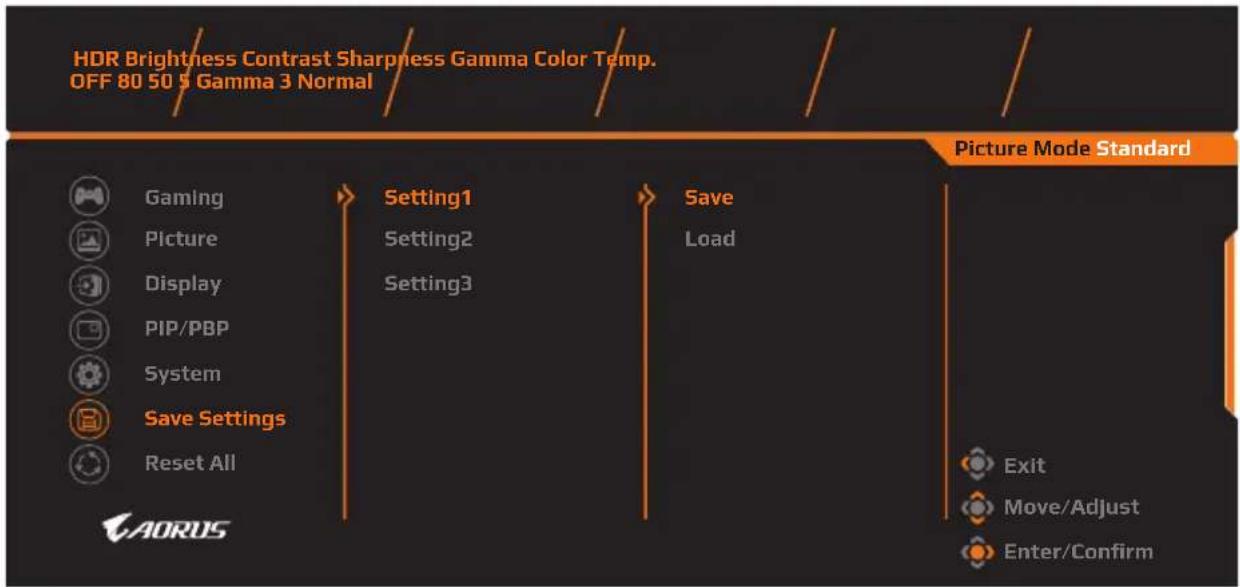
Save Settings
Set the personalized OSD configurations for Setting1, Setting2, or Setting3.
flowchart
graph TD
    A["HDR Brightness Contrast Sharpness Gamma Color Temp.<br>OFF 80 50 5 Gamma 3 Normal"] --> B["Gaming"]
    A --> C["Picture"]
    A --> D["Display"]
    A --> E["PIP/PBP"]
    A --> F["System"]
    A --> G["Save Settings"]
    A --> H["Reset All"]
    I["Picture Mode Standard"] --> J["Setting1"]
    I --> K["Setting2"]
    I --> L["Setting3"]
    I --> M["Save Load"]
    N["AORUS"] --> O["Exit"]
    N --> P["Move/Adjust"]
    N --> Q["Enter/Confirm"]
| Item Description | |
| Save Save the customized settings. | |
| Load Load the saved settings. | |
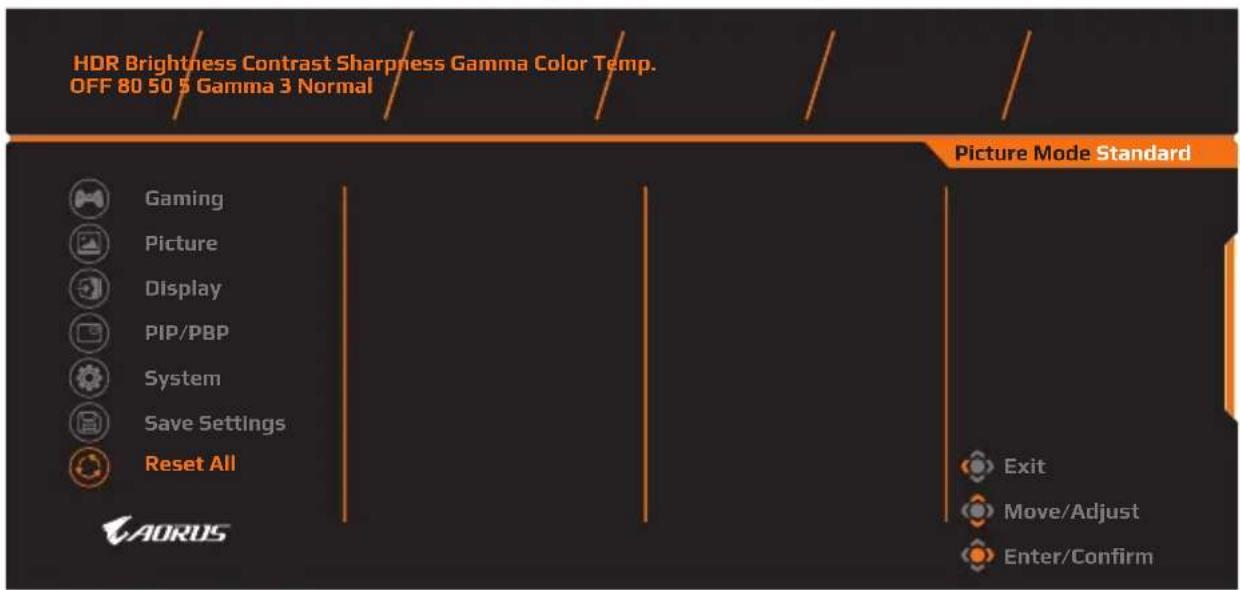
Reset All
Restore the monitor to its factory default settings.
APPENDICES
Specifications
| Item Specifications | |
| Panel Size 27-inch | |
| Aspect Ratio 16:9 | |
| Resolution 2560 x 1440 | |
| Refresh Rate 165Hz | |
| LED Life 30000 hours (min.) | |
| Pixel Pitch 0.233 x 0.233 | |
| Response Time 1ms (MPRT) | |
| Brightness 350nits (typ.) / 280nits (min.) | |
| Contrast Ratio 1000:1 (typ.) | |
| Dynamic Contrast Ratio | 12M:1 (typ.) |
| Color Depth 1.073G | |
| Active Display area 596.7 | 36(H) x 335.664(V) |
| Viewing Angle | 178°(H) / 178°(V) |
| Frequency 48~165Hz (gaming mode) | |
| Input/Output Terminals | 2x HDMI 2.0 2x USB 3.01x DP1.2 (downstream)1x Headphone 1x USB upstream1x Microphone |
| Power Supply | AC 100 ~ 240V at 50/60Hz |
| Power Consumptions | On: 85W (Max.)Standby: 0.5WOff: 0.3W |
| Dimensions (W x H x D) | 614.9 x 565.9 x 236.9mm (with stand) |
| Weight | 8.0 ±0.5 kgs (Net) |
Note: Specifications subject to change without notice.
Supported Timing List
| Timing List HDMI 2.0 Display Port 1.2 | ||
| 640x480@60Hz | √ | √ |
| 640x480@75Hz | √ | √ |
| 720x480@60Hz | √ | √ |
| 720x576P@50Hz | √ | √ |
| 800x600@60Hz | √ | √ |
| 800x600@75Hz | √ | √ |
| 1024x768@60Hz | √ | √ |
| 1280x720@60Hz | √ | √ |
| 1280x720@100Hz | √ | √ |
| 1280x720@120Hz | √ | √ |
| 1920x1080@60Hz | √ | √ |
| 1920x1080@120Hz | √ | √ |
| 1920x1080@144Hz | √ | X |
| 1920x1080@165Hz | X | √ |
| 2560x1440@60Hz | √ | √ |
| 2560x1440@120Hz | √ | √ |
| 2560x1440@144Hz | √ | √ |
| 2560x1440@165Hz | X | √ |
Troubleshooting
| Problem Possible Solution(s) | |
| No power • Make sure the power cable is properly connected to the power source and the monitor.• Check the cable and plug to make sure they are not broken.• Make sure the monitor is turned on. | |
| No image appears on the screen | • Make sure the monitor and the computer are properly connected and both devices are turned on.• Make sure you have selected the correct input source. Refer to page 25 or 35.• Adjust the Brightness and Contrast settings. Refer to page 33. |
| The image does not fill the entire screen | • Try different Display Mode (aspect ratio) setting. Refer to page 32. |
| The colors are distorted | • Make sure the input signal cable is properly connected.• Configure the image related settings. Refer to the “Picture” section. |
| No sound or volume is low | • Make sure the headphone cable is properly connected.• Adjust the volume level. Refer to page 27 or 37.• Adjust your computer sound related settings. |
Note: If the problem persists, please contact our customer service for further assistance.
Basic Care
When the screen becomes dirty, do the following to clean the screen:
- Wipe the screen with your soft, lint-free cloth to remove any residual dust.
- Spray or apply the cleaning fluid onto a soft cloth. Then wipe the screen gently with the damp cloth.
Note:
• Make sure that the cloth is damp, but not wet.
- When wiping, avoid applying excessive pressure on the screen.
• Acidic or abrasive cleaners can damage the screen.
Notes on USB Charging
The following devices are not compatible with BC 1.2 of CDP mode. When the Hub is connected to a PC, these devices cannot be charged using the USB cable.
| Vendor Device | PID/VID | |
| Apple IPad PID_1 | 29A/VID_05AC | |
| Samsung Galaxy | Tab2 10.1 PID_6860/VID_04E8 | |
| Samsung GALAXY | TabPro PID_6860/VID_04E8 |
GIGABYTE Service Information
More service information, please visit GIGABYTE official website: https://www.gigabyte.com/


- Disclaimer
- SAFETY INFORMATION
- Regulatory Notices
- United States of America, Federal Communications Commission Statement
- Supplier's Declaration of Conformity 47 CFR § 2.1077 Compliance Information
- FCC Compliance Statement:
- Canadian Department of Communications Statement
- European Union (EU) CE Declaration of Conformity
- European Union (EU) RoHS (recast) Directive 2011/65/EU & the European Commission Delegated Directive (EU) 2015/863 Statement
- European Union (EU) Community Waste Electrical & Electronic Equipment (WEEE) Directive Statement
- WEEE Symbol Statement
- End of Life Directives-Recycling
- Japan Class 01 Equipment Statement
- Japan VCCI Class B Statement
- China RoHS Compliance Statement
- Environment-friendly Use Period
- Declaration of the Presence Condition of the Restricted Substances Marking
- Safety Precautions
- CONTENTS
- Safety Information ....3
- Introduction....11
- Getting Started....16
- Using the Device....23
- Operations 26
- Appendices....41
- INTRODUCTION
- Unpacking
- Package Contents
- Warranty Card
- Product Overview
- Front View
- Rear View
- GETTING STARTED
- Installing the Monitor Base
- Adjusting the Viewing Angle
- Adjusting the Tilt Angle
- Adjusting the Swivel Angle
- Changing the Screen Orientation
- Installing a Wall-Mount Bracket (Optional)
- Making Connections
- USING THE DEVICE
- Turning the Power On/Off
- Power On
- Power Off
- Managing the Cables
- User Comfort Recommendations
- Selecting the Input Source
- OPERATIONS
- Quick Menu
- Hot Key
- Function Key Guide
- Dashboard
- Game Assist
- Configure the Device Settings
- Gaming
- Picture
- Display
- PIP/PBP
- System
- Save Settings
- Reset All
- APPENDICES
- Troubleshooting
- Basic Care
- Note:
- Notes on USB Charging
- GIGABYTE Service Information
Brand : GIGABYTE
Model : Aorus FI27Q-EK
Category : Screen