
PS-32B10C - Security Camera ZKTeco - Free user manual and instructions
Find the device manual for free PS-32B10C ZKTeco in PDF.


| Product Type | Security Camera (Speed Dome) |
| Brand | ZKTeco |
| Model | PS-32B10C |
| Built-in Camera | High sensitivity, high resolution, auto-focus, auto-iris, auto white balance, IR cut filter, auto back light compensation, auto slow shutter |
| Decoder | Integrated multi-protocol decoder (PELCO-D, PELCO-P, FACTORY, etc.) |
| Presets | 128 programmable presets |
| Patterns | 4 programmable pattern tours (each up to 180 seconds) |
| Scans | 4 programmable auto scans (left/right limit) |
| Tours | 4 auto tours (up to 32 presets per tour) |
| Pan/Tilt | Pan 360° continuous, tilt 0° to 90° with auto flip |
| Pan Speed | Variable speed, minimum 1°/s without jitter |
| Construction | Iron and carbon alloy structure for durability and heat dissipation |
| OSD Menu | On-screen display menu in English for configuration |
| Temperature Control | Built-in temperature sensor with fan for automatic cooling |
| Operating Temperature | -10°C to +60°C (with heater: -40°C to +60°C) |
| Humidity | < 90% |
| Power Supply | Requires external power adapter (24V AC / 12V DC, not included) |
| Communication Interface | RS485 bus for control (daisy-chain connection) |
| Dome ID | Addressable 1-255 via RS485 |
| Auto Flip | Automatically rotates 180° when tilting down for continuous surveillance |
| IR LED Control | Built-in IR LED with sensitivity, manual delay, and luminance adjustment |
| Cleaning | Use soft dry cloth with neutral detergent for dome cover |
| Warranty | 1 year free maintenance |
| Included Accessories | Power cable, video cable, RS485 cable |
Frequently Asked Questions - PS-32B10C ZKTeco
User questions about PS-32B10C ZKTeco
0 question about this device. Answer the ones you know or ask your own.
Ask a new question about this device
Download the instructions for your Security Camera in PDF format for free! Find your manual PS-32B10C - ZKTeco and take your electronic device back in hand. On this page are published all the documents necessary for the use of your device. PS-32B10C by ZKTeco.
USER MANUAL PS-32B10C ZKTeco
© Copyright 2014 ZKTeco Inc. ZKTeco Logo is a registered trademark of ZKTeco or a related company. All other product and company names mentioned are used for identification purposes only and may be the trademarks of their respective owners. All specifications are subject to change without notice. All rights reserved.
1. Precaution
I Electrical safety
Conform to country and local electrical safety standard when using or installing the product. Using local special power adapter.
Transportation
The dome should be protected against extremes of pressure, vibration and humidity during storage and transportation. It should be shipped in parts disassembled as the original packing did. Damage caused by improper transportation is not within the warranty.
Installation with care
Do not install it in any other orientation. Do not squeezed structure parts, which may cause mechanical damage. Down cover is a precise optical product. Do not touch it directly to avoid scratches which can affect image quality.
Requirements to service personnel
All the service work should be done by qualified technicians.
Environmental requirements
Operation environment temperature: -10°C \~ +60°C / -40\~ +60°C (bulid in heater) Humidity: < 90%
Air pressure: 86-106Kpa Don't place the camera to be shoot by strong light objects
Don't place the camera to be shoot by strong light objects. Don't point the dome to the sun or other bright objects when in use or not. It may affect image quality.
2.2 Product schematic drawing
1. Connect the power line, video cable and RS485cable.
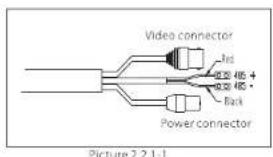
Attention: Different series product may have different adaptor, Please refer to the sticker on the wire or on the box with your products, otherwise it may damage the product.
3 Performance and feature
This product is high-technology surveillance product with high definition and color camera, variable-speed pan/tilt and multifunction decoder. It can reduce the connection and installation process between systematic parts at a max limit, and also can improve the stability and reliability of the system. Meanwhile it is easy to install and repair, and it has the following advantages: beautiful shape, rotate lightly and neatly, little noise, simple operation and so on.
1. Built-in digital camera
● High sensitivity, high resolution, and integrated digital processing
- Auto-focus
- Auto-Iris
● Auto brightness control
● Auto white balance - IR cut filter
● Auto back light compensation
● Auto slow shutter
2. Integrated and multi-protocol decoder
●Figure design, all the data are stored in the inner of camera pan/tilt, when power off, the storage data can't be lose.
●Built-in decoder, integrated multi-protocol, including PELCO-D, PELCO-P, FACTORY, etc.
●128 presets can be stored, preset 1-80 support auto tour, and each tour can store up to 32 presets.
●4 pattern, 4 scan, 4 tour
●Built-in direction indicator and temperature indicator
●Rs485 bus controlling in series, and dome ID 1-255 optional
3. Built-in pan/tilt
● Iron and carbon alloy structure, high intensity, and good heat dissipation.
- Precise stepping motor, rotate smoothly, react sensitivity and orientate accurately.
- Exquisite mechanical drive, support pan 360° continuously and tilt 0-90°, and may rotate 180° with auto flip.
- Rotate slowly at pan 1° /s, and the image doesn't jitter.
4. OSD menu
● All the menu option are displayed in English.
- Video OSD menu. It is direct and simple to revise the dome information and parameter by keyboard and menu display.
● May set park action, and set power up action or carry out appointed action.
5. Internal temperature test
- When the temperature exceeds the upper limit, the screen will display alarm information.
- According to the real-time temperature, the fan will measure if it starts or not, and prolong the life of fan.
4. Function instruction
This passage mainly describes the main function and general principle of mini speed dome, and does not refer to the operation methods.
4.1 Auto-run motion
● Focus/speed proportion pan
When manually adjusting, for far focus situation, the dome responds at a high-speed so that touching rocker slightly may make picture move rapidly, thus cause the picture to lose. To base on humanized design, the dome automatically adjust pan and tilt rotation according to zoom near and far, which make it is convenient to operate manually to make tracks for the object. In the menu, you may change system parameter setting proportion pan as ON, thus you may run this function.
- Auto flip
If user holds the joystick in the down position, the camera rotates pan 180 degrees, then the camera rotates tilts up to 90 degrees, you may directly watch the rear view to realize surveillance all processes in portrait 180 degrees. In the menu, you may set the system parameter setting AUTO FLIP as ON, thus you may run this function.
• IDLE RUM
By the menu "IDLE RUN" and "idle action", user may set auto-call preset or run tour, pattern, and scan, etc after pointing a few minutes if the dome doesn't run any motions.
● Power up run
By the menu "power up run", after the dome powers up or restarts, user may set auto-resume motions before power up and auto-call preset or run tour, pattern, and scan etc.
4.2 Camera control
● Magnification control
The user can control "Wide/Tele" to adjust zoom far and near of the image by keyboard controller to obtain panoramic image or close view that you need. The speed dome support digital zoom and optical zoom.
- Focus control
System defaults Auto focus. When the lens changes, camera will auto-adjust focus according to the centre of the image to get legible image; user also can manually focus to get desire image by operating keyboard "FAR/NEAR". When operating keyboard joystick, camera resumes to auto focus.
The camera cannot auto focus in the following status:
● Target is not the centre of the image
● Observation the target near and far at the same time, can not be clear at the same time.
● Target is a strong light object, such as spotlight etc.
● Target moves too fast
● Target is subfusc, such as wall
●Target is too dark or vague
● Target image is too small
ØIris control
System defaults Auto Iris. Camera can rapidly adjust size of Iris, through the automatically induct the changing of environment ray, and thus make the brightness of deferent image stable.
User may adjust iris by controlling keyboard. "OPEN/CLOSE" to get required brightness that you need. User also can resume auto iris by joystick operation. When controlling the Iris manually, the dome locks current position you manually controlled; when operating joystick, the dome resume auto Iris.
∅Auto back light compensation
Camera sub-area can carry out auto back light compensation. Under a strong light background, camera will auto compensate light for the darker object and adjust daylight to the bright background. In order to avoid making the image lack fidelity by the back line is too bright, and the object is unable to recognize because of darkness, thus gain legible image
∅Auto white balance
Camera can automatically adjust white balance in accordance with the alteration of background lightness to reach a true colour.
4.3 Monitor function
∅ Set and call preset
Preset function is that dome stores current pan/tilt angle, zoom and other position parameters into the memory. When necessary dome recalls these parameters and adjust camera to that position. User can store and recall presets easily and promptly by using keyboard controlling. The dome can store up to 128 presets.
ØTour
Tour is the built-in function in the speed dome. It can appoint setting in advance, and make presets arranged in needful order in tour dwell. By inserting presets in tour dwell, to make the camera tour between these presets. Tour order can be programmed, each time you run tour, you can set park time. A tour can store 32 preset.
ØScan
User can easily preset right limit and left limit by controlling menu and menu, in order to make the camera scanned between right limit and left limit at a setting speed.
∅Pattern
Pattern is built-in function in the speed dome; the dome can record the tracks that are no less than 180s, when running pattern, the dome moves repeatedly according to the recorded tracks. Each dome can set up to 4 pattern.
∅Lens position display
The position that the speed dome has finished to self-testing as 0 point of pan rotation and tilt rotation. The pan range is 0-360°, and tilt range is 0-90°. According to the displayed information, to set the position of camera lens, and the position can display on the screen.
4.4 Constant temperature Function
Inner temperature sensor surveille temperature inside of the dome. When the dome work in the high temperature, the dome will automatically to start-up the fan to reduce the heat, to make sure the dome work in the reliable temperature environment, increase its stability and prolong the life time of the dome.
System setting
System setting
5. System setting
5.1 Basic operation
5.1.1 Power up and self-testing
The dome conducts self-testing after current-carring, and it rotates slowly until displaying pan origin that is default setting, then moving to tilt origin, when self-testing is finished, there is relevant system information displaying on the screen, as follows:
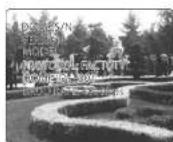
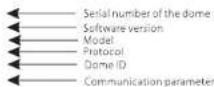
The information will not disappear until you stop to operate the system. If you set “power up action”, the dome will automatically activate motions after self-testing. How to operate the function? We will explain detail introduction in following passages.
5.1.2 Call the main menu
The system enters into the main menu by 95preset or twice transfer 9 preset in 3 seconds. All the menu setting must enter into the main menu at first.
5.1.3 Menu and keyboard operation
∅ Keyboard operation:
【OPEN】when choosing menu, it means to enter the next menu or enter into setting, or save after finish to set.
【CLOSE】when choosing menu, it means to close to cancel, or exit to the former menu.
Joystick to up: When choosing menu, it means to choose the former one; when choosing picture, it means camera tilt up.
Joystick to down: when choosing menu, it means to choose the next one; when choosing picture, it means camera tilt down.
Joystick to left: when choosing menu, it is equal with 【Close】, when choosing picture, it means camera tilt left.
Joystick to right: when choosing menu, it is equal with 【Open】, when choosing picture, it means camera tilt right.
Press 【TELE】 and 【WIDE】 at the same time, it means 3D joystick rotates joystick cap.
5
∅ Menu operation:
"BACK": Back to the former menu.
"EXIT": Exit to menu
"ON": Open some setting
"OFF": Close some setting
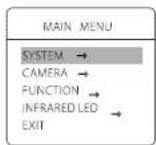
5.2Dome initial information
-
Call 95 preset or transfer 9 preset twice in three seconds to enter the main menu.
-
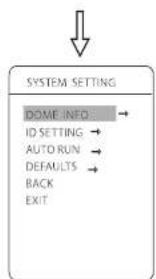
Operate the joystick up and down and move the cursor to 【SYSTEM】, press 【OPEN】 to enter submenu.
-
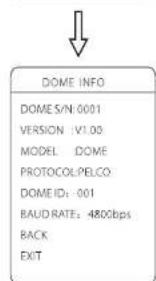
Operate the joystick up and down and move the cursor to 【DOME INFO】, press 【OPEN】 to display initial information as the left picture shows.
Initial information includes S/N of the dome, soft edition, protocol, dome ID, communication parameter. SYSTEM may change the numerical value of initial information.
flowchart
graph TD
    A["↓"] --> B["SYSTEM SETTING"]
    B --> C["DOME INFO"]
    C --> D["ID SETTING"]
    D --> E["AUTO RUN"]
    E --> F["DEFAULTS"]
    F --> G["BACK"]
    G --> H["EXIT"]
SYSTEM
SYSTEM
flowchart
graph TD
    A["MAIN MENU"] --> B["SYSTEM SETTING"]
    B --> C["ID SETTING"]
    C --> D["5/N :0025<br>CONF :0000<br>ID :001<br>BAUDRATE :9600<br>BACK<br>EXIT"]
5.3 ID Setting
-
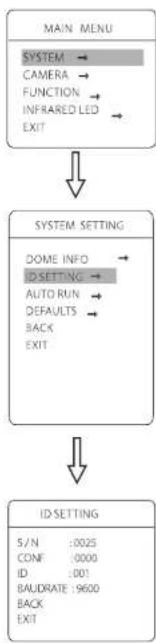
Call 95 preset or call 9 preset twice within 3 seconds, to enter into main menu.
-
Operate the joystick up and down and move the cursor to 【SYS-TEM】, press 【OPEN】 to enter submenu.
-
Operate the joystick up and down and move the cursor to 【ID SETTING】, press 【OPEN】 to call dome parameter setting menu.
【S/N】: Series number of the dome
【CONF】: Confirm S/N and input the same number with S/N
【ID】: Set dome address (ID range: 001-255)
The shortcut of Dome ID setting: call 101-116 preset twice within 3 seconds, to set dome ID as 1 to 16. For example, call 103 preset twice within 3 seconds, then dome ID be setted as 3.

-
If [S/N] and [CONF] are different, the above operation can't be implemented.
-
The dome address should be set as 25S by setting SW1 as ON at first, there will be display this item [DOME ID]
-
After setting dome address, the dome need to restart, then the dome address will be effective.
flowchart
graph TD
    A["MAIN MENU"] --> B["SYSTEM"]
    B --> C["SYSTEM"]
    C --> D["AUTO RUN"]
    D --> E["AUTO FLIP ON PROPORTION ON POWERUP RUN NONE IDLE RUN BACK EXIT"]
5.4 AUTO RUN
Systematic motion controlling may control a series of canonical movement of the dome, and plays an important role in controlling the image of the dome.
-
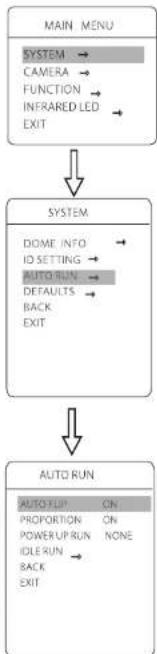
The system enters into the main menu by calling 95 preset or by calling 9 preset twice within 3 seconds.
-
Operate the joystick up and down and move the cursor to 【SYST-EM】, press 【OPEN】 to enter submenu.
5.4.1 AUTOFLIP
Operate the joystick up and down and move the cursor to 【PANT-ILT SETTING】, press 【OPEN】to enter 【AUTO FLIP】. Operate the joystick up and down to choose ON to open "auto flip", and choose OFF to close "auto flip". Press 【OPEN】to save.
OPERATION KNACKS
When manually adjusting, for far focus situation, the dome responds at a high-speed so that touching rocker slightly may make picture move rapidly, thus cause the picture to lose. To base on humanized design, the dome automatically adjust pan and tilt rotation according to zoom near and far, which make it is convenient to operate manually run after object.
5.4.2 PROPORTION
Operate joystick and move the cursor to【PROPORTION】, press【OPEN】to enter "proportion" setting, operate joystick up and down to choose, if choosing【ON】, it means to open proportion pan. If choosing【OFF】, it means to close proportion pan, press【OPEN】to save.
SYSTEM
SYSTEM

flowchart
graph TD
    A["MAIN MENU"] --> B["SYSTEM"]
    B --> C["SYSTEM"]
    C --> D["AUTO RUN"]
    D --> E["IDLE RUN"]
    E --> F["IDLET RUN"]
5.4.3 Power up run
The dome startup to run actions after self-testing, if nobody intervenes with it, the dome will repeatedly run this action continuously, if default sets as 【NONE】.
Operate joystick, move the cursor to 【POWER UP ACTION】: press【OPEN】to jump to the following choice, tilt up/down joystick to choose "power up action", press【OPEN】to save.
● 【NONE】:noneaction
● 【AUTO】: the dome resumes the primary action and direction re power up.
● 【PRESET】: use preset
● 【SCAN】: run scan
● 【PAT】: run pattern
● 【TOUR】: run tour
5.4.4 IDLERUN
This setting allows the dome to run an appointed action after it enters vacancy for a few time (1-240 minutes). If default sets as 0, it means not to run this action.
- Operate the joystick up and down and move the cursor to 【IDLE RUN】, press 【OPEN】 to tilt up/down joystick to set idle time, the range is 0-240 (minute), press 【OPEN】 to save.
【PARK ACTION】Is running action at park time, when 【PARK TIME】sets as 0, this item can't be set.
- Operate the joystick up and down and move the cursor to 【IDLE ACTION】, press 【OPEN】there will be a sign “ ” in the front of 【IDLE ACTION】, the cursor jump to right, after tilting up/down joystick to choose "idle action", there are options for choosing as follows, press 【OPEN】to save.
● 【NONE】: (default) no action
● 【PAT】: run pattern
● 【TOUR】: run tour
● 【SCAN】:run:scan
● 【PRESET】: use preset
flowchart
graph TD
    A["MAIN MENU"] --> B["SYSTEM"]
    B --> C["CAMERA"]
    C --> D["FUNCTION"]
    D --> E["INFRARED LED"]
    E --> F["EXIT"]
    B --> G["SYSTEM"]
    G --> H["DOME INFO"]
    H --> I["ID SETTING"]
    I --> J["AUTO RUN"]
    J --> K["DEFAULTS"]
    K --> L["BACK"]
    L --> M["EXIT"]
    G --> N["DEFAULTS"]
    N --> O["CLEAR ALL PRESETS"]
    N --> P["CLEAR ALL PATTERNS"]
    N --> Q["CLEAR ALL TOURS"]
    N --> R["FACTORY DEFAULTS"]
    N --> S["RESTART"]
    N --> T["BACK"]
    N --> U["EXIT"]
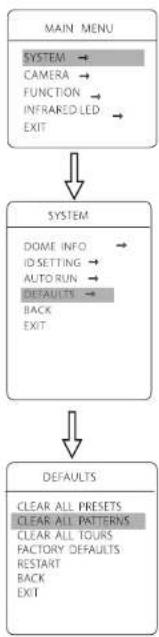
5.5 Defaults
- The system enters into the main menu by calling 95 preset or by calling 9 preset twice within 3 seconds.
- Operate the joystick up and down and move the cursor to 【SYST-EM】, press 【OPEN】 to enter submenu.
- Operate the joystick up and down and move the cursor to 【DEFAULTS】, press 【OPEN】 to enter submenu, as left picture shows
Run this function, the camera parameter and system parameter will resume before production, clear all windows and alarm setting. Please be cautious to use this function.
● 【RESTART】: restart the dome

Once clear all commands in the controlling menu, they don't resume, so please be careful of using.
flowchart
graph TD
    A["MAIN MENU"] --> B["FUNCTION"]
    B --> C["PRESETS"]
    C --> D["PRESSETS NUMBER 001"]
    D --> E["SET PRESET"]
    E --> F["SHOW PRESET"]
    F --> G["CLEAR PRESET"]
    G --> H["BACK"]
    H --> I["EXIT"]
    I --> J["EXIT"]
    J --> K["INFRARED LED"]
    K --> L["FUNCTION"]
    L --> M["CAMERA"]
    M --> N["SYSTEM"]
6. Function setting
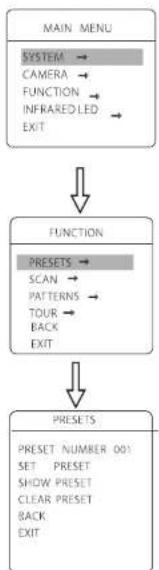
6.1 Preset
- The system enters into the main menu by calling 95 preset or by calling 9 preset twice within 3 seconds. Click each command to enter "preset menu" according to the order of the left picture. As follows:
Define preset and call preset function can be set by keyboard operation, input preset number at first, then click the key "save /call preset" to carry out.
-
Define current preset number: move the cursor to 【PRESET NUM -BER】, press 【OPEN】to choose preset number, the range is 01-128 as the left picture shows, here chooses number 5 as current preset, the following operations aim at the current preset.
-
Define current preset: move the cursor to 【SET PRESET】, press 【OPEN】, by operating joystick to adjust magnification, to choose good objective image, press 【OPEN】to save. If the image is very near, the image is belong in digital zoom; when setting preset, the image will jump to maximal optical zoom.
OPERATION KNACKS
Preset function is that dome stores current pan/tilt angle, zoom and other position parameters into the memory. When necessary dome recalls these parameters and adjust camera to that position.
- Display current preset: move the cursor to 【SHOW PRESET】, press【OPEN】, the screen will display the current preset.
- Clear current preset: move the cursor to 【CLEAR PRESET】, press【OPEN】, the current preset is cleared.
flowchart
graph TD
    A["MAIN MENU"] --> B["SYSTEM"]
    B --> C["CAMERA"]
    C --> D["FUNCTION"]
    D --> E["INFRARED LED"]
    D --> F["EXIT"]
    B --> G["FUNCTION"]
    G --> H["PRESETS"]
    H --> I["SCAN"]
    I --> J["PATTERNS"]
    J --> K["TOUR"]
    K --> L["BACK"]
    L --> M["EXIT"]
    G --> N["SCAN"]
    N --> O["SCAN NUMBER 1"]
    N --> P["SCAN SPEED 20"]
    N --> Q["SET LEFT LIMIT"]
    N --> R["SET RIGHT LIMIT"]
    N --> S["CLEAR SCAN"]
    N --> T["RUN SCAN"]
    T --> U["BACK"]
    T --> V["EXIT"]
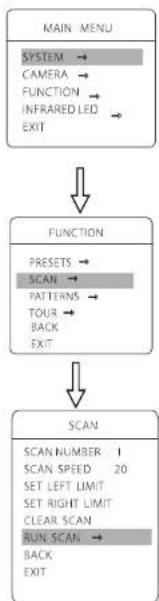
6.2 Scan
Scan is that pre-set two points, then the camera repeatedly scan between the two points at a stable speed, the same magnification and pan. Each dome has four scan.
- The system enters into the main menu by calling 95 preset or by calling 9 preset twice within 3 seconds. Click menu to enter "scan" menu, as the left picture shows.
- Define current scan number: operate joystick, move the cursor to [scan number], press [open], tilt up/downjoystick to choose scan number, press [open] to save. The following operations aim at the current scan number:
- Scan speed setting: operate joystick to 【SCAN SPEED】, press 【OPEN】, tilt up/down joystick to adjust scan speed, press 【OPEN】 to save.
- Left limit setting, operate joystick to【SET LEFT LIMIT】, press 【OPEN】, operate joystick to choose objective image, press 【OPEN】 to save. Right limit setting is the same as left limit setting.
- Run scan: operate joystick to 【RUN SCAN】, press 【OPEN】 to exit the menu, and it starts to run scan.
flowchart
graph TD
    A["MAIN MENU"] --> B["FUNCTION"]
    B --> C["PATTERNS"]
    A -->|SYSTEM →| A
    A -->|CAMERA →| A
    A -->|FUNCTION →| A
    A -->|INFRARED LED →| A
    A -->|EXIT →| A
    B -->|PRESSETS →| B
    B -->|SCAN →| B
    B -->|PATTERNS →| B
    B -->|TOUR ←| B
    B -->|BACK ←| B
    B -->|EXIT ←| B
    C -->|PATTERN NUMBER 1| C
    C -->|RECORD PATTERN| C
    C -->|RUN PATTERN| C
    C -->|CLEAR PATTERN| C
    C -->|BACK| C
    C -->|EXIT| C
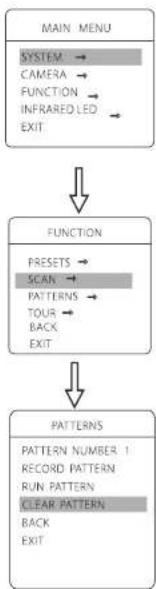
6.3 Pattern
Pattern is built-in function in camera; the speed dome can record tracks that are no less than 180s. (A series of pan/tilt controlling and lens controlling command). Each dome may set up to 4 patterns.
-
The system enters into the main menu by calling 95 preset or by calling 9 preset twice within 3 seconds.
-
Operate the joystick up and down and move the cursor to 【FUNCTION SETTING】, press 【OPEN】 to enter submenu.
-
Operate the joystick up and down and move the cursor to【PATTERN】, press【OPEN】to enter menu "Pattern".
- Choose pattern number: move the cursor to 【PATTERN NUMBER】, press 【OPEN】, the pattern you choose as current one, the following operations aim at the current pattern.
- Define current pattern tour: move the cursor to 【RECORD PATTERN】, press 【OPEN】 to set pattern track, move the image random, and draw the focus. Each dome has a tour that is no less than 180s, a series of park time, magnification, focus will be recorded, press 【OPEN】 to save.
- Run pattern: operate joystick to 【RUN PATTERN】, press 【OPEN】to run, the dome will continuously and repeatedly record the specific track.

flowchart
graph TD
    A["MAIN MENU"] --> B["FUNCTION"]
    B --> C["TOUR"]
    C --> D["TOUR"]
    D --> E["TOUR"]
6.4 Tour
Tour is the built-in function in the speed dome, it will arrange the presets into the queue of auto-tour, and can set how long it will park at preset. Operate auto-tour is a process of incessantly transfer each preset. One tour can store 32 presets at most.
- The system enters into the main menu by calling 95 preset or by calling 9 preset twice within 3 seconds.
- Operate the joystick up and down and move the cursor to 【FUNCTION】, press 【OPEN】 enter submenu.
- Operate the joystick up and down and move the cursor to 【TOUR】, press 【OPEN】 to enter menu "tour".
-
Set tour: move the cursor to 【EDIT TOUR】, press 【OPEN】 to set tour interface, 【PO-S-TM】 set preset, speed and time, press 【OPEN】, the first dwell is activated, tilt up/down joystick to choose preset number, the preset numerical value should be within 1-80 preset, a tour can set up to 24 presets. Press 【OPEN】, the cursor jump to the next dwell, tilt up/down joystick to choose current arrival preset speed, total 8 level of speed, increasingly from level 1 to level 8. Press 【OPEN】, the cursor jumps to the next dwell, tilt up/down joystick to set current preset maintaining time, 60 seconds maximum. If set the presets of the second line, move the cursor to the second line, press 【OPEN】 to continue edit. Press 【OPEN】 to save after setting, press 【CLOSE】 to exit.
-
Run tour: Operate joystick, move the cursor to 【RUN TOUR】, press 【OPEN】 to exit the menu, it starts to run tour.
flowchart
graph TD
    A["MAIN MENU"] --> B["SYSTEM"]
    B --> C["CAMERA"]
    C --> D["FUNCTION"]
    D --> E["INFRARED LED"]
    E --> F["EXIT"]
    B --> G["INFRARED LED"]
    G --> H["SENSITIVITY"]
    H --> I["MANUAL DELAY"]
    I --> J["IR ON/OFF"]
    J --> K["LUMINANCE"]
    K --> L["BACK"]
    L --> M["EXIT"]
    H --> N["IR ON/OFF"]
    N --> O["IR ON/OFF"]
    O --> P["AUTO"]
    P --> Q["ON TIME"]
    Q --> R["N/A"]
    R --> S["OFF TIME"]
    S --> T["N/A"]
    T --> U["BACK"]
    U --> V["EXIT"]
    N --> W["LUMINANCE"]
    W --> X["LUMINANCE"]
    X --> Y["AUTO"]
    Y --> Z["TELE LED"]
    Z --> AA["N/A"]
    AA --> AB["WIDE LED"]
    AB --> AC["N/A"]
    AC --> AD["BACK"]
    AD --> AE["EXIT"]
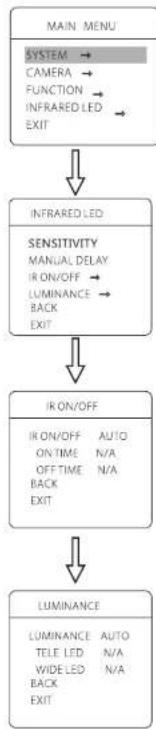
7. Infrared led setting
7.1 IR SENSITIVITY:
infrared automatic open sensitivity settings, range 0\~100, the user can according to the environmental illumination status modulates infrared automatic open
7.2 MANUAL DELAY:
infrared light manual opening, closing time, if time is 0, Do not automatically close infrared lamp.
7.3 IRON/OFF:
IR control mode, can be divided into a, AUTO, MANUAL, TIME three models, In TIME model, according to the user set time to switch IR; in MANUAL mode, Call the 62 preset command to open the infrared light, open the 63 preset closed lamp.
7.4 IR LUMINANCE:
infrared brightness control method in infrared light, open effect after, Divided into: AUTO, GROUP, MANUAL, three states AUTO mode, infrared automatic brightness matching lens distance, according to the cameralens changes. Infrared high beam and dipped beam headlights will automatically adjust the brightness, reach the intensity of illumination and brightness automatic matching. And can improve the infrared lamp life.
GROUP mode: packet mode, in a packet mode, infrared high beam and dipped beam headlights will match According to the lens distance packet opened at the same time.
MANUAL mode: the manual control mode, infrared brightness from the lens parameters influence. The user can set the high beam and dipped beam brightness, range 0\~100
8 Trouble shooting
| Trouble | Possible causes | Solution |
| No action, no video after power up | Power supply is damage or power consumption is not enough | Replace |
| Power line connected wrong | Correct | |
| Engineering line is malfunction | Check and repair | |
| Self-testing and image are normal but the dome is uncontrollable | The dome DIP switch setting is incorrect | Refer to switch setting, reset the switch |
| Rs485 may carve out a way | Check Rs485 connection, confirm the connection is correct and good in contact | |
| Rs485 is in malfunction | PIs consult appendix "Rs485 Bus acknowledge" | |
| Video image is not steady. | Video line is bad connection | Eliminate |
| Power consumption is not enough | Replace right power adapter, it is better to put the switch and power adapter near the dome | |
| Video image is not steady and the motor is faulted | Power consumption is not enough | Replace the power |
| Dome controlling is not smooth. | Controlling line connected wrong, or Rs485 loads too much or the distance of communication is too far | 1. Connect 120Ω resistance in the dome pan/tilt that is far from the controller2. Increase distributor |
8.1 The cleaning of clear down cover
To obtain constant clear videos, user should clean the down cover periodically.
- Be caution when cleaning, hold the down cover ring only to avoid direct touch to the acrylic down cover. The acid sweat mark of fingerprint will corrode the coating of down cover and scratch on down cover will cause vague image.
- Use soft dry cloth or the substitute to clean the inner and outer surfaces
- For hand contamination, use neutral detergent. Any cleanser for high grade furniture is applicable.
8.2 RS485Bus basic knowledge Characteristics of Rs485 Bus
As specified by Rs485 standard, Rs485 Bus is of half-duplexed data transmission cables with characteristic impedance as 120 Ω. The maximum load capacity is 32 unit loads (including main controller and controller equipment). Transmission distances of Rs485 Bus When user selects the 0.56mm(24AWG) twist pair wires as data transmission cable, the max theoretical transmitting distance are as follows:
| Baud rate | Max distance |
| 2400bps | 1800m |
| 4800bps | 1200m |
| 9600bps | 800m |
| 19200bps | 600m |
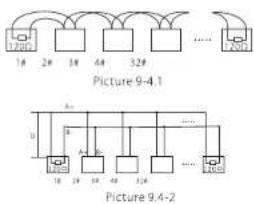
If user selects thinner cables, or installs the dome in an environment with strong electromagnetic interference, or connects lots of equipment to the Rs485Bus, the max transmitting distance will be decreased. To increase the maximum transmitting distance, do the contrary. Connection and termination resistor The Rs485Bus standards require a daisy-chain connection between the equipment. There must be termination resistors with 120Ω (as the picture 9.4-1). Please refer to picture 9.4-2 for simple connection. D should not exceed 7m.
Problems in practical connections
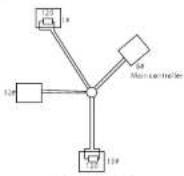
In some circumstances user adopts a star configuration in practical connection, The termination resistors must be connected to the two equipment 1# and 15# in picture 9.4-3. As the star configuration is not in conformity with the requirements of R5485 standards, problems such as signal reflections, lower anti-interference performance arise when the cables are long in the connection. The reliability of control signals is decreased with the phenomena that the dome does not respond or just responds at intervals to the controller, or does continuous operation without stop.
Picture 9.4-3
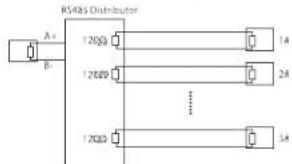
In such circumstances the factory recommends the usage of RS485 distributor. The distributor can change the star configuration connection to the mode of connection stipulated in the RS485 standards. The new connection achieves reliable data transmission (Refer to Picture 9.4-4).
Picture 9.4-4
RS485Bus troubles shooting
| Trouble | Possible cause | Solution |
| Dome can do self-testing but can not be controlled | 1. The address and baud rate setting of dome are not in conformity with those of controller.2. The + and - connection of RS485 Bus is incorrect3. Bad connection4. There are circuit in the RS485 Bus | 1. Chage the address and baud rate of controller or dome2. Adjust the + and - connection of Rs4853. Make sure the connections are fully seated4. Change RS485 Bus wires |
| The dome can be controlled but the operation is not smooth | 1. The RS485Bus is not in good contact with the connectors2. One wire of RS485bus is broken3. The dome is very far from controller4. There are two many domes connected in the system | 1. Secure the connection2. Replace RS485 bus wires3. Add termination resistors to the system4. Install RS485 distributor |
9.Shortcut key:
| CALL+"N"+PRESET | Show preset |
| SET+"N"+PRESET | Save preset |
| CALL+"95"+PRESET | Enter menu |
| CALL+"94"+PRESET | Restart |
| CALL+"92"+PRESET | Set scan1 Left limit |
| CALL+"93"+PRESET | Set scan1 Right limit |
| CALL+"97"+PRESET | Run scan1 |
| CALL+"98"+PRESET | Run tour1 |
| CALL+"99"+PRESET | Run scan1 |
| CALL+"62"+PRESET | Open IR LED(manual state) |
| CALL+"63"+PRESET | Close IR LED(manual state) |
9. Maintenance
(1) Range of warranty
● The product will be maintained free for one year.
● The product will be obtained the free maintenance service if the same malfunction appears again within three months.
- Malfunction of products caused by force majeure (such as war, earthquake, lightning strike and so on), abuse, non-standard operation, change of construction, non-normal wear or accident are non-free of warranty.
- Please prevent from the damage which is caused by heavy pressure, the fierce vibration and soaks in the process of transportation and storage, which does not belong to the free maintenance scope.
- Please adopt the way of fission package or original package to transport because the product damage dose not belong to the free maintenance scope if you use the whole packing way, not the original packing way.
● The maintenance services will not be free when the pan/tilt module is disassembled or serviced by the user voluntarily.
- Our company implements the lifetime payable service if the product in malfunction has surpassed the warranty period.
- To the products with defect: If it's in the period of warranty, please fill in the form of warranty information correctly, describe the trouble in details, and provide the trouble in details, and provide original sales invoice or its copy.
For the damage and loss which was caused by the user's specifically application, factory won't bear any risk and responsibility. The factory compensation made by breach of faith, negligence or tortious won't exceed the amount of the products. The factory won't bear any responsibility for the special, unexpected and continue damage caused by any other reasons.
- Our company has the final right of explanation for the above terms.
(2) Warranty terms
If the products are within the warranty time, the buyer should fill in the warranty card and send back together with the products.
(3) Shipping
If the product needs repaired, you can return it to the manufacturer through the supplier or directly. If you choose the later, please contact us in order to speed up the process. And our company only undertake the one-way freight from manufacturer to customer after maintenance.
- Precaution
- I Electrical safety
- Transportation
- Installation with care
- Requirements to service personnel
- Environmental requirements
- Product schematic drawing
- Connect the power line, video cable and RS485cable.
- Performance and feature
- Built-in digital camera
- Integrated and multi-protocol decoder
- Built-in pan/tilt
- OSD menu
- Internal temperature test
- Function instruction
- Auto-run motion
- ● Focus/speed proportion pan
- - Auto flip
- • IDLE RUM
- Camera control
- ● Magnification control
- - Focus control
- ØIris control
- ∅Auto back light compensation
- ∅Auto white balance
- Monitor function
- ∅ Set and call preset
- ØTour
- ØScan
- ∅Pattern
- ∅Lens position display
- Constant temperature Function
- System setting
- System setting
- Basic operation
- Power up and self-testing
- Call the main menu
- Menu and keyboard operation
- ∅ Keyboard operation:
- ∅ Menu operation:
- 5.2Dome initial information
- SYSTEM
- ID Setting
- AUTO RUN
- AUTOFLIP
- OPERATION KNACKS
- PROPORTION
- Power up run
- IDLERUN
- Defaults
- Function setting
- Preset
- Scan
- Pattern
- Tour
- Infrared led setting
- IR SENSITIVITY:
- MANUAL DELAY:
- IRON/OFF:
- IR LUMINANCE:
- The cleaning of clear down cover
- RS485Bus basic knowledge Characteristics of Rs485 Bus
- Problems in practical connections
- 9.Shortcut key:
- Maintenance
- Range of warranty
- Warranty terms
- Shipping
Brand : ZKTeco
Model : PS-32B10C
Category : Security Camera