WGNBPW-720 - Sphygmomanometer Walgreens - Free user manual and instructions
Find the device manual for free WGNBPW-720 Walgreens in PDF.


| Product Type | Upper Arm Blood Pressure Monitor |
| Model | WGNBPW-720 |
| Brand | Walgreens |
| Measurement Method | Oscillometric |
| Arm Circumference | 22-42 cm (8.7-16.5 inches) |
| Systolic Range | 60-260 mmHg |
| Diastolic Range | 40-199 mmHg |
| Pulse Range | 40-180 beats/min |
| Accuracy | Blood pressure: ±3 mmHg; Pulse: ±5% |
| Display | LCD digital screen |
| Memory | 120 readings for 2 users (60 each) |
| Power Source | 4 x AA batteries (not included) or AC adapter (optional) |
| Battery Life | Approximately 300 measurements |
| Dimensions (Unit) | 15 x 10 x 6 cm (5.9 x 3.9 x 2.4 inches) |
| Weight (Unit) | Approx. 320 g (0.7 lbs) without batteries |
| Cuff Size | Standard adult cuff (22-42 cm) |
| Clinically Validated | Yes |
| Irregular Heartbeat Detection | Yes |
| WHO Classification Indicator | Yes |
| Auto Shut-Off | Yes, after 1 minute of inactivity |
| Warranty | 2 years limited |
| Cleaning | Wipe with a soft, dry cloth. Do not immerse in water. |
| Storage Conditions | Temperature: -20°C to 55°C; Humidity: 15-90% RH |
| Operating Conditions | Temperature: 10°C to 40°C; Humidity: 15-85% RH |
Frequently Asked Questions - WGNBPW-720 Walgreens
User questions about WGNBPW-720 Walgreens
0 question about this device. Answer the ones you know or ask your own.
Ask a new question about this device
Download the instructions for your Sphygmomanometer in PDF format for free! Find your manual WGNBPW-720 - Walgreens and take your electronic device back in hand. On this page are published all the documents necessary for the use of your device. WGNBPW-720 by Walgreens.
USER MANUAL WGNBPW-720 Walgreens
DELUXE WRIST
Blood Pressure Monitor
• 5-Year Limited Warranty
natural_image
Color calibration bar with grayscale and RGB swatches, no text or symbols presentTABLE OF CONTENTS
INTRODUCTORY INFORMATION:
Important Product Notices and Safety Instructions .... 3
About Blood Pressure....5
Blood Pressure Standard......6
How This Blood Pressure Monitor Works......8
USAGE INFORMATION:
Name/Function of Each Part 9
Display Explanations....10
Installing Batteries 12
Wrist Positioning Guide 14
Setting User Preferences....15
Applying the Cuff....16
Correct Measurement Posture 18

natural_image
Color calibration bar with grayscale and RGB swatches, no text or symbols presentMeasurement Procedure....19
Risk Category Index 23
Irregular Heartbeat Detector (IHB) 24
Recalling Values from Memory......26
Clearing Values from Memory 27
Important Notes Regarding Your Blood Pressure Measurement....28
Care, Maintenance & Cleaning 29
Potential for Electromagnetic Interference....31
Troubleshooting 32
Specifications 33
5 Year Limited Warranty 35

natural_image
Color calibration bar with grayscale and RGB swatches, no text or symbols presentIMPORTANT PRODUCT NOTICES AND SAFETY INSTRUCTIONS
When using your blood pressure monitor, basic precautions should always be followed. Please read and follow all instructions and warnings before using this product. Save these instructions for future reference.
- Please note that this is a home healthcare product only and it is not intended to serve as a substitute for the advice of a physician or medical professional.
- This device uses the oscillometric method to measure systolic and diastolic blood pressure, as well as heart rate.
- Do not use this device for diagnosis or treatment of any health problem or disease. Measurement results are for reference only. Consult a healthcare professional for interpretation of blood pressure measurements. Contact your physician if you have or suspect any medical problem. Do not change your medications without the advice of your physician or healthcare professional.
- This product is not suitable for people with arrhythmias. This device may have difficulty determining the proper blood pressure for pregnant women and for individuals with irregular heartbeat, diabetes, poor circulation of blood, kidney problems or for users who have suffered from a stroke.

natural_image
Color calibration bar with grayscale and RGB swatches, no text or symbols present- Consult your physician before measuring blood pressure at the wrist if you have any of the following conditions: Severe hypertension, severe diabetes, severe arteriosclerosis, severe kidney disease or vascular disease that may compromise circulation.
- The pulse display is not suitable for checking the frequency of heart pacemakers.
- Electromagnetic interference: The device contains sensitive electronic components. Avoid strong electrical or electromagnetic fields in the direct vicinity of the device (e.g. mobile telephones, microwave ovens). These may lead to temporary impairment of measurement accuracy.
• Use blood pressure monitor only for its intended use. - Do not wrap the cuff around body parts other than your wrist.
• Not for use by or on persons under the age of 18.
• Use only 1.5V AAA alkaline batteries for power supply.
Blood pressure measurements determined with this device are equivalent to those obtained by a trained observer using the cuff/stethoscope auscultatory method, within the limits prescribed by the American National Standard, Manual, electronic, or automated sphygmomanometers.

natural_image
Color calibration bar with grayscale and RGB swatches, no text or symbols presentABOUT BLOOD PRESSURE
What is Blood Pressure?
Blood pressure is the pressure exerted on the artery walls while blood flows through the arteries. The pressure measured when the heart contracts and sends blood out of the heart is systolic (highest) blood pressure. The pressure measured when the heart dilates with blood flowing back into the heart is called diastolic (lowest) blood pressure.
Why Measure Your Blood Pressure?
Among today's various health problems, those associated with high blood pressure are very common. High blood pressure dangerously correlates with cardiovascular diseases. Therefore, blood pressure monitoring is important for identifying those at risk.

natural_image
Pure electrical circuit lines without any symbols
natural_image
Color calibration bar with grayscale and multicolor squares, no text or symbols presentBLOOD PRESSURE STANDARD
The table below contains defined levels for hypertension that are publicly available from the National Heart Lung and Blood Institute at the U.S. National Institutes of Health (NIH) (http://www.nhlbi.nih.gov/health/dci/Diseases/Hbp/HBP_WhatIs.html). Users can compare their own blood pressure readings against these defined levels to determine if they may be potentially at increased risk.
This table is applicable to most adults aged 18 and older.
Blood pressure tends to go up and down, even in people who normally don't have high readings. If your numbers stay above the “normal” range most of the time, you may be at increased risk and should consult your physician.
| Category Systolic (mmHg) Diastolic (mmHg) | ||
| Normal Less than 120 and Less than 80 | ||
| Prehypertension 120-139 or 80-89 | ||
| High Blood Pressure | ||
| Stage 1 140-159 or 90-99 | ||
| Stage 2 160 or higher or 100 or higher | ||
Although one can easily find where their own blood pressure readings fall on this table, this monitor comes equipped with a Risk Category Index that automatically compares each reading to the defined levels and provides a helpful cue if

natural_image
Color calibration bar with grayscale and RGB swatches, no text or symbols presentyour reading falls into one of the stages that could potentially indicate increased risk. See page 23 for more information on this feature.
Please note that cues provided by this monitor are only intended to assist you in using this table. The table and cues are only provided for convenience to help you understand your non-invasive blood pressure reading as it relates to the NIH information. They are not a substitute for a medical examination by your physician. It is important for you to consult with your physician regularly. Your physician will tell you your normal blood pressure range as well as the point at which you may actually be considered to be at risk.
natural_image
Pure geometric line drawing with intersecting lines forming an L-shape (no text or symbols)
natural_image
Color calibration bar with grayscale and RGB swatches, no text or symbols presentHOW THIS BLOOD PRESSURE MONITOR WORKS
This monitor uses innovative technology to detect your blood pressure. This technology enables the monitor to automatically inflate and deflate at the appropriate level for each individual. With one touch of a button, the cuff will automatically inflate to block the blood flow through your artery. Next, the deflation process starts.
To help guide your wrist into the ideal position, this blood pressure monitor comes equipped with an optional wrist positioning guide to help you take an accurate blood pressure reading. Please see page 14 for more information on this feature.
Please note that any muscle movement during inflation or deflation will cause measurement error. When measurement is complete, the monitor will display your systolic pressure, diastolic pressure, and pulse readings. The monitor automatically finds where your measurement results fall on the NIH's National Heart Lung and Blood Institute's table and provides a cue if your reading falls into one of the stages that could potentially indicate increased risk. See page 23 for more information on this feature.
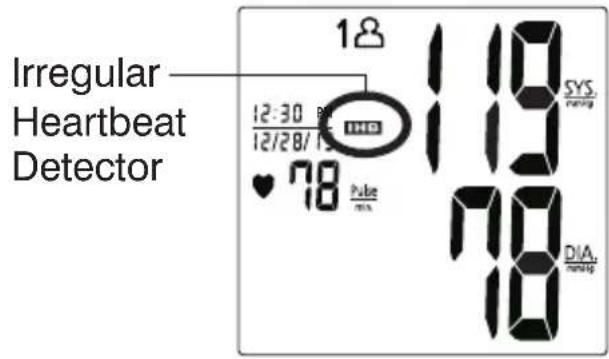
The appearance of the IHB icon indicates that a pulse irregularity consistent with an irregular heartbeat was detected during measurement. Refer to page 24 for more information on the Irregular Heartbeat Detector.

natural_image
Color calibration bar with grayscale and RGB color swatches, no text or symbols presentNAME/FUNCTION OF EACH PART
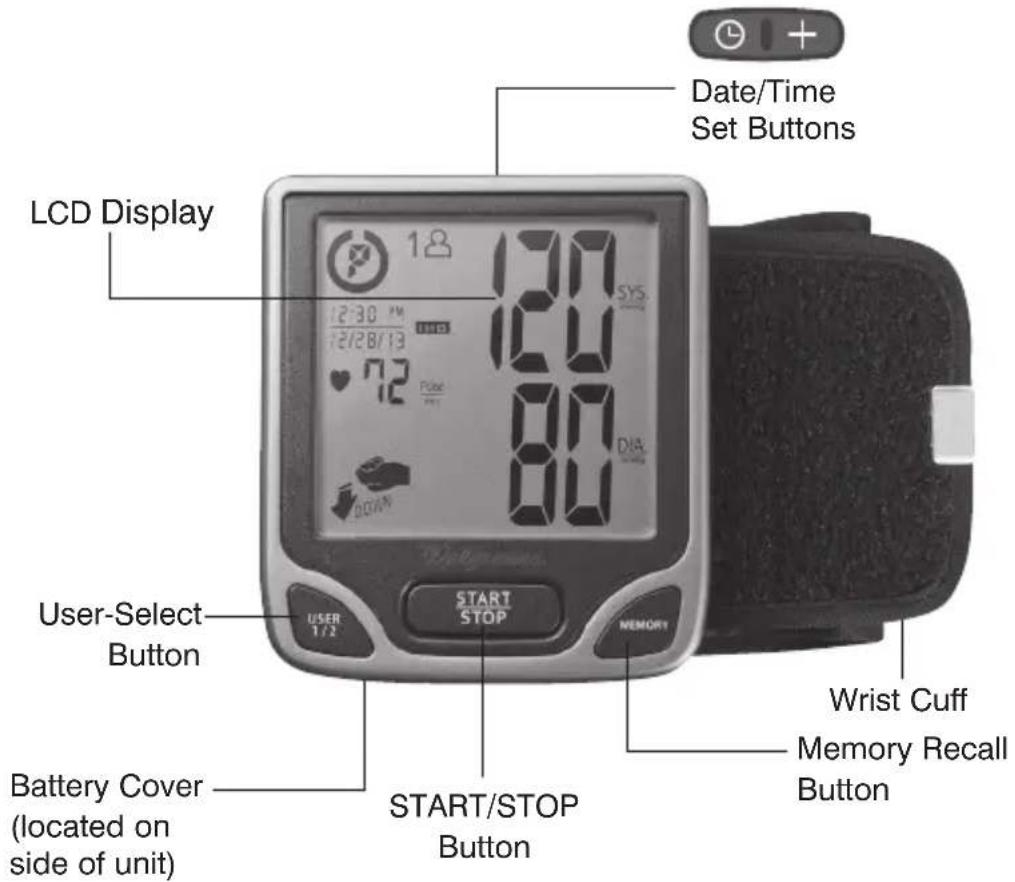
Accessories for unit :
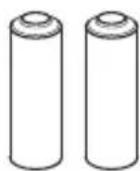
2 "AAA" size, 1.5V alkaline batteries included with the carrying case with the unit.
9

natural_image
Color calibration bar with grayscale and multicolor squares, no text or symbols presentDISPLAY EXPLANATIONS
natural_image
Pure geometric line drawing with intersecting lines forming an L-shape (no text or symbols)
natural_image
Color calibration bar with grayscale intensity scale and a central crosshair (no text or symbols)Display Symbols:
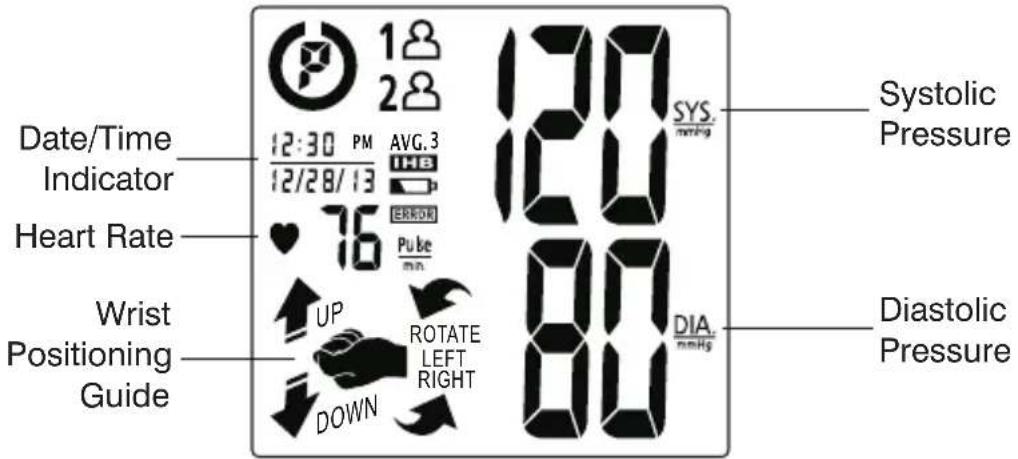
| 18 | User 1: Appears when the monitor is operated by User 1. |
 | User 2: Appears when the monitor is operated by User 2. |
 | Weak Battery Symbol: Appears when batteries should be replaced. |
 | Pulse Symbol: Shows the heart rate per minute. |
 | Wrist Positioning Guide: See page 14 for more information. |
 | Irregular Heartbeat Detector: See page 24 for more information. |
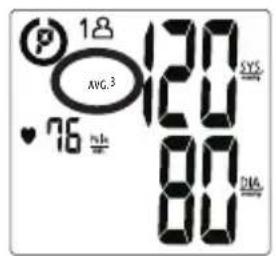
 | Memory Average: Displays average of last 3 readings. |
 | Risk Category Index: See page 23 for more information. |
If ERROR and any of the following letters and numbers appear in the area that systolic pressure should be displayed, an error has occurred with your reading. See Troubleshooting section of this manual for more information.
| EE | Measurement Error: Wrap the cuff correctly and keep wrist steady during measurement. Measure again. |
| E1 | Air Circuit Abnormality: Measure again. |
| E2 | Pressure Exceeding 300 mmHg: Switch the unit off to clear, then measure again. |
| E3 | Error Determining Measurement Data: Measure again. |
| E4 | Component Error: Measure again. |
| EP | System Error: Measure again. |

natural_image
Color calibration bar with grayscale intensity scale and a central crosshair (no text or symbols)INSTALLING BATTERIES
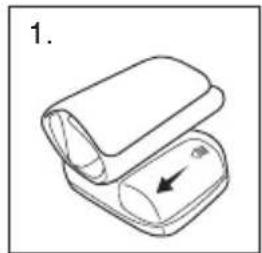
- The battery cover is located along the side of the monitor. Remove battery cover by pressing down and pulling away from the monitor.
- Install batteries according to the polarity indications inside the compartment (as shown in figure 2). Battery Type: 2 Alkaline LR03 (AAA) size
- Insert the other battery, according to the polarity indications inside the compartment (as shown in figure 3).
- Replace the cover by inserting it back into place.
natural_image
Line drawing of a medical device with an arrow indicating a specific area (no text or symbols present)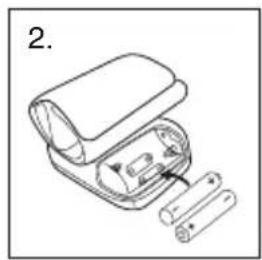
natural_image
Line drawing of a medical device with a clamped component and a separate cylindrical device (no text or symbols)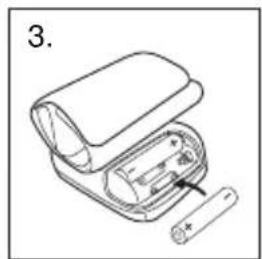
natural_image
Illustration of a battery pack with an open lid and a cylindrical battery inserted (no text or symbols)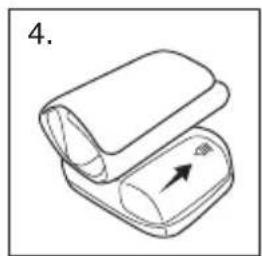
natural_image
Illustration of a closed device with an arrow indicating direction (no text or symbols)
natural_image
Color calibration bar with grayscale and RGB swatches, no text or symbols presentReplace the batteries if:
- The weak battery symbol appears on the display.
- Nothing appears on the display when the power is switched on.
As the supplied batteries are for test only, they may be discharged earlier than batteries you buy in stores. Replace all batteries at one time (as simultaneous set). Use only 1.5V AAA alkaline batteries. Remove batteries when unit is not in use for extended periods of time. Date and time will need to be reset if batteries are removed or replaced. Clean contacts on battery and in battery compartment with a soft dry cloth each time you install batteries.
Note:
Batteries are hazardous waste. Do not dispose of them together with the household garbage.


natural_image
Color calibration bar with grayscale and multicolor squares, no text or symbols presentWRIST POSITIONING GUIDE
- When using wrist blood pressure monitors, it is important to take the measurement while relaxing your wrist at heart level. This will help ensure an accurate reading will be taken. Because it is difficult to find the ideal location for a wrist measurement we have included an optional Wrist Positioning Sensor that will assist in directing your wrist to the ideal location for a blood pressure measurement.
- After you press START/STOP button, the display will illuminate with different icons that are designed to help you move your wrist. Once the ideal location is found, the Pulse Symbol will flash and measurement will begin.
| SYMBOL ACTION | |
 | Move your wrist up. |
 | Move your wrist down. |
 | Rotate your wrist to your left. |
 | Rotate your wrist to your right. |
14

natural_image
Color calibration bar with grayscale and RGB swatches, no text or symbols presentSETTING USER PREFERENCES
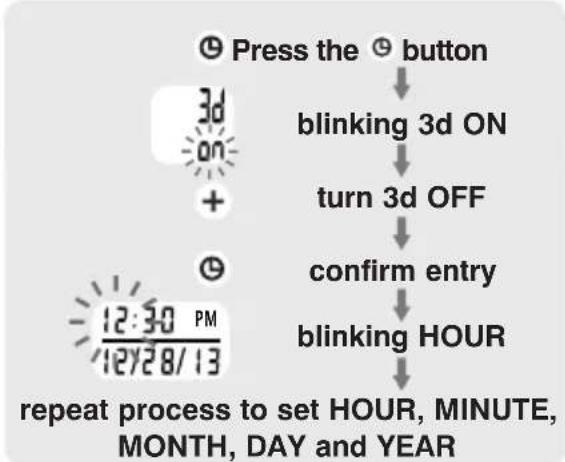
- To adjust the user preferences, press the Date/Time Set button 🔒 located on the top of the monitor.
- The display will show a blinking ON. By default, the wrist positioning guide is ON. To turn it OFF, press the + button.
- Press the Date/Time Set button 📊 again for the display to show a blinking number, showing the HOUR. Change the hour by pressing the + button. Each press will increase the number by one in a cycling manner. Pressing the Date/Time Set button ⏻ will confirm the entry.
- Change the MINUTE, MONTH, DAY and YEAR as described in Step 3 above, using the + button to change the numbers and the Date/Time Set button ⏻ to confirm the entries.
flowchart
graph TD
    A["Press the button"] --> B["blinking 3d ON"]
    B --> C["turn 3d OFF"]
    C --> D["confirm entry"]
    D --> E["blinking HOUR"]
    E --> F["repeat process to set HOUR, MINUTE, MONTH, DAY and YEAR"]
15

natural_image
Color calibration bar with grayscale and RGB swatches, no text or symbols presentAPPLYING THE CUFF
- Remove all watches, wrist jewelry, etc. prior to attaching the wrist monitor. Clothing sleeves should be rolled up and the cuff should be wrapped around bare skin for correct measurements.
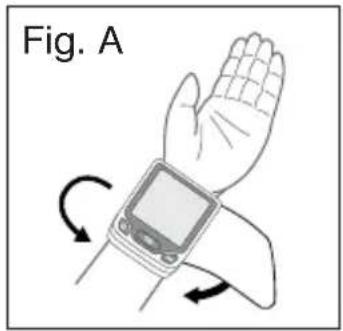
- Apply cuff to left wrist with palm facing up as shown in Fig. A.
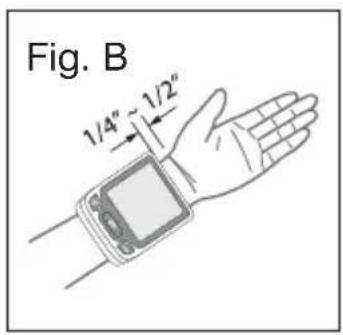
- Make sure the edge of the cuff is about 1/4"\~1/2" (1 cm) from the palm as shown in Fig. B.

natural_image
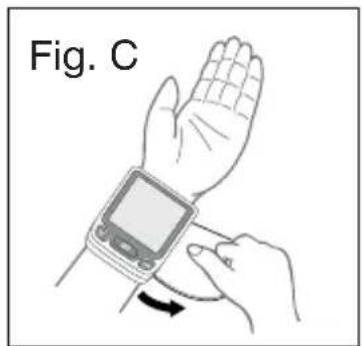
Color calibration bar with grayscale and RGB color swatches, no text or symbols present- In order to ensure accurate measurements, fasten the hook and loop strap securely around your wrist so there is no extra space between the cuff and the wrist as shown in Fig. C. If the cuff is not wrapped tight enough, the measurement values will not be accurate.
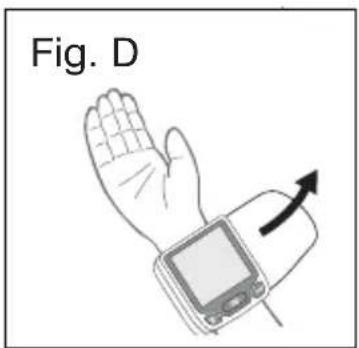
- If your physician has diagnosed you with poor circulation in your left arm, place the cuff around your right wrist as shown in Fig. D.
Note:
If it is not possible to use the cuff on your left wrist, it can also be used on your right wrist. However, all measurements should be made using the same wrist.
natural_image
Pure geometric line drawing with intersecting lines forming an L-shape (no text or symbols)
natural_image
Color calibration bar with grayscale and RGB swatches, no text or symbols presentCORRECT MEASUREMENT POSTURE
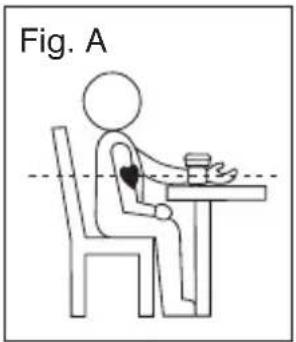
- Place your elbow on a table so that the cuff is at the same level as your heart as shown in Fig. A. Relax your entire body, especially between your elbow and fingers.
Note:
Your heart is located slightly below your armpit.
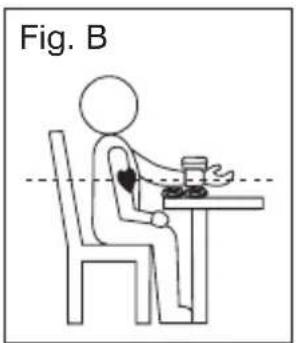
- If the cuff is not at the same level as your heart or if you cannot keep your arm completely still throughout the reading, use a soft object such as a folded towel to support your arm as shown in Fig. B.
- Turn your palm upwards.
- Sit upright in a chair, and take 5-6 deep breaths.
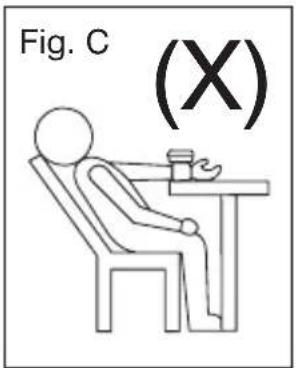
- Avoid leaning back while the measurement is being taken as shown in Fig. C.

natural_image
Color calibration bar with grayscale and RGB swatches, no text or symbols presentMEASUREMENT PROCEDURE
Important Notes:
- Position the monitor at the same level as your heart during measurement to ensure accurate readings.
- Blood pressure changes with every heartbeat and is in constant fluctuation throughout the day.
- Blood pressure measurement can be affected by the position of the user, his or her physiologic condition and other factors. For greatest accuracy, wait 1 hour after exercising, bathing, eating, drinking beverages with alcohol or caffeine, or smoking to measure blood pressure.
- Before a measurement, it is suggested that you sit quietly for 15 minutes as measurements taken during a relaxed state will have greater accuracy. You should not be physically tired or exhausted while taking a measurement.
- During the measurement, do not talk or move your arm or hand muscles.
• See page 28 for additional notes regarding your blood pressure measurement.
If you are using this blood pressure monitor for the first time, please remove the protective film from the screen.

natural_image
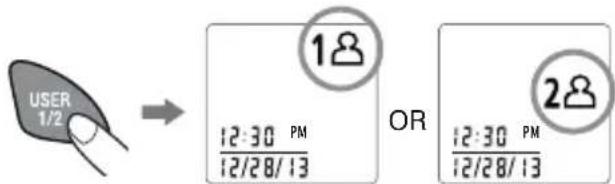
Color calibration bar with grayscale and RGB color swatches, no text or symbols present- Press the User-Select button to choose User 1 or User 2.
- With the cuff wrapped around your wrist, press the START/STOP button. Do not start the measurement process unless the cuff is wrapped around your wrist.
- If your wrist is not in the ideal position, the screen will suggest moving your wrist up or down, or rotating to the left, or to the right.
| SYMBOL ACTION | |
 | Move your wrist up. |
 | Move your wrist down. |
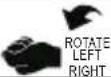 | Rotate your wrist to your left. |
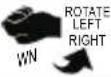 | Rotate your wrist to your right. |
Note:
When the 3d function is turned OFF, this instruction will not appear.

natural_image
Color calibration bar with grayscale and RGB swatches, no text or symbols present- All digits will light up, checking the display functions. The checking procedure will be completed after about 3 seconds.
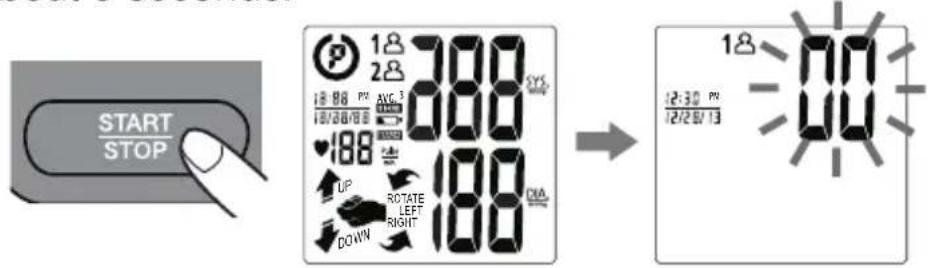
- After all symbols disappear, the display will show "00". The monitor is "Ready to Measure" and will automatically inflate the cuff to begin measurement. This cuff will then begin deflating as measurement continues.
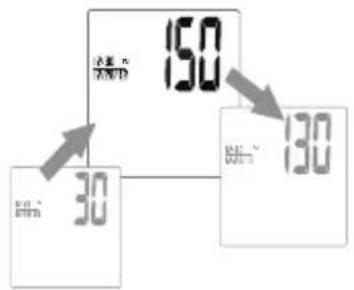
Note:
The monitor will re-inflate automatically if the system detects that your body requires more pressure for measurement.


natural_image
Color calibration bar with grayscale and multicolor squares, no text or symbols present- When the measurement is completed, the cuff will deflate entirely and systolic pressure, diastolic pressure and pulse will be shown simultaneously on the LCD screen. The measurement is then automatically stored into memory.
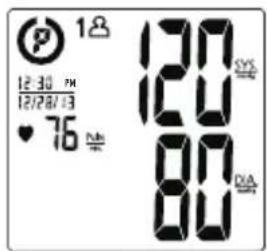
Note:
- This monitor automatically turns off approximately 1 minute after last operation. You may also press the START/STOP button to turn the unit off.
- To interrupt the measurement, you may press the START/STOP button (recommended), MEMORY, User-Select or Date/Time Set (USER 1/2 / Ⓐ buttons. The cuff will deflate immediately after a button is pressed.

natural_image
Color calibration bar with grayscale and multicolor squares, no text or symbols presentRISK CATEGORY INDEX
This monitor comes equipped with a Risk Category Index that automatically compares each reading to defined levels established by the U.S. National Institutes of Health's (NIH) National Heart Lung and Blood Institute as described earlier in this manual, and provides a helpful cue if your reading falls into one of the stages that could potentially indicate increased risk. No cue is given if the reading falls in the normal range as defined by NIH. Please note that cues provided by this monitor are only intended to assist you in using this table. The table and cues are only provided for convenience to help you understand your non-invasive blood pressure reading as it relates to the NIH information. They are not a substitute for a medical examination by your physician. It is important for you to consult with your physician regularly. Your physician will tell you your normal blood pressure range as well as the point at which you may actually be considered to be at risk.

Stage 2 Hypertension

Prehypertension

Stage 1 Hypertension
Normal (No Symbol)

natural_image
Color calibration bar with grayscale and RGB swatches, no text or symbols presentIRREGULAR HEARTBEAT DETECTOR (IHB)
The appearance of the ICDN indicates that a pulse irregularity consistent with an irregular heartbeat was detected during measurement. Usually this is not a cause for concern. However, if the symbol appears often, we recommend you seek medical advice. Please note that the device does not replace a cardiac examination, but serves to detect pulse irregularities at an early stage.
Movement, shaking or talking during the measurement can result in pulse irregularities that may cause the appearance of this icon. Therefore, it is of great importance to not move or talk during measurement.

natural_image
Color calibration bar with grayscale and RGB color swatches, no text or symbols presentTo determine the presence of an irregular heartbeat, the average of the heartbeat intervals is calculated with the first 3 normal effective heartbeat values. It is important to note that the average is not a strict mathematical averaging of all recorded intervals. At least 3 beats with 25% or greater difference from the average heartbeat interval will generate the on the screen.
IMPORTANT INFORMATION:
This blood pressure monitor is not designed for use by people with arrhythmias nor for diagnosing or treating an arrhythmia problem. As a safeguard, we recommend that if you have arrhythmias such as atrial or ventricular premature beats and atrial fibrillation or any other special conditions you should check with your physician before using your blood pressure monitor.


natural_image
Color calibration bar with grayscale and RGB swatches, no text or symbols presentRECALLING VALUES FROM MEMORY
This monitor can be used by two individuals. Each user can store up to 60 measurements.
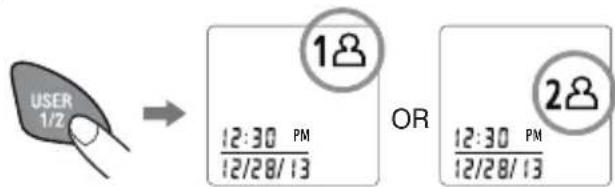
- PresstheUser-Select button.
-
Choose User 1 or User 2.
3.PresstheMEMORY button to access the memory. -
The monitor will first display the calculated average applied to the last 3 memories ("AVG. 3").
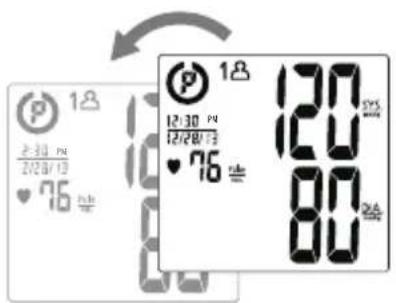
- Every new press of the MEMORY button will recall a previous reading. The latest reading will be recalled first.

natural_image
Color calibration bar with grayscale intensity scale and a central crosshair (no text or symbols)CLEARING VALUES FROM MEMORY
- Press the User-Select button to select User 1 or User 2.
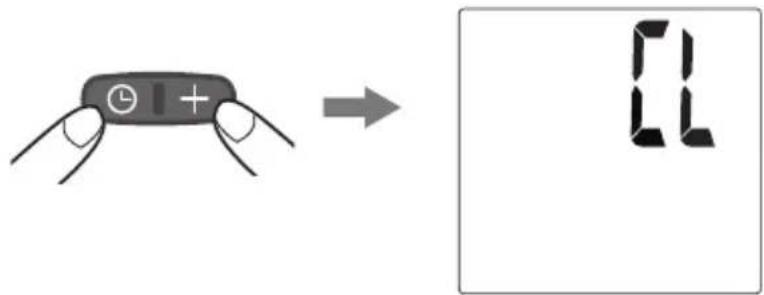
- Press and hold the Date/Time Set Ⓑ and + buttons at the same time while in memory recall mode and the data for the selected user will be erased automatically.


natural_image
Color calibration bar with grayscale and RGB swatches, no text or symbols presentIMPORTANT NOTES REGARDING YOUR BLOOD PRESSURE MEASUREMENT
• Take your reading in a comfortable environment as measurements can be affected by hot or cold temperatures. Take your blood pressure at normal body temperature.
- Do not move or talk during measurement as this can elevate readings.
- Do not move or cross legs during measurement. Keep feet flat on floor.
- Do not touch cuff or monitor during measurement procedure.
- It is suggested that you take your measurements at the same time each day and use the same wrist for consistency.
- Users should wait a minimum of 5 minutes before taking additional measurements. More time may be necessary depending upon your physiology.
- The measurement results that users receive are for reference only. If users have any blood pressure concerns, please consult a physician.
- Once inflation reaches 300 mmHg, the unit will deflate automatically for safety reasons.
• This product is not suitable for people with arrhythmias.
- This device may have difficulty determining the proper blood pressure for pregnant women and for users with irregular heartbeat, diabetes, poor circulation of blood, kidney problems, or for users who have suffered a stroke.

natural_image
Color calibration bar with grayscale and RGB swatches, no text or symbols presentCARE, MAINTENANCE & CLEANING
- Clean the blood pressure monitor body and cuff carefully with a slightly damp, soft cloth. Do not press. Do not wash cuff or use chemical cleaner on it. Never use thinner, alcohol or petrol (gasoline) as cleaner.
- Leaky batteries can damage the unit. Remove the batteries when the unit will not be used for a long time.
- Follow local ordinances and recycling instructions regarding disposal or recycling of the device and device components, including batteries.
- If the unit is stored near freezing, allow it to acclimate to room temperature before use.
- This blood pressure monitor is not field serviceable. You should not use any tool to open the device nor should you attempt to adjust anything inside the device. If you have any problems with this device, please contact HoMedics Consumer Relations (contact information on warranty page).
- Do not immerse the unit in water as this will result in damage to the unit.
- Do not subject the monitor or cuff to extreme temperatures, humidity, moisture, or direct sunlight. Protect from dust.

natural_image
Color calibration bar with grayscale and RGB swatches, no text or symbols present- Do not fold the cuff tightly.
- Do not disassemble the monitor or cuff. If in need of repair, refer to the warranty section of this manual.
- Do not subject the monitor to extreme shocks (do not drop on floor).
- Do not inflate the cuff unless wrapped around wrist.
- Do not wrap the cuff around body parts other than your wrist.
- Do not drop or insert any object into any opening.
- This monitor may not meet its performance specifications if stored or used outside of these temperature and humidity ranges:
• Storage/Transportation Environment
Temperature:
-13^ F 158^ F
(-25^ 70^)
Humidity:
Less than 93% RH
• Operation Environment
Temperature:
41^ F 104^ F
(5°C \~40°C)
Humidity:
15 \~ 93% RH
POTENTIAL FOR ELECTROMAGNETIC INTERFERENCE
To avoid inaccurate results caused by electromagnetic interference between electrical and electronic equipment, do not use the device near a cell phone or microwave oven.
This device complies with Part 15 of the FCC Rules. Operation is subject to the following two conditions: (1) this device may not cause harmful interference, and (2) this device must accept any interference received, including interference that may cause undesired operation.
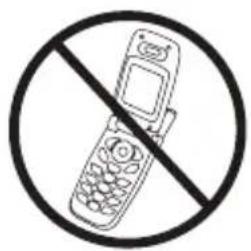
NOTE: The manufacturer is not responsible for any radio or TV interference caused by unauthorized modifications to this equipment. Such modifications could void the user authority to operate the equipment.
NOTE: This equipment has been tested and found to comply with the limits for a Class B digital device, pursuant to Part 15 of the FCC Rules. These limits are designed to provide reasonable protection against harmful interference in a residential installation. This equipment generates, uses and can radiate radio frequency energy and, if not installed and used in accordance with the instructions, may cause harmful interference to radio communications. However, there is no guarantee that interference will not occur in a particular installation. If this equipment does cause harmful interference to radio or television reception, which can be determined by turning the equipment off and on, the user is encouraged to try to correct the interference by one or more of the following measures:
- Reorient or relocate the receiving antenna.
- Increase the separation between the equipment and receiver.
- Connect the equipment into an outlet on a circuit different from that to which the receiver is connected.
- Consult the dealer or an experienced radio/TV technician for help.
TROUBLESHOOTING
If any abnormality arises during use, please check the following points:
| SYMPTOMS | POSSIBLE CAUSES | CORRECTION |
| Unit does not turn on when the START/STOP button is pushed. | Batteries have run down. | Replace them with two new AAA alkaline batteries. |
| Battery polarities have been positioned incorrectly. | Re-insert the batteries in the correct positions. | |
| EE measurement error symbol shown on display or the blood pressure value is displayed excessively low (or high). | Cuff has been placed incorrectly. | Wrap the cuff properly so that it is positioned correctly. Measure again. |
| Did you talk or move during measurement? | Keep wrist steady during measurement. Measure again. | |
| Shaking of the wrist with the cuff on. | ||
| E1 error symbol shown on display | Air circuit abnormality. | Measure again. |
| E2 error symbol shown on display | Inflation pressure exceeding 300 mmHg. | Switch the unit off, then measure again. |
| E3 error symbol shown on display | Error determining measurement data. | Measure again. |
| E4 error symbol shown on display | Component malfunction. | Measure again. |
| EP error symbol shown on display | System error. Measure again. |
Note: If the unit still does not work, contact HoMedics Consumer Relations. Under no circumstance should you disassemble or attempt to repair the unit by yourself. Contact information for HoMedics Consumer Relations Department can be found on the warranty page.

natural_image
Color calibration bar with grayscale and RGB color swatches, no text or symbols presentSPECIFICATIONS
| Power Source: | Two 1.5V DC (AAA) Alkaline batteries |
| Measurement Method: | Oscillometric |
| Measurement Range: | Pressure: 40~280 millimeters Mercury (mmHg)Pulse: 40~199 beats/minute |
| Accuracy: | Pressure: ±3 mmHgPulse: ±5% of reading |
| Pressure Sensor: | Semi-conductor |
| Inflation: | Pump driven |
| Deflation: | Automatic Pressure release valve |
| Memory Capacity: | 60 memories for each User (120 total) |
| Auto-shut-off: | 1 minute after last button operation |
| Operation Environment: | Temperature: 41°F~104°F (5°C~40°C)Humidity: 15% ~ 93% RH |
| Storage/Transportation Environment: | Temperature: -13°F~158°F (-25°C~70°C)Humidity: Less than 93% RH |

natural_image
Color calibration bar with grayscale and RGB swatches, no text or symbols present| Weight: | 0.24 lbs (107 g) (without batteries) |
| Wrist Circumference: | 5.3” - 7.7” (13.5cm - 19.5cm) |
| Accessories: | 2 AAA alkaline batteries, instruction manual, hard plastic storage case |
| Dimensions: | 2.72”(L) x 3.07”(W) x 1.11”(H)69mm(L) x 78mm(W) x 28.5mm(H) |
 | Internally Powered equipmentType BF EquipmentIPx0-No special protection against the ingress of water.Not suitable for use in presence of flammable anesthetic mixture wth air, oxygen or nitrous oxide. Continuous operation with short-time loading. |
Note: These specifications are subject to change without notice.

natural_image
Color calibration bar with grayscale and multicolor squares, no text or symbols presentMade exclusively for
Walgreens
For service or repair, do not return this unit to the retailer. Contact HoMedics Consumer Relations at:
Email:
cservice@
homedics.com
Phone:
1-800-466-3342
Business Hours:
8:30am-7pm ET
Monday-Friday
Distributed by
HOMEDICS
HoMedics, Inc.
3000 Pontiac Trail
Commerce
Township, MI
48390
Printed in China
LIMITED FIVE YEAR WARRANTY
HoMedics sells its products with the intent that they are free of defects in manufacture and workmanship for a period of five years from the date of original purchase, except as noted below. HoMedics warrants that its products will be free of defects in material and workmanship under normal use and service. This blood pressure monitor meets the simulated measurement cycles test requirement per EN1060-3, part 8.10. This warranty extends only to consumers and does not extend to Retailers.
To obtain warranty service on your HoMedics product, contact a Consumer Relations Representative by telephone at 1-800-466-3342 for assistance. Please make sure to have the model number of the product available.
HoMedics does not authorize anyone, including, but not limited to, Retailers, the subsequent consumer purchaser of the product from a Retailer or remote purchasers, to obligate HoMedics in any way beyond the terms set forth herein. This warranty does not cover damage caused by misuse or abuse; accident; the attachment of any unauthorized accessory; alteration to the product; improper installation; unauthorized repairs or modifications; improper use of electrical/power supply; loss of power; dropped product; malfunction or damage of an operating part from failure to provide manufacturers recommended maintenance; transportation damage; theft; neglect; vandalism; or environmental conditions; loss of use during the period the product is at a repair facility or otherwise awaiting parts or repair; or any other conditions whatsoever that are beyond the control of HoMedics.
This warranty is effective only if the product is purchased and operated in the country in which the product is purchased. A product that requires modifications or adoption to enable it to operate in any other country than the country for which it was designed, manufactured, approved and/or authorized, or repair of products damaged by these modifications is not covered under this warranty.

natural_image
Color calibration bar with grayscale and RGB color swatches, no text or symbols presentTHE WARRANTY PROVIDED HEREIN SHALL BE THE SOLE AND EXCLUSIVE WARRANTY. THERE SHALL BE NO OTHER WARRANTIES EXPRESS OR IMPLIED INCLUDING ANY IMPLIED WARRANTY OF MERCHANTABILITY OR FITNESS OR ANY OTHER OBLIGATION ON THE PART OF THE COMPANY WITH RESPECT TO PRODUCTS COVERED BY THIS WARRANTY. HOMEDICS SHALL HAVE NO LIABILITY FOR ANY INCIDENTAL, CONSEQUENTIAL OR SPECIAL DAMAGES. IN NO EVENT SHALL THIS WARRANTY REQUIRE MORE THAN THE REPAIR OR REPLACEMENT OF ANY PART OR PARTS WHICH ARE FOUND TO BE DEFECTIVE WITHIN THE EFFECTIVE PERIOD OF THE WARRANTY. NO REFUNDS WILL BE GIVEN. IF REPLACEMENT PARTS FOR DEFECTIVE MATERIALS ARE NOT AVAILABLE, HOMEDICS RESERVES THE RIGHT TO MAKE PRODUCT SUBSTITUTIONS IN LIEU OF REPAIR OR REPLACEMENT.
This warranty does not extend to the purchase of opened, used, repaired, repackaged and/or resealed products, including but not limited to sale of such products on Internet auction sites and/or sales of such products by surplus or bulk resellers. Any and all warranties or guarantees shall immediately cease and terminate as to any products or parts thereof which are repaired, replaced, altered, or modified, without the prior express and written consent of HoMedics.
This warranty provides you with specific legal rights. You may have additional rights which may vary from state to state. Because of individual state regulations, some of the above limitations and exclusions may not apply to you.
HoMedics® is a registered trademark of HoMedics, LLC.
© 2012 HoMedics, LLC. All rights reserved.
IB-WGNBPW720
P/N: 323102020 Ver. 001
natural_image
Pure geometric line drawing with intersecting lines (no text or symbols)
IB-WGNBPW-720--02.indd 37 2012/7/11 上午 11:37
natural_image
Color calibration bar with grayscale and RGB swatches, no text or symbols presentÍNDICE
natural_image
Color calibration bar with grayscale and RGB swatches, no text or symbols presentnatural_image
Color calibration bar with grayscale and RGB swatches, no text or symbols presentnatural_image
Pure geometric lines forming an L-shape with no text, numbers, or symbols
natural_image
Color calibration bar with grayscale and multicolor squares, no text or symbols presentnatural_image
Color calibration bar with grayscale and RGB swatches, no text or symbols presentnatural_image
Color calibration bar with grayscale and multicolor squares, no text or symbols presentnatural_image
Color calibration bar with grayscale and RGB swatches, no text or symbols presentnatural_image
Color calibration bar with grayscale and RGB swatches, no text or symbols presentnatural_image
Color calibration bar with grayscale intensity scale and a central crosshair (no text or symbols)natural_image
Color calibration bar with grayscale and RGB swatches, no text or symbols presentnatural_image
Color calibration bar with grayscale intensity scale and a central crosshair (no text or symbols)natural_image
Illustration of a medical device with a black arrow pointing to a component (no text or symbols)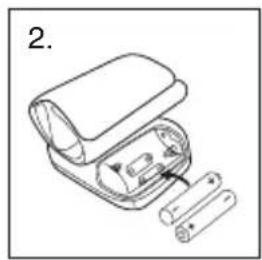
natural_image
Line drawing of a medical device with a clamped component and two cylindrical parts (no text or symbols)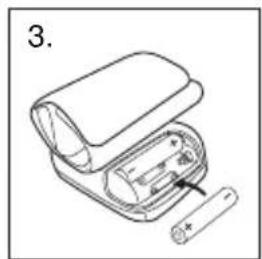
natural_image
Illustration of a battery pack with an open lid and a cylindrical battery inserted (no text or symbols)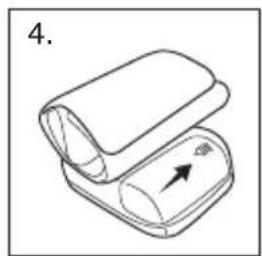
natural_image
Illustration of a closed device with an arrow indicating direction (no text or symbols)
natural_image
Color calibration bar with grayscale and RGB swatches, no text or symbols presentnatural_image
Color calibration bar with grayscale and multicolor squares, no text or symbols presentnatural_image
Color calibration bar with grayscale gradient and a central crosshair (no text or symbols)natural_image
Color calibration bar with grayscale and RGB swatches, no text or symbols presentnatural_image
Illustration of a human hand with a wristwatch and wristband, showing rotational motion (no text or symbols)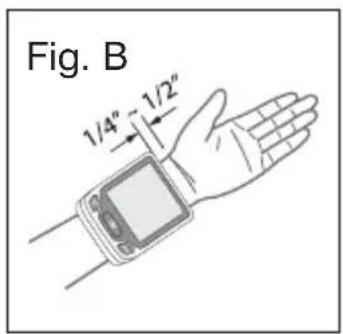

natural_image
Color calibration bar with grayscale and RGB color swatches, no text or symbols presentnatural_image
Color calibration bar with grayscale and RGB swatches, no text or symbols presentnatural_image
Color calibration bar with grayscale and RGB swatches, no text or symbols presentnatural_image
Color calibration bar with grayscale intensity scale and a central crosshair (no text or symbols)natural_image
Color calibration bar with grayscale and RGB swatches, no text or symbols presentnatural_image
Color calibration bar with grayscale and RGB swatches, no text or symbols presentnatural_image
Pure geometric line drawing with intersecting lines (no text or symbols)
natural_image
Color calibration bar with grayscale and RGB swatches, no text or symbols presentÍNDICE DE CATEGORÍA DE RIESGO
natural_image
Color calibration bar with grayscale and RGB swatches, no text or symbols presentDETECTOR DE LATIDOS CARDÍACOS IRREGULARES (IHB)
natural_image
Color calibration bar with grayscale and RGB swatches, no text or symbols presentnatural_image
Color calibration bar with grayscale and multicolor squares, no text or symbols presentCÓMO RECUPERAR VALORES DE LA MEMORIA
natural_image
Color calibration bar with grayscale and RGB swatches, no text or symbols presentCÓMO BORRAR VALORES DE LA MEMORIA

natural_image
Color calibration bar with grayscale and RGB swatches, no text or symbols presentnatural_image
Color calibration bar with grayscale and RGB swatches, no text or symbols presentCUIDADO, MANTENIMIENTO Y LIMPIEZA
natural_image
Color calibration bar with grayscale and RGB swatches, no text or symbols presentnatural_image
No crossed-out mobile phone symbol (no text or numbers present)natural_image
Color calibration bar with grayscale and RGB swatches, no text or symbols presentESPECIFICACIONES
natural_image
Color calibration bar with grayscale and RGB swatches, no text or symbols presentnatural_image
Color calibration bar with grayscale and RGB swatches, no text or symbols presentHoMedics, LLC 3000 Pontiac Trail Commerce Township, MI 48390
Impreso en China
GARANTÍA LIMITADA POR CINCO AÑOS
natural_image
Color calibration bar with grayscale and RGB color swatches, no text or symbols presentnatural_image
Pure geometric line drawing with intersecting lines forming an L-shape (no text or symbols)
natural_image
Color calibration bar with grayscale and RGB color swatches, no text or symbols present
IB-WGNBPW720
natural_image
Pure geometric lines forming an L-shape with no text or symbolsIB-WGNBPW-720--02.indd 75 2012/7/11 上午 11:37
natural_image
Pure geometric line drawing with intersecting lines forming an L-shape (no text or symbols)WRIST POSITIONING GUIDE
- When using wrist blood pressure monitors, it is important to take the measurement while relaxing your wrist at heart level. This will help ensure an accurate reading will be taken. Because it is difficult to find the ideal location for a wrist measurement we have included an optional Wrist Positioning Sensor that will assist in directing your wrist to the ideal location for a blood pressure measurement.
• After you press START/STOP button, the display will illuminate with different icons that are designed to help you move your wrist. Once the ideal location is found, the Pulse Symbol will flash and measurement will begin.
| SYMBOL ACTION | |
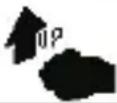 | Move your wrist up. |
 | Move your wrist down. |
 | Rotate your wrist to your left. |
 | Rotate your wrist to your right. |
If ERROR and any of the following letters and numbers appear in the area that systolic pressure should be displayed or the wrist icon appears, an error has occurred with your reading.
 | Component Error: Measure again. |
 | Wrist Is Not In The Ideal Position:Measure again. Once the wrist positioning sensor guides your wrist to your ideal location, keep arm still until measurement is completed. |
- DELUXE WRIST
- Blood Pressure Monitor
- TABLE OF CONTENTS
- INTRODUCTORY INFORMATION:
- USAGE INFORMATION:
- IMPORTANT PRODUCT NOTICES AND SAFETY INSTRUCTIONS
- ABOUT BLOOD PRESSURE
- What is Blood Pressure?
- Why Measure Your Blood Pressure?
- BLOOD PRESSURE STANDARD
- HOW THIS BLOOD PRESSURE MONITOR WORKS
- INSTALLING BATTERIES
- Replace the batteries if:
- Note:
- WRIST POSITIONING GUIDE
- SETTING USER PREFERENCES
- APPLYING THE CUFF
- CORRECT MEASUREMENT POSTURE
- MEASUREMENT PROCEDURE
- Important Notes:
- RISK CATEGORY INDEX
- IRREGULAR HEARTBEAT DETECTOR (IHB)
- IMPORTANT INFORMATION:
- RECALLING VALUES FROM MEMORY
- CLEARING VALUES FROM MEMORY
- IMPORTANT NOTES REGARDING YOUR BLOOD PRESSURE MEASUREMENT
- CARE, MAINTENANCE & CLEANING
- POTENTIAL FOR ELECTROMAGNETIC INTERFERENCE
- TROUBLESHOOTING
- Walgreens
- HOMEDICS
- LIMITED FIVE YEAR WARRANTY
- ÍNDICE
- ÍNDICE DE CATEGORÍA DE RIESGO
- DETECTOR DE LATIDOS CARDÍACOS IRREGULARES (IHB)
- CÓMO RECUPERAR VALORES DE LA MEMORIA
- CÓMO BORRAR VALORES DE LA MEMORIA
- CUIDADO, MANTENIMIENTO Y LIMPIEZA
- GARANTÍA LIMITADA POR CINCO AÑOS
Brand : Walgreens
Model : WGNBPW-720
Category : Sphygmomanometer