
CAR1000 - Receiver JENSEN - Free user manual and instructions
Find the device manual for free CAR1000 JENSEN in PDF.


| Product Type | Car Stereo Receiver |
| Brand | Jensen |
| Model | CAR1000 |
| Dimensions (W x H x D) | 188 x 58 x 165 mm (1-DIN) |
| Weight | 1.5 kg |
| Power Supply | 12V DC (negative ground) |
| Maximum Power Output | 4 x 50 Watts |
| RMS Power Output | 4 x 22 Watts @ 4 Ohms |
| Tuner Bands | AM/FM |
| Preset Stations | 30 (18 FM, 12 AM) |
| Playback Media | CD, CD-R/RW, MP3 via USB |
| Audio Inputs | AUX (3.5 mm), USB |
| Bluetooth | Yes (built-in microphone for hands-free calling) |
| Display | LCD with adjustable color |
| Remote Control | Yes (included) |
| Anti-Theft | Detachable faceplate |
| Operating Temperature | -10°C to 60°C |
| Maintenance | Clean with soft, dry cloth; avoid solvents |
| Safety | Disconnect battery negative terminal before installation |
| Spare Parts & Repairability | Contact Jensen support for authorized service centers |
Frequently Asked Questions - CAR1000 JENSEN
User questions about CAR1000 JENSEN
0 question about this device. Answer the ones you know or ask your own.
Ask a new question about this device
Download the instructions for your Receiver in PDF format for free! Find your manual CAR1000 - JENSEN and take your electronic device back in hand. On this page are published all the documents necessary for the use of your device. CAR1000 by JENSEN.
USER MANUAL CAR1000 JENSEN
CAR1000
10.1"CAPACITIVE TOUCH SCREEN 2 DIN MULTIMEDIA MECHLESS RECEIVER
AM-FM USB/SD Media Player Rear Camera Input
INSTALLATION & OWNER'S MANUAL
android auto

Works with Apple CarPlay

Bluetooth®
JENSEN®
Copyright Notes
This product incorporates copyright protection technology that is protected by method claims of certain U.S. patents and other intellectual property rights owned by Macrovision Corporation and other rights owners. Use of this copyright protection technology must be authorized by Macrovision Corporation, and is intended for home and other limited viewing uses only unless otherwise authorized by Macrovision Corporation. Reverse engineering or disassembly is prohibited.
The microSD logo is trademark of SD-3C LLC. The Bluetooth® word mark and logos are owned by the Bluetooth SIG, Inc.
Use of the Apple CarPlay logo means that a vehicle user interface meets Apple performance standards. Apple is not responsible for the operation of this vehicle or its compliance with safety and regulatory standards. Please note that use of this product with iPhone, iPod or iPad may affect wireless performance. Apple CarPlay is a trademark of Apple Inc. "Made for iPod" and "Made for iPhone" mean that an electronic accessory has been designed to connect specifically to iPod or iPhone, respectively, and has been certified by the developer to meet Apple performance standards. iPhone and iPod are trademarks of Apple, Inc., registered in the U.S. and other countries.
Availability of Android Auto™ may vary depending upon your country and phone model. Please visit android.com/auto for more information. Android, Android Auto, Google and other marks are trademarks of Google Inc.
Other trademarks and trade names are those of their respective owners.
Table of Contents
Page
Warning Statement 3
Safety Information/Precautions 4
Preparation/Mounting 5
Wiring Diagram 6
Control Locations.... 7
Remote Preparation 8
General Operation 9-10
AM/FM Tuner Operation 11
USB/microSD Operation 12
Media Compatibility 13-14
Bluetooth Operation 15-16
Apple CarPlay 17-18
Android Auto 19-20
Auxiliary Inputs/Rear Camera Operation.... 21
SWC Input Operation 22
Troubleshooting 23
Specifications 24
Warranty. 25
WARNING
Upon installation of this monitor/media player ("unit") into a vehicle, the driver of the vehicle must not operate this unit by watching videos or playing video games while driving. Failure to follow this instruction could lead to driver distraction which could result in serious injury or death to the vehicle's occupants or persons outside the vehicle and/or property damage.
Several states prohibit the installation of monitors/media players if the screen is visible from the driver's seat. If you reside in a jurisdiction which has enacted such a law, this unit must not be installed so that the screen is visible from the driver's seat. When installing this unit in the front console/dashboard, the unit must be positioned so that it is facing the front passenger seat only. Failure to follow this instruction could lead to driver distraction which could result in serious injury or death to the vehicle's occupants or persons outside the vehicle and/or property damage.
This unit is designed so that it may be operated only when the vehicle is in "Park" and the parking brake is fully engaged. To this end, this unit includes a parking brake lock-out feature which prohibits the unit from operating if the vehicle is not in "Park" and/or the parking brake is not fully engaged. When installing this unit, the installer must connect the parking brake detect wire to the parking brake mechanism in order to make the parking brake lock-out feature operable. DO NOT simply ground the parking brake detect wire to a metal portion of the vehicle. Failure to properly install the parking brake lock-out feature could lead to driver distraction which could result in serious injury or death to the driver's occupants or persons outside the vehicle and/or property damage.
Once the parking brake lock-out feature is installed, the owner/user must not attempt to disrupt/neutralize the parking brake lock-out feature by (a) partially engaging the parking brake and/or (b) purchasing/using any device or unit designed to send necessary brake signals to the unit. Failure to follow these instructions could lead to driver distraction which could result in serious injury or death to the driver's occupants or persons outside the vehicle and/or property damage.
When operating this unit, keep the unit's volume level low enough so that the vehicle's occupants can hear traffic-related sounds such as police and emergency vehicles. Failure to follow this instruction could lead to driver distraction which could result in serious injury or death to the vehicle's occupants or persons outside the vehicle and/or property damage.
Safety Information
Please read all instructions carefully before attempting to install or operate.
Due to its technical nature, it is highly recommended that your JENSEN CAR1000 is installed by a professional installer or an authorized dealer. This product is only for use in vehicles with 12VDC negative ground only.
To prevent damage or injury:
- Make sure to ground the unit securely to the vehicle chassis ground.
- Do not remove the top or bottom covers of the unit.
- Do not install the unit in a spot exposed to direct sunlight or excessive heat or the possibility of water splashing.
- Do not subject the unit to excessive shock.
- When replacing a fuse, only use a new one with the prescribed rating. Using a fuse with the wrong rating may cause the unit to malfunction.
- To prevent short circuits when replacing a fuse, disconnect the wiring harness first.
- Use only the provided hardware and wire harness.
- You cannot view video while the vehicle is moving. Find a safe place to park and engage the parking brake.
- If you experience problems during installation, consult your nearest JENSEN dealer.
- If the unit malfunctions, reset the unit as described on page 10 first. If the problem still persists, consult your nearest JENSEN dealer or call tech assistance @ (888) 921-4088.
- To clean the monitor, wipe only with a dry silicone cloth or soft cloth. Do not use a stiff cloth, or volatile solvents such as paint thinner and alcohol. They can scratch the surface of the panel and/or remove the printing.
- When the temperature of the unit falls (as in winter), the liquid crystal inside the screen will become darker than usual. Normal brightness will return after using the monitor for a while.
- When extending the ignition, battery or ground cables, make sure to use automotive-grade cables or other cables with an area of 0.75mm (AWG 18) or more to prevent voltage drops.
- Do not touch the liquid crystal fluid if the LCD is damaged or broken. The liquid crystal fluid may be hazardous to your health or fatal. If the liquid crystal fluid from the LCD contacts your body or clothing, wash it off with soap immediately.
FCC Compliance
This device complies with Part 15 of the FCC Rules. Operation is subject to the following two conditions:
(1) this device may not cause harmful interference, and
(2) this device must accept any interference received, including interference that may cause undesired operation.
Warning: Changes or modifications to this unit not expressly approved by the party responsible for compliance could void the user's authority to operate the equipment.
This equipment complies with FCC radiation exposure limits set forth for an uncontrolled environment.
This equipment should be installed and operated with a minimum distance of 20cm between the radiator & your body.
This transmitter must not be co-located or operating in conjunction with any other antenna or transmitter.
Note: This equipment has been tested and found to comply with the limits for a Class B digital device, pursuant to Part 15 of the FCC Rules. These limits are designed to provide reasonable protection against harmful interference in a residential installation. This equipment generates, uses and can radiate radio frequency energy and, if not installed and used in accordance with the instructions, may cause harmful interference to radio communications. However, there is no guarantee that interference will not occur in a particular installation. If this equipment does cause harmful interference to radio or television reception, which can be determined by turning the equipment off and on, the user is encouraged to try to correct the interference by one or more of the following measures:
- Reorient or relocate the receiving antenna.
- Increase the separation between the equipment and receiver.
- Connect the equipment into an outlet on a circuit different from that to which the receiver is connected.
- Consult the dealer or an experienced radio/TV technician for help.
Preparation
Before You Start
- Disconnect negative battery terminal. Consult a qualified technician for instructions.
- Avoid installing the unit where it would be subject to high temperatures, such as from direct sunlight, or where it would be subject to dust, dirt or excessive vibration.
INSTALLATION GUIDE
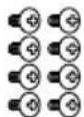
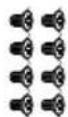
MOUNTING SCREWS

M2.6 x 6.0mm
M5.0×6.0mm
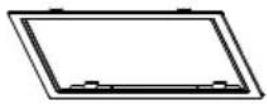
TRIM RING
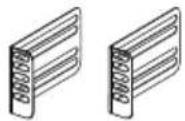
MOUNTING BRACKET
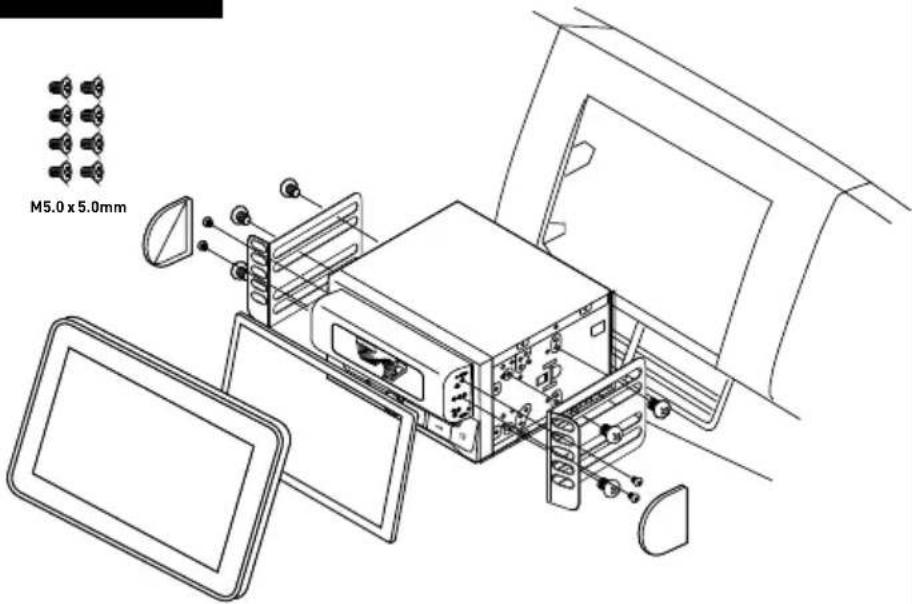
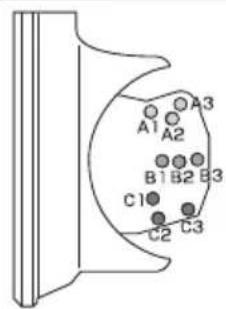
When replacing a fuse, make sure to use the correct type and amperage. Using an incorrect fuse could cause damage. The unit uses (1) 15 amp ATC mini style fuse located on the power connector.
Wiring Notes:
Subwoofer output
The Subwoofer preamp audio output (Blue jacket with Black RCA) is active in all audio modes.
Rear camera input
A rear view camera (not included) can be used with the Camera input.
Control Locations
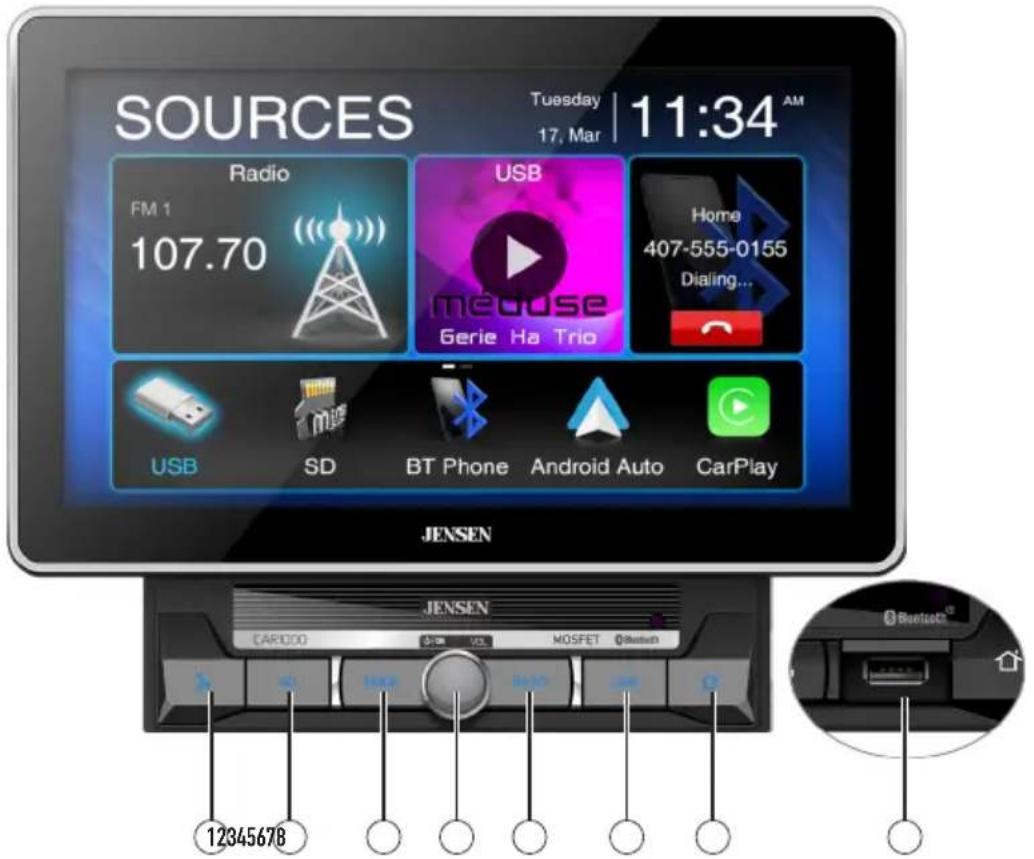
The radio display features the following functions and displays:
① Voice Activation Button
② microSD Card Slot
③ MODE
4 Power/Volume/Mute
⑤ Band
6 USB Port
⑦ Home
⑧ RESET / USB Port
Remote Control Preparation
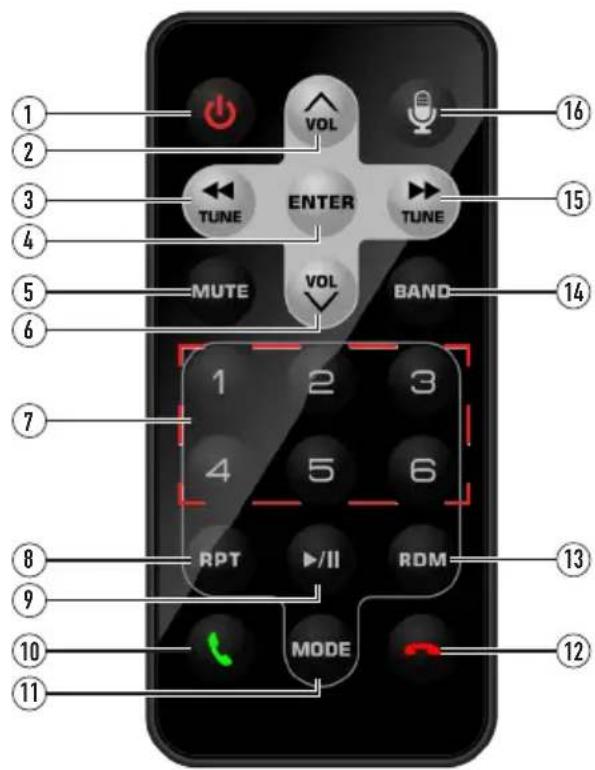
① Power
② Volume Up
③ Tune/Track Down
④ Enter
⑤ Mute
⑥ Volume Down
⑦ Preset 1\~6
⑧ Repeat
⑨ Play/Pause
10 Talk
⑪ MODE
12 End Call
13 Random
⑭ BAND
15 Tune/Track Up
⑯ Voice Activation Button
General Operation
| Power On/Off | Momentarily press ⬆ to turn the unit on. Press and hold to turn the unit off. |
| Volume | Rotate the volume knob to increase or decrease the volume level. |
| Mute | Momentarily press MUTE to silence the audio. Momentarily press MUTE again to return to the previously selected volume. Rotating the volume knob while the volume is muted will also cancel the mute function. |
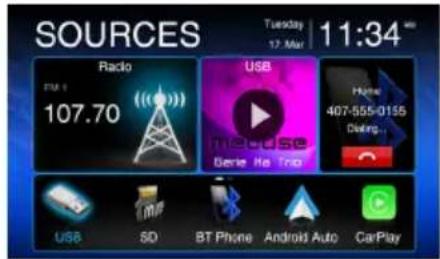
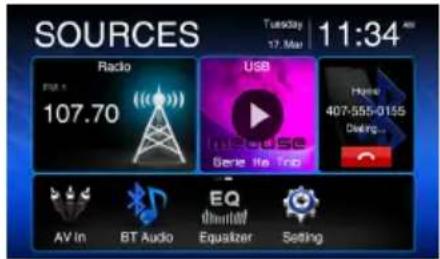
| Mode | Press MODE at the top left corner of the screen to display the main menu. |
| Radio/USB/microSD/BT Phone/Android Auto/CarPlay/AV In/BT Audio/Equalizer/Setting | |
| Note: Modes of operation can also be accessed by selecting the corresponding icon from the main menu. | |
| Main Menu | Operation Mode Selection: Press the icon at the top left corner of the screen to display the OSD main menu. Press the Radio/USB/microSD/BT Phone/Android Auto/CarPlay/AV In/BT Audio/Equalizer/Setting in the Main meu pate to select the desired source. |
| Dimmer | Press theicon to adjust the brightness. |
| A/V In | Connect external audio/video devices to the rear RCA Type A/V Input |
| USB | Insert a USB flash drive to play MP3/FLAC/MP4/Xvid files. |
| Reset | To resolve abnormal operation or if the unit is inoperable. Press the RESET button located behind the front panel directly under USB port. The unit will reset the main processor to the default setting.Note: Use the tip of a pen to access the reset button. To restore the factory default software settings. |
General Operation
Setup Menu
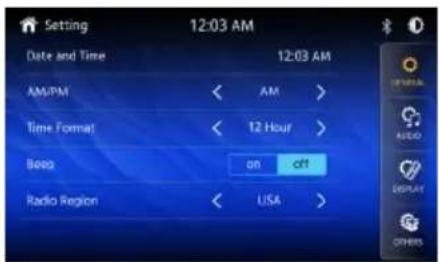
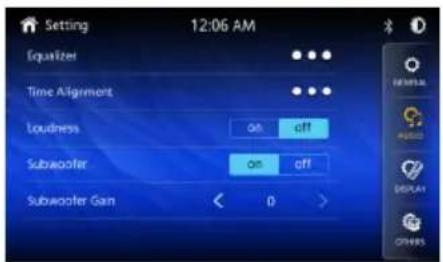
From the Main Menu screen, select Setup to access the Setting menu and select from eight categories represented by the icons on the top of the screen: General, Audio, Display, Others. Select the category, and adjust any of the available options using the touch screen.
General:
- Adjust the date and time- Day, Month, Year, Hour, Minute and Format.
- Time Format- Select between 12-Hour and 24-Hour Time Format.
- Beep Tone - Turn the Beep Tone On or Off.
• Radio Region - Select Radio Region.
Audio:
- Equalizer-Select between the following EQ presets: Default, User, Classic, Rock, Jazz, Electric, Pop, Soft (allows user to enter custom EQ settings).
- Time Alignment-To adjust time correction settings select "Surround1" "Surround2" or "Surround3".
- Loudness - Touch screen button to turn the Loudness function on/off.
- Subwoofer Control - Touch the button to turn the Subwoofer Control On/Off.
- Subwoofer Gain - Select subwoofer -15 to 0 (-6 is default).
Display:
- Brightness- Press > or < to adjust to desired level. (O Minimum/20 maximum: Day: 20 is default, Night: 6 is default).
- Dimmer Mode- Press > or < to adjust to change the mode (Auto/Day/Night).
Others:
- Factory Default-Reset Bluetooth Settings or Reboot System.
- System Version-Displays soft ware version of unit.
AM/FM Tuner Operation
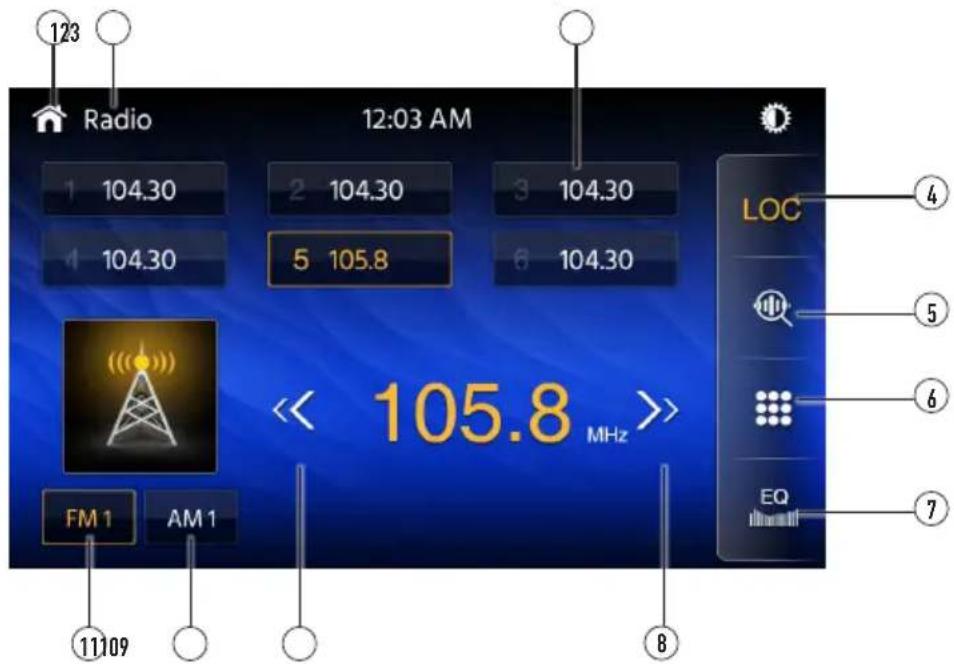
Radio Operation
From the main menu, touch Radio icon on the screen to select AM/FM tuner mode.
Main Menu ①
Press 📂con to return to Main Menu screen.
Current Mode Indicator ②
Display status of various tuning functions including Auto.
Preset Stations③
To store a station as a preset in the current band, tune to the desired station, then press the desired preset number from the list. Press any preset in the list to recall and begin playback of that station. (Hold this button down for a few seconds and it will switch between AS and PS)
Local / Distance ④
Press DX/LOC text to turn on the local or distance.
AS/PS 5
Auto Store Presets: Press and hold AS/PS to automatically program the FM(18)/AM(12) available into the presets in the current Band.
Keypad ⑥
Preset Scan: Press AS/PS to scan through all tunable presets in the current band and play them for 3 seconds each.
EQ 7
Direct Search Keypad.
Seek Tune Up⑧
Press the icon to adjust Equalizer setting.
Seek Tune Down ⑨
Press to automatically tune to a higher frequency.
AM 10
Press to automatically tune to a lower frequency.
FM 11
Press to toggle between 2 AM bands.
Press to toggle between 3 FM bands.
USB/microSD Operation
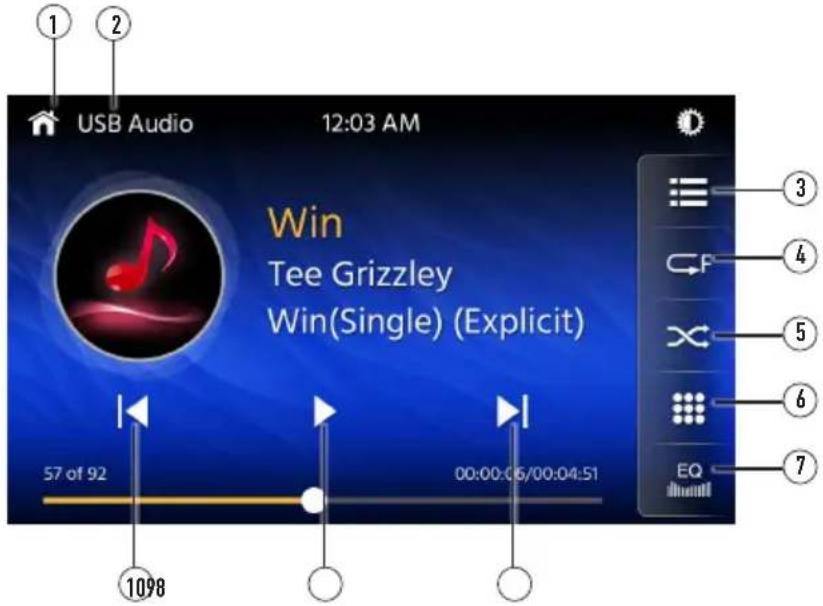
| USB/miroSD | From the main menu, touch the USB or miroSD icon on the main screen. |
| Main Menu 1 | Pressicon to return to Main Menu screen. |
| Current Mode Indicator 2 | Displays source currently playing. |
| List 3 | Pressicon to access a list of all files and folders on the device.- Presstoaccess the root directory- Press a folder name to access that folder, and presstoreturn to the file list- Use the up and down arrows to navigate the file list- Press the "arrow to return to the previous screen. |
| Repeat 4 | Pressicon to repeat current track and adjust to repeat all tracks in the current folder. Touch RPT again to exit repeat mode. |
| Random 5 | Pressicon to shuffle all tacks in the current folder. and again to shuffle all tracks. Touchicon again to exit Repeat mode. |
| Search 6 | Pressicon to search a music file. |
| EQ 7 | Press theEQicon to adjust Equalizer setting. |
| Track Up 8 | Press▶icon to skip ahead to the next song |
| Play / Pause 9 | Press▶ion to pause or resume playback. |
| Track Down 10 | Pressicon to return to the beginning of the current track. |
Media Compatibility
| File Type MP3 | |||
| File System | FAT | FAT 12 X | |
| FAT 16/FAT 32 | √ | ||
| File Extension | .mp3/.MP3/.Mp3/.mP3/.flac/ogg/.MP4/.Xvid | √ | |
| .rmp/.m4a X | |||
| MPEG Format | MPEG 1 | √ | |
| MPEG 2 | √ | ||
| MPEG 2.5 | √ | ||
| Sampling Frequency | MPEG 1 32/44.1/48kHz | ||
| MPEG 2 12/16/22.05/24kHz | |||
| MPEG 2.5 8/11.025/12kHz | |||
| Bitrate | MPEG 1 32 ~ 320kbps | ||
| MPEG 2 8 ~ 160kbps | |||
| MPEG 2.5 8 ~ 160kbps | |||
| Other Information | Directory Depth Unlimited | ||
| File Name Length 32 bytes | |||
| Total File Number 2000 files | |||
| Total Folder Number 200 folders | |||
| File Number via Folder | 2000 files | ||
| MP3 ID3 TAG | ver.1.x | √ | |
| ver.2.x | √ | ||
| Title, Artist, Album | √ | ||
Notes:
- Due to ongoing technological advancement, some USB flash drives may be incompatible with this unit.
Media Compatibility
| Media Compatibility | The following types of files are not compatible:MP3 PRO format, MP3 playlistsRMP formatAAC, protected AAC, M4A format |
| Playback Order | MP3 playback sequence begins in the root folder of the USB device. Any empty folders or folders that do not include MP3 files are skipped. |
| Compatible Recording Formats | ISO9660 standards:Maximum nested folder depth is 8 (including the root folder).Valid characters for folder/file names are letters A-Z (all caps), numbers 0-9, and “_” (underscore). Some characters may not be displayed correctly, depending on the character type.This device can play back files in Joliet and other standards that conform to ISO9660. MP3 written in the formats other than the above may not play and/or their file names or folder names may not be displayed properly. |
| Notes | Some files may not play or be displayed correctly, depending on sampling rates and bit rates.For best results, use the following settings when ripping MP3 files:128kbps or higher constant bit rate44.1kHz or higher sampling frequency |
Bluetooth Operation
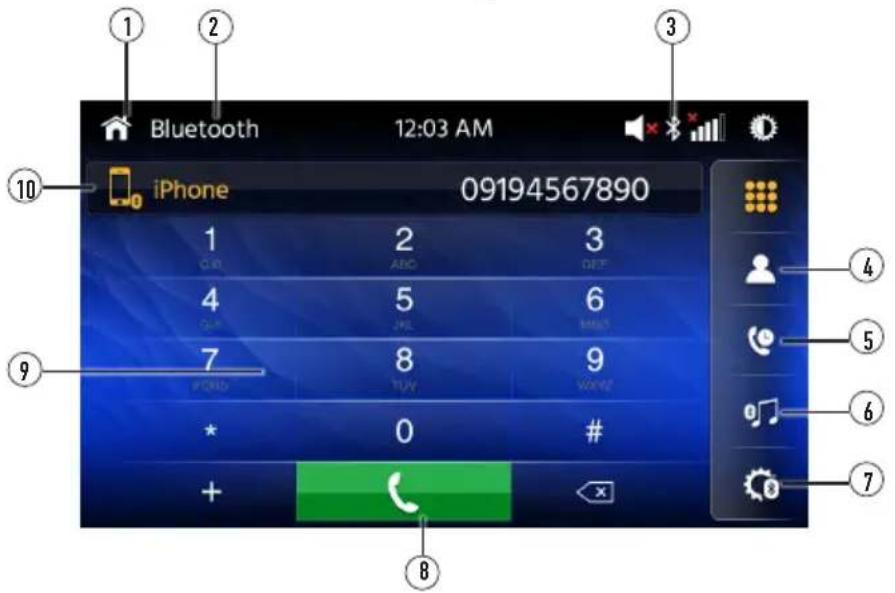
| Before using Bluetooth | Before you can use a Bluetooth device to make hands-free calls or stream audio. it must be authenticated. This is also referred to as "pairing" a device. |
| Pairing a New Device | The unit broadcasts the pairing signal constantly when no devices are currently connected. Complete the pairing sequence from your Bluetooth device. Refer to the owner's manual for your device for more details. The device name is "CAR1000". The unit can be in any mode of operation when pairing is performed. On certain phones, pairing may need to be done more than once. |
| Connect | The head unit will automatically connect to the last connected device when the connect feature is set to Auto connect On. If the connect feature is set to Auto Connect Off, the head unit will not automatically connect to any device. |
| Bluetooth Phone | From the main menu. touch the Bluetooth on the screen. Bluetooth icon will appear anytime a Bluetooth device is connected. |
| Main Menu 1 | Press icon to return to Main Menu screen. |
| Current Mode Indicator 2 | Displays current mode of operation. |
| Bluetooth Status indicator 3 | When Bluetooth is On and a Bluetooth device is being paired. the indicator will flash. When Bluetooth is On and a phone is connected to the unit. the indicator will illuminate steady. |
| Phone Book 4 | Press "CONTACTS" to access phone book menu. |
| Call Log 5 | Press the Call Log to show( Dialed. Missed and Received Calls ). |
Bluetooth Operation
Bluetooth Music 6
Press MUSIC to transfer audio between the unit and mobile phone.
Setup 7
Press "SETUP" to access Bluetooth settings.
Call 8
Dial a number and touch the Phone icon to call.
Phone Keypad 9
Use the keypad to dial a phone number.
Devices 10
Press the DEVICES to show the pairing device list. To connect to a previously connected device, press the current device name. Any previously connected devices that are in rang will be listed by their device name. Press the desired device name to disconnect from the current device and connect to the new device.
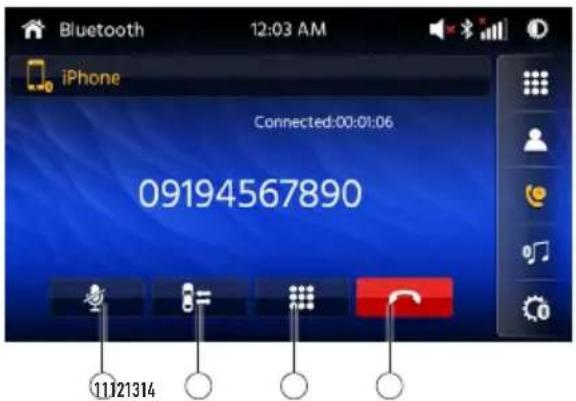
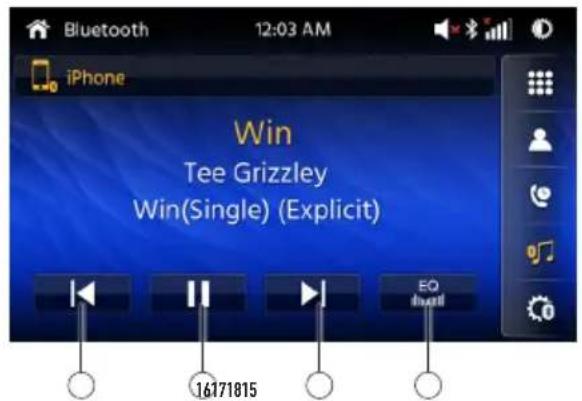
Microphone ⑪
Turn the Microphone voice On or Off.
Audio Transfer Button 12
Press to transfer audio between the unit and mobile phone.
Keypad 13
Press to return to the Keypad screen.
End Call 14
Press the End icon on screen or the End button on the front Panel to end a call in progress or o reject an incoming call.
Track Down 15
Press icon to return to the beginning of the current track.
Play / Pause 16
Press ▶idon to pause or resume playback.
Track Up 17
Touch ▶icon to skip ahead to the next song.
EQ 18
Press the icon to adjust Equalizer setting.
Apple CarPlay Operation
Apple CarPlay™ is a smart interface for iPhone, allowing you to voice-control (via Siri) music, navigation, phone and messaging apps - significantly reducing driver distraction.

Phone - Use Siri to make calls, return missed calls, listen to voicemail messages, and view the caller ID on the receiver's screen.

Messages - Ask Siri to send, read, and reply to text messages. This hands free operation minimizes distraction and allows you to keep hands on the wheel and eyes on the road.

Music - Access music by artist, song, playlist, and more through the receiver's touchscreen or via Siri. The receiver will mirror the iPhone screen with artist and track information.

Maps - Use Siri to request turn-by-turn directions – search by address or points of interest. Apple Maps will be mirrored on the screen, including traffic information and estimated time to destination.
Compatible Devices
Made for iPhone models:
iPhone 11 Plus, iPhone 11, iPhone XS Max, iPhone XS, iPhone XR, iPhone X, iPhone 8, iPhone 8 Plus, iPhone 7, iPhone 7 Plus, iPhone 6, iPhone 6S
Starting Apple CarPlay™
Connect an iPhone to the receiver's USB port using a Apple Certified Lightning cable (not included). Apple CarPlay will launch automatically. The familiar applications will appear on the receiver's touchscreen to activate Siri voice control.
Note: For safety reasons, CarPlay features are limited while driving and will vary with each CarPlay-enabled app. Available functions are determined by each individual app provider. For more information, visit www.apple.com/ios/carplay.
Note: Certain iPhone functions may be illegal while driving in your location. Be sure to familiarize yourself with local and state laws regarding mobile devices. When in doubt, stop and park your vehicle before using any devices.
Apple CarPlay Operation
When the CarPlay menu is displayed, the home button in the lower left corner work just like the home button on your iPhone.
Press and hold it to summon Siri and begin your voice commands.
At any time during CarPlay operation, you can press this button momentarily to return to the main CarPlay menu screen.
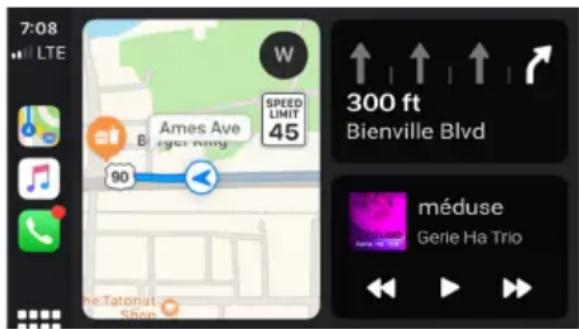
Press any Application button on the main CarPlay menu to access that operation directly. The toolbar on the left side of the screen displays the time, signal strength and shortcuts to the most popular applications - Phone, Music and Navigation - so they can be accessed quickly and easily without returning to the main menu.
Controlling Apple CarPlay™
The following basic controls will operate many standard CarPlay features.

Touch - Briefly press the desired option.

Swipe - Briefly swipe in the desired direction.

Drag - Press, hold and drag to the desired location.
Note: There is no need to pair your iPhone when using CarPlay. This will occur automatically when connecting an iPhone to the unit's USB port.
Note: When CarPlay is in use, the unit's Bluetooth will turn off automatically and hands-free functionality will operate through the CarPlay feature. Any other devices connected via Bluetooth will be disconnected during CarPlay use.
Exiting Apple CarPlay™
Disconnecting your iPhone will automatically exit CarPlay mode. To exit CarPlay mode while your phone is still connected, press the Power/Volume knob momentarily, and the unit's main menu will be displayed.
Android Auto™ Operation
Android Auto™ brings the most useful apps to your phone screen or your compatible car display, in a format that makes it easy for you to keep your main focus on driving. You can control things like navigation and maps, calls and text messages, and music.
Google Assistant
With your Google Assistant on Android Auto, you can keep your eyes on the road and your hands on the wheel while using your voice to help you with your day. Simply say, "Ok Google," or in compatible cars, long press the voice control button on your steering wheel.
Navigation
Get real-time traffic alerts to avoid hazards, speed traps, and find the fastest route. Or take a break and find a bite along the way.
Calls & Messages
Your Google Assistant lets you stay connected while you're driving. Your Assistant can help you call phone numbers from your contacts, chat with your favorite apps, read your messages aloud and text back, keeping your hands on the wheel.
Compatible Devices
Android Auto™ requires the Android Auto app from Google Play installed on an Android smartphone running Android Lollipop 5.0 or higher.
Warning:
Certain uses of the smartphone may not be legal while driving in your jurisdiction, so you must be aware of and obey any such restrictions. If in doubt as to a particular function, only perform it while the car is parked. No feature should be used unless it is safe to do so under the driving conditions you are experiencing.
Starting Android Auto™
Connect an Android Auto ^TM compatible device to the unit via USB cable. Android Auto ^TM will launch automatically, or it can be accessed at any time from the main menu.
Note: When the device for Android Auto is connected to this unit, the device is also connected via Bluetooth at the same time. If five devices are already paired, the message confirming whether to delete the registered device is displayed. If you want to delete the device, touch [Agree]. If you want to delete other device, touch [BT Settings] and delete the devices manually.
Note: If Android Auto is turned on during a call on a cellular phone other than the Android Auto compatible device, the Bluetooth connection will switch to the Android Auto compatible device after the call.
Android Auto™ Operation
Using Android Auto™
The Android Auto™ home screen displays personalized information, like time to your destination, reminders, recent calls incoming messages, the song you're listening to, and Google Now cards.
When the Android Auto™ menu is displayed, you can say "OK Google" or select the microphone in the upper right corner to talk to Google.
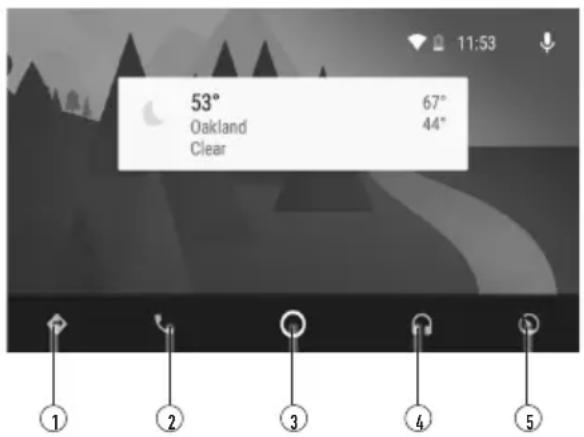
① Maps and Navigation
② Calls and Contacts
③ Home Screen
④ Music and Audio
⑤ Exit Android Auto
Exiting Android Auto™
To exit Android Auto ^TM , press the Exit button. Disconnecting your Android phone will automatically exit Android Auto ^TM mode.
Rear RCA Input
A/V IN
Connect an optional audio/video source into the RCA (rear) input.
Adjust volume on the external audio source as needed (if connected to the headphone output of the device).
Rear Camera Operation - (Optional)
Using Rear Camera
Connect an optional rear camera to the Camera Input (Black RCA connector). Refer to the wiring diagram for details.
Auto Selection
The unit will automatically select camera mode when connected to the reverse lamp circuitry.
Note: The external video output is not active when using the rear camera input.
SWC Input Operation
The built-in SWC Interface is compatible with PAC steering wheel control modules. The PAC SWI-RC is recommended. A third-party adapter must be used in order for the CAR1000 to be compatible with any steering wheel controls. The following controls are available for most vehicles.
| 1. Reset 4. Seek/Track | Down (-) 7. Volume Down | (-) 10. BT End | |
| 2. Mode 5. Mute 8. Band | |||
| 3. Seek/Track Up (+) 6. | Volume Up (+) 9. BT Talk |
Note: Not all OE steering wheel functions may be supported by the CAR1000.
PAC SWI-RC Installation Hints
- Set "Radio Select Switch". Set the SWI-RC to position 7 - "Pioneer/Other/Sony".
- To program, use the Pioneer/Sony/Other radio function mapping order for JENSEN units.
- When programming the SWI-RC, if a function is not supported (or not desired), then the function MUST be skipped as per the PAC SWI-RC instructions.
- The SWC function MUST be programmed in the correct order per the PAC SWI-RC radio function mapping order instructions.
| Function Order | Function Mapping | SWI-RC (3.3VDC Reference) | |
| Center Pin (Ring) Voltage (Function Select) | Tip Pin Voltage | ||
| 1 Reset | |||
| 2 Mode | |||
| 3 Seek + / Track + H 3.3v 0.6 | |||
| 4 Seek - / Track - | H 3.3v | 1.81 | |
| 5 | Mute | H 3.3v | 1.01 |
| 6 | Volume + | H 3.3v | 2.07 |
| 7 | Volume - | H 3.3v | 2.32 |
| 8 | Band | H 3.3v | 2.73 |
| 9 BT Talk | L 0.0V | 0.60 | |
| 10 | BT End | L 0.0V | 1.01 |
Troubleshooting
| General | ||
| Problem Cause | Action | |
| Unit will not turn on (no power) | Yellow wire not connected or incorrect voltage Red wire not connected or incorrect voltage | Check connections for proper voltage (11~16VDC) |
| Black wire not connected Check connection to ground | ||
| Fuse blown Replace fuse(s) | ||
| Unit has power (but no sound) | Speaker wires not connected Check connections at speakers | |
| One or more speaker wires touching each other or touching chassis ground | Insulate all bare speaker wires from each other and chassis ground | |
| Unit blows fuse(s) | Yellow or red wire touching chassis ground Check for pinched wire | |
| Speaker wires touching chassis ground Check for pinched wire | ||
| Incorrect fuse rating Use fuses with correct rating | ||
| Unit has audio (but no video) | Parking brake safety circuit not connected Parking brake not applied | Check connections at parking brake Apply parking brake as described on page 26 |
| IR remote does not work | Dead battery Replace battery | |
For Your Records
Please keep your original sales receipt and be prepared to provide this receipt in the event you require service, as your original receipt is considered the best proof of purchase and indicates the date you purchased your JENSEN product.
Register Your Product
Dealer Name ____
Dealer Phone ____
Purchase Date ____
Register your product online at www.jensenmobile.com.
Specifications
| FM Tuner | Tuning range: 87.5MHz-107.9MHzUsable sensitivity: 10dBf50dB quieting sensitivity: 20dBfStereo separation @ 1kHz: 38dBFrequency response: 30Hz-13kHz |
| AM Tuner | Tuning range: 530kHz-1710kHzUsable sensitivity: 24uVFrequency response: 30Hz-2.3kHz |
| Front USB | Compatibility: High Speed USB 2.0USB Class: Mass storage class |
| Monitor | Panel size: 10.1" diagonal measurementView angle (up/down/left/right): 50/70/70/70Resolution: 1024 (H) x 600 (V)Brightness (cd/m2): 500Contrast ratio: 500:1Pixels: 1,152,000 |
| General | Speaker output impedance: 4 ohmsLine output voltage: 4 volt RMSLine output impedance: 200 ohmsChassis dimensions: 7" x 7" x 4" (W x D x H)Design and specifications subject to change without notice. |

CEA-2006 Power Standard Specifications
(reference: 14.4VDC +/- 0.2V, 20Hz\~20kHz)
Power Output: 16 Watts RMS x 4 channels at 4 ohms and ≤ 1% THD+N Signal to Noise Ratio: 80dBA (reference: 1 watt into 4 ohms)
Limited One Year Warranty
This warranty gives you specific legal rights. You may also have other rights which vary from state to state.
Samsung America Inc warrants this product to the original purchaser to be free from defects in material and workmanship for a period of one year from the date of the original purchase.
Samsung America Inc agrees, at our option, during the warranty period, to repair any defect in material or workmanship or to furnish an equal new, renewed or comparable product (whichever is deemed necessary) in exchange without charges, subject to verification of the defect or malfunction and proof of the date of purchase. Subsequent replacement products are warranted for the balance of the original warranty period.
Who is covered? This warranty is extended to the original retail purchaser for products purchased from an authorized JENSEN dealer and used in the U.S.A.
What is covered? This warranty covers all defects in material and workmanship in this product. The following are not covered: software, installation/removal costs, damage resulting from accident, misuse, abuse, neglect, product modification, improper installation, incorrect line voltage, unauthorized repair or failure to follow instructions supplied with the product, or damage occurring during return shipment of the product. Specific license conditions and copyright notices for the software can be found via www.jensenmobile.com.
What to do?
-
Before you call for service, check the troubleshooting guide in your owner's manual. A slight adjustment of any custom controls may save you a service call.
-
If you require service during the warranty period, you must carefully pack the product (preferably in the original package) and ship it by prepaid transportation with a copy of the original receipt from the retailer to an authorized service center.
-
Please describe your problem in writing and include your name, a return UPS shipping address (P.O. Box not acceptable), and a daytime phone number with your shipment.
-
For more information and for the location of the nearest authorized service center please contact us by one of the following methods:
• Call us toll-free at (888) 921-4088
• E-mail us at cs@jensenmobile.com
Exclusion of Certain Damages: This warranty is exclusive and in lieu of any and all other warranties, expressed or implied, including without limitation the implied warranties of merchantability and fitness for a particular purpose and any obligation, liability, right, claim or remedy in contract or tort, whether or not arising from the company's negligence, actual or imputed. No person or representative is authorized to assume for the company any other liability in connection with the sale of this product. In no event shall the company be liable for indirect, incidental or consequential damages.

natural_image
Circular icon featuring the United States flag with stars, no text or symbols presentCustomer Support
1-888-921-4088
(Monday-Friday, 9AM-5PM EST)
Visit https://www.jensenmobile.com
Designed and Engineered in USA
JENSEN®
All rights reserved. No part of this publication may be reproduced, distributed, or transmitted in any form or by any means, including photocopying, recording, or other electronic or mechanical methods, without the prior written permission of NAMSUNG AMERICA INC.
- CAR1000
- Copyright Notes
- Table of Contents
- WARNING
- Safety Information
- To prevent damage or injury:
- FCC Compliance
- Preparation
- Before You Start
- INSTALLATION GUIDE
- Wiring Notes:
- Subwoofer output
- Rear camera input
- General Operation
- Setup Menu
- General:
- Audio:
- Display:
- Others:
- Media Compatibility
- Bluetooth Operation
- Apple CarPlay Operation
- Compatible Devices
- Made for iPhone models:
- Starting Apple CarPlay™
- Controlling Apple CarPlay™
- Exiting Apple CarPlay™
- Android Auto™ Operation
- Google Assistant
- Navigation
- Calls & Messages
- Warning:
- Starting Android Auto™
- Using Android Auto™
- Exiting Android Auto™
- Rear RCA Input
- Rear Camera Operation - (Optional)
- SWC Input Operation
- PAC SWI-RC Installation Hints
- Specifications
- Limited One Year Warranty
- What to do?
- Customer Support
Brand : JENSEN
Model : CAR1000
Category : Receiver