
DHP8W19 - Tumble dryer DELONGHI - Free user manual and instructions
Find the device manual for free DHP8W19 DELONGHI in PDF.


| Product Type | Tumble Dryer |
| Brand | DeLonghi |
| Model | DHP8W19 |
| Capacity | 8 kg |
| Drying System | Heat Pump |
| Energy Efficiency Class | A++ |
| Annual Energy Consumption | 180 kWh |
| Noise Level | 65 dB(A) |
| Dimensions (H x W x D) | 85 x 60 x 60 cm |
| Weight | 50 kg |
| Power Supply | 230 V, 50 Hz |
| Rated Power | 900 W |
| Drying Programs | Cotton, Synthetics, Delicates, Wool, Time Drying |
| Sensor Drying | Yes |
| Reverse Tumbling | Yes |
| Lint Filter Indicator | Yes |
| Condenser Cleaning | Manual |
| Water Tank Location | Top drawer |
| Delay Start | Up to 24 hours |
| Child Lock | Yes |
| Repairability Index | 7.5 / 10 |
Frequently Asked Questions - DHP8W19 DELONGHI
User questions about DHP8W19 DELONGHI
0 question about this device. Answer the ones you know or ask your own.
Ask a new question about this device
Download the instructions for your Tumble dryer in PDF format for free! Find your manual DHP8W19 - DELONGHI and take your electronic device back in hand. On this page are published all the documents necessary for the use of your device. DHP8W19 by DELONGHI.
USER MANUAL DHP8W19 DELONGHI
safety warnings 5
unpacking.... 15
installation.... 16
installing your dryer 16
choosing the right location for your dryer 16
moving and installing.... 17
moving the dryer from one location to another.... 17
levelling the dryer 17
connecting to the mains supply 17
product overview.... 18
the unit....18
the control panel....19
preparation....20
organising laundry 20
preparing laundry 20
selecting the programme....21
dry programme setting 22
first time use 22
standard drying cycle 22
tips for optimum drying 22
cancelling a drying programme 23
switching off and removing laundry 23
how to set the child lock 23
maintenance - cleaning the dryer 24
cleaning the drum....24
cleaning the exterior of your dryer 24
cleaning the door seal and window 24
cleaning the upper lint filter 24
cleaning the lower lint filter 25
cleaning the water tank 25
hints and tips 26
error codes 27
specifications.... 27
product fiche....28
Περιεχομενα
- For your continued safety and to reduce the risk of injury or electric shock, read all instructions carefully before using the unit and keep them for future reference. Please follow all the safety precautions listed below.
- Retain this manual. Include this manual if you pass the unit onto a third party.
WARNING!
- Never allow large loads to remain in the dryer after each drying cycle ends.
- Softener sheets can cause a waxy build-up on the lint filter. Wash the lint filter in warm soapy water and dry it completely before replacing it in the dryer.
- Do not leave damp items in a warm or hot dryer. Start the drying cycle immediately and keep the exhaust opening clutter free.
- Do not climb on the dryer. You may hurt yourself or damage the dryer.
- If you will not be using the dryer for a while, such as when you go on holiday, turn off the electricity supply to the dryer and remove the plug from the socket.
- Never stop a dryer before the end of the drying cycle unless all items are quickly removed and spread out so that the heat is dissipated.
- Never store plastic, paper or clothing that may burn or melt on top of the dryer during operation.
- Keep flammable substances well away from the dryer – for example kerosene, gasoline, benzene, paint thinner and alcohol, or clothing soaked with these. They may cause an explosion or a fire.
- All airways (including wall vents) must be kept free from blockages.
- Never use the dryer without the lint filter.
- Do not place heavy or wet items on top of the appliance.
- Do not spill any liquid on the appliance, it may cause damage. Clean up any accidental spillages immediately.
Installation
- Check that the voltage marked on the rating label matches your mains voltage.
- The appliance must be placed on a flat stable surface (not on a carpet) and should not be subjected to excessive vibrations or any impact.
- Do not install your dryer anywhere that is exposed to high humidity, water or the weather. If you do, it may cause an electric shock, fire, failure or deterioration.
- Your dryer should NOT be located next to a gas hob, cooker, heater, or eye-level grill as flames from the burners could cause damage to your machine.
- DO NOT operate the dryer in an enclosed environment, ensure the dryer is adequately ventilated.
- If the dryer is enclosed or fitted under a work surface, a gap of at least 10mm must be allowed above the top of the dryer and at least 25mm (1") either side. This allows air to enter into the rear air inlet. The dryer must NEVER be run in a cupboard with a closed door.
- Do not stack the tumble dryer on top of other appliances.
- Any electrical work required to install the appliance should be carried out by a qualified person.
- Failure to install, maintain and/or operate the dryer according to the manufacturer's instructions may result in conditions which can lead to bodily injury and/or property damage.
- Ensure that the end of the hose is not directed towards the air intake grille at the rear of the dryer.
- The ventilation openings at the rear of dryer must not be obstructed by a carpet.
- The exhaust air must not be discharged into a flue that is used to extract fumes from an appliance burning gas or other fuels.
- The appliance must not be installed behind a lockable door, a sliding door or a door with a hinge on the opposite side to that of the dryer, in such a way that a full opening of the dryer door is restricted.
- Do not use a mains plug adapter or extension cable. It may overheat and cause a fire.
- Do not operate this dryer until you are sure the dryer has been installed according to the INSTALLATION INSTRUCTIONS, and installation and grounding are in compliance with all local codes and/or other applicable codes and requirements.
- Before the appliance is removed from service or discarded, remove the door of the drying compartment.
Caring for Laundry
- The dryer must only be used for its intended purpose.
• Always observe the rules for drying garments. If in doubt, do NOT dry. -
Take particular care that woolen articles are NOT dried in a dryer unless they are labelled ‘Superwash’, ‘Machine Washable’ or have the ‘May be tumble dried’ symbol. If in any doubt, do not dry wool in the machine. Unlike other materials, the mechanism of wool shrinkage is irreversible, i.e. it will not stretch back to its original size and shape.
-
Do not dry water-proof sheets or clothing. These may cause dryer failure, which could lead to injury, or damage to the laundry or to the dryer.
- Items such as foam rubber (latex foam), shower caps, waterproof textiles, rubber backed articles and clothes or pillows fitted with foam rubber pads should not be dried in the dryer.
- Fabric softeners, or similar products, should be used as specified by the fabric softener instructions.
- Do not dry unwashed items in the dryer.
- Do not attempt to dry dripping wet articles.
- Do not overload the dryer with laundry. Drying results may be unsatisfactory.
- Be careful not to get your laundry caught in the door when you close it. This could damage your laundry.
- Always check and remove objects such as nails, pins, coins, clips, etc. Cigarette lighters, in particular, present a hazard that can be avoided by this process. They could damage your laundry or the dryer.
- Do not dry articles that have been previously cleaned in, washed in, soaked in, or spotted with gasoline, dry cleaning solvents, other flammable, or explosive substances as they give off vapours that could ignite or explode.
- Items that have been soiled with substances such as cooking oil, acetone, alcohol, petrol, kerosene, spot removers, turpentine, waxes and wax removers should be washed in hot water with an extra amount of detergent before being dried in the dryer.
General Use
- This appliance is for normal, indoor, household, domestic use only.
- The maximum mass of dry textile material to be used in the appliance is 8kg.
- Make sure the mains plug is pushed firmly in the socket. A loose connection may overheat and cause electrical shock or a fire.
- Check the mains lead and mains plug for any wear and tear, looseness, or damage. If the mains cable is damaged, it must be replaced by a qualified service agent in order to avoid a hazard.
- Check the mains plug regularly for dirt. If dirt accumulates on the mains plug, it could cause a fire. To prevent this, unplug the cable and clean the mains plug with a dry rag.
- If you disconnect the mains plug, hold onto the mains plug not the cable. Pulling the cable may cause an electric shock or a fire.
-
Do not touch the laundry inside the dryer, not until the drum has completely stopped. Even if the drum is spinning at low speed it can cause an injury. Take particular care of children.
-
Do not operate the dryer with any guards and/or panels removed.
- Never attempt to operate this appliance if it is damaged, malfunctioning, has missing or broken parts, including a damaged mains cable or plug.
- Do not bypass any safety devices.
- Do not allow the air inlet at the back of the dryer, the air outlet or vent hose to be obstructed.
- Do not touch the mains lead or mains plug with wet hands. It may cause an electric shock.
- Do not put any electrical equipment near the dryer.
- The final part of a dryer cycle occurs without heat (cool down cycle) to ensure that the items are left at a temperature that ensures that the items will not be damaged.
- This appliance can be used by children aged from 8 years and above and persons with reduced physical, sensory or mental capabilities or lack of experience and knowledge if they have been given supervision or instruction concerning use of the appliance in a safe way and understand the hazards involved. Children shall not play with the appliance. Cleaning and user maintenance shall not be made by children without supervision.

CAUTION: WHEN THE DRYER IS IN USE AVOID TOUCHING THE REAR OF THE DRYER AS IT MAY BE HOT.
Cleaning & Maintenance
- Clean the lint filter after every use.
- If the supply cord is damaged, it must be replaced by the manufacturer, its service agent or similarly qualified persons in order to avoid a hazard.
- Keep all the area surrounding exhaust openings free from accumulation of dust, lint and dirt. An obstructed opening may reduce airflow and efficiency.
- Do not use the dryer if industrial chemicals have been used for cleaning.
- Do not pour water directly onto any part of the dryer. It may cause a short circuit or electric shock.
- Keep burning objects, such as candles or cigarettes, away from the dryer. They may cause a fire or damage.
- The interior of the machine and exhaust duct should be cleaned periodically by qualified service personnel.
- Do not dismantle, repair or modify the dryer. The dryer could malfunction and cause a fire or injury. If service is required, contact a qualified service agent.
WARNING

IT IS HAZARDOUS FOR ANYONE OTHER THAN AUTHORISED SERVICE PERSONNEL TO CARRY OUT SERVICING OF REPAIRS WHICH INVOLVE THE REMOVAL OF COVERS.
TO AVOID THE RISK OF AN ELECTRICAL SHOCK DO NOT ATTEMPT REPAIRS YOURSELF.

WARNING: Risk of fire/flammable materials
Thank you for purchasing your new Dryer.
These operating instructions will help you use it properly and safely.
We recommend that you spend some time reading this installation/instruction manual in order that you fully understand all the operational features it offers.
Read all the safety instructions carefully before use and keep this installation/instruction manual for future reference.
unpacking
Remove all items from the packaging. Retain the packaging. If you dispose of it please do so according to local regulations.
The following items are included:

The Main Unit

Instruction Manual
installation
installing your dryer
Please Read And Follow The Instructions Carefully.
- In addition to the instructions mentioned here, special regulations of the relevant power supply companies may apply. If in doubt, have the dryer connected by a qualified technician.
- The dryer is heavy - caution when lifting it. Do not lift by projecting components (e.g. dryer door).
- Lay hoses and cables in such a way that there is no risk of tripping over them.

An additional space (approximately 150mm) is required at the rear of the dryer. This is to allow enough space for the vent hose (if any).
choosing the right location for your dryer
- Make sure there is enough space for your dryer.
• Install your dryer on a flat, stable surface to avoid excessive vibrations and noise.
x Sloping surface

x Unstable x Bumpy

surface

- Do not install your dryer in direct sunlight. If this appliance is installed in an unheated cold room, the optimum ambient storage temperature must be 5°C or above. If placed below this temperature, the appliance performance will be considerably affected and in some instances may not even operate until the ambient temperature rises above 5°C.
- Start by tilting the dryer backwards.
- One person should stand behind it, holding the rear of the top panel. The other person should grip the bottom feet at the front.
- Do not touch the door opening button (door handle) while holding.
- Check that you have all the required accessories for installation.
• We recommend that you entrust the installation of the dryer to a qualified technician.

Two or more people are required to move the dryer.
installation
moving and installing
moving the dryer from one location to another
Before you move the dryer:
- Disconnect the mains cable.

Two or more people are required to carry the dryer and for any installation work.
levelling the dryer
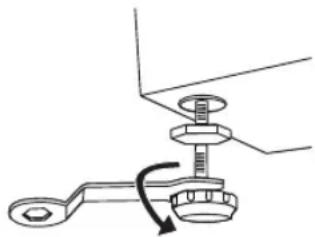
There are levelling feet on the underside. They must be adjusted to make sure the dryer is level.
- Adjust all levelling feet.
- Use a spirit level to ensure the dryer is level.
Check that the feet are bolted to the dryer - if they're unbolted, the dryer will move around.
connecting to the mains supply
For your safety:
- Do not use a mains plug adapter or extension cable.
- If the mains cable or mains plug are damaged, stop using them and call a qualified technician for assistance.
Installation check list
By now, you should have installed the dryer.
Let's go through the checklist to ensure that the installation has been done correctly!
| Questions Checkbox | ||
| Levelling feet Are they bolted securely to the dryer? | ||
| Are they standing flat? | ||
| Power supply - Is the household dedicated mains socket fully rated at 220V - 240V AC? | ||
| Location - Is your dryer on a flat, stable surface? Does it run without wobbling / moving excessively? | ||
product overview
the unit


![graph TD A["Programme Dial"] --> B["Cotton"] A --> C["Extra"] A --> D["Auto"] A --> E["Extra"] A --> F["Synthelics"] G["Power Button"] --> H["DHP8W19 On/Off Start/Pause"] H --> I["Delay Button"] H --> J["Anti-Crease Button"] H --> K["Start/Pause Button"] B --> L["Standard"] B --> M["Iron"] B --> N["…](/content/2026/05/1051213/images/9096f2b009860aae1f5e5e730f9e7b0518477451e987b18637dfef7ad2d46a80.jpg)
preparation
Read the following to understand how best to prepare your laundry for drying.
organising laundry
- Sort your laundry according to fabric type, e.g., polyester/cotton; denim; etc.
- Sort your laundry by colour.
preparing laundry
- Before loading laundry into the dryer, thoroughly spin the laundry in the washing machine. This will reduce remaining moisture content and help dry your laundry faster. It will also be more energy-efficient.
- Make sure all zips are closed, buttons are done up, hooks and eyelets are fastened, and ties and belts are already looped.
• Always check the washing label of your clothes to make sure they are suitable for tumble drying. If no washing label is available, it is recommended not to tumble dry your clothes.
| Symbol Description | |
| Tumble dry, normal | |
| Tumble dry, low heat | |
| Tumble dry, medium heat | |
| Tumble dry, high heat | |
| Do not tumble dry |

selecting the programme
| Programme Load (kg) Description | |||
| Auto 5.0 | Full automatic programme. It will adjust the drying time according to the weight of the load. | ||
| Cotton | Extra 8.0 | To extra dry particularly thick or multi-layered cotton clothing. | |
| Standard 8.0 To standard dry cotton clothing. | |||
| Iron 8.0 To dry cotton clothing that requires ironing. | |||
| Jeans 6.0 | To dry jeans or leisure clothing that are spun at high speed in the washing machine. | ||
| Mixed 3.5 To dry mixed types of fabrics in one load. | |||
| Sports 3.0 | To dry sportswear, thin fabrics, polyester which are not ironed. | ||
| Delicate 1.0 To dry delicate laundry that is suitable for drying. | |||
| Baby Care 1.0 | To dry small load of baby clothing. | ||
| Synthetics | Extra 3.5 | To extra dry particularly thick or multi-layered synthetic fabrics. | |
| Standard 3.5 | To standard dry thin synthetic fabrics that will not be ironed. | ||
| Cool | - | This is not a dry programme. To blow warm air to remove odd smell from dry clothes. | |
| Refresh | - | This is not a dry programme. To blow warm air to remove odd smell from dry clothes and make them fluffy. | |
| Rapid 45' | 0.6 | To dry small load in 45 minutes. | |
| Warm 60' | - | To warm clothes with hot air in 60 minutes. | |
| Warm 30' | - | To warm clothes with hot air in 30 minutes. | |
The energy class is A++
"Cotton Standard" is the standard drying programme to which the information in the label and the fiche relates, and it is suitable to dry normal cotton load and it is the most efficient programme in terms of energy consumption for drying that type of cotton laundry.

Duration of drying may vary due to the moisture content, type of garment fabric, and/or other factors not within the unit's control. The lower the temperature of the room, the longer it will take for the dryer to dry clothing.
dry programme setting
first time use
Before the first use, wipe the dryer drum with a damp cloth to remove any residues which may have been produced during production. Alternatively, run a brief drying cycle (around 1 hour) with damp clothes in the drum.

Before use, check that the upper and lower lint filters are clean and positioned properly in the dryer. Never use the appliance without the lint filters in place. If there is no filter, the dryer will not operate. The same applies to the water tank.
GB
standard drying cycle
- Pull the door handle and put the laundry in the drum. Make sure laundry is loose and not caught in the door.
- Close the door firmly. It will click.
- Press the On/Off button to switch on the dryer.
- Turn the Programme Dial to select the drying programme appropriate for your load.
- If you wish to use a longer anti-crease time, press the Anti-Crease button, the anti-crease time will be extended to 120 minutes (default is 30 minutes). Anti-crease is not available in "Cool" and "Refresh" programmes.
- If you wish to delay start the drying programme, press the Delay button repeatedly to select the hours (3, 6, 9 or 12 hours) that you want the drying cycle to start. To cancel the delay function, press the On/Off button to Off.
- Press the Start/Pause button to start the drying programme.
- When the drying programme has finished, the machine will beep. If you do not want the dryer to proceed to anti-crease, press the On/Off button to switch off the dryer.

Always check the clothing manufacturer's care label before placing the clothing in the tumble dryer. If in doubt, do NOT tumble dry.
tips for optimum drying
- Do not over-dry the clothes, as this increases the chance of shrinkage and creasing.
- Do not dry clothes containing rubber, foam, and similar elasticated fabrics.
- Do not dry clothes if they have been dry-cleaned.
- Always check your clothes' washing labels for tumble dry suitability. If in doubt, do NOT tumble dry.
cancelling a drying programme
To cancel a drying programme:
- Press the Start/Pause button.
- Switch off the power.
The drying programme is now cancelled.
To choose a different programme, turn on the power and use as normal.

If you need to pause the unit or open the door for any reason during a drying cycle, take extra care! The interior drum temperature is high.
switching off and removing laundry
Always allow the unit to complete the drying cycle before switching off and removing laundry.
- Press the On/Off button to switch off the dryer. Unplug the dryer.
- Open the dryer door and remove your laundry.
how to set the child lock
The Child Lock prevents children from accidentally changing a dry programme.
- Switch on the dryer.
- To activate the Child Lock function, press the Anti-Crease and Delay buttons at the same time for about 3 seconds.
- To cancel the Child Lock function, press the Anti-Crease and Delay buttons at the same time for about 3 seconds.

Your machine will deactivate the function buttons except the On/Off button when the child lock is activated.
maintenance - cleaning the dryer

Always unplug the dryer before cleaning.
cleaning the drum
Any rust left inside the drum by metal articles must be removed immediately with chlorine-free detergent. Never use steel wool.

Do not put laundry in the dryer during drum cleaning.
GB
cleaning the exterior of your dryer
- Clean the outside of your dryer with a soft cloth and mild detergent such as kitchen detergent.
- Do not splash water over the dryer.
- Do not use cream cleansers, thinners or products containing alcohol or kerosene.
cleaning the door seal and window
- Wipe the window and seal after each use to remove lint and stains. If lint builds up, it can affect drying performance.
- Remove any coins, buttons and other objects from the door seal after each drying cycle.
cleaning the upper lint filter
After each drying cycle, the Filter indicator will light up, indicating to clean the upper lint filter.
- Open the door.
- Pull the lint filter straight up.
- Clean using a cloth to wipe away lint and dust. You can also wash the lint filter, but you must thoroughly dry it afterwards.
- Replace the lint filter firmly.


The upper lint filter must be cleaned after each use. The dryer will not operate properly if the filter is dirty or missing.
cleaning the lower lint filter
- Open the lower filter cover.
- Unscrew the locking levers.
- Take out the lower filter and clean it thoroughly.
- Replace it back and screw the locking levers.
- Close the cover.


The lower lint filter must be cleaned each week. The dryer will not operate properly if the filter is dirty or missing.
cleaning the water tank
When the Full indicator lights up, it indicates the water tank is full and needs to be emptied.
- Hold and pull out the water tank with both hands.
- Tilt the water tank and pour out the water into a basin.
- Replace the water tank.
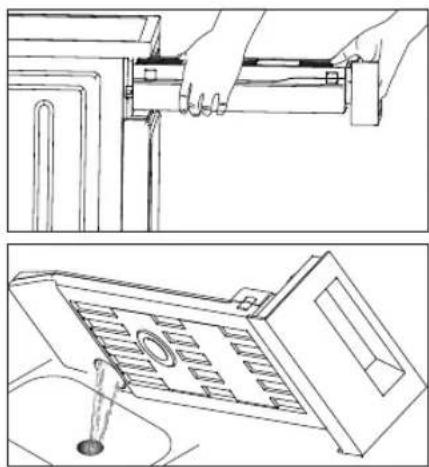

You can also empty the water tank after each use. The dryer will not operate properly if the water tank is full or missing.
hints and tips
| Issues Solutions | |
| Dryer will not start. • Check | the plug and make sure it is fully and firmly inserted into the mains socket.Remove some laundry.Press the On/Off button to turn on the dryer, then press Start/Pause to start the drying programme.Install the filter properly in the unit.Contact a qualified service agent for repairs. |
| Exterior is hot / burning smell. | Make sure the lint filters are cleaned. |
| Clothes are too dry. • Remove | clothes promptly after the drying cycle is finished.Check the apparel's cleaning label to make sure you have selected the correct drying programme. |
| Clothes are still wet / not dry enough. | Remove some of the laundry.Sort clothes before tumble drying. |
| Clothes have shrunk. • Check | the apparel's cleaning label to make sure you have selected the correct drying programme.Remove the clothes while they are still damp, then line dry. |
| Drying results still unsatisfactory. | Check the apparel's cleaning label to make sure you have selected the correct drying programme.Clean the lint filters.Empty the water tank.Remove some laundry.Uncover ventilation slots.Clean the drum interior. |
| Door will not close. Clear / remove obstructing item. | |
| Drying cycle ends shortly after programme starts. | Add more laundry, or select a higher drying level. |
| Drying cycle is unusually long. | Clean the lint filters.Select a more suitable drying programme, or remove some laundry.Spin laundry in washing machine thoroughly before using dryer. |
| Piles on clothes after drying. | Turn the clothes inside out.Use a fabric softener during washing. |
| Unusual knocking noises from inside dryer. | This is normal and NOT a fault. |
error codes
| Display LED | Reason Solutions | |
| Full | Water tank is full Empty water tank. | |
| Water pump or water level sensor failure | Please call up the local service line. | |
| Child Lock + 9h | Temperature sensor error | |
| Child Lock + 6h | Humidity sensor error | |
| Others Please call up the local service line. | ||
GB
specifications
| rated voltage and frequency 220 - 240V ~ 50 Hz |
| rated power input 850 W |
| refrigerant / mass / GWP R134a / 295g / 1430 |
| maximum mass of dry cloth 8 kg |
| weight of the product Approx. 51 kg |
| dimension Approx. 845mm (H) x 595mm (W) x 630mm (D) |
Features and specifications are subject to change without prior notice.
product fiche
Brand: DēLonghi
Model: DHP8W19
Rated capacity: 8 kg
Dryer Type: Condenser
Energy efficiency class: A++
Energy consumption 236 kWh per year, based on 160 drying cycles of the standard cotton programme at full and partial load, and the consumption of the low-power modes. Actual energy consumption per cycle will depend on how the appliance is used.
GB
This is an automatic tumble dryer.
EU Ecolabel: N/A
Energy consumption of the standard cotton programme at partial load: 1.08 kWh
Energy consumption of the standard cotton programme at full load: 1.98 kWh
Power consumption (off-mode): = 0.01 W
Power consumption (left-on mode): = 0.8 W
Duration of the left-on mode: 10 minutes
Cotton + Standard programme, which is the “standard cotton programme” used at full and partial load, is the standard drying programme to which the information in the label and the fiche relates, that this programme is suitable for drying normal wet cotton laundry and that it is the most efficient programme in terms of energy consumption for cotton.
Weighted programme time of the standard cotton programme at full and partial load: 142 minutes
Programme time of the standard cotton programme at full load: 185 minutes
Programme time of the standard cotton programme at partial load: 110 minutes
Condensation efficiency class 'B' on a scale from G (least efficient) to A (most efficient).
Average condensation efficiency of the standard cotton programme at full load: 81%
Average condensation efficiency of the standard cotton programme at partial load: 81%
Weighted condensation efficiency for the standard cotton programme at full and partial load: 81%
Sound power level for the standard cotton programme at full load: 69 dB
This appliance contains Fluorinated Greenhouse Gas R134a hermetically sealed.
Charge size: 295g (0.422 tonnes CO2 equivalent)
Global Warming Potential (GWP): 1430
Η Κύρια μονάδα

Εγχειρίδιο χρήσης


The symbol on the product or its packaging indicates that this product must not be disposed of with your other household waste. Instead, it is your responsibility to dispose of your waste equipment by handing it over to a designated collection point for the recycling of waste electrical and electronic equipment. The separate collection and recycling of your waste equipment at the time of disposal will help conserve natural resources and ensure that it is recycled in a manner that protects human health and the environment.
For more information about where you can drop off your waste for recycling, please contact your local authority, or where you purchased your product.
GR
DSG Retail Ireland Ltd (259460)
3rd Floor Office Suite,
Omni Park SC, Santry, Dublin 9, Republic of Ireland
THΛΕΦΩΝΟ ΕΠΙΚΟΙΝΩΝΙΑΣ SERVICE : 210 2899999
ΦΟΡΜΑ ΕΠΙΚΟΙΝΩΝΙΑΣ SERVICE: https://www.kotsovolos.gr/site/contact.jsp
Web Site: www.kotsovolos.gr
- ΠΕΡΙΕΧΟΜΕΝΑ
- WARNING
- INSTALLATION
- CARING FOR LAUNDRY
- GENERAL USE
- CLEANING & MAINTENANCE
- THANK YOU FOR PURCHASING YOUR NEW DRYER
- UNPACKING
- INSTALLING YOUR DRYER
- PLEASE READ AND FOLLOW THE INSTRUCTIONS CAREFULLY
- CHOOSING THE RIGHT LOCATION FOR YOUR DRYER
- MOVING AND INSTALLING
- MOVING THE DRYER FROM ONE LOCATION TO ANOTHER
- LEVELLING THE DRYER
- CONNECTING TO THE MAINS SUPPLY
- FOR YOUR SAFETY
- INSTALLATION CHECK LIST
- PRODUCT OVERVIEW
- PREPARATION
- ORGANISING LAUNDRY
- PREPARING LAUNDRY
- SELECTING THE PROGRAMME
- DRY PROGRAMME SETTING
- FIRST TIME USE
- GB
- STANDARD DRYING CYCLE
- TIPS FOR OPTIMUM DRYING
- CANCELLING A DRYING PROGRAMME
- SWITCHING OFF AND REMOVING LAUNDRY
- HOW TO SET THE CHILD LOCK
- MAINTENANCE - CLEANING THE DRYER
- CLEANING THE DRUM
- CLEANING THE EXTERIOR OF YOUR DRYER
- CLEANING THE DOOR SEAL AND WINDOW
- CLEANING THE UPPER LINT FILTER
- CLEANING THE LOWER LINT FILTER
- CLEANING THE WATER TANK
- ERROR CODES
- SPECIFICATIONS
- PRODUCT FICHE
- GR
Brand : DELONGHI
Model : DHP8W19
Category : Tumble dryer