LE42K5000A - Television Haier-Thermocool - Free user manual and instructions
Find the device manual for free LE42K5000A Haier-Thermocool in PDF.

| Brand | Haier-Thermocool |
| Model | LE42K5000A |
| Product Type | LED Television |
| Screen Size | 42 inches (106 cm) |
| Resolution | 1920 x 1080 (Full HD) |
| Aspect Ratio | 16:9 |
| Refresh Rate | 60 Hz |
| Connectivity | HDMI (2), USB (1), VGA, Component, Composite, RF, Audio Out |
| Energy Consumption | 80 W (typical) |
| Weight (with stand) | 10.5 kg |
| Weight (without stand) | 9.8 kg |
| Dimensions (with stand) | 97 x 62 x 20 cm |
| Dimensions (without stand) | 97 x 57 x 8 cm |
| VESA Mount | 200 x 200 mm |
| Power Supply | AC 100-240V, 50/60Hz |
| Operating System | None (non-smart TV) |
| Audio Output | 2 x 8 W speakers |
| Remote Control | Infrared (included) |
| Energy Class | B |
Frequently Asked Questions - LE42K5000A Haier-Thermocool
User questions about LE42K5000A Haier-Thermocool
0 question about this device. Answer the ones you know or ask your own.
Ask a new question about this device
Download the instructions for your Television in PDF format for free! Find your manual LE42K5000A - Haier-Thermocool and take your electronic device back in hand. On this page are published all the documents necessary for the use of your device. LE42K5000A by Haier-Thermocool.
USER MANUAL LE42K5000A Haier-Thermocool
Please READ this manual carefully before operating your TV, and retain it for future reference.
Contents
01 Safety Warnings
Welcome....2
Important Information....2
Safety notice....3
Warning and cautions...... 4
02 Introduction
Main Parameter....5
Base Stand Assembly Instruction....6
Wall Mounting Installation Guidelines....7
Front Control Panel....8
Rear/Side Sockets......8
Connecting to your Haier TV 9
Common Interface 11
03 Remote Control
Remote Control.... 12
04 Operation
Basic Operation 13
Picture MENU 14
Audio MENU 14....
Wide Mode MENU 14......
Channel MENU 15....
Antenna Type 1.5
Auto Tune 15
Manual Tune 15....
Program Edit 15
Signal Information 16......
CI Information 16.
Time MENU 16....
Setup MENU 16
HDMI_CEC 16
System Lock 16
Advance 17
Android Mode 17
Home Menu 17
Application Menu 19
Media Menu 19
Hotel Mode 20
05 Trouble shooting
Trouble shooting 21
06 Specification
Specification 24......
01 Safety warnings
WELCOME
Thanks for buying this 42"/55" LED LCD TV. This guide will help you set up and begin using your TV. First, check the contents of your box with the parts check list below:
42"FULL HD 1080P Digital LED LCD TV
Remote control
Remote control
AAA battery x 2
AAA battery x 2
Instruction Manual
Instruction Manual
Quick start guide
Quick start guide
Stand
Stand
55"
Now you can get started!
IMPORTANT INFORMATION
READ ALL INSTRUCTIONS BEFORE USE AND KEEP FOR FUTURE REFERENCE.


CAUTION
TO REDUCE THE RISK OF ELECTRIC SHOCK, DO NOT REMOVE COVER (OR BACK). NO USER SERVICEABLE PARTS INSIDE. FOR ANY PROBLEMS, REFER SERVICING TO THE CUSTOMER HELP LINE. THERE IS A LIGHTNING ARROW SYMBOL IN THE TRIANGLE: THIS SYMBOL INDICATES HIGH VOLTAGE IS PRESENT INSIDE. IT IS DANGEROUS TO MAKE ANY KIND OF CONTACT WITH ANYINSIDE PART OF THIS PRODUCT.
THERE IS A EXCLAMATION MARK IN THE TRIANGLE: THIS SYMBOL ALERTS YOU THAT IMPORTANT LITERATURE CONCERNING OPERATION AND MAINTENANCE HAS BEEN INCLUDED WITH THIS PRODUCT.
CAUTION: TO REDUCE THE RISK OF ELECTRIC SHOCK AND FIRE, DO NOT PUT THE TV SET NEAR SOURCES OF HUMIDITY. DO NOT USE ANY ABRASIVE CLEANERS WHICH MAY SCRATCH OR DAMAGE THE LCD SCREEN. AVOID CONTACT WITH OBJECTS THAT MAY SCRATCH THE LCD SCREEN.

NOTE: SERVICING THE UNIT YOURSELF IS UNAUTHORISED AND COULD LEAD TO INJURY OR PRODUCT DAMAGE. REFER ALL SERVICING TO THE CUSTOMER HELPLINE.
Safety notice
- Warning: To reduce the risk of electric shock, do not remove the cover or back. There are no user-serviceable parts inside. Refer servicing to qualified personnel.
- Warning: To prevent fire or electric shock hazard, do not expose the unit to rain or moisture.
- Do not expose the product to water (dripping or splashing) and no objects filled with liquids, such as vases, should be placed on the unit.
- Keep the product away from direct sunlight and heat source such as radiators or stoves.
- Do not block the ventilation openings. Slots and openings on the unit are provided for ventilation. The openings should never be blocked by placing your product on a cushion, sofa or other similar surface.
- Do not place the product on unstable cart, stand, tripod, bracket or table. The unit may fall, resulting in possible damage or injury.
- Never place heavy or sharp objects on the panel or frame.
- Unplug the Power from the outlet when the unit is not in use.
- Attention should be drawn to the environmental aspects of battery disposal.
- WARNING: The battery shall not be exposed to excessive heat such as sunshine, fire or the like.
- WARNING: Excessive sound pressure from earphones or headphones can cause hearing loss.
- Warning: To avoid any injury caused by lean of the product, please always ensure the whole product was placed within the table surface in horizontal.
• CAUTION: When the apparatus was in electrostatic circumstance, it may be malfunction and need to reset by user.

This marking indicates that this product should not be disposed with other household wastes throughout the EU. To prevent possible harm to the environment or human health from uncontrolled waste disposal, recycle it responsibly to promote the sustainable reuse of material resources. To return your used device, please use the return and collection systems or contact the retailer where the product was purchased. They can take this product for environmental safe recycling.


WARNING AND CAUTIONS
natural_image
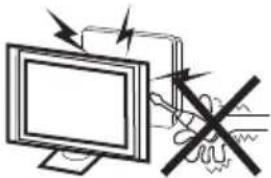
Illustration of a computer monitor with a warning symbol and a crossed-out cable, no text or labels present.Warning

High voltages are used in the operation of this television receiver. Do not remove the cabinet back from your set. Refer servicing to qualified service personnel.
natural_image
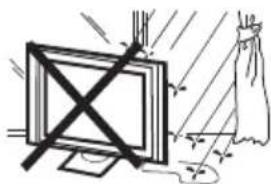
Simple line drawing of a monitor with X-shaped screen and a cloth, no text or symbols presentWarning

To prevent fire or electrical shock hazard, do not expose the television receiver to rain or moisture.

natural_image
Simple line drawing of a computer monitor with a crossed X symbol and stars (no text or symbols)Warning

Do not drop or push objects into the television cabinet slots or openings. Never spill any kind of liquid on the television receiver.
natural_image
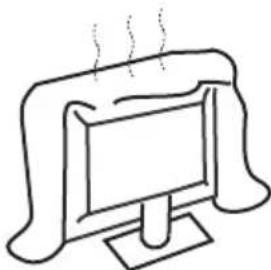
Simple line drawing of a computer monitor with a stand and smokestack (no text or symbols)Caution

Do not block the ventilation holes in the back cover. Adequate ventilation is essential to prevent failure of electrical components.
natural_image
Simple line drawing of a flat-screen monitor with a black X mark on the stand (no text or symbols)Caution

Do not trap the power supply cord under the television receiver.
natural_image
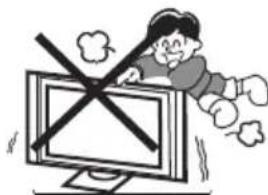
Cartoon illustration of a person standing on a computer monitor with a crossed-out X symbol (no text or symbols present)Caution

Never stand on, lean on, or suddenly push the television or its stand. You should pay special attention to children. Serious injury may result if it should fall.

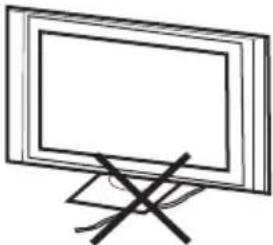
Caution

Do not place your television on an unstable cart, stand, shelf or table. Serious injury to an individual, and damage to the television, may result if it should fall.
natural_image
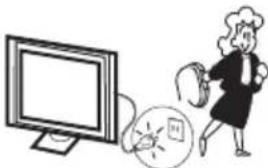
Illustration of a person reacting with a device to a computer monitor (no text or symbols present)Caution

When the television receiver is not used for an extended period of time, it is advisable to disconnect the AC power cord from the AC outlet.
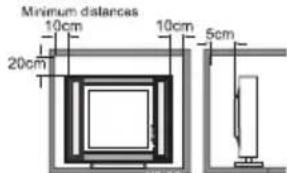
Caution

If the television is to be built into a compartment or similar enclosure, the minimum distances must be maintained. Heat build-up can reduce the service life of your television, and can also be dangerous.
02 Introduction
Never tamper with any components inside the TV, or any other adjustment controls not described in this manual. All LED-TV's are high voltage electrical equipment.
When you clean dust or any water drops off the SCREEN or CABINET or around any of the buttons or connectors, the power cabled should be removed from the power socket. Wipe the TV with a soft, dry, dust free cloth.
During thunderstorms, unplug the power cable and aerial / antenna cable to prevent damage to your TV and any other devices connected to it.
All repairs to this TV should only be performed by qualified TV service personnel.
Main features
① Used as Television, display terminal, PC display;
② High luminance, wide viewing angle;
③ HDMI interface and SCART Interface;
Main parameter
| Panel | 42" | 55" |
| TV System | PAL-B/G,I,D/KSECAM-B/G,D/K,L,DVB-T,DVB-C,DVB-T2 | |
| Video Signal System | PAL/SECAM/MPEG2/MPEG4/H.264 | |
| Storage channel number | 1000(DTV);100(ATV) | |
| Input Power Voltage | AC 100 -240 V 50/60Hz | |
| Power consumption | 80W | 136W |
| Standby Power consumption | ≤0.50W | ≤0.50W |
| Audio Output Power(THD ≤ 7%) | 2x8W | 2x10W |
| Signal Input | High-Definition Multimedia Interface (HDMI) x 3AV Input x 1Audio x 1LAN Input x 1YPbPr Inputx 1CI x 1USB x 3RF Co-Ax x 1SCART Inputx 1TF x 1 | |
| Signal output | Headphone x 1SCART Output x 1Optical Output x 1 | |
| Horizontal definition (TV line) | Composite video input >=350YPbPr >=400 | |
INSTALLATIONCAUTION
*Locate the TV in the room where light does not strike the screen directly.
*Total darkness or a reflection on the picture screen can cause eyestrain. Soft and indirect lighting is recommended for comfortable viewing.
*Allow enough space between the TV and the wall to permit ventilation.
*Avoid excessively warm locations to prevent possible damage to the cabinet or premature component failure.
*Do not cover the ventilation openings when using theTV.
④ NICAM;
⑤ T; ime-shift
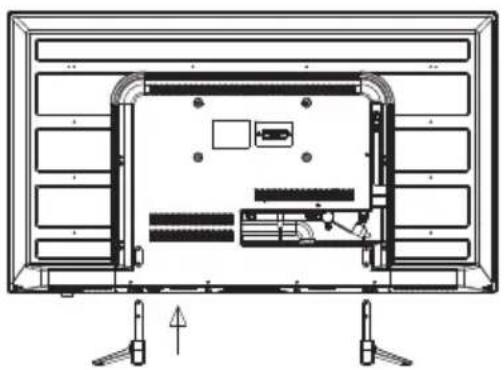
Base Stand Assembly Instruction
- On each desk stand, identify the longer leg of the stand, and slide the rectangular section of the desk stands into the TV so that the longer leg is facing towards the front of the TV.
natural_image
Technical line drawing of a front-mounted TV unit with internal components and mounting feet (no text or symbols)(42"/55")
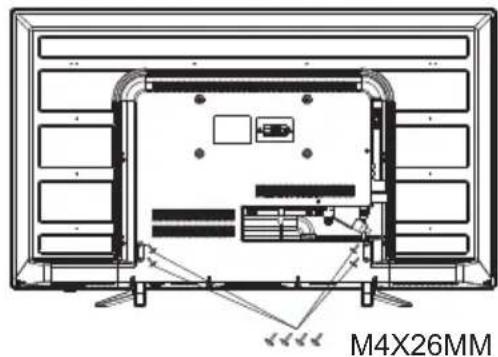
- Insert the long screws into the holes in the rear of the TV that line up with the holes in the rectangular section of the metal desk stands, and tighten the screws firmly. You may need to slightly jiggle the metal base stands around in their holes to allow the screws to be correctly seated prior to being tightened.
INSTALLATION NOTES
Locate the TV in a room where light does not strike the screen directly. Total darkness or a reflection on the screen can cause eyestrain. Soft and indirect lighting is recommended for comfortable viewing.
Allow enough space between the TV and the wall to permit ventilation. Please do not attempt to rotate the TV on the stand.
Avoid excessively warm locations to prevent possible damage to the cabinet or premature component failure.
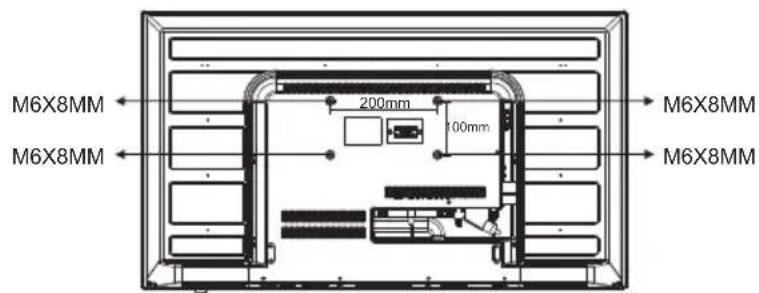
WALL MOUNTING INSTALLATION GUIDELINES
This television can be wall mounted as follows:
- Place the LED LCD Television onto a solid surface. Please place some soft material over the front of the screen to protect it from any damage.

natural_image
Top-down schematic of a room layout with furniture and fixtures (no text or symbols)- Use the four screws provided to fix the TV onto a wall mounting bracket (not included) via the four VESA standard holes on the back of the television.
( )42"
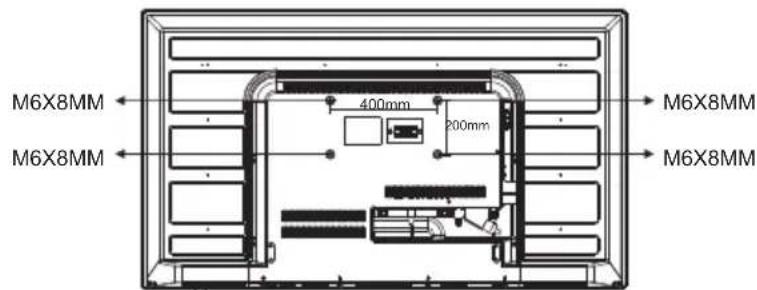
(55)"
Front control panel
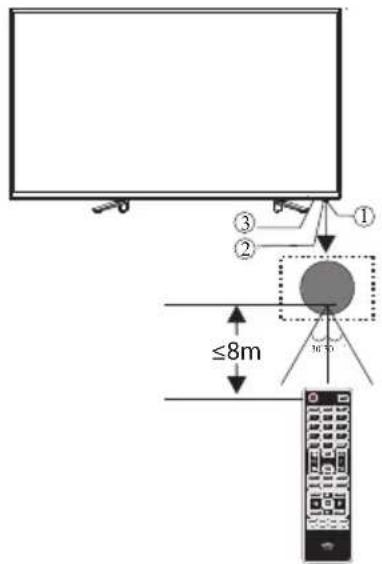
1 Remote control sensor.
2 Indicator LED:
RED: STANDBY.
3 Key board.
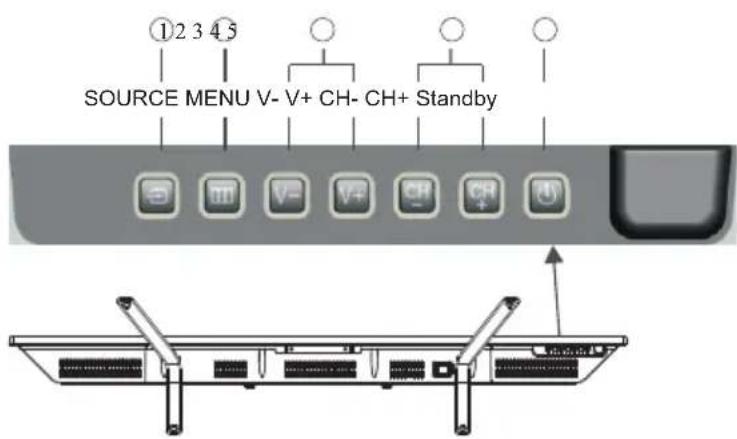
1 SOURCE Display the input source menu.
2 MENU Display main MENU.
3 V+/V- Adjust sound level.
In MENU, adjust the item that you selected.
4 CH+/CH- In TV mode, press CH+ or CH- to change the channel up and down.
In MENU, press CH+ or CH- to select items.
5 STANDBY
Rear/Side Sockets
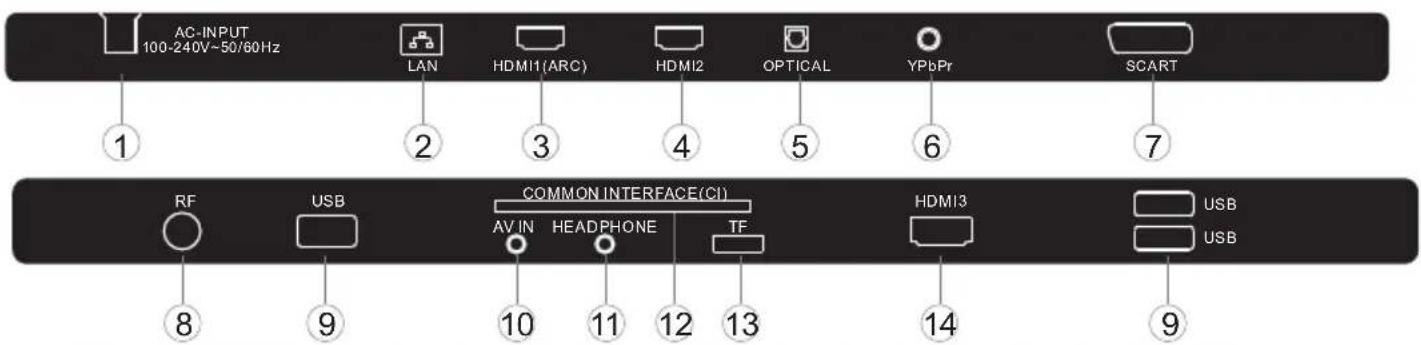
| 1 | AC Power Source | input |
| 2 | LAN | input |
| 3 | HDMI1(ARC) | input |
| 4 | HDMI2 | input |
| 5 | OPTICAL | output |
| 6 | YPbPr | input |
| 7 | SCART | input/output |
| 8 | ANT | input |
| 9 | USB | input |
| 10 | AV IN | input |
| 11 | HEADPHONE | analogue audio output |
| 12 | COMMON INTERFACE(CI) | input |
| 13 | TF | input |
| 14 | HDMI3 | input |
Connecting to your TV

flowchart
graph TD
    A["AC-INPUT 100-240V~50/60Hz"] --> B["LAN"]
    B --> C["HDMI1(ARC)"]
    C --> D["HDMI2"]
    D --> E["OPTICAL"]
    E --> F["YPbPr"]
    F --> G["SCART"]
    H["Audio/Video machine with HDMI interfaces"] --> I["RF"]
    I --> J["USB"]
    J --> K["COMMON INTERFACE(CI)"]
    K --> L["AV IN HEADPHONE TF"]
    L --> M["HDMI3"]
    M --> N["USB"]
    O["Connect USB receiver to USB slot of the TV"] --> P["USB"]
    Q["CVBS, DVD Player or other machine with CVBS/S-Video."] --> R["USB"]
    R --> S["AV IN HEADPHONE TF"]
    S --> T["HDMI3"]
    T --> U["USB"]
    V["G Green (Y)"] --> W["AC-INPUT 100-240V~50/60Hz"]
    X["B Blue (Pb/Cb)"] --> Y["AC-INPUT 100-240V~50/60Hz"]
    Z["W White(AUDIO-L)"] --> AA["AC-INPUT 100-240V~50/60Hz"]
    AB["R Red (AUDIO-R, Pr/Cr)"] --> AC["AC-INPUT 100-240V~50/60Hz"]
    AD["Y Yellow (VIDEO)"] --> AE["AC-INPUT 100-240V~50/60Hz"]
Connecting to your Haier TV
Connecting a DVD player / Satellite / cable set top box receiver / games console / PC or Laptop
There are several options to connecting a DVD player / Satellite or Cable set top box receiver / games console / PC or Laptop to your TV.
Option 1 SCART
Connect a SCART cable (not supplied) from the SCART socket on the TV to the DVD player cable set top box receiver or games consol.
2 To select the device connected with the SCART cable press the SOURCE button on the remote and use the ▼▲ keys to select SCART and press the OK button.
Note: The TV will default to the SCART connection when the TV is switched on.
Option 2 HDMI
If the device you want to connect to the TV is switched on, switch off the device first.
2 Connect a HDMI cable (not supplied) from the HDMI socket on the TV to the DVD player cable receiver or games consol.
3 Switch on the device you have just connected to the TV
4 To select the device connected with the HDMI cable press the SOURCE button on the remote and use the ▼▲ keys to select HDMI and press the OK button.
Option 3 AV Audio Visual (Yellow/White/Red)
1 Make sure that both TV and the device are switched off before connecting.
2 Connect the AV cables (not supplied) from the Video (yellow) and Audio (white, red) sockets on the TV to the DVD player or games console etc.
3 To select the device connected with the AV cable press the SOURCE button on the remote and use the ▼▲ keys to select AV and press the OK button.
Option 4 COMPONENT (Green/Blue/Red)+(White/Red)
1 Make sure that both TV and the device are switched off before connecting.
2 Connect the cables (not supplied) from the COMPONENT IN sockets Y, Pb, Pr (green, blue, red) and L-Audio-R (white, red) on the TV to the DVD player or games console etc.
8 To select the device connected with the COMPONENT cable press the SOURCE button on the remote and use the key to select and YPbPr press the OK button.
Option 5 USB
1 Most USB sticks can be connected to your TV and some digital cameras may also work.
2 Connect USB stick (not supplied) or a USB cable (not supplied) to the TV.
3 To select the USB device connected to the TV, press the SOURCE button on the remote and use the keys to select USB and press the OK button.
Note1: Only *.jpg and *.mp3 files will work, other file types are not guaranteed and may not. Note 2. Apple iPhones and iPods are not compatible with your TV.
Note 3. When connecting any device to the USB connection, keep the USB cable length as short as possible.
Option 6 HEADPHONE OUTPUT
Insert the plug of the earphone into the headphone socket on the TV. The TV speakers are now muted. Alternatively you can also plug in external speakers if required.
Option 7 LAN INPUT
Connects your TV to the internet router by an Ethernet cable. This is for future services such as the red button, and on demand / catch up TV services.
Option 8 OPTICAL OUTPUT
Use an optical cable to connect the TV's OPTICAL socket to an external audio receiver's audio coaxial input socket. Plug the connected devices into the mains socket before switching on the TV.
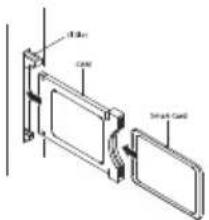
COMMON INTERFACE
The common interface (CI) slot is designed to accept the conditional Access (CA) Module and Smart card in order to view the pay TV programmes and additional services.
Contact your Common Interface service provider to get more information about the modules and subscription.
Please noted that CA modules and smart cards are neither supplied nor optional accessories from us.
Warning
- Switch off your TV before any module is inserted in the Common Interface slot.
1 Insert the CAM correctly, then Smart Card to the CI slot that is located at the side of the TV.
2 Turn on the TV and it will display the below message if the CI module is detected. Wait for few moments until the card is activated.
CI Module Inserted
3 Press the MENU button and press the ◀▶ buttons to select the CI then ▶MSN ▶ to enter the submenu. Press the ◀▶ buttons to select the CI information.
4 Detailed information on the CI card in use is displayed.
5 Press OK button to access the card menu. Refer to the module instruction manual for setting details.
6 When module is removed, the following message will appear on the screen.
CI Module Removed
03 Remote Control
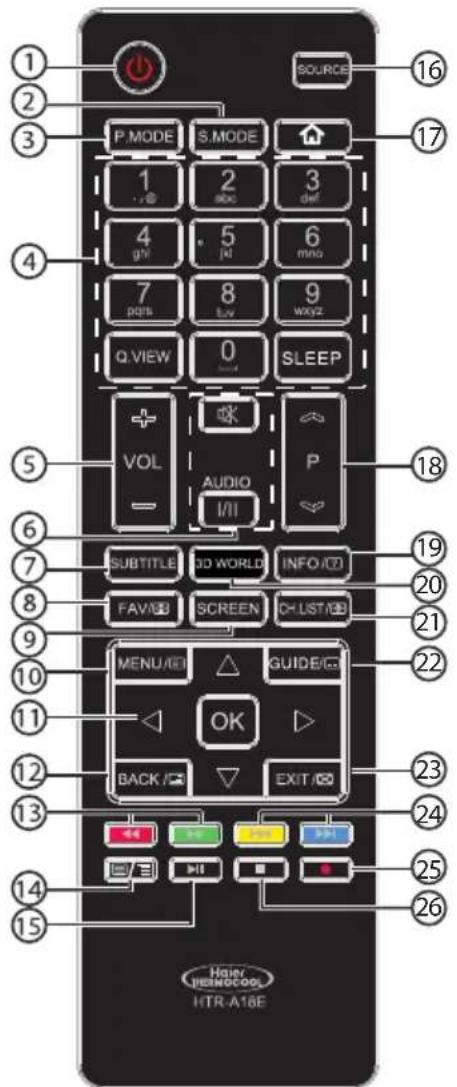
| # | Button | Descriptions |
| 1 | (Power) | Press to turn the TV on or off. |
| 2 | S.MODE | Press to select the sound mode. |
| 3 | P.MODE | Press to select the picture mode. |
| 4 | 0-9 | Press to enter a channel number or password. |
| Q.VIEW | Press to switch to the last viewed channel. | |
| SLEEP | Press to set the sleep timer. | |
| 5 | VOL +/- | Press to adjust the volume level. |
| 6 | (Mute) | Press to turn the sound on or off. |
| AUDIO(I/II) | Press to select Mono,Nicam stereo for ATV channel.Select Audio language for DTV channel. | |
| 7 | SUBTITLE | Press to turn the subtitle on or off. |
| 8 | FAV/ | Press to open a favorite channel list.In teletext mode,press to hold a page. |
| 9 | SCREEN | Press to change picture aspect ratio. |
| 10 | MENU/ | Press to open the on-screen menu.In teletext mode,press to open the INDEX page. |
| 11 | ▲▼◀ | Press to navigate the on-screen menu. |
| Press to confirm a selection.OK | ||
| 12 | BACK/ | Press to return to the previous screen.In teletext mode,press to enter mix mode. |
| 13 | ◀ (reverse) ▶ (forward) | Press to fast forward or reverse playback in multimedia mode. |
| 14 | ≡/≡ | In teletext mode,press to open or close teletext page. |
| 15 | ▶II | Press to play/pause in multimedia mode.(play/pause) |
| 16 | SOURCE | Press to open the input source list. |
| 17 | ♡ | Press to enter into HOME PAGE. |
| 18 | P ≈/≈ | Press to change the channel. |
| 19 | INFO/ | Press to display the channel information.In teletext mode,press to reveal the hidden information. |
| 20 | 3D WORLD | These models do not support 3D feature. |
| 21 | CH.LIST/ | Press to open the channel list.In teletext mode, press to switch the image to top,bottom or full. |
| 22 | GUIDE/ | Press to display electronic programme guide in mode. Press to enter the teletext subpage.DTV |
| 23 | EXIT/ | Press to close the on-screen menu.In teletext mode,press to exit the teletext mode. |
| 24 | ◀ (previous) ▶ (next) | Press to select previous or next file. |
| 25 | ● (REC) | Press to record the TV program you are watching in DTV mode. |
| 26 | ■(stop) | Press to stop multimedia playback. |
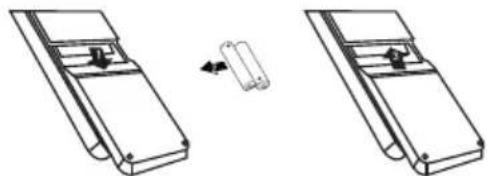
Insert Batteries into the Remote Control
natural_image
Diagram showing two mechanical components with a directional arrow indicating motion (no text or symbols)-
Remove the battery cover.
-
Inserting the 2 AAA 1.5V batteries making sure the polarity (+ or -) of the batteries matches the polarity marks inside the unit.
-
Mount the battery cover. Replace with new batteries when the TV set begins to show the following symptoms: Operation is unsteady or erratic. Sometimes the TV set does not function with Remote Control Unit.
Remark:
1) Alkaline Battery Recommended.
2) Remove batteries when they are exhausted or if the remote control is not to be used for long time.
04 OPERATION
Basic Operation
Power supply to switch on/off this Unit. Before switch on, ensure that all connections will be proper and correct.
Press Power on/off (at the bottom of the rear panel of this Unit) to turn on/off this Unit. When the power indicator turns red, this Unit accesses the power on and standby state.
Press ⏻key to start this Unit. The power indicator turns off. Press ⏻key once again to switch off this Unit.
If there is no signal for the current signal source, this unit will automatically set to the standby state 10 minutes later.
If not to use the main Unit for a long time, unplug the AC power cord from the AC outlet.
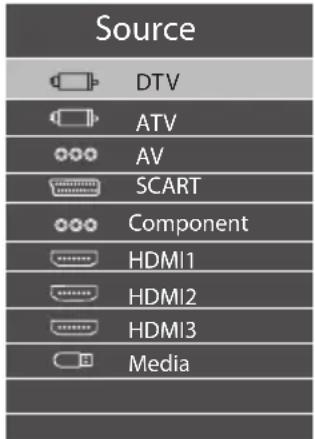
Select input signal sources
After turn on the main unit, press source to select proper input source. Press ▼▲ buttons to select the main signal source. Press OK button to confirm.
Setting the OSD Menu
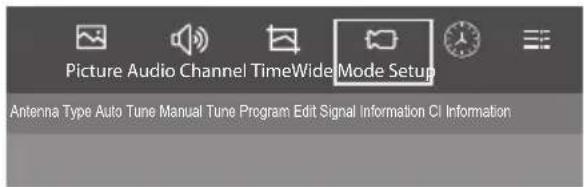
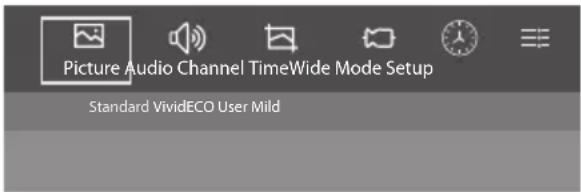
Press MENU button, and the main menu appears. the main menu display in turn as below:
Picture→Audio→Wide Mode→Channel→Time→Setup When display of some menu option is gray, it indicates that such options are not available under the current mode.
General Step for Menu Setup:
●For each main menu, first press▼ to enter the submenu.
●Press ◀▶ to select the desired adjustable option.
●Press ◀▶ to adjust to suitable value.(There is ▶ option only following such menu, then press ▶ key only)
● After the selection of option is completed, press Menu to be able to quit the menu.
Installation Guide
The installation guide only appear when the TV first time turn on or reset to factory set.
| Please select an OSD language | ||||
| English | French Italian Spanish German | |||
| Dutch Russian | Polish | Czech | Romanian | |
| Hungarian | Greek | Portuguese | Thai | Arabic |
1). Press the ▲▼ buttons to navigate the menu and change the settings. Press the OK button to confirm.
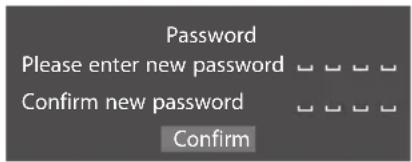
Select your desired language to be displayed on the menu. Input your password and press confirm to complete.
Note: The default password is 0000.
Home And Shop modes
2). When the unit is turn on for the very first time, it will show Initialization set-up menu. After the OSD language is set, the user can choose between "shop mode" and "home mode". When the screen shows the following setting menu and the cursor stays on the "home mode" choice, press ◀▶ to adjust, and "OK" to enter the menu.

If "Home mode" is chosen, the following menu will displayed.
| Confirm | |
| Are you sure to change to Home mode? | |
| OK | Cancel |
Choose "Cancel" to go back to the Initialization set-up menu. Choose "OK" to enter the Network menu.
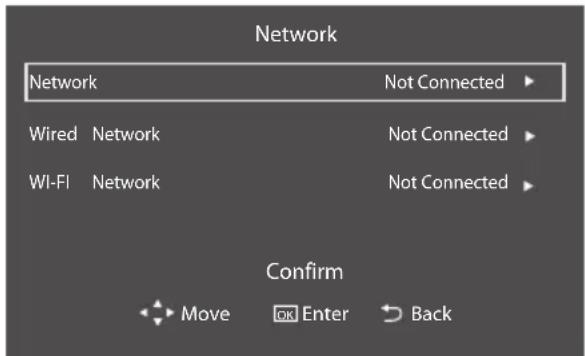
Press the ▲▼ buttons to select network type, then press the OK button to enter the submenu. After the Network is set, press the ▲▼ buttons to select "Confirm" and then press the OK button to confirm.
3). The following menu will display. Press the ◀▶ buttons to select DTV/ATV and then press the OK button to confirm.
| DVB Tuning Type | ||||
| DTV | ATV | |||
Press the ◀▶ buttons to select DVB-T/DVB-C and then press the OK button to confirm.
| Antenna Type | ||||
| DVBT | DVBC | |||
a. If you select DVB-T, the next step is to select the country then press the OK button into the country select menu.
| Country | ||||
| Philippines | Thailand | Egypt | Saudi Arabia | Iran |
| Iraq | Kuwait | Indonesia | Israel | Nigeria |
| Morocco | India | Malaysia | Pakistan | Benin |
b. If you select DVB-C, the next step is to select the country then press the OK button into the country select menu.
| Country | ||||
| Philippines | Thailand | Egypt | Saudi Arabia | Iran |
| Iraq | Kuwait | Indonesia | Israel | Nigeria |
| Morocco | India | Malaysia | Pakistan | Benin |
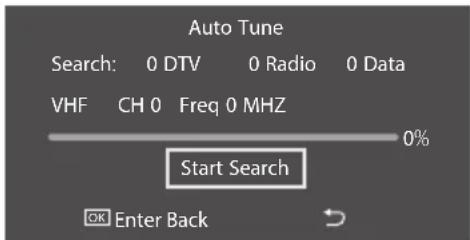
4). Channel tuning will commence. This operation may take up to some minutes. The display will show the progress of the tuning and the number of channels found.
5). If you want to skip the Auto tuning, press the MENU button to interrupt the tuning half way.
A pop-up screen will be displayed, press the OK button to to onfirm. You will then go straight to Network.

6). After tuning is complete, the channels are arranged in a preset order. If you wish to skip channels, modify the preset order or rename channels, select Programme Edit under the channel menu.
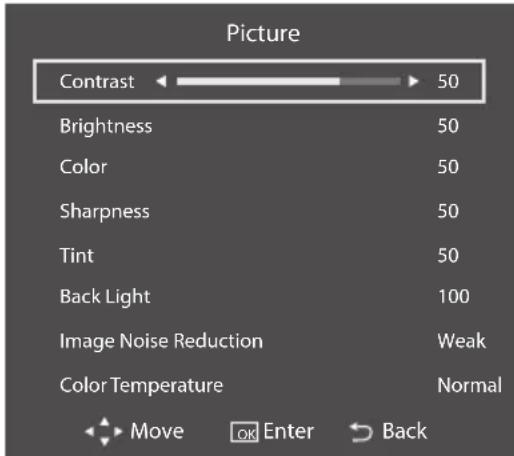
1. Picture MENU
1). Press the MENU button and then press the ◀▶ buttons to select the Picture menu and then press the ▼button.
2). Press the ◀▶ buttons to select submenu ECO/Standard/User/Mild/Vivid Mode.
- User Mode:
Picture: You can adjust picture effect here, such as brightness, color, sharpness etc.
2. Audio MENU
1). Press the MENU button and then press the ◀▶ buttons to select the Audio MENU and then press the ▼ button.
2). Press the ◀▶ buttons to select submenu.
Standard/Music/Theatre/User
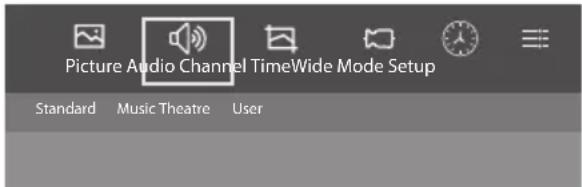
- User Mode:
Picture: You can adjust picture effect here, such as brightness, color, sharpness etc.
Sound: You can adjust the sound effect here, such as bass, treble, balance etc.
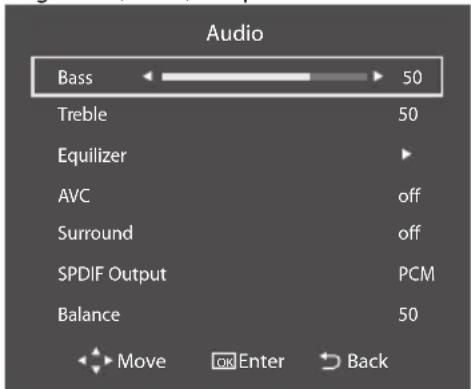
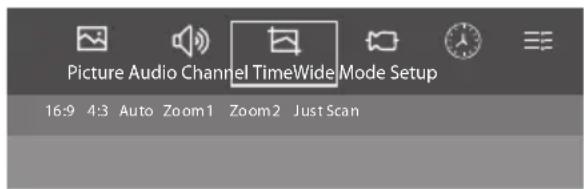
3. Wide Mode MENU
1). Press the MENU button and then press the ◀▶ buttons to select the Wide Mode MENU and then press the ▼ button.
2). Press the ◀▶ buttons to select submenu.
16:9/4:3/Auto/Zoom1/Zoom2/Just Scan
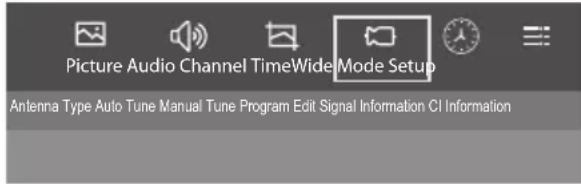
4. Channel MENU
1). Press the MENU button and then press the ◀▶ buttons to select the Channel MENU and then press the ▼button.
2). Press the ◀▶ buttons to select submenu.
Antenna Type/Auto Tune/Manual Tune/Program Edit/Signal Information/CI Information.
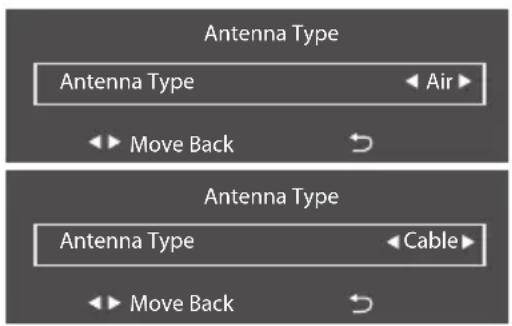
4.1 Antenna Type
1). Press the MENU button and then press the ◀▶ buttons to select the Channel MENU and then press the ▼button.
2). Press the ◀▶ buttons to select Antenna Type and press OK to confirm.
3). press the ◀▶ to select Air or Cable.
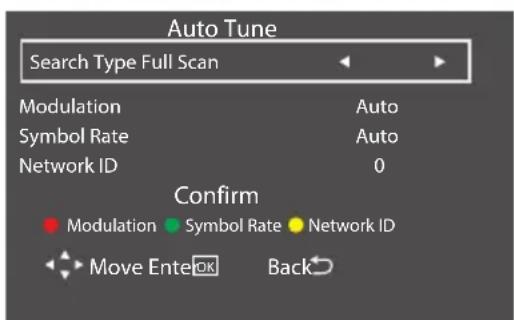
4.2 Auto Tune
1) press the ◀▶/▼▲ buttons to select the country where you will operate the TV. Press the OK button to confirm.
2) If "country" is chosen, the following menu will displayed, then press the ◀▶ buttons to select Full Scan or Quick Scan.
3) press ▼▲to select confirm and press OK to Confirm.
| Country | ||||
| Philippines | Thailand | Egypt | Saudi Arabia | Iran |
| Iraq | Kuwait | Indonesia | Israel | Nigeria |
| Morocco | India | Malaysia | Pakistan | Benin |
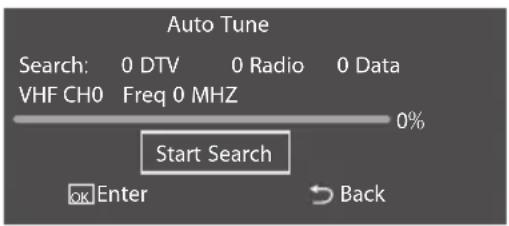
4). Channel tuning will commence. This operation may take up to some minutes. The display will show the progress of the tuning and the number of channels found.
5). If you want to skip the Auto tuning, press the MENU button or OK button to interrupt the tuning half way. A pop-up screen will be displayed, press the OK button to confirm. You will then go back main menu.
6). After tuning is complete, the channels are arranged in a preset order. If you wish to skip channels, modify the preset order or rename channels, select Programme Edit under the channel menu.
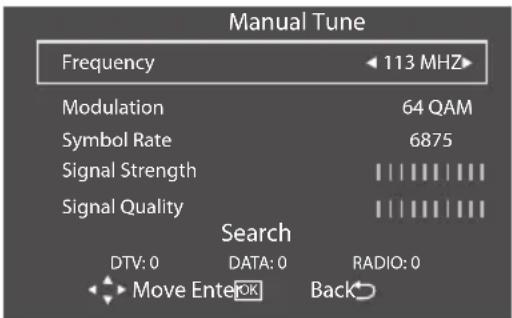
4.3 Manual Tune
1). Press the MENU button and then press the ◀▶ buttons to select the Channel MENU and then press the ▼button.
2). Press the ◀▶ buttons to select Manual Tune and press OK to confirm.
3).press▼▲the select Frequency, Modulation, Symbol Rate etc.
4).press ◀▶ to adjust the value.
5).press ▼▲ to select Search button and than press OK to Search.
4.4 Program Edit
1). Press the MENU button and then press the ◀▶ buttons to select the Channel MENU and then press the ▼button.
2). Press the ◀▶ buttons to select Program Edit and press OK to confirm. You can Delete, Rename, Move, Skip, favorite.
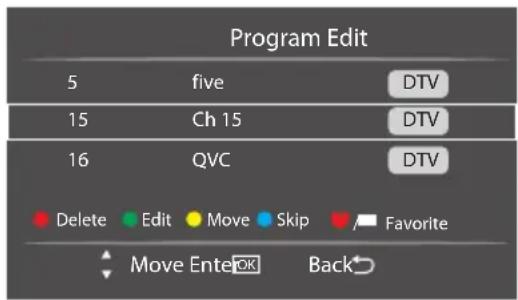
Delete
Press teletext red button, the program is cursor will delete.
Edit
Only can rename ATV programs.
Move the cursor to the program, press teletext green button to rename the program.
Press ▼▲ to choose the character, press ◀▶ to move the cursor. Press MENU button to exit edit, Press EXIT to exit the menu.
- Move
Use the Arrow Buttons to select the channel you wish to move. Then press the Yellow Button to select Move function. Once active use the Arrow Buttons to move and then press OK to confirm.
Skip
Press ▼▲ to choose the program, press teletext blue button to skip this program, Choose the skipped program, The will show on the right side of the program. Choose the skipped program, press blue button again, you can cancel the skip. The will disappear.
- Favorite
Press ▼▲ to choose the program, press FAV button, it will show ♥ on the side of the program. Choose the FAV program, press FAV button again, you can cancel the FAV, the♥ will disappear. Once you favorite group is created, you can press the FAV key to quickly access your favorite channel.
4.5 Signal Information
1). Press the MENU button and then press the ◀▶ buttons to select the Channel MENU and then press the ▼button.
2). Press the ◀▶ buttons to select Signal Information and press OK to confirm.
4.6 CI Information
1). Press the MENU button and then press the ◀▶ buttons to select the Channel MENU and then press the ▼button.
2). Press the ◀▶ buttons to select CI Information and press OK to confirm.
5. Time MENU
1). Press the MENU button and then press the ◀▶ buttons to select the Time MENU and then press the ▼ button.
2). Press the ◀▶ buttons to select submenu.
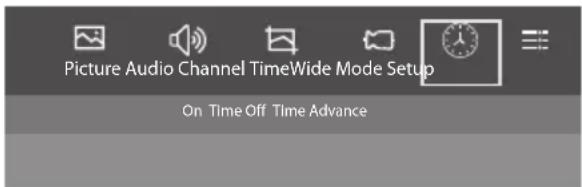
On Time/Off Time/Advance
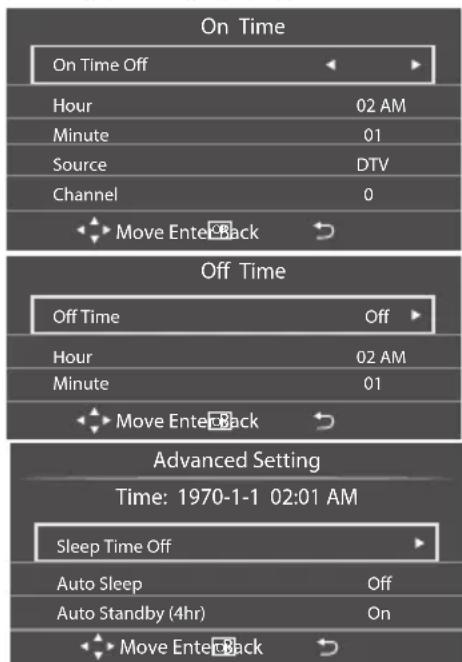
You can adjust Off Time, On Time, Sleep Time etc.
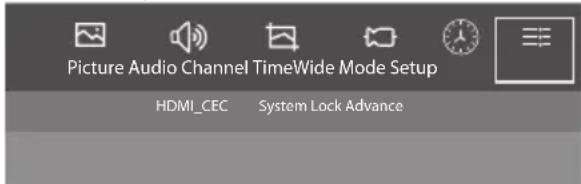
6. Setup MENU
1). Press the MENU button and then press the ◀▶ buttons to select the Setup MENU and then press the ▼button.
2). Press the ◀▶ buttons to select submenu.
HDMI_CEC/System Lock/Advance
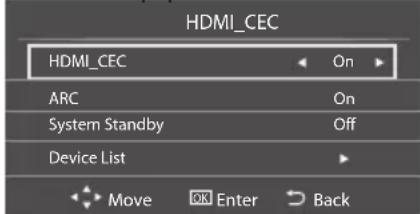
6.1 HDMI\_CEC
1). Press the MENU button and then press the ◀▶ buttons to select the Setup MENU and then press the ▼button.
2). Press the ◀▶ buttons to select HDMI_CEC and press OK to confirm. If the HDMI_CEC is On, you can through the tv remote control to control the blu-rayplayer. ARC is to select the sound equipment.
6.2 System Lock
1). Press the MENU button and then press the ◀▶ buttons to select the Setup MENU and then press the ▼button.
2). Press the ◀▶ buttons to select System Lock and press OK to confirm.
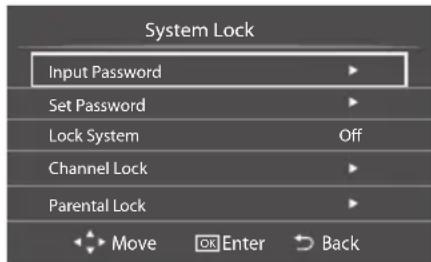
You can lock system, set password, block program and set parental Guidance, Once you set the lock system on you can not search the channels or change any programs.
The default pass word is 0000, if you forget the password, you can sue the super password:9443.
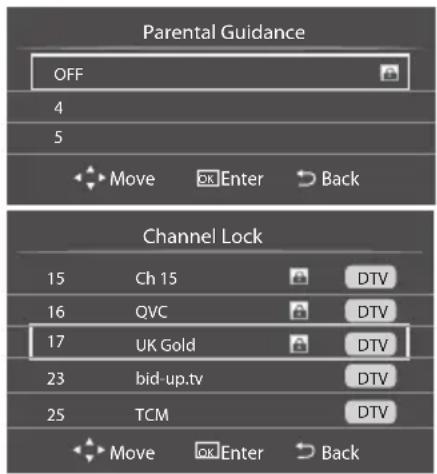
Channel Lock: Press ▼▲ to select Channel Lock and press OK to confirm.
Parental Lock: Press ◀▶ to choose rating.
6.3 Advance
1). Press the MENU button and then press the ◀▶ buttons to select the Setup MENU and then press the ▼button.
2). Press the ◀▶ buttons to select Advance and press OK to confirm. Here are some of the TV set.
| Menu Time 15 Seconds | |
| Audio Language | English |
| 2nd Audio Language | English |
| Language | |
| Subtitle Language | English |
| 2nd Subtitle Language | English |
| AD | Off |
| AD Volume | 35 |
| Hearing Impaired | On |
| Shop Mode | Off |
| Switch Mode | Mirroring |
| Blue Screen | On |
| PVR File System | |
| Restore to Default | |
Android Mode
If you are in the TV Mode, you can press "BACK" buttons to go to Android Mode. When you press the "BACK" button, the following menu will displayed. Also, you can press "button to goto Android Mode.

Press "OK" to select. Now you are in the Android Mode.
1) Home Menu.
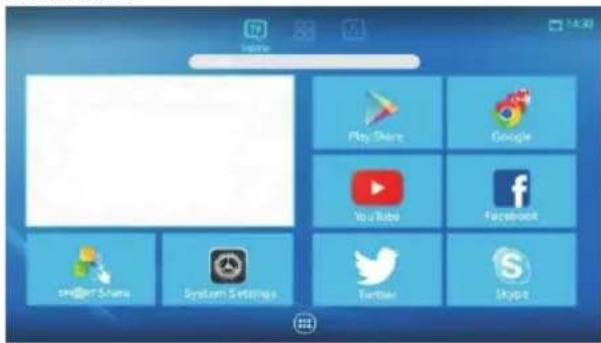
In Home menu you can choose a few here in some app. such as Play store, YouTube, Twitter, Facebook, Skype, Google etc. SMARTShare can put you on the phone's screen shows on TV. You can choose the System Settings to set the Android system.
Smart Share Manual
Smart Share is a function that allows to share the display of various consumerelectronic devices to a device such as a N+Smart compatible television wirelessly. This would allow both theN+Smart compatible television and consumerelectronic device to display consumer electronic device's screen at the same time. Press the OK buttons to enter the Smart Share application
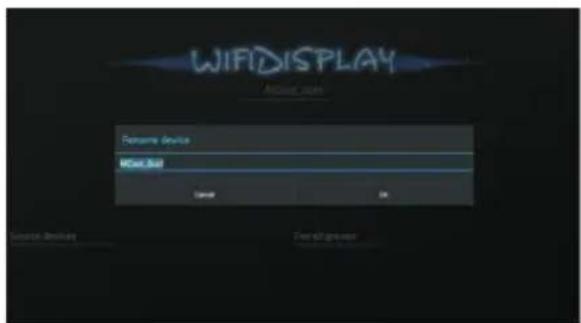
Pressthe▼▲◀▶ buttons to select Setting
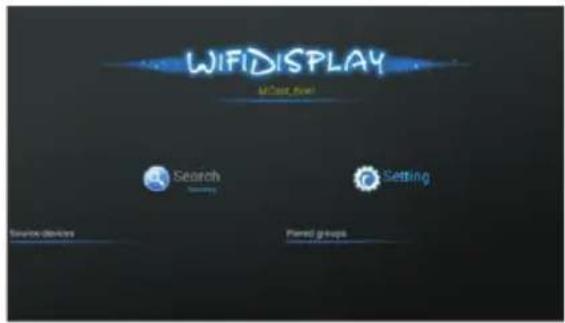
Press OK buttons and then you can change the name of television.
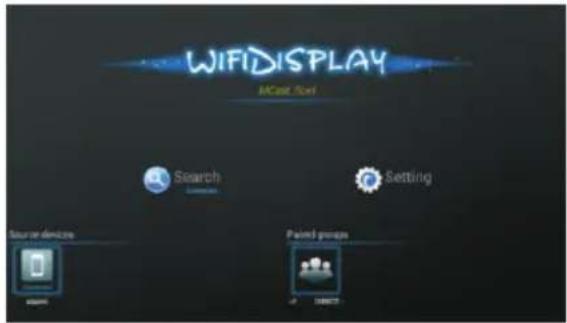
Source devices will display the name of consumerelectronic device that can connect with the television now.
Paired groups will display the consumerelectronic device that have connected with the televisionbefore.Then you can use your device to connect with the television.
NOTE:
Consumerelectronic device should support this function.
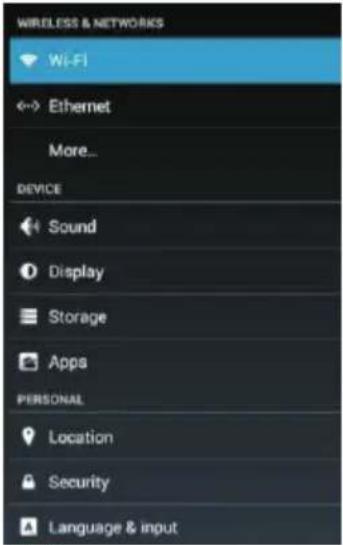
1.1 Net
You can choose the Wi-Fi to connect Wi-Fi, Ethernet. If you connected Wi-Fi, the Ethernet will closed.
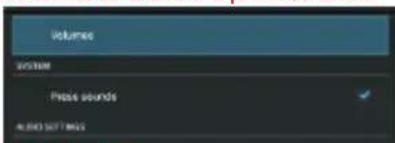
1.2 Sound
You can press the Sound button to change the sound volumes or close the press sounds.
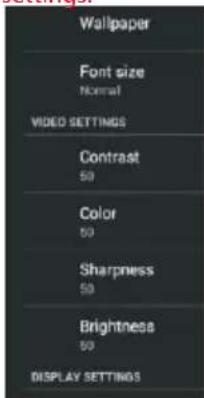
1.3 Display
You can press the Display button to replace your Wallpaper or change your Font size type, and video settings.
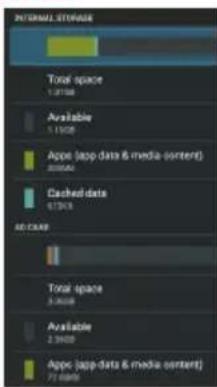
1.4 Storage
You can press the Storage button to view the memory status.
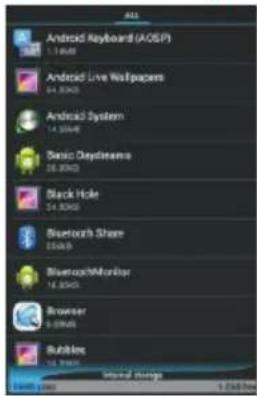
1.5 Apps
You can press the Apps button to view your install apps.
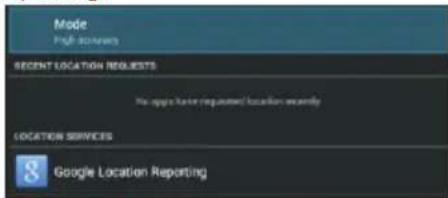
1.6 Location
You can check your local services.such as google Location reporting.
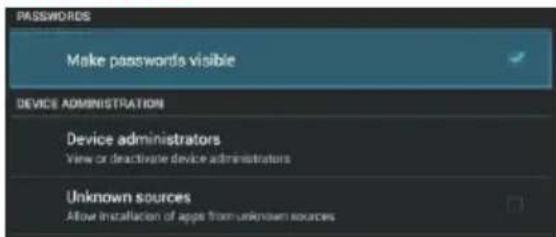
1.7 Security
You can Make passwords visible, view or deactivate device administrators, and allow installation of apps from unknown sources.
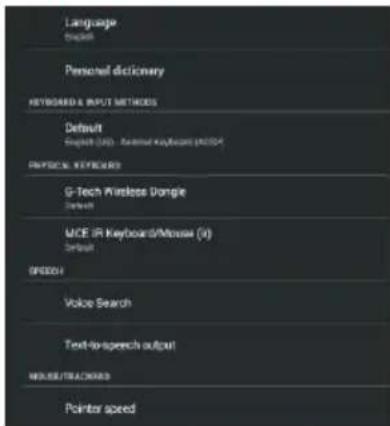
1.8 Language & input
You can reset your OSD language, this functions are about language, Keyboard etc, and you can go to your habits.
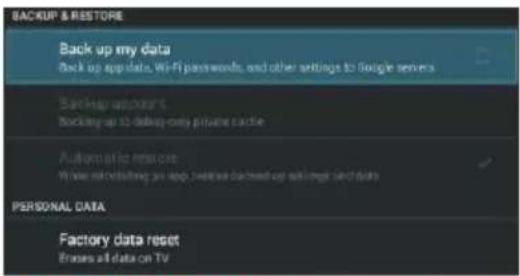
1.9 Backup & reset
You can Back up app data, Wi-Fi passwords, and other settings to Google servers.
If you want to make your system to reset to defaults, you can press the Factory data reset.
Warning: , please backup your personal data.evenow
1.10 System Update
Here you can upgrade your system by Local update or Net update.

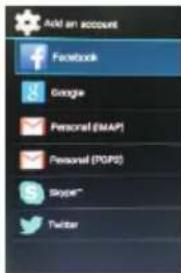
1.11 Add account
You can add an account at this point.
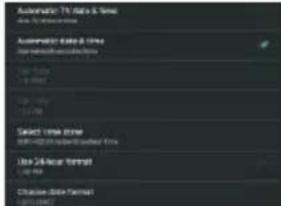
1.12 Date & time
Here is some of time Settings, you can go to your habits.
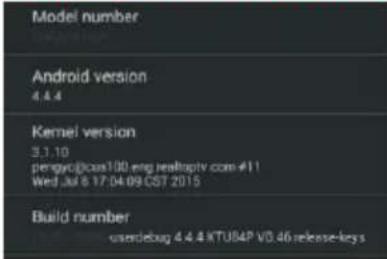
1.13 About TV
Here is some version info, such as Model number, Android verdion, Kernel version, Build number.
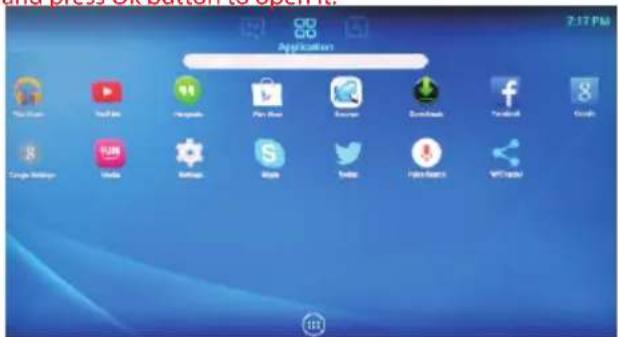
2) Application Menu
There are some Apps, you can choose your like application, and press Ok button to open it.
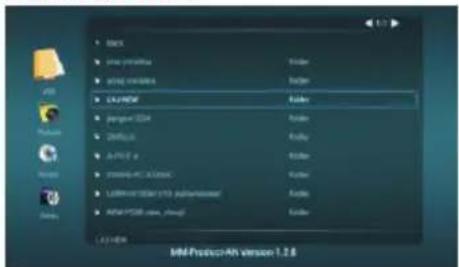
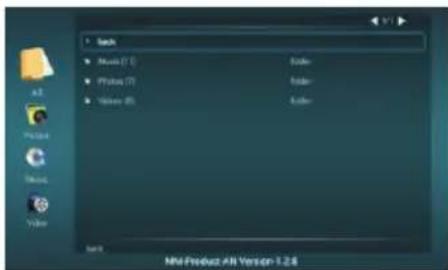
3) Media Menu
You can insert your USB storage device, you can browse your pictures, music, video on TV.
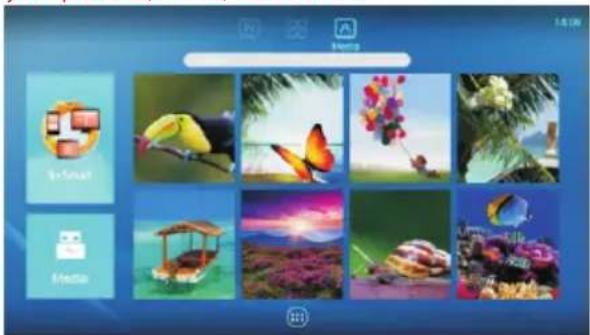
N+Smart Manual
N+Smart is a function that allows various consumerelectronic devices to share content with each other across a standard home network. This would allow a device such as aN+Smart compatible television to play music or viewvideos or photos stored on a desktop computer or thecompatible device. Press the OK buttons to enter theN+Smart application.
Pressthe ▼▲ buttons to select the network N+Smart device, then press OK button to confirm.

Pressthe ▼▲ buttons to select the device, then press OK buttonto confirm.
The operate step is the same as USB Player.
NOTE:
Consumerelectronic device should support this function.
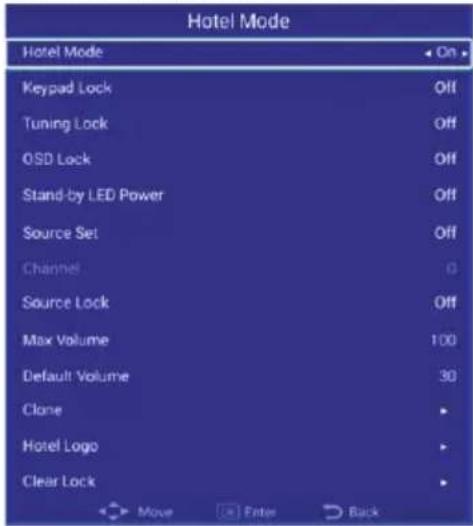
Hotel Mode Manual:
- Source + 1,0,0,1, enter Hotel Mode.
-
If Keypad Lock is On, then Keypad can not work.
-
If Tunging Lock is On, then Tunging can not work.
-
If OSD Lock is On, then Menu can not work and prompt OSD Locak.
-
If Stand-by LED Power is On, then LED can not work.
-
If Source Set is DTV or ATV, and Channel can set number, then Power boot, the source default settings. If Source Set is AV or HDMI... , then Channel can not set, but Power boot, the source default settings.
-
If Source Lock is On, then Source menu can appear, but it does not work.
-
If Max Volume is 100, then TV Max Volume is 100, if Max Volume is 60, then TV Max Volume is 60.
-
If Default Volume is 30, then Power boot, the TV Volume is 30.
-
Clone function can clone all settings and read to USB, you can write other TV.
-
Hotel Logo is change Start up Logo.
-
Clear Clone is clear all settings.
05 Trouble shooting
| Trouble phenomenon Symptom | Inspection Check | |||
| Picture Audio | ||||
 | Snow Noise |  | antenna position, direction or connection | |
 | Ghost |  | Normal audio | antenna position, direction or connection |
 | Interference |  | Noise | electronic equipment, car/ motorcycle, fluorescent light |
 | Normal Picture |  | Mute | Volume(check if mute is activated or if the audio system connections are not correct) |
 | No picture Mute |  | Power cord is not inserted Power switch is not opened Contrast and brightness/volume setup Press standby key on the remote control for inspecting | |
 | No colour Normal |  | control | |
 | Picture breaking up |  | Normal audio or weak | retune channel |
 | No colour |  | Noise | TVsystem |
 | There is black bar on top and bottom |  | Normal audio | Change aspect to zoom |
Trouble Shooting
| My TV does not display the picture on my laptop / PC when connected. | Most PC's and laptops when connected with a VGA Plug (the blue 15 pin plug on your PC or laptop) require you to press some buttons on your key board to get a picture on a TV or other external display. This is usually the F7 (Dell) or F4 (HP / Samsung) or F5 (Toshiba). On laptops, you have to press the "Fn" key at the same time as the "F" key. |
| I have connected my PC/Laptop to the TV and get a picture but no sound. Why ? | The VGA cable only carries the video or picture information. You need to connect a separate cable connected to the earphone socket (3.5mm jack) on you PC/Laptop to the 3.5m (PC Audio IN) socket on your TV. You will need to select "PC" using the Source button on your remote.Alternatively connect your PC/Laptop using a HDMI cable if you PC/Laptop has a HDMI connector. HDMI is both audio and video. |
| The picture is not auto resizing when changing channels. | Check that the TV picture Aspect Ratio is set to 'Auto' on all inputs ATV, DTV, SCART, HDMI 1, 2 etc.To set the aspect ratio, (Auto, 4:3 or 16:9). Press Source button start at ATV and repeat the sequence below for all input sources ATV, DTV, SCART, HDMI 1 and 2 as each input source is controlled separately.Press TV Menu buttonPress Right Arrow to access Picture sub menuPress Down Arrow to select Aspect RatioSelect AutoPress ExitRepeat for all input sources. |
| I have just plugged in a DVD player or another item into my TV and it doesn't work. | This is applicable to any item of equipment plugged to the TV1. Turn both TV & DVD player off (plugs out of the wall socket, not standby).2. Turn off any equipment connected to the SCART socket.3. Disconnect the SCART plug from the TV.4. Plug in and turn TV on5. Plug in and turn DVD player on6. Select HDMI from Source Menu7. Press play on DVD player and check movie plays okNOTE: The SCART socket has priority over HDMI and it is important that the equipment connected to the SCART socket on the TV is switched OFF (not in standby).Please follow this information. If the advice works and the DVD player works, the TV is OK it is just a bit confused.Probably HDMI plugs have been removed and plugged back in when the TV is switched on.Never remove or plug in HDMI cables or any digital equipment with the equipment switched on.Always switch off all equipment when unplugging or connecting any digital equipment. |
Trouble Shooting Digital TV Problems and possible Solutions.
Picture Breaks into Pixels
A typical example of a reception problem includes the break up of pictures (pixilation) or the picture freezing, sometimes there are clicking or squeaking sounds or the sound drops out or there is NO reception at all.
Your picture may break into pixels due to the digital video signal dropping. The signal dropping may occur because of either problems with weak signals (see TV Aerials) or if you are connected by cable a weak cable signal. If the problem is weak signals, use an amplifier to strengthen the signal. A cable technician can help you install an inline amplifier or a pre-amplifier. This will boost your signal strength and fix the pixel problem.
If you are receiving your TV signal by satellite, check your dish has not moved following high winds, or that the signal is blocked by trees. Trees can be a problem as the TV signal can change depending if a tree between the satellite dish and satellite is in bare or in full leaf.
Missing channels
It may be that you find that there are channels missing, or you're receiving channels from the wrong region. Sometimes the interactive services (red button) doesn't work. This is usually caused by weak signal, see TV Aerials
TV Aerials
Digital terrestrial television (Freeview) comes to your TV via an aerial, The old aerial that was good for analogue TV may not work well for digital so may need upgrading. If you are getting some but not all of the digital channels on DTV (Freeview) for example you get BBC1, BBC2, Channel 4, but not ITV or Channel 5, this is usually because your aerial is a narrow band type, and needs to be changed to a wide band type.
Faulty Leads and Cables
Check your TV. Are the leads at the back - to the mains, the aerial, the set-top box, the video or DVD player or recorder properly connected? SCART leads are known to work loose over time and can result in both audio and video (picture) problems. Either left or right or both audio is missing and the colours are poor or muddy looking. Push the SCART plugs firmly in, this should fix the problem.
HDMI plugs need to be pushed in firmly; it's only the last millimetre that the contacts make. Typically the black plastic part of the HDMI plug should be very close or touching the body of the TV or component.
When plugging in any HDMI cables you may experience problems if the HDMI cables are plugged in when the TV or the other component is switched on. Always switch off both the TV and the component you are plugging in. If you have checked the plugs and sockets, switch off the TV and whatever you have plugged in to the TV and then switch them on again.
I have connected my PC to the TV. There is no sound.
If you connect your PC or Laptop to the TV using a VGA (15 pin Sub D) cable there is no audio, you need to connect a separate audio cable to the TV from the PC or laptop.
Unnatural Colours and Flesh Tones
Unnatural flesh tones and other colours could present another problem even in a new HDTV. This is due to the TV picture settings, which are optimized for a showroom environment. Fix this by changing the picture mode to natural in the picture menu. For more precision, try manually setting the colour, contrast and brightness options in the picture menu.
White Outlines
White outlines around objects and people generally appear either if the TV sharpness is set to very high, or if your television set uses some edge-enhancement processing technology. Go to the picture menu and adjust the sharpness till the white outline disappears. If edge-enhancement is enabled, try to disable it using the service menu.
Choppy Video
At times the video might become choppy. When this happens, check whether the signal is strong enough. If the signal is strong the problem is with the cable operator. If the signal strength is weak, try boosting the signal strength with the help of an amplifier.
The picture does not fill the screen
When connecting PC's or laptops to the TV, the picture may not fill the screen. Check the display settings on your PC or laptop (Windows > Start > Control Panel > Appearance and Personalization > Display settings) and select the best resolution. On your TV select:- TV Menu > Picture > Settings and then try AUTO, ZOOM1 or ZOOM2 for the best display.
USB Connection
The USB connection will work with *.jpg (photo) and *.mp3 (music) files. Please note the TV does not recognize Apple iPhone, or iPod's connected to the USB connector on the TV. The TV may play other files, but due to the multiple different file formats, there is no guarantee that these other file formats will work.
42" FULL HD 1080P Digital LED LCD TV
| Television picture quality: | FULL HDIntegrated digital.Screen Size: 107cmResolution 1920x1080 pixels 50Hz. |
| DTV Tuner Decoder | DVB-T, DVB-C, DVB-T216/32/64/128/256 QAM modulationMPEG2,MPEG4,H.264 |
| Connectivity: | 3 HDMI sockets1 SCART socket.Component video socket./AV.3 USB port.1 LAN port.1 OPTICAL port.1 Headphone port.Supported Systems:PAL+SECAMStorage channel number: 1000(DTV),100(ATV)TV (RF):75 Ω ImbalanceAV Video-Input:75 Ω ,1V-P,RCAAV Audio-Input:20K Ω , RMS500mVYPbPr/HDMI Video Input:480i, 480p, 576i, 576p, 720p, 1080i, 1080p |
| Sound quality: | NICAM stereo sound system.2 x 8 watts RMS power output. |
| Standby Power consumption | ≤0.50W |
| Digital features: | Digitally interactive.Digital text.Digital video broadcasting (DVB) subtitles available.Auto setup.Auto scan for new channels.Now and next programme guide.7 day electronic programme guide (EPG).Top up TV compatible.CI slot.Audio description compatible. |
| Additional features: | UHF/VHF tuner;Sleep timer; ;Picture and textParental GuidanceRemote control batteries required 2 x AAA (included).VESA Mount Size: 200x100 mmPackage Size (WxHxD): 1030x137x635mmSet Size (WxHxD) with Stand: 948x200x593 mmSet Size (WxHxD) without Stand: 948x70x554 mmPackage weight : 10kgSet weight with stand: 7.8kgSet weight without stand: 7.67 kg |
* The part specifications of this TV set provided here are for reference only.
Differences may occur as product technology is updated.
Design and specifications are subject to change without notice.
Scart Output description :
1. When current source is ATV, scart output signal is ATV.
2. When current source is AV, scart output signal is AV.
3. When current source is DTV,scart output signal is DTV
4. Other source have no SCART output signal.
55" FULL HD 1080P Digital LED LCD TV
| Television picture quality: | FULL HDIntegrated digital.Screen Size: 139.7cmResolution 1920x1080 pixels 50Hz. |
| DTV Tuner Decoder | DVB-T, DVB-C, DVB-T216/32/64/128/256 QAM modulationMPEG2,MPEG4,H.264 |
| Connectivity: | 3 HDMI sockets1 SCART socket.Component video socket./AV.3 USB port.1 LAN port.1 OPTICAL port.1 Headphone port.Supported Systems:PAL+SECAMStorage channel number: 1000(DTV),100(ATV)TV (RF):75 Ω ImbalanceAV Video-Input:75 Ω ,1V-P,RCAAV Audio-Input:20K Ω , RMS500mVYPbPr/HDMI Video Input:480i, 480p, 576i, 576p, 720p, 1080i, 1080p |
| Sound quality: | NICAM stereo sound system.2 x 10 watts RMS power output. |
| Standby Power consumption | ≤0.50W |
| Digital features: | Digitally interactive.Digital text.Digital video broadcasting (DVB) subtitles available.Auto setup.Auto scan for new channels.Now and next programme guide.7 day electronic programme guide (EPG).Top up TV compatible.CI slot.Audio description compatible. |
| Additional features: | UHF/VHF tuner;Sleep timer;;Picture and textParental GuidanceRemote control batteries required 2 x AAA (included).VESA Mount Size: 400x200 mmPackage Size (WxHxD): 1367x150x850mmSet Size (WxHxD) with Stand: 1242x260x767mmSet Size (WxHxD) without Stand: 1242x62x720mmPackage weight : 19.1kgSet weight with stand: 13.9kgSet weight without stand: 13.4 kg |
* The part specifications of this TV set provided here are for reference only. Differences may occur as product technology is updated. Design and specifications are subject to change without notice.
Scart Output description :
- When current source is ATV, scart output signal is ATV.
- When current source is AV, scart output signal is AV.
- When current source is DTV, scart output signal is DTV
- Other source have no SCART output signal.