
LP810 - Video projector INFOCUS - Free user manual and instructions
Find the device manual for free LP810 INFOCUS in PDF.


| Product Type | Video Projector |
| Brand | InFocus |
| Model | LP810 |
| Display Technology | DLP |
| Resolution | SVGA (800 x 600) |
| Brightness | 1300 ANSI Lumens |
| Contrast Ratio | 1000:1 |
| Lamp Life | Up to 4000 hours (eco mode) |
| Dimensions (W x D x H) | 31.0 x 24.0 x 9.0 cm |
| Weight | 2.3 kg |
| Power Consumption | 250 W (max) |
| Power Supply | AC 100-240V, 50/60 Hz |
| Keystone Correction | Vertical ±10° |
| Zoom Ratio | 1.2x manual |
| Projection Lens | F/2.4 - 2.6, f=28.4 - 34.0 mm |
| Inputs | VGA, S-Video, Composite Video, Audio 3.5mm |
| Outputs | RS-232, USB (service) |
| Noise Level | 35 dB (normal mode) |
| Lamp Type | 150W P-VIP |
| Maintenance | Clean air filter every 100 hours; replace lamp when needed |
| Safety Features | Auto-off after 30 minutes of inactivity; overheating protection |
| Spare Parts | Replacement lamp (SP-LAMP-018), air filter |
| Repairability | Modular design for easy lamp and filter replacement |
| General Information | User manual available for free download at notice-facile.com |
Frequently Asked Questions - LP810 INFOCUS
User questions about LP810 INFOCUS
0 question about this device. Answer the ones you know or ask your own.
Ask a new question about this device
Download the instructions for your Video projector in PDF format for free! Find your manual LP810 - INFOCUS and take your electronic device back in hand. On this page are published all the documents necessary for the use of your device. LP810 by INFOCUS.
USER MANUAL LP810 INFOCUS
natural_image
Line drawing of a projector with lens and control panel (no text or symbols)PRESENTATIONS
WORKING SESSIONS
TRAINING
MULTIMEDIA
■ ANIMATION
VIDEO
TO THE OWNER
Before operating this projector, read this manual thoroughly and operate the projector properly.
This projector provides many convenient features and functions. Operating the projector properly enables you to manage those features and maintains it in better condition for a considerable time.
Improper operation may result in not only shortening the product-life, but also malfunctions, fire hazard, or other accidents.
If your projector seems to operate improperly, read this manual again, check operations and cable connections and try the solutions in the “Trouble-shooting” section of the end of this booklet. If the problem still persists, contact the sales dealer where you purchased the projector or the service center.

SAFETY PRECAUTIONS
WARNING : TO REDUCE THE RISK OF FIRE OR ELECTRIC SHOCK, DO NOT EXPOSE THIS APPLIANCE TO RAIN OR MOISTURE.
- This projector produces intense light from the projection lens. Do not stare directly into the lens as possible. Eye damage could result. Be especially careful that children do not stare directly into the beam.
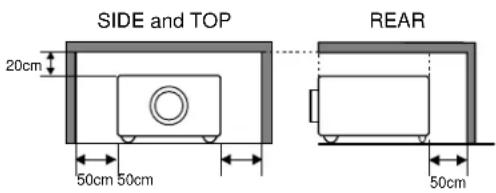
- This projector should be set in the way indicated. If not, it may result in a fire hazard.
- Take appropriate space on the top, sides and rear of the projector cabinet for allowing air circulation and cooling the projector. Minimum distance should be taken. If the projector is to be built into a compartment or similarly enclosed, the minimum distances must be maintained. Do not cover the ventilation slot on the projector. Heat build-up can reduce the service life of your projector, and can also be dangerous.
- Do not put any flammable object or spray can near the projector, hot air is exhausted from the ventilation holes.
- Remote Control Unit, supplied to this projector, emits the laser beam as the laser pointer function from Laser Light Window while pressing LASER button (for 1 minute / LASER POINTER INDICATOR lights red to indicate laser emission). Do not look into Laser Light Window or shine the laser beam on yourself or other people. Eye damage may result.
- If the projector is not to be used for an extended time, unplug the projector from the power outlet.
READ AND KEEP THIS USER'S GUIDE FOR LATER USE.

CAUTION
RISK OF ELECTRIC SHOCK
DO NOT OPEN

CAUTION : TO REDUCE THE RISK OF ELECTRIC SHOCK, DO NOT REMOVE COVER (OR BACK). NO USER-SERVICEABLE PARTS INSIDE EXCEPT LAMP REPLACEMENT. REFER SERVICING TO QUALIFIED SERVICE PERSONNEL.

THIS SYMBOL INDICATES THAT DANGEROUS VOLTAGE CONSTITUTING A RISK OF ELECTRIC SHOCK IS PRESENT WITHIN THIS UNIT.

THIS SYMBOL INDICATES THAT THERE ARE IMPORTANT OPERATING AND MAINTENANCE INSTRUCTIONS IN THE USER'S GUIDE WITH THIS UNIT.
All the safety and operating instructions should be read before the product is operated.
Read all of the instructions given here and retain them for later use. Unplug this projector from AC power supply before cleaning. Do not use liquid or aerosol cleaners. Use a damp cloth for cleaning.
Follow all warnings and instructions marked on the projector.
For added protection to the projector during a lightning storm, or when it is left unattended and unused for long periods of time, unplug it from the wall outlet. This will prevent damage due to lightning and power line surges.
Do not expose this unit to rain or use near water... for example, in a wet basement, near a swimming pool, etc...
Do not use attachments not recommended by the manufacturer as they may cause hazards.
Do not place this projector on an unstable cart, stand, or table. The projector may fall, causing serious injury to a child or adult, and serious damage to the projector. Use only with a cart or stand recommended by the manufacturer, or sold with the projector. Wall or shelf mounting should follow the manufacturer's instructions, and should use a mounting kit approved by the manufacturers.
An appliance and cart combination should be moved with care. Quick stops, excessive force, and uneven surfaces may cause the appliance and cart combination to overturn.

Slots and openings in the back and bottom of the cabinet are provided for ventilation, to insure reliable operation of the equipment and to protect it from overheating.
The openings should never be covered with cloth or other materials, and the bottom opening should not be blocked by placing the projector on a bed, sofa, rug, or other similar surface. This projector should never be placed near or over a radiator or heat register.
This projector should not be placed in a built-in installation such as a book case unless proper ventilation is provided.
Never push objects of any kind into this projector through cabinet slots as they may touch dangerous voltage points or short out parts that could result in a fire or electric shock. Never spill liquid of any kind on the projector.
This projector should be operated only from the type of power source indicated on the marking label. If you are not sure of the type of power supplied, consult your authorized dealer or local power company.
Do not overload wall outlets and extension cords as this can result in fire or electric shock. Do not allow anything to rest on the power cord. Do not locate this projector where the cord may be damaged by persons walking on it.
Do not attempt to service this projector yourself as opening or removing covers may expose you to dangerous voltage or other hazards. Refer all servicing to qualified service personnel.
Unplug this projector from wall outlet and refer servicing to qualified service personnel under the following conditions:
a. When the power cord or plug is damaged or frayed.
b. If liquid has been spilled into the projector.
c. If the projector has been exposed to rain or water.
d. If the projector does not operate normally by following the operating instructions. Adjust only those controls that are covered by the operating instructions as improper adjustment of other controls may result in damage and will often require extensive work by a qualified technician to restore the projector to normal operation.
e. If the projector has been dropped or the cabinet has been damaged.
f. When the projector exhibits a distinct change in performance—this indicates a need for service.
When replacement parts are required, be sure the service technician has used replacement parts specified by the manufacturer that have the same characteristics as the original part. Unauthorized substitutions may result in fire, electric shock, or injury to persons.
Upon completion of any service or repairs to this projector, ask the service technician to perform routine safety checks to determine that the projector is in safe operating condition.
Federal Communication Commission Notice
This equipment has been tested and found to comply with the limits for a Class A digital device, pursuant to Part 15 of FCC Rules. These limits are designed to provide reasonable protection against harmful interference when the equipment is operated in a commercial environment. This equipment generates, uses, and can radiate radio frequency energy and, if not installed and used in accordance with the instruction manual, may cause harmful interference to radio communications. Operation of this equipment in a residential area is likely to cause harmful interference in which case the user will be required to correct the interference at his own expense.
Do not make any changes or modifications to the equipment unless otherwise specified in the instructions. If such changes or modifications should be made, you could be required to stop operation of the equipment.
CAUTION!
This is a Class A equipment. This equipment can cause interference in residential areas; in this case, the operator can be asked to take adequate countermeasures.
AC POWER CORD REQUIREMENT
The AC Power Cord supplied with this projector meets the requirement for use in the country you purchased it.
AC Power Cord for the United States and Canada :
AC Power Cord used in the United States and Canada is listed by the Underwriters Laboratories (UL) and certified by the Canadian Standard Association (CSA). AC Power Cord has a grounding-type AC line plug. This is a safety feature to be sure that the plug will fit into the power outlet. Do not try to defeat this safety feature. Should you be unable to insert the plug into the outlet, contact your electrician.
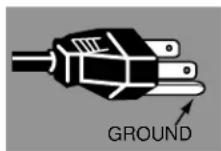
THE SOCKET-OUTLET SHOULD BE INSTALLED NEAR THE EQUIPMENT AND EASILY ACCESSIBLE.
FEATURES AND DESIGN 6
PREPARATION 7
NAME OF EACH PART OF PROJECTOR 7
SETTING-UP PROJECTOR 8
CONNECTING AC POWER CORD 8
POSITIONING PROJECTOR 9
ADJUSTABLE FEET 10
MOVING PROJECTOR 10
CONNECTING PROJECTOR 11
TERMINALS OF PROJECTOR 11
CONNECTING TO COMPUTER 12
CONNECTING TO VIDEO EQUIPMENT 13
BEFORE OPERATION 14
LENS SHIFT ADJUSTMENT 20
KEYSTONE ADJUSTMENT 20
PICTURE FREEZE FUNCTION 21
BLANK FUNCTION 21
P-TIMER FUNCTION 21
SOUND ADJUSTMENT 21
COMPUTER MODE 22
SELECTING INPUT SOURCE 22
SELECTING COMPUTER SYSTEM 22
PC ADJUSTMENT 23
AUTO PC ADJUSTMENT 23
MANUAL PC ADJUSTMENT 24
COMPATIBLE COMPUTER SPECIFICATIONS 26
PICTURE IMAGE ADJUSTMENT 27
IMAGE LEVEL SELECT 27
IMAGE LEVEL ADJUSTMENT 28
PICTURE SCREEN ADJUSTMENT 29
VIDEO MODE 30
SELECTING INPUT SOURCE 30
SELECTING VIDEO SYSTEM 31
PICTURE IMAGE ADJUSTMENT 32
IMAGE LEVEL SELECT 32
IMAGE LEVEL ADJUSTMENT 33
PICTURE SCREEN ADJUSTMENT 34
SETTING 35
SETTING MENU 35
APPENDIX 37
WARNING TEMP. INDICATOR 38
AIR FILTER CARE AND CLEANING 38
CLEANING PROJECTION LENS 38
LAMP REPLACEMENT 39
LAMP REPLACE COUNTER 39
TROUBLESHOOTING 40
TECHNICAL SPECIFICATIONS 42
TRADEMARKS
- Apple, Macintosh, and PowerBook are trademarks or registered trademarks of Apple Computer, Inc.
- IBM and PS/2 are trademarks or registered trademarks of International Business Machines, Inc.
- Windows and PowerPoint are registered trademarks of Microsoft Corporation.
- Proxima and InFocus are trademarks or registered trademarks of InFocus Corporation.
- Each name of corporations or products in the user's guide is a trademark or a registered trademark of its respective corporation.
This Multimedia Projector is designed with most advanced technology for portability, durability, and ease of use. This projector utilizes built-in multimedia features, a palette of 16.77 million colors, and matrix liquid crystal display (LCD) technology.
◆ Compact Design
This projector is extremely compact in size and weight. It is designed to carry and work anywhere you wish to use.
◆ Compatibility
This projector widely accepts various video and computer input signals including;
- Computers
IBM-compatible or Macintosh computer up to 1280 x 1024 resolution. - 6 Color Systems
NTSC, PAL, SECAM, NTSC 4.43, PAL-M or PAL-N color system can be connected. - Component Video
Component video signal, such as a DVD player output high definition TV signals including 480i, 480p, 575i, 575p, 720p, 1035i or 1080i, can be connected. - S-Video
S-Video signal, such as a S-VHS VCR output signal, can be connected.
◆ High Resolution Image
This projector provides 1024 x 768 dots resolution for computer input and 800 horizontal TV lines. Resolution from a computer between XGA (1024 x 768) and SXGA (1280 x 1024) is compressed into 1024 x 768 dots. This projector cannot display image of over 1280 x 1024 dots. When resolution of your computer is over than 1280 x 1024, reset a computer output for lower resolution.
◆ Multi-Scan System
This projector has Multi-Scan System to conform to almost all computer output signals quickly. There is no need for troublesome manual adjustment of frequency and other settings.
◆ One-Touch Auto PC Adjustment
Incoming computer video signals are recognized and best adjustment is automatically set by Auto PC Adjustment. No complicated setup is necessary and projection is always precise.
◆ Motor-driven Lens Shift
Projection lens can be moved up and down with motor-driven lens shift function. This function makes it easy to provide projected image where you want.
Zoom and focus can be also adjusted with motor-driven operation.
◆ Digital Zoom (for Computer)
Digital Zoom function adjusts image size to approx. 1/4 \~ 49 times of original image size, allowing you to focus on crucial information at a presentation.
♦ Keystone Correction
Positioning of a projector may result in distorted image being displayed in a trapezoid shape. Keystone Correction solves this problem by digitally altering projection to produce undistorted images.
Power Management
Power Management function is provided to reduce power consumption while a projector is not in use. This Power Management function operates to turn Projection Lamp off when a projector detects signal interruption and any button is not pressed over 5 minutes. Projection Lamp is automatically turned on again when a projector detects signal or any operation button is pressed. This projector is shipped with this function ON.
◆ Digital Visual Interface
This projector is equipped with DVI 24-pin terminal for connecting DVI output from a computer.
♦ Laser Pointer Function
Remote Control Unit supplied with this projector includes Laser Pointer function. This function helps you to make a smart presentation on a projected screen.
◆ Wireless Mouse
Remote Control Unit supplied with this projector has Wireless Mouse function for a connected computer. This function enables you to operate both projector and computer with Remote Control Unit only.
◆ Multilanguage Menu Display
Operation menu is displayed in; English, German, French, Italian, Spanish, Portuguese, Dutch, Swedish, Chinese, Korean or Japanese.
NAME OF EACH PART OF PROJECTOR
FRONT OF CABINET
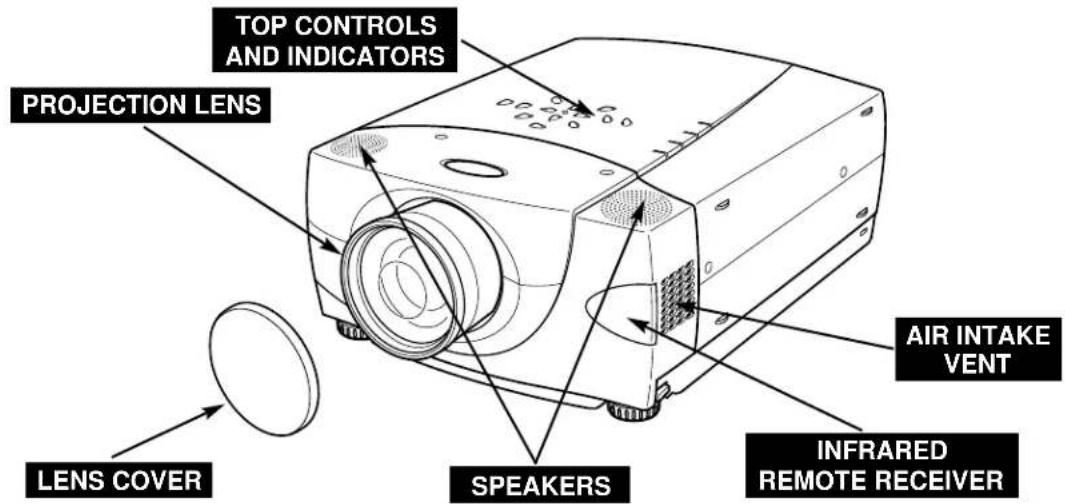
BACK OF CABINET
EXHAUST VENT

HOT AIR EXHAUSTED!
Air blown from exhaust vent is hot. When using or installing a projector, following precautions should be taken.
- Do not put a flammable object near this vent.
- Keep rear grills at least 3'(1 m) away from any object, especially heat-sensitive object.
- Do not touch this area, especially screws and metallic parts. This area will become hot while a projector is used.
This projector detects internal temperature and automatically controls operating power of Cooling Fans.
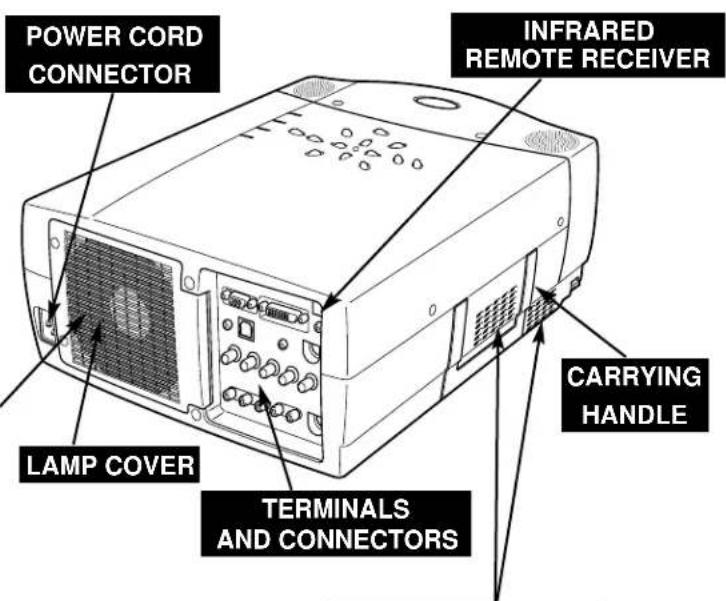
BOTTOM OF CABINET
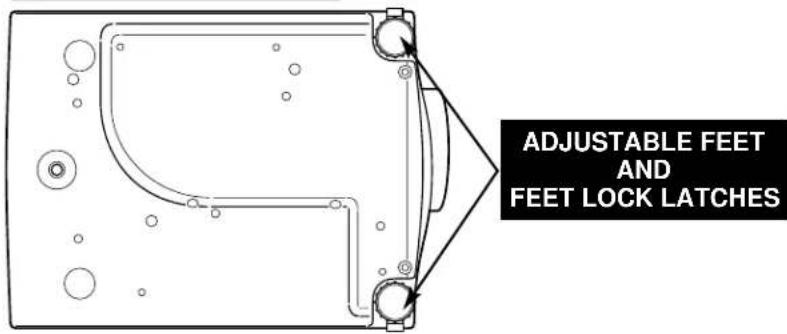
AIR INTAKE VENTS
This projector is equipped with cooling fans for protection from overheating. Pay attention to following to ensure proper ventilation and avoid a possible risk of fire and malfunction.
- Do not cover vent slots.
- Keep side clear of any objects. Obstructions may block cooling air.
SETTING-UP PROJECTOR
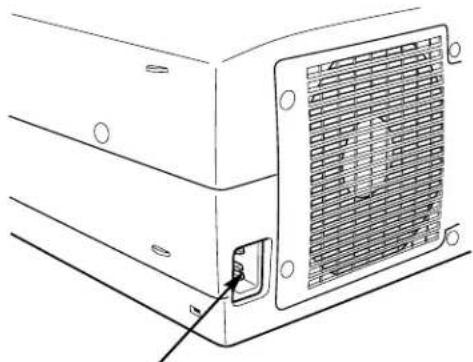
CONNECTING AC POWER CORD
This projector uses nominal input voltages of 100-120 V or 200-240 V AC. This projector automatically selects correct input voltage. It is designed to work with single-phase power systems having a grounded neutral conductor. To reduce risk of electrical shock, do not plug into any other type of power system.
Consult your authorized dealer or service station if you are not sure of type of power supply being in use.
Connect a projector with a peripheral equipment before turning a projector on. (Refer to pages 11 \~ 13 for connection.)

CAUTION
For safety, unplug AC Power Cord when an appliance is not used.
When this projector is connected to outlet with AC Power Cord, an appliance is in Stand-by Mode and consumes a little electric power.
natural_image
Technical line drawing of a mechanical component with a grating and mounting bracket (no text or symbols)Connect AC Power Cord (supplied) to a projector. AC outlet must be near this equipment and must be easily accessible.
| NOTE ON POWER CORDAC Power Cord must meet requirement of country where you use a projector.Confirm AC plug type with chart below and proper AC power cord must be used.If supplied AC Power Cord does not match AC outlet, contact your sales dealer. | ||
| Projector side | AC Outlet side | |
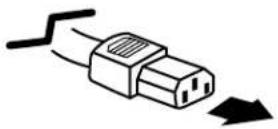 To POWER CORD CONNECTOR on a projector. To POWER CORD CONNECTOR on a projector. | For U.S.A. and Canada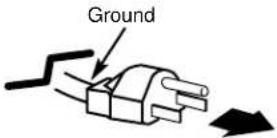 To AC Outlet.(120 V AC) To AC Outlet.(120 V AC) | For Continental Europe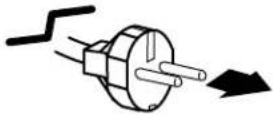 To AC Outlet.(200 - 240 V AC) To AC Outlet.(200 - 240 V AC) |
POSITIONING PROJECTOR
- This projector is designed to project on a flat projection surface.
- Projector can be focused from 4.6' (1.4m) \~ 48.3' (14.7m).
- Refer to figure below to adjust screen size.
ROOM LIGHT
Brightness in room has a great influence on picture quality. It is recommended to limit ambient lighting in order to provide best image.
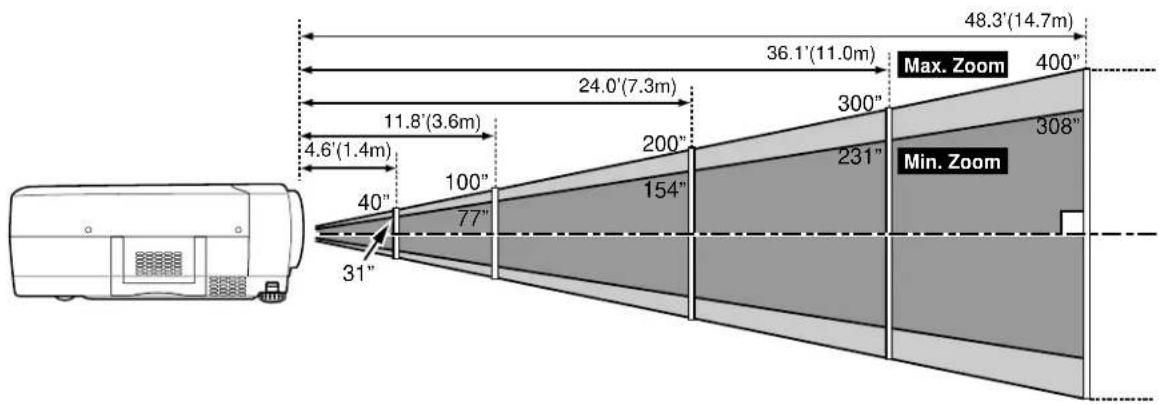
| Screen Size | Max. Zoom | 40" | 100" | 150" | 200" | 250" | 300" | 400" |
| Min. Zoom | 31" | 77" | 115" | 154" | 192" | 231" | 308" | |
| Distance | 4.6' (1.4m) | 11.8' (3.6m) | 17.7' (5.4m) | 24.0' (7.3m) | 30.2' (9.2m) | 36.1' (11.0m) | 48.3' (14.7m) | |
LENS SHIFT ADJUSTMENT
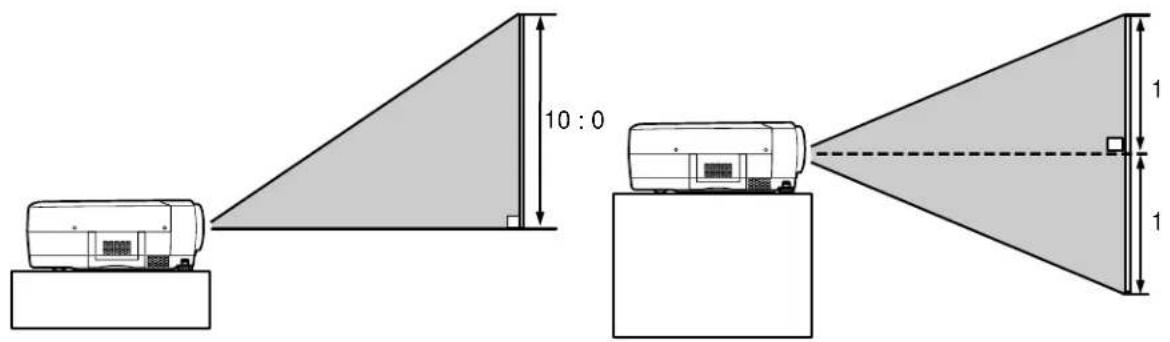
Projection lens can be moved up and down with motor-driven lens shift function. This function makes it easy to provide projected image where you want. U/D ratio can be adjusted 10:0 \~ 1:1 (refer to figure below.). Refer to P 20 for operation.
Highest (10:0) Lowlet (1:1)
ADJUSTABLE FEET
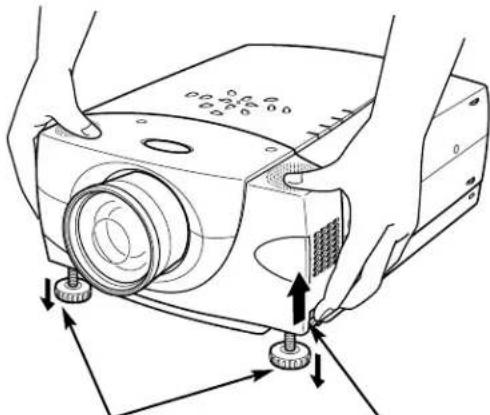
Picture tilt and projection angle can be adjusted by rotating ADJUSTABLE FEET. Projection angle can be adjusted to 10.5 degrees.
1 Lift front of a projector and pull FEET LOCK LATCHES on both sides of a projector.
2 Release FEET LOCK LATCHES to lock ADJUSTABLE FEET and rotate ADJUSTABLE FEET to fine tune position and tilt.
3 To shorten ADJUSTABLE FEET, lift front of a projector and pull and undo FEET LOCK LATCHES.
Position and keystone distortion of image can be adjusted using Menu Operation. (Refer to P 20 and 35.)
natural_image
Line drawing of a projector with hands adjusting its base and buttons, showing mechanical components (no text or symbols)ADJUSTABLE FEET FEET LOCK LATCHES
MOVING PROJECTOR
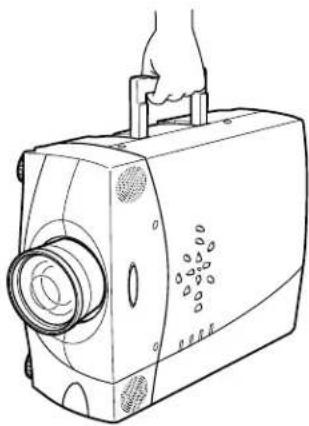
Use Carry Handle when moving a Projector.
When moving a projector, replace lens cover and retract feet to prevent damage to lens and cabinet.
When this projector is not in use for an extended period, put it into case (dust cover) supplied with this projector.

NOTE
THIS PROJECTOR SHOULD BE SET IN THE WAY INDICATED. PROJECTION LAMP MAY MALFUNCTION.
natural_image
Line drawing of a vintage camera with handle and ventilation slots (no text or symbols)
CAUTION IN CARRYING OR TRANSPORTING A PROJECTOR
- Do not drop or bump a projector, otherwise damages or malfunctions may result.
- When carrying a projector, use a suitable carrying case.
- Do not transport a projector by using a courier or transport service in an unsuitable transport case. This may cause damage to a projector. To transport a projector through a courier or transport service, consult your dealer for best way.
TERMINALS OF PROJECTOR
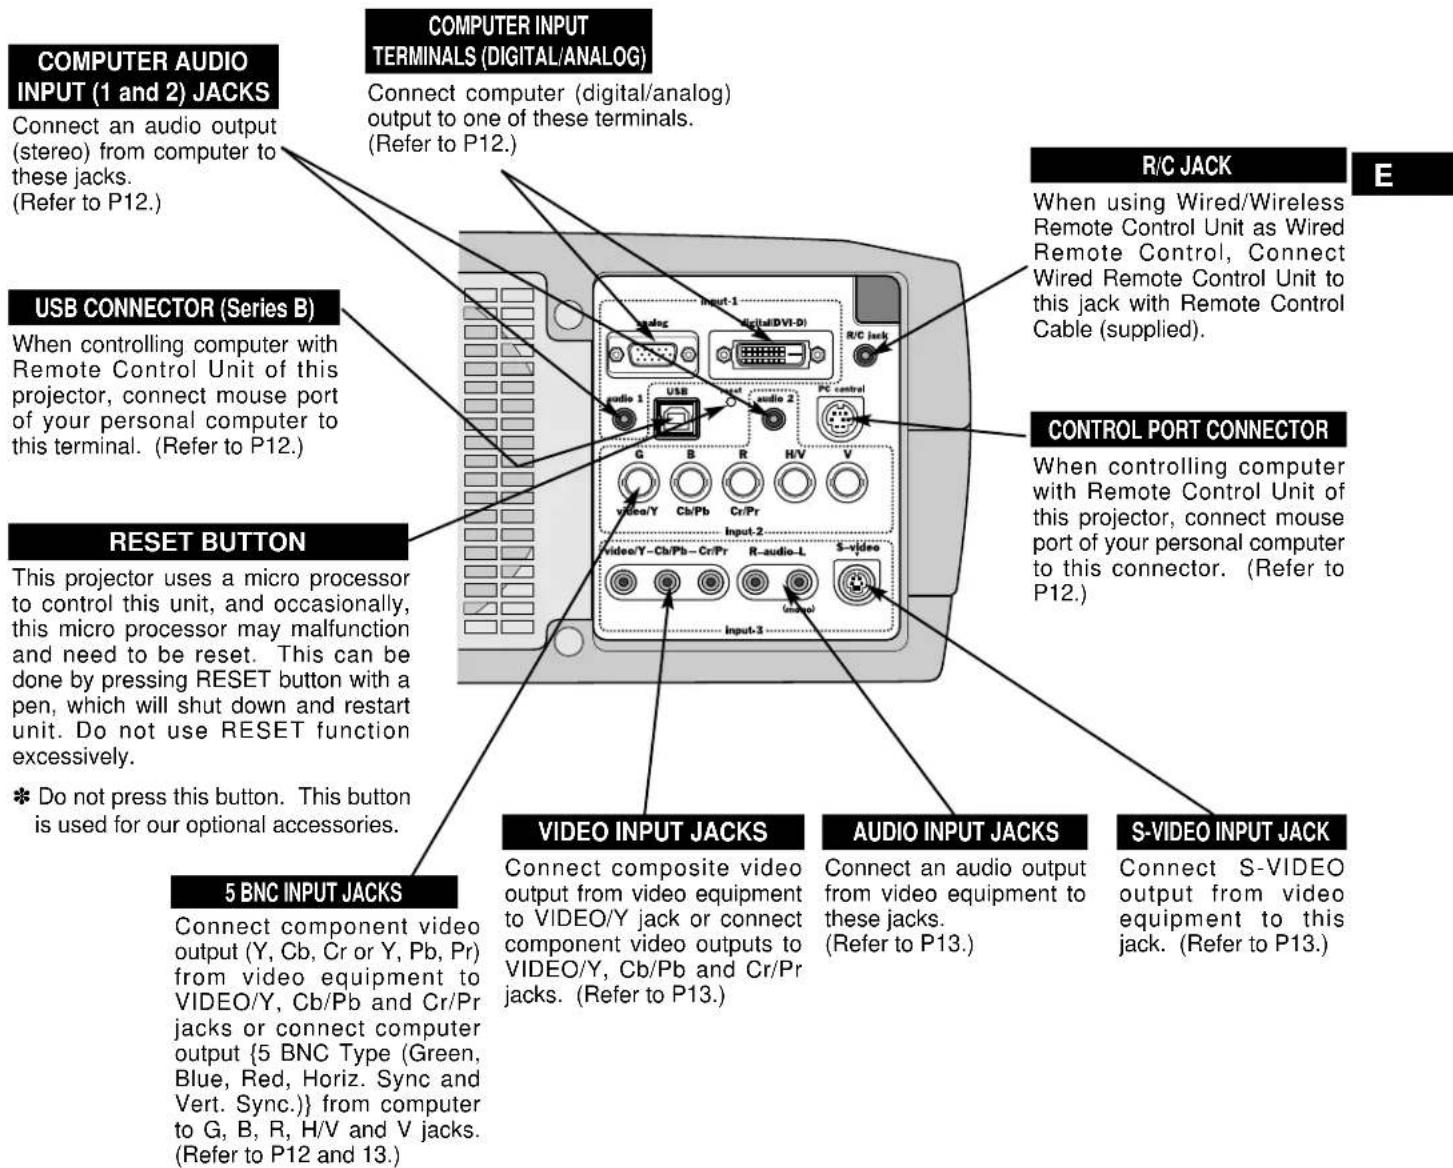
This projector has input and output terminals on its back for connecting computers and video equipment. Refer to figures on pages 11 to 13 and connect properly.
CONNECTING TO COMPUTER
Cables used for connection (* = Cable or adapter is not supplied with this projector.)
• VGA Cable (HDB 15 pin)
• DVI-Digital Cable (for Single Link T.M.D.S.) *
• BNC Cable *
• Control Cable for PS/2 Port, Serial Port or ADB Port
- USB Cable *
• MAC Adapter (When connecting to Macintosh computer)
• Audio Cables (RCA x 2 and Mini Plug (stereo) x 1) *
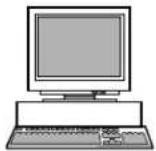
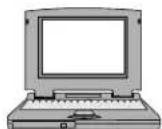
IBM-compatible computer or Macintosh computer (VGA / SVGA / XGA / SXGA)
Desktop type
Laptop type
Audio Output
Serial port
Monitor Output
Monitor Output
USB port
PS/2 port
ADB port
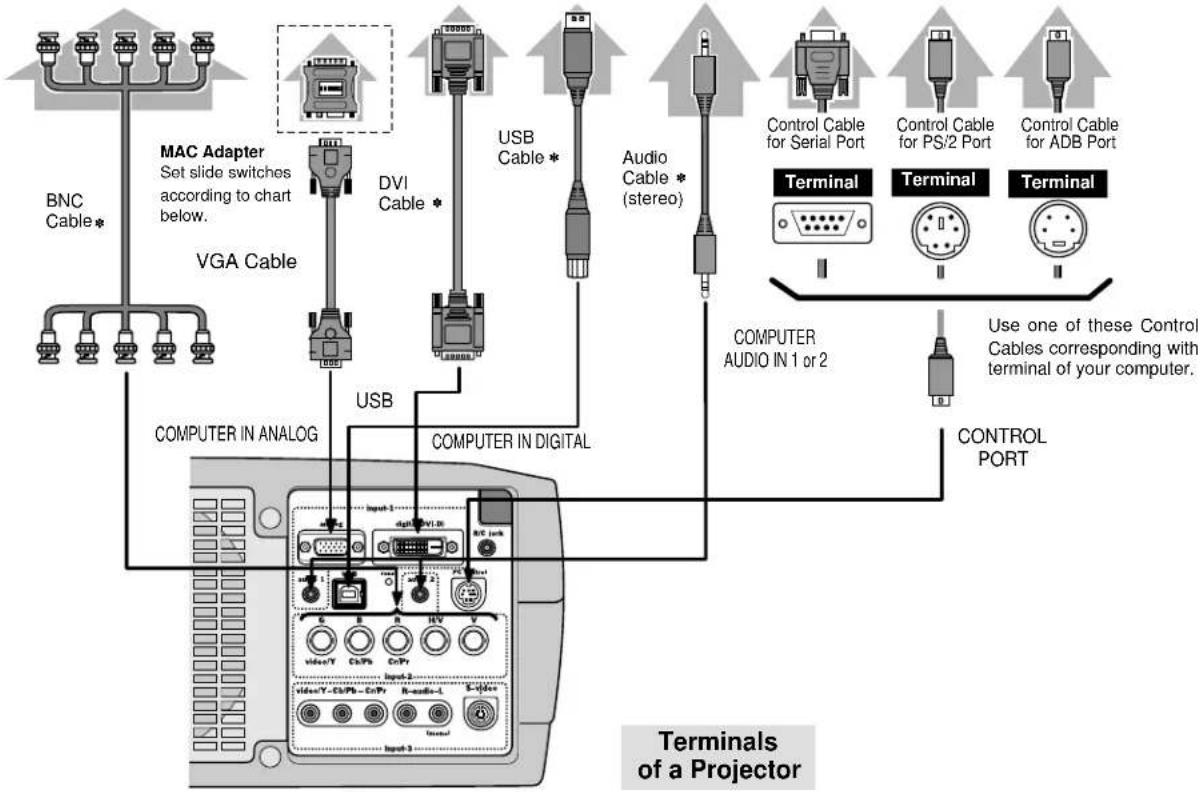
flowchart
graph TD
    A["BNC Cable"] --> B["MAC Adapter"]
    B --> C["VGA Cable"]
    C --> D["Computer IN ANALOG"]
    D --> E["Computer in DIGITAL"]
    E --> F["USB Cable *"]
    F --> G["USB Cable * (stereo)"]
    G --> H["Control Cable for Serial Port"]
    H --> I["Terminal"]
    I --> J["Control Cable for PS/2 Port"]
    J --> K["Terminal"]
    K --> L["Control Cable for ADB Port"]
    L --> M["COMPUTER AUDIO IN 1 or 2"]
    M --> N["CONTROL PORT"]
    N --> O["Use one of these Control Cables corresponding with terminal of your computer."]
    E --> P["Input 1: dV10, V1L0, RGB, HN, Video/Y, Cs/Pb, CrPr, R audio-L, S video"]
    style A fill:#f9f,stroke:#333
    style B fill:#ccf,stroke:#333
    style C fill:#cfc,stroke:#333
    style D fill:#fcc,stroke:#333
    style E fill:#cff,stroke:#333
    style F fill:#ffc,stroke:#333
    style G fill:#cfc,stroke:#333
    style H fill:#fcc,stroke:#333
    style I fill:#ffc,stroke:#333
    style J fill:#cfc,stroke:#333
    style K fill:#cfc,stroke:#333
    style L fill:#cfc,stroke:#333
    style M fill:#fcc,stroke:#333
    style N fill:#cfc,stroke:#333
    style O fill:#fcc,stroke:#333
    style P fill:#ffc,stroke:#333
    style Q fill:#cfc,stroke:#333
    style R fill:#fcc,stroke:#333
◆ MAC ADAPTER
Set switches as shown in table below depending on RESOLUTION MODE that you want to use before you turn on projector and computer.
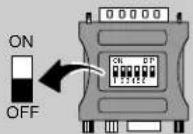
| 1 | 2 | 3 | 4 | 5 | 6 | |
| 13" MODE (640 x 480) | OFF | OFF | OFF | OFF | ||
| 16" MODE (832 x 624) | ON | OFF | OFF | OFF | OFF | |
| 19" MODE (1024 x 768) | OFF | OFF | ON | OFF | ||
| 21" MODE (1152 x 870) | ON | ON | ON | ON | OFF | OFF |

NOTE :
When connecting cable, power cords of both a projector and external equipment should be disconnected from AC outlet. Turn a projector and peripheral equipment on before computer is switched on.
CONNECTING TO VIDEO EQUIPMENT
Cables used for connection (\* = Cable is not supplied with this projector.)
• Video Cable (RCA x 1 or RCA x 3) *
• BNC Cable *
• S-VIDEO Cable *
• Audio Cable (RCA x 2) *
Video Source (example)
Video Cassette Recorder Video Disc Player
Component video output equipment. (such as DVD player or high-definition TV source.)
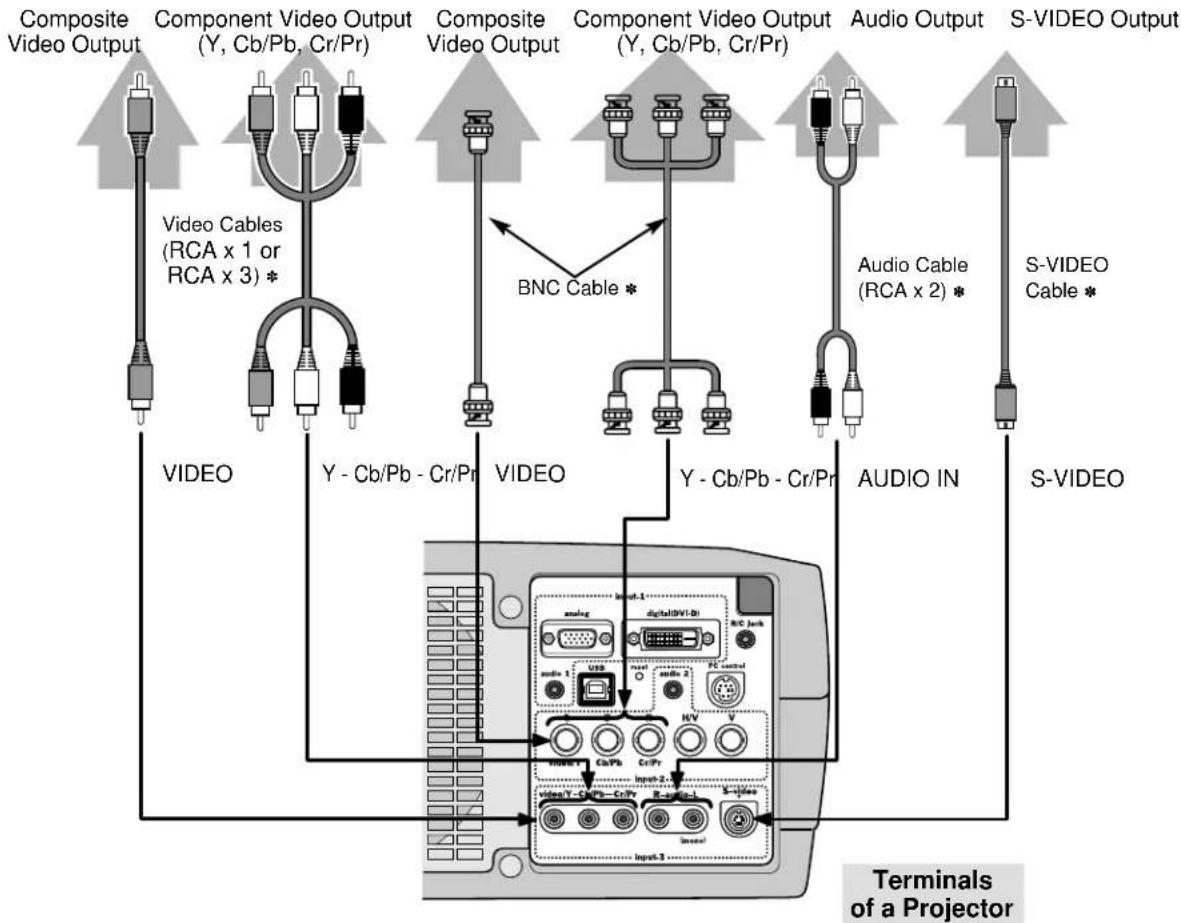
flowchart
graph TD
    A["Composite Video Output"] --> B["Video Cables (RCA x 1 or RCA x 3) *"]
    C["Component Video Output"] --> D["Y - Cb/Pb - Cr/Pr"]
    E["Composite Video Output"] --> F["VIDEO"]
    G["Component Video Output"] --> H["Y - Cb/Pb - Cr/Pr"]
    I["Audio Output"] --> J["Audio Cable (RCA x 2) *"]
    K["S-VIDEO Output"] --> L["S-VIDEO Cable *"]
    M["VIDEO"] --> N["Microcontroller with Audio IN"]
    O["Video"] --> P["Microcontroller with Audio IN"]
    Q["Audio"] --> R["Microcontroller with Audio IN"]
    S["Video"] --> T["Microcontroller with Audio IN"]
    U["Audio IN"] --> V["Microcontroller with Audio IN"]
    W["Microcontroller with Audio IN"] --> X["Microcontroller with Audio IN"]
    Y["Microcontroller with Audio IN"] --> Z["Microcontroller with Audio IN"]
    AA["Microcontroller with Audio IN"] --> AB["Microcontroller with Audio IN"]
    AC["Microcontroller with Audio IN"] --> AD["Microcontroller with Audio IN"]
    AE["Microcontroller with Audio IN"] --> AF["Microcontroller with Audio IN"]
    AG["Microcontroller with Audio IN"] --> AH["Microcontroller with Audio IN"]
    AI["Microcontroller with Audio IN"] --> AJ["Microcontroller with Audio IN"]
    AK["Microcontroller with Audio IN"] --> AL["Microcontroller with Audio IN"]
    AM["Microcontroller with Audio IN"] --> AN["Microcontroller with Audio IN"]
    AO["Microcontroller with Audio IN"] --> AP["Microcontroller with Audio IN"]
    AQ["Microcontroller with Audio IN"] --> AR["Microcontroller with Audio IN"]
    AS["Microcontroller with Audio IN"] --> AT["Microcontroller with Audio IN"]
    AU["Microcontroller with Audio IN"] --> AV["Microcontroller with Audio IN"]
    AW["Microcontroller with Audio IN"] --> AX["Microcontroller with Audio IN"]
    AY["Audio Cable"] --> AZ["BNC Cable *"]
    BA["S-VIDEO Cable"] --> BB["Audio Cable (RCA x 2) *"]

NOTE :
When connecting cable, power cords of both a projector and external equipment should be disconnected from AC outlet.
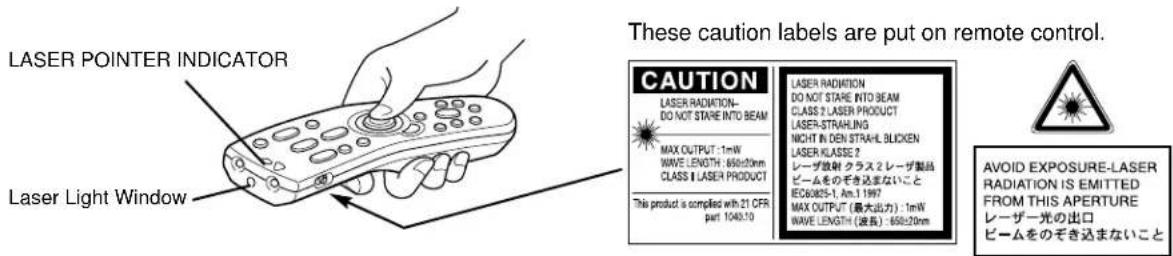
LASER POINTER FUNCTION
This Remote Control Unit emits a laser beam as laser pointer function from Laser Light Window. When LASER button is pressed, laser light goes on. And when LASER button is being pressed for more than 1 minute or LASER button is released, light goes off. LASER POINTER INDICATOR lights RED and Laser is emitted with RED light to indicate laser beam is being emitted.
Laser emitted is a class II laser; therefore, do not look into Laser Light Window or shine laser beam on yourself or other people. Three marks bellow are caution labels for laser beam.
CAUTION : Use of controls, adjustments or performance of procedures other than those specified herein may result hazardous radiation exposure.
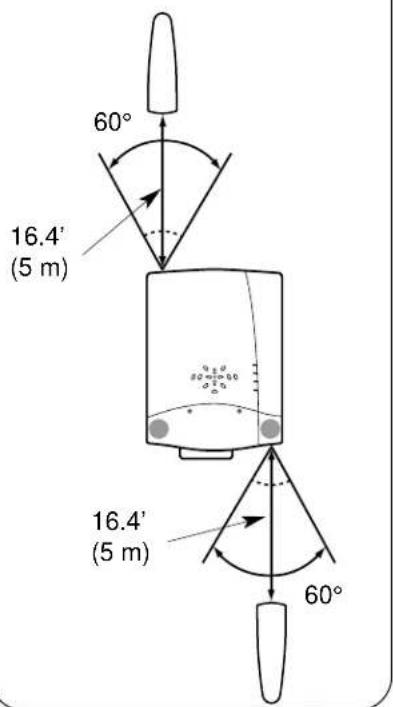
Operating Range
Point Remote Control Unit toward projector (Receiver Window) whenever pressing any button. Maximum operating range for Remote Control Unit is about 16.4' (5m) and 60° in front and rear of a projector.
Remote Control Batteries Installation

Remove battery compartment lid.
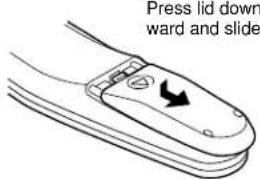

Slide batteries into compartment.
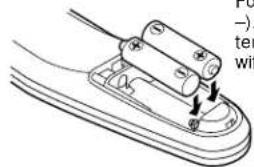

Replace compartment lid.
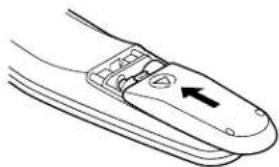
natural_image
Line drawing of a mechanical component with an arrow indicating direction (no text or symbols)
To insure safe operation, please observe following precautions :
- Use (2) AA, UM3 or R06 type alkaline batteries.
- Replace two batteries at same time.
- Do not use a new battery with an used battery.
- Avoid contact with water or liquid.
- Do not expose Remote Control Unit to moisture, or heat.
- Do not drop Remote Control Unit.
- If a battery has leaked on Remote Control Unit, carefully wipe case clean and install new batteries.
- Danger of explosion if battery is incorrectly replaced.
- Dispose of used batteries according to batteries manufacturers instructions and local rules.
TOP CONTROLS AND INDICATORS
This projector has CONTROL BUTTONS (TOP CONTROLS) and INDICATORS on its top.
ZOOM BUTTON
Used to adjust zoom. (P20)
FOCUS BUTTON
Used to adjust focus. (P20)
MENU BUTTON
Used to open or close MENU operation. (P17, 18)
POWER ON-OFF BUTTON
Used to turn a projector on or off. (P19)
LAMP INDICATOR
Becomes dim when a projector is turned on. And bright when a projector is in stand-by mode.
READY INDICATOR
Lights green when a projector is ready to be turned on. And it flashes green in Power Management mode. (P36)
WARNING TEMP. INDICATOR
Flashes red when internal projector temperature is too high. (P38)
LAMP REPLACE INDICATOR
Turns to yellow when life of projection lamp draws to an end. (P39)
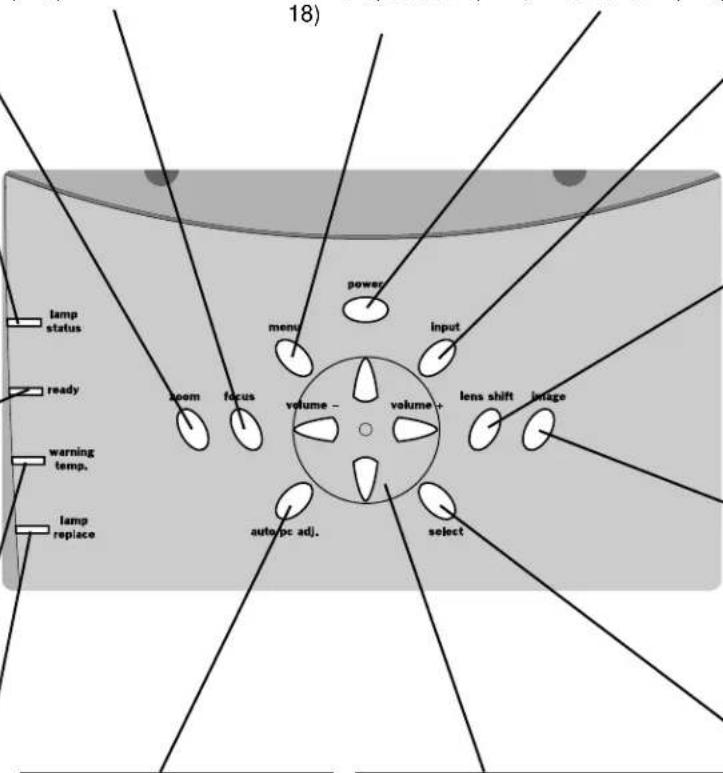
AUTO PC ADJ. BUTTON
Used to operate AUTO PC Adjustment function. (P23)
POINT (VOLUME + / - ) BUTTONS
Used to select an item or adjust value in ON-SCREEN MENU. They are also used to pan image in DIGITAL ZOOM +/- mode. (P29) POINT LEFT/RIGHT buttons are also used as VOLUME +/- buttons.
INPUT BUTTON
Used to select input source. (P22, 30)
LENS SHIFT BUTTON
Used to select LENS SHIFT function. (P20)
IMAGE BUTTON
Used to select image level. (P27, 32)
SELECT BUTTON
Used to execute item selected. It is also used to expand / compress image in DIGITAL ZOOM mode. (P29)
You can control and adjust this projector through ON-SCREEN MENU. Refer to following pages to operate each adjustment on ON-SCREEN MENU.
1 DISPLAY MENU
Press MENU button to display ON-SCREEN MENU.
2 MOVING POINTER
Move pointer (* see below) or adjust value of item by pressing POINT button(s) on Top Control or on Remote Control Unit.
* Pointer is icon on ON-SCREEN MENU to select item. See figures on section "FLOW OF ON-SCREEN MENU OPERATION" below.
3 SELECT ITEM
Select item or set selected function by pressing SELECT button.
WIRELESS REMOTE CONTROL
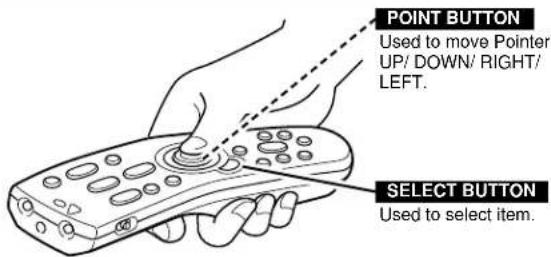
TOP CONTROL
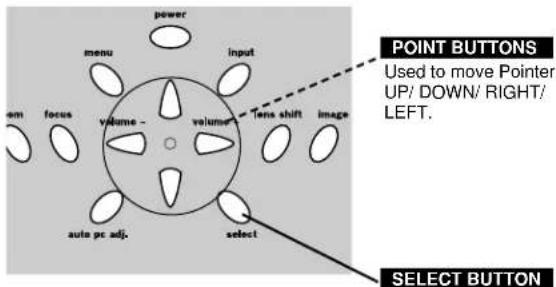
Used to move Pointer UP/ DOWN/ RIGHT/ LEFT.
Used to select item.
Select Menu to be adjusted
2 Move POINTER (red frame) to MENU ICON that you want to select by pressing POINT RIGHT / LEFT buttons.
Control or adjust item through ON-SCREEN MENU
3 Press POINT DOWN button and move POINTER (red frame or red arrow) to ITEM that you want to adjust, and then press SELECT button to show ITEM DATA.
4 Adjust ITEM DATA by pressing POINT RIGHT / LEFT buttons.
Refer to following pages for details of respective adjustments.
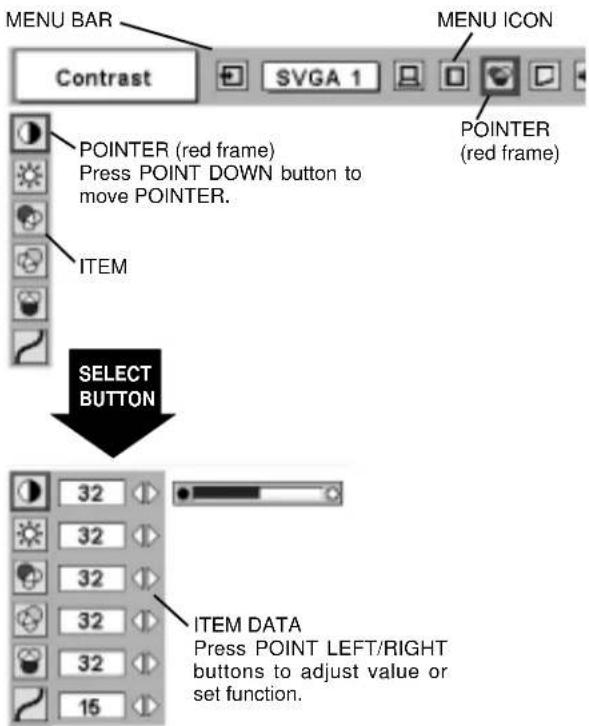
MENU BAR
FOR PC SOURCE
Press MENU BUTTON while connecting to PC input source.
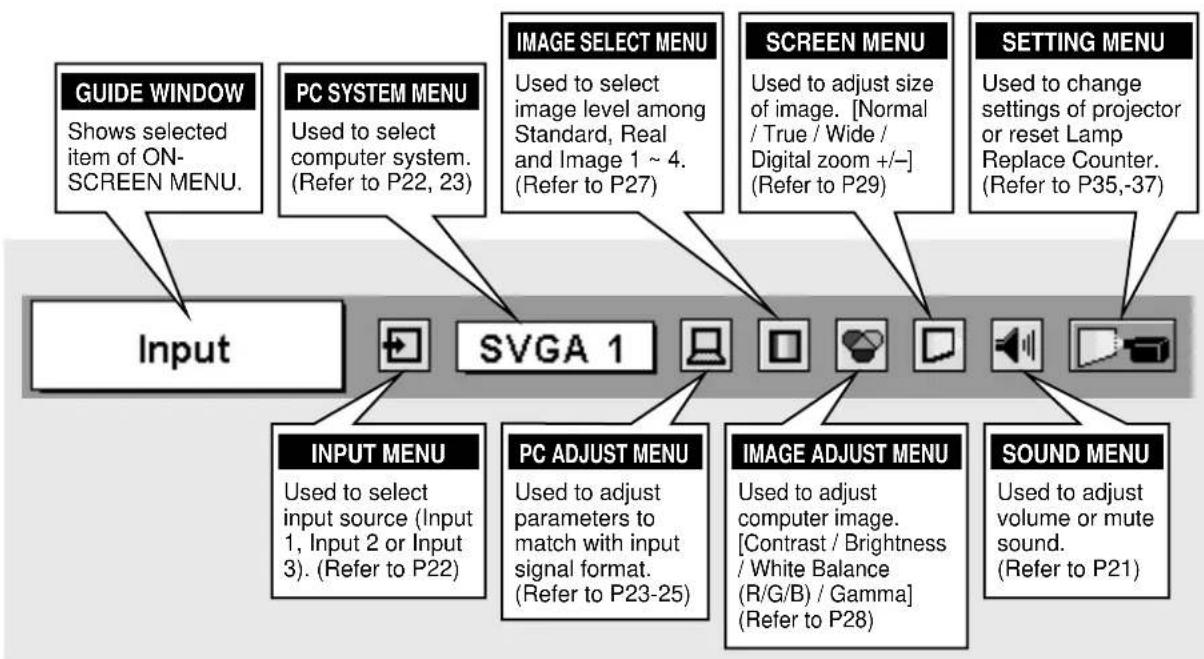
flowchart
graph TD
    A["Input"] --> B["GUIDE WINDOW"]
    A --> C["PC SYSTEM MENU"]
    A --> D["IMAGE SELECT MENU"]
    A --> E["SCREEN MENU"]
    A --> F["SETTING MENU"]
    A --> G["INPUT MENU"]
    A --> H["PC ADJUST MENU"]
    A --> I["IMAGE ADJUST MENU"]
    A --> J["SOUND MENU"]
    B --> K["Shows selected item of ON-SCREEN MENU."]
    C --> L["Used to select computer system. (Refer to P22, 23)"]
    D --> M["Used to select image level among Standard, Real and Image 1 ~ 4. (Refer to P27)"]
    E --> N["Used to adjust size of image. [Normal / True / Wide / Digital zoom +/-"] (Refer to P29)]
    F --> O["Used to change settings of projector or reset Lamp Replace Counter. (Refer to P35,-37)"]
    G --> P["Used to select input source (Input 1, Input 2 or Input 3). (Refer to P22)"]
    H --> Q["Used to adjust parameters to match with input signal format. (Refer to P23-25)"]
    I --> R["Used to adjust computer image. [Contrast / Brightness / White Balance (R/G/B) / Gamma"] (Refer to P28)]
    J --> S["Used to adjust volume or mute sound. (Refer to P21)"]
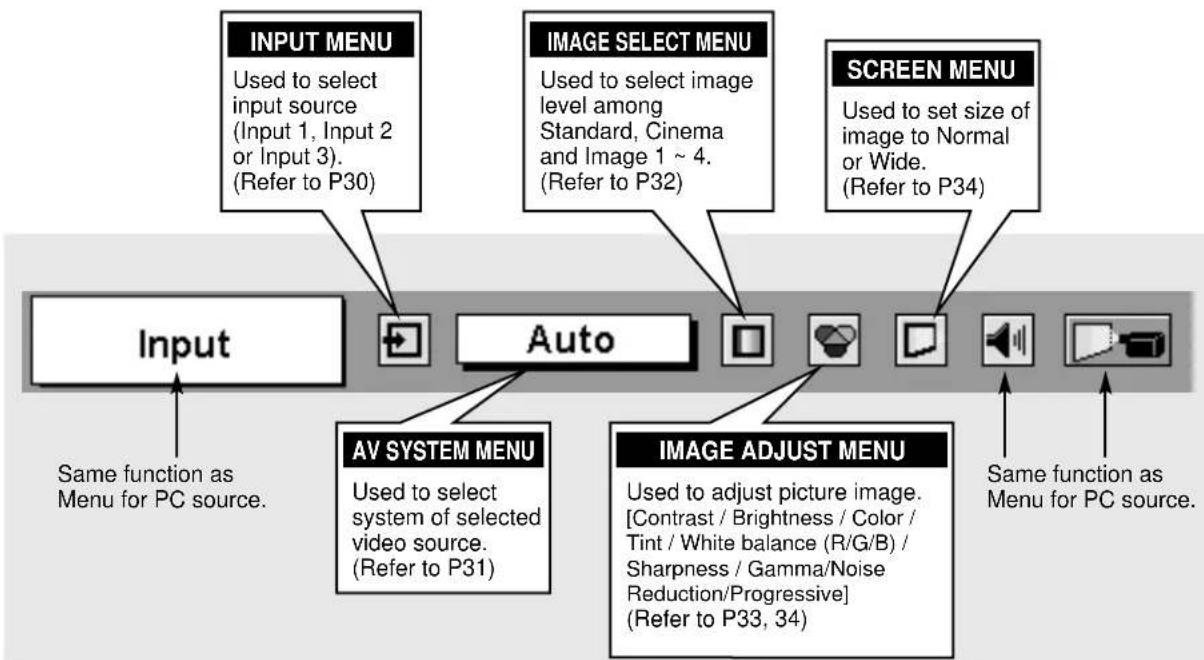
FOR VIDEO SOURCE
Press MENU BUTTON while connecting to VIDEO input source.
flowchart
graph TD
    A["Input"] --> B["AV SYSTEM MENU"]
    A --> C["Image ADJUST MENU"]
    B --> D["Input menu: Used to select input source (Input 1, Input 2 or Input 3). (Refer to P30)"]
    C --> E["Image Select Menu: Used to select image level among Standard, Cinema and Image 1 ~ 4. (Refer to P32)"]
    C --> F["Screen Menu: Used to set size of image to Normal or Wide. (Refer to P34)"]
    D --> G["Input function: Same function as Menu for PC source."]
    E --> H["Image adjust menu: Used to adjust picture image. [Contrast / Brightness / Color / Tint / White balance (R/G/B) / Sharpness / Gamma/Noise Reduction/Progressive"] (Refer to P33, 34)]
    F --> I["Screen menu: Same function as Menu for PC source."]
TURNING ON / OFF PROJECTOR
TURNING ON PROJECTOR
1 Complete peripheral connections (with Computer, VCR, etc.) before turning on projector. (Refer to "CONNECTING TO PROJECTOR" on pages 11\~13 for connecting that equipment.)
2 Connect a projector's AC Power Cord into an AC outlet. LAMP Indicator lights RED, and READY Indicator lights GREEN.
NOTE : When "On start" function is ON, this projector is turned on automatically by connecting AC Power Cord to an AC outlet. (Refer to pages 35, 36.)
3 Press POWER ON-OFF button on Top Control or on Remote Control Unit to ON. LAMP Indicator dims, and Cooling Fans start to operate. Preparation Display appears on a screen and count-down starts. Signal from PC or Video source appears after 30 seconds.
Current Input position and Lamp mode status are also displayed on screen for 5 seconds. (Refer to "LAMP MODE" on page 36.)
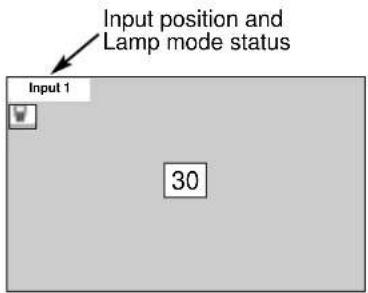
Preparation Display disappears after 30 seconds.
E
TURNING OFF PROJECTOR
1 Press POWER ON-OFF button on Top Control or on Remote Control Unit, and a message "Power off?" appears on a screen.
2 Press POWER ON-OFF button again to turn off projector. LAMP Indicator lights bright and READY Indicator turns off. After projector is turned off, Cooling Fans operate (for 90 seconds). During this "Cooling Down" period, this appliance cannot be turned on.
3 When projector has cooled down, READY Indicator lights GREEN again and you can turn projector on. After cooling down completely, disconnect AC Power Cord.

TO MAINTAIN LIFE OF LAMP, ONCE YOU TURN PROJECTOR ON, WAIT AT LEAST 5 MINUTES BEFORE TURNING IT OFF.
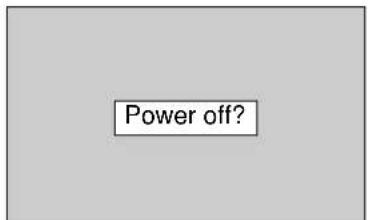
Message disappears after 4 seconds.
When "Power Management" function is ON, projector detects signal interruption and turns off Projection Lamp automatically. Refer to "Power Management" on page 35.
When WARNING TEMP. Indicator flashes red, projector is automatically turned off. Wait at least 5 minutes before turning on projector again.
When WARNING TEMP. Indicator continues to flash, follow procedures below:
- Press POWER ON-OFF button to turn a projector off and disconnect AC Power Cord from an AC outlet.
- Check Air Filters for dust accumulation.
- Clean Air Filters. (See "AIR FILTER CARE AND CLEANING" section on page 38.)
- Turn a projector on again.
If WARNING TEMP. Indicator should still continue to flash, contact sales dealer where you purchased this projector or service center.
ADJUSTING SCREEN
ZOOM ADJUSTMENT
1 Press ZOOM button on Top Control or ZOOM ▲/▼ button on Remote Control Unit. Message "Zoom" is displayed.
2 Press ZOOM ▲ button or POINT UP button to make image larger, and press ZOOM ▼ button or POINT DOWN button to make image smaller.
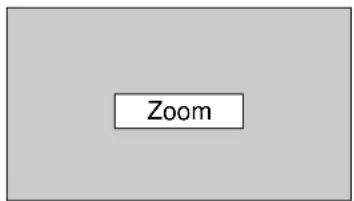
Message disappears after 4 seconds.
E
FOCUS ADJUSTMENT
1 Press FOCUS button on Top Control or FOCUS ▲/▼ button on Remote Control Unit. Message "Focus" is displayed.
2 Adjust focus of image by pressing FOCUS ▲/▼ button or POINT UP/DOWN button(s).
NOTE;
Focus adjustment may not function properly if the image is corrected by KEYSTONE adjustment.
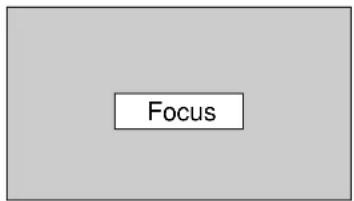
Message disappears after 4 seconds.
LENS SHIFT ADJUSTMENT
1 Press LENS SHIFT button on Top Control or LENS SHIFT ▲/▼ button on Remote Control Unit. Message "Lens shift" is displayed.
2 Press POINT UP button or LENS SHIFT ▲ button to move image up, press POINT DOWN or LENS SHIFT ▼ button to move image down.
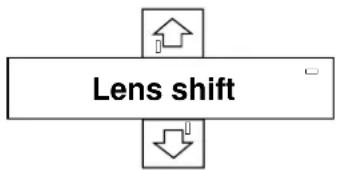
flowchart
graph TD
    A["↑"] --> B["Lens shift"]
    C["↓"] --> B
    B --> D["Square Block"]
    style B fill:#f9f,stroke:#333
KEYSTONE ADJUSTMENT
If a projected picture has keystone distortion, correct the image with KEYSTONE adjustment.
1 Press KEYSTONE button on Remote Control Unit or select Keystone on SETTING menu. (Refer to page 35.) Keystone dialog box appears.
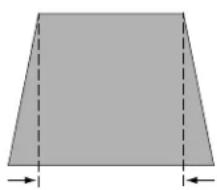
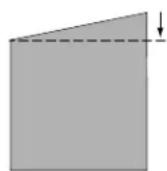
2 Correct keystone distortion by pressing POINT UP/DOWN/LEFT/RIGHT button(s). Press POINT UP button to reduce the upper part of the image, and press POINT DOWN button to reduce the lower part. Press POINT LEFT button to reduce the left part, and press POINT RIGHT button to reduce the right part.
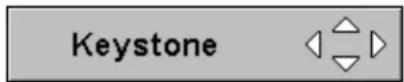
- Arrows are white in no correction.
- Arrow(s) of direction being corrected turn(s) red.
- Arrow(s) disappear(s) at the maximum correction.
Reduce the upper width with POINT UP button.
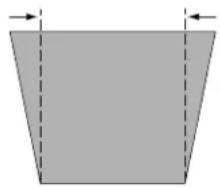
natural_image
Simple geometric diagram of a trapezoid with dashed vertical lines and arrows indicating width (no text or symbols)Reduce the lower width with POINT DOWN button.
natural_image
Simple geometric diagram of a trapezoid with dashed vertical lines and two horizontal arrows indicating width (no text or symbols)Reduce the left part with POINT LEFT button.
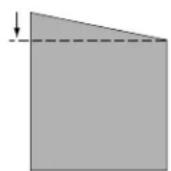
Reduce the right part with POINT RIGHT button.
PICTURE FREEZE FUNCTION
Press FREEZE button on Remote Control Unit to freeze picture on-screen. To cancel FREEZE function, press FREEZE button again or press any other button except POINT / SELECT / RIGHT CLICK / LASER button.
BLANK FUNCTION
Press BLANK button on Remote Control Unit to black out image. To restore to normal, press BLANK button again or press any other button except POINT / SELECT / RIGHT CLICK / LASER button.
Message disappears after 4 seconds.
E
P-TIMER FUNCTION
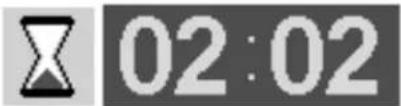
Press P-TIMER button on Remote Control unit. Timer display "00 : 00" appears on screen and timer starts to count time (00 : 00 \~ 59 : 59). To stop P-TIMER display, press P-TIMER button. And then, press P-TIMER button again to cancel P-TIMER function.
SOUND ADJUSTMENT
DIRECT OPERATION
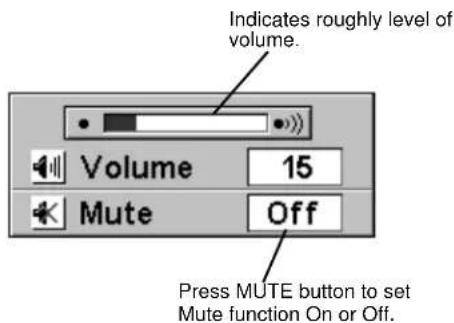
Volume
Press VOLUME (+/-) button(s) on Top Control or on Remote Control Unit to adjust volume. Volume dialog box appears on screen for a few seconds. (+) button to increase volume, and (-) button for decreasing.
Mute
Press MUTE button on Remote Control Unit to cut off sound. To restore sound to its previous level, press MUTE button again or press Volume (+/-) button(s).
Display disappears after 4 seconds.
MENU OPERATION
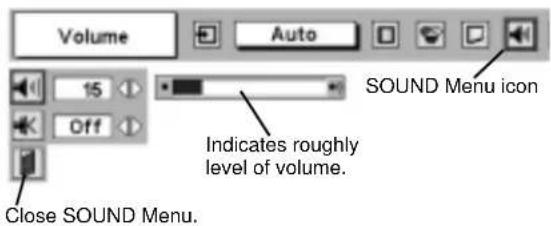
1 Press MENU button and ON-SCREEN MENU will appear. Press POINT LEFT/RIGHT buttons to move a red frame pointer to SOUND Menu icon.
2 Press POINT DOWN button to move a red frame pointer to item that you want to select, and then press SELECT button.

Volume
To increase volume, press POINT RIGHT button, and press POINT LEFT button for decreasing.

Mute
Press POINT LEFT/RIGHT button(s) to cut off sound. Dialog box display is changed to "On" and sound is cut off. To restore sound to its previous level, press POINT LEFT/RIGHT button(s) again.
SOUND MENU
SELECTING INPUT SOURCE
DIRECT OPERATION
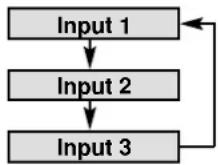
Choose Computer by pressing INPUT button on Top Control or on Remote Control Unit.
If projector cannot reproduce proper image, select correct input source through MENU OPERATION (see below).
INPUT button
MENU OPERATION
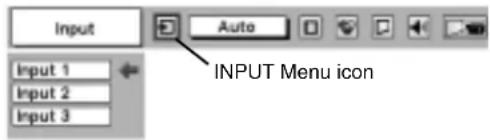
1 Press MENU button and ON-SCREEN MENU will appear. Press POINT LEFT/RIGHT buttons to select Input and press SELECT button. Another dialog box INPUT SELECT Menu will appear.
2 Press POINT DOWN button and a red-arrow icon will appear. Move arrow to INPUT source that you want to select, and then press SELECT button.
SELECTING COMPUTER SYSTEM
WHEN SELECT INPUT 1 (COMPUTER INPUT TERMINALS)
1 Press MENU button and ON-SCREEN MENU will appear. Press POINT LEFT/RIGHT button to move a red frame pointer to INPUT Menu icon.
2 Press POINT DOWN button to move a red arrow pointer to Input 1 and then press SELECT button. Source Select Menu will appear.
3 Move a pointer to either Digital or Analog and then press SELECT button.
Digital
When your computer is connected to COMPUTER INPUT (DIGITAL) terminal, select RGB (Digital).
Analog
When your computer is connected to COMPUTER INPUT (ANALOG) terminal, select RGB (Analog).
INPUT MENU
![Input Input 1 Input 2 Input 3 INPUT Menu icon Move a pointer (red arrow) to Input 1 and press SELECT button. Input 1 RGB [Digital] RGB [Analog] Source Select Menu Move a pointer to Digital or Analog and press SELECT button.](/content/2026/05/1050710/images/1505cd716485d223f20d53ddc18fea73de04175a668537ab9742249db7999fe5.jpg)
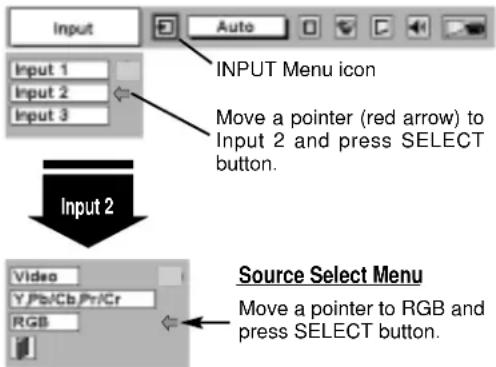
WHEN SELECT INPUT 2 (5 BNC INPUT JACKS)
When connect a computer output [5 BNC Type (Green, Blue, Red, Horiz. Sync and Vert. Sync.)] from a computer to G, B, R, H/HV and V jacks.
1 Press MENU button and ON-SCREEN MENU will appear. Press POINT LEFT/RIGHT button to move a red frame pointer to INPUT Menu icon.
2 Press POINT DOWN button to move a red arrow pointer to Input 2 and then press SELECT button. Source Select Menu will appear.
3 Press POINT DOWN button and a red-arrow icon will appear. Move arrow to "RGB", and then press SELECT button.
INPUT MENU
AUTOMATIC MULTI-SCAN SYSTEM
This projector automatically tunes to most different types of computers based on VGA, SVGA, XGA or SXGA (refer to "COMPATIBLE COMPUTER SPECIFICATION" on page 26). When selecting Computer, this projector automatically tunes to incoming signal and projects proper image without any special setting. (Some computers need setting manually.)
Note : Projector may display one of following messages.
Auto
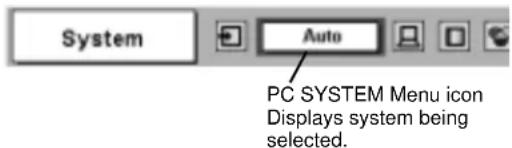
When projector cannot recognize connected signal as PC system provided in this projector, Auto PC Adjustment function operates to adjust projector and message "Auto" is displayed on SYSTEM Menu icon.
When image is not provided properly, manual adjustment is required. (Refer to P24 and 25.)
—
There is no signal input from computer. Make sure connection of computer and a projector is set correctly. (Refer to TROUBLESHOOTING on page 40.)
D-VGA, D-SVGA or D-XGA
When digital computer signal is received on DVI terminal, above message is displayed on PC SYSTEM Menu icon.
SELECT COMPUTER SYSTEM MANUALLY
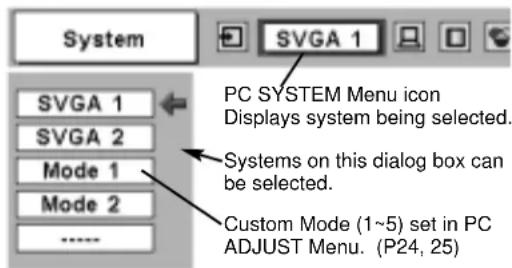
This projector automatically selects PC system among those provided in this projector and PC system can be also selected manually.
1 Press MENU button and ON-SCREEN MENU will appear. Press POINT LEFT/RIGHT buttons to move a red frame pointer to PC SYSTEM Menu icon.
2 Press POINT DOWN button to move a red arrow pointer to system that you want to set, and then press SELECT button.
PC SYSTEM MENU
PC SYSTEM MENU
PC ADJUSTMENT
AUTO PC ADJUSTMENT
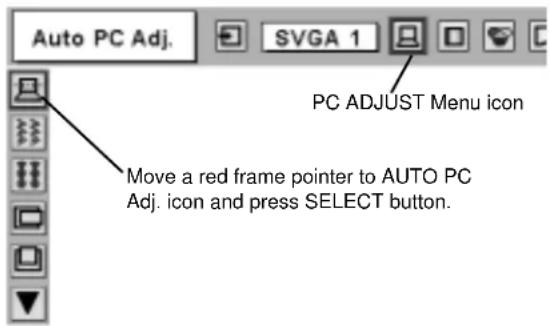
Auto PC Adjustment function is provided to automatically adjust Fine sync, Total dots and Picture Position to conform to your computer. Auto PC Adjustment function can be operated as follows.

Auto PC Adj.
1 Press MENU button and ON-SCREEN MENU will appear. Press POINT LEFT/RIGHT button to move a red frame pointer to PC ADJUST Menu icon.
2 Press POINT DOWN button to move a red frame pointer to AUTO PC Adj. icon and then press SELECT button twice. This Auto PC Adjustment can be also executed by pressing AUTO PC ADJ. button on Remote Control Unit.
Store adjustment parameters.
Adjustment parameters from Auto PC Adjustment can be memorized in this projector. Once parameters are memorized, setting can be done just by selecting Mode in PC SYSTEM Menu (P23). Refer to step 3 of MANUAL PC ADJUSTMENT section (P25).
PC ADJUST MENU
NOTE
- Fine sync, Total dots and Picture Position of some computers can not be fully adjusted with this Auto PC Adjustment function. When image is not provided properly through this function, manual adjustments are required. (Refer to page 24, 25.)
- Auto PC Adjustment function cannot be operated in Digital Signal input on DVI terminal and "RGB", "720p (HDTV)", "1035i (HDTV)" or "1080i (HDTV)" is selected on PC SYSTEM Menu.
MANUAL PC ADJUSTMENT
This projector can automatically tune to display signals from most personal computers currently distributed. However, some computers employ special signal formats which are different from standard ones and may not be tuned by Multi-Scan system of this projector. If this happens, projector cannot reproduce a proper image and image may be recognized as a flickering picture, a non-synchronized picture, a non-centered picture or a skewed picture.
This projector has a Manual PC Adjustment to enable you to precisely adjust several parameters to match with those special signal formats. This projector has 5 independent memory areas to memorize those parameters manually adjusted. This enables you to recall setting for a specific computer whenever you use it.
Note : This PC ADJUST Menu cannot be operated when in digital signal input on DVI terminal and "RGB" is selected on PC SYSTEM MENU (P23).
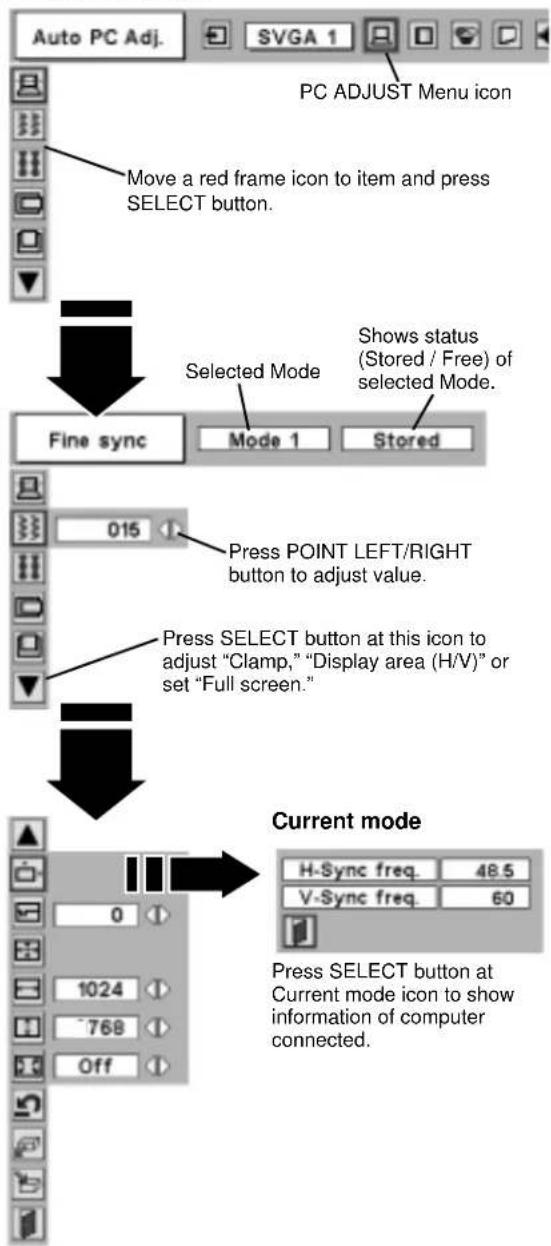
1 Press MENU button and ON-SCREEN MENU will appear. Press POINT LEFT/RIGHT button to move a red frame pointer to PC ADJUST Menu icon.
2 Press POINT DOWN button to move a red frame pointer to item that you want to adjust and then press SELECT button. Adjustment dialog box will appear. Press POINT LEFT/RIGHT button to adjust value.

Fine sync
Adjusts an image as necessary to eliminate flicker from display. Press POINT LEFT/RIGHT button to adjust value.(From 0 to 31.)

Total dots
Number of total dots in one horizontal period. Press POINT LEFT/RIGHT button(s) and adjust number to match your PC image.

Horizontal
Adjusts horizontal picture position. Press POINT LEFT/RIGHT button(s) to adjust position.

Vertical
Adjusts vertical picture position. Press POINT LEFT/RIGHT button(s) to adjust position.

Current mode
Press SELECT button to show information of computer selected.

Clamp
Adjusts clamp position. When image has a dark bar(s), try this adjustment.
PC ADJUST MENU

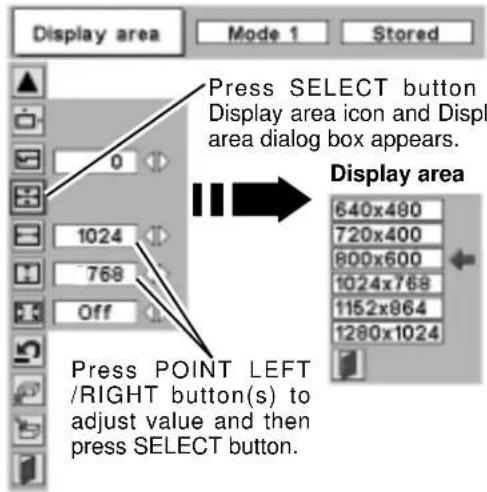
Display area
Selects area displayed with this projector. Select resolution at Display area dialog box.

Display area H
Adjustment of horizontal area displayed with this projector. Press POINT LEFT/RIGHT button(s) to decrease/increase value and then press SELECT button.

Display area V
Adjustment of vertical area displayed with this projector. Press POINT LEFT/RIGHT button(s) to decrease/increase value and then press SELECT button.

Full screen
Press POINT LEFT/RIGHT button(s) to switch Full screen function to "On" or "Off." Set "On" to resize image with 4 x 3 aspect ratio to fit screen.
NOTE : Display area (H/V) and Full screen cannot be adjusted when "1035i (HDTV)" or "1080i (HDTV)" is selected on PC SYSTEM Menu (P23).
3

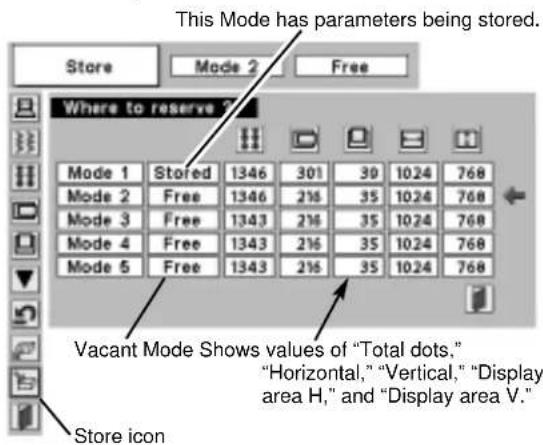
Store
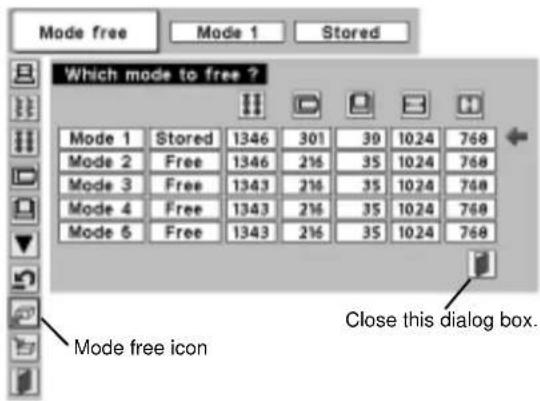
To store adjustment parameters, move a red frame pointer to Store icon and then press SELECT button. Move a red arrow pointer to any of Mode 1 to 5 that you want to store and then press SELECT button.

Mode free
To clear adjustment parameters previously set, move a red frame pointer to Mode free icon and then SELECT button. Move a red arrow pointer to Mode that you want to clear and then press SELECT button.
Other icons operates as follows.

Reset
Reset all adjust parameters on adjustment dialog box to previous figure.

Quit
Closes PC ADJUST MENU.
E
To store adjustment data.
To clear adjustment data.
COMPATIBLE COMPUTER SPECIFICATIONS
Basically this projector can accept a signal from all computers with V, H-Frequency mentioned below and less than 160 MHz of Dot Clock.
| ON-SCREEN DISPLAY | RESOLUTION | H-Freq. (kHz) | V-Freq. (Hz) | ON-SCREEN DISPLAY | RESOLUTION | H-Freq. (kHz) | V-Freq. (Hz) |
| VGA 1 | 640 x 480 31 | 47 59.88 | XGA 10 | 1024 x 768 62 | .04 77.07 | ||
| VGA 2 720 x 400 31.47 70 | .09 | XGA 11 | 1024 x 768 | 61.00 | 75.70 | ||
| VGA 3 640 x 400 31.47 70 | .09 | XGA 12 | 1024 x 768 (Interlace) | 35.522 43 | .48 | ||
| VGA 4 640 x 480 37.86 74 | .38 | XGA 13 | 1024 x 768 | 46.90 58 | .20 | ||
| VGA 5 640 x 480 37.86 72 | .81 | XGA 14 | 1024 x 768 | 47.00 58 | .30 | ||
| VGA 6 640 x 480 37.50 75 | .00 | XGA15 | 1024 x 768 | 58.03 72 | .0 | ||
| VGA 7 640 x 480 43.269 85 | .00 | MAC 19 | 1024 x 768 60.24 | 75.08 | |||
| MAC LC13 | 640 x 480 34 | .97 66.60 | MAC 21 | 1152 x 870 | 68.68 75 | .06 | |
| MAC 13 640 x 480 35.00 66 | .67 | SXGA 1 | 1152 x 864 | 64.20 70 | .40 | ||
| RGB | (Interlace) | 15.734 30 | SXGA 2 | 1280 x 1024 | 62.50 58 | .60 | |
| RGB | (Interlace) | 15.625 | 25 | SXGA 3 | 1280 x 1024 | 63.90 60 | .00 |
| SVGA 1 800 x 600 | 35.156 56 | .25 | SXGA 4 | 1280 x 1024 | 63.34 59 | .98 | |
| SVGA 2 800 x 600 37.88 60 | .32 | SXGA 5 | 1280 x 1024 | 63.74 60 | .01 | ||
| SVGA 3 800 x 600 46.875 | 75.00 | SXGA 6 | 1280 x 1024 | 71.69 67 | .19 | ||
| SVGA 4 800 x 600 53.674 | 85.06 | SXGA 7 | 1280 x 1024 | 81.13 76 | .107 | ||
| SVGA 5 800 x 600 48.08 72 | .19 | SXGA 8 | 1280 x 1024 | 63.98 60 | .02 | ||
| SVGA 6 800 x 600 37.90 61 | .03 | SXGA 9 | 1280 x 1024 | 79.976 75 | .025 | ||
| SVGA 7 800 x 600 34.50 55 | .38 | SXGA 10 | 1280 x 960 | 60.00 60 | .00 | ||
| SVGA 8 800 x 600 38.00 60 | .51 | SXGA 11 | 1152 x 900 | 61.20 65 | .20 | ||
| SVGA 9 800 x 600 38.60 60 | .31 | SXGA 12 | 1152 x 900 | 71.40 75 | .60 | ||
| SVGA 10 800 x 600 32.70 51 | .09 | SXGA 13 | 1280 x 1024 (Interlace) | 50.00 43 | .00 | ||
| SVGA 11 800 x 600 38.00 60 | .51 | SXGA 14 | 1280 x 1024 (Interlace) | 50.00 47 | .00 | ||
| MAC 16 832 x 624 49.72 74 | .55 | SXGA 15 | 1280 x 1024 | 63.37 60 | .01 | ||
| XGA 1 1024 x 768 | 48.36 60 | .00 | SXGA 16 | 1280 x 1024 | 76.97 72 | .00 | |
| XGA 2 1024 x 768 | 68.677 84 | .997 | SXGA 17 | 1152 x 900 | 61.85 66 | .00 | |
| XGA 3 1024 x 768 | 60.023 75 | .03 | SXGA 18 | 1280 x 1024 (Interlace) | 46.43 43 | .35 | |
| XGA 4 1024 x 768 | 56.47 70 | .07 | SXGA 19 | 1280 x 1024 63 | .79 60 | .18 | |
| XGA 5 1024 x 768 60.31 74 | .92 | MAC | 1280 x 960 75 | .00 75 | .08 | ||
| XGA 6 1024 x 768 | 48.50 60 | .02 | MAC | 1280 x 1024 80 | .00 75 | .08 | |
| XGA 7 1024 x 768 | 44.00 54 | .58 | 720p (HDTV) | (Progressive) | 45.00 60 | .00 | |
| XGA 8 1024 x 768 | 63.48 79 | .35 | 1035i (HDTV) | (Interlace) | 33.75 30 | .00 | |
| XGA 9 | 1024 x 768 (Interlace) | 36.00 43 | .59 | 1080i (HDTV) | (Interlace) | 33.75 30 | .00 |
When a input signal is digital from DVI terminal, refer to chart below.
| ON-SCREEN DISPLAY | RESOLUTION | H-Freq. (kHz) | V-Freq. (Hz) | ON-SCREEN DISPLAY | RESOLUTION | H-Freq. (kHz) | V-Freq. (Hz) |
| D-VGA | 640 x 480 31 | 469 59.940 | D-XGA | 1024 x 768 | 48.363 | 60.004 | |
| D-SVGA | 800 x 600 37 | 879 60.317 |
NOTE : Specifications are subject to change without notice.
PICTURE IMAGE ADJUSTMENTS
IMAGE LEVEL SELECT (DIRECT)
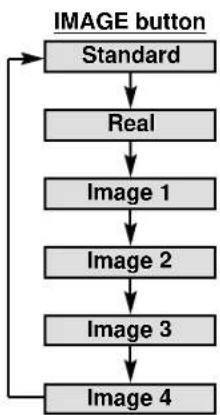
Select image level among Standard, Real, Image 1, Image 2, Image 3 and Image 4 by pressing IMAGE button on Top Control or on Remote Control Unit.
Standard
Normal picture level preset on this projector.
Real
Picture level with improved halftone for graphics.
IMAGE 1\~4
User preset picture adjustment in IMAGE ADJUST Menu (P28).
flowchart
graph TD
    A["IMAGE button"] --> B["Standard"]
    B --> C["Real"]
    C --> D["Image 1"]
    D --> E["Image 2"]
    E --> F["Image 3"]
    F --> G["Image 4"]
    G --> H["Feedback Loop"]
E
IMAGE LEVEL SELECT (MENU)
1 Press MENU button and ON-SCREEN MENU will appear. Press POINT LEFT/RIGHT button to move a red frame pointer to IMAGE SELECT Menu icon.
2 Press POINT DOWN button to move a red frame pointer to level that you want to set and then press SELECT button.

Standard
Normal picture level preset on this projector.

Real
Picture level with improved halftone for graphics.

IMAGE 1\~4
User preset picture adjustment in IMAGE ADJUST Menu (P28).
IMAGE SELECT MENU
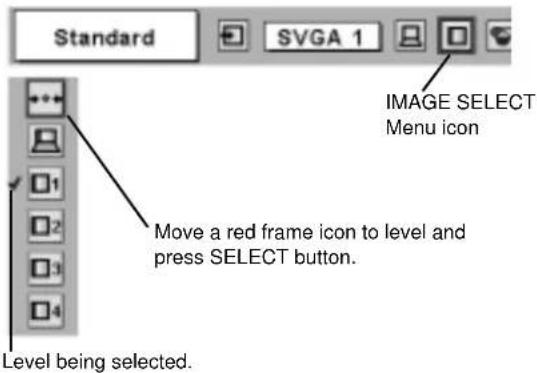
IMAGE LEVEL ADJUSTMENT
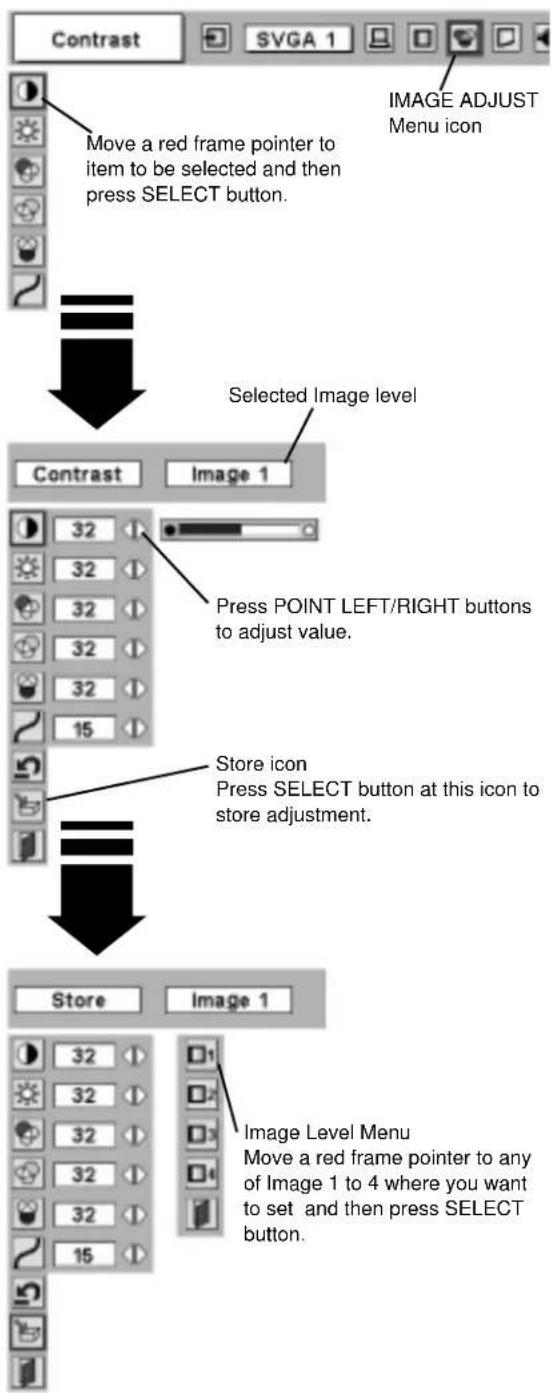
1 Press MENU button and ON-SCREEN MENU will appear. Press POINT LEFT/RIGHT buttons to move a red frame pointer to IMAGE ADJUST Menu icon.
2 Press POINT DOWN button to move a red frame pointer to item that you want to adjust and then press SELECT button. Level of each item is displayed. Adjust each level by pressing POINT LEFT/RIGHT button(s).

Contrast
Press POINT LEFT button to decrease contrast, and POINT RIGHT button to increase contrast. (From 0 to 63.)

Brightness
Press POINT LEFT button to adjust image darker, and POINT RIGHT button to adjust brighter. (From 0 to 63.)

White balance (Red)
Press POINT LEFT button to lighten red tone and POINT RIGHT button to deeper tone. (From 0 to 63.)

White balance (Green)
Press POINT LEFT button to lighten green tone and POINT RIGHT button to deeper tone. (From 0 to 63.)

White balance (Blue)
Press POINT LEFT button to lighten blue tone and POINT RIGHT button to deeper tone. (From 0 to 63.)

Gamma
Press either POINT LEFT button or POINT RIGHT button to obtain better balance of contrast. (From 0 to 15.)
3

Store
To store manually preset image, move a red frame pointer to Store icon and press SELECT button. Image Level Menu will appear. Move a red frame pointer to Image 1 to 4 where you want to set and then press SELECT button.
Other icons operates as follows.

Reset
Reset all adjustment to previous figure.

Quit
Closes IMAGE MENU.
IMAGE ADJUST MENU
flowchart
graph TD
    A["Move a red frame pointer to item to be selected and then press SELECT button."] --> B["Selected Image level"]
    B --> C["Image 1: Press POINT LEFT/RIGHT buttons to adjust value."]
    C --> D["Store icon Press SELECT button at this icon to store adjustment."]
    D --> E["Image Level Menu: Move a red frame pointer to any of Image 1 to 4 where you want to set and then press SELECT button."]
PICTURE SCREEN ADJUSTMENT
This projector has a picture screen resize function, which enables you to display desirable image size.
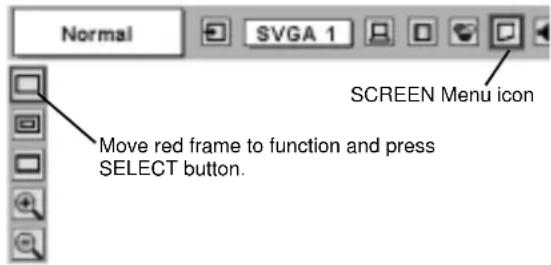
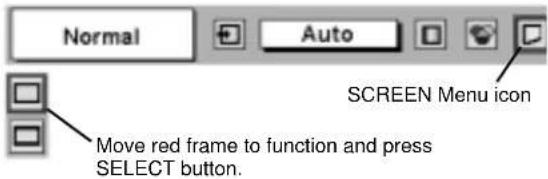
1 Press MENU button and ON-SCREEN MENU will appear. Press POINT LEFT/RIGHT button(s) to move a red frame pointer to SCREEN Menu icon.
2 Press POINT DOWN button and move a red frame pointer to function that you want to select and then press SELECT button.

Normal
Provides image to fit screen size.

True
Provides image in its original size. When original image size is larger than screen size (1024 x 768), this projector enters "Digital zoom +" mode automatically.

Wide
Provides image to fit wide video aspect ratio (16 : 9) by expanding image width uniformly. This function can be used for providing a squeezed video signal at 16 : 9.

Digital zoom +
When Digital zoom + is selected, ON-SCREEN MENU disappears and message "D. Zoom +" is displayed. Press SELECT button to expand image size. And press POINT UP/DOWN/LEFT/RIGHT button(s) to pan image. Panning function can work only when image is larger than screen size.
A projected image can be also expanded by pressing D.ZOOM ▲ button on Remote Control Unit.

Digital Zoom –
When Digital zoom – is selected, ON-SCREEN MENU disappears and message "D. Zoom –" is displayed. Press SELECT button to compress image size.
A projected image can be also compressed by pressing D.ZOOM ▼ button on Remote Control Unit.
To cancel Digital Zoom +/- mode, press any button except D.ZOOM ▲/▼, SELECT, POINT and AUTO PC ADJ. buttons.
SCREEN MENU
E
NOTE
- True and Digital zoom +/- cannot be operated when "RGB", "1035i (HDTV)" or "1080i (HDTV)" is selected on PC SYSTEM Menu (P23).
- Wide cannot be selected when "720p (HDTV)", "1035i (HDTV)" or "1080i (HDTV)" is selected on PC SYSTEM Menu (P23).
- This projector cannot display any resolution higher than 1280 X 1024. If your computer's screen resolution is higher than 1280 X 1024, reset resolution to lower before connecting projector.
- Image data in other than XGA (1024 x 768) is modified to fit screen size in initial mode.
- Panning function may not operate properly if computer system prepared on PC ADJUST Menu is used.
SELECTING INPUT SOURCE
WHEN SELECT INPUT 2 (5 BNC INPUT JACKS)
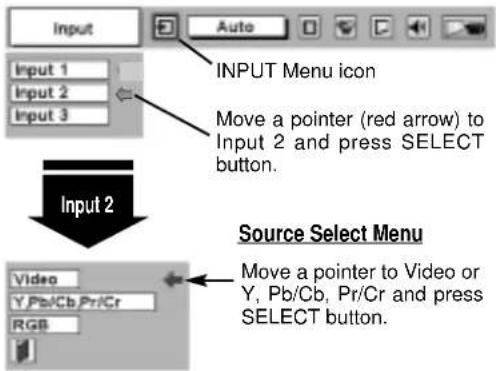
When connecting to those equipment, select a type of Video source in SOURCE SELECT Menu.
1 Press MENU button and ON-SCREEN MENU will appear. Press POINT LEFT/RIGHT button to move a red frame pointer to INPUT Menu icon.
2 Press POINT DOWN button to move a red arrow pointer to Input 2 and then press SELECT button. Source Select Menu will appear.
3 Move a pointer to source that you want to select and then press SELECT button.
Video
When video input signal is connected to VIDEO jack, select Video.
Y,Pb/Cb,Pr/Cr
When video input signal is connected to Y-Pb/Cb-Pr/Cr jacks, select Y, Pb/Cb, Pr/Cr.
INPUT MENU
WHEN SELECT INPUT 3 (AV TERMINALS)
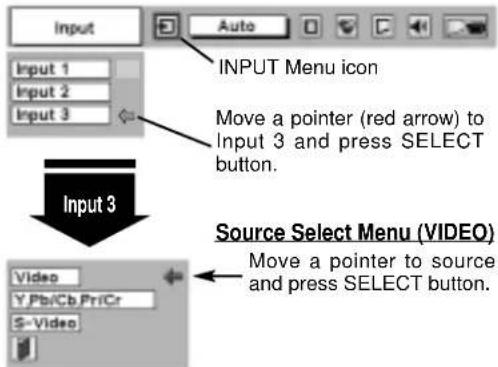
When connecting to those equipment, select a type of Video source in SOURCE SELECT (VIDEO) Menu.
1 Press MENU button and ON-SCREEN MENU will appear. Press POINT LEFT/RIGHT button to move a red frame pointer to INPUT Menu icon.
2 Press POINT DOWN button to move a red arrow pointer to Input 3 and then press SELECT button. Source Select Menu will appear.
3 Move a pointer to source that you want to select and then press SELECT button.
Video
When video input signal is connected to VIDEO jack, select Video.
Y,Pb/Cb,Pr/Cr
When video input signal is connected to Y-Pb/Cb-Pr/Cr jacks, select Y, Pb/Cb, Pr/Cr.
S-Video
When video input signal is connected to S-VIDEO jack, select S-Video.
INPUT MENU
1 Press MENU button and ON-SCREEN MENU will appear. Press POINT LEFT/RIGHT buttons to move a red frame pointer to AV SYSTEM Menu icon.
2 Press POINT DOWN button to move a red arrow pointer to system that you want to select and then press SELECT button.
Projector automatically detects incoming Video system, and adjusts itself to optimize its performance.
When Video System is PAL-M or PAL-N, select system manually first.
PAL / SECAM / NTSC / NTSC4.43 / PAL-M / PAL-N
If projector cannot reproduce proper video image, it is necessary to select a specific broadcast signal format among PAL, SECAM, NTSC, NTSC 4.43, PAL-M, and PAL-N.
Y, Pb/Cb, Pr/Cr JACKS
Auto
Projector automatically detects incoming Video signal, and adjusts itself to optimize its performance.
When Video System is 1035i or 1080i, select system manually first.
COMPONENT VIDEO SIGNAL FORMAT
If projector cannot reproduce proper video image, it is necessary to select a specific component video signal format among 480i, 575i, 480p, 575p, 720p, 1035i and 1080i.
PICTURE IMAGE ADJUSTMENTS
IMAGE LEVEL SELECT (DIRECT)
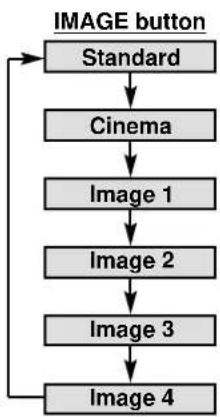
Select image level among Standard, Cinema, Image 1, Image 2, Image 3 and Image 4 by pressing IMAGE button on Top Control or on Remote Control Unit.
Standard
Normal picture level preset on this projector.
Cinema
Picture level adjusted for picture with fine tone.
IMAGE 1\~4
User preset picture adjustment in IMAGE ADJUST Menu (P34).
flowchart
graph TD
    A["IMAGE button"] --> B["Standard"]
    B --> C["Cinema"]
    C --> D["Image 1"]
    D --> E["Image 2"]
    E --> F["Image 3"]
    F --> G["Image 4"]
    G --> A
IMAGE LEVEL SELECT (MENU)
1 Press MENU button and ON-SCREEN MENU will appear. Press POINT LEFT/RIGHT button to move a red frame pointer to IMAGE SELECT Menu icon.
2 Press POINT DOWN button to move a red frame pointer to level that you want to set and then press SELECT button.

Standard
Normal picture level preset on this projector.

Cinema
Picture level adjusted for picture with fine tone.

IMAGE 1\~4
User preset picture adjustment in IMAGE ADJUST Menu (P34).
IMAGE SELECT MENU
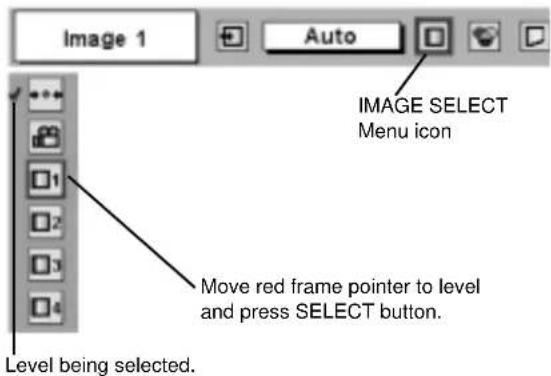
IMAGE LEVEL ADJUSTMENT
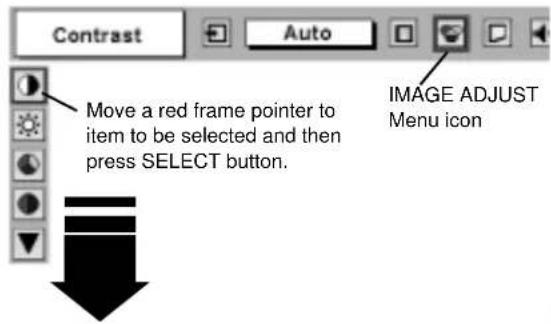
1 Press MENU button and ON-SCREEN MENU will appear. Press POINT LEFT/RIGHT button(s) to move a red frame pointer to IMAGE ADJUST Menu icon.
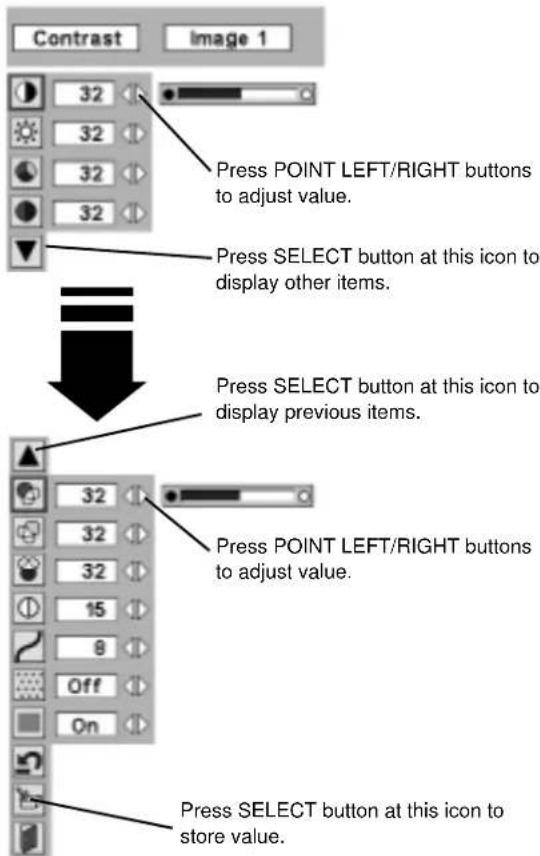
2 Press POINT DOWN button to move a red frame pointer to item that you want to adjust and then press SELECT button. Level of each item is displayed. Adjust each level by pressing POINT LEFT/RIGHT button(s).

Contrast
Press POINT LEFT button to decrease contrast, and POINT RIGHT button to increase contrast. (From 0 to 63.)

Brightness
Press POINT LEFT button to adjust image darker, and POINT RIGHT button to adjust brighter. (From 0 to 63.)

Color
Press POINT LEFT button to lighten color, and POINT RIGHT button to deeper color. (From 0 to 63.)

Tint
Press POINT LEFT button or POINT RIGHT button to obtain proper color. (From 0 to 63.)

White balance (Red)
Press POINT LEFT button to lighten red tone and POINT RIGHT button to deeper tone. (From 0 to 63.)

White balance (Green)
Press POINT LEFT button to lighten green tone and POINT RIGHT button to deeper tone. (From 0 to 63.)

White balance (Blue)
Press POINT LEFT button to lighten blue tone and POINT RIGHT button to deeper tone. (From 0 to 63.)

Sharpness
Press POINT LEFT button to soften image, and POINT RIGHT button to sharpen image. (From 0 to 15.)

Gamma
Press either POINT LEFT button or POINT RIGHT button to obtain better balance of contrast. (From 0 to 15.)

Noise reduction
Press POINT LEFT/RIGHT button(s) to change noise reduction mode. Dialog box display is changed to "On" to reduce noise (rough parts) of image. Press POINT LEFT/RIGHT button(s) again, to change noise reduction mode to off.

Progressive scan
Press POINT LEFT/RIGHT button(s) to change progressive scan mode. Dialog box display is changed to "Off" and progressive scan mode to off. Press POINT LEFT/RIGHT button(s) again, progressive scan mode to on.
IMAGE ADJUST MENU
E
NOTE :
Tint cannot be adjusted when video system is PAL, SECAM, PAL-M or PAL-N.
Noise Reduction cannot be operated when video signal types and systems as follow.
- Composite video signal (SECAM, NTSC4.43, PAL-M and PAL-N systems).
- S-video signal (SECAM, PAL-M and PAL-N systems).
- Component video signal.
Progressive cannot be operated when "480p", "575p", "720p", "1035i" or "1080i" is selected on AV SYSTEM MENU (P31).
3

Store
To store adjustment data, move a red frame pointer to Store icon and press SELECT button. Image Level Menu will appear. Move a red frame pointer to Image Level 1 to 4 and then press SELECT button.
Other icons operates as follows.

Reset
Reset all adjustment to previous figure.

Quit
Closes IMAGE MENU.
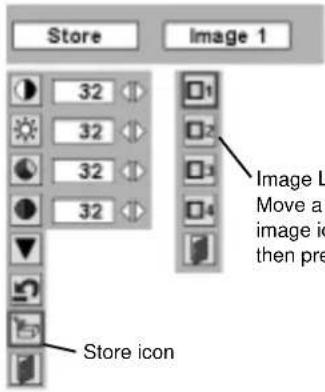
Image Level Menu Move a red frame pointer to image icon to be set and then press SELECT button.
PICTURE SCREEN ADJUSTMENT
This projector has a picture screen resize function, which enables you to display desirable image size.
1 Press MENU button and ON-SCREEN MENU will appear. Press POINT LEFT/RIGHT button(s) to move a red frame pointer to SCREEN Menu icon.
2 Press POINT DOWN button and move a red frame pointer to function that you want to select and then press SELECT button.

Normal
Provides image at a normal video aspect ratio of 4 : 3.

Wide
Provides image at a wide screen ratio of 16:9.
SCREEN MENU
NOTE: SCREEN Menu cannot be operated when "720p," "1035i," or "1080i" is selected on AV SYSTEM Menu (P31).
SETTING MENU
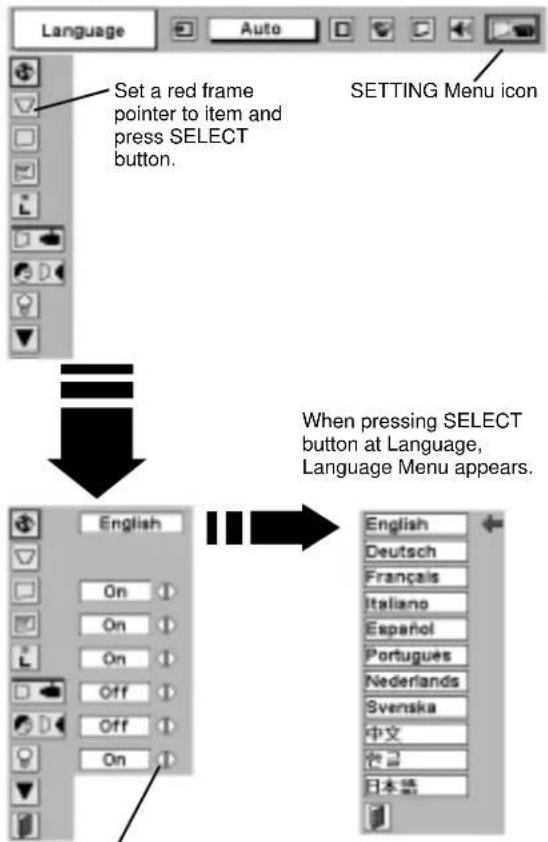
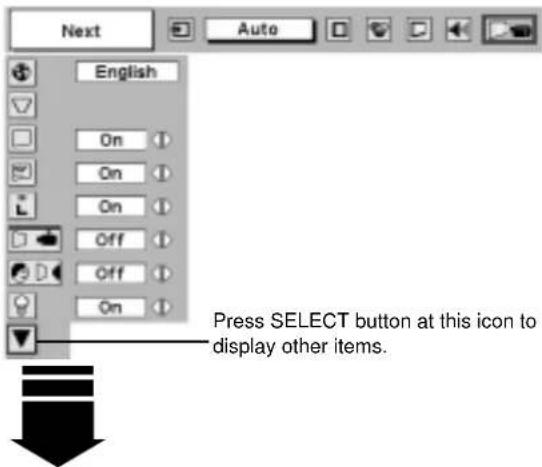
1 Press MENU button and ON-SCREEN MENU will appear. Press POINT LEFT/RIGHT button(s) to move a red-frame pointer to SETTING icon.
2 Press POINT DOWN button to move a red-frame pointer to item that you want to set and then press SELECT button. Setting dialog box appears.

Language
Language used in ON-SCREEN MENU is selectable from among English, German, French, Italian, Spanish, Portuguese, Dutch, Swedish, Chinese, Korean and Japanese.

Keystone
When image is distorted, select Keystone. ON-SCREEN MENU disappears and Keystone dialog box is displayed. Correct keystone distortion by pressing POINT UP/DOWN/LEFT/RIGHT button(s). Refer to KEYSTONE ADJUSTMENT on page 20.

Blue back
When this function is "On," this projector will produce a blue image instead of video noise on screen when any input source is unplugged or turned off.

Display
This function decides whether to display On-Screen Displays.
On … shows all On-Screen Displays.
Off .... sets On-Screen Displays disappeared except;
• ON-SCREEN MENU
- "Power off?" message

Logo
When this function is "On," projector displays our logo when starting up.

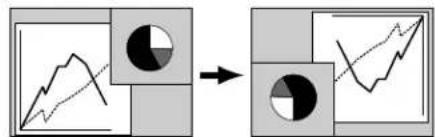
Ceiling
When this function is "On," picture is top / bottom and left / right reversed. This function is used to project image from a ceiling mounted projector.

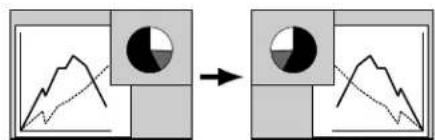
Rear
When this function is "On," picture is left / right reversed. This function is used to project image to a rear projection screen.

Power management
This function turns Projection Lamp off when this projector detects signal interruption and is not used for a certain period in order to reduce power consumption and maintain Lamp-life. (This projector is shipped with this function ON.)
Power Management function operates to turn Projection Lamp off when input signal is interrupted and any button is not pressed over 5 minutes. This function operates as follows;
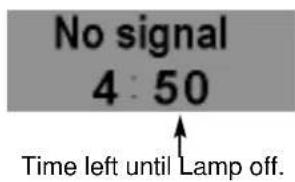
- When any input signal is interrupted, "No signal" and counting down display appears (for 5 minutes).
- After counting down for 5 minutes, projector lamp and READY indicator are turned off.
- When READY indicator flashing, Projection Lamp can be turned on again (Power Management mode).
In this Power Management mode, Projection Lamp is automatically turned on when input signal connected or projector is operated with any button on Top Control or on Remote Control Unit again.
SETTING MENU
Move a pointer to item and then press POINT LEFT/RIGHT button(s).
Ceiling function
flowchart
graph LR
    A["Line Graph"] --> B["Circle Node"]
    B --> C["Line Chart"]
Rear function
flowchart
graph LR
    A["Graph with shaded circle"] --> B["Pie chart with shaded circle"]
    style A fill:#f9f,stroke:#333
    style B fill:#bbf,stroke:#333

On start
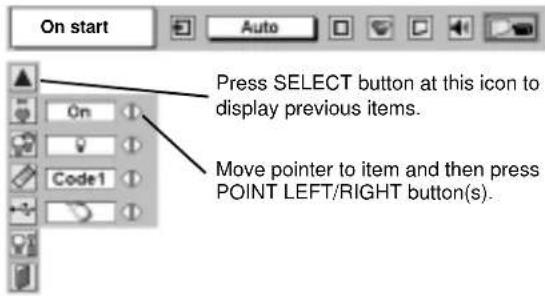
When this function is "On," projector is automatically turned on just by connecting AC Power cord to a wall outlet.
Note ; Be sure to turn projector off properly (refer to section "TURNING OFF PROJECTOR" on P19). If projector is turned off in wrong steps, On Start function does not operate properly.

Lamp mode
When selecting the " 🔥" (Eco), the projector reduce the brightness and set into the low power consumption mode.

Remote control
This projector has two different remote control codes; factory-set normal code (Code 1) and secondary code (Code 2). This switching function prevents remote control operation mixture (jam) when operating several projectors or video equipment together. When operating projector in "Code 2," both projector and Remote Control Unit must be switched to "Code 2."
To change code of Projector;
Set Remote control in SETTING MENU to "Code 2."
To change code of Remote Control Unit;
Press both MENU and IMAGE buttons on Remote Control Unit together for over 10 seconds.
After changing code, make sure Remote Control operates properly. To return to normal code (Code 1), operate both projector and Remote Control in ways above again.
NOTE : When batteries of Remote Control Unit are replaced or ALL-OFF switch is turned to "ALL-OFF," remote transmit code automatically returns to normal code (Code 1).

USB
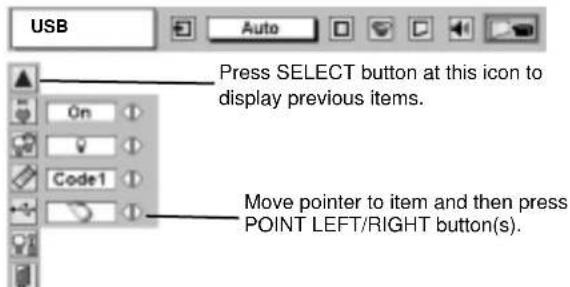
This Projector is equipped with USB port for interactive operation between a projector and computer. Set mode following steps below.
Wireless Mouse mode
Select " " when controlling a computer with Remote Control of this projector.
Projector mode
Select " " when controlling a projector with computer.
NOTE: Before you control a projector by computer, install USB driver (optionally sold parts) and set up computer following instruction in USB driver package. Contact your authorized dealer.

Lamp counter reset
This function is used to reset Lamp Replace Counter. When replacing Projection Lamp, reset Lamp Replace Counter by using this function. Refer to page 39 for operation.

Quit
Closes SETTING MENU.
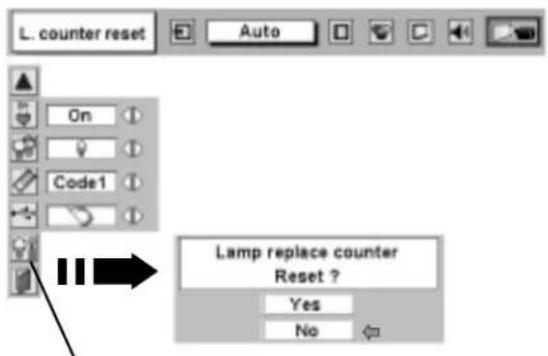
Move pointer to Lamp counter reset and then press SELECT button. Message "Lamp replace counter reset?" is displayed.
E
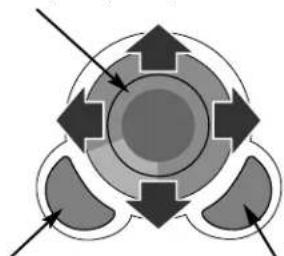
Wireless Remote Control Unit is not only able to operate this projector but also usable as a wireless mouse for most Personal Computers. POINT buttons and two CLICK buttons are used for wireless mouse operation.
This Wireless Mouse function is available only when PC mouse pointer is displayed on a projected screen. When ON-SCREEN MENU or any message / dialog box is displayed on screen instead of PC mouse pointer, this Wireless Mouse function cannot be used.
INSTALLATION
To use Wireless Remote Control Unit as Wireless Mouse for a Personal Computer, installation of mouse driver (not supplied) is required. Make sure that mouse driver is properly installed in your computer. And make sure that mouse port (or USB port) of a Personal Computer is activated.
1 Connect mouse port (or USB port) of your computer to Control Port (or USB connector) of this projector with Control Cable (or USB cable). (Refer to page 11, 12 for connection.)
2 Turn a projector on first, and then turn on your computer. When computer is switched on first, Wireless Mouse may not work properly.
Note : When your computer has no mouse port, connect Serial Port of your computer to Control Port of a projector with Control Cable for Serial Port (not supplied).
When controlling a PC mouse pointer, operate Wireless Mouse with POINT button, SELECT button, and RIGHT CLICK button on Wireless Remote Control Unit.
POINT button
Used to move PC mouse pointer. Pointer is moved corresponding with direction you are pressing.
SELECT (LEFT CLICK) button
This button has same function as left button in a PC mouse.
RIGHT CLICK button
This button has same function as right button in a PC mouse. This button is not available for controlling this projector.
POINT button (Move pointer)
natural_image
Abstract diagram with concentric circles and directional arrows, no text or symbols presentSELECT button (left button of mouse)
RIGHT CLICK button (right button of mouse)
MAINTENANCE
WARNING TEMP. INDICATOR
WARNING TEMP. Indicator flashes red when an internal temperature of a projector exceeds normal temperature. This Indicator stops flashing when temperature of a projector returns to normal. When WARNING TEMP. Indicator continues to flash, check items listed below.
1 Ventilation Slots of a projector may be blocked. In such an event, reposition a projector so that Ventilation Slots are not obstructed.
2 Air Filter may be clogged with dust particles. Clean Air Filter by following section AIR FILTER CARE AND CLEANING below.
3 If WARNING TEMP. Indicator remains on after performing above checks, Cooling Fans or Internal Circuits may be malfunctioning. Contact service personnel from an authorized dealer or a service station.
AIR FILTER CARE AND CLEANING
Air Filter prevents dust from accumulating on surface of Projection Lens and Projection Mirror. Should Air Filter become clogged with dust particles, it will reduce Cooling Fans' effectiveness and may result in internal heat build up and adversely affect life of a projector. Clean Air Filter following steps below:
1 Turn off a projector, and disconnect AC power cord from AC outlet.
2 Turn a projector upside down and remove Air Filter (2 used) by pulling latches upward.
3 Clean Air Filter with a brush or wash out dust and particles.
4 Replace Air Filter properly. Make sure that Air Filter is fully inserted.

CAUTION
Do not operate a projector with Air Filter removed. Dust may accumulate on LCD Panel and Projection Mirror degrading picture quality.
Do not put small parts into Air Intake Vents. It may result in malfunction of a projector.
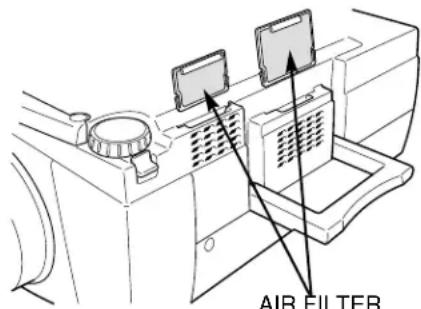
AIR FILTER
Pull up and remove.
RECOMMENDATION
We recommend avoiding dusty/smoky environments when operating a projector. Usage in these environments may cause poor image quality and may void the warranty.
When using under dusty or smoky conditions, dust may accumulate on a lens, liquid crystal panels, or optical elements inside a projector. This condition may degrade quality of a projected image.
When above symptoms are noticed, contact your authorized dealer or service station for proper cleaning.
CLEANING PROJECTION LENS
Follow these steps to clean Projection Lens:
1 Apply a non-abrasive camera lens cleaner to a soft, dry cleaning cloth. Avoid using an excessive amount of cleaner. Abrasive cleaners, solvents or other harsh chemicals might scratch a surface.
2 Lightly wipe a cleaning cloth over Projection Lens.
3 When a projector is not in use, replace Lens Cover.
LAMP REPLACEMENT
When life of Projection Lamp of this projector draws to an end, LAMP REPLACEMENT indicator lights yellow. When a projected image becomes dark or color of an image becomes unnatural, replacement of Projection Lamp is required.

CAUTION
For continued safety, replace with a lamp assembly of same type.
Allow a projector to cool for at least 45 minutes before you open Lamp Cover. Inside of a projector can become very hot.

CAUTION
Do not drop a lamp assembly or touch a glass bulb! Glass can shatter and may cause injury.

Follow these steps to replace lamp assembly.
1 Turn off a projector and disconnect AC plug. Allow a projector to cool for at least 45 minutes.
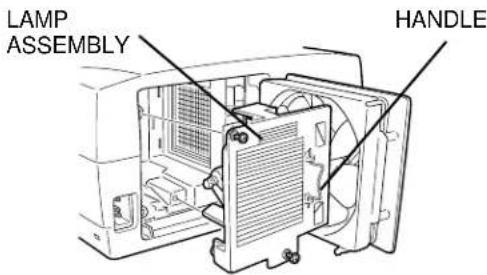
2 Loosen 2 screws with a screwdriver and open Lamp Cover.
3 Loosen 2 screws with a screwdriver and pull out Lamp Assembly by grasping Handle.
4 Replace Lamp Assembly with a new one and tighten 2 screws back. Make sure that Lamp Assembly is set properly. Replace Lamp Cover and tighten 2 screws.
5 Connect AC Power Cord to a projector and turn it on.
6 Reset Lamp Replace Counter (refer to section "Lamp Replace Counter" below).
NOTE : Do not reset Lamp Replace Counter when Projection Lamp is not replaced.
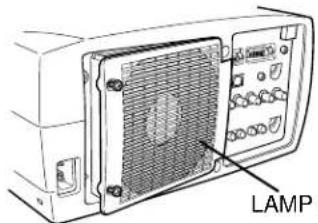
LAMP COVER
ORDER REPLACEMENT LAMP
Replacement Lamp can be ordered through your dealer. When ordering Projection Lamp, give following information to dealer.
- Model No. of your projector : LP810/DP9295
- Replacement Lamp Type No.: Lamp No.: SP-LAMP-011
LAMP REPLACE COUNTER
Be sure to reset Lamp Replace Counter when Lamp Assembly is replaced. When Lamp Replace Counter is reset, LAMP REPLACE Indicator stops lighting.
1 Turn projector on, press MENU button and ON-SCREEN MENU will appear. Press POINT LEFT/RIGHT button(s) to move a red frame pointer to SETTING Menu icon (refer to page 37).
2 Press POINT DOWN button to move a red frame pointer to "Lamp counter reset" and then press SELECT button. Message "Lamp replace counter reset?" is displayed. Move pointer to [Yes] and then press SELECT button.
3 Another confirmation dialog box appears and select [Yes] to reset Lamp Replace Counter.
Do not reset Lamp Replace Counter except after Projection Lamp is replaced.
TROUBLESHOOTING
Before calling your dealer or service center for assistance, check matters below once again.
- Make sure you have connected a projector to your computer or video equipment as described in section "CONNECTING PROJECTOR" on pages 11 \~ 13.
- Check cable connection. Verify that all computer, video and power cord are properly connected.
- Verify that all power is switched on.
- If a projector still does not produce an image, re-start your computer.
- If an image still does not appear, unplug a projector from your computer and check your computer monitor's display. Problem may be with your graphics controller rather than with a projector. (When you reconnect a projector, be sure to turn computer and monitor off before you power up a projector. Power equipment back on in order of : Projector and computer.)
- If problem still exists, check following chart.
| Problem: Try these Solutions | |
| No power. | Plug a projector into your AC outlet.Make sure READY Indicator lights.Wait 90 seconds after a projector is turned OFF when turning a projector back on.NOTE: After pressing Power ON-OFF button to OFF, make sure a projector works as follows:LAMP indicator lights bright and READY indicator turns off.After 90 seconds, READY indicator lights green again and a projector may be turned on by pressing Power ON-OFF button.Check WARNING TEMP. indicator. If indicator flashes red, a projector cannot be turned on.(See "TURNING ON/OFF PROJECTOR" section on page 19.)Check Projection Lamp. (Refer to page 39.) |
| Image is out of focus. | Adjust focus of a projector.Make sure a projection screen is at least 4.6' (1.4m) from a projector.Check Projection Lens to see if it needs cleaning.NOTE: Moving a projector from a cool temperature location to a warm temperature location may result in moisture condensation on Projection Lens. In such an event, leave a projector OFF and wait until condensation disappears. |
| Picture is Left/Right reversed. | Check Ceiling / Rear feature. (See “SETTING” section on page 35.) |
| Picture is Top/Bottom reversed. | Check Ceiling feature. (See “SETTING” section on page 35.) |
| Some displays are not seen during Operation. | Check Display feature.(See “SETTING” section on page 35.) |
| No image. | Check connection between your computer or video equipment and a projector.When turning a projector on, it takes about 30 seconds to display an image.Check system that you select is corresponding with your computer or video equipment.Make sure temperature is not out of Operating Temperature (5°C ~ 35°C). |
| No sound. | Check audio cable connection from audio input source.Adjust audio source.Press VOLUME (+) button.Press MUTE button. |
| Remote Control Unit does not work. | Check batteries.Check ALL-OFF switch on Remote Control Unit is set to “ON”.Make sure nothing is between Infrared Remote Receiver and Remote Control Unit.Make sure you are not too far from a projector when using Remote Control Unit.Maximum operating range is 16.4' (5m).Check transmitted signal mode from Remote Control Unit.(See“SETTING” section on page 36.) |
| Wireless Mouse function does not work. | Check cable connection between a projector and your computer.Check mouse setting on your computer.Turn a projector on before turning on a computer. |
Where to Get Help :
If you still need help after checking the table above, you should call your dealer's technical support line and explain your problem.
If your dealer cannot solve your problem, please call InFocus Corporation's Technical Support directly at 1-800-799-9911. Support is free between 6 a.m. and 6 p.m. PST, Monday through Friday. Support is available in North America after hours and weekends for a fee at 1-888-592-6800. Or, send us an e-mail at techsupport@infocus.com.
In Europe, call InFocus in The Netherlands at (31) 20-5792000.
In Asia, call InFocus in Singapore at (65) 6353-9449. Or, send us an e-mail at techsupport@infocus.com.
Our World Wide Web address is http://www.infocus.com.
In the event that your unit is determined to be defective, you'll be issued a Return Authorization Number. After you've received this number, send the unit, a copy of your sales receipt, and a description of the problem, freight prepaid, to Proxima. Clearly note the Return Authorization Number on the outside of the shipping box.

This symbol on the nameplate means the product is Listed by Underwriters Laboratories Inc. It is designed and manufactured to meet rigid U.L. safety standards against risk of fire, casualty and electrical hazards.

The CE Mark is a Directive conformity mark of the European Community (EC).
TECHNICAL SPECIFICATIONS
| Projector Type | Multi-media Projector |
| Dimensions (W x H x D) | 12.6" x 6.6" x 18.5" (319 mm x 168 mm x 470 mm) |
| Net Weight | 18.5 lbs (8.4 kg) |
| LCD Panel System | 1.3" TFT Active Matrix type, 3 panels |
| Panel Resolution | 1024 x 768 dots |
| Number of Pixels | 2,359,296 (1024 x 768 x 3 panels) |
| Color System | PAL, SECAM, NTSC, NTSC4.43, PAL-M and PAL-N |
| High Definition TV Signal | 480i, 480p, 575i, 575p, 720p, 1035i and 1080i |
| Scanning Frequency | H-sync. 15 ~ 100 KHz, V-sync. 50 ~ 100 Hz |
| Projection Lens | F1.7 ~ 2.0 lens with f=48.2 mm ~ 62.6 mm Motor zoom and focus |
| Throw distance | 4.6' (1.4 m) ~ 48.3' (14.7 m) |
| Motorized Lens Shift | Up and Down |
| Projection Image Size (Diagonal) | Adjustable from 31" to 400" |
| Horizontal Resolution | 800 TV lines (HDTV) |
| Projection Lamp | 275 watt type |
| Input 1 Jacks | DVI Terminal (Digital), HDB 15-pin Terminal (Analog)and Stereo Mini Type Jack (Audio) |
| Input 2 Jacks | BNC Type x 5 (G or VIDEO/Y, B or Cb/Pb, R or Cr/Pr, H and V), Stereo MiniType Jack (Audio) |
| Input 3 Jacks | RCA Type x 3 (VIDEO/Y, Cb/Pb and Cr/Pr), RCA Type x 2 (Audio R and L)and DIN 4-pin (S-Video) |
| Other Jacks | DIN 8-pin (Control port), USB port (Series B receptacle)and Wired Remote Jack |
| Built-in Speakers | INT. SP. Stereo (R and L), 2 watt RMS (T.H.D. 10%) |
| Feet Adjustment | 0° to 10.5° |
| Voltage andPower Consumption | AC 100 ~ 120 V (4.8 A Max. Ampere), 50 / 60 Hz (The U.S.A and Canada)AC 200 ~ 240 V (2.4 A Max. Ampere), 50 / 60 Hz (Continental Europe) |
| Operating Temperature | 41 °F ~ 95 °F (5 °C ~ 35 °C) |
| Storage Temperature | 14 °F ~ 140 °F (-10 °C ~ 60 °C) |
| Remote Control Transmitter | Power Source : AA, UM3 or R06 Type x 2Operating Range : 16.4' (5m) / ±30°Dimensions : 2.2" x 1.3" x 7.6" (55mm x 34mm x 192mm)Net Weight : 0.36 lbs (165 g) (including batteries)Laser Pointer : Class II Laser (Max. Output : 1mW / Wave length : 650±20nm) |
| Accessories | User's GuideAC Power CordWireless/Wired Remote Control Transmitter and BatteriesRemote Control CableVGA CableMAC/VGA Adapter3 Types Control Cable (For PS/2, Serial and ADB port)Protective Dust CoverLens Cover |
- Specifications are subject to change without notice.
- LCD panels are manufactured to the highest possible standards. At least 99.99% of the pixels are effective, however a tiny fraction of the pixels (0.01% or less) may be ineffective by the characteristics of the LCD panels.
CONFIGURATIONS OF TERMINALS
COMPUTER INPUT-1 TERMINAL (ANALOG)
Terminal : HDB15-PIN
Connect display output terminal of computer to this terminal with VGA Cable (supplied). When connecting Macintosh computer, MAC Adapter (supplied) is required.
Pin Configuration
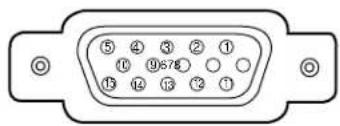
| 1 | Red Input | 9 | +5V Power |
| 2 | Green Input | 10 | Ground (Vert.sync.) |
| 3 | Blue Input | 11 | Sense 0 |
| 4 | Sense 2 | 12 | DDC Data |
| 5 | Ground (Horiz.sync.) | 13 | Horiz. sync. |
| 6 | Ground (Red) | 14 | Vert. sync. |
| 7 | Ground (Green) | 15 | DDC Clock |
| 8 | Ground (Blue) | ||
COMPUTER INPUT-1 TERMINAL (DIGITAL)
Terminal : DVI 24-pin
Connect display output terminal of computer to this terminal with DVI cable (for Single Link T.M.D.S. / not supplied).
Pin Configuration
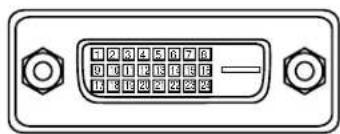
| 1 | T.M.D.S. Data2- | 9 | T.M.D.S. Data1- | 17 | T.M.D.S. Data0- |
| 2 | T.M.D.S. Data2+ | 10 | T.M.D.S. Data1+ | 18 | T.M.D.S. Data0+ |
| 3 | T.M.D.S. Data2 Shield | 11 | T.M.D.S. Data1 Shield | 19 | T.M.D.S. Data0 Shield |
| 4 | No Connect | 12 | No Connect | 20 | No Connect |
| 5 | No Connect | 13 | No Connect | 21 | No Connect |
| 6 | DDC Clock | 14 | +5V Power | 22 | T.M.D.S. Clock Shield |
| 7 | DDC Data | 15 | Ground (for +5V) | 23 | T.M.D.S. Clock+ |
| 8 | No Connect | 16 | Hot Plug Detect | 24 | T.M.D.S. Clock- |
CONTROL PORT CONNECTOR
Terminal : Mini DIN 8-PIN
Connect control port (PS/2, Serial or ADB port) on your computer to this connector with Control Cable (supplied).
Pin Configuration
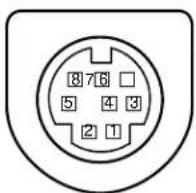
| PS/2 Serial | ADB | ||
| 1 | ---- | R X D | ---- |
| 2 | CLK | ---- | ADB |
| 3 | DATA | ---- | ---- |
| 4 | GND | GND | GND |
| 5 | ---- | RTS / CTS | ---- |
| 6 | ---- | T X D | ---- |
| 7 | GND | GND | ---- |
| 8 | ---- | GND | GND |
USB CONNECTOR (Series B)
Connect USB port terminal on your computer or peripheral equipment to this connector with USB Cable (not supplied).
Pin Configuration
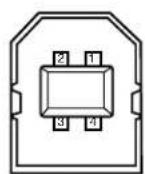
| 1 | Vcc |
| 2 | - Data |
| 3 | + Data |
| 4 | Ground |
Limited Warranty
InFocus Corporation ("InFocus") warrants that the Projector ("Product") purchased from InFocus, an InFocus distributor, or an WInFocus Wreseller will conform to the Wmanufacturer's specifications and be free Wfrom defects in material or workmanship for the Warranty period provided below. InFocus does not warrant that the Product will meet the specific requirements of the end-user customer.
If the Product, which is the subject of this Limited Warranty, is defective in material or workmanship during the warranty period, InFocus, at its option will REPAIR or REPLACE the Product.
All exchanged parts and products replaced under this Warranty will become property of InFocus. InFocus' sole obligation is to supply (or pay for) all labor necessary to repair the Product found to be defective within the Warranty period and to repair or replace defective parts with new parts or, at the option of InFocus serviceable used parts that are equivalent or superior to new parts performance.
Limited Warranty Alternatives: Subject to the Limitations, Exclusions and Disclaimers, InFocus Warrants as follows:
- W2 Year Parts and Labor Product Warranty From the date of purchase, InFocus warrants that the Product will conform to the manufacturers' specifications and be free from defects in material or workmanship for a period of two (2) years.
- WI Year Parts Only Accessory Warranty - From the date of purchase, InFocus warrants that the customer replaceable and accessory products will conform to the manufacturers' specifications and be free from defects in material or workmanship for a period of one (1) year.
- W90 Day/500 Hour Replacement Lamp Warranty - Lamp Products purchased in projectors or separately as replacements after the original projector purchases is Ninety (90) days or 500 hours, whichever comes first. During the Warranty period for the Product, InFocus warrants that Replacement lamps, which are purchased at the time of projector purchase, will have a 90-day or 500 hour warranty, whichever comes first, from the date the spare lamp is put into use.
WARRANTY LIMITATION AND EXCLUSION
THIS WARRANTY SETS FORTH INFOCUS' MAXIMUM LIABILITY FOR ITS PRODUCT. THIS WARRANTY EXTENDS ONLY TO PRODUCTS PURCHASED FROM INFOCUS OR AN INFOCUS AUTHORIZED RESELLER. InFocus shall have no further obligation under the foregoing Limited Warranty if the Product has been damaged due to abuse, misuse, neglect, smoke exposure (cigarette or otherwise), accident, unusual physical or electrical stress, unauthorized modifications (including use of an unauthorized mount), tampering, alterations, or service other than by InFocus or its authorized agents, causes other than from ordinary use or failure to properly use the Product in the application for which said Product was intended.
This Warranty excludes Product or accessory cleaning, repair, or replacement of plastics due to cosmetic damage and damage as a result of normal wear. Product repair outside of the terms of the Limited Warranty will be on a time and materials basis. Prolonged Product “demonstration” causes unusual Product wear and is not considered normal use under the terms of this Limited Warranty.
The Accessory Warranty covers the accessory item only and excludes normal wear. The Lamp Product Warranty excludes expected lamp degradation.
Remanufactured WProducts Wand WSoftware WProducts Ware Wexempt Wfrom Wthe Wforegoing Limited WWarran Please refer to the appropriate Remanufactured Product Limited Warranty or Software Product Limited Warranty for applicable Warranty information.
DISCLAIMER OF UNSTATED WARRANTIES
THE WARRANTY PRINTED ABOVE IS THE ONLY WARRANTY APPLICABLE TO THIS PRODUCT. ALL OTHER WARRANTIES, EXPRESS OR IMPLIED, INCLUDING, BUT NOT LIMITED TO, THE IMPLIED WARRANTIES OF WMERCHANTABILITY WAND WFITNESS WFOR PARTICULAR WPURPOSE WARE WDISCLAIMED. THERE ARE NO WARRANTIES THAT EXTEND BEYOND THE DESCRIPTION ON THE FACE HEREOF AND THE FOREGOING WARRANTY SHALL NOT BE EXTENDED, ALTERED OR VARIED EXCEPT BY WRITTEN INSTRUMENT SIGNED WBY WINFOCUS. WSOME JURISDICTIONS WDO WNOT ALLOW LIMITATIONS ON WHOW LONG AN IMPLIED WARRANTY MAY LAST, SO SUCH LIMITATIONS MAY NOT APPLY TO YOU.
Limited Warranty Period
The Limited Warranty period commences on the date of purchase by the end-user customer for both the 2 year Product Warranty and the 1 year Accessory Warranty. These Limited Warranty provisions shall apply only to the end-user purchaser (first person or entity that purchased a new Product for personal or business use and not for the purpose of distribution or resale).
To Be Eligible For Limited Warranty Coverage
Any Wperson Wexercising Wa Wclaim under this WLimited Warranty Wmust Westablish Wto Wthe satisfaction Wo. InFocus both Wthe date Wof purchase Wand Wthat the WProduct Wwas Wpurchased new. WThe Wsales Wreceipt Wor Winvo showing the date of purchase of the Product or Accessory is the proof of the date of purchase.
To Obtain Warranty Service
During the Limited Warranty period, to exercise this Limited Warranty, the purchaser must first contact 1) InFocus, 2) a service facility authorized by InFocus or 3) the place of original purchase.
InFocus Customer Service - 1-800-799-9911 or techsupport@infocus.com
E
For Warranty service, the purchaser will be advised to return or deliver the defect freight and all fees prepaid, to an InFocus Service Center or to a service facility authorized by InFocus. When returning Product to InFocus, a Return Material Authorization Number (RMA #) is required and must be clearly displayed on the outside of the shipping carton or a similar package affording an equal degree of protection. InFocus or the service facility authorized by InFocus will return the repaired/replaced Product freight prepaid to the purchaser.
Products returned for Warranty service must be accompanied by a written letter that: (i) explains the problem; (ii) provides proof of date of purchase; (iii) provides the dealer's name; and (iv) provides the model and serial number of the Product. Upon request of InFocus Corporation or an authorized repair center for InFocus, proof of legal importation must accompany the warranty repair Product, otherwise the Product must be returned to the place of original purchase, to the manufacturer (Purchaser must bear all tax, duty and freight), or the Purchaser must bear charges for the warranty repair.
No repair or replacement of Product or part thereof shall extend the Limited Warranty period as to the entire Product. Warranty on the repair part and workmanship shall only be effective for a p ninety (90) days following the repair or replacement of that part or the remaining period of the Product Limited Warranty whichever is greater.
LIMITATION OF LIABILITY
IT IS UNDERSTOOD AND AGREED THAT INFOCUS' LIABILITY WHETHER IN CONTRACT, IN TORT, WUNDER WANY WWARRANTY, WIN WNEGLIGENCE WOR WOTHERWISE WSHALL WNOT WEXCEED WTHE RETURN OF THE AMOUNT OF THE PURCHASE PRICE PAID BY PURCHASER AND UNDER NO CIRCUMSTANCES SHALL INFOCUS BE LIABLE FOR SPECIAL, INDIRECT, INCIDENTAL OR CONSEQUENTIAL DAMAGES OR LOST PROFITS, LOST REVENUES OR LOST SAVINGS. THE PRICE STATED FOR THE PRODUCTS IS A CONSIDERATION IN LIMITING INFOCUS' LIABILITY.
Limitation on Bringing Action ____ - No action, regardless of form, arising out of the agreement to purchase the product may be brought by purchaser more than one year after the cause of action has accrued.
Governing Law____ - Any action, regardless of form, arising out of the agreement to purchase the product is governed by Oregon law.
Mandatory Arbitration ____ - Any action, regardless of form, arising out of the agreement to purchase the product is subject to mandatory arbitration.
SOME JURISDICTIONS DO NOT ALLOW THE EXCLUSION OR LIMITATION OF INCIDENTAL OR CONSEQUENTIAL DAMAGES SO THE ABOVE LIMITATION OR EXCLUSION MAY NOT APPLY TO YOU. THIS LIMITED WARRANTY GIVES YOU SPECIFIC LEGAL RIGHTS, AND YOU MAY ALSO HAVE OTHER RIGHTS, DEPENDING ON JURISDICTION.
InFocus Corporation
27700B SW Parkway Avenue
Wilsonville, Oregon 97070-9215
1-800-294-6400 • 503-685-8888
Fax: 503-685-8887
http://www.infocus.com
In Europe:
Strawinskylaan 585.
1077 XX Amsterdam, The Netherlands
Phone: (31) 20-5792000
Fax: (31) 20-5792999
In Asia:
238A Thomson Road
18-01/04 Novena Square
Singapore 307684
Telephone: (65) 6334-9005
Fax: (65) 6333-4525
Part No. 010-0428-00
11/2002
610 304 0035 (1AA6P1P3748-- PK3F)
Printed in Japan
- TO THE OWNER
- SAFETY PRECAUTIONS
- WARNING : TO REDUCE THE RISK OF FIRE OR ELECTRIC SHOCK, DO NOT EXPOSE THIS APPLIANCE TO RAIN OR MOISTURE.
- Federal Communication Commission Notice
- CAUTION!
- AC POWER CORD REQUIREMENT
- AC Power Cord for the United States and Canada :
- FEATURES AND DESIGN 6
- PREPARATION 7
- CONNECTING PROJECTOR 11
- BEFORE OPERATION 14
- COMPUTER MODE 22
- VIDEO MODE 30
- SETTING 35
- APPENDIX 37
- TRADEMARKS
- ◆ Compact Design
- ◆ Compatibility
- ◆ High Resolution Image
- ◆ Multi-Scan System
- ◆ One-Touch Auto PC Adjustment
- ◆ Motor-driven Lens Shift
- ◆ Digital Zoom (for Computer)
- ♦ Keystone Correction
- Power Management
- ◆ Digital Visual Interface
- ♦ Laser Pointer Function
- ◆ Wireless Mouse
- ◆ Multilanguage Menu Display
- NAME OF EACH PART OF PROJECTOR
- BACK OF CABINET
- EXHAUST VENT
- HOT AIR EXHAUSTED!
- AIR INTAKE VENTS
- SETTING-UP PROJECTOR
- CONNECTING AC POWER CORD
- CAUTION
- POSITIONING PROJECTOR
- ROOM LIGHT
- LENS SHIFT ADJUSTMENT
- ADJUSTABLE FEET
- MOVING PROJECTOR
- CAUTION IN CARRYING OR TRANSPORTING A PROJECTOR
- TERMINALS OF PROJECTOR
- CONNECTING TO COMPUTER
- ◆ MAC ADAPTER
- NOTE :
- CONNECTING TO VIDEO EQUIPMENT
- Cables used for connection (\* = Cable is not supplied with this projector.)
- LASER POINTER FUNCTION
- Operating Range
- Remote Control Batteries Installation
- TOP CONTROLS AND INDICATORS
- ZOOM BUTTON
- FOCUS BUTTON
- MENU BUTTON
- POWER ON-OFF BUTTON
- LAMP INDICATOR
- READY INDICATOR
- WARNING TEMP. INDICATOR
- LAMP REPLACE INDICATOR
- AUTO PC ADJ. BUTTON
- POINT (VOLUME + / - ) BUTTONS
- INPUT BUTTON
- LENS SHIFT BUTTON
- IMAGE BUTTON
- SELECT BUTTON
- DISPLAY MENU
- MOVING POINTER
- SELECT ITEM
- Select Menu to be adjusted
- Control or adjust item through ON-SCREEN MENU
- MENU BAR
- FOR PC SOURCE
- FOR VIDEO SOURCE
- TURNING ON / OFF PROJECTOR
- TURNING ON PROJECTOR
- TURNING OFF PROJECTOR
- ADJUSTING SCREEN
- ZOOM ADJUSTMENT
- E
- FOCUS ADJUSTMENT
- KEYSTONE ADJUSTMENT
- PICTURE FREEZE FUNCTION
- BLANK FUNCTION
- P-TIMER FUNCTION
- SOUND ADJUSTMENT
- DIRECT OPERATION
- Volume
- Mute
- MENU OPERATION
- SELECTING INPUT SOURCE
- SELECTING COMPUTER SYSTEM
- WHEN SELECT INPUT 1 (COMPUTER INPUT TERMINALS)
- Digital
- Analog
- WHEN SELECT INPUT 2 (5 BNC INPUT JACKS)
- AUTOMATIC MULTI-SCAN SYSTEM
- Auto
- —
- D-VGA, D-SVGA or D-XGA
- SELECT COMPUTER SYSTEM MANUALLY
- PC ADJUSTMENT
- AUTO PC ADJUSTMENT
- Auto PC Adj.
- NOTE
- MANUAL PC ADJUSTMENT
- Fine sync
- Total dots
- Horizontal
- Vertical
- Current mode
- Clamp
- Display area
- Display area H
- Display area V
- Full screen
- 3
- Store
- Mode free
- Reset
- Quit
- COMPATIBLE COMPUTER SPECIFICATIONS
- PICTURE IMAGE ADJUSTMENTS
- IMAGE LEVEL SELECT (DIRECT)
- Standard
- Real
- IMAGE 1\~4
- IMAGE LEVEL SELECT (MENU)
- IMAGE LEVEL ADJUSTMENT
- Contrast
- Brightness
- White balance (Red)
- White balance (Green)
- White balance (Blue)
- Gamma
- PICTURE SCREEN ADJUSTMENT
- Normal
- True
- Wide
- Digital zoom +
- Digital Zoom –
- WHEN SELECT INPUT 3 (AV TERMINALS)
- PAL / SECAM / NTSC / NTSC4.43 / PAL-M / PAL-N
- Y, Pb/Cb, Pr/Cr JACKS
- COMPONENT VIDEO SIGNAL FORMAT
- Cinema
- Color
- Tint
- Sharpness
- Noise reduction
- Progressive scan
- SETTING MENU
- Language
- Keystone
- Blue back
- Display
- Logo
- Ceiling
- Rear
- On start
- Lamp mode
- Remote control
- To change code of Projector;
- To change code of Remote Control Unit;
- USB
- Wireless Mouse mode
- Projector mode
- Lamp counter reset
- INSTALLATION
- POINT button
- SELECT (LEFT CLICK) button
- RIGHT CLICK button
- MAINTENANCE
- AIR FILTER CARE AND CLEANING
- RECOMMENDATION
- CLEANING PROJECTION LENS
- LAMP REPLACEMENT
- ORDER REPLACEMENT LAMP
- LAMP REPLACE COUNTER
- TROUBLESHOOTING
- Where to Get Help :
- CONFIGURATIONS OF TERMINALS
- COMPUTER INPUT-1 TERMINAL (ANALOG)
- COMPUTER INPUT-1 TERMINAL (DIGITAL)
- CONTROL PORT CONNECTOR
- USB CONNECTOR (Series B)
- Limited Warranty
- WARRANTY LIMITATION AND EXCLUSION
- DISCLAIMER OF UNSTATED WARRANTIES
- Limited Warranty Period
- To Be Eligible For Limited Warranty Coverage
- To Obtain Warranty Service
- LIMITATION OF LIABILITY
- 18-01/04 Novena Square
Brand : INFOCUS
Model : LP810
Category : Video projector