
DP2000 - Video projector KODAK - Free user manual and instructions
Find the device manual for free DP2000 KODAK in PDF.


| Product Type | Home Theater Video Projector |
| Model | Kodak DP2000 |
| Display Technology | DLP |
| Native Resolution | 1920 x 1080 (Full HD) |
| Brightness (Lumens) | 2000 ANSI Lumens |
| Contrast Ratio | 10000:1 |
| Lamp Type | LED |
| Lamp Life | 30000 Hours |
| Keystone Correction | ±40° Vertical |
| Zoom | Manual 1.1x |
| Inputs | HDMI x2, USB, VGA, AV, Audio 3.5mm |
| Outputs | Audio 3.5mm, Speaker 3W |
| Dimensions (W x D x H) | 250 x 200 x 80 mm |
| Weight | 1.5 kg |
| Power Supply | 100-240V AC, 50/60Hz, 80W |
| Maintenance | Clean lens with soft dry cloth; ensure ventilation slots are dust-free |
| Safety Warning | Do not stare into lens; keep away from water and heat sources |
| Accessories Included | Remote control, power cable, user manual |
| Repairability | LED light source not user-replaceable; contact authorized service for repairs |
| Warranty | 1 Year Limited |
Frequently Asked Questions - DP2000 KODAK
User questions about DP2000 KODAK
0 question about this device. Answer the ones you know or ask your own.
Ask a new question about this device
Download the instructions for your Video projector in PDF format for free! Find your manual DP2000 - KODAK and take your electronic device back in hand. On this page are published all the documents necessary for the use of your device. DP2000 by KODAK.
USER MANUAL DP2000 KODAK
with KODAK Image Manager Software
FCC Warning
This equipment has been tested and found to comply with the limits for a Class A digital device, pursuant to part 15 of the FCC Rules. These limits are designed to provide reasonable protection against harmful interference when the equipment is operated in a commercial environment. This equipment generates, uses, and can radiate radio frequency energy and, if not installed and used in accordance with the instruction manual, may cause harmful interference to radio communications. Operation of this equipment in a residential area is likely to cause harmful interference in which case the user will be required to correct the interference at his own expense.
Canada
This Class A digital apparatus complies with Canadian ICES-003.
Safety Certifications
UL, CUL, TÜV, NOM
EN 55022 Warning
This is a Class A product. In a domestic environment it may cause radio interference, in which case the user may be required to take adequate measures. The typical use is in a conference room, meeting room or auditorium.
Declaration of Conformity
Manufacturer: Eastman Kodak Company
Rochester, New York 14650 USA
We declare under our sole responsibility that the KODAK DP2000 Digital Projector conforms to the following directives and norms:
Directive 89/336/EEC, Amended by 93/68/EEC
EMI: EN 55022 (1992) Class A
EMC: EN 50082-1 (1992)
IEC 801-2, IEC 801-3, IEC 801-4
Directive 73/23/EEC, Amended by 93/68/EEC
Safety: EN 60950: 1992 + Λ1 + Λ2 + Λ3: 1995
July, 1999
Australian Certification C-tick mark

Table of Contents
Safety Instructions 1
Safety Definitions 1
Important Operating Considerations 2
Battery Use 3
Introduction 5
Image Resolution 5
Compatibility 5
Unpacking the Projector 6
Projector Features 7
Usage Guidelines 7
If You Need Assistance 8
Warranty 10
Setting up the Projector ..... 11
Positioning the Projector 11
Connecting the Projector 12
Starting the Projector 17
Turning Off the Projector 18
Using the Projector 19
Basic Image Adjustment 19
Adjusting the Projector 20
The Remote Control 21
Using the Keypad and Remote Control 23
Using the On-Screen Menus 25
Kodak Menu 35
Maintenance & Troubleshooting 37
Cleaning the Lens 37
Replacing the Projection Lamp 38
Replacing the Batteries in the Remote Control ..... 41
Using the Kensington Lock 41
Troubleshooting 42
Appendix A 47
Specifications 47
Appendix B 49
Portable and Laptop Activation Chart 49
Appendix C 59
Using Video Mirroring with a PowerBook Computer .... 59
Appendix D 61
Projected Image Size 61
Index 63
Safety Instructions
Please read and follow all safety instructions provided before using your new projector. Failure to comply with safety instructions may result in fire, electrical shock, or personal injury and may damage or impair protection provided by equipment. Please save all safety instructions.
Safety Definitions
- Warning: Statements identify conditions or practices that could result in permanent personal injury.
- Caution: Statements identify conditions or practices that could result in damage to your equipment.
Safety Symbols

Attention: For information about use of a feature, please refer to this User's Guide.

Warning: Hot surface. Do not touch.

An arrow pointing to the lamp door on the projector.
Safety Terms
- Warning: Don't look directly into the lens when the projector is turned on.

- Warning: To replace the lamp, turn the power off and unplug the power cord. To avoid burns, wait 30 minutes before opening the lamp door. Follow all instructions provided in this User's Guide.

- Warning: Please use the power cord provided. Connect the power cord to a receptacle with a protective safety (earth) ground terminal.
- Warning: Refer all service to qualified service personnel. Servicing your own projector will void the warranty. See “If You Need Assistance” on page 8 for the customer service contact information.
- Caution: Don't block ventilation openings.
- Caution: Don't set liquids on the projector. Spilled liquids may damage your projector.
- Caution: Don't place the projector on a hot surface or in direct sunlight.
- Caution: Do not drop the projector. Transport the projector in a Kodak-approved case.
Important Operating Considerations
Do not place the projector on a tablecloth or other soft covering that may block the vents. In the unlikely event of the bulb rupturing, thoroughly clean the area behind the projector and discard any edible items placed in that area.
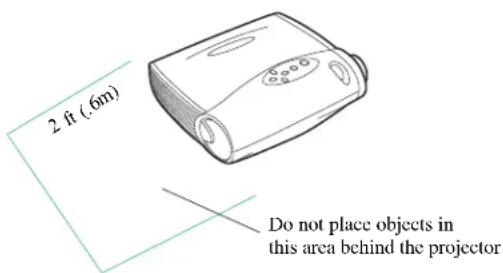
Battery Use
Read and follow all warnings and instructions supplied by the battery manufacturer.
Keep batteries away from children.
Store batteries in their original packaging.
When inserting batteries, verify that the (+) and (-) terminals are aligned correctly.
Replace all batteries of a set at the same time.
Do not mix new batteries with used ones.
Do not use batteries of different chemistries, capacities, brands or sizes together. Leakage could result.
Do not disassemble, recharge, or short-circuit batteries.
Do not subject batteries to high temperature or fire.
Discard used batteries according to all applicable local and national regulations. Utilize established community battery recycling programs where they are available. Consult battery manufacturers for additional information for disposing of batteries.
In the unlikely event of contact with battery electrolyte, customers in the U.S. can contact the Kodak Information Center (KIC) at 1-800-242-2424. U.S. customers can also contact KIC for information regarding electrolyte removal from KODAK product components.
Customers outside the U.S. can contact their local Kodak Customer Service representative.
Introduction
The KODAK DP2000 Digital Projector is specifically designed for the mobile presenter. It packs XGA 1024 x 768 graphics with 16.7 million colors into a small, 4.8 pound package. It generates crisp, clear images using Digital Light Processing ^™ (DLP) technology. The DP2000 is easy to connect, easy to use, easy to transport, and easy to maintain.
Included with the DP2000 is Kodak's exclusive Image Manager feature. With this feature you can select the image display setting best suited for your specific presentation material and projection environment.
Image Resolution
The XGA resolution of the DP2000's projected image is 1024 x 768. The projector cannot compress screen resolutions above 1024 x 768. If your computer's screen resolution is higher than 1024 x 768, reset it to a lower resolution before you connect the projector.
The DP2000 automatically expands 640 x 480 and 800 x 600 images to 1024 x 768. You can display these images at their native resolutions by turning off the Auto Resize feature. See “Auto Resize” on page 28 for more information.
Compatibility
The projector is compatible with a wide variety of computers and video devices, including:
- IBM-compatible computers, including laptops, up to 1024 x 768 resolution.
- APPLE MACINTOSH and POWERBOOK computers up to 1024 x 768 resolution.
- Most standard VCRs, DVD players, camcorders and laser disc players.
Unpacking the Projector
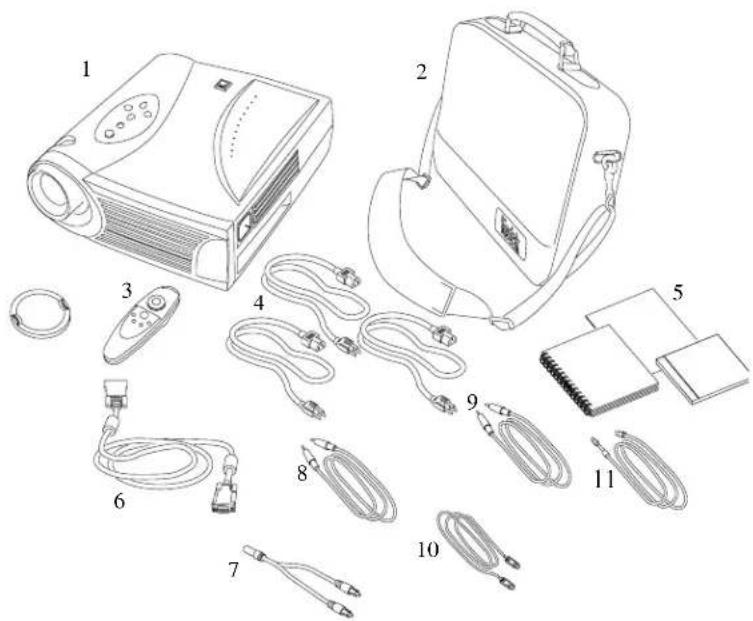
The projector comes with the items shown here. Check to make sure that all are included. Contact your dealer of KODAK products immediately if anything is missing.
-
Digital projector and lens cap 6. VESA computer cable
-
Soft carry case 7. Audio cable adapter
-
Remote control 8. Audio cable
-
Power cords (U.S., U.K, Euro) 9. Composite video cable
-
User's Guide, Quick Start Guide, 10. USB mouse cable and Online User Guide CD 11. PS/2 mouse cable
Projector Features

Usage Guidelines
- Do not look directly into the projection lens when the lamp is turned on. The bright light may harm your eyes.
- Do not block the grills on the projector. Restricting the air flow can cause it to overheat and turn off. If this happens, you must wait a minute before attempting to turn it back on.
- Handle the projector as you would any product with glass components. Be especially careful not to drop it.
- Avoid leaving the projector in direct sunlight or extreme cold for extended periods of time. If this happens, allow it to reach room temperature before use.
- Transport the projector in a Kodak-approved hard or soft case.
If You Need Assistance
The first place to look for help is in “Maintenance & Troubleshooting” on page 37. But you can also get help online, by fax, or by phone.
Online Services
Contact Kodak via:
World Wide Web http://www.kodak.com
(click on Service and Support)
America Online (keyword) KODAK
CompuServe GO KODAK
Kodak Internet List Server photo-cd@info.kodak.com; or
ftp.kodak.com
Faxed Information
Kodak offers automated support by fax:
U.S. and Canada 1-800-508-1531
Europe 44-0-131-458-6962
U.K. 44-0-131-458-6962
Customer Support
If you have questions concerning the operation of your KODAK projector, you can speak directly to a customer support representative. Have the projector serial number ready, and be at your computer with your projector when you call.
In the U.S. and Canada call toll free, 1-888-375-6325, between the hours of 9:00 a.m. and 8:00 p.m. (Eastern Standard Time) Monday through Friday.
The International Toll Line is +44 (0) 131 458 6714.
In Europe call
This product is backed by a limited two-year warranty. The details of the warranty are printed at the back of this manual. A longer term warranty can be purchased from your dealer of KODAK products.
Setting up the Projector
This section describes how to:
• determine where to position the projector
- connect the projector to a computer or a video player
- turn on and turn off the projector
If you are experienced in setting up presentation systems, use the Quick Start card that came with the KODAK DP2000 Digital Projector. Otherwise, follow the procedures described here.
Positioning the Projector
Note: If you want to project from behind a translucent screen, set up the projector behind your screen. See “Rear Projection” on page 31 to reverse the image.
-
Make sure your projector is on a flat surface. It must be within 10 feet (3 m) of your power source and within 6 feet (1.8 m) of your computer.
-
Position the projector the desired distance from the screen.
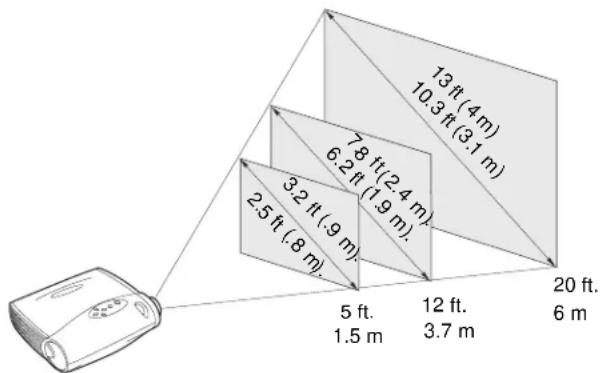
- The distance from the lens of the projector to the screen and the zoom setting determine the size of the projected image as shown here. For more information about image sizes at minimum and maximum zoom settings, see “Projected Image Size” on page 61.
- Make sure the projector and your computer are turned off.
Connecting the Projector
Icons on the projector will aid you when connecting the projector to a computer or video player.
Caution: Turn off the computer, monitor and projector whenever you connect the components.
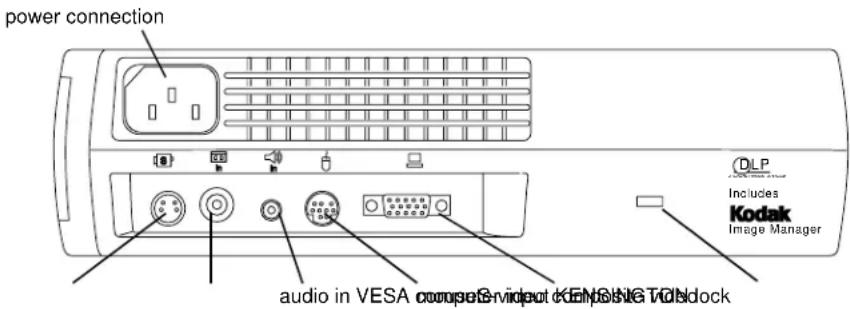
Connecting to a Computer
When you connect the projector to a computer, make sure that the distance between it and the projector is 6 feet or less.
Always use the power cord and VESA cable that shipped with the projector. A surge-protected power strip is recommended.
Many laptop computers do not automatically turn on their external video port when a secondary display device such as a projector is connected. Refer to your computer manual for the command that activates the external video port. Activation commands for some laptop computers are listed in Appendix C.
Note: If you are connecting an older Macintosh computer that does not have a 15-pin connector, use the optional Mac adaptor.
To connect to a computer:
-
Plug one end of the VESA computer cable into the video connector on your computer.
-
Plug the other end of the VESA computer cable in the connector on the projector


Do you want to play your computer's audio on the projector?
-
Plug either end of the audio cable into the audio connector on your computer.
-
Plug the other end of the audio cable into the connector on the projector.
Do you want to control the computer's mouse from the projector's remote control or keypad?
If your computer has a PS/2 connector, use the PS/2 mouse cable.
- Plug the 6-pin end of the PS/2 mouse cable into the mouse connector on your computer.
- Plug the 8-pin end of the PS/2 mouse cable into the connector on the cable hub.
If your computer has a USB connector and is running a USB compatible operating system, use the USB mouse cable.
-
Plug the end of the USB mouse cable into the mouse connector on your computer.
-
Plug the end of the USB mouse cable into the connector on the projector.
Note: A USB mouse is hot-pluggable, meaning that you do not need to restart your computer after connecting the mouse to use the mouse. A PS-2 mouse is not hot-pluggable.
Now you're ready to start the projector and computer. Skip to "Starting the Projector" on page 17.
Connecting to a Video Player
If your video player uses a round, one-prong composite video connector, you'll only need the audio cable, audio adapter, and composite video cable that shipped with the projector.
If your video player uses a round, four-prong S-video connector, you'll need an S-video cable in addition to the audio cable and audio adapter. The S-video cable is sold separately.
Note: Your video player may have a "Video Out" connector for a coaxial cable connection. Do not use this to connect to the projector.
To connect to a video player:
- Plug the composite video cable yellow connector into the "video-out" connector on your video player. This connector may be labeled "To Monitor."
- If you're using an S-video cable, connect it to the "S-video out" connector on the video player.
- Plug the other yellow connector into the composite video connector on the back of the projector.
- If you're using S-video, plug the other end of the cable into the "S-video" connector on the projector.

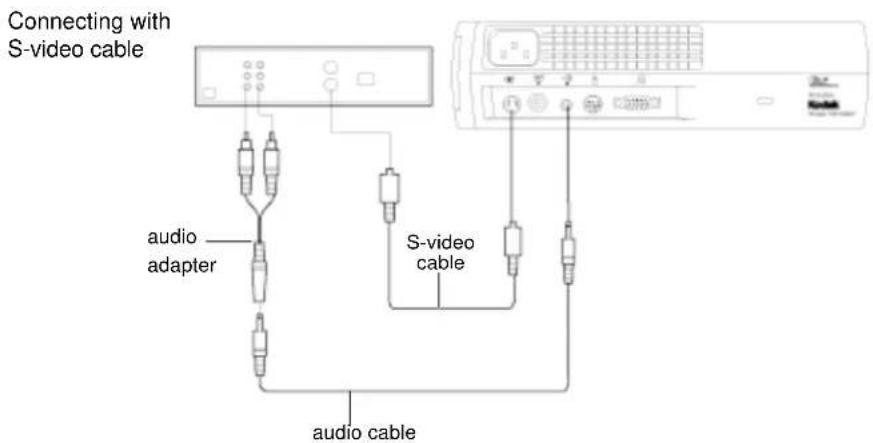
- Plug the plug the audio adapter white connector into the left "audio out" port on your video player. Plug the adapter red connector into the right "audio out" port on the video player.
- Plug the other end of the audio adapter into the audio cable.
- Plug the audio cable into the "audio in" connector on the projector.
The projector is compatible with these major broadcast video standards: NTSC, NTSC 4.43, PAL, PAL-M, PAL-N, and SECAM. It automatically adjusts to optimize its performance for the incoming video. See “Video Standard” on page 30 for details.
Starting the Projector
Note: We recommend using a surge protector power strip.
- Remove the lens cap.
- Plug the power cord into the side of the projector, and then plug it into your electrical outlet.
The fans start to run and the lamp LED on top of the projector lights orange until the software has initialized. Then the LED lights green.
-
Turn on the lamp by pressing the button on the keypad.
The KODAK startup screen appears. -
If you connected the projector to a video player, turn on the video player.
- The video image should appear on the projection screen. If a computer source is active, press the button on the keypad (page 23) or the button on the remote to display your video image. You can select a default source to determine which source the projector examines first during power-up for active video; see “Default Source” on page 31.
- Use the 🔔 🔔 buttons to adjust the volume.
- If you connected the projector to a computer, turn on the computer. Make sure the computer external video port is activated. See “Portable and Laptop Activation Chart” on page 49.
Note: With some computers, the order in which you power up the equipment is very important. Most computers should be turned on last, after all other peripherals have been turned on. Refer to your computer documentation to determine the correct order.
- The computer image should appear on the projection screen. If a video source is active, press the button on the keypad (page 23) or the button on the remote to display your computer's image.
- If necessary, make adjustments to the image using the projector's on-screen menus. To open the menus, press the button on the keypad or remote, then select the Display or Image sub-menu. For more information about the menus, see “Using the On-Screen Menus” on page 25.
Turning Off the Projector
To completely turn off the projector, unplug it. If you want to turn the projector back on immediately, you must allow about a minute for the lamp to cool. The lamp won't light if it's too hot.
Note: Lamp life will be extended if you turn the lamp off, then wait 1 minute while the lamp cools before unplugging the projector. The Lamp LED will light green when the lamp has cooled. See page 24 for details on the Lamp LED.
If you want to turn off the display for a short period of time, press the ⏻ button on the keypad or remote. This blanks the screen for fifteen minutes, but keeps the projector running. (You can change the amount of time the projector stays in standby mode; see “Standby Time” on page 31 for details.) After 15 minutes, the lamp goes out (the projector keeps running). To exit standby mode, press the ⏻ button again. (It may take several seconds for the projection lamp to reach full power and project the image again.)
Using the Projector
This section describes how to use and make adjustments to the projector. It also provides a reference to the keypad and remote control buttons and the options available from the on-screen menus.
Basic Image Adjustment
-
Make sure you have turned on your equipment in the right order (page 17).
-
If the image doesn't display completely, zoom the image (page 20), adjust the height of the projector (page 20) or center the image by adjusting its horizontal or vertical position (page 29). Be sure the projector is at a 90 degree angle to the screen.
-
If the image is out of focus, rotate the focus lens (page 20).
-
If the image appears to shimmer or if it has blurry vertical bars after you have adjusted the focus, turn Auto Image (page 28) off and then back on to reset the automatic sync and tracking. If that doesn't clear up the image, turn Auto Image off and adjust the sync (page 29) and/or the tracking (page 29) manually.
-
If the colors don't look right, check the KODAK Image Manager settings. See "Kodak Menu" on page 35
Or
Adjust the brightness (page 26) and the tint (page 27).
Adjusting the Projector
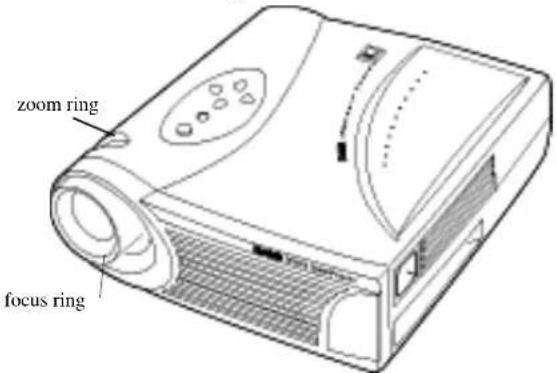
To focus the image, rotate the focus ring until the image is clear. To zoom the image, rotate the zoom ring. This adjusts the image size without affecting focus.
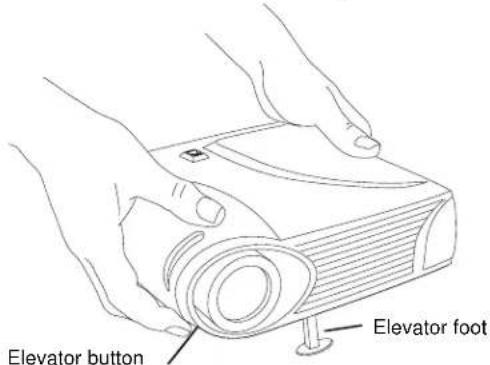
The projector is equipped with a self-locking, quick-release elevator foot and button.
To raise the projector:
-
Press and hold the elevator button.
-
Raise the projector to the height you want, then release the button to lock the elevator foot into position.
The Remote Control
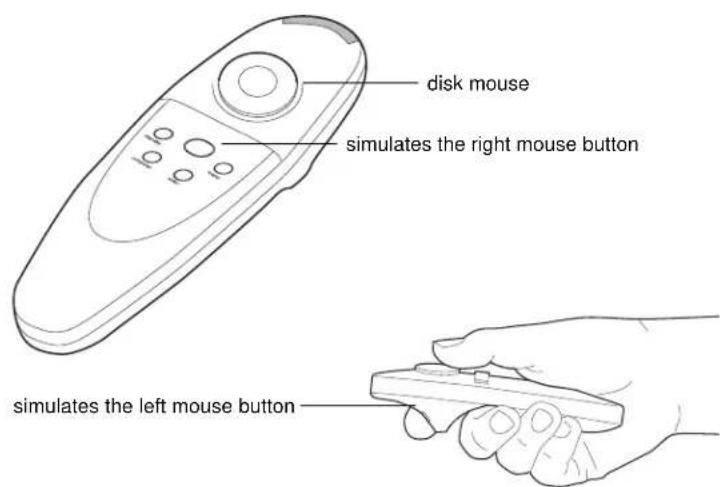
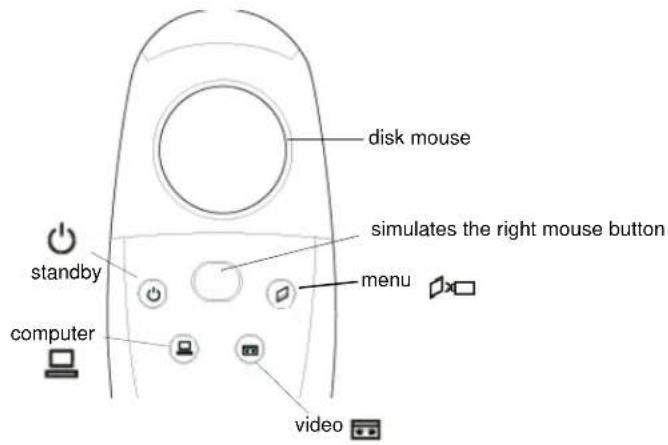
The projector ships with a remote that has four function buttons, a disk mouse and two mouse buttons, one on the top of the remote and one on the bottom.
Point the remote control at the projection screen or at the front or rear of the projector. The range for optimum operation is about 25 feet (7.6 m). If you point the remote at the projection screen, the distance to the screen and back to the projector must not be more than 25 feet (7.6 m). For best results, point the remote directly at the projector.
Note: If the remote is inactive for several minutes, it “sleeps” to conserve battery life. Press any button except the disk mouse to re-activate the remote.
Press anywhere on the edge of the disk mouse to move the cursor on the screen. You can move the cursor at any angle by pressing the corresponding edge of the disk. The mouse button on the top of the remote simulates your computer's right mouse button; the button on the bottom simulates your computer's left mouse button. See “Using the Keypad and Remote Control” starting on page 23 for a description of the four function buttons.
If you are creating presentations in MICROSOFT ^® POWERPOINT ^® , you can use the remote’s mouse buttons to navigate through your presentation while in Slide Show mode. To configure POWERPOINT for this, choose Options from the Tools menu, click the View Tab, de-select the “Popup Menu on Right Mouse Click” option in the Slide Show section, then click OK. Then, when you’re in POWERPOINT’s Slide Show mode, a left click advances to the next slide and a right click returns to the previous slide (other POWERPOINT modes are not affected).
Using the Keypad and Remote Control
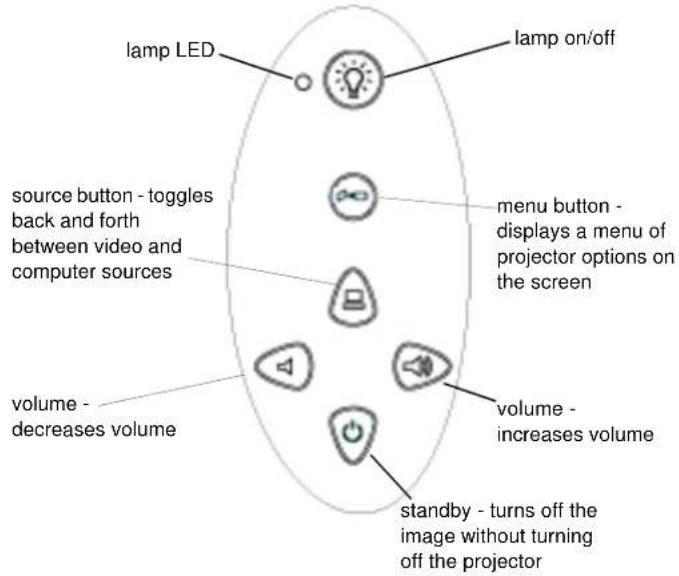
While the menus are displayed, the volume, source, and standby buttons on the keypad act as menu navigation buttons. See “Using the On-Screen Menus” on page 25 for details.
The Keypad Buttons.
The Remote Control Buttons
Lamp on/off (keypad only)

Press the button to turn the lamp on or off. The Lamp LED indicates the state of the lamp. A green Lamp LED indicates that you can turn the lamp on, or the lamp is currently on. An orange LED indicates the software is initializing or the lamp is cooling. Do not press the button when the LED is orange.
Menu
Press open the on-screen menus (the keypad lights green). Press again to close the menus. When you close the menus, the projector saves any changes you made. For more information about the on-screen menus, see “Using the On-Screen Menus” on page 25.
Source (keypad only) or Computer and Video (remote control only)
When you have more than one source (computer and video) connected to the projector, select between them by pressing the ⏻ button on the keypad or the ⏱ button on the remote.
Standby
When you press, the display and audio turn off and a blank screen is displayed for 15 minutes. You can change the amount of time the projector stays in standby mode; see “Standby Time” on page 31 for details.
- If you press again within 15 minutes, the projector returns to normal operations immediately.
- If you don't press again, the lamp turns off after 15 minutes.
- If you press again after 15 minutes, wait until the lamp LED is green.
Volume (keypad only)
• To increase the volume, press
- To decrease the volume, press ◀.
Volume adjustments are saved for each source that you have connected.
Using the On-Screen Menus
The projector has seven drop-down menus that allow you to make image adjustments and change a variety of settings. Most of these adjustments aren't available directly from the keypad.
Note: Some menu items may be grayed out at certain times. This indicates that the item is not applicable to your setup (for example, video standards do not apply to computer sources) or the item is not enabled until another selection is made (for example, Manual Tracking is not available until Auto Image is turned off).
To open the on-screen menus, press the button on the keypad or remote. This changes the volume, source, and standby buttons on the keypad to menu navigation buttons. Press the corresponding buttons to move the cursor up, down, left, or right, or use the disk mouse on the remote. To select a menu, move the cursor left and right to highlight the menu you want. The drop-down menu appears.

To change a menu setting, use the up and down navigation buttons on the keypad or the disk mouse on the remote control to move the cursor up and down to the item you want to change (the selected item is highlighted red), then use the left and right navigation buttons to adjust a setting.
Some submenus, such as Brightness, consist of a slider bar you use to increase or decrease a value. Some submenus, such as Standby Time, consist of options you scroll through to select the desired one. All changes are saved when you close the menus.
To access another menu, use the up and down navigation buttons or the disk mouse on the remote control to move back to the top of the current menu, then use the left and right navigation buttons to move to another menu.
Display Menu
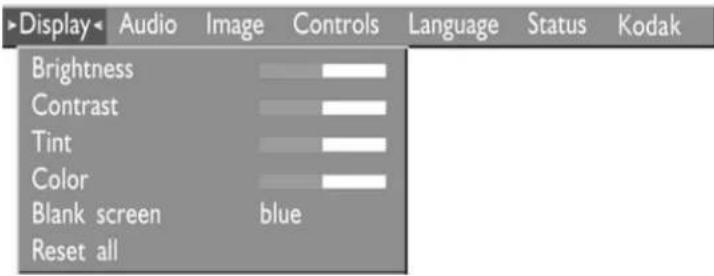
Brightness
Adjusting the brightness changes the intensity of the image.
- Press the left navigation button to darken the image.
- Press the right navigation button to lighten the image.
Contrast
Contrast controls the degree of difference between the lightest and darkest parts of the picture. Adjusting the contrast changes the amount of black and white in the image.
- Press the left navigation button on the keypad to decrease the contrast.
- Press the right navigation button on the keypad to increase the contrast, making the blacks appear blacker and the whites appear whiter.
Tint
The tint adjusts the red-green color balance in the projected image. Changing the Tint setting has no effect on PAL or SECAM video sources.
- Press the left navigation button on the keypad to increase the amount of green in the image.
- Press the right navigation button on the keypad to increase the amount of red in the image.
Color
The color setting adjusts a video image from black and white to fully saturated color.
- Press the left mouse button to decrease the amount of color in the image.
- Press the right mouse button to increase the amount of color in the image.
Blank Screen
Blank Screen determines what color is displayed when there is no active source and when the projector is in standby. Click the left or right navigation button to toggle between blue and black.
Reset All
Click the left or right navigation button to reset all the options (except Language, Video Standard, Rear Projection, and Standby Time) in all the menus to their original settings.
Audio Menu

Volume
Note: Changing the volume from the menu is the same as changing it using the keypad.
- Press the left navigation button to decrease the volume.
- Press the right navigation button to increase the volume.
Volume adjustments you make are saved for each source.
Image Menu

Auto Image
Note: Some screen savers interfere with the operation of Auto Image. If you're experiencing problems, try turning your screen saver off, then turning Auto Image off and back on.
The projector automatically adjusts tracking, signal synchronization and vertical and horizontal position for most computers (Auto Image does not apply to video sources). If you want to adjust these features manually, you must turn off Auto Image first by highlighting Auto Image in the Image menu and clicking either the left or right navigation button to select "off".
Auto Resize
Auto Resize automatically resizes the image by scaling it up. It only affects computer images that are not the projector's native resolution.
When Auto Resize is on, the projector makes the best fit of the image to the screen. If you turn Auto Resize off (by highlighting it in the Image menu and clicking the left or right navigation button to select "off"), the image may be either cropped or too small for the screen.
Manual Sync
Note: The Manual Sync option is available only for computer sources. The projector sets this option automatically for a video source.
The projector adjusts signal synchronization automatically for most computers. But if the projected computer image looks fuzzy or streaked, try turning Auto Image off then back on again. If the image still looks bad, try adjusting the signal synchronization manually:
- Turn Auto Image off.
- Highlight Manual sync, then press the left or right navigation button repeatedly until the image is sharp and free of streaks.
Manual Tracking
The projector adjusts tracking automatically to match the video signal from your computer. However, if the display shows evenly spaced, fuzzy, vertical lines or if the projected image is too wide or too narrow for the screen, try turning Auto Image off then back on again. If the image is still bad, try adjusting the tracking manually:
Note: Manual Tracking option is available only for computer sources. The projector sets this option automatically for a video source.
- Turn Auto Image off.
- Highlight Manual tracking, then press the left or right navigation button repeatedly until the fuzzy vertical bars are gone.
Horizontal position
Note: The Horiz. Position option is available only for computer sources. The projector sets this option automatically for a video source.
Follow these steps to manually adjust the horizontal position:
- Turn Auto Image off.
- Highlight Horizontal position, then press the left navigator button to move the image right or press the right navigator button to move the image left.
Positioning adjustments are saved when you unplug the projector.
Vertical position
Note: The Vert. Position option is available only for computer sources. The projector sets this option automatically for a video source.
Follow these steps to manually adjust the vertical position.
- Turn Auto Image off.
- Highlight Vertical position, then press the left navigation button to move the image down or press the right navigation button to move the image up.
Positioning adjustments are saved when you power off the projector.
Controls Menu
| Display | Audio | Image | Controls | Language | Status | Kodak |
| Video standard | ||||||
| Standby time | 1 minute | |||||
| Rear projection | off | |||||
| Default source | computer | |||||
| Auto source select | of | |||||
| Plug and Play | on | |||||
| Display messages | on | |||||
| Display startup screen | on | |||||
Video Standard
When Video standard is set to Auto, the projector attempts to pick the video standard (NTSC, NTSC 4.43, PAL, PAL-M, PAL-N, or SECAM) automatically based on the input signal it receives. (The video standard options may vary depending on your region of the world.) If the projector is unable to detect the correct standard, the colors might not look right or the image might appear “torn.” If this happens, manually select a standard by clicking either the left or right navigation button and cycling through the standards.
Note: If you already know the video standard used in your geographical area, it's best to manually select it.
Standby Time
This option lets you select how long the lamp stays on and how long the blank screen is displayed in standby mode before the projector turns off. Select among 1, 5, 10, and 15 minutes and 1 and 2 hours by clicking the left or right navigation button and cycling through the options.
Rear Projection
When you turn Rear Projection on, the projector reverses the image so you can project from behind a translucent screen. Highlight Rear Projection, then click the left or right navigation button to turn this feature on and off.
Default Source
Default Source toggles between Computer and Video. This determines which source the projector checks first for active video during power-up. Highlight Default Source and click the left or right navigation button to toggle between the options.
Auto Source Select
This setting toggles between On and Off. When this feature is Off, the projector defaults to the source selected in Default Source. To display another source, you must manually select one by pressing the button on the keypad or the button on the remote control. When this feature is On, the projector automatically finds the active source, checking the default source first. Highlight Auto Source Select and click the left or right navigation button to turn this feature on and off.
Plug and Play
This setting toggles between On and Off. When it is On, most new computers will automatically recognize the projector, then set the monitor resolution and refresh rate accordingly. You need to set the Plug and Play setting to Off for the projector to display properly on some older computers. The Plug and Play setting does not affect video images.
If the projector's display constantly changes between the computer image and the message, "Perfecting the image", you may need to set Plug and Play to Off.
Display Messages
This setting toggles between On and Off. When this feature is On, status messages such as “No signal detected” or “Standby Active” appear in the lower-right corner of the screen. Click the left or right navigation button to turn this feature off and not see status messages.
Display Startup Screen
This setting toggles between On and Off. When this feature is On, the KODAK startup screen appears when the projector starts up and remains until an active source is detected. The startup screen contains information on contacting Kodak. Click the left or right navigation button to turn this feature off and display a plain black or blue screen instead of the startup screen.
Language Menu
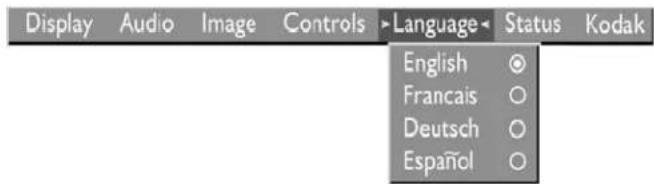
You can display the on-screen menus in English, French, German, and Spanish.
Move the cursor to the language you want, then click the left or right navigation button. The menus redraw immediately.
Status Menu
This is a read-only window for informational purposes. To display the status window, select Show status from the menu, then click the left or right navigation button. To remove the window, click the left or right navigation button.
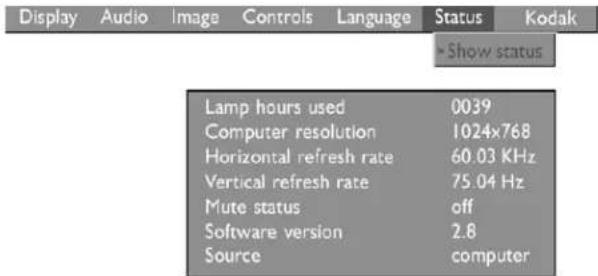
Lamp hours used
Indicates how many hours the current lamp has been in use. The counter starts at zero hours and counts each hour the lamp is in use. Change the bulb when the brightness is no longer acceptable. See “Replacing the Projection Lamp” on page 38 for details.
Computer resolution
Shows your computer's resolution setting. To change this, go to your computer's Control Panel and adjust the resolution in the Display tab. See your computer user's guide for details.
Horizontal refresh rate
The time period that one horizontal line is displayed.
Vertical refresh rate
The time period that one video frame is displayed.
Mute status
Indicates if the audio is muted.
Software version
Indicates the projector's software version. This information is useful when contacting Technical Support.
Source
Indicates the active source, Computer or Video.
Kodak Menu
Kodak's exclusive Image Manager feature allows you to select the image display setting best suited for your specific presentation material and projection environment.

Image Manager Settings
Photo-PC Setting matches the higher contrast found on a standard PC monitor. This option is best for:
- images created on a PC
- images from a KODAK digital camera
- a starting point for composite or S-video inputs.
Photo-Mac Setting matches the lower contrast found on a standard MACINTOSH monitor. It is generally used for images created on or for a MACINTOSH. This setting also works well with a PC if you are using higher than normal contrast PC images.
Rich Colors results in an image with deep contrast and saturated vibrant colors. It is generally used under bright lighting conditions. This setting works well to enhance colors of certain graphics and it may be useful when images created for a MACINTOSH are displayed from a PC.
Spreadsheets results in an image with contrast between a PC and MACINTOSH monitor. It is generally used for text-rich tables, such as financial displays. This setting factors in ambient light, subject matter, and personal preferences to deliver the right balance of contrast and brightness.
Graphics delivers the maximum brightness and high contrast needed to project graphics and text against solid colored backgrounds.
Using the Image Manager
- Click the Kodak menu.
- Select the setting best suited for your presentation material and environment.
The new contrast setting is immediately applied to the image. - Click OK to save the setting as your default Image Manager setting for the current and future presentations.
Maintenance & Troubleshooting
This section describes how to:
- clean the lens
- replace the projection lamp
- replace the batteries in the remote
• use the Kensington lock feature - troubleshoot the projector
Cleaning the Lens
Follow these steps to clean the projection lens:
-
Apply a non-abrasive camera lens cleaner to a soft, dry cloth.
-
Avoid using an excessive amount of cleaner.
-
Abrasive cleaners, solvents or other harsh chemicals might scratch the lens.
-
Lightly wipe the cleaning cloth over the lens in a circular motion.
-
If you don't intend to use the projector immediately, replace the lens cap.
Replacing the Projection Lamp
Caution: To avoid burns, allow the projector to cool for at least 30 minutes before you open the lamp module door. Never extract the lamp module while the lamp is operating.
The lamp hour counter in the Status menu counts the number of hours the lamp has been in use. Replace the lamp when the brightness is no longer acceptable. You can order new lamp modules from your dealer of KODAK products.
Follow these steps to replace the projection lamp:
- Turn off the projector by unplugging the power cord.
-
Wait 30 minutes to allow the lamp to cool thoroughly
-
Invert the projector on a flat surface, then insert a small screwdriver or other flat object into the tab on the lamp module door.

natural_image
Line drawing of a device with a handle and internal compartments (no text or symbols)- Pull the lamp door up and remove it.
Caution: Never operate the projector with the lamp door open or removed. This disrupts the air flow and causes the projector to overheat.
- Loosen the two non-removable screws on the outside of the module.

natural_image
Line drawing of a device casing with internal compartments and mounting points (no text or symbols)- Grasp the pull tab and lift out the lamp module.
Be careful when removing the lamp module so that it does not break.

natural_image
Line drawing of a computer case with internal compartments and mounting holes (no text or symbols)- Install the new lamp module, being sure to align the connectors properly.
Caution: Do not drop the lamp module or touch the glass bulb! The glass may shatter and cause injury.
-
Gently push the module in until it is flush with the bottom case of the projector.
-
Tighten the screws on the outside of the module.
-
Replace the lamp door by inserting the hooks on the rear of the lamp door into the projector and pressing the lamp door into place.
11.Plug in the power cord to turn the projector back on.
- To reset the lamp hour counter in the Status window, press and hold the button, then press the button (while still holding down the button) for 5 seconds. Verify that the counter was reset by pressing the button and viewing the counter in the Status window.
Replacing the Batteries in the Remote Control
The life of the batteries depends on how often and how long you use the remote control. Symptoms of low battery charge include erratic responses when using the remote control and a reduced range of operation.
Follow these steps to replace the batteries:
- Turn the remote control face down in your hand.
- Slide the battery cover off the end of the remote control.
- Remove the old batteries and properly dispose of them.
- Install two new AAA alkaline batteries. Make sure you install each battery in the correct direction.
- Slide the battery cover back on the remote control.
Using the Kensington Lock
The projector has a Kensington Security Standard connector for use with a Kensington MicroSaver Security System. Refer to the information that came with the Kensington System for instructions on how to use it to secure the projector.

natural_image
Line drawing of a projector device with control panel and ports (no text or symbols)Troubleshooting
Problem: Nothing on projection screen
- Make sure that the power cord is properly connected to a fully functional AC electrical outlet. Make sure that the power cord is also properly connected to the projector.
- If the projector is plugged into a power strip, make sure the power strip is turned on.
- Make sure you have removed the lens cap on the projection lens at the front of the projector.
- Make sure the lamp is switched on.
- Check the projector's lamp to ensure that it is securely connected in the lamp module. See “Replacing the Projection Lamp” on page 38.
- Make sure that the cables do not have any bent pins.
Problem: Color or text not being projected
- You might need to adjust the brightness up or down until the text is visible. Refer to “Brightness” on page 26 for more information.
Problem: The screen resolution is not right
- Make sure the computer's video card is set for a resolution of no greater than 1024 x 768.
Problem: Image isn't centered on the screen
- Move the projector to reposition the image.
- Reposition the image using the software. Refer to “Horizontal position” on page 29 and “Vertical position” on page 30.
- Be sure the projector is at a 90 degree angle to the screen.
Problem: Only the start-up screen displays
- Verify that the cables are connected correctly. See page 12 through page 16 for connection procedures.
- Verify that the proper input source is selected. See “Source (keypad only) or Computer and Video (remote control only)” on page 24.
- You might need to turn everything off and turn on the equipment again in the proper order. Refer to your computer documentation to determine the correct order.
- Make sure your laptop external video port is turned on. See the “Portable and Laptop Activation Chart” on page 49 in this guide or your computer’s manual for details.
- Make sure your computer video board is installed and configured correctly.
- Make sure your computer has a compatible video board. The projector isn't CGA, EGA or SXGA compatible.
If you're using Windows 98:
- Open "My Computer" icon, the Control Panel folder and then the Display icon.
- Click the Settings tab.
- Verify that the Desktop area is set to 1024 x 768 or less.
Problem: Image is too wide or narrow for screen
- Adjust the zoom or projector placement.
- Adjust the resolution of your video card if it's greater than 1024 × 768 .
Problem: Image is out of focus
- Turn the projection lens to focus the image.
- Make sure the projection screen is at least 5 feet (1.5 m) from the projector.
- Check the projection lens to see if it needs cleaning.
Problem: Image and menus are reversed left to right
- Rear projection mode is probably turned on. Turn Rear Projection off in the Controls menu. The image should immediately return to forward projection. See “Rear Projection” on page 31.
Problem: the projector displays vertical lines, "bleeding" or spots
- Adjust the brightness. See “Brightness” on page 26.
- Check the projection lens to see if it needs cleaning.
Problem: no sound
- Adjust the volume.
- Verify the audio/input connections.
- Adjust the audio source.
Problem: Image is "noisy" or streaked
Try these steps in this order.
- Deactivate the screen saver on your computer.
- Turn Auto Image off and then back on again. See "Auto Image" on page 28.
- Turn Auto Image off and adjust the synchronization and tracking manually to find an optimal setting. See "Manual Sync" on page 29 and "Manual Tracking" on page 29.
- The problem could be with your computer's video card. If possible, connect a different computer.
Problem: Projected colors don't match the computer or video player's colors
Just as there are differences in the displays of different monitors, there are often differences between the computer image and the projected image.
- Adjust the colors using the KODAK Image Manager. See “Kodak Menu” on page 35.
- Adjust the brightness, tint and/or contrast from the Display menu. See “Brightness” on page 26, “Tint” on page 27 and “Contrast” on page 26.
Problem: Lamp seems to be getting dimmer
- The lamp begins to lose brightness when it has been in use for a long time. Replace the lamp as described in “Replacing the Projection Lamp” on page 38.
Problem: Lamp shuts off
- A minor power surge may cause the lamp to shut off. Unplug the projector, wait at least a minute, then plug it back in.
- Make sure the vents are not blocked.
To contact KODAK support see “If You Need Assistance” on page 8.
Appendix A
Specifications
The projectors must be operated and stored within the temperature and humidity ranges specified.
Temperature
| Operating | 50 to 104° F (10 to 40° C) |
| Non-operating -4 to 158 | °F (-20 to 70° C) |
Humidity
| Operating and non-operating 5% to 95% relative humidity, non-condensing |
Dimensions
| 8.9 x 10 x 2.8 inches (22.6 x 25.4 x 7.1 cm) |
Weight
| 4.8 lbs (2.2 kg) unpacked |
Altitude
| Operating 0 to 10,000 feet (3,048 meters) |
| Non-operating 0 to 40,000 feet (12,192 meters) |
Optics
Focus Range 4.9 - 16 feet (1.5 - 5 m)
Lamp
Type 120-watt VIP lamp
Input Power Requirements
100-120VAC 6A; 50/60Hz
200 - 240VAC 3A; 50Hz
Audio Input
Input Impedance 10K ohm nominal, AC coupled
$$ \begin{array}{l} \mathrm{THD} \leq 0.3 \% \ \mathrm{L} _ {\mathrm{IN}} \text {or} \mathrm{R} _ {\mathrm{IN}} < 2. 0 \mathrm{VrmsforTHD} \ \leq 0.3 \% \ \end{array} $$
Maximum Input Voltage (L IN + RIN)PEAK < 4.5 V for
Sensitivity 100 mV at 1 KHz for 88 dB
SPL at 1 meter
Connector Type 3.5 mm (1/8 inch) stereo phone
mini
Appendix B
Portable and Laptop Activation Chart
Many laptop computers do not automatically turn on their external video port when a secondary display device such as a projector is connected. Activation commands for some laptop computers are listed in the following table. (If your computer is not listed or the given command does not work, refer to the computer's documentation for the appropriate command.) On many laptops, the activation function key is labeled with an icon, for example □/□ or the text CRT/LCD.
Note: Usually, pressing the key commands once activates the external video port, pressing it again activates both the external and internal ports, and pressing it a third time activates the internal port. Refer to your computer documentation for details on your specific model.
| Computer | Key command to activate port | Key command to de-activate port |
| Acer Ctrl-Alt-Esc (for setup) | Ctrl-Alt-Esc (for setup) | |
| AST* ** FN-D or Ctrl-D FN-D or Ctrl-D | ||
| Ctrl-FN-D Ctrl-FN-D | ||
| FN-F5 FN-F5 | ||
| type from A:/IVGA/CRTFN-F12 FN-F12 | type from A:/IVGA/CRT | |
| AMS FN-F2 FN-F2 | ||
| AMT setup screen setup screen | ||
| AT&TFN-F3 | FN-F6 | FN-F3FN-F6 |
| Advanced Logic Research | Ctrl-Alt-V Ctrl-Alt-V | |
| Altima Shift-Ctrl-Alt-Csetup VGA/Conf.Simulscan | Shift-Ctrl-Alt-Lsetup VGA/Conf.Simulscan | |
| Ambra** FN-F12 FN-F12FN-F5 FN-F5F2/Choose Option/F5 | F2/Choose Option/F5 | |
| Amrel* ** setup menu setup menuShift-Ctrl-D Shift-Ctrl-D | ||
| Apple see Mac Portable and Mac PowerBook | ||
| Aspen automatic automatic | ||
| Award | FN-F6 FN-F6 | |
| BCC* automatic | reboot computer | |
| Bondwell LCD or CRT options after bootup | reboot for LCD or CRT options to appear | |
| Chaplet** setup screen setup screenFN-F6 FN-F6FN-F4 FN-F4 | ||
| Chembook FN-F6 FN-F6 | ||
| Commax Ctrl-Alt-#6 Ctrl-Alt-#5 | ||
| Compaq**Ctrl-Alt-<Ctrl-Alt->FN-F4 FN-F4automatic automatic mode/? (for setup option) | mode/? (for setup option) | |
| Compuadd** | automatic automaticAlt-F for screen setup option | Alt-F for screen setup option |
| Data General Ctrl-Alt-Command Ctrl-Alt-Command | ||
| Data General Walkabout | 2 CRT/X at DOS prompt | reboot |
| Datavue Ctrl-Shift-M | Ctrl-Shift-M | |
| DEC** FN-F5 | FN-F5FN-F4 FN-F4 | |
| Dell** Ctrl-Alt-< | Ctrl-Alt->Ctrl-Alt-F10 Ctrl-Alt-F10FN-F8 (CRT/LCD) FN-F8FN-D FN-DFN-F12 FN-F12 | |
| Digital* automatic rebootFN-F2 FN-F2 | ||
| Dolch dip switch to CRT dip switch to LCD | ||
| Epson | dip switch to CRT | dip switch to LCD |
| Everex* | setup screen option setup screen option | |
| For-A | Ctrl-Alt-Shift-C | Ctrl-Shift-Alt-L |
| Fujitsu | FN-F10 | |
| Gateway FN-F3 | FN-F1/FN-F1 again simultaneous | FN-F3FN-F1 |
| Grid* ** FN-F2 | choose auto or simultaneousCtrl-Alt-Tab Ctrl-Alt-Tab | FN-F2 |
| Hitachi FN-F7 | FN-F7 | |
| Honeywell FN-F10 | FN-F10 | |
| Hyundai setup screen option setup screen option | ||
| IBM 970* automatic warm reboot | ||
| IBM ThinkPad** | reboot, enter setup menuFN-F7, select choice from setup menuFN-F1, select choiceFN-F5, select choicePS/2 SC select choice (CRT, LCD, etc.) | FN-F2 |
| Infotel FN-F12 | FN-F12 | |
| Kaypro boot up, | monitor plugged in | unplug monitor |
| Kris Tech FN-F8 | FN-F8 | |
| Leading Edge FN-T | FN-T | |
| Mac Portable 100 | no video port: not compatible | |
| Mac PowerBook | ||
| 140, 145, 150, 170 | no video port: requires a 3rd-party interface | |
| 160, 165, 180, 520, 540, 5300 | Control Panel folder, PowerBook Display folder; Activate Video Mirroring | warm reboot |
| 210, 230, 250, 270, 280, 2300 | requires Apple Docking Station or Mini Dock | |
| Magitronic FN-F4 | FN-F4 | |
| Mastersport FN-F2 | FN-F1 | |
| Micro Express* | automatic warm reboot | |
| Micron FN-F2 | FN-F2 | |
| Microslate* automatic warm reboot | ||
| Mitsubishi SW2 | On-Off-Off-Off | SW2 Off-On-On-On |
| NCR setup screen option setup screen option | ||
| NEC** setup screen option setup screen optionCRT at the DOS promptFN-F3 FN-F3 | LCD at the DOS prompt | |
| Olivetti* automatic automaticFN-O/* FN-O/* | ||
| Packard Bell*** | FN-F0 FN-F0Ctrl-Alt-< Ctrl-Alt-> | |
| Panasonic FN-F2 | FN-F2 | |
| Prostar Ctrl-Alt-S | at bootup Ctrl-Alt-S at | bootup |
| Samsung* setup | screen option setup screen option | |
| Sanyo setup screen | option setup screen option | |
| Sharp dip switch | to CRT dip switch to LCD | |
| Sun SPARC- Dataview | Ctrl-Shift-M Ctrl-Shift-M | |
| Tandy** Ctrl-Alt | -Insert Ctrl-Alt-Insert | |
| setup screen option setup screen option | ||
| Tangent | FN-F5 FN-F5 | |
| Texas Instruments* | setup screen option setup screen option | |
| Top-Link** | setup screen option setup screen option | |
| FN-F6 FN-F6 | ||
| Toshiba** | Ctrl-Alt-End | Ctrl-Alt-Home |
| FN-End | FN-Home | |
| FN-F5 FN-F5 | ||
| setup screen option setup screen option | ||
| Twinhead* FN-F7FN-F5 FN-F5Automatic Automatic | ||
| WinBook Ctrl-Alt-F10 Ctrl-Alt-F10 | ||
| Wyse software driven software driven | ||
| Zenith** FN-F10 FN-F10FN-F2 FN-F2FN-F1 FN-F1 | ||
| Zeos** Ctrl-Shift-DFN-F1 | Ctrl-Shift-DFN-F1 | |
* These manufacturers have models that automatically send video to the external CRT port when some type of display device is attached.
** These manufacturers offer more than one key command depending on the computer model
Appendix C
Using Video Mirroring with a PowerBook Computer
When you turn video mirroring (called SimulScan in newer PowerBooks-see below) on, the projector displays the same information that appears on your PowerBook's built-in screen. When video mirroring is off, the projector acts like a separate display.
To turn on video mirroring for the first time:
- Open the Monitor's control panel; click on Monitor 2.
- Set the number of colors you want.
- Open the Control Strip; click on the monitor icon.
- Select "Turn Video Mirroring On."
Now you can turn video mirroring on and off from the Control Strip without having to open the Monitor's control panel again.
When using video mirroring and high color graphics such as slide shows, the projected image occasionally might turn black and white. If this happens, perform the following steps:
- Turn off video mirroring.
- Open the Monitor's control panel.
- Move the white menu bar to Monitor 2 to set the projector as the primary monitor.
- Restart the PowerBook.
Using SimulScan
Some newer PowerBooks display images on an external monitor or projector differently than previous ones. When using SimulScan, the projector displays the same information that appears on your PowerBook.
To select SimulScan:
- Open the Control Panel, then double-click Monitors and Sound.
- In the Resolution list, choose the SimulScan mode, then click OK.
- If this changes your display settings, a dialog box appears. Click OK to confirm the change.
Appendix D
Projected Image Size
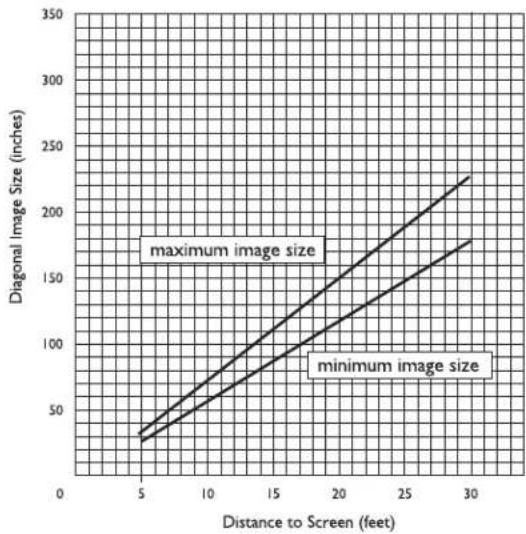
Use this chart and tables to help you determine projected image sizes
line
| Distance to Screen (feet) | maximum image size (inches) | minimum image size (inches) | | ------------------------- | --------------------------- | --------------------------- | | 5 | 40 | 30 | | 10 | 80 | 60 | | 15 | 120 | 90 | | 20 | 160 | 120 | | 25 | 200 | 150 | | 30 | 240 | 180 |Table 1: Image Size, Width and Height for DP2000-maximum image size
| Distance to Screen | Diagonal Width Height | ||
| 4.9 ft | 3.2 ft | 2.6 ft | 1.9 ft |
| 1.5 m | .9 m | .8 m | 6 m |
| 8 ft | 5.2 ft | 4.2 f | 3.1 ft |
| 2.4 m | 1.6 m | 1.3 m | .9 m |
| 12 ft | 7.8 ft | 6.3 ft | 4.7 ft |
| 3.7 m | 2.4 m | 1.9 m | 1.4 m |
| 16 ft | 10.4 ft | 8.3 ft | 6.3 ft |
| 4.9 m | 3.1 m | 2.5 m | 1.9 m |
| 20 ft | 13.0 ft | 10.4 ft | 7.8 ft |
| 6 m | 3.9 m | 3.1 m | 2.4 m |
| 30 ft | 19.5 ft | 15.6 ft | 11.7 ft |
| 9 m | 5.9 m | 4.8 m | 3.6 m |
Table 2: Image Size, Width and Height for DP2000-minimum image size
| Distance to Screen | Diagonal Width Height | ||
| 4.9 ft | 2.5 ft | 2.0 ft | 1.5 ft |
| 1.5 m | .8 m | .6 m | .4 m |
| 8 ft | 4.1 ft | 3.3 ft | 2.5 ft |
| 2.4 m | 1.25 m | 1 m | .7 m |
| 12 ft | 6.2 ft | 4.9 ft | 3.7 ft |
| 3.7 m | 1.9 m | 1.5 m | 1.1 m |
| 16 ft | 8.2 ft | 6.6 ft | 4.9 ft |
| 4.9 m | 2.5 m | 1.9 m | 1.5 m |
| 20 ft | 10.3 ft | 8.2 ft | 6.2 ft |
| 6 m | 3.1 m | 2.5 m | 1.9 m |
| 30 ft | 15.4 ft | 12.3 ft | 9.2 ft |
| 9 m | 4.7 | 3.7 m | 2.8 m |
Index
A
activation commands for laptops 49
adjusting
brightness 26
color 27
contrast 26
height 20
tint 27
volume 24, 27
altitude limits 47
assistance. See Technical Support
Audio menu 27
Volume 27
Auto Source Select 31
B
Blank Screen 27
brightness, adjusting 26
buttons on keypad
Menu 24
Standby 24
Volume 24
C
cable hub 12
cables
A/V 15
composite video 15
hub connector 12
mouse 14
cleaning the projection lens 37
color
adjusting 27
colors
don't match monitor colors 45
not displayed 42
compatibility
IBM-compatible 5
Macintosh 5
composite video cable
connecting 15
computers, compatible 5
connecting
laptop 14
mouse 14
power cord 17
video player 15–16
connector panel 12
contrast, adjusting 26
Controls menu 30
Auto Source Select 31
Default Source 31
Display Messages 32
Display Startup Screen 32
Plug and Play 32
Rear Projection 31
Standby Time 31
Video Standard 30
customer support numbers 9
D
Default Source 31
dimensions 47
Display menu options
Blank Screen 27
Brightness 26
Color 27
Contrast 26
Reset All 27
Tint 27
displaying
messages 32
on-screen menus 24
startup screen 32
F
focus range 48
fuzzy lines 29
H
help
customer support numbers 9
fax 8
humidity 47
I
IBM-compatible computers
compatibility 5
image
adjusting 19
centering 29
colors don't match 45
fuzzy lines 29
has lines or spots 44
not centered 42
not displayed 42
out of focus 43
quality 42–45
resolution 5
reversed 31, 44
size 11, 61
streaked 44
too wide or too narrow 43
zooming 20
Image Manager 35
Image menu options 28
Auto Image 28
Auto Resize 28
Horiz. Position 29
Manual Sync 29
Manual Tracking 29
Vert. Position 30
K
Kensington lock 41
keypad
using 23
keypad buttons
menu 24
standby 24
volume 24
KODAK Image Manager 35
L
lamp
turns off unexpectedly 45
lamp hour counter 34
Language menu 33
language, selecting for menus 33
laptop activation sequence 49
lens
cleaning 37
M
Macintosh computers
compatibility 5
Menu button 25
menus. See on-screen menus
monitor, colors don't match 45
mouse, connecting 14
N
NTSC video 30
0
on-screen menus
Audio menu 27
changing functions 25
changing language of 33
Controls menu 30
Display menu 26
displaying 25
Image menu 28
Language menu 33
Status menu 33
P
PAL video 27, 30
Plug and Play 32
power cord
connecting 17
power up sequence 17, 43
project from behind the screen 31
R
rear projection 31
relative humidity 47
remote control
operating the disk mouse 22
using 21, 23
re-positioning image on screen 29
resetting adjustments 27
resolution 5
S
safety guidelines 1
SECAM video 27, 30
security feature 41
service numbers 9
setting up 11
SimulScan with PowerBooks 60
specifications 47
Standby button 24
Standby Time 31
startup screen 32
Status menu 33
support numbers 9
S-video, connecting 15
T
temperature limits 47
test pattern 43
text not visible 42
tint, adjusting 27
turning off the projector 18
turning on the projector 17
U
USB mouse 14
V
vertical lines displayed 29, 44
video 27
mirroring PowerBook 59
video standards 30
volume
adjusting 24
W
warranty 10, 67
weight 47
Z
zooming the image 20
WARRANTY TIME PERIOD
Kodak warrants the KODAK DIGITAL SCIENCE DP2000 Digital Projector (excluding lamps) to be free from malfunctions and defects in both materials and workmanship for two years from the date of purchase.
WARRANTY REPAIR COVERAGE
This warranty will be honored within the geographical location that the product was purchased.
If the equipment does not function properly during the warranty period due to defects in either materials or workmanship, Kodak will, at its option, either repair or replace the equipment without charge, subject to the conditions and limitations stated herein. Such repair will include all labor as well as any necessary adjustments and/or replacement parts.
If replacement parts are used in making repairs, these parts may be remanufactured, or may contain remanufactured materials. If it is necessary to replace the entire system, it may be replaced with a remanufactured system.
Kodak will also provide telephone assistance during the warranty period.
LIMITATIONS
WARRANTY SERVICE WILL NOT BE PROVIDED WITHOUT DATED PROOF OF PURCHASE.
THIS WARRANTY BECOMES NULL AND VOID IF YOU FAIL TO PACK YOUR DIGITAL PROJECTOR IN A MANNER CONSISTENT WITH THE ORIGINAL PRODUCT PACKAGING AND DAMAGE OCCURS DURING PRODUCT SHIPMENT.
THIS WARRANTY DOES NOT COVER: CIRCUMSTANCES BEYOND KODAK'S CONTROL; SERVICES OR PARTS TO CORRECT PROBLEMS RESULTING FROM THE USE OF ATTACHMENTS, ACCESSORIES, OR ALTERATIONS NOT MARKETED BY KODAK; SERVICE REQUIRED AS THE RESULT OF UNAUTHORIZED MODIFICATIONS OR SERVICE; MISUSE, ABUSE; FAILURE TO FOLLOW KODAK'S OPERATING, MAINTENANCE, OR REPACKAGING INSTRUCTIONS; OR FAILURE TO USE ITEMS SUPPLIED BY KODAK (SUCH AS ADAPTORS AND CABLES).
KODAK MAKES NO OTHER WARRANTIES, EXPRESS, IMPLIED, OR OF MERCHANTABILITY OR FITNESS FOR A PARTICULAR PURPOSE FOR THIS EQUIPMENT OR SOFTWARE.
REPAIR OR REPLACEMENT WITHOUT CHARGE ARE KODAK'S ONLY OBLIGATION UNDER THIS WARRANTY. KODAK WILL NOT BE RESPONSIBLE FOR ANY SPECIAL, CONSEQUENTIAL OR INCIDENTAL DAMAGES RESULTING FROM THE PURCHASE, USE, OR IMPROPER FUNCTIONING OF THIS EQUIPMENT REGARDLESS OF THE CAUSE. SUCH DAMAGES FOR WHICH KODAK WILL NOT BE RESPONSIBLE INCLUDE, BUT ARE NOT LIMITED TO, LOSS OF REVENUE OR PROFIT, DOWN-TIME COSTS, LOSS OF USE OF THE EQUIPMENT, COST OF ANY SUBSTITUTE EQUIPMENT, FACILITIES OR SERVICES, OR CLAIMS OF YOUR CUSTOMERS FOR SUCH DAMAGES.
Depending on your geographical location, some limitations and exclusions may not apply.
Shipment of a unit from the customer to the kodak service center will be at the customer's expense.
This warranty is not transferable from the original purchaser of the equipment.
APPLICATION SUPPORT
For application specific support, contact your reseller, systems integrator, software manufacturer, or dealer.
HOW TO OBTAIN SERVICE
Please refer to the Service and Support section of your User's Guide for the support hotline designated to your location.
When returning a digital projector for repair, the unit shall be packed in its original packing materials. A problem report should also be enclosed with the equipment. If the original packaging has been discarded or is not available, packing will be at the owner's expense.
The repaired or replaced unit will be shipped from Kodak within five business days from the date of the digital projector receipt at the service center.
Unless a specific Kodak warranty is communicated to the purchaser in writing by a Kodak company, no other warranty or liability exists beyond the information contained above, even though defect, damage, or loss may be caused by negligence or other act.
To obtain warranty repair service contact your local Kodak representative. For assistance, refer to the Service and Support information in the KODAK Digital Projector User's Guide.
Eastman Kodak Company
343 State Street
Rochester, New York 14650
Kodak is a trademark of
Eastman Kodak Company.

- FCC Warning
- Canada
- Safety Certifications
- EN 55022 Warning
- Declaration of Conformity
- Table of Contents
- Safety Instructions 1
- Introduction 5
- Setting up the Projector ..... 11
- Using the Projector 19
- Maintenance & Troubleshooting 37
- Safety Instructions
- Safety Definitions
- Safety Symbols
- Safety Terms
- Important Operating Considerations
- Battery Use
- Introduction
- Image Resolution
- Compatibility
- Unpacking the Projector
- Projector Features
- Usage Guidelines
- If You Need Assistance
- Online Services
- Faxed Information
- Customer Support
- Setting up the Projector
- Positioning the Projector
- Connecting the Projector
- Connecting to a Computer
- To connect to a computer:
- Do you want to play your computer's audio on the projector?
- Do you want to control the computer's mouse from the projector's remote control or keypad?
- Connecting to a Video Player
- To connect to a video player:
- Starting the Projector
- Turning Off the Projector
- Using the Projector
- Basic Image Adjustment
- Adjusting the Projector
- The Remote Control
- Using the Keypad and Remote Control
- Lamp on/off (keypad only)
- Menu
- Source (keypad only) or Computer and Video (remote control only)
- Standby
- Volume (keypad only)
- Using the On-Screen Menus
- Display Menu
- Brightness
- Contrast
- Tint
- Color
- Blank Screen
- Reset All
- Audio Menu
- Volume
- Image Menu
- Auto Image
- Auto Resize
- Manual Sync
- Manual Tracking
- Horizontal position
- Vertical position
- Controls Menu
- Video Standard
- Standby Time
- Rear Projection
- Default Source
- Auto Source Select
- Plug and Play
- Display Messages
- Display Startup Screen
- Language Menu
- Status Menu
- Lamp hours used
- Computer resolution
- Horizontal refresh rate
- Vertical refresh rate
- Mute status
- Software version
- Source
- Kodak Menu
- Image Manager Settings
- Using the Image Manager
- Maintenance & Troubleshooting
- Cleaning the Lens
- Replacing the Projection Lamp
- Replacing the Batteries in the Remote Control
- Using the Kensington Lock
- Troubleshooting
- Problem: Nothing on projection screen
- Problem: Color or text not being projected
- Problem: The screen resolution is not right
- Problem: Image isn't centered on the screen
- Problem: Only the start-up screen displays
- Problem: Image is too wide or narrow for screen
- Problem: Image is out of focus
- Problem: Image and menus are reversed left to right
- Problem: the projector displays vertical lines, "bleeding" or spots
- Problem: no sound
- Problem: Image is "noisy" or streaked
- Problem: Projected colors don't match the computer or video player's colors
- Problem: Lamp seems to be getting dimmer
- Problem: Lamp shuts off
- Appendix A
- Specifications
- Optics
- Lamp
- Input Power Requirements
- Audio Input
- Appendix B
- Portable and Laptop Activation Chart
- Appendix C
- Using Video Mirroring with a PowerBook Computer
- Using SimulScan
- Appendix D
- Projected Image Size
- Index
- A
- B
- C
- D
- 0
- P
- R
- S
- T
- U
- V
- W
- Z
- WARRANTY TIME PERIOD
- WARRANTY REPAIR COVERAGE
- LIMITATIONS
- APPLICATION SUPPORT
- HOW TO OBTAIN SERVICE
Brand : KODAK
Model : DP2000
Category : Video projector