Diamant 50HL5300F - Television Horizon - Free user manual and instructions
Find the device manual for free Diamant 50HL5300F Horizon in PDF.

| Product Type | Television |
| Screen Size | 50 inches (127 cm diagonal) |
| Dimensions (with stand) | 1128 x 707 x 256 mm |
| Dimensions (without stand) | 1128 x 659 x 89 mm |
| Weight (with stand) | 12.5 kg |
| Weight (without stand) | 10.2 kg |
| Display Resolution | 3840 x 2160 (4K Ultra HD) |
| Refresh Rate | 60 Hz |
| Smart TV | Yes, with built-in apps |
| Connectivity | HDMI (3), USB (2), Ethernet, Wi-Fi, Bluetooth |
| Audio Output | 20 W (2 x 10 W) |
| Power Consumption (typical) | 100 W |
| Standby Power | <0.5 W |
| Power Supply | AC 100-240 V, 50/60 Hz |
| Cleaning Instructions | Use a soft dry cloth; avoid liquids |
| Safety Precautions | Keep away from heat sources and moisture |
| Spare Parts | Remote control (Model RC-50HL), stand, screws |
| Repairability Index | 5.5 / 10 |
| Package Contents | TV, remote, batteries, stand, user manual |
| Wall Mount VESA | 200 x 200 mm (M6 screws) |
Frequently Asked Questions - Diamant 50HL5300F Horizon
User questions about Diamant 50HL5300F Horizon
0 question about this device. Answer the ones you know or ask your own.
Ask a new question about this device
Download the instructions for your Television in PDF format for free! Find your manual Diamant 50HL5300F - Horizon and take your electronic device back in hand. On this page are published all the documents necessary for the use of your device. Diamant 50HL5300F by Horizon.
USER MANUAL Diamant 50HL5300F Horizon
Thank you for choosing this product!
EN Please read the instructions carefully and keep the manual for subsequent briefings. This manual is designed to give you all necessary instructions concerning installation, usage and maintenance of this machi ne. To operate the unit correctly and safely, please read this manual carefully before installation and usage.
natural_image
Technical line drawing of a mechanical assembly with internal components and a side-view detail (no text or symbols)natural_image
Technical line drawing of an electronic device interior with antenna and power outlet (no text or symbols)natural_image
Technical line drawing of a mechanical or electrical component assembly (no text or symbols)natural_image
Illustration of a flat-screen TV with a hand pressing a button next to it (no text or symbols)[GRAPHIC: Cyclic Loop]
The exclamation point within an equilateral triangle is intended to alert the user to the presence of important operating in the literature accompanying the appliance.
![Horizon Diamant 50HL5300F - [GRAPHIC: Cyclic Loop] - 1](/content/2026/05/1050143/images/3b57003ba362780e83d333f987a4fd26b47d14fef7517eaa9bd13c823befc7bb.jpg)
Warning
The lightning flash with arrowhead symbol within an equilateral triangle, is intended to alert the user to the presence of uninsulated dangerous voltage within the products enclosure that may be of sufficient magnitude to constitute a risk of electric shock to persons.
CAUTION
RISK OF ELECTRIC SHOCK DO NOT OPEN
High voltages are used in the operation of this product. to reduce the risk of electric shock, do not remove cover of the cabinet, refer servicing to qualified service personal
If the TV any changes or coarse adjustment, electric shocks to be hurt, do not attempt to open a machine-maintenance, customer contact centres needed overhaul.
Important Safety Precautions:
1) Read these instructions. 2) Keep these instructions. 3) Heed all warnings. 4) Follow all instructions.
5) Do not use this apparatus near water. 6) Clean only with dry cloth.
7) Do not block any ventilation openings. Install in accordance with the manufacturer's instructions.
8) Do not install near any heat sources such as radiators, heat registers, stoves, or other apparatus (including amplifiers) that produce heat.
9) Do not defeat the safety purpose of the polarized or grounding-type plug. A polarized plug has two blades with one wider than the other. A grounding type plug has two blades and a third grounding prong. The wide blade or the third prong are provided for your safety, If the provided plug does not fit into your outlet, consult an electrician for replacement of the obsolete outlet.
10) Protect the power cord from being walked on or pinched particularly at Plugs, convenience receptacles, and the point where they exit from the apparatus.
11) Only use attachments /accessories specified by the manufacturer.
12) Use only with the cart, stand, tripod, bracket, or table specified by the manufacturer, or sold with the apparatus. When a cart is used caution when moving the cart/apparatus combination to avoid injury tip-over.
13) Unplug this apparatus during lightning storms or when unused for long periods of time.

Caution:
14) To reduce the risk of fire or electric shock, do not expose this apparatus to rain or moisture.
15) The mains plug is used as disconnect device, the disconnect device shall remain readily operable.
16) The socket-out shall be installed near the equipment and shall be easily accessible.
17) This product should never be placed in a built-in installation such as a bookcase or rack unless proper ventilation is provided or the manufacture's instructions have been adhered to.
18) The apparatus shall not be exposed to dripping or splashing and that no objects filled with liquid, such as vases, shall be placed on the apparatus.
19) Do not place any sources of danger on the apparatus (e.g. liquid filled objects, lighted candles).
20) Wall or Ceiling Mounting - The appliance should be mounted to a wall or ceiling only as recommended by the manufacturer.
21)

Never place the TV, remote control or batteries near naked flames or other heat sources, including direct sunlight. To prevent the spread of fire, keep candles or other flames away from the TV, remote control and batteries at all times.
22) The USB terminal should be loaded with 0.5 A under normal operation.
These servicing instructions are for use by qualified service personnel only. To reduce the risk of electric shock do not perform any servicing other than that contained in the operating instructions, unless you are qualified to do so.
23) The battery shall not be exposed to excessive heat such as sunshine, fire or the like.
24) This equipment is a Class II or double insulated electrical appliance. It has been designed in such a way that it does not require a safety connection to electrical earth
25) The maximum using environment temperature is 45 degrees. The Maximum using altitude is 2000 meters
natural_image
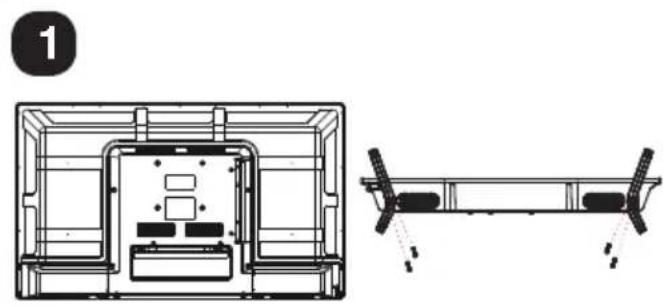
Technical line drawing of a mechanical assembly with internal components and a side-view detail (no text or symbols)Insert the stand into the bottom of the LED TV body and tighten the screws.
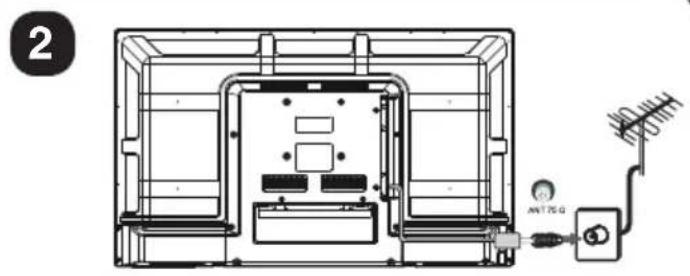
Insert the aerial cable into the RF socket.
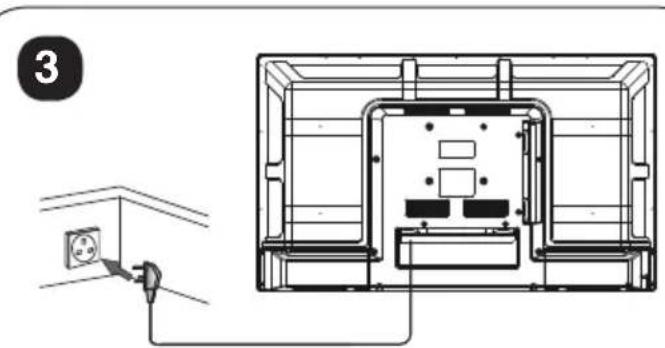
Connect the power cord into a suitable wall socket and switch on.
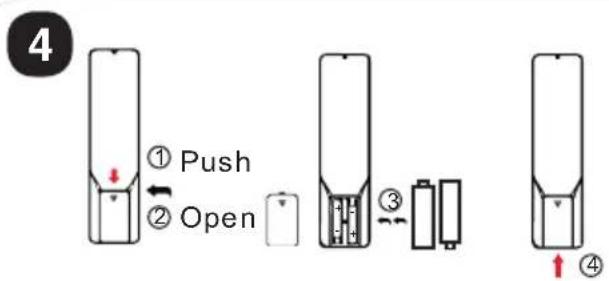
1.Open the battery compartment cover on the back side;
2. Insert two 1.5V batteries of AAA type with correct polarity.
3. Close the battery compartment cover on the back side
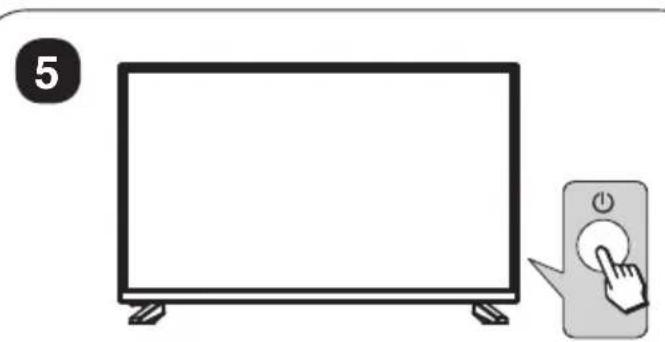
Switch on the TV by pressing the power button on the side of the TV or on the remote control. (The LED will change from red to green)
6
TV Buttons:
Note: The following is only functional schematic. The actual position and arrangement of the buttons may differ by model.
| VOL+ | VOL- | CH+ | CH- | MENU | SOURCE | (1) |
:Turn ON/OFF Power.
SOURCE: External Signal Input Selection.
MENU: Display Main MENU And Confirm MENU Item Selection.
CH+/-:Select Channel.
VOL+/-:Adjust Volume.
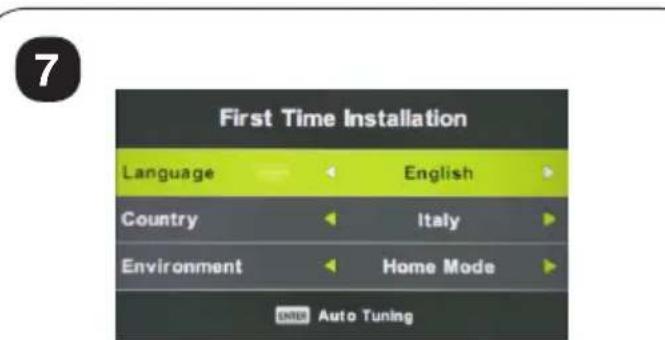
First Time Installation
- TV will enter First Time Installation ( or press MENU on remote, select SETUP) First Time Installation
- Follow the on-screen steps to setup language, country and channel scan.
| Screen Size | power Consumption | Main accessories |
| 19" | 36W/48W | User's manual x1Remote controller x1Power cord x1AAA Batteries x2 |
| 20" | 36W/48W | |
| 22" | 36W/48W | |
| 24" | 36W/48W | |
| 28" | 36W | |
| 32" | 56W/65W/100W | |
| 39"/40" | 60W/70W/76W | |
| 42" | 67W/70W/95W/100W | |
| 43" | 65W/80W | |
| 50" | 100W/108W/135W | |
| 55" | 100W/135W/140W/160W | |
| 65" | 159W/165W/195W |
Note:
Picture for reference purposes only; Please prevail in kind.
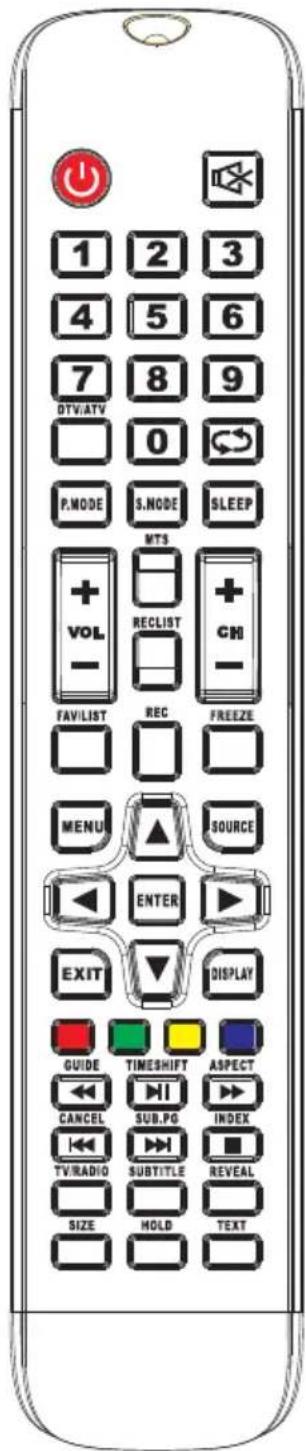
Remote Controller:
POWER
Set your TV to power on or standby mode.
MUTE
Press to mute the sound. Press again or press VOL+ to unmute.
NUMBER BUTTONS
Press 0-9 to select a TV channel directly when you are watching TV. The channel change after 2 seconds. Applicable for entering page number in teletext mode and so on.
ATV/DTV
Switch between Analog and Digital TV.

Return to the previous viewed program.
S.MODE: Press to cycle through the different sound settings.
SLEEP: Select amount of time before TV turn itself off automatically.
MTS : Press to search the NICAM modes.
P.MODE: Press to cycle through the different picture settings.
MENU
Allows you to navigate the on-screen menus.
SOURCE
Open the main menu, press to list the sources.
THUMBSTICK (▲/▼/◄/►/ENTRE)
Allows you to navigate the on-screen menus and adjust the system settings to your preference.
DISPLAY
Press to display the source and channel's information.
EXIT
Exist from the menu or sub-menu and cancel the function in progress (if applicable).
TV/RADIO : When watching channel, allows you to switch between TV and Radio modes.
GUIDE: Launches the EPG (Electronic Program Guide). ←: Fast reverse in PVR or Media Player mode.
TIME SHIFT: DTV channel time shift Function. ▶: play on PVR or Media Player mode.
CANCEL: When a page is selected in the mode of text, it may take some time before it becomes available, pressing the CANCEL key will return to the TV mode. When the required page is found, the page number will appear at the top of the TV picture, press the CANCELkey to return to the mode of text for you to browse this page. ⬆:Previous chapter in PVR or Media Player mode
INDEX: Request the Index page in Teletext mode.
■: Exit the playing function in PVR or Media Player mode.
SIZE: Change the size of display in Teletext mode.
REVEAL: Reveal or Hide the hidden words.
COLOR BUTTONS: Teletex switch of the analog parts, the items selection in the menu of the digital parts and the practice of the MHEG5 in the DVB menu.
CH+/CH- : Press to scan through channels.
FAV/LIST: press to open the favorite list.
then you can select the favorite channel.
ASPECT: Select picture scale.
▶: fast forward in PVR or Media Player mode.
FREEZE: press to freeze the picture.
SUB. PG : Press to access sub page.
▶: Next chapter in PVR or Media Player mode.
SUBTITLE: To show and set the language of current DTV.
HOLD: HOLD On or Off for current page display.
TEXT: Switch the teletext on and off.
REC LIST: Show the recorded list.
REC: Record begin in PVR mode.
Battery Installation:
Remove the battery compartment lid on the rear of the remote control by sliding the lid down, then off. Put two AAA batteries inside the battery compartment with their + and - ends aligned as indicated. Do not mix old and new batteries or different types of batteries.
Slide the lid until you hear it click into place.
Using the Remote Control:
Unless stated, otherwise, the remote control can operate all the features of the TV.
Always point the remote control directly at the remote sensor in front of the TV.
natural_image
Technical line drawing of a mechanical assembly with internal components and a side-view detail (no text or symbols)natural_image
Technical line drawing of an electronic device interior with antenna and power outlet (no text or symbols)natural_image
Technical line drawing of a mechanical or electrical component assembly (no text or symbols)natural_image
Illustration of a flat-screen TV with a hand pressing a button next to it (no text or symbols)natural_image
Technical line drawing of a mechanical assembly with internal components and a side-view detail (no text or symbols)natural_image
Technical line drawing of an electrical enclosure with antenna and grounding (no text or symbols)natural_image
Illustration of a flat-screen TV with a hand pressing a button next to it (no text or symbols)natural_image
Technical line drawing of a mechanical assembly with internal components and a side-view detail (no text or symbols)natural_image
Technical line drawing of an electronic device interior with antenna and power outlet (no text or symbols)natural_image
Technical line drawing showing a wall socket connected to a wall-mounted electrical outlet (no text or symbols present)natural_image
Illustration of a flat-screen TV with a hand pressing a button next to it (no text or symbols)natural_image
Technical line drawing of a mechanical assembly with internal components and a side-view detail (no text or symbols)natural_image
Technical line drawing of an electrical enclosure with antenna and grounding (no text or symbols)natural_image
Technical line drawing of a mechanical or electrical enclosure with internal components (no text or symbols)natural_image
Illustration of a flat-screen TV with a hand pressing a button next to it (no text or symbols)First Time Installation