94922 - Irrigation Control ORBIT - Free user manual and instructions
Find the device manual for free 94922 ORBIT in PDF.

| Product Type | Irrigation Controller |
| Brand | Orbit |
| Model | 94922 |
| Number of Zones | 4 zones |
| Watering Programs | 3 independent programs |
| Start Times per Program | Up to 4 start times per program |
| Watering Duration Range | 1 minute to 4 hours per zone |
| Display | LCD screen with backlight |
| Rain Delay | Adjustable 24-72 hours |
| Manual Watering | Yes, manual override for all zones |
| Power Source | 9V alkaline battery (not included) |
| Battery Life | Approximately 1 year under normal use |
| Water Resistance | Splash resistant (IP54 suitable for outdoor use) |
| Operating Temperature | 32°F to 120°F (0°C to 49°C) |
| Dimensions (L x W x H) | 6.5 x 4.5 x 2.5 inches |
| Weight (with battery) | 0.5 lbs |
| Seasonal Adjustment | Adjust watering by percentage (0-200%) |
| Water Budget | Set monthly water budget |
| Delay Watering | Set delay for up to 14 days |
| Installation | Mounts to wall or post; connects to outdoor faucet |
| Safety | For outdoor use; install in weather-protected area |
| Maintenance | Clean screen with damp cloth; replace battery annually |
| Warranty | 2-year limited warranty |
| Replacement Parts | Available through Orbit customer service |
Frequently Asked Questions - 94922 ORBIT
User questions about 94922 ORBIT
0 question about this device. Answer the ones you know or ask your own.
Ask a new question about this device
Download the instructions for your Irrigation Control in PDF format for free! Find your manual 94922 - ORBIT and take your electronic device back in hand. On this page are published all the documents necessary for the use of your device. 94922 by ORBIT.
USER MANUAL 94922 ORBIT
- Introduction 2
- Getting Started 4
- Programming Your Timer ....6
• Using the Remote Control Device .....11 - Using the Optional Rain-Freeze Sensor ....12
- Installing Indoor Mount Sprinkler Timer and Remote Control Device Sleeve .... 12
• Diagnostics Circuit Breaker .....15 - Glossary of Terms. 16
- Trouble Shooting 18
Section 1: Introduction
Thank you for selecting an Orbit ^® Signature Control timer, the most advanced and versatile controller available. Orbit ^® designers have combined the latest technological features with an intuitive display to create a controller that fits every watering need.
Please read this manual completely before you begin programming and using the controller.
Important Features and Capabilities
Dual Programs
The timer offers two programs – Program A and Program B – for watering flexibility. Any of the watering stations can be assigned to either program. For example, stations that water your garden and flower beds could be assigned to Program A and watered daily starting at 8 a.m., while stations that water your lawn could be assigned to Program B and watered every third day starting at 5 a.m.
Six Cycle Start Times Per Program
The timer accommodates six different start times for each of the two programs (A and B). Most timers only allow four different cycle start times.
No-Watering Days and Times
It's easy to prevent watering on one or more days of the week or during specific periods of the day. This comes in handy if watering restrictions are imposed in your area.
Docking Port
This timer has been designed for convenience and “armchair” programming. The timer’s docking port is mounted on a wall and all wires are connected to it. The main timer unit can be easily and quickly slid on and off the docking port, allowing you to take the timer virtually anywhere to create or change watering programs.
Remote Control Capabilities (Not included on all models)
This timer can be controlled by the included remote control device via a radio frequency (RF) receiver and antennae, both of which are built into the timer. The remote control device allows you to turn stations on and off on the spot and to perform programming tasks from anywhere within range. The 433 megahertz remote frequency is approved for use in the United States, Canada, Europe and Australia, and permits an effective line-of-sight range of 300 feet (reduced to 200 feet with obstructions).
Programming Information Stored Safely in Non-Volatile Memory
All programming information for Program A and Program B is stored indefinitely in the timer's non-volatile memory (EEPROM) and internal memory. This high-end feature means your programming won't be lost or erased if the power and batteries go out.
Easy-to-Read Back-Lit LCD Display
The timer's back-lit blue LCD display screen is easy to read under any lighting conditions.
Choice of Five Languages
You can easily set the LCD display to read in any of five languages: English, Spanish, French, German or Italian.
Water Budgeting
This convenient feature provides a quick, easy way to increase or decrease the watering durations of all stations in both programs to match seasonal watering needs. You won't have to adjust each station's watering time individually.
Rain Sensor (Optional)
An optional rain sensor can be purchased separately to prevent programmed watering for a period of time after rain falls (determined by the amount of rain and how quickly the sensors dry out). If your unit is RF capable then you can use a wireless sensor. Otherwise a hard-wired sensor can be used.
Commonly Used Controls
Digital Display with Text Messaging
A large LCD (Liquid Crystal Display) shows the time of day and indicates many of the programming settings. Interactive text messaging simplifies programming and current sprinkler timer status. (See Figure 1)
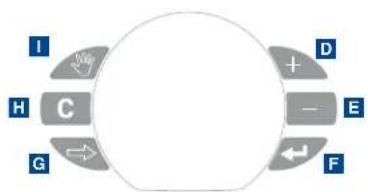
Programming Buttons
These nine buttons are used for programming and other operations:
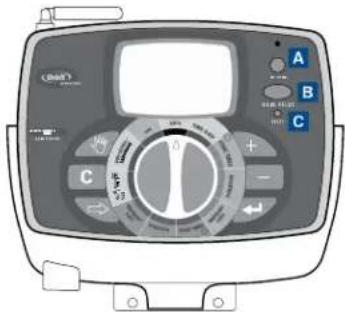
Figure 1: Front view of timer
A RF Sync (only on remote control model)
Allows the timer to synchronize with a new remote or wire less sensor.
B Rain Delay
Push this button once while in AUTO to access the rain delay option. NOTE: Pressing this button will access the Language and No Watering Period options while in those respective dial positions.
C Reset (pin hole)
Resets the timer to its factory settings.
D Increase
E Decrease
F Enter
G Next
H Clear
Manual
flowchart
graph TD
    I --> H
    H --> C
    C --> G
    C --> D
    C --> E
    C --> F
Selection Dial
This dial is used for programming, reviewing and operating the sprinkler timer.
Rain Sensor Bypass Switch
In Active position the controller will monitor the rain sensor, in Bypass position the controller will ignore the rain sensor. (This switch is for hard wired sensors only and does not effect wireless rain sensors - sensors sold separately).
About This Manual
We have added the following features to this manual to assist you:
- BLUE TEXT relates to the buttons used for programming.
- BLUE UNDERLINED TEXT relates to stop positions for the selection dial.
- A glossary of the most common terms is included. (see page 16)
Section 2: Getting Started
You can program this sprinkler timer in just a few basic steps. Before you begin programming, it is important to:
- Activate the batteries
- Reset the sprinkler timer
- Select the preferred language
- Set the time of day and date
• Determine a watering plan
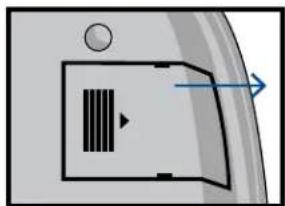
Activating the Batteries
- Slide the docking port off the timer unit to gain access to the battery compartment door.
- Slide the door off the battery compartment in the direction of the arrow.
- Remove the black strip from the battery compartment.
- Replace the battery compartment door.
- Slide the docking port back onto the main controller unit.
natural_image
Simple diagram of a door with a vent and directional arrow, no text or symbols present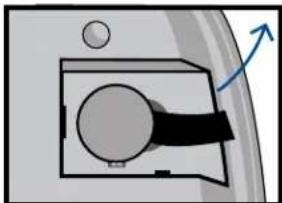
natural_image
Diagram of a mechanical component with a circular element and directional arrow (no text or symbols)The display will show "LOW BATTERY" when it is time to replace the batteries.
NOTE: Batteries alone will not operate the valves in your sprinkling system. The transformer must be plugged in and have power to operate your system normally.
Reset the Timer
If this is the first time the sprinkler timer has been programmed, you should press the small recessed button labeled RESET (located under the RAIN DELAY button). You will probably need a pen, pencil or similarly small object to push it.
Do not press the RESET button again unless you want to completely remove all your programming, including time and date. If no programming occurs after the RESET button has been pressed and the dial is left in the AUTO position the timer will assume a default program mode. In default mode, the timer will automatically water each station for 10 minutes, beginning at 5 a.m. each day.
Select the Preferred Language
- Turn the selection dial to BUDGETING/LANGUAGE.
- Press the RAIN DELAY button.
- Press the NEXT button until the desired language is shown in the display.
- Exit the language selection mode by turning the selection dial or pressing the RAIN DELAY button.
Set the Time of Day and Date
If this is the first time the timer has been programmed, press the small recessed RESET button.
- Turn the selection dial to TIME/DATE.
- The top line of the display reads "SET TIME." Set the current time by pressing either the + or - button.
NOTE: To move faster through the time or other selections, hold the + or - buttons down, rather than merely pressing and releasing.
- Press the ENTER button. The display now reads "SET YEAR." Set the current year by pressing either the or button.
- Press the ENTER button. The display now reads "SET MONTH." Set the current month by pressing either the + or - button.
- Press the ENTER button. The display now reads "SET DATE." Set the current day of the month by pressing either the + or - button.
- Exit the set time and date mode at any time by turning the selection dial.
Determine a Watering Plan
See page 20 for instructions.
Section 3: Programming Your Timer
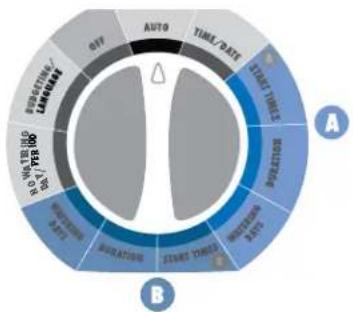
pie
| Category | Value | |---|---| | Auto | 100 | | OFF | 50 | | SWITCHING / LANDING | 75 | | SWITCHING + 1000 | 100 | | SWITCHING + 2000 | 125 | | STAIRS TIMES | 150 | | TIME DATE | 175 | A BFigure 2: Program A and Program B Dial Settings
Set Start Times
IMPORTANT: Multiple start times in Program A will repeat the watering program. Generally, only one cycle start time is required for each program (A and B) Start times do not correspond to individual stations.
- Turn the selection dial to START TIMES for the program you wish to set (A or B).
- Set Start Time 1 using the + and - buttons.
- If you wish to set additional start times (up to six) for the same program, press the NEXT button or ENTER button.
• To remove a start time press CLEAR □. - Exit the set start time mode by turning the selection dial.
Set Station Watering Durations
- Turn the selection dial to DURATION for the program you wish to set (A or B).
- Set the desired duration (0 - 120 minutes) for the station displayed. Press NEXT or ENTER to advance to the next station. Press CLEAR remove a duration.
IMPORTANT: Each station can have two durations. For example: Station 1 can have a duration of 5 minutes in Program A and a duration of 25 minutes in Program B. Typically a station has only one duration in either Program A of B. A station with a setting of 0 minutes will not water with that Program.
- If two programs are needed repeat these steps for the other program.
- Exit the set watering durations mode by turning the selection dial.
Set Watering Days
- Turn the selection dial to WATERING DAYS for the program you wish to set (A or B).
Set to Water - Days of the Week:
- Press the NEXT button to move through the days of the week. The selected day will flash. Press ENTER and a water drop appears above that day of the week. The program is now set to water on that day. The program can be set to water any combination of days (ex. Mo, We, Fr).
- To deactivate watering for a particular day, press the CLEAR button. The water drop will disappear.
Set to Water - Odd Days:
- Press the NEXT button until "ODD" flashes.
- Press the ENTER button. A water drop will appear above "ODD."
- You can deactivate the "ODD" mode by pressing the CLEAR button or by selecting another watering day mode. The water drop will disappear.
Set to Water - Even Days:
- Press the NEXT button until "EVEN" flashes.
- Press the ENTER button. A water drop will appear above "EVEN."
- You can deactivate the "EVEN" mode by pressing the
CLEAR button or by selecting another watering day mode. The water drop will disappear.
Set to Water - Interval
- Press the NEXT button until "INT" (interval) flashes.
- Press the of buttons to select the desired interval (select between every 1 day and every 32 days). An interval of "2" means it will water every other day.
- You can deactivate the "INTERVAL" mode by pressing the CLEAR button or by selecting another watering day mode. The water drop will disappear.
Set the Timer to Automatically Run Your Programs:
- Turn the selection dial to AUTO. The timer will be controlled automatically by the programming parameters that have been set.
To Turn All Watering Off:
- Turn the selection dial to OFF. This prevents the timer from turning any watering station on at any time, regardless of programming.
To Prevent Watering on a Particular Day:
There may be one or more days of the week when you never want to have the water turn on, regardless of what the program
says. (For example, in some water districts, watering is prohibited on certain days.) To cancel programmed watering on specific days of the week, follow these steps:
- Turn the selection dial to NO WATERING DAY/PERIOD. On the display, you will see the seven days of the week with a water drop above each day. The water drop means watering is allowed on that particular day.
- Press the NEXT button to select the day of the week you don't want to water. (The day will flash.)
- Press the CLEAR C button. The water drop above that day will disappear and the "ON" on the bottom right of the display will change to "OFF." This means the timer will prevent watering on that day.
- To unblock a day that has been selected as a no watering day, select the day (following the same steps), then press the ENTER button. The water drop will reappear and the "OFF" will change to "ON."
- Exit the "NO WATERING DAY" selection mode by turning the selection dial.
To Prevent Watering During a Particular Period of the Day:
There may be a time of the day when you never want the water to come on, regardless of what the program calls for. (Perhaps your community has banned watering during certain periods of the day, or you don't want your children to get wet going to school.) Here's what to do:
- Turn the selection dial to NO WATERING DAY/PERIOD.
- Press the RAIN DELAY button. The display reads "SET NO WATER START PERIOD."
- Press either the or button to set the start time of the period you don't want the water to come on.
- Press the ENTER button. The display reads "SET NO WATER END PERIOD."
- Press either the or button to set the end time of the period you don't want the water to come on.
- Exit the "NO WATERING PERIOD" selection mode by turning the selection dial.
NOTE: If programmed watering is interrupted by a no-watering period, the timer will resume the watering schedule where it left off as soon as the no-watering period is over. If the no-watering period prevents scheduled watering from starting, the timer will start the watering as soon as the no-watering period is over. This feature is called "stacking."
Set Water Budgeting:
Water Budgeting is a quick way to adjust your set durations (10 to 200%) based on seasonal requirements.
- Turn the selection dial to BUDGETING/LANGUAGE.
- Either press the button to increase the watering times, or press the button to decrease the times in increments of 10 percent. A setting of 100% will not change the set durations, a setting of 200% will increase a 10 minute
duration to 20 minutes, and a setting of 10% will decrease a 10 minute duration to 1 minute.
- Exit the set water budgeting mode by turning the selection dial.
Test All Stations:
With the “TEST ALL” function, you can easily test all the watering stations by turning them on in sequence for one minute each.
- With the dial in the AUTO position press the MANUAL button.
- The display reads "TEST ALL" to the right of the letters "A" and "B."
- Press the ENTER button.
Each watering station will turn on for one minute, in sequence. To abort this process before the test is finished, press the CLEAR button. To advance quickly from one station to the next press NEXT . Otherwise, the timer will automatically exit the "TEST ALL" mode after all stations have run for one minute.
Manual Watering - All Stations:
With the "MANUAL ALL" function, you can manually turn on the watering stations at any time.
- With the dial in the AUTO position press the MANUAL button.
- Press the NEXT button.
- The display reads "MANUAL ALL" to the right of the letters "A" and "B."
- Press the ENTER button.
Each station with a set duration will water in sequence. To quickly advance from one station to the next press NEXT 📋.
To abort this process before the manual watering is finished, press CLEAR. Otherwise, the timer will automatically exit the "MANUAL ALL" mode after all stations have run.
Manual Watering - Program A:
This will allow you to water only those stations with set durations in Program A.
- With the dial in the AUTO position press the MANUAL button.
- Press the NEXT button until the display reads "A MANUAL ALL".
- Press the ENTER button.
Each station will water, in sequence, one after another, for the same duration specified in Program A. To quickly advance from one station to the next press NEXT.
To abort this process before the manual watering is finished, press CLEAR. Otherwise, the timer will automatically exit the "A - MANUAL ALL" mode after all Program A stations have run.
Manual Watering - Program B:
This will allow you to water only those stations with set durations in Program B.
- With the dial in the AUTO position press the MANUAL button.
- Press the NEXT button until the display reads "B MANUAL ALL".
- Press the ENTER button.
Each station will water, in sequence, one after another, for the same duration specified in Program B. To quickly advance from one station to the next press NEXT ☑.
To abort this process before the manual watering is finished, tpress CLEAR. Otherwise, the timer will automatically exit the "B - MANUAL ALL" mode after all Program B stations have run.
Manual Watering - Single Stations:
This will allow you to water a single station at a time.
- With the dial in the AUTO position press the MANUAL button.
- Press the NEXT button until the display reads "MANUAL STATION 1".
-
Press the NEXT button to select the station number you want to water.
-
Press the of buttons to select the number of minutes to water that station (from 1 to 120 minutes).
- Press the ENTER button.
To abort this process before the manual watering is finished, press CLEAR. Otherwise, the timer will automatically exit the "MANUAL - STATION" mode after the selected station has run.
Rain Delay Function:
You can press the RAIN DELAY button to stop all programmed watering from taking place for a certain number of hours or days (for instance, after a rain storm).
- With the dial in the AUTO position press the RAIN DELAY button.
- Press the or buttons to change the rain delay period. The options are: 24 hours, 48 hours, 72 hours, 4 days, 5 days ... and up to 99 days in one-day increments.
- Press the ENTER button to enter the rain delay mode. The Rain Delay hours remaining will show on the display.
The timer will revert to the programmed schedule at the expiration of the rain delay period. To return to the programmed schedule before the expiration of the rain delay period, press the CLEAR button.
Manual Advance During Watering:
- Pressing the NEXT button will advance watering from
the current station to the next station in the cycle. This can be done during scheduled, manual, or remote actuated watering.
Section 4: Using the Remote Control Device
NOTE: The timer will accept commands from the remote control device only when the selection dial is turned to AUTO or OFF. (If the selection dial is turned to any other setting, commands from the Remote Control Device will be stored in memory and executed when the selection dial is turned to AUTO).
Install a Battery in the Remote Control Device:
- Open the battery compartment door.
• Install a 9-volt battery in the battery compartment. - Replace the battery compartment door.
To Synchronize the Remote Control Device with the Timer:
The remote device provided with your timer is already synchronized to your timer. If the remote is not functioning properly or if you are adding a new remote or RF sensor to your system do the following:
- With the remote device in your hand press the "RF Sync" button on the timer (this will activate a red light on the timer).
- Press the OFF button on the remote or depress the stem of the RF sensor (the red light should start blinking).
- If the red light blinks you have successfully synchronized the devices. If the light does not blink check that the remote has a fresh 9V battery or that the RF sensor switch is not OFF and try the steps again.
To Water All Stations:
- Press and release the ALL button on the remote control device to select all stations for watering.
- Press and release the ON "X" MIN button to command the timer to water all the stations sequentially for the desired ("X") number of minutes.
- If you wish to advance to the next station before a station's watering duration is complete, press NEXT.
To Water One Station:
- Press the number of the station you wish to water.
- Press ON "X" MIN to water the station for the desired ("X") number of minutes.
To Water More Than One Specific Station:
- Press the numbers of the stations you wish to water. (Example: 3, 7, 10, and 6. The timer will water in sequence from lowest to the highest. 3, 6, 7, 10.) (No matter which order you press the keys, the timer will water them sequentially from the lowest to the highest number.)
- Press ON "X" MIN to water those stations for the desired ("X") number of minutes.
To Cancel Remote Control Device Operation and Return Control to Timer:
- Press the OFF/CLEAR button on the Remote Control Device. This cancels any current commands from the device and returns control back to the timer.
Section 5: Using the Optional Rain-Freeze Sensor
An optional rain-freeze sensor can be purchased separately to prevent programmed watering for a specified period of time after rain falls or during periods when temperatures fall below a specified temperature. The sensor has settings for RAIN, OFF and RAIN/FREEZE. Please refer to the manual that accompanies the rain-freeze sensor for installation and programming instructions.
NOTE: The rain-freeze sensor will function only when the selection dial on the timer is turned to AUTO.
Section 6: Installing Indoor Mount Sprinkler Timer and Remote Control Device Sleeve
NOTE: Before installation, please have the following tools on hand:
• Phillips screwdriver
- Wire strippers
Installing the Sprinkler Timer in Five Easy Steps
1. Select a Location
Select a location with the following criteria:
- Near an electrical outlet. (Avoid using an outlet controlled by a switch.)
- In a dry, indoor location, where operating temperatures are not below 32^ or above 122^ Fahrenheit (below 0 degrees or above 50 degrees Celsius).
- Not in direct sunlight.
- Accessible to sprinkler wires from valves.
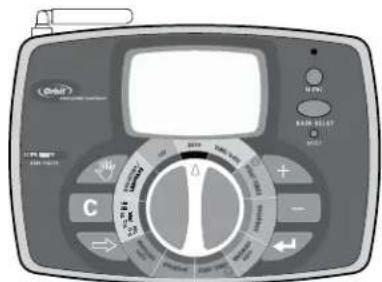

Figure 3: Mounting the Docking Port
2. Mount the Docking Port
- Slide the timer off the docking port. (See Figure 3)
- Using the mounting template (included), mark the two screw locations on the wall, then drill holes at the marks for No. 8 screws. Use the expanding anchors in plaster or masonry if necessary.
- Place the docking port against the wall, aligning the two holes in the docking port with the two drilled holes.
- Secure the docking port to the wall by screwing a No. 8 screw (included) through each of the two holes.
- Do not slide the timer back onto the docking port yet.
3. Connect the Transformer
- Find the two sockets at the bottom of the docking port labeled "24VAC." (See Figure 4)
• Insuring the transformer is not plugged in; insert one of
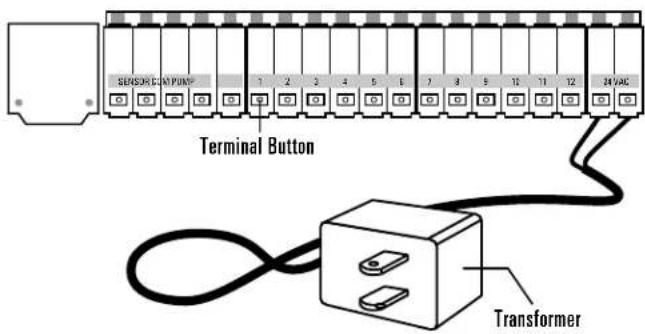
Figure 4: Connecting the Transformer
the two power leads from the transformer into each terminal socket using the phillips screwdriver to depress the terminal button (this allows for wire insertion or removal).
- Plug in the transformer.
WARNING: Do not link two or more sprinkler timers together with one transformer.
4. Connect Valve Wires to Timer, Pump Start and Master Valve Sockets
A. Wire the Electric Valves
NOTE: If the distance between the sprinkler timer and valves is under 700' (210 m), use Orbit® sprinkler wire or 20 gauge (AWG) plastic jacketed thermostat wire to connect the sprinkler timer to the valves. If the distance is over 700' (210 m), use 16 gauge (AWG) wire.
- Taking the sprinkler wire, strip 1/2" (12 mm) of the plastic insulation off the end of each individual wire.
- Connect one wire from each valve (it doesn't matter which wire) to a single "common" sprinkler wire. This is usually white. (See Figure 5)
IMPORTANT: All wires should be joined together using wire nuts, solder and/or vinyl tape. For additional protection to waterproof connections, an Orbit® grease cap can be used.
- Next, connect the remaining wire from each valve to a separate colored sprinkler wire.
- To avoid electrical hazards, only one valve should be connected to each station.
IMPORTANT: The wire can be buried in the ground. However, for greater protection, wires can be pulled through PVC pipe and buried underground. Be careful to avoid burying the wires in locations where they could be damaged by future digging or trenching.
B. Connect Valve Wires to the Sprinkler Timer
- Strip 1/4" (6 mm) of the plastic insulation off the end of each wire.
- Determine which valve you want to connect to which station. Insert each sprinkler wire, excluding the "common" wire, into a separate station socket (numbered above each socket) by inserting the bare wire fully into the socket under each number. (See Figure 5)
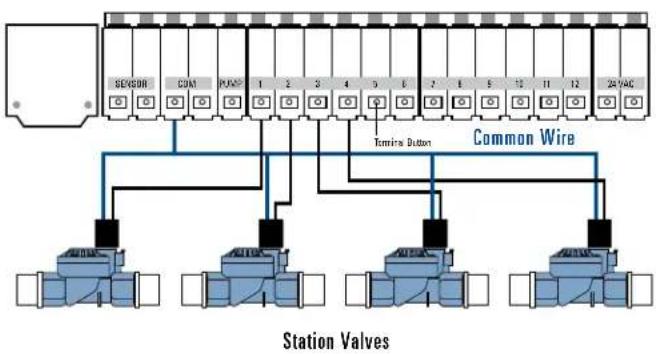
Figure 5: Connecting Sprinkler Wire
- Connect the common wire to one of the two sockets (white in color) labeled "COM."
NOTE: Insert only one wire into each "COM" socket. If more than two common wires are required, splice several together so only one wire runs into each of the two "COM" terminals. Protect the splice connection with a wire nut.
C. Connect Pump Start and Master Valve
This timer allows a master valve or pump start relay to operate whenever a station is on.
NOTE: If you are activating a pump from this timer, you must purchase a Pump Start Relay.
From the pump start relay (or master valve); connect one wire to the "PUMP" socket and the other wire to the "COM" socket.
Once all connections to the docking port are made, you may slide the timer back onto the docking port.
5. Mount the Sleeve for the Remote Control Device
- Using the mounting template (included) mark the two screw locations on the wall, then drill holes at the marks for No. 8 screws. Use the expanding anchors in plaster or masonry if necessary. (The sleeve can be mounted any where and does not need to be next to the timer.)
-
Place the remote control device sleeve against the wall, aligning the two holes in the sleeve with the two drilled holes.
-
Secure the sleeve to the wall by screwing a No. 8 screw (included) through each of the two holes.
- Slide the remote control device into the sleeve.
Section 7: Diagnostics Circuit Breaker
Smart-Scan® Diagnostic Fault Sensing
A diagnostic fault sensor will automatically scan for the presence of a faulty solenoid or wiring short in a valve during each watering sequence. If a faulty station is detected, the sprinkler timer will move to the next working station. Smart-Scan® also detects faulty wiring for the Pump or Master Control. Upon detection watering cycle is discontinued.
Fault Notification
- Faulty Station: "FAULT STN" and station number is displayed. When multiple faulty stations are detected, only the last faulty station will be displayed.
- Faulty wiring for pump/master control: "PUMP FAULT" is displayed.
Correcting the Fault
- First, repair the short in the wiring or replace the faulty solenoid.
- Test the station by operating a manual watering sequence.
-
If the short is not detected after a few seconds, the fault notification message will be terminated.
-
If the message continues, a short in the wiring still exists.
Internal Auto-Resetting Electronic Circuit Breaker
The sprinkler timer is equipped with an internal electronic self-resetting circuit breaker.
Possible causes of a circuit breaker tripping:
- If lightning strikes nearby.
- When the power supply has an electric spike.
- If a station has a wiring short.
Whenever one of these conditions occurs, the electronic circuit breaker may trip, causing the station output from the sprinkler timer to be halted momentarily. The batteries will continue to activate the LCD. After a few moments, the sprinkler timer will automatically retest the circuit to see if the condition has stopped. If so, the circuit breaker will reset itself.
Section 8: Glossary of Terms
| TERM DEFINITION | |
| Cycle Start Time | The time the program begins watering the cycle |
| Master Valve | A valve that prohibits water from reaching station valves |
| Multiple Start Times | A feature that allows a program to be operated multiple times on the same day |
| Program (A or B) | A schedule for a group of stations that determines the date and time for watering |
| Rain Delay | A feature that prevents the sprinkler timer from running it's scheduled watering program for a specific duration |
| Solenoid | The electrical part on a sprinkler (irrigation) valve that opens and closes the valve |
| Sprinkler Timer | A device that is responsible for turning an automatic irrigation system on and off |
| Stacking | When a start time is scheduled to begin before the previous cycle has completed |
| Station (Watering Station) | An area where the watering (irrigation) is all controlled by a single control valve |
| Terminal | The connection point on the docking port where a wire is inserted |
| Watering Program | See “Program (A or B)” |
| Watering Restrictions | Specific days and/or times that local municipalities prohibit watering |
| Watering Valve(Irrigation Valve) | Used in conjunction with sprinkler timers – a convenient way to deliver water to lawns, plants and gardens |
| Zones | See “Station (Watering Station)” |
Determine a Watering Plan
Your timer has two programs: Program A and Program B. The dual program capability allows you to assign certain watering stations to Program A and others to Program B. There are various reasons why you would want to do so. For example, you might want to assign the stations that water the garden and flower beds to Program A and those that water the lawn areas of your yard to Program B. That way, you can set Program A to water the garden beds every day, and set Program B to water the lawn every second or third day.
Your timer allows you to set up to six different watering cycle start times for Program A or Program B. You cannot set a cycle start time for each station. Stations can be assigned to either Program A or Program B. Stations assigned to a program will turn on sequentially according to the cycle start times assigned.
To help you visualize how best to program your timer, it might be helpful to make a watering plan on paper. This will help you establish the days, times and durations to water each station.
- For each station (or valve) write down the watering location, the type of sprinkler head and the types of plants to be watered.
- Using this list, determine the recommended watering duration (for each type of sprinkler head and the vegetation to be watered) and frequency for each station.
IMPORTANT: Be aware of any watering restrictions through your local water district.
- Determine, based on step 2, the ideal watering option for each station.
Based on the preceding information your water program may look like this:
| Station | Program | Watering Option | Days | Start Time | Duration Minutes | Location | Sprinkler | Plants | |
| 1 | A | Days of Week | M, W, Sat | 5:00 AM | 15 min | Front Strip | Spray Heads | Grass | |
| 2 | A | Days of Week | M, W, Sat | 15 min | Front, North | Spray Heads | Grass | ||
| 3 | B | Odd/Even | Every other day | 6:45 AM | 30 min | Back, North | Gear Drive | Grass | |
Section 9: Trouble Shooting
| Symptom Possible Causes of Problems | Correction | |
| One or more stations do not turn on | 1. Faulty Solenoid | Replace solenoid |
| 2. Wire broken or not connected | Repair wire and check connections | |
| 3. Flow control stem screwed down, shutting valve off | Turn flow control stem counter-clockwise until desired flow is achieved | |
| 4. Programming is incorrect | Check to make sure the station in question is set to water with a program | |
| Stations turn on when they are not supposed to | 1. Water pressure is too high | Install a pressure reducer |
| 2. More than one start time is programmed | Reduce the number of start times for that program | |
| 3. Stations are set to water with both programs | Set station duration to 0 for suspect program | |
| One station is stuck on and will not shut off | 1. Faulty valve | Check that valve is not installed backwards |
| 2. Particles of dirt or debris stuck in valve | Remove dirt or debris from valve | |
| 3. Valve diaphragm faulty | Replace diaphragm | |
| All stations do not turn on | 1. Transformer is defective or is not connected correctly | Check connections and outlet if NO A/C power persists replace transformer |
| 2. Programming is incorrect | Check Start Time and Watering Days | |
| 3. Timer is in OFF mode | Turn dial to AUTO | |
| Timer will not power up | 1. Transformer is defective or is not connected correctly | Check connections and outlet if NO A/C power persists replace transformer |
| 2. Timer is not all the way down on the docking port | Push down timer on docking port until back light turns on. | |
| Stations continue to turn on and off when they are not programmed to | 1. More than one start time is programmed with overlapping schedules | Reduce the number of start times for that program |
| 2. Excessive pressure | Install pressure reducer | |
| Persistent Fault | 1. Short in wiring or solenoids | Check wiring or replace solenoid |
Help
Before returning this sprinkler timer to the store, contact Orbit® Technical Service at: 1-800-488-6156, 1-801-299-5555.
Listings
This device complies with Part 15 of the FCC Rules. Operation is subject to the following two conditions: (1) This device may not cause harmful interference, and (2) This device must accept any interference received, including interference that may cause undesired operation.
Warning: Changes or modifications to this unit not expressly approved by the party responsible for compliance could void the user's authority to operate the equipment.
NOTE: This equipment has been tested and found to comply with the limits for a Class B digital device, pursuant to Part 15 of the FCC Rules. These limits are designed to provide reasonable protection against harmful interference in a residential installation. This equipment generates uses and can radiate radio frequency energy and, if not installed and used in accordance with the instructions, may cause harmful interference to radio communications. However, there is no guarantee that interference will not occur in a particular installation. If this equipment does cause harmful interference to radio or television reception, which can be determined by turning the equipment off and on, the user is encouraged to try to correct the interference by one or more of the following measures:
- Reorient or relocate the receiving antenna.
-
Increase the separation between the equipment and receiver.
-
Connect the equipment into an outlet on a circuit different from that to which the receiver is connected.
- Consult the dealer or an experienced radio/TV technician for help.
Orbit® Irrigation Limited Six-Year Warranty
Orbit® Irrigation Products, Inc. warrants to its customers that its products will be free from defects in materials and workmanship for a period of six years from the date of purchase.
We will replace, free of charge, the defective part or parts found to be defective under normal use and service for a period of up to six years after purchase (proof of purchase required).
We reserve the right to inspect the defective part prior to replacement. Orbit® Irrigation Products, Inc. will not be responsible for consequential or incidental cost or damage caused by the product failure. Orbit® liability under this warranty is limited solely to the replacement or repair of defective parts.
To exercise your warranty, return the unit to your dealer with a copy of the sales receipt.
SAFETY OF CHILDREN: The controller is not intended for use by young children or infirm person without supervision. Young children should be supervised to ensure they do not play with controller.
Orbit ^® Irrigation Products, Inc.
North Salt Lake, UT 84054 USA
www.orbitonline.com | 1-800-488-6156
© 2007 Orbit® Irrigation Products, Inc.
All rights reserved. All trade names are registered
trademarks of respective manufacturers listed.
- Section 1: Introduction
- Important Features and Capabilities
- Dual Programs
- Six Cycle Start Times Per Program
- No-Watering Days and Times
- Docking Port
- Remote Control Capabilities (Not included on all models)
- Programming Information Stored Safely in Non-Volatile Memory
- Easy-to-Read Back-Lit LCD Display
- Choice of Five Languages
- Water Budgeting
- Rain Sensor (Optional)
- Commonly Used Controls
- Digital Display with Text Messaging
- Programming Buttons
- A RF Sync (only on remote control model)
- B Rain Delay
- C Reset (pin hole)
- Selection Dial
- Rain Sensor Bypass Switch
- About This Manual
- Section 2: Getting Started
- Activating the Batteries
- Reset the Timer
- Select the Preferred Language
- Set the Time of Day and Date
- Determine a Watering Plan
- Section 3: Programming Your Timer
- Set Start Times
- Set Station Watering Durations
- Set Watering Days
- Set to Water - Days of the Week:
- Set to Water - Odd Days:
- Set to Water - Even Days:
- Set to Water - Interval
- Set the Timer to Automatically Run Your Programs:
- To Turn All Watering Off:
- To Prevent Watering on a Particular Day:
- To Prevent Watering During a Particular Period of the Day:
- Set Water Budgeting:
- Test All Stations:
- Manual Watering - All Stations:
- Manual Watering - Program A:
- Manual Watering - Program B:
- Manual Watering - Single Stations:
- Rain Delay Function:
- Manual Advance During Watering:
- Section 4: Using the Remote Control Device
- Install a Battery in the Remote Control Device:
- To Synchronize the Remote Control Device with the Timer:
- To Water All Stations:
- To Water One Station:
- To Water More Than One Specific Station:
- To Cancel Remote Control Device Operation and Return Control to Timer:
- Section 5: Using the Optional Rain-Freeze Sensor
- Section 6: Installing Indoor Mount Sprinkler Timer and Remote Control Device Sleeve
- Installing the Sprinkler Timer in Five Easy Steps
- Select a Location
- Mount the Docking Port
- Connect the Transformer
- Connect Valve Wires to Timer, Pump Start and Master Valve Sockets
- Wire the Electric Valves
- Connect Valve Wires to the Sprinkler Timer
- Connect Pump Start and Master Valve
- Mount the Sleeve for the Remote Control Device
- Section 7: Diagnostics Circuit Breaker
- Smart-Scan® Diagnostic Fault Sensing
- Fault Notification
- Correcting the Fault
- Internal Auto-Resetting Electronic Circuit Breaker
- Help
- Listings
- Orbit® Irrigation Limited Six-Year Warranty
Brand : ORBIT
Model : 94922
Category : Irrigation Control