
PSMO634X - Oven Philco - Free user manual and instructions
Find the device manual for free PSMO634X Philco in PDF.


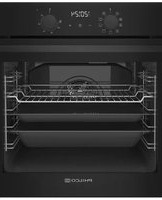
| Product Type | Built-in Microwave Oven |
| Brand | Philco |
| Model | PSMO634X |
| Installation | Built-in |
| Capacity | 34 L |
| Microwave Power | 900 W |
| Grill Power | 1000 W |
| Convection Power | 1350 W |
| Functions | Microwave, Grill, Convection, Defrost, Auto Cook |
| Control Type | Touch Control + Rotary Knobs |
| Display Type | LED Digital |
| Child Lock | Yes |
| Interior Light | Yes |
| Turntable | Yes, 315 mm |
| Door Opening | Drop-down |
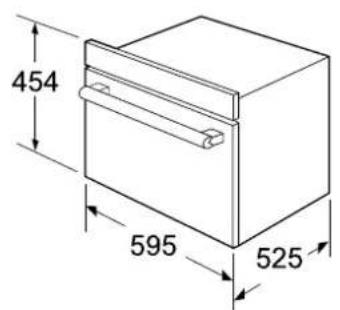
| Dimensions (H x W x D) | 455 x 595 x 560 mm |
| Cavity Dimensions (H x W x D) | 230 x 410 x 370 mm |
| Net Weight | 33.5 kg |
| Power Supply | 230 V / 50 Hz, 16 A |
| Energy Consumption (Microwave) | 0.95 kWh |
| Cleaning | Stainless steel interior, easy-clean enamel |
| Safety Features | Child lock, overheating protection, door interlock |
| Spare Parts Availability | Turntable, glass tray, grill rack, filters available |
| Warranty | 2 years |
Frequently Asked Questions - PSMO634X Philco
User questions about PSMO634X Philco
0 question about this device. Answer the ones you know or ask your own.
Ask a new question about this device
Download the instructions for your Oven in PDF format for free! Find your manual PSMO634X - Philco and take your electronic device back in hand. On this page are published all the documents necessary for the use of your device. PSMO634X by Philco.
USER MANUAL PSMO634X Philco
Built-in Combination Steam
Oven with Hot air and
Microwave
USER MANUAL
Model : PSMO634X
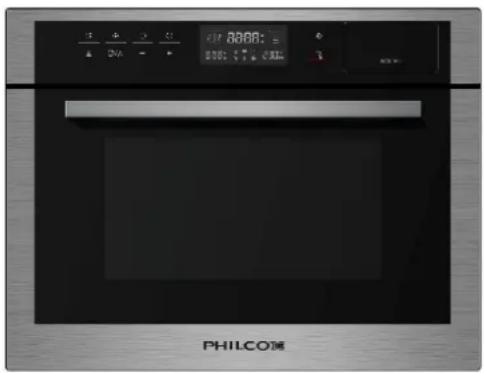
Read these instrucon carefully before using your oven, and keep it carefully. If you follow the instrucons, your oven will provide you with many years of good service.
SAVE THIS USER MANAL CAREFULLY
CONTENTS
CONTENTS 2
PRECAUTIONS TO AVOID POSSIBLE EXPOSURE TO EXCESSIVE MICROWAVE ENERGY 3
ADDENDUM 3
SPECIFICATIONS 3
IMPORTANT SAFETY INSTRUCTION 4-5
TO REDUCE THE RISK OF INJURY TO PERSONS GROUNDING INSTALLATION 6-8
SETTING UP YOUR OVEN 8
IMPORTANT INFORMATION ABOUT INSTALLING 9
PLACEMENT 10
INSTALLATION DIMENSIONS 1 0
BUILDING IN 10-11
BEFORE FIRST USE 1 2
(a) Do not attempt to operate this oven with the door open since this can result in harmful exposure to microwave energy. It is important not to break or tamper with the safety interlocks.
(b) Do not place any object between the oven front face and the door or allow soil or cleaner residue to accumulate on sealing surfaces.
(c) WARNING: If the door or door seals are damaged, the oven must not be operated until it has been repaired by a competent person.
ADDENDUM
If the apparatus is not maintained in a good state of cleanliness, its surface could be degraded and affect the lifespan of the apparatus and lead to a dangerous situation.
Specifications
| Model: | PSMO634X |
| Rated Voltage: | 230V~50Hz |
| Rated Input Power(Microwave): | 1550W |
| Rated Output Power(Microwave): | 900W |
| Rated Output Power(Grill): | 1200W |
| Rated Input Power(Convection): | 1750W |
| Rated Input Power(Steam): | 1500W |
| Rated Input Power(Maximum): | 00W33 |
| Oven Capacity: | 34L |
| External Dimensions: | 595×525× 454mm |
| Net Weight: | Approx. 33kg |
IMPORTANT SAFETY INSTRUCTIONS
WARNING
To reduce the risk of fire, electric shock, injury to persons or exposure to excessive microwave oven energy when using your appliance, follow basic precautions, including the following:
- Warning: Liquids and other foods must not be heated in sealed containers since they are liable to explode.
- Warning: It is hazardous for anyone other than a competent person to carry out any service or repair operation that involves the removal of a cover which gives protection against exposure to microwave energy.
- This appliance can be used by children aged from 8 years and above and persons with reduced physical, sensory or mental capabilities or lack of experience and knowledge if they have been given supervision or instruction concerning use of the appliance in a safe way and understand the hazards involved. Children shall not play with the appliance. Cleaning and user maintenance shall not be made by children unless they are older than 8 and supervised.
- Keep the appliance and its cord out of reach of children less than 8 years.
- Only use utensils suitable for use in microwave ovens.
- The oven should be cleaned regularly and any food deposits should be removed.
- Read and follow the specific:"PRECAUTIONS TO AVOID POSSIBLE EXPOSURE TO EXCESSIVE MICROWAVE ENERGY".
- When heating food in plastic or paper containers, keep an eye on the oven due to the possibility of ignition.
- If smoke is emitted, switch off or unplug the appliance and keep the door closed in order to stifle any flames.
- Do not overcook food.
- Do not use the oven cavity for storage purposes. Do not store items, such as bread, cookies, etc. inside the oven.
-
Remove wire twist-ties and metal handles from paper or plastic containers/bags before placing them in the oven.
-
Install or locate this oven only in accordance with the installation instructions provided.
- Eggs in the shell and whole hard-boiled eggs should not be heated in microwave ovens since they may explode, even after microwave heating has ended.
-
This appliance is intended to be used in household and similar applications such as: -staff kitchen areas in shops, offices and other working environments; -by clients in hotels, motels and other residential type environments; -farm houses; -bed and breakfast type environments.
-
If the supply cord is damaged, it must be replaced by the manufacturer, its service agent or similarly qualified persons in order to avoid a hazard.
-
Do not store or use this appliance outdoors.
-
Do not use this oven near water, in a wet basement or near a swimming pool.
-
The temperature of accessible surfaces may be high when the appliance is operating. The surfaces are liable to get hot during use. Keep cord away from heated surface, and do not cover any vents on the oven.
-
Do not let cord hang over edge of table or counter.
-
Failure to maintain the oven in a clean condition could lead to deterioration of the surface that could adversely affect the life of the appliance and possibly result in a hazardous situation.
-
The contents of feeding bottles and baby food jars shall be stirred or shaken and the temperature checked before consumption, in order to avoid burns.
-
Microwave heating of beverages can result in delayed eruptive boiling, therefore care must be taken when handling the container.
- Children should be supervised to ensure that they do not play with the appliance.
- The appliances are not intended to be operated by means of an external timer or separate remote-control system.
- Accessible parts may become hot during use. Young children should be kept away.
- Steam cleaner is not to be used.
28 During use the appliance becomes hot. Care should be taken to avoid touching heating elements inside the oven. - Only use the temperature probe recommended for this oven.(for ovens provided with a facility to use a temperature-sensing probe.)
- WARNING: The appliance and its accessible parts become hot during use. Care should be taken to avoid touching heating elements. Children less than 8 years of age shall be kept away unless continuously supervised.
- The microwave oven must be operated with the decorative door open.(for ovens with a decorative door.)
32 Surface of a storage cabinet can get hot. - The microwave oven is intended for heating food and beverages. Drying of food or clothing and heating of warming pads, slippers, sponges, damp cloth and similar may lead to risk of injury, ignition or fire.
- WARNING: When move the stove, do not carry handle. ( Stove is overweight, handles are easily broken.)
- The water in the receiving tank, inside the oven and in the water tank should be cleaned up after each use.
- Do not use the paper cups and plastic containers with temperature below 120 degrees. The glass, ceramic, stainless steel utensils can be used.
- Steam is the main heating function for this product.
READ CAREFULLY AND KEEP FOR FUTURE REFERENCE
To Reduce the Risk of Injury to Persons Grounding Installation
DANGER
Electric Shock Hazard
Touching some of the internal components can cause serious personal injury or death.
Do not disassemble this appliance.
WARNING
Electric Shock Hazard
Improper use of the grounding can result in electric shock. Do not plug into an outlet until appliance is properly installed and grounded.
This appliance must be grounded. In the event of an electrical short circuit, grounding reduces the risk of electric shock by providing an escape wire for the electric current. This appliance is equipped with a cord having a grounding wire.
Consult a qualified electrician or serviceman if the grounding instructions are not completely understood or if doubt exists as to whether the appliance is properly grounded.
-
A short power-supply cord is provided to reduce the risks resulting from becoming entangled in or tripping over a longer cord.
-
If a long cord set or extension cord is used:
1) The marked electrical rating of the cord set or extension cord should be at least as great as the electrical rating of the appliance.
2) The extension cord must be a grounding-type 3-wire cord.
3) The long cord should be arranged so that it will not drape over the counter top or tabletop where it can be pulled on by children or tripped over unintentionally.
CLEANING
Be sure to disconnect the appliance from the power supply.
- Clean the cavity of the oven after using with a slightly damp cloth.
- Clean the accessories in the usual way in soapy water.
- The door frame and seal and neighbouring parts must be cleaned carefully with a damp cloth when they are dirty.
- Do not use harsh abrasive cleaners or sharp metal scrapers to clean the oven door glass since they can scratch the surface, which may result in shattering of the glass.
- Cleaning Tip---For easier cleaning of the cavity walls that the food cooked can touch:
Place half a lemon in a bowl, add 300ml (1/2 pint) water and heat on 100% microwave power for 10 minutes.
Wipe the oven clean using a soft, dry cloth.
UTENSILS
CAUTION
Personal Injury Hazard It is hazardous for anyone other than a competent person to carry out any service or repair operation that involves the removal of a cover which gives protection against exposure to microwave energy.
See the instructions on "Materials you can use in microwave oven or to be avoided in microwave oven." There may be certain non-metallic utensils that are not safe to use for microwaving. If in doubt, you can test the utensil in question following the procedure below.
Utensil Test:
- Fill a microwave-safe container with 1 cup of cold water (250ml) along with the utensil in question.
- Cook on maximum power for 1 minute.
- Carefully feel the utensil. If the empty utensil is warm, do not use it for microwave cooking.
- Do not exceed 1 minute cooking time.
Materials you can use in microwave oven
| Utensils | Remarks |
| Browning dish | Follow manufacturer's instructions. The bottom of browning dish must be at least 3/16 inch (5mm) above the turntable. Incorrect usage may cause the turntable to break. |
| Dinnerware | Microwave-safe only. Follow manufacture's instructions. Do not use cracked or chipped dishes. |
| Glass jars | Always remove lid. Use only to heat food until just warm. Most glass jars are not heat resistant and may break. |
| Glassware | Heat-resistant oven glassware only. Make sure there is no metallic trim. Do not use cracked or chipped dishes. |
| Oven cooking bags | Follow manufacturer's instructions. Do not close with metal tie. Make slits to allow steam to escape. |
| Paper plates and cups | Use for short-term cooking/warming only. Do not leave oven unattended while cooking. |
| Paper towels | Use to cover food for reheating and absorbing fat. Use with supervision for a short-term cooking only. |
| Parchment paper | Use as a cover to prevent splattering or a wrap for steaming. |
| Plastic | Microwave-safe only. Follow the manufacturer's instructions. Should be labeled "Microwave Safe". Some plastic containers soften, as the food inside gets hot. "Boiling bags" and tightly closed plastic bags should be slit, pierced or vented as directed by package. |
| Plastic wrap | Microwave-safe only. Use to cover food during cooking to retain moisture. Do not allow plastic wrap to touch food. |
| Thermometers | Microwave-safe only (meat and candy thermometers). |
| Wax paper | Use as a cover to prevent splattering and retain moisture. |
Materials to be avoided in microwave oven
| Utensils | Remarks |
| Aluminum tray | May cause arcing. Transfer food into microwave-safe dish. |
| Food carton with metal handle | May cause arcing. Transfer food into microwave-safe dish. |
| Metal or metal-trimmed utensils | Metal shields the food from microwave energy. Metal trim may cause arcing. |
| Metal twist ties | May cause arcing and could cause a fire in the oven. |
| Paper bags | May cause a fire in the oven. |
| Plastic foam | Plastic foam may melt or contaminate the liquid inside when exposed to high temperature. |
| Wood | Wood will dry out when used in the microwave oven and may split or crack. |
| Enamel Tray | Not allowed to be used in microwave power |
SETTING UP YOUR OVEN
Names of Oven Parts and Accessories
Remove the oven and all materials from the carton and oven cavity Your oven comes with the following accessories:
Instruction Manual 1


natural_image
Technical line drawings of a three-part plastic tray or enclosure structure, showing front, top, and side views with no text or symbols.-
Control panel
-
Grill element
-
Light
-
Level
5 Glass door
-
Hinge
-
Grill Rack
-
Glass Dish
-
Enamel Tray (Packing Separately)
IMPORTANT INFORMATION ABOUT INSTALLING
• This appliance is NOT intended for use in a commercial environment.
- Please observe the installation instructions provided and note that this appliance should only be installed by a qualified technician.
• The appliancemust be connected to a properly installed earthed socket.
- Adapters, multiway strips and extension cords must not be used. Overloading can result in fire.
- If the appliance is not fitted with a supply cord and a plug, the connection equipment must have a contact separation in all poles that provide full disconnection, and the appliance must be incorporated in the fixed wiring in accordance with the wiring rules.
The accessible surface may be hot during operation.
Placement
• This appliance is only intended to be fully fitted in a kitchen.
- This appliance is not designed to be used as a tabletop appliance or inside a cupboard.
- Thefittedcabinetmustnothaveaback wallbehindtheappliance.
- Agapofat least 100 mmmustbemaintained betweenthewallandthebaseorback paneloftheunitabove.
- Thefittedcabinetmusthaveaventilation
achieve this,cutbackthebasepanelorfit openingof 250cm ^2 on the front. To
a ventilation grille.
• Ventilationslotsand intakesmustnotbecovered.
- Thesafe operationofthisappliancecanonlybe guaranteed ifithasbeen installedin accordancewiththeseinstallation instructions.
• The fitterisliable forany damageresultingfromincorrect installation.
- The units into which the appliance is fitted must be heat-resistant up to 90 °C.
Installation dimensions
Ventilation openings
behind, min. 250 cm²

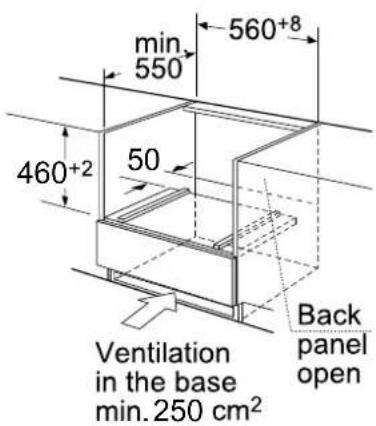
Note: There should be gap above the oven.
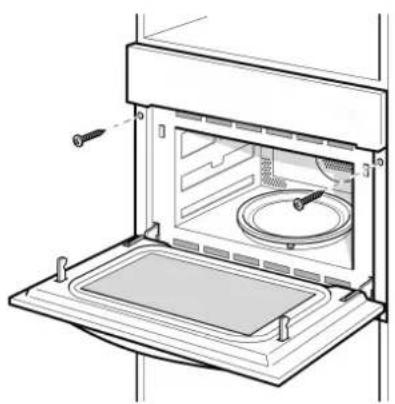
Building in
- Do not hold or carry the appliance by the door handle. The door handle cannot hold the weight of the appliance and may break off.
- Carefully push the appliance into the cabinet, making sure that it is in the centre.
- Open the door and fasten the appliance with the screws that were supplied.
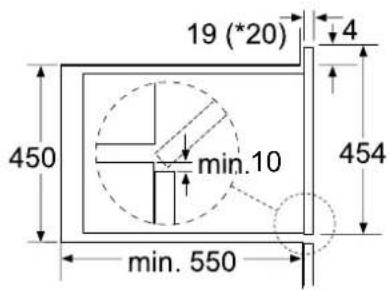
* 20 mm for metal fascias
natural_image
Line drawing of an open microwave oven with a dish inside, showing internal components and a tool (no text or symbols)Fully insert the appliance and centre it.
Do not kink the connecting cable.
Screw the appliance into place.
The gap between the worktop and the appliance must not be closed by additional battens.
Initial cleaning and heating
Removing all of the protection foil on the front of the appliance.
For more information see the "CLEANING". Before the first use of the appliance,
● Before using your appliance for the first time
- Take out and clean all the tray, wire rack and glass dish.
- Clean the appliance interior cavity with a damp cloth and warm water. Never use abrasive detergent to clean the cavity.
- Heat the empty oven to banish odor.
● Touch “ ▶ ” keys. Appliance turn on, the main menu appears in the display.
● Touch " : ≈" to choose the convection function.
Recommended temperature will be highlighted, along with microwave started directly.
- Raise the temperature to maximum temperature. This can be achieved by using beside proximity keys or the numeric keypad to achieve.
- Touch " ▶ " symbol next to the sensor keys. Heat the empty oven for at least an hour.
When you do this, make sure that the room is well ventilated. Close the door to the other room to avoid odor pervaded the House.
- Let the appliance cool down to room temperature. Then solution of neutral detergent mixed with hot water to clean inside the microwave oven, then wipe dry with a clean soft cloth.
Keep the door open until completely dry in the oven.
Control Panel

This oven uses modern electronic control to adjust cooking parameters to meet your needs better.
| Symbol | Function |
| Steam | |
 | Heat Mode (Microwave, Grill ,Convection,Grill+Fan, MW+Grill, MW+Convection,Microwave+Grill+Fan,Grill+Fan function) |
| / | Rapid preheating/Auto menu/Defrost |
 | Press briefly:StopPress twice:CancelPress and hold:Childproof Lock |
 | Temperature/Weight |
| Clock | |
 | Start |
| Water tank |
Clock Setting
When do 000e still got the upover will ring once.
1) Pteset the right time (between 00:00 and 23:59.)
2) After you have set the right time, press " L". The clock has been set.
Note: 1) If you want to change the time, you have to press and hold the "L" button for 3 seconds. The actual time disappears and then the time will blink in the display.
Press" — " or " + " to set the new time and press the " Ⓛ " button to confirm the setting.
2) When you set the clock, long press " —" or " + " when adjusting 10MIN, short press time (each time you adjust 1MIN).
Using the programmer
NOTE: Press " 🔵", you could choose Microwave, Grill, Convection, Grill+Fan, MW+Convection, MW+ Grill function, Microwave+Grill +Fan.
2. Microwave Cooking
1) Press the " 🔗 " button to activate the program selection. "01:00" will light in the display and the microwave icon appears.
2) Press " ⇌" or " - " or " + " to select microwave cooking mode.
3) Press "↔", then press " - " or " + " to set the microwave power (900W, 7.00W, 450W, 300W, 100W)
4) Press "L", then press " - " or " + " to set the cooking time.
The max. cooking time depends on the power that has been set. When the power is 900W, the MAX. time is 30 minutes and other powers are 90 minutes.
5) Press " ▶ " button to start cooking.
Microwave Power Chart
| Microwave Power | 100% | 80% 50% | 30% | 20% | |
| Display | 900W | 700W | 450W | 300W | 100W |
You can see from the table below from which power levels you can choose and for which foods the power levels are suitable.
| Power level Food | |
| 900 W - Boiling water, reheating- Cooking chicken, fish, vegetables | |
| 700 W - Reheating- Cooking mushrooms, shell fish- Cooking dishes containing eggs and cheese | |
| 450 W - Cooking rice, soup | |
| 300 W - Defrosting- Melting chocolate and butter | |
| 100 W - Defrosting sensitive/delicate foods- Defrosting irregularly-shaped foods- Softening ice cream- Allowing dough to rise |
3. Grill Cooking
1) Press the " Button to activate the program selection. "01:00" displays and the microwave icon appears.
2) Press " : ≈" or " - " or " + " to select grill mode. The default grill power is the third level.
3) Press " " to choose the grill level.
4) Press" — "or " + " to select the level 3(the MAX.), level 2 or level 1(the MIN.).
5) Press "L" to select the time setting mode. The default time is 10 minutes.
Press" — "or " + " to select the cooking time of grill. The MAX.time is 90 minutes.
6) Press " ▶ " button to start cooking.
4. Convection Cooking
1) Press the " 🔊" button to activate the program selection. "01:00" displays and the microwave icon appears.
2) Press " : ≈" or " - " or " + " to select convection mode.
The default temperature is 180 degrees.
3) Press " " to enter to the temperature mode.
4) Press" — " or " + " to select temperpature. The temperature is from 50 to 230 degrees.(50,100,105,110,115,120,125,130,135,140,145,150,155,160,165),170,175,180,185,190,195,200,205,210,215,220,225,230
5) Press "L" to select the time setting mode. The default time is 10 minutes. Press " - " or " + " to select the cooking time. The MAX.time is 5 hours.
6) Press " ▶ " button to start cooking.
5. Grill Fan Cooking
1) Press the " 🔊" button to activate the program selection. "01:00" displays and the microwave icon appears.
2) Press "or " - " or " + " to select grill fan mode. The default temperature is 180 degrees.
3) Press " " to enter to the temperature selection.
4) Press " —" or " + " to select the temperature. The temperature is from to 0 degrees.(35,100,105,110,115,120,125,130,135,140,145,150)35 18 155),160,165,170,175,180
5) Press "L" to select the time setting mode. The default time is 10 minutes. Press " - " or " + " to select the cooking time. The MAX.time is 5 hours.
6) Press " ▶ " button to start cooking.
- Microwave + Grill Cooking
1) Press the " : ≈ " button to activate the program selection. "01:00" displays and the microwave icon appears.
2) Press" : ≈ " or " - "or " + " to select the " MW+GRILL" combination mode.
3) Press " " to enter to the grill level selection.
4) Press" — "or " + " to select the level 3(the MAX.), level 2 or level 1(the MIN.).
5) Press " " to enter to the microwave power level selection.
6) Press " — " or " + " to select the microwave power(700W, 450W, 300W, 100W). The default power is 300W.
7) Press" " to select the time setting mode. The default time is 10 minutes.
8) Press" — "or " + " to select the cooking time. The MAX.time is 90 minutes.
9) Press " ▶ " button to start cooking.
- Microwave + Convectional Cooking
1) Press the " 🔵 " button to activate the program selection. "01:00" displays and the microwave icon appears.
2) Press" : ≈ " or " - "or " + " to select the "MW+ CONV."combination mode.
3) Press " " to enter to the temperature selection. The default temperature is 180 degrees.
4) Press " — " or " + " to select the temperature between to degrees.50 230 (50,100,105,110,115,120,125,130,135,140,145,150,155,160, 165),170,175,180,185,190,195,200,205,210,215,220,225,230
5) Press " " to enter to the microwave power level selection.
6) Press " — " or " + " to select the microwave power(700W, 450W, 300W, 100W). The default power is 300W.
7) Press" " to select the time setting mode. The default time is 10 minutes.
8) Press" - "or " + " to select the cooking time. The MAX.time is 90 minutes.
9) Press " ▶ " button to start cooking.
- Microwave + Grill Fan Cooking
1) Press the " 🔊" button to activate the program selection. "01:00" displays and the microwave icon appears.
2) Press" : ≈ " or " — "or " + " to select the "MW+GRILL+FAN"combination mode.
3) Press " " to enter to the temperature selection.
The default temperature is 180 degrees.
4) Press " — " or " + " to select the temperature. The temperature is from 100 to 0 degrees.(100,105,110,115,120,125,130,135,140,145,150) 155,160,165,170,175,180
5) Press " " to enter to the microwave power level selection.
6) Press " — " or " + " to select the microwave power(700W, 450W, 300W, 100W). The default power is 300W.
7) Press" " to select the time setting mode. The default time is 10 minutes.
8) Press" — "or " + " to select the cooking time. The MAX.time is 90 minutes.
9) Press " ▶ " button to start cooking.
9. Auto Cook
1) In standby mode, press "@/A" button once, the display " *Δ" lights, go into defrost menu mode; press the key more than once, you can switch between the different cooking types such as d01, P01, S01, at this point you can press the " — " or " + " to choose Defrost, Non Steam Menu ,Steam Menu switches between three types of cooking. When the display " A " lights, enter menu mode automatically, the default symbol weight, cooking time and cooking light; the display shows P01 or S01.
2) Press the " " and flashing display shows P01 or S01, at this point, you can press " - "or " + ", select the Menu type (P01-P40 or S01-S40).
Note:
1) For non-steam menu (P01-P40), press "↔" to confirm menu selection and enter the weight of menu selection state automatically, at this point, you can press " - " or " + ", choose the automatic menu weight cooking time display.
2) For the steam menu, at this time, if you need to adjust the default cooking time, you can press Ⓛ, and makes the default cooking time of flashing, at this point, press " - " or " + " adjust the Cook time menu.
3) Press " ▶" button to start cooking.
NOTE:
1) After steam auto menu, the water pump will withdraw the water back to water tank, there will be some noise.
2) After steam auto menu, you need to clean the water on cavity and door panel.
3) If the menu need preheating, don't put the food in the oven during preheating. Only when the temperature is reached, then you can put in the food to start cooking.
10. Defrost
1) In standby mode, press"@/A"button once, select defrost mode, the display " *Δ " lights, into Auto Defrost Mode; display shows d01, initial weight, cooking time and cooking signs light up;
2) Press "↔", to confirm the selected defrost mode and enter the defrost weight selection state, press " — "or " + "to select automatic defrost weight cooking time display;
3) Press " ▶" button to start cooking.
11. Preheating Function
The preheating function can be activated after you have set the functions has been set: Convection, Grill fan, ,MW-convection,MW-Grill fan.
1) Press " Ⓞ/A" button. When the preheat icon appears in the display.
2) Press " ▶ " button to start preheating. When the right temperature is reached, you will hear three beeps. You can stop the preheating by opening the oven door or by pressing the " □ " button.
Note: The preheating function only works if you have already chosen one of the modes above. During preheating, the microwave function is switched off.
During preheating, don't put the food in the oven. You may put in the food for cooking, when the temperature is reached.
12 Steam Function
1) In standby mode, press " <> " button, enter the steam mode, time lights up by default 10:00. Press the key several times, you can switch to other steam modes (or you can press " - " or " + " to select other desire steam modes.)
2) When you select Steam mode, the icon is displayed, signs light up. The icon is displayed, and "10:00", "Min" and "°C" lights up. Tank icon on the right show current water level (lack of water or not), and the default temperature 100 °C lights up.
3) Press the " " key to switch to the temperature selection, the temperature flashes, at this point, press " — " or " +" to select a temperature (50°C, 60°C, 70°C, 80°C, 90°C, 100°C.)
4) Press" " to select the time 'setting mode. The default time is 10 minutes.
5) Press" — "or " + " to select the cooking time. The MAX.time is 90 minutes.
6) Press " ▶ " button to start cooking.
13 Microwave+Steam Function
1) In standby mode, press " <> " button, enter the steam mode, time lights up by default 10:00. Press the key several times, you can switch to other steam modes (or you can press " —" or " + " to select other desire steam modes.)
2) When you select MW+Steam mode, the icon is displayed, then displays 300W.
3) Press " " to enter to the microwave power level selection.
4) Press " — " or " + " to select the microwave power(900W, 700W, 450W, 300W, 100W). The default power is 300W.
5) Press "↔" button, adjust the steam, and the steam icon flashes, then press
" — " or " + " to set steam (default 30 percent), if the steam is not in Flash, you can
press the "↔" key to make it Flash and then press " — " and " + " to set the steam.
6) Press" " to select the time setting mode. The default time is 10 minutes.
7) Press" — "or " + " to select the cooking time. The MAX.time depends on the power that has been set. When the power is 900W, the MAX.time is 30 minutes and other powers are 90 minutes.
8) Press " ▶ " button to start cooking.
14 Convection+Steam Function
1) In standby mode, press " "" " button, enter the steam mode, time lightsup by default 10:00. Press the key several times, you can switch to other steam modes (or you can press " - " or " + " to select other desire steam modes.)
2) When you select Conv.+Steam mode, the icon is displayed, the default temperature is 180 degrees.
3) Press " " to enter to the temperature selection.
4) Press " - " or " + " to select temperature.(180°C, 190°C, 20°C, 21°C, 22°C)
5) Press "↔" button, adjust the steam, and steam the display flashes, then press " — " or " + " to set steam (default 30 percent), if the steam is not in Flash, you can press the "↔" key to make it Flash and then press " — " and " + " to set the steam.
6) Press" " to select the time setting mode. The default time is 10 minutes.
7) Press" — "or " + " to select the cooking time . The MAX.time is 90 minutes.
8) Press " ▶ " button to start cooking.
\* Child Safety Lock Function
Lock: In standby mode, press "☐" for 3 seconds, there will be a long "beep" denoting entering into the children-lock state and "☐" indicator will light.
Unlock : In locked mode, press " " for 3 seconds, there will be a long "beep" denoting that the lock is released, and " " indicator will disappear.
\*Display Specification
(1) When setting, if no other operation, it will confirm automatically after 10 seconds. Except clock setting for the first time.
(2) During setting program, after adjusted for 3 seconds, it will confirm after 3 seconds.
(3) When the oven is in setting state or pause state, including auto menu and defrost program, if no operation in 5 minutes, it will enter into the off state.
(4) The oven lamp will light all the time if the door is open.
(5) The oven lamp will light all the time if the oven is paused.
(6) " ▶ " button must be pressed to continue cooking if the oven door is open during cooking process.
(7) The " : " button can be press in any state to open the water tank
Steam note:
1. Before steam cooking:
Before starting the steam cooking mode, if the tank is empty, press ▶ button, abnormal buzzer is emitted and the screen icon will show water scarcity status of water level to remind you to add water.
2. During steam cooking:
During steam cooking mode, if the tank is empty, abnormal buzzer will ring and the screen icon will show water scarcity status of water level to remind you to add water. After adding water, it will work normally.
3. After steam cooking:
1-After steam function is finished, the water in boiler will be withdraw to water tank. about 1 minute. This process lasts for
2-During the process to withdraw the water back to water tank, if the water tank is full, the system will be beeping 10 times to remind you clean up the tank. After the water tank is empty, the system will continue to withdraw water.
4. Defect codes
The following defect codes may occur during steam functions :
E-06: 1-Water tank is not close well.
2-The water tank is empty, need to fill the water tank.
E-05: water system abnormal, need to contact Customer Service for help, below is the possibilities.
1-The water sensor is abnormal.
2-The water pipe is abnormal.
3-The water pump is abnormal.
4-The water tank is abnormal.
15. Automatic descaling Function
For best cleaning results, we recommend that you use detergent like "Sodium citrate" for descaling the appliance. Please refer to the manufacturer's instruction for use. It is suggested that descaling function should be used after the steam function has been run for 20 hours.
1) Turn on the appliance, remove the water tank, fill in 1 litre of fresh water into the water tank, add a packet of descaling agent.
2) Put the water tank back in the appropriate place.
3) In standby mode, press " Ⓞ/A "button, the display " *△" lights, display shows default mode d01, default weight 0.10, corresponding cooking time and " Kg ""Min" light up.
4) Press 📄/A repeatedly, when CLE indicator lighten t means to enter Descaling function. "Min" and default time 20:00 lighten, tank icon show the current water level (Water, lack of water, full of water), other icons disappear.
5) Press " ▶" to start the program.
6) Wait for 1 minute till program is finished, remove the water tank, empty and clean it thoroughly.
7) Refill the tank with fresh water. then repeat steps 3 to 6.
Note: the descaling process shall not be shut down. If the descaling process shut down before the entire program, then must be restarted from step 3.
Auto Cook Menu
- STEAM MENU
| AUTO-MENU DISPLAY WEIGHT | POWER | ||
| Trout S01 | 200 | Steam100°C+300W | |
| 300 | |||
| 400 | |||
| 500 | |||
| 600 | |||
| Salmon Filet S02 | 200 | Steam100°C+100W | |
| 300 | |||
| 400 | |||
| 500 | |||
| 600 | |||
| Pikeperch S03 | 200 | Steam100°C+300W | |
| 300 | |||
| 400 | |||
| 500 | |||
| 600 | |||
| Prawns S04 | 200 | Steam100°C | |
| 300 | |||
| 400 | |||
| 500 | |||
| 600 | |||
| Halibut filet | S05 | 200 | Steam100°C+300W |
| 300 | |||
| 400 | |||
| 500 | |||
| 600 | |||
| Cockles S06 | 200 | Steam100°C+100W | |
| 300 | |||
| 400 | |||
| 500 | |||
| 600 | |||
| Cod filet S07 | 200 | Steam100°C+300W | |
| 300 | |||
| 400 | |||
| 500 | |||
| 600 | |||
| Herring S08 | 200 | Steam100°C+300W | |
| 300 | |||
| 400 | |||
| 500 | |||
| 600 | |||
| Tuna filet S09 | 200 | Steam100°C+100W | |
| 300 | |||
| 400 | |||
| 500 | |||
| 600 | |||
| Crab S10 | 2 | Steam100°C+300W | |
| 3 | |||
| 4 | |||
| 5 | |||
| 6 | |||
| Chicken leg S11 | 200 | Steam100°C+300W | |
| 300 | |||
| 400 | |||
| 500 | |||
| 600 | |||
| Chicken breast | S12 | 200 | Steam100°C+300W |
| 300 | |||
| 400 | |||
| 500 | |||
| 600 | |||
| 700 | |||
| 800 | |||
| Meatball S13 | 200 | Steam100°C+300W | |
| 300 | |||
| 400 | |||
| 500 | |||
| 600 | |||
| Turkey escalope | S14 | 400 | Steam100°C+300W |
| 500 | |||
| 600 | |||
| 700 | |||
| 800 | |||
| Pork filet, whole | S15 | 200 | Steam100°C+300W |
| 300 | |||
| 400 | |||
| 500 | |||
| 600 | |||
| Sausages S16 | 200 | Steam100°C+100W | |
| 300 | |||
| 400 | |||
| 500 | |||
| 600 | |||
| Eggs in Glass | S17 | 1 | Steam100°C |
| 3 | |||
| Eggs, hard S18 | 1 | Steam100°C | |
| 3 | |||
| Eggs, soft S19 | 1 | Steam100°C | |
| 3 | |||
| Brown rice + water | S20 | 200g+400mL | Steam100°C+ 450W/Steam100°C+ 300W |
| 400g+800mL | |||
| Rice + water S21 | 200g+300mL | Steam100°C+ 450W/Steam100°C+300W | |
| 400g+600mL | |||
| Eggplant/Aubergine | S22 | 200 Steam100°C+300W | |
| 300 | |||
| 400 | |||
| 500 | |||
| 600 | |||
| Beans S23 | 200 Steam100°C+300W | ||
| 300 | |||
| 400 | |||
| 500 | |||
| 600 | |||
| Broccoli S24 | 200 Steam100°C | ||
| 300 | |||
| 400 | |||
| 500 | |||
| 600 | |||
| Cauliflower S25 | 200 Steam100°C+300W | ||
| 300 | |||
| 400 | |||
| 500 | |||
| 600 | |||
| Peas S26 | 200 Steam100°C+300W | ||
| 300 | |||
| 400 | |||
| 500 | |||
| 600 | |||
| Potatoes with skin(whole,small) | S27 | 1 Steam100°C+300W | |
| 2 | |||
| 3 | |||
| 4 | |||
| Potatoes with skin(whole, big) | S28 | 1 Steam100°C+300W | |
| 2 | |||
| 3 | |||
| 4 | |||
| Potatoes without skin(pieces) | S29 | 200 Steam100°C+300W | |
| 300 | |||
| 400 | |||
| 500 | |||
| 600 | |||
| Carrots S30 | 200 Steam100°C+300W | ||
| 300 | |||
| 400 | |||
| 500 | |||
| 600 | |||
| Corn cobs S31 | 2 Steam100°C+300W | ||
| 3 | |||
| 4 | |||
| 5 | |||
| 6 | |||
| Bell peppers S32 | 200 | Steam100°C |
| 300 | ||
| 400 | ||
| 500 | ||
| 600 | ||
| Hot peppers S33 | 200 | Steam100°C |
| 300 | ||
| 400 | ||
| 500 | ||
| 600 | ||
| Mushrooms S34 | 200 | Steam100°C+300W |
| 300 | ||
| 400 | ||
| 500 | ||
| 600 | ||
| Leeks S35 | 200 | Steam100°C+300W |
| 300 | ||
| 400 | ||
| 500 | ||
| 600 | ||
| Brussels sprouts S36 | 200 | Steam100°C |
| 300 | ||
| 400 | ||
| 500 | ||
| 600 | ||
| Celery S37 | 200 Steam100°C+300W | |
| 300 | ||
| 400 | ||
| 500 | ||
| 600 | ||
| 700 | ||
| 800 | ||
| Asparagus S38 | 200 | Steam100°C+100W |
| 300 | ||
| 400 | ||
| 500 | ||
| 600 | ||
| Spinach S39 | 200 Steam100°C+300W | |
| 300 | ||
| 400 | ||
| 500 | ||
| 600 | ||
| Courgette S40 | 200 Steam100°C+300W | |
| 300 | ||
| 400 | ||
| 500 | ||
| 600 | ||
- NO-STEAM MENU
| AUTO-MENU | DISPLAY | WEIGHT POWER | |
| Melt chocolate P01 | 100 450W | ||
| 150 450W | |||
| 200 450W | |||
| Melt butter P02 | 100 450W | ||
| 150 450W | |||
| 200 450W | |||
| Sweet potato P03 | 200 100W+220°C | ||
| 400 100W+220°C | |||
| 600 100W+220°C | |||
| Chicken Whole P04 | 800 100W+220°C | ||
| 1000 100W+220°C | |||
| 1200 100W+220°C | |||
| Chicken leg P05 | 200 450W+220°C | ||
| 300 450W+220°C | |||
| 400 450W+220°C | |||
| 500 450W+220°C | |||
| 600 450W+220°C | |||
| 700 450W+220°C | |||
| 800 450W+220°C | |||
| Chicken Wings P06 | 200 300W+220°C | ||
| 300 300W+220°C | |||
| 400 300W+220°C | |||
| 500 300W+220°C | |||
| 600 300W+220°C | |||
| 700 300W+220°C | |||
| 800 300W+220°C | |||
| Fish Whole P07 | 1 100W+220°C | ||
| 2 100W+220°C | |||
| 3 100W+220°C | |||
| Fish Steak P08 | 200 100W+220°C | ||
| 300 100W+220°C | |||
| 400 100W+220°C | |||
| 500 100W+220°C | |||
| 600 100W+220°C | |||
| Fresh pizza P09 | 200 Pre-heat/200°C conv. | ||
| 300 Pre-heat/200°C conv. | |||
| 400 Pre-heat/200°C conv. | |||
| 500 Pre-heat/200°C conv. | |||
| 600 Pre-heat/200°C conv. | |||
| Frozen Pizza P10 | 200 100W+220°C | ||
| 300 100W+220°C | |||
| 400 100W+220°C | |||
| Cake P11 | 400 Pre-heat/150°C | ||
| 500 Pre-heat/150°C | |||
| 600 Pre-heat/150°C | |||
| Roast Pork P12 | 400 450W+220°C | ||
| 500 450W+220°C | |||
| 600 450W+220°C | |||
| 700 450W+220°C | |||
| 800 450W+220°C | |||
| 900 450W+220°C | |||
| 1000 450W+220°C | |||
| Chicken kabobs P13 | 200 100W+220°C | ||
| 300 100W+220°C | |||
| 400 100W+220°C | |||
| 500 100W+220°C | |||
| 600 100W+220°C | |||
| Shrimp P14 | 200 Pre-heat/220°C | ||
| 400 Pre-heat/220°C | |||
| 600 Pre-heat/220°C | |||
| Beef steak P15 | 400 100W+220°C | ||
| 500 100W+220°C | |||
| 600 100W+220°C | |||
| 700 100W+220°C | |||
| 800 100W+220°C | |||
| 900 100W+220°C | |||
| 1000 100W+220°C | |||
| Roast Ribs | P16 | 200 100W+220°C | |
| 400 100W+220°C | |||
| 600 100W+220°C | |||
| Chocolate cookies | P17 | 500 Pre-heat/180°C | |
| lemon cookies P18 | 400 | Pre-heat/200°C | |
| Sausage P19 | 200 Pre-heat/220°C | ||
| 400 Pre-heat/220°C | |||
| 600 Pre-heat/220°C | |||
| finger food P20 | 200 Pre-heat/220°C | ||
| 300 Pre-heat/220°C | |||
| 400 Pre-heat/220°C | |||
| Reheat P21 | 200 900W | ||
| 300 | 900W | ||
| 400 900W | |||
| 500 900W | |||
| 600 900W | |||
| Potato P22 | 1 900W | ||
| 2 | 900W | ||
| 3 | 900W | ||
| Beverage P23 | 1 900W | ||
| 2 900W | |||
| 3 900W | |||
| Pasta P24 | 100(+800ml cold water) | 700W | |
| 150(+1000ml cold water) | |||
| 200(+1200ml cold water) | |||
| SBa5 | 1 | 900W | |
| 2 | |||
| 3 | |||
| Pizza P26 | 1 | 900W | |
| 2 | |||
| 3 | |||
| Muffin P27 | 1 | 900W | |
| 2 | |||
| 3 | |||
| 4 | |||
| Oatmeal P28 | 50+500ml water | 900W/450W | |
| 100+1000ml water | |||
| 150+1500ml water | |||
| Baked Apple P29 | 2 | 700W | |
| 3 | |||
| 4 | |||
| Sandwich P30 | 1 | 900W | |
| 2 | |||
| 3 | |||
| Popcorn P31 | 50 | 900W | |
| 100 | |||
| Fudge Brownies | P32 | 800 | 100W+180°C |
| Bread P33 | 100 | Grill Level3 | |
| 150 | |||
| 200 | |||
| Chicken nuggets P34 | 200 | 100W+220°C | |
| 300 | |||
| 400 | |||
| 500 | |||
| 600 | |||
| French Fries P35 | 200 | 100W+220°C | |
| 300 | |||
| 400 | |||
| 500 | |||
| Oatmeal raisin cookies | P36 | 600 | Pre-heat/180°C |
| pecan crisps | P37 | 500 | Pre-heat/180°C |
| peanut chocolate cookies | P38 | 500 Pre-heat/180°C | |
| amburger steak | P39 | 2 | 100W+220°C |
| 4 | |||
| 6 | |||
| Muffin P40 | 840(70g*12) | Pre-heat/180°C | |
TROUBLE SHOOTING
| Normal | |
| Microwave oven interfering TV reception | Radio and TV reception may be interfered when microwave oven operating. It is similar to the interference of small electrical appliances, like mixer, vacuum cleaner, and electric fan. It is normal. |
| Dim oven light | In low power microwave cooking, oven light may become dim. It is normal. |
| Steam accumulating on door, hot air out of vents | In cooking, steam may come out of food. Most will get out from vents. But some may accumulate on cool place like oven door. It is normal. |
| Trouble | Possible Cause | Remedy |
| Oven can not be started. | (1) Power cord not plugged in properly. | Unplug. Then plug again after 10 seconds. |
| (2) Fuse blowing or circuit breaker works. | Contact Customer Service. | |
| (3) Trouble with outlet. | Contact Customer Service. | |
| Oven does not heat. | (4) Door not closed well. | Close door properly. |

According to Waste of Electrical and Electronic Equipment (WEEE) directive, WEEE should be separately collected and treated. If at any time in future you need to dispose of this product please do NOT dispose of this product with household waste. Please send this product to WEEE collecting points where available.
請記錄下列產品資料
Proudly Serviced by:

a Gilman Group Company
太平家庭電器
2/F, Shing Dao Industrial Building, 232 Aberdeen Main Road, Hong Kong 香港香港仔大道232號城都工業大廈2樓
PHILCO®
natural_image
Technical line drawing of a rectangular frame with mounting holes (no text or symbols)重要安裝注意事項重要安裝注意事項
Proudly Serviced by:
a Gilman Group Company
太平家庭電器
2/F, Shing Dao Industrial Building, 232 Aberdeen Main Road, Hong Kong 香港香港仔大道232號城都工業大廈2樓


- Built-in Combination Steam
- Oven with Hot air and
- Microwave
- USER MANUAL
- Model : PSMO634X
- CONTENTS
- ADDENDUM
- IMPORTANT SAFETY INSTRUCTIONS
- WARNING
- READ CAREFULLY AND KEEP FOR FUTURE REFERENCE
- To Reduce the Risk of Injury to Persons Grounding Installation
- DANGER
- CLEANING
- UTENSILS
- CAUTION
- Utensil Test:
- Materials to be avoided in microwave oven
- SETTING UP YOUR OVEN
- Names of Oven Parts and Accessories
- IMPORTANT INFORMATION ABOUT INSTALLING
- Placement
- Installation dimensions
- Building in
- Initial cleaning and heating
- Control Panel
- Clock Setting
- Microwave Cooking
- Grill Cooking
- Convection Cooking
- Grill Fan Cooking
- Auto Cook
- Note:
- Defrost
- Preheating Function
- Steam Function
- Microwave+Steam Function
- Convection+Steam Function
- \* Child Safety Lock Function
- \*Display Specification
- Steam note:
- Before steam cooking:
- During steam cooking:
- After steam cooking:
- Defect codes
- Automatic descaling Function
- Auto Cook Menu
- TROUBLE SHOOTING
- 請記錄下列產品資料
- 太平家庭電器
- PHILCO®
- 重要安裝注意事項重要安裝注意事項
Brand : Philco
Model : PSMO634X
Category : Oven