943-109 - Food thermometer Menuett - Free user manual and instructions
Find the device manual for free 943-109 Menuett in PDF.


| Product Type | Food Thermometer |
| Brand | Menuett |
| Model | 943-109 |
| Dimensions | Approximately 20 x 3 x 2 cm (7.9 x 1.2 x 0.8 in) |
| Weight | Approximately 50 g (1.8 oz) |
| Power Source | 1 x CR2032 battery (included) |
| Temperature Range | -50°C to +300°C (-58°F to +572°F) |
| Accuracy | ±1°C (±2°F) from -20°C to 100°C |
| Display | LCD, clear digits |
| Probe Type | Stainless steel, folding |
| Auto-Off | After approx. 10 minutes of inactivity |
| Functions | Instant read, Celsius/Fahrenheit switch, hold function |
| Cleaning | Wipe with a damp cloth; do not immerse in water |
| Safety | Not dishwasher safe; keep out of reach of children |
| Spare Parts | CR2032 battery (standard) |
| Repairability | Battery replacement only; no user-serviceable parts |
Frequently Asked Questions - 943-109 Menuett
User questions about 943-109 Menuett
0 question about this device. Answer the ones you know or ask your own.
Ask a new question about this device
Download the instructions for your Food thermometer in PDF format for free! Find your manual 943-109 - Menuett and take your electronic device back in hand. On this page are published all the documents necessary for the use of your device. 943-109 by Menuett.
USER MANUAL 943-109 Menuett
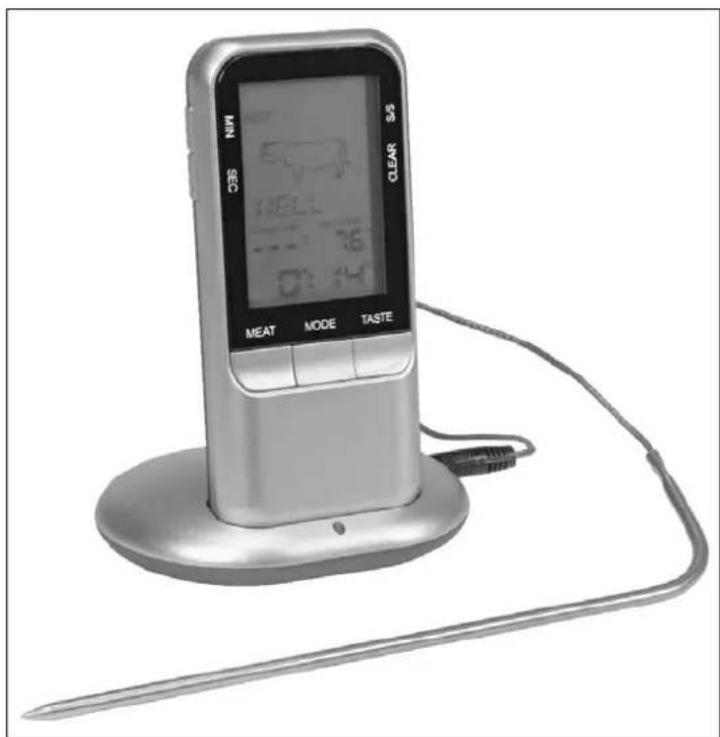
User Instructions for Wireless Meat Thermometer
943-109
SV Bruksanvisning i original
NO Bruksanvisning i original
EN Operating instructions in original
TEKNISKA DATA
flowchart
graph LR
    A[" cow "] --> B[" cow "]
    B --> C[" cow "]
    C --> D[" burger "]
    D --> E[" pig "]
    E --> F[" chicken "]
    F --> G[" fish "]
Wireless meat thermometer with timer function
Temperature: 0 to 250°C
Backlight
Temperature display in °C/°F
Settings for type of meat and cooking
Timer display with alarm
Temperature display with alarm
USE
Read the User Instructions carefully before use. Save these instructions for future reference.
Replacing the batteries, receiver
- Open the battery cover on the back of the receiver.
- Insert 2 new alkaline AAA batteries in the battery compartment with the terminals (+/-) correctly positioned as shown by the markings in the compartment.
- Replace the cover.
- Check functionality by switching On and Off with the switch on the back.
Replacing the batteries, transmitter
- Open the battery cover.
- Insert 2 new alkaline AAA batteries in the battery compartment with the terminals (+/-) correctly positioned as shown by the markings in the compartment.
- Replace the battery cover.
- Check functionality by switching On and Off with the switch underneath.
- When the transmitter is supplied with voltage the status lamp in the middle of the receiver flashes 3 times and the transmitter sends temperature data to the receiver.
IMPORTANT:
Status lamp
The red status lamp in the middle of the transmitter flashes when the transmitter is actuated and transmitting.
Transmitter
If the temperature is constant the transmitter sends temperature signals at 30 second intervals. If the temperature changes by more than 1^ C the transmitter sends a temperature signal.
Connecting the sensor
Connect the sensor cable to the jack on the right side of the transmitter.
USE
Connect the sensor to the jack on the transmitter. Insert the sensor into the thickest part of the meat. Make sure that the sensor does not go right through the meat. Never expose any part of the sensor to a naked flame.
Settings for type of meat and cooking
- Press the MEAT button to set the type of meat.
- Press repeatedly to browse between types of meat in the following order.

flowchart
graph LR
    A["BEEF"] --> B["LAMB"]
    B --> C["VEAL"]
    C --> D["HAMBURGER"]
    D --> E["PORK"]
    E --> F["TURKEY"]
    F --> G["CHICKEN"]
    G --> H["FISH"]
- Press the TASTE button to select the cooking method (rare, medium rare, medium, medium well or well done). The target temperature is shown on the display.
- Start the cooking.
- An audio signal is given when the set temperature is reached.
Manual setting of target temperature
- Insert the sensor into the meat, as above.
- Hold the MODE button pressed for 3 seconds to switch to manual temperature setting.
- Set the required temperature with the MIN and SEC buttons.
- Press the MODE button to confirm the setting.
- The target temperature is shown on the display. Start the cooking.
- An audio signal is given when the set temperature is reached.
After cooking
- Pull out the sensor when you have finished cooking. Use a potholder, or equivalent.
- Clean the sensor with hot water and a mild detergent.
Wipe the main unit with a damp cloth.
Choice of display unit
Select the temperature display in °C or °F by pressing the MODE button.
Clock/timer
The clock and timer work independently of the temperature sensor.
Clock function
If the timer is not set, the clock shows the time elapsed since the cooking started.
Setting the timer
Set the required time with the MIN and SEC buttons.
Starting the timer
- Press the button to start.
- Press the button again to pause.
- When the timer has been paused it can be reset with the CLEAR button.
- An audio signal is given when the timer has counted down to 0. Press any button to switch off the signal.
NOTE: The longest timer time is 99 minutes and 59 seconds.
Backlight
Press any button to activate the backlight for 5 seconds.
Jula reserves the right to make changes. In the event of problems, please contact our service department.
www.jula.com

Care for the environment!
Must not be discarded with household waste! This product contains electrical or electronic components that should be recycled. Leave the product for recycling at the designated station e.g. the local authority's recycling station.
- User Instructions for Wireless Meat Thermometer
- TEKNISKA DATA
- USE
- Read the User Instructions carefully before use. Save these instructions for future reference.
- Replacing the batteries, receiver
- Replacing the batteries, transmitter
- IMPORTANT:
- Status lamp
- Transmitter
- Connecting the sensor
- Settings for type of meat and cooking
- Manual setting of target temperature
- After cooking
- Choice of display unit
- Clock/timer
- Clock function
- Setting the timer
- Starting the timer
- Backlight
- Care for the environment!
Brand : Menuett
Model : 943-109
Category : Food thermometer