
TO1675B - Oven BLACK & DECKER - Free user manual and instructions
Find the device manual for free TO1675B BLACK & DECKER in PDF.


| Brand | Black & Decker |
| Model | TO1675B |
| Product Type | Convection Countertop Oven |
| Color | Black |
| Power Source | 120 V, 60 Hz, grounded outlet |
| Wattage | 1500 W (estimated) |
| Dimensions (Approx.) | 17.5 x 12.5 x 10 inches |
| Weight (Approx.) | 12 lbs |
| Functions | Toast, Convection Bake, Broil, Keep Warm |
| Timer | 60-minute mechanical timer with Stay On option and signal bell |
| Temperature Control | Adjustable knob, up to 450°F (Broil setting) |
| Toast Shade Selector | Adjustable, integrated with timer knob |
| Interior Capacity | Fits up to 4 slices of bread or a 9-inch pizza |
| Rack Positions | Upper (broil) and lower (bake) |
| Included Accessories | Slide rack/broil rack, bake pan/drip tray, removable crumb tray |
| Heating Elements | Top and bottom, with convection fan |
| Safety Features | Grounded plug, tamper-resistant screw, auto shut-off (timer) |
| Cleaning | Hand wash or dishwasher safe accessories; wipe exterior with damp cloth |
| Warranty | 2-year limited warranty (US and Canada) |
| Replacement Parts | Available by calling 1-800-738-0245 or online |
| Manual Languages | English, Spanish, and others available for translation |
Frequently Asked Questions - TO1675B BLACK & DECKER
User questions about TO1675B BLACK & DECKER
0 question about this device. Answer the ones you know or ask your own.
Ask a new question about this device
Download the instructions for your Oven in PDF format for free! Find your manual TO1675B - BLACK & DECKER and take your electronic device back in hand. On this page are published all the documents necessary for the use of your device. TO1675B by BLACK & DECKER.
USER MANUAL TO1675B BLACK & DECKER
CONVECTION COUNTERTOP OVEN
Accessories/Parts (USA)
1-800-738-0245
For online customer service
and to register your product, go to
www.prodprotect.com/applica
natural_image
Exterior view of a black-and-decker toaster oven with open lid and side grilles (no visible text or symbols on main subject)MODELS/MODELOS
○ T01675W
○ T01675B
Please Read and Save this Use and Care Book.
IMPORTANT SAFEGUARDS
When using electrical appliances, basic safety precautions should always be followed, including the following:
○ Read all instructions.
○ Do not touch hot surfaces. Use handles or knobs.
To protect against electrical shock do not immerse cord, plugs or appliance in water or other liquids.
○ Close supervision is necessary when any appliance is used by or near children.
○ Unplug from outlet when not in use and before cleaning. Allow to cool before putting on or taking off parts.
Do not operate any appliance with a damaged cord or plug, or after the appliance malfunctions or has been damaged in any manner. Return appliance to the nearest authorized service facility for examination, repair or adjustment. Or, call the appropriate toll-free number on the cover of this manual.
- The use of accessory attachments not recommended by the appliance manufacturer may cause injuries.
○ Do not use outdoors.
○ Do not let cord hang over edge of table or counter, or touch hot surfaces.
○ Do not place on or near a hot gas or electric burner, or in a heated oven.
- Extreme caution must be used when moving an appliance containing hot oil or other hot liquids.
○ Always attach plug to appliance first, then plug cord into the wall outlet. To disconnect, turn any control to OFF, then remove plug from wall outlet.
○ Do not use appliance for other than intended use.
○ Use extreme caution when removing tray or disposing of hot grease.
Oversized foods or metal utensils must not be inserted in a toaster oven, as they may create a fire or risk of electric shock.
○ A fire may occur if the toaster oven is covered or touching flammable material including curtains, draperies, walls and the like, when in operation.
○ Do not clean with metal scouring pads. Pieces can break off the pad and touch electrical parts resulting in a risk of electric shock.
- Extreme caution should be exercised when using containers constructed of other than metal or glass.
- Do not store any material, other than manufacturer's recommended accessories, in this oven when not in use.
○ Do not place any of the following materials in the oven: paper, cardboard, plastic and the like.
○ Do not cover crumb tray or any part of this oven with metal foil. This will cause overheating of the oven.
SAVE THESE INSTRUCTIONS.
This product is for household use only.
GROUNDED PLUG
As a safety feature, this product is equipped with a grounded plug, which will only fit into a three-prong outlet. Do not attempt to defeat this safety feature. Improper connection of the grounding conductor may result in the risk of electric shock. Consult a qualified electrician if you are in doubt as to whether the outlet is properly grounded.
TAMPER-RESISTANT SCREW
Warning: This appliance is equipped with a tamper-resistant screw to prevent removal of the outer cover. To reduce the risk of fire or electric shock, do not attempt to remove the outer cover. There are no user-serviceable parts inside. Repair should be done only by authorized service personnel.
ELECTRICAL CORD
a) A short power-supply cord is to be provided to reduce the risk resulting from becoming entangled in or tripping over a longer cord.
b) Longer extension cords are available and may be used if care is exercised in their use.
c) If an extension cord is used,
1) The marked electrical rating of the cord set or extension cord should be at least as great as the electrical rating of the appliance, and
2) The cord should be arranged so that it will not drape over the countertop or tabletop where it can be pulled on by children or tripped over unintentionally.
If the appliance is of the grounded type, the extension cord should be a grounding-type 3-wire cord.
Note: If the power supply cord is damaged, it should be replaced by qualified personnel; in Latin America, by an authorized service center.
Product may vary slightly from what is illustrated.

A
Important: When using the TIMER/TOAST function, always turn the dial past 20 and then turn back or forward to desired setting.
- Power indicator light
† 2. Temperature control knob (Part# T01675-01)
† 3. Cooking FUNCTION selector knob (Part# T01675-02)
† 4. 60-minute TIMER/TOAST shade selector knob (Part# T01675-03)
† 5. Removable crumb tray (Part# T01675-04)
† 6. Slide rack/broil rack (Part# T01675-05)
† 7. Bake pan/drip tray (Part# T01675-06) - Door handle
- Rack slots
- Extra-deep curved interior
Note: indicates consumer replaceable/removable parts
How to Use
This product is for household use only.
 | CAUTION |
| THIS OVEN GETS HOT.WHEN IN USE, ALWAYS USE OVEN MITTS OR POT HOLDERS WHEN TOUCHING ANY OUTER OR INNER SURFACE OF THE OVEN. |
CAUTION
GETTING STARTED
- Remove packing materials and any stickers.
- Remove and save literature.
- Please go to www.prodprotect.com/applica to register your warranty.
- Remove the slide rack and bake pan from oven. Wash in sudsy water, or in the dishwasher.
- Replace slide rack in oven.
- Select a location for the unit. Do not place unit under cabinets or too close to the wall to allow heat to flow without damaging counter space.
TOASTING
Important: The oven top and side surfaces get hot.
It is not necessary to preheat the oven for toasting.
- Set temperature control knob to Toast position.
- Open oven door. Insert the slide rack into the bottom slot.
- Place the toast directly on the slide rack and close the door.
- Set the cooking FUNCTION selector knob to Toast.
- Turn toast shade selector past 20 and then turn back to desired toast shade.
Note: For best results, select the medium setting for your first cycle, then adjust lighter or darker to suit your taste.
-
The indicator light comes on and stays on during the toasting cycle.
-
When toasting is done, the signal bell sounds, the oven automatically shuts off and the indicator light goes off.
-
Open oven door and using oven mitt or pot holder, slide out rack to remove toast.
Important: Always use an oven mitt or pot holder to remove food from the oven as the door and the slide rack will be hot.
Helpful Tip for Multiple Toasting Cycles
For best results, when making three or more consecutive batches of toast, allow a short cool down period between toasting cycles.
USEFUL TIPS
- You must turn off the TIMER/TOAST shade selector knob if you want to discontinue toasting.
- When making more toast immediately after one toasting cycle, set the toast shade selector to a slightly lighter setting.
CONVECTION BAKING
Convection uses a fan to circulate heat evenly for consistently better cooking.
Important: The oven top and side surfaces get hot.
Note: This oven has been designed with preset temperatures to accommodate convection baking.
- Consult the CONVECTION BAKING GUIDE (page 7) for the type of food you want to cook.
Note: For best results, when baking or cooking, always preheat the oven at least 10 minutes at the desired temperature setting.
- Open oven door. Insert the slide rack into the bottom slot.
- Set the temperature control knob to the desired temperature setting.
- Set the cooking FUNCTION selector knob to 📋 Bake.
Important: You must set the timer or select Stay On for the oven to function.
- Turn timer past 20 and then turn back or forward to desired baking time, including preheat time.
Tip: To set the timer to the Stay On setting if you want to control cooking time or need to cook your food longer than 60 minutes, turn the timer counterclockwise.
- The indicator light comes on and stays on during cooking cycle.
- The heating elements cycle on and off to maintain the temperature.
Note: Be sure the top edge of the food or container is at least 112 ” (3.81 cm) away from the upper heating elements.
- You can cook your food two ways:
• In the bake pan placed on the slide rack (Ba).
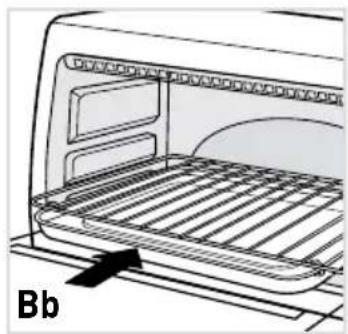
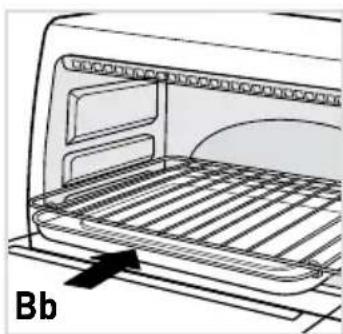
- Directly on the slide rack using the bake pan as a drip tray, inserted in the rack support rails underneath the slide rack (Bb).

natural_image
Line drawing of a microwave oven with a tray and lid, labeled 'Ba' (no text or symbols on the diagram itself)OR
natural_image
Line drawing of a refrigerator interior with a rack and door, labeled 'Bb' (no text or symbols on the diagram itself)- Close oven door.
- Cook food according to recipe or package instructions and check at minimum time to see if it is done.
-
Once cooking cycle is finished:
-
If the timer was on, the signal bell sounds, the indicator light goes off and the oven automatically turns off.
-
If the timer was not on, turn the TIMER/TOAST selector knob from the Stay On position to the Off position. The indicator light goes off.
-
Open oven door and using oven mitt or pot holder, slide out rack to remove food.
Important: Always use an oven mitt or pot holder to remove food from the oven as the door and the slide rack will be hot.
CONVECTION BAKING GUIDE
Note: When baking foods, use the upper or lower rack position.
| FOOD AMOUNT TIME | TEMPERATURE/ PROCEDURE | ||
| Chicken pieces To fit bake pan 375°F (191 °C) Bake until (1-4 pieces) 45-55 minutes chicken registers 180°F (82 °C) on thermometer. | |||
| Ham, lamb, pork chops, (1-4 chops or follows) or steaks | To fit bake pan 325°F (163 °C) low favorite recipe | Bake until as desired. | |
| Cookies (recipe or refrigerated slice & bake, drop or pre-cut) | 6-8 cookies recipe directions until done and browned as desired. | Follow package or bake pan and place on top of slide rack. Bake | Arrange in |
| Biscuits, dinner rolls recipe directions (recipe or refrigerated) | To fit bake pan direction until done and browned as desired. | Follow package or bake pan and place on top of slide rack. Bake | Arrange in |
| White or sweet potatoes medium potatoes | 1-6 medium 1 to 1-1/4 hours place directly on slide rack. | 400°F (204 °C) | Wash and erce potatoes. |
| Frozen French Single layer Fow double directionally frozen (breaded and fried foods), frozen snacks prevent over browning. | Fou double directionally frozen (breaded and fried foods), frozen snacks prevent over browning. | Arrange in bake pan and place on top of | |
| Individual frozen pizza | Follow package directionally frozen (breaded and fried foods), frozen snacks prevent over browning. | Place pizza directly on | |
BROILING
Important: The oven top and side surfaces get hot.
Note: When broiling, preheat oven for 5 minutes.
- Use the BROILING GUIDE (page 9) for cooking times.
- Set temperature control knob to 450 Broil position.
- Insert slide rack into upper slot. Set the cooking FUNCTION selector knob to Broil.
- Open oven door and use the bake pan as a drip tray. Insert it under the slide rack on the rack support rails (Bb).
Important: You must set the timer or select Stay On for the oven to function.
- Turn timer past 20 and then turn back or forward to desired broiling time. Select Stay On, if you want to control cooking time yourself.
- Place food on the slide rack.
Note: Be sure the top edge of the food or container is at least 112 ” (3.81 cm) away from the upper heating elements.
Important: Food should not extend beyond the edges of the bake pan to avoid drippings from falling onto the heating elements.
- The first time you broil an item in this oven, cook according to recipe or package instructions and check at minimum time to see if it is done.
- When finished broiling:
- If the timer was on, the signal bell sounds, the indicator light goes off and the oven automatically turns off.
- If the timer was not on, turn the TIMER/TOAST selector knob from the Stay On position to the Off position. The indicator light goes off.
- Using an oven mitt or pot holder, slide out broiling rack together with bake pan to remove food.
Important: Always use an oven mitt or pot holder to remove food from the oven as the door and the slide rack will be hot.
BROILING GUIDE
Note: When broiling foods, slide the bake pan/drip tray underneath the slide rack/broil rack using the rack support rails. Insert rack into upper slot. Broiling times are approximate. For best results do not undercook ground beef, fish or poultry.
| FOOD AMOUNT TIME PROCEDURE | |||
| Chicken pieces 1-4 pieces 30-40 minutes skin-side down; turn after 15-25 minutes. Continue broiling until 170°F (77 °C) on meat thermometer, or juices run clear. | Arrange pieces | ||
| Frankfurters turn frequently. | 1-8 frankfurters | 8-12 minutes | For uniform browning, |
| Hamburgers (0,11 kg each) 145°F (63 °C) on meat thermometer, or done as desired. | 1-4 ( 14 lb. . continue broiling until | 12-18 minutes Turn after 8 minutes; | |
| Beef steaks (19mm thick) 145°F (63 °C) on meat thermometer, or done as desired. | 1-2 ( 34" . continue broiling until | 18-25 minutes Turn after 10 minutes; | |
| Pork chops (19mm thick) 160°F (71 °C) on meat thermometer. | 1-4 ( 34" . continue broiling until | 20-30 minutes Turn after 12 minutes; | |
| Fish steaks (26mm thick) or 145°F (63 °C) on meat thermometer. | 1-4 (1" easily with a fork | 10-18 minutes | Broil until fish flakes |
| Open-face cheese sandwich bread with tomato and sliced cheese, if desired. Broil until tomato is hot and cheese is melted. | 1-4 slices toast bread first. Top | 7-10 minutes | For crispier sandwich, |
KEEP WARM FUNCTION
- Set temperature control knob to Min setting (minimum temperature).
- Set cooking FUNCTION selector knob to Keep Warm position.
- Turn timer past 20 and then turn back or forward and set to desired number of minutes or to Stay On position.
Care and Cleaning
This product contains no user serviceable parts. Refer service to qualified service personnel.
CLEANING YOUR OVEN
Important: Before cleaning any part, be sure the oven is off, unplugged, and cool.
Always dry parts thoroughly before using oven after cleaning.
- Clean the glass door with a sponge, soft cloth or nylon pad and sudsy water. Do not use a spray glass cleaner.
- To remove the slide rack, open the door, pull the rack forward and out. Wash the slide rack in sudsy water or in a dishwasher. To remove stubborn spots, use a polyester or nylon pad.
- Wash the bake pan in sudsy water or in dishwasher.
To minimize scratching, use a polyester or nylon pad.
CRUMB TRAY

natural_image
Technical line drawing of a mechanical component with layered structure (no text or symbols)- Open oven door and pull out crumb tray (C).
- Dispose of crumbs and wipe the tray with a dampened cloth, or wash in sudsy water or in the dishwasher.
- Be sure to dry thoroughly before inserting the tray back into the oven.
EXTERIOR SURFACES
Important: The oven top surface gets hot, be sure the oven has cooled completely before cleaning.
Wipe the top and exterior walls with a damp cloth or sponge. Dry thoroughly.
COOKING CONTAINERS
Metal, ovenproof glass or ceramic bakeware without glass lids can be used in your oven. Follow manufacturer's instructions. Be sure the top edge of the container is at least 1½" (3.81 cm) away from the upper heating elements.
TROUBLESHOOTING
| PROBLEM POSSIBLE CAUSE SOLUTION | ||
| Unit is not heating or stops heating. | Electrical outlet is not working or oven is unplugged. | Check to make sure outlet is working. Both the temperature control knob and the timer must be set in order for the oven to function. |
| Second toasting is too dark. | Setting on toast is too dark. | If doing repeated toasting in the oven, select a shade slightly lighter than the previous setting. |
| Moisture forms on the inside of the glass door during toasting. | The amount of moisture differs in different products, whether bread, bagels or frozen pastries. | The moisture that forms on the oven door is quite common and will usually disappear during the toasting cycle. Since the oven is closed the moisture cannot evaporate as it would in a traditional toaster. |
| Food is overcooked or undercooked. | Temperature and cook time may need to be adjusted. | As a toaster oven is much smaller than a regular oven, it may heat up faster and cook faster. Try lowering the temperature 25°F from the suggested temperature in a recipe or on a label. |
| There is burnt food odor or smoking when oven is being used. | There are remnants of food in crumb tray or on the walls of the oven. | Refer to the directions in the CARE AND CLEANING section of this Use & Care booklet. Make sure all parts of the oven, bake pan and rack are clean. |
| Heating elements do not seem to be on. | The heating elements cycle on and off during baking. | Check the oven to make certain the function desired is being used. On broil, only the top element is on. |
NEED HELP?
For service, repair or any questions regarding your appliance, call the appropriate 800 number on the cover of this book. Please DO NOT return the product to the place of purchase. Also, please DO NOT mail product back to manufacturer, nor bring it to a service center. You may also want to consult the website listed on the cover of this manual.
Two-Year Limited Warranty
(Applies only in the United States and Canada)
What does it cover?
- Any defect in material or workmanship provided; however, Spectrum Brands, Inc.'s liability will not exceed the purchase price of product.
For how long?
- Two years from the date of original purchase with proof of such purchase.
What will we do to help you?
- Provide you with a reasonably similar replacement product that is either new or factory refurbished.
How do you get service?
- Save your receipt as proof of date of sale.
- Visit the online service website at www.prodprotect.com/applica, or call toll-free 1-800-231-9786, for general warranty service.
- If you need parts or accessories, please call 1-800-738-0245.
What does your warranty not cover?
- Damage from commercial use
- Damage from misuse, abuse or neglect
- Products that have been modified in any way
- Products used or serviced outside the country of purchase
- Glass parts and other accessory items that are packed with the unit
- Shipping and handling costs associated with the replacement of the unit
- Consequential or incidental damages (Please note, however, that some states do not allow the exclusion or limitation of consequential or incidental damages, so this limitation may not apply to you.)
How does state law relate to this warranty?
- This warranty gives you specific legal rights. You may also have other rights that vary from state to state or province to province.
A
Importante:
natural_image
Line drawing of a microwave oven with a tray and lid, labeled 'Ba' (no text or symbols on the diagram itself)0
natural_image
Diagram of a refrigerator interior showing ventilation slots and a labeled component 'Bb' (no text or symbols on the diagram itself)natural_image
Technical line drawing of a mechanical component with layered structure and a labeled section (no text or symbols)Col. Centro, Cuauhtemoc,
México, D.F.
Tel. 01 800 714 2503
Nicaragua
LRM ELECTRONICA
Managua - Sinsa Altamira 1.5
kilómetros al norte
Nicaragua
Tel. (505) 2270-2684
Panamá
Supermarcas
City Market Nivel Plaza Local 153
Diagonal Hotel Melia,
Caracas.
Tel. (582) 324-0969
www.applicaservice.com
servicio@applicamail.com
Corporation and are used under license. All rights reserved
BLACK+DECKER y el logo tipo BLACK+DECKER son marcas registradas de The Black & Decker
Made and Printed in People's Republic of China
© 2015 The Black+Decker Corporation and Spectrum Brands, Inc.
11943-00 E/S
T22-5002137
- CONVECTION COUNTERTOP OVEN
- IMPORTANT SAFEGUARDS
- SAVE THESE INSTRUCTIONS.
- GROUNDED PLUG
- TAMPER-RESISTANT SCREW
- ELECTRICAL CORD
- How to Use
- CAUTION
- GETTING STARTED
- TOASTING
- Helpful Tip for Multiple Toasting Cycles
- USEFUL TIPS
- CONVECTION BAKING
- Important: The oven top and side surfaces get hot.
- Important: You must set the timer or select Stay On for the oven to function.
- CONVECTION BAKING GUIDE
- BROILING
- Important: Food should not extend beyond the edges of the bake pan to avoid drippings from falling onto the heating elements.
- BROILING GUIDE
- KEEP WARM FUNCTION
- Care and Cleaning
- CLEANING YOUR OVEN
- CRUMB TRAY
- EXTERIOR SURFACES
- COOKING CONTAINERS
- NEED HELP?
- Two-Year Limited Warranty
- (Applies only in the United States and Canada)
- What does it cover?
- For how long?
- What will we do to help you?
- How do you get service?
- What does your warranty not cover?
- How does state law relate to this warranty?
- A
- Importante:
- Nicaragua
- Panamá
Brand : BLACK & DECKER
Model : TO1675B
Category : Oven