
Saros ICE4T-W-T-EACH - Loudspeaker Crestron - Free user manual and instructions
Find the device manual for free Saros ICE4T-W-T-EACH Crestron in PDF.


| Product Type | Loudspeaker |
| Model | Saros ICE4T-W-T-EACH |
| Brand | Crestron |
| Speaker Type | 2-way, in-ceiling |
| Woofer | 4" (102 mm) polypropylene |
| Tweeter | 0.75" (19 mm) soft dome |
| Frequency Response | 80 Hz – 20 kHz |
| Impedance | 8 ohms (nominal) / 70V/100V transformer |
| Power Handling | 30 W continuous program |
| Sensitivity | 87 dB 1W/1m |
| Transformer Taps | 6W, 12W, 25W (70V/100V) |
| Color | White |
| Dimensions (Diameter x Depth) | 8.5" x 4.5" (216 mm x 114 mm) |
| Cutout Diameter | 7.5" (191 mm) |
| Weight | 3.5 lbs (1.6 kg) |
| Mounting | In-ceiling with dog ears |
| Grille | Included, white painted steel |
| Compliance | UL/CE listed |
| Warranty | 5 years |
| Care and Cleaning | Wipe with a dry, soft cloth. Do not use harsh chemicals. |
| Safety | Install in accordance with local codes. Ensure secure mounting to avoid falls. Disconnect power before wiring. |
| Spare Parts and Repairability | Contact Crestron authorized service centers for replacement parts. No user-serviceable parts inside. |
Frequently Asked Questions - Saros ICE4T-W-T-EACH Crestron
User questions about Saros ICE4T-W-T-EACH Crestron
0 question about this device. Answer the ones you know or ask your own.
Ask a new question about this device
Download the instructions for your Loudspeaker in PDF format for free! Find your manual Saros ICE4T-W-T-EACH - Crestron and take your electronic device back in hand. On this page are published all the documents necessary for the use of your device. Saros ICE4T-W-T-EACH by Crestron.
USER MANUAL Saros ICE4T-W-T-EACH Crestron
Saros ^1 Express speakers by Credicron ^2 deliver easy installation and excellent performance in a range of popular sizes for cost-sensitive commercial applications. Ideal for use in background music, paging, and sound reinforcement systems, Saros Express speakers are engineered to achieve full, even coverage and clear sound quality at a very affordable cost. Their zero-bezel framesless grille achieves an unobtrusive and contemporary appearance. Installing the grille requires no hardware or tools, utilizing powerful magnets to hold it in place. A safely tether is included to prevent the grille from ever telling from the ceiling. Saros Express speakers are available in white or black and can be pointed to blend with the ceiling surface.


Installation
Prepare Mounting Hole
Before finalizing the speaker location, check to make sure there are no fixtures, pipes, air ducts, joists, or other possible obstructions. If applicable, use a good quality stud finder to locate joists. If there are no obstructions, use the supplied template to trace an outline of the mounting hole.
For drop tile ceilings, remove the ceiling tile and place on a flat surface to trace the mounting hole. For drywall or standard construction ceilings, use the template to trace the mounting hole directly on the ceiling.
Install Cable
Run the cable from the audio source to the speaker location, observing all appropriate local codes. Strip the ends of the speaker cables approximately 1/8" to 3/16" (-3 mm to -5 mm) and twist the strands.
Install Tile Bridge
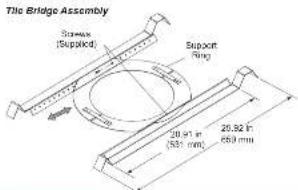
The included tile bridge components provide proper support when the speaker is installed in a typical drop tile ceiling. Refer to the illustration below.
Based on the location of the mounting hole determined in "Prepare Mounting Hole" above, use the two supplied screws to attach the support ring to the rails so that when installed, the ring is aligned with the mounting hole and the rails rest on the ceiling grid frame.
- The support ring position on the rails is adjustable to enable off-center speaker positioning. The tile bridge assembly can be folded to fill through the speaker cutout in blind-mount situations.
Install/Remove Grille
The zero-bezel frameless grille is held in place by powerful magnets. A safety tether is included to prevent any possibility of the grille falling from the ceiling. With the tether attached, place the grille in position on the speaker. To remove the grille, grip the edges and pull away from the speaker.
Paint the Speaker Grille
Speaker grille painting should be done prior to mounting.
-
Carefully remove the material on the underside of the grille and set it aside for reinstallation. It may be necessary to use a knife or other sharp instrument to free an edge of the material so it can be pressed away. Use care to avoid cutting or tearing the material.
-
Dry brush or lightly spray the surface to be painted. Use care to avoid clogging the hoes in the grille.
-
Once the paint is dry, reinstall the material to the underside.
Mount/Remove Speaker
The in-ceiling speaker includes four toggle clamps that simplify the mounting process. If the grille is mounted on the speaker, remove it before proceeding. (Refer to "InstallRemove Grille" above.)
-
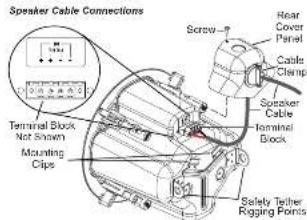
Referring to the illustrations to the right, remove the screw securing the rear cover panel, and lift the cover panel off to expose the supplied terminal block.
-
Route the speaker cable through the cover cable clamp and connect the wires to the terminal black, using the outer IN terminals: red to + and black to -. Use the inner + and - THRU terminals to connect a pass-through (parallel) speaker.
-
Allow some slack in the speaker cable(s) and position the cover panel on the back, making certain it engages the mounting clips. Secure the cover panel using the screw removed in step 1 and tighten the cable clamp to secure the cable(s). Do not overnight. Use a safety tether attached to the rear enclosure to prevent the speaker from accidentally falling.
-
The toggle clamps offer two positions to accommodate both standard and extra thick surfaces up to 2.4 inches (61 mm). For extra thick tiles, reset the toggle clamps to the upper position before continuing.
a. With the toggle clamps turned inward, insert the speaker into the opening.
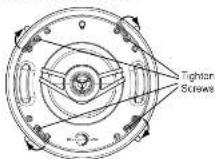
b. Hold the speaker against the ceiling and begin tightening the four screws on the front of the speaker. The toggle clamps first rotate into clamping position (as indicated in the front view illustration to the right) and then begin holding the speaker to the ceiling.
c. Tighten the screws until the speaker is secure. Do not over lighten.
- Speaker removal is accomplished by reversing steps 1 through 4 above.
Set the Transformer Tap Selector Switch
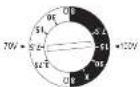
The speakers are equipped with a 70/100 V matching transformer for distributed audio systems. The transformer tap selector switch on the front panel is used to set the speaker power level. Use a flat blade screwdriver to adjust the switch.
-
For SAROS_ICE4T and SAROS_ICE8T 70 V systems, use the left side settings and select from 3.75, 7.5, 15, or 30 watts.
-
For SAROS_ICE4T and SAROS_ICE8T 100 V systems, use the right side settings and select from 7.5, 15, or 30 watts. The X position should not be used.
-
For SAROS_ICEBT 70 V systems, use the left side settings and select from 7.5.15, 30, or 60 walls.
-
For SAROS_ICE8T 100 V systems, use the right side settings and select from 15, 30, or 60 watts. The X position should not be used.
The switch may also be set to 8Ω operation, bypassing the transformer completely. This selling should be used only for 8 Ω audio systems.
Front View - Grille Removed
Far SAROS_ICE4T, and SAROS_ICE6T
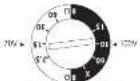
For SAROS ICE8T

SAROS ICE4T/ICE6T/ICE8T
Saros® Express 2-Way In-Ceiling Speakers

Physical Views
Front View - Grille Removed (Typical)
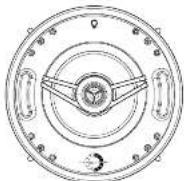
Rear and Side View (Typical)
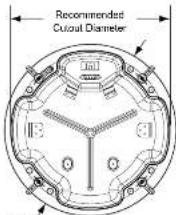
Diameter
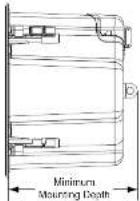

Specifications
SAROS_ICE4T/ICE6T/ICE8T
| SPECIFICATION | SAROS_ICE4T | SAROS_ICE6T | SAROS_ICE8T |
| Wooler | 4.0 in (102 mm)trusted paper with ringmode decoupled clotharound and stool basket | 6.5 in (165 mm)trusted paper with ringmode decoupled clotharound and stool basket | 8.0 in (203 mm)trusted paper with ringmode decoupled clotharound and stool basket |
| Tweeter | 0.78 in (20 mm) testedcloth dome, horn-loaded | 0.98 in (25 mm) testedcloth dome, horn-loaded | 0.98 in (25 mm) testedcloth dome, horn-loaded |
| Crossover FrequencyImportance | 2.0 kHz8.0 nominal withtransformer set to 8Ω | 2.5 kHz8.0 nominal withtransformer set to 8Ω | 2.5 kHz8.0 nominal withtransformer set to 8Ω |
| Transformer Tops | 3.75, 7.5, 15, 30 watts at70 V, 7.5, 15, 30 watts at100 V | 3.75, 7.5, 15, 30 watts at70 V, 7.5, 15, 30 watts at100 V | 7.5, 15, 30, 60 watts at70 V, 15, 30, 60 watts at100 V |
| Frequency Response | 85 Hz to 20 kHz (≥3 dB) | 75 Hz to 20 kHz (≤3 dB) | 70 Hz to 20 kHz (≤3 dB) |
| Frequency Range | 75 Hz to 20 kHz (-10 dB) | 60 Hz to 20 kHz (-10 dB) | 55 Hz to 20 kHz (-10 dB) |
| Power Handling | 40 watts program, (8 Ω) | 60 watts program (8 Ω) | 75 watts program, (8 Ω) |
| Sensitivity | 89 dB @ (W/m) | 89 dB @ (W/m) | 89 dB @ (W/m) |
| Coverage | 95° nominal (nominal) | 95° nominal (nominal) | 95° nominal (nominal) |
| ConnectionsInput | (1) 4 pin 5 mm detachable terminal block with screw down flanges;Speaker input with parallel pass-through;Medium Wire Size: 12 AWG | ||
| Controls | Transformer Top: (1) Receased, 5-socket, screwdriver adjustable, rotary switch or buffer;Used to select 70/100 V tap settings or 8Ω (bypass) | ||
| EnvironmentalTemperatureHumidity | -2" to 120°F (-9" to 49°C)5% to 95% RH (non-condensing) | ||
| ConstructionEnclosure | Zinc-claded steel, platinum-rated, 1/2 in or 3/4 in conduit knockout lamp and side, 1 cable camera included | ||
| Delta | ABS UL94V-9 plastic | ||
| Grid | Stool with frontural finish, paintable, magnetically-hand zero-nazel transcess,safety letter | ||
| Mounting | Flush cooling mount using 4 integral 2-case toggle clamps, 2.4 in (61 mm) maximum surface thickness, the bridge included, (2) Fogging points for safety letter(SFKA-ST-15 sole separately) | ||
| DimensionsDiameterDepthRecommendedduct rod diameterMinimum mountingdepth | 8.53 in (217 mm) notincluding toggles7.13 in (161 mm)7.70 in (195 mm)6.90 in (176 mm) | 10.57 in (269 mm) notincluding toggles8.31 in (211 mm)9.70 in (245 mm)8.10 in (206 mm) | 12.97 in (367 mm) notincluding toggles9.10 in (231 mm)11.20 in (285 mm)8.93 in (226 mm)12.2 in (5.7 kg) |
| Weight | 7.0 lb (3.2 kg) | 10.0 lb (4.5 kg) | |

Problem Solving
Troubleshooting
The following table provides corrective action for possible trouble situations. If further assistance is required, please contact a Crestron customer service representative.
| TROUBLE | POSSIBLE CAUSE(S) | CORRECTIVE ACTION |
| No sound or intermittent sound is coming from the speakers. | There is a cable connection error. | Verify the cable connections between the amplifier and speakers. |
| The amplifier is not receiving an input signal or there is a malfunction. | Verify that the amplifier is functioning correctly, that it is receiving an input signal, and that the correct input source is selected. | |
| Constant noise such as buzz, hum, or hes is coming from the speakers. | There is a faulty device in the system. | Verify that all system devices are functioning properly. |
| There is a system grounding fault. | Verify that system grounding is correct. | |
| Low frequency output is poor. | There is an incorrect polarity connection at the speaker or amplifier. | Verify the speaker connection polarity (+ on amplifier to + on speaker). |
Further inquiries
To locate specific information or resolve questions after reviewing this guide, contact Crestron's True Blue Support at 1-886-CRESTRON [1-886-273-7876] or for assistance within a particular geographic region, refer to the listing of Crestron worldwide offices at www.crestron.com/offices.
To post a question about Crestron products, log onto Crestron's Online Help at www.crestron.com/onlinehelp. First-time users must establish a user account to fully benefit from all available features.
Future Updates
As Creslon improves functions, adds new features and extends the capabilities of the SAROS ICE/TICE6/TICE8T, additional information may be made available as manual updates. These updates are safety electronic and serve as intermediary supplements prior to the release of a complete technical documentation revision. Check the Creslon website periodically for manual update availability and its relevance. Updates are identified as an "Aodendum" in the Download column.
The specific patents that cover construction products are listed at patients.cresion.com.
Crestron, the Crestron logo, and name are either trademarks or registered trademarks of Crestron Electronics, Inc. in the United States and/or other countries. Other trademarks registered trademarks, and trade names may be used in this document to refer to either the entities claiming the names and names of their products. Crestron displays any proprietary interest in the markets and names of others. Crestron is not responsible for awards to typography or photography.
This document also written by the Technical Publications department at Crestron, 62013 Crestron Electronics, Inc.
Brand : Crestron
Model : Saros ICE4T-W-T-EACH
Category : Loudspeaker