
DS-MH6111 - Action Camera Hikvision - Free user manual and instructions
Find the device manual for free DS-MH6111 Hikvision in PDF.


| Product Type | Action Camera / Wireless Camera |
| Brand | Hikvision |
| Model | DS-MH6111 |
| Dimensions (Approx.) | 70 x 40 x 20 mm (estimated) |
| Weight (Approx.) | 100 g (estimated) |
| Power Supply | 5V DC via USB (included adapter) |
| Battery Type | Built-in rechargeable lithium-ion (non-removable) |
| Battery Life | Up to several hours (not specified) |
| Storage | TF card (microSD, not included, up to 32GB or higher) |
| Video Compression | H.264 |
| Video Resolution | Up to 1080p (estimated) |
| Wireless | Wi-Fi (connects to Android device hotspot) |
| Mounting | Magnetic (attaches to metal surfaces) |
| Indicators | Charging (red/green), Status (green/red/blue) |
| Operating System | Compatible with Android 4.1+ via iVMS-4500 app |
| Recording Modes | Manual start/stop, adjustable video duration |
| Image Capture | Yes, still photos via app |
| Reset Method | Physical reset button or via software |
| Firmware Upgrade | Via TF card (manual process) |
| Compliance | FCC Part 15, CE, ICES-003 |
Frequently Asked Questions - DS-MH6111 Hikvision
User questions about DS-MH6111 Hikvision
0 question about this device. Answer the ones you know or ask your own.
Ask a new question about this device
Download the instructions for your Action Camera in PDF format for free! Find your manual DS-MH6111 - Hikvision and take your electronic device back in hand. On this page are published all the documents necessary for the use of your device. DS-MH6111 by Hikvision.
USER MANUAL DS-MH6111 Hikvision
natural_image
Abstract graphic with geometric shapes and a red flag featuring a globe and hand (no text or symbols)Wireless Camera
User Manual

User Manual
COPYRIGHT © 2017 Hangzhou Hikvision Digital Technology Co., Ltd.
ALL RIGHTS RESERVED.
Any and all informaon, including, among others, wordings, pictures, graphs are the properes of Hangzhou Hikvision Digital Technology Co., Ltd. or its subsidiaries (hereinaer referred to be "Hikvision"). This user manual (hereinaer referred to be "the Manual") cannot be reproduced, changed, translated, or distributed, parally or wholly, by any means, without the prior written permission of Hikvision. Unless otherwise spulated, Hikvision does not make any warranes, guarantees or representaons, express or implied, regarding to the Manual.
About this Manual
This Manual is applicable to Wireless Camera.
The Manual includes instrucons for using and managing the product. Pictures, charts, images and all other informaon hereinaer are for descripon and explanaon only. The informaon contained in the Manual is subject to change, without noce, due to rmware updates or other reasons. Please nd the latest version in the company website (hp://overseas.hikvision.com/en/).
Please use this user manual under the guidance of professionals.
Trademarks Acknowledgement
and other Hikvision's trademarks and logos are the properes of Hikvision in various jurisdicons. Other trademarks and logos menoned below are the properes of their respective owners.
Legal Disclaimer
TO THE MAXIMUM EXTENT PERMITTED BY APPLICABLE LAW, THE PRODUCT DESCRIBED, WITH ITS HARDWARE, SOFTWARE AND FIRMWARE, IS PROVIDED "AS IS", WITH ALL FAULTS AND ERRORS, AND HIKVISION MAKES NO WARRANTIES, EXPRESS OR IMPLIED, INCLUDING WITHOUT LIMITATION, MERCHANTABILITY, SATISFACTORY QUALITY, FITNESS FOR A PARTICULAR PURPOSE, AND NON-INFRINGEMENT OF THIRD PARTY. IN NO EVENT WILL HIKVISION, ITS DIRECTORS, OFFICERS, EMPLOYEES, OR AGENTS BE LIABLE TO YOU FOR ANY SPECIAL, CONSEQUENTIAL, INCIDENTAL, OR INDIRECT DAMAGES, INCLUDING, AMONG OTHERS, DAMAGES FOR LOSS OF BUSINESS PROFITS, BUSINESS INTERRUPTION, OR LOSS OF DATA OR DOCUMENTATION, IN CONNECTION WITH THE USE OF THIS PRODUCT, EVEN IF HIKVISION HAS BEEN ADVISED OF THE POSSIBILITY OF SUCH DAMAGES.
REGARDING TO THE PRODUCT WITH INTERNET ACCESS, THE USE OF PRODUCT SHALL BE WHOLLY AT YOUR OWN RISKS. HIKVISION SHALL NOT TAKE ANY RESPONSIBILITES FOR ABNORMAL OPERATION, PRIVACY LEAKAGE OR OTHER DAMAGES RESULTING FROM CYBER ATTACK, HACKER ATTACK, VIRUS INSPECTION, OR OTHER INTERNET SECURITY RISKS; HOWEVER, HIKVISION WILL PROVIDE TIMELY TECHNICAL SUPPORT IF REQUIRED.
SURVEILLANCE LAWS VARY BY JURISDICTION. PLEASE CHECK ALL RELEVANT LAWS IN YOUR JURISDICTION BEFORE USING THIS PRODUCT IN ORDER TO ENSURE THAT YOUR USE CONFORMS THE APPLICABLE LAW. HIKVISION SHALL NOT BE LIABLE IN THE EVENT THAT THIS PRODUCT IS USED WITH ILLEGITIMATE PURPOSES.
IN THE EVENT OF ANY CONFLICTS BETWEEN THIS MANUAL AND THE APPLICABLE LAW, THE LATER PREVAILS.
Regulatory informaon
FCC informaon
FCC compliance: Please take aenon that changes or modicaon not expressly approved by the party responsible for compliance could void the user's authority to operate the equipment.
Note: This product has been tested and found to comply with the limits for a Class B digital device, pursuant to Part 15 of the FCC Rules. These limits are designed to provide reasonable protecon against harmful interference in a residential installation. This product generates, uses, and can radiate radio frequency energy and, if not installed and used in accordance with the instructions, may cause harmful interference to radio communications.
However, there is no guarantee that interference will not occur in a particular installaon. If this product does cause harmful interference to radio or television recepon, which can be determined by turning the equipment o and on, the user is encouraged to try to correct the interference by one or more of the following measures:
—Reorient or relocate the receiving antenna.
—Increase the separaon between the equipment and receiver.
—Connect the equipment into an outlet on a circuit dierent from that to which the receiver is connected.
—Consult the dealer or an experienced radio/TV technician for help.
This equipment should be installed and operated with a minimum distance 20cm between the radiator and your body.
FCC conditions
This device complies with part 15 of the FCC Rules. Operaon is subject to the following two conditions:
-
This device may not cause harmful interference.
-
This device must accept any interference received, including interference that may cause undesired operaon.
EU Conformity Statement
This product and - if applicable - the supplied accessories too are marked with "CE" and comply therefore with the applicable harmonized European standards listed under the Radio

Equipment Directive 2014/53./EU, the EMC Directive 2014/30/EU, the LVD Directive 2014/35/EU, the RoHS Directive 2011/65/EU.
2012/19/EU (WEEE direcve): Products marked with this symbol cannot be disposed of as unsorted municipal waste in the European Union. For proper recycling, return this product to your

local supplier upon the purchase of equivalent new equipment, or dispose of it at designated collecon points. For more informaon see: www.recyclethis.info.
2006/66/EC (baery direcve): This product contains a baery that cannot be disposed of as unsorted municipal waste in the European Union. See the product documentaon for specic

baery informaon. The baery is marked with this symbol, which may include leering to indicate cadmium (Cd), lead (Pb), or mercury (Hg). For proper recycling, return the baery to your supplier or to a
designated collecon point. For more informaon see: www.recyclethis.info.
Industry Canada ICES-003 Compliance
This device meets the CAN ICES-3 (B)/NMB-3(B) standards requirements.
This device complies with Industry Canada licence-exempt RSS standard(s). Operaon is subject to the following two conditions:
1) this device may not cause interference, and
2) this device must accept any interference, including interference that may cause undesired operation of the device.
Under Industry Canada regulaons, this radio transmier may only operate using an antenna of a type and maximum (or lesser) gain approved for the transmier by Industry Canada. To reduce potential radio interference to other users, the antenna type and its gain should be so chosen that the equivalent isotropically radiated power (e.i.r.p.) is not more than that necessary for successful communicaon.
Chapter 1 Product Checking
1.1 Checking Steps
Aer buying a wireless camera (hereinaer referred to as camera or device), please check the outer packing to see if there is obvious damage. If not, open the packaging box and check the aachments according to the package content list.
Make sure that nothing is missing or damaged before installaon.
1.2 Package Content
The package content list is shown below.
Table 1-1 Package Content
| No. | Name | Quantity | Unit |
| 1 | Camera | 1 | pc |
| 2 | Magnec Board | 1 | pc |
| 3 | USB Cable | 1 | pc |
| 4 | Adapter | 1 | pc |
Chapter 2 Product Introducon
2.1 Features
Wireless camera is a portable video recording device that supports local storage by TF card. It allows you to view real-me video and congure parameters on Android system client.
The product has following features.
- Magnec installaon, which is easy, convenient, and highly adaptable to dierent environment;
- Compact and portable design;
● Built-in baery to ensure long working me without external power supply;
● Built-in camera to record video in TF card;
● H.264 video compression technology to save network transmission bandwidth and storage space; - Auto conncon with terminal Wi-Fi to transmit audio and video data stably in mobile environment.
2.2 Overview
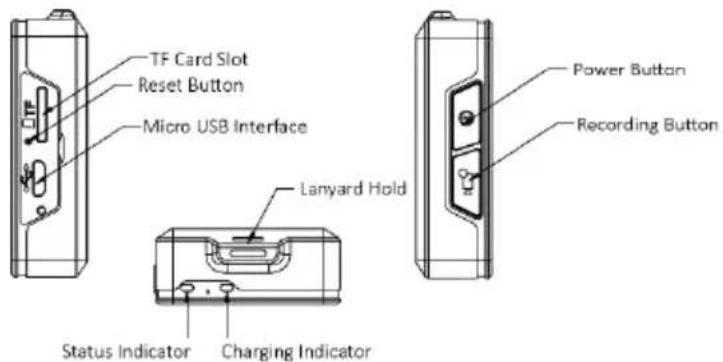
Figure 2-1 Product Overview
Table 2-1 Indicator Descripon
| Indicator | Status | Descripon |
| Charging indicator | Solid red | Charging... |
| Solid green | Fully charged | |
| Status indicator | Solid green | Normal |
| Flashing red | Low baery | |
| Solid red | Failed | |
| Flashing blue | Transming data through Wi-Fi... | |
| Flashing green | Recording... | |
| Solid blue | Upgrading... |
2.3 Typical Applicaon
Install the iVMS 4500 applicaon on Android mobile terminal (like mobile phone and portable video recorder), and the camera will connect to the Wi-Fi network of the terminal automacally. You can add the device on the soware.
Note:
The mobile terminal should use Android V4.1 or above.
Chapter 3 Product Installaon
3.1 Safety Precaons
Charger
● The charger you use should meet your local standards.
- Do not drop charger.
- If the adapter plug, housing or power cord is damaged, please contact service center for replacement to avoid potential electric shock or re disaster.
- Do not touch the charging device with wet hand. Do not use the charger if it is exposed to water or other liquid, to avoid potential electric shock.
- Do not pull the power cord with excessive force.
Baery
- The built-in baery is non-removable. To avoid potenal damage and other risks, do not change the baery by yourself. The baery can be replaced only by authorized service center.
- Follow your local lows and regulaons to dispose the baery. Do not dispose it together with household garbage.
3.2 Install TF Card
Steps:
- Open the dust cover on the side of the device.
- Push in the TF card slowly to the slot. A click sound means the card is inserted.
- Close the access ap.
3.3 Install Device
The camera supports magnec installaon. You can x and carry the device by aaching it to metal objects (like magnec board).
3.4 Charge
Please charge the device before your rst use, or when the status indicator is ashing red.
Steps:
- Open the dust cover on the side of the device.
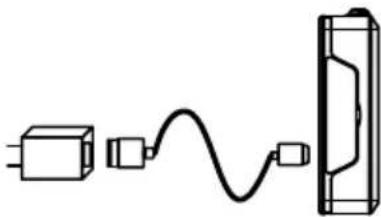
- Connect one end of the USB cable to the charger and the other to the USB interface of the camera.
natural_image
Pure electrical circuit lines without any symbolsFigure 3-1 Connect Power Cord
- Plug the charger in the outlet.
- When the charging indicator turns to green, unplug the charger and disconnect the cable.
- Close the dust cover.
Chapter 4 Product Applicaon
4.1 Power On
Hold power buon for 3 seconds, and the camera is on.
4.2 Record in TF Card
Before You Start:
Install a TF card.
Steps:
- Press recording buon to start recording. The video will be stored in the TF card.
- Press recording buon again to stop recording.
4.3 Connect to iVMS-4500
You can view camera image and congure camera parameters remotely aer camera is connected with your Android device via iVMS-4500.
Before You Start:
- Ensure version of your Android device (mobile phone or portable video recorder) is V4.1 or above.
● The distance between the camera and the Android device should be less than 1 meter.
Steps:
- Install the iVMS-4500 soware in your Android device.
- Power on wireless camera and run soware.
- Tap ⊖ and select Device List.
Note:
Then the Wi-Fi hotspot on your Android device will be turned on automacally.
- Tap the searched camera to connect it automatically and view its live image.
4.4 Start Recording
Steps:
- Tap and select Live View.
- Tap to start recording.
- Tap 📄 again to stop. The video will be stored in the memory of Android device.
- Tap Ⓔ and select Picture & Video to play back the video.
4.5 Capture Pictures
Steps:
- Tap and select Live View.
- Tap to capture picture. The picture will be stored in the memory of Android device.
- Tap Ⓤ and select Picture & Video to view the picture.
4.6 Copy Videos to Your Computer
Steps:
- Tap ⊕ and select Parameter Setngs.
- Tap the corresponding device IP address.
- Tap USB Mode Sengs.
- Use the USB cable to connect the camera and the computer.
- Open the device folder.
- Copy the videos to the computer.
Note:
The camera will stop recording in USB mode and reboot automatically aer being disconnected from the computer.
4.7 Maintenance Management
Power O
When the device is on, hold power buon for 3 seconds.
View Device Informaon
Steps:
- Tap and select Devices.
- Select the corresponding device IP address to view its detailed informaon.
Upgrade
Steps:
- Hold power buon for 3 seconds to power o the device.
- Take out TF card and copy the upgrade le to the TF card root directory.
- Reinstall the TF card. Refer to 3.2 Install TF Card for details.
- Press power buon for 3 seconds again to power on the device.
Note:
The upgrading will take 1 to 10 minutes. Please ensure power is sucient during the upgrading process.
Result:
The camera will start up and delete the upgrade le automacally aer being upgraded.
Congure Wi-Fi Parameters
Follow the steps to connect to Wi-Fi of an Android device.
Steps:
- Tap ⊕ and select Parameter Setngs.
- Tap the corresponding device IP address.
- Tap Wi-Fi Sengs.
- Input SSID and Password of the Wi-Fi to connect.
- Tap Conrm.
Note:
The camera will automatically connect to the Wi-Fi of an Android device within one meter range if it has been connected before.
Congure Encoding Parameters
To modify video resolution, frame rate and bitrate, you can congregate encoding parameters.
Steps:
- Tap ⊕ and select Parameter Setngs.
- Tap the corresponding device IP address.
- Tap Encoding Sengs.
- Modify parameters as needed.
● Resoluon: Image is clearer with higher resoluon.
● Frame Rate: Video is more consecutive with higher frame rate.
- Bitrate: Video is of beer quality with higher bitrate, but takes more memory.
5. Tap Save.
Congure Video Duraon
The video duraon is selectable.
Steps:
- Tap ⊕ and select Parameter Setngs.
- Tap the corresponding device IP address.
- Tap Recording Sengs.
- Select Duraon of Video File as needed.
- Tap Save.
Note:
The longer the video duraon is, the larger a video le will be.
Set Camera Time
If the device me in incorrect, you can set me on the iVMS-4500.
Steps:
- Tap ⊕ and select Parameter Setngs.
- Tap the corresponding device IP address.
- Tap Reset System Time. The camera me will be synchronized with the Android device me.
Restore Factory Sengs
If the camera is running abnormally, you can restore it to factory sengs by operang camera or soware.
Steps (by camera):
- Open the dust cover on the side of the camera.
- Hold reset buon for 1 second with a needle or similar object.
- Close the dust cover.
Steps (by soware):
- Click Ⓤ and select Parameter Sengs.
- Click the corresponding device IP address.
- Click Remotely Restore Defaults.
Result:
The camera will be restored to factory sengs aer reboong.
Reboot Remotely
The device can be rebooted remotely through soware.
Steps:
- Click Ⓤ and select Parameter Sengs.
- Click the corresponding device IP address.
- Click Remotely Reboot.
- User Manual
- ALL RIGHTS RESERVED.
- About this Manual
- Trademarks Acknowledgement
- Legal Disclaimer
- Regulatory informaon
- FCC informaon
- FCC conditions
- EU Conformity Statement
- Industry Canada ICES-003 Compliance
- Chapter 1 Product Checking
- Checking Steps
- Package Content
- Chapter 2 Product Introducon
- Features
- Overview
- Typical Applicaon
- Note:
- Chapter 3 Product Installaon
- Safety Precaons
- Charger
- Baery
- Install TF Card
- Steps:
- Install Device
- Charge
- Chapter 4 Product Applicaon
- Power On
- Record in TF Card
- Connect to iVMS-4500
- Before You Start:
- Start Recording
- Capture Pictures
- Copy Videos to Your Computer
- Maintenance Management
- Power O
- View Device Informaon
- Upgrade
- Result:
- Congure Wi-Fi Parameters
- Congure Encoding Parameters
- Tap Save.
- Congure Video Duraon
- Set Camera Time
- Restore Factory Sengs
- Steps (by camera):
- Steps (by soware):
- Reboot Remotely
Brand : Hikvision
Model : DS-MH6111
Category : Action Camera