
Palmcorder PV-L454 - Camcorder PANASONIC - Free user manual and instructions
Find the device manual for free Palmcorder PV-L454 PANASONIC in PDF.


| Product Type | Camcorder |
| Model | Panasonic Palmcorder PV-L454 |
| Dimensions (WxHxD) | 87.2 x 123 x 226 mm (3-3/8 x 4-7/8 x 8-7/8 in) |
| Weight | 0.89 kg (1.96 lbs) |
| Power Supply | Camcorder: DC 6V; AC Adaptor: 110-240V AC, 50/60 Hz |
| Battery Type | Nickel-Cadmium (PV-BP18/LSSB0008) DC 6V |
| Video Recording System | 2 rotary heads, helical scanning, NTSC |
| Image Sensor | 1/4-inch CCD (integral color filter) |
| Lens | 20:1 zoom, F1.7, focal length 2.8-56mm |
| Digital Zoom | Up to 750x (D.ZOOM2) |
| Viewfinder | 0.33-inch Liquid Crystal Color Electronic Viewfinder |
| LCD Monitor | 2.5-inch (63.5mm) LCD |
| Minimum Illumination | 1.6 lux (0.16 footcandles) |
| Shutter Speed | Auto: 1/60-1/350; Manual: up to 1/8000 (High Speed Shutter) |
| Built-in Light | AccuBrite™, replaceable bulb (Part No. VLLW0015) |
| Recording Media | VHS-C cassette (VHSC) |
| Recording Time | SP: 20-40 min; SLP: 1-2 hours (depending on tape) |
| Image Stabilization | Digital E.I.S. (Electronic Image Stabilization) |
| Special Features | MotionSensor, Programmed Recording, Auto Fade, Color Digital Fade, Backlight Compensation |
| Accessories Supplied | AC Adaptor, Audio/Video Cable, Battery Pack, Shoulder Strap, Lens Cap, CR2025 Clock Battery |
| Operating Temperature | 0°C to 40°C (32°F to 104°F) |
| Warranty | 1 year parts and labor (CCD: 6 months) |
Frequently Asked Questions - Palmcorder PV-L454 PANASONIC
User questions about Palmcorder PV-L454 PANASONIC
0 question about this device. Answer the ones you know or ask your own.
Ask a new question about this device
Download the instructions for your Camcorder in PDF format for free! Find your manual Palmcorder PV-L454 - PANASONIC and take your electronic device back in hand. On this page are published all the documents necessary for the use of your device. Palmcorder PV-L454 by PANASONIC.
USER MANUAL Palmcorder PV-L454 PANASONIC
Palmcorder® Camcorder
VHSC
Panasonic®
Camcorder
Operating Instructions
Models No.
PV-L354
PV-L454
natural_image
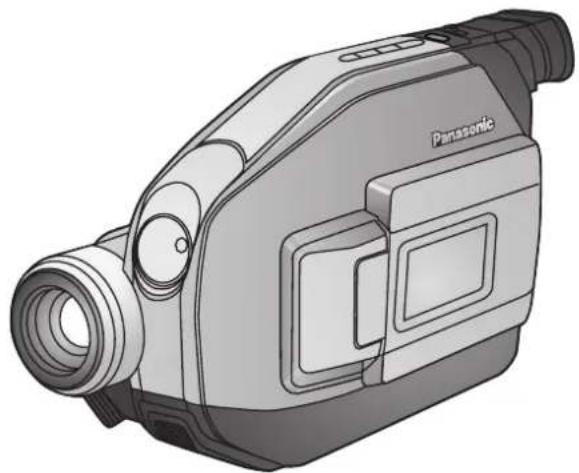
Illustration of a Panasonic video camera with lens and control panel (no text or symbols on body)Please read these instructions carefully before attempting to operate this product. Please save this manual.
For assistance, please call : 1-800-211-PANA(7262) or, contact us via the web at:http://www.panasonic.com/contactinfo
Things You Should Know
Thank you for choosing Panasonic!
You have purchased one of the most sophisticated and reliable products on the market today. Used properly, it will bring you years of enjoyment. Please take time to fill in the information to the right.
The serial number is on the tag located on the underside of your Camcorder. Be sure to retain this manual as your convenient Camcorder information source.
Date of Purchase
Dealer Purchased From
Dealer Address
Dealer Phone No.
Model No.
Serial No.
Unpack your Camcorder
These accessories are provided in order to set up or use your Camcorder.
1 pc. AC Adaptor (PV-A20) with DC Power Cable (page 11)
1 pc. Audio/Video Cable (LSJA0368) (pages 22, 23)
1 pc. Battery Pack (LSSB0011/LSSB0014) (pages 10, 11) (PV-L354 only)


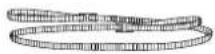
1 pc. Shoulder Strap (LSFC0012) (page 13)
1 pc. Lens Cap (LSKM0937) with Lens Cap Strap (LSGQ0049) (page 13)
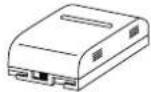
(PV-BP18/LSSB0008) (pages 10, 11) (PV-L454 only)

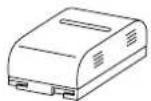
1 pc. CR2025 Clock Battery (installed in Camcorder) (page 36)

This operating instruction book is designed for use with models PV-L354 and PV-L454. Features may vary, so please read carefully.
Differences between models
| Model Number | Battery Pack | Digital Zoom maximum | Viewfinder |
| PV-L354 | LSSB0011/LSSB0014Nickel Metal Hydride Battery/Nickel Cadmium Battery | 700x | 8.4 mm (0.33 inch)Electronic Viewfinder |
| PV-L454 | PV-BP18/LSSB0008Nickel Cadmium Battery | 750x | 8.4 mm (0.33 inch)Liquid Crystal Color Electronic Viewfinder |
2
For assistance, please call : 1-800-211-PANA(7262) or, contact us via the web at:http://www.panasonic.com/contactinfo
Things You Should Know
Safety Precautions
WARNING: TO PREVENT FIRE OR SHOCK HAZARD, DO NOT EXPOSE THIS EQUIPMENT TO RAIN OR MOISTURE.
Your Compact VHS Camcorder is designed to record and play back in Standard Play (SP) and Super Long Play (SLP) modes. You can also play a Compact VHS Camcorder recording on your VHS VCR using the optional VHS PlayPak.
This Camcorder is equipped with the HQ System to provide excellent video pictures, and is compatible with standard VHS equipment.
It is recommended that only cassette tapes that have been tested and inspected for use in VCR machines with the VHSC and/or WHark be used.

CAUTION
RISK OF ELECTRIC SHOCK DO NOT OPEN

CAUTION: TO REDUCE THE RISK OF ELECTRIC SHOCK.
DO NOT REMOVE COVER (OR BACK)
NO USER-SERVICEABLE PARTS INSIDE
REFER SERVICING TO QUALIFIED SERVICE PERSONNEL

This symbol warns the user that uninsulated voltage within the unit may have sufficient magnitude to cause electric shock. Therefore, it is dangerous to make any kind of contact with any inside part of this unit.

This symbol alerts the user that important literature concerning the operation and maintenance of this unit has been included. Therefore, it should be read carefully in order to avoid any problems.
The above markings are located on the appliance's bottom cover.
FCC Warning : Any unauthorized changes or modifications to this equipment would void the users authority to operate.
This device complies with Part 15 of the FCC Rules. Operation is subject to the following two conditions: (1) This device may not cause harmful interference, and (2) this device must accept any interference received, including interference that may cause undesired operation.
Note: This equipment has been tested and found to comply with Part 15 and part 18 of the FCC Rules. These limits are designed to provide reasonable protection against harmful interference when operated in a residential environment.
If this equipment does cause interference to radio or television reception, which can be determined by turning the equipment off and on, use the equipment in another location and/or utilize an electrical outlet different from that used by the receiver.
If necessary, consult the dealer or an experienced radio/TV technician for help. You may find the booklet, 'Something About Interference' available from FCC local regional offices helpful.
This product may cause interference to radio equipment and should not be installed near maritime safety communications equipment or other critical navigation or communication equipment operating between 0.45-30 MHz.
Important Safeguards
-
Read Instructions – All the safety and operating instructions should be read before the unit is operated.
-
Retain Instructions – The safety and operating instructions should be retained for future reference.
-
Heed Warnings – All warnings on the unit and in the operating instructions should be adhered to.
-
Follow Instructions – All operating and maintenance instructions should be followed.
-
Cleaning – Unplug this video unit from the wall outlet before cleaning. Do not use liquid or aerosol cleaners. Use a dry cloth for cleaning.
-
Attachments – Do not use attachments not recommended by the video product manufacturer as they may be hazardous.
-
Water and Moisture – Do not use this video unit near water – for example near a bath tub, wash bowl, kitchen sink, or laundry tub, in a wet basement, or near a swimming pool, and the like.
-
Accessories – Do not place this video unit on an unstable cart, stand, tripod, bracket, or table. The video unit may fall, causing serious injury to a child or adult, and serious damage to the unit. Use only with a cart, stand, tripod, bracket, or table recommended by the manufacturer, or sold with the video unit. Any mounting of the unit should follow the manufacturer's instructions and should use a mounting accessory recommended by the manufacturer. An appliance and cart
combination should be moved with care. Quick stops, excessive force, and uneven surfaces may cause the appliance and cart combination to overturn.

-
Ventilation – Slots and openings in the cabinet are provided for ventilation and to ensure reliable operation of the video unit and to protect it from overheating. These openings must not be blocked or covered. Never place the video unit on a bed, sofa, rug, or other similar surface, or near or over a radiator or heat register. This video unit should not be placed in a built-in installation such as a bookcase or rack unless proper ventilation is provided or the manufacturer's instructions have been adhered to.
-
Power Sources – This video unit should be operated only from the type of power source indicated on the marking label. If you are not sure of the type of power supply to your home, consult your appliance dealer or local power company. For video units intended to be operated from battery power, or other sources, refer to the operating instructions.
-
Grounding or Polarization – This video unit may be equipped with either a polarized 2-wire AC (Alternating Current) line plug (a plug having one blade wider than the other) or 3-wire grounding type plug, a plug having a third (grounding) pin.
The 2-wire polarized plug will fit into the power outlet only one way. This is a safety feature. If you are unable to insert the plug fully into the outlet, try reversing the plug. If the plug still fails to fit, contact your electrician to replace your obsolete outlet. Do not defeat the safety purpose of the polarized plug.
The 3-wire grounding type plug will fit into a grounding type power outlet. This is a safety feature. If you are unable to insert the plug into the outlet, contact your electrician to replace your obsolete outlet. Do not defeat the safety purpose of the grounding type plug.
-
Power-Cord Protection – Power-supply cords should be routed so that they are not likely to be walked on or pinched by items placed upon or against them. Paying particular attention to cords of plugs, convenience receptacles, and the point where they exit from the unit.
-
Outdoor Antenna Grounding – If an outside antenna or cable system is connected to the video unit, be sure the antenna or cable system is grounded so as to provide some protection against voltage surges and built-up static charges. Part 1 of the Canadian Electrical Code, in USA Section 810 of the National Electrical Code, provides information with respect to proper grounding of the mast and supporting structure, grounding of the lead-in wire to an antenna discharge unit, size of grounding conductors, location of antenna discharge unit, connection to grounding electrodes, and requirements for the grounding electrode.

- Lightning – For added protection of this video unit receiver during a lightning storm, or when it is left unattended and unused for long periods of time, unplug it from the wall outlet and disconnect the antenna or cable system. This will prevent damage to the video unit due to lightning and power-line surges.
For assistance, please call : 1-800-211-PANA(7262) or, contact us via the web at:http://www.panasonic.com/contactinfo
Important Safeguards
-
Power Lines – An outside antenna system should not be located in the vicinity of overhead power lines or other electric light or power circuits, or where it can fall into such power lines or circuits. When installing an outside antenna system, extreme care should be taken to keep from touching such power lines or circuits as contact with them might be fatal.
-
Overloading – Do not overload wall outlets and extension cords as this can result in a risk of fire or electric shock.
-
Objects and Liquids – Never push objects of any kind into this video unit through openings as they may touch dangerous voltage points or short out parts that could result in a fire or electric shock. Never spill liquid of any kind onto the video unit.
-
Servicing – Do not attempt to service this video unit yourself as opening or removing covers may expose you to dangerous voltage or other hazards. Refer all servicing to qualified service personnel.
-
Damage Requiring Service – Unplug this video unit from the wall outlet and refer servicing to qualified service personnel under the following conditions:
a. When the power-supply cord or plug is damaged.
b. If any liquid has been spilled into, or objects have fallen onto, the video unit.
c. If the video unit has been exposed to rain or water.
d. If the video unit does not operate normally by following the operating instructions. Adjust only those controls that are covered by the operating instructions, as an improper adjustment of other controls may result in damage and will often require extensive work by a qualified technician to restore the video unit to its normal operation.
e. If the video unit has been dropped or the cabinet has been damaged.
f. When the video unit exhibits a distinct change in performance – this indicates a need for service.
-
Replacement Parts – When replacement parts are required, be sure the service technician has used replacement parts specified by the manufacturer or have the same characteristics as the original part. Unauthorized substitutions may result in fire, electric shock or other hazards.
-
Safety Check – Upon completion of any service or repairs to this video unit, ask the service technician to perform safety checks to determine that the video unit is in safe operating order.
Precautions
WARNING
USE & LOCATION
- TO AVOID SHOCK HAZARD ... Your Camcorder and power supply should not be exposed to rain or moisture. Do not connect the power supply or operate your Camcorder if it gets wet. Your Camcorder has been designed for outdoor use, however it is not designed to sustain direct exposure to water, rain, sleet, snow, sand, dust, or a direct splashing from a pool or even a cup of coffee. This action could permanently damage the internal parts of your Camcorder. Do not attempt to disassemble this unit. Unplug your Camcorder from the power supply before cleaning.
CAUTION
• DO NOT AIM YOUR CAMCORDER AT THE SUN OR OTHER BRIGHT OBJECTS.
- DO NOT LEAVE THE CAMCORDER WITH THE EVF AIMED DIRECTLY AT THE SUN AS THIS MAY CAUSE DAMAGE TO THE INTERNAL PARTS OF THE EVF.
- DO NOT EXPOSE YOUR CAMCORDER TO EXTENDED HIGH TEMPERATURE ... Such as, in direct sunlight, inside a closed car, next to a heater, etc... This action could permanently damage the internal parts of your Camcorder.
- AVOID SUDDEN CHANGES IN TEMPERATURE ... If the unit is suddenly moved from a cold place to a warm place, moisture may form on the tape and inside the unit.
• DO NOT LEAVE YOUR CAMCORDER OR THE POWER SUPPLY TURNED ON WHEN NOT IN USE.
- STORAGE OF YOUR CAMCORDER ... Store and handle your Camcorder in a manner that will not subject it to unnecessary movement (avoid shaking and striking). Your Camcorder contains a sensitive pick-up device which could be damaged by improper handling or storage.
CARE
- TO CLEAN YOUR CAMCORDER ... Do not use strong or abrasive detergents when cleaning your Camcorder body.
- TO PROTECT THE LENS ... Do not touch the surface of the lens with your hand. Use a commercial camcorder lens solution and lens paper when cleaning the lens. Improper cleaning can scratch the lens coating.
• TO PROTECT THE FINISH OF YOUR CAMCORDER ... Before handling your Camcorder, make sure your hands and face are free from any chemical products, such as suntan lotion, as it may damage the finish.
Table of Contents
Getting Started
Things You Should Know 2\~3
Important Safeguards 4\~5
Precautions....5
Select OSD Language 7
Self Demo Mode 8
Quick Operation Guide 9
Supplying Power (Battery Charge/Use/Refresh/Care, AC Adaptor, Car Battery Cord) .. 10\~11
Cassette Information 12
Before Using (Using the Shoulder and Hand Straps, Lens Cap) 13
Using MENU Mode 14
Setting the Clock (Time Zone, Auto Daylight Saving Time) 15\~16
AccuBrite™ Built-in Light (Using the Light, Replacing the Bulb) 17
Basic Operation
Camera Recording (Basic, Stand-by, Programmed Recording) 18\~20
Playing Back Recordings
(Basic Playback, Visual Search, Still Picture, Tracking, TV/VCR Playback) 21\~22
Copying your Tapes (dubbing) 23
Special Features
Four-Speed Power Zoom.... 24
Backlight 24
Focus (Auto/Manual Focus) 25
High Speed Shutter (Auto/Manual Shutter) 26
Auto Fade 27
Color Digital Fade 28
Digital Zoom 29
Digital Electronic Image Stabilization (E.I.S.) 30
MotionSensor 31
For your information
Viewfinder/LCD Monitor Indications 32\~34
Notes On Operations 35
Replacing Clock Battery ....36
Palmcorder Accessory System 37
Palmcorder Accessory Order Form 38
Specifications 39
Before Requesting Service (Video Head Cleaning) 40
Request for Service Notice 41
Limited Warranty 42
Customer Services Directory 43
Index 44
6
For assistance, please call : 1-800-211-PANA(7262) or, contact us via the web at:http://www.panasonic.com/contactinfo
Select OSD Language
The Camcorder is preset to ENGLISH. You can select ENGLISH or SPANISH as the OSD (on screen display) language. If SPANISH language is selected, turn to the Spanish Operating Instructions in this manual.
Before you begin...
- Connect Camcorder to power source.

1 Set POWER to CAMERA or VCR.
2 Press MENU for MENU mode. Press UP or DOWN to select LANGUAGE.


[ VCR MODE ][ CAMERA MODE ]
3 Press M.FOCUS to select IDIOMA ; ESPAÑOL.


[ VCR MODE ][ CAMERA MODE ]
4 Press MENU to exit. Then, see Spanish Operating Instructions in this manual.
Note:
To select ENGLISH OSD:
- Set to LANGUAGE ; ENGLISH in MENU screen.
Self Demo Mode
Self Demo mode is on when the screen below appears. To turn it off, follow steps 1-4 below.
EVF or LCD Monitor


Before you begin...
- Connect Camcorder to power source.
1 Set POWER to CAMERA.
2 Press MENU for MENU mode. Press UP or DOWN to select SELF DEMO.

3 Press M.FOCUS to select OFF.
4 Press MENU to exit.
Note:
- Self Demo stops automatically if battery is attached (page 10) and cassette tape is inserted (page 12).
- Inserting a tape alone (or attaching a partially charged battery) only temporarily stops Self Demo.
- Self Demo stops for 30 seconds when the Back Light is pressed.
To turn Self Demo back on:
- Set to SELF DEMO ; ON in MENU screen.
For assistance, please call : 1-800-211-PANA(7262) or, contact us via the web at:http://www.panasonic.com/contactinfo
Quick Operation Guide

natural_image
Line drawing of a portable electronic device connected to a power outlet (no text or symbols)Charging the Battery Pack
Charge Battery Pack fully before operation (page 10).
1 Plug in AC Adaptor.
2 Insert Battery. CHARGE Lamp flashes, then stays lit when charging is complete.
Insert Cassette

natural_image
Technical line drawing of a mechanical device with no visible text or symbols1 Attach fully charged Battery (page 10).
2 Slide TAPE EJECT to open door.
3 Insert cassette (page 12).
4 Press here to close door.

Camera Recording
See page 18.
1 Press LCD-OPEN to unlock the LCD monitor. Swing it fully open and adjust the angle.
2 Set POWER to CAMERA.
3 Press RECORD/PAUSE to
Press RECORD/PAUSE again to pause recording.

Playback using the LCD Monitor
See page 21.
1 Press LCD-OPEN to unlock the LCD monitor. Swing it fully open and adjust the angle.
2 Set POWER to VCR.
3 Press ◀ (REWIND/SEARCH) to rewind tape.
4 Press ▶/II (PLAY/ STILL) to start playback.
5 Press ■ (STOP) to stop playback.
Supplying Power
• We recommend using Panasonic's Battery.
• We cannot guarantee the quality of this Camcorder when batteries of other companies are used.
Charging the Battery Pack
Charge Battery Pack fully before use.

1 Plug in AC Adaptor. POWER Lamp lights.
2 Disconnect the DC power cable from the AC Adaptor. If the DC Power Cable is connected to the AC Adaptor, the Battery will not be charged.
3 Adaptor, the Battery will not be charged. Insert Battery. A Align left side of Battery with left edge of AC Adaptor. B Press Battery down and slide in direction of arrow. The CHARGE Lamp flashes, then stays lit when charging is complete.
4 Charging is complete. Remove Battery. Slide Battery to the left and lift off.
Note:
- Charging takes about 50 minutes (PV-L354) or 1.5 hours (PV-L454).
- While the DC Power Cable (supplied) is connected to the AC Adaptor, the Battery cannot be charged.
• After charging 5 times, use Battery Refresh feature as explained below. - Battery life gradually decreases after repeated use and recharging. If operation time becomes very short even after a sufficient charge, discard Battery properly (pages 11, 35).
Using the Battery Pack
A fully charged Battery provides a maximum of about 1 hour (PV-L354) or 2 hours (PV-L454) of continuous use (LCD monitor off) or about 40 minutes (PV-L354) or 1.5 hours (PV-L454) (LCD monitor on). Actual time may vary due to operating conditions. Using the Built-in Light decreases operating time.

A Lift up EVF and attach Battery.
a Insert top of Battery into top of mounting surface.
bPress and snap into place.
B Remove Battery.
Slide BATTERY RELEASE and remove Battery.
Battery Refresh
This feature completely discharges Battery before recharging begins. Use after every 5 charges for optimum Battery performance.

To use battery refresh, insert Battery on AC Adaptor (see steps 1\~3 above), then press BATTERY REFRESH.
The REFRESH Lamp lights, then goes out when discharge is complete. Battery charging will then start automatically.
If BATTERY REFRESH is pressed by mistake, remove Battery from AC Adaptor and reinsert it for normal charging.
Note:
- Charging takes about 4 hours (PV-L354) or about 7.5 hours (PV-L454) when Battery Refresh is used
- Battery will not operate in extremely high temperatures.
10
For assistance, please call : 1-800-211-PANA(7262) or, contact us via the web at:http://www.panasonic.com/contactinfo
Supplying Power
Battery Care
CAUTION
- Do not place the Battery near or dispose of in fire.
- Do not connect (short-circuit) the positive (+) and negative (−) terminals.
- Never attempt to disassemble or reassemble the Battery.
- Do not drop or jar Battery.
- Use Battery with specified units only.
- Charge only with specified charger.
- Do not use an insufficiently charged or worn-out Battery.
- Battery can be charged within a temperature range of
10 °C (50 °F) and 35 °C (95 °F) - Battery is normally warm after charging or just after use.
Battery Life and Protection
- If Battery is used in extremely high temperatures, a safety device will automatically prevent operation.
- While not in use, remove Battery from the Camcorder and AC Adaptor, and store in a cool, dark, dry place.
- Keep Battery terminals clean.
AC Adaptor

1
Connect AC Adaptor DC OUT to Camcorder DC IN with supplied DC Power Cable.
2
Plug in AC Adaptor. POWER Lamp lights.
Note:
- While the DC Power Cable (supplied) is connected to the AC Adaptor, the Battery cannot be charged.
- When not in use, unplug AC Adaptor from AC outlet. (Adaptor uses 1.2 W of electricity while plugged in.)
CAUTION
This unit will operate on 110/120/220/240 V AC 50/60 Hz. An AC plug adaptor may be required for voltages other than 120 V AC. Please contact either a local or foreign electrical parts distributor for assistance in selecting an alternate AC plug. We recommend using the accessory power plug adaptor (VJSS0070/K2DB42E00001) in an area which has special AC outlets.
Car Battery Cord (Optional)

1
Connect PV-C16 Car Battery Cord (optional) to Camcorder DC IN.
2
A Start engine first.
⑧ Plug Car Battery Cord into Cigarette lighter socket.
- If Car Battery cord fuse needs replacing, use exact current rating (in amps).
Note:
- This cord only works in vehicles equipped with DC 12 V (negative ground) battery. Check with your car/truck dealer. Use only specified car battery cord.
- To avoid blowing the car battery cord fuse, do step 2 in the proper order.
- Running vehicles must be well ventilated.
- When not in use, disconnect cigarette lighter plug.
- For personal safety the driver of the vehicle should not attempt to operate the camcorder while driving.
Cassette Information
Cassette Insertion/Removal

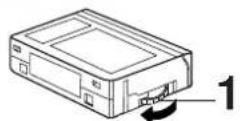
1 Turn Tape Wheel in direction of arrow until there is no slack.
2 Attach Battery (page 10).
3 Slide TAPE EJECT to open door.
4 Insert cassette as shown.
5 Press here to close door.
• To remove the cassette, slide the TAPE EJECT switch.
Record/Playback Time
Use tapes with the VHSC in this unit.
| Tape Speed | Cassette type | ||
| TC-20 | TC-30 TC | 40 | |
| SP(Standard Play) | 20 minutes | 30 minutes | 40 minutes |
| SLP(Super Long Play) | 1 hour | 1 hour30 minutes | 2 hours |
• SLP playback may contain more picture noise.
Erase Protection Tab
Protects tapes from being accidentally erased.

1 To prevent accidental erasing, break off tab with screwdriver. (Or, slide tab open.)
2 To record again, cover hole with adhesive tape. (Or, slide tab closed.)
For assistance, please call : 1-800-211-PANA(7262) or, contact us via the web at:http://www.panasonic.com/contactinfo
Before Using
How to remove the Sensor tag

① Open the Hand Strap as illustrated at left.
② Remove the Sensor tag. Then, replace the Hand Strap.
Adjust the Length of the Shoulder Strap
Attaching Shoulder Strap
Remove Battery Pack before completing the following steps:
1 Undo strap ends from buckles.
2 Thread strap ends through Strap Rings on Camcorder.

natural_image
Line drawing of a digital camera with attached cable and lens (no text or symbols)
Pull a loop of strap from buckle, then pull strap tight to shorten or lengthen.
Hand Strap
3 Re-insert the strap ends into buckles. ③ ② ① min. 25.4 mm (1 inch)

Adjust Hand Strap length to fit your hand as shown.
Lens Cap
Attaching the Lens Cap Strap to the Hand Strap: Remove the Hand Strap from the front clasp and thread the Strap through the loop in the Lens Cap Strap. Reattach the Hand Strap.

natural_image
Line drawing of a vintage camera with lens and base mount (no text or symbols)Using MENU Mode

Before you begin...
- Connect Camcorder to power source.
- Set POWER to CAMERA or VCR.
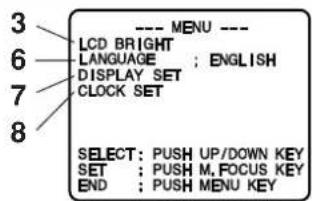
1 Press MENU for MENU mode. The CAMERA or VCR MENU screen (see below left) appears when Menu mode is entered.
2 Press UP or DOWN to highlight the desired menu item.
3 Press M.FOCUS to set selection.
4 Press MENU to exit.
Note:
- The Menu mode is canceled if UP/DOWN, M.FOCUS, or MENU are not pressed within 5 minutes when Self Demo mode is off with no cassette tape and/or battery inserted.
- The Menu mode is canceled if UP/DOWN, M.FOCUS, or MENU are not pressed within 30 seconds when Self Demo mode is on with no cassette tape and/or battery inserted.
1 REC MODE (page 18).
Change to desired tape speed, SP/SLP.
2 SHUTTER (page 26).
Select desired shutter speed.
3 LCD BRIGHT (page 18).
LCD BRIGHT SETTING sub menu is displayed.
Adjust LCD monitor brightness level.
4 DIGITAL EFFECTS (pages 27\~29, 31).
DIGITAL EFFECTS sub menu is displayed.
To select DIGITAL ZOOM, MOTIONSENSOR, or FADE.
5 PROGRAMMED REC (page 20).
Camcorder starts and stops recording at a preset time.
6 LANGUAGE (page 7).
Select LANGUAGE ; ENGLISH or IDIOMA ;
ESPAÑOL as desire.
7 DISPLAY SET (pages 32, 33).
DISPLAY SET sub menu is displayed.
To select DISPLAY or MODE SELECT.
8 CLOCK SET (pages 15, 16).
CLOCK SET sub menu is displayed.
Set the Date and Time.
9 STAND-BY RELEASE (page 19).
ON : Enables quick resumption of recording from Stand-by mode.
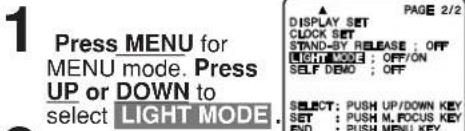
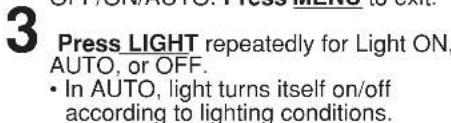
10 LIGHT MODE (page 17).
OFF/ON : Light can be set ON or OFF.
OFF/ON/AUTO : Light can be set ON, OFF, or AUTO.
11 SELF DEMO (page 8).
ON : SELF DEMO screen is displayed.
Camera Mode Menu Screen

VCR Mode Menu Screen
14
For assistance, please call : 1-800-211-PANA(7262) or, contact us via the web at:http://www.panasonic.com/contactinfo
Setting the Clock
Set the following items in order: Time Zone, Daylight Saving Time, Date, and Time.

Before you begin...
- Connect Camcorder to power source.
- Set POWER to CAMERA or VCR.
1
Press MENU for MENU mode. Press UP or DOWN to select CLOCK SET.


Getting Started
[ VCR MODE ][ CAMERA MODE ]
2
Press M.FOCUS for CLOCK SET menu. Press UP or DOWN to select TIME ZONE, DST, or DATE/TIME.

3
Press M.FOCUS for menu of item selected in step 2.
To change the setting: TIME ZONE → Go to step 3a on page 16. D.S.T. → Go to step 3b on page 16. DATE/TIME → Go to step 3c on page 16.
4
Press MENU twice to exit.
Setting the Clock
3a Setting the Time Zone
The Camcorder is preset to Eastern time. [ Time Zone chart ]
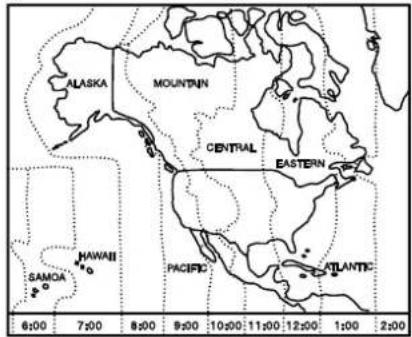
Press UP or DOWN to select local time zone. Press M.FOCUS to confirm entry.

- When traveling, repeat this operation and select one of the 8 listed time zones to set the clock to local time.
Note :
- Clock may lose or gain up to 2 minutes per month.
- When traveling outside the listed time zones, set clock to local time manually.
- To adjust or set clock, see "Setting Date and Time" (below).
3b Auto Daylight Saving Time
Clock will auto-adjust to daylight saving time (DST).
DST: AUTO
Spring (First Sunday in April) : ahead one hour.

flowchart
graph LR
    A["Normal Time"] --> B["1:00AM"]
    B --> C["2:00AM"]
    D["Daylight Saving Time"] --> E["3:00AM"]
    E --> F["4:00AM"]
Autumn (Last Sunday in October) : back one hour.

flowchart
graph LR
    A["Daylight Saving Time"] --> B["1:00AM"]
    B --> C["2:00AM"]
    C --> D["Normal Time"]
    D --> E["1:00AM"]
    E --> F["2:00AM"]
The Camcorder is preset to DST: AUTO. If DST is not observed in your area, set to OFF by doing the following.
Press UP or DOWN to select OFF or AUTO. Press M.FOCUS to confirm entry.

Note:
- Auto DST does not function if time zone is set to Hawaii or Samoa (see "Setting the Time Zone" above).
3c Setting Date and Time
Date and time including leap years are calculated up to DEC 31, 2099.
EXAMPLE :

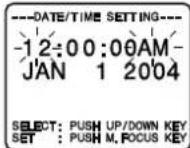
Press or hold down UP or DOWN to select hour, then press M.FOCUS to fix.
Repeat for minute, month, day, and year.
Clock starts when year is entered and M.FOCUS is pressed.
16
For assistance, please call : 1-800-211-PANA(7262) or, contact us via the web at:http://www.panasonic.com/contactinfo
AccuBrite™ Built-in Light
Using the Light
For recording in dim lighting.

Note:
• Using Light reduces battery operating time.
- Provide proper ventilation when using Light extensively in a hot environment.
• Using Light when the Camcorder is powered by a car battery may shorten bulb life.
- Set Light to OFF when not in use.
- When Camcorder is in CAMERA Rec mode with LIGHT MODE set to ON or AUTO, changing to VCR Play mode will cause the light to go out and the menu setting will revert to OFF.
When returning to CAMERA Rec mode, the LIGHT MODE must be set again.
Replacing the Bulb
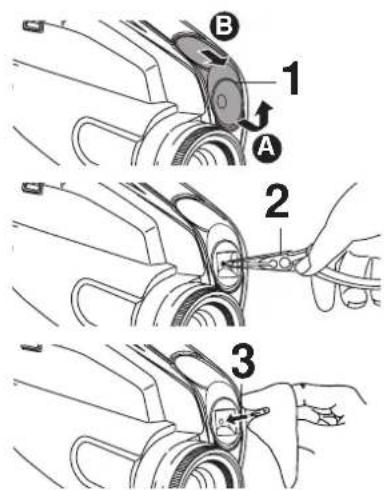
Before you begin...
- Connect Camcorder to power source.
- Set POWER to CAMERA.

EVF or LCD Monitor
CAUTION
This mark indicates that light becomes hot. Never cover Light while on.
Before you begin...
- Order Part No. VLLW0015 for replacement bulb.
- Set POWER to OFF.
1 Slightly raise portion A of lens cover to unhook, and slide portion B forward to remove.
2 Using Tweezers or needle-nose pliers, carefully remove bulb.
• Take unit to service center if you need assistance.
3 Replace bulb using a clean cloth or tissue. (Do not touch with fingers.)
4 Replace lens cover.
Note:
- Handle bulb gently. Excessive force may cause bulb to crack.
DANGER:
Use only replacement bulb (PART NO. VLLW0015) supplied by Panasonic to reduce risk of fire. Handle new bulb with cloth or tissue as skin oils will decrease bulb life. Remove lens cover and allow bulb to cool before replacing to avoid possible burn hazard.
Camera Recording
Recording via EVF or LCD Monitor
View recording scene on EVF (Electronic Viewer Finder) or LCD (Liquid Crystal Display) monitor.
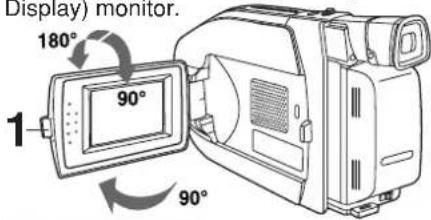
CAUTION
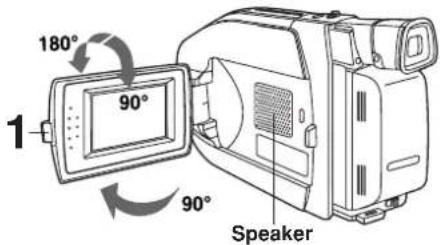
Rotating partially open LCD monitor may block cassette door and damage Camcorder body.

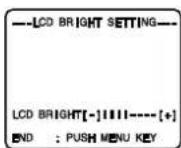
To adjust LCD BRIGHT

Press MENU for MENU mode. Press UP or DOWN to select LCD BRIGHT.


Press M.FOCUS for LCD BRIGHT SETTING menu. Press UP or DOWN to adjust LCD monitor brightness level.
Before you begin...
- Connect Camcorder to power source.
- Insert cassette with record tab (page 12).
1
Press LCD-OPEN to unlock the LCD monitor. Swing LCD monitor fully open and adjust viewing angle.
2
Set POWER to CAMERA.
- Be sure POWER is fully turned to CAMERA position.
- EVF or LCD monitor turns on/off by the POWER switch.
- Both EVF and LCD monitor turn on when LCD is at 180° (see above left). This allows both you and the subject to view the recording.
3
LCD : Adjust LCD monitor brightness level. See "To adjust LCD BRIGHT" below.
EVF : Look into EVF and adjust VISION ADJUSTMENT to your preference.
4
Set REC MODE to "SP" or "SLP" in the CAMERA MODE Menu (page 14).
5
Press RECORD/PAUSE to start or pause recording.
6
Set POWER to OFF when finished.
• To remove the cassette, slide the TAPE EJECT switch (page 12).
Note:
- When Camcorder is aimed at excessively bright objects, or bright lights, a vertical bar may appear in the picture. This is normal for the CCD pick-up. Try to avoid this when possible.
- Using LCD monitor reduces battery operation time. Return LCD monitor to locked position when not in use.
18
For assistance, please call : 1-800-211-PANA(7262) or, contact us via the web at:http://www.panasonic.com/contactinfo
Camera Recording
Before you begin...
- Connect Camcorder to power source.
- Insert cassette with record tab (page 12).
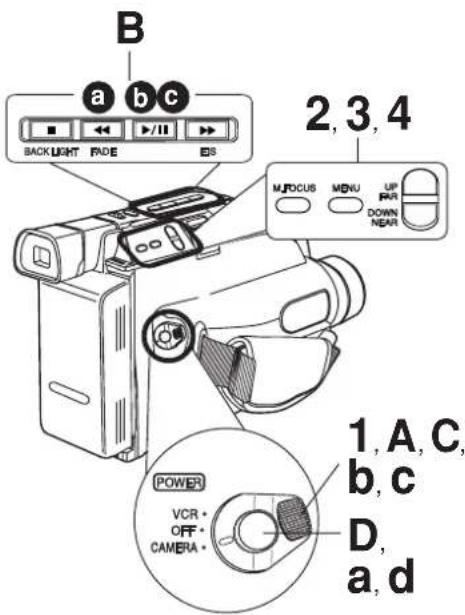
Stand-by Quick Release
If left in RECORD/PAUSE mode for 5 minutes, Camcorder switches to Stand-by mode to conserve battery. When set to ON, Stand-by Quick Release lets you resume recording by pressing RECORD/PAUSE two times. Stand-by Quick Release is set to OFF at the factory.
1
Set POWER to CAMERA.
2
Press MENU for MENU mode.
Press UP or DOWN to select STAND-BY RELEASE.

3
Press M.FOCUS to select ON or OFF.
ON : From Stand-by mode, press RECORD/PAUSE two times to resume recording.
OFF : From Stand-by mode, set POWER to OFF, then to CAMERA. Press RECORD/PAUSE to record.
4
Press MENU to exit.
Manual Easy Editing
For proper continuity when taping from Stop mode or after attaching a new Battery.
A
Set POWER to VCR.
B
a Press ◀ (REWIND/SEARCH) to rewind a few seconds of tape.
b Press ▶/II (PLAY/ STILL) to review recording.
Press ▶(PLAY/ STILL) where you want to continue recording.
C
Set POWER to CAMERA.
D
Press RECORD/PAUSE to resume recording.
Easy Edit Stand-by
For a smooth transition between scenes if recording is stopped, and then started within 24 hours.
a
Press RECORD/PAUSE to stop recording.
b
Set POWER to OFF and leave cassette in Camcorder.
C
To resume recording, set POWER to CAMERA.
d
Press RECORD/PAUSE to resume recording.
Note:
- Use Manual Easy Edit (left) if more than 24 hours before recording is resumed.
Camera Recording
Programmed Recording
Set a recording start and stop time. Or, set a 5 or 10 second interval recording to be done each minute.

REC TIME :

*1 Record 5 seconds each minute.
*2 Record 10 seconds each minute.
Before you begin...
- Connect Camcorder to power source.
Use AC Adaptor for longer recordings.
- Insert cassette with record tab (page 12).
- Set POWER to CAMERA.
1
Press MENU for MENU mode. Press UP or DOWN to select PROGRAMMED REC.

2
Press M.FOCUS.
(Current time is displayed.)
Each additional press of M.FOCUS increases start time by 30 minutes
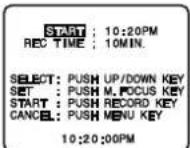
3
Press DOWN to select REC TIME.
Press M.FOCUS
repeatedly to select one of the options shown at left.

To cancel the setup, press MENU twice.
4
Press RECORD/PAUSE
to place Camcorder in stand-by mode.
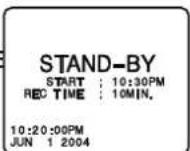
Recording will be done as scheduled.
Note:
- Start time may not be set over 24 hours from current time.
- Camcorder shuts off at tape end, or 12 hours after Interval Recording starts.
• To cancel, set POWER to OFF.
For assistance, please call : 1-800-211-PANA(7262) or, contact us via the web at:http://www.panasonic.com/contactinfo
Playing Back Recordings
Before you begin...
- Connect Camcorder to power source.
- Insert recorded tape.
Tracking Control

natural_image
Illustration showing a person playing golf with a stick, before and after a change (no text or symbols)Auto Tracking
Continuously analyzes each recording for optimum picture quality.
Manual Tracking
Some recordings require manual adjustment to reduce noise.
Press UP or DOWN until Playback picture clears up.
Press M.FOCUS to return to Auto Tracking.
Playback on EVF or LCD Monitor
1 Press LCD-OPEN and swing LCD monitor fully open.
2 Set POWER to VCR.
- If tape has no record tab, auto playback begins.
- EVF or LCD monitor turns on/off by the POWER switch.
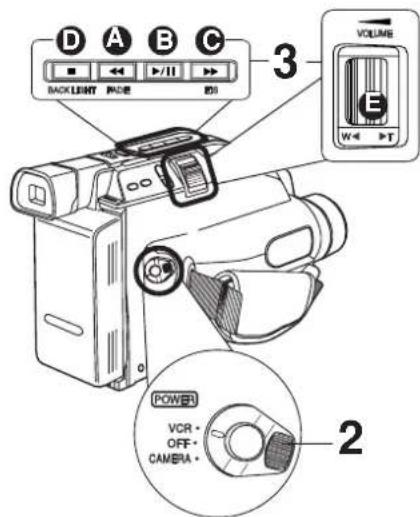
3 Playback function buttons.
A
B▶/II (PLAY/ STILL) : Play tape
©▶▶ (FAST FORWARD/SEARCH)
Fast Forward tape.
D■(STOP):Stop tape.
E VOLUME : During playback, adjust volume of speaker.

Press "W" : Volume down. ←→ Press "T" : Volume up.
Note:
- Using LCD monitor reduces battery operating time. Return LCD monitor to locked position when not in use.
- During playback, press MENU to adjust LCD monitor brightness (page 18).
Special Effects
Quick Visual Search
Search Speed
- SP (Standard Play) : 3 times normal.
• SLP (Super Long Play) : 9 times normal.
During playback, press:
- FAST FORWARD/SEARCH) : fast forward search
- (REWIND/SEARCH) : rewind search Press again or press ▶/II (PLAY/STILL) for normal play.
Still Picture
Press ▶(RILAY/STILL) to freeze picture.
Press again for normal play.
This feature works best in SLP mode (page 12).
Note:
- During search, horizontal noise bars will appear. Audio is muted.
• To protect video heads and tape, operating modes
will revert as follows after 5 minutes:
Still Stand-by
Stand-by Power off (when Battery Pack is used). - Tape auto-rewinds if played or fast forwarded to end.
Playing Back Recordings
TV Playback or Viewing
Connect Camcorder to a TV to view playback or recordings in progress.

Before you begin...
- Connect Camcorder to power source.
• Make all TV-Camcorder connections.
1 Set POWER to:
VCR →view playback.
CAMERA → view picture as it is recorded.
2 Turn TV ON and set to LINE INPUT.
See TV owner's manual.
3 Begin playback or recording.
VCR Playback using PlayPak (Optional)
Load Battery in PlayPak
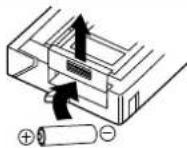
Remove Battery lid and insert AA battery.
- Do not reverse polarity.
- Replace battery when tape loading/unloading takes longer than usual.
Insert VDSGsette in PlayPak
1 Turn MSR Cassette Tape Wheel in direction of arrow to take up any slack.
2 Slide RELEASE to open cassette lid.
5 Insert the VHSC cassette with the window up and on the left, then snap lid shut.

not obstruct cassette while loading.
PlayPak Load
ctor to fully retract
e using in VHS VCR.


Remove VU50sette

1 Slide RELEASE and wait for lid to open.
2 Push cassette out through hole in bottom of PlayPak with your finger.
22
For assistance, please call : 1-800-211-PANA(7262) or, contact us via the web at:http://www.panasonic.com/contactinfo
Copying your Tapes (dubbing)
Connections

Monitor with your TV
- Turn TV on and tune to VCR channel (CH3 or CH4).
- Set TV/VCR Selector on VCR to VCR.
Before you begin...
• Make Camcorder-VCR connections (see left).
- Turn both units on.
- Set VCR input signal to LINE. Please see VCR owner's manual.
- Set Camcorder POWER to VCR.
1 Insert a pre-recorded tape into Camcorder and a blank tape with record tab into VCR.
2 Press ▶(RLAY/ STILL) on
Camcorder, then press again at starting point.
3 Press REC, then STILL/PAUSE on VCR.
4 Press ▶(PLAY/ STILL) on
Camcorder and STILL/PAUSE on VCR to start copying.
5 Press ■(STOP) on both units to stop copying.
Note:
- Camcorder will only playback tapes recorded in SP or SLP mode.
- Dubbing may reduce picture quality.
CAUTION:
Unauthorized exchanging and/or copying of copyrighted recordings may be copyright infringement.
Four-Speed Power Zoom
Zoom in (close up) and out (wide angle) in one of four speeds ranging from slow (16 seconds) to fast (2 seconds).

Before you begin...
- Connect Camcorder to power source.
- Set POWER to CAMERA.
Zoom In ("T")
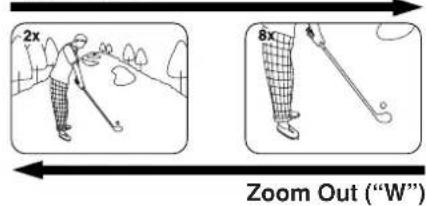
- Zoom slowly:
Lightly press "T" (telephoto) or "W" (wide angle) POWER ZOOM button.
- Zoom quickly:
Apply more pressure to the button.
Backlight
Use when subject is darker than surroundings, in shadowed area, or in front of the light source.
Before you begin...
- Connect Camcorder to power source.
- Set POWER to CAMERA.

Press ■(BACK LIGHT) while recording to select the level of backlight compensation.
In normal lighting, press ■(BACK LIGHT) repeatedly until no indicator is displayed.

flowchart
graph TD
    A["No Indication (Normal)"] --> B["First press (Low)"]
    B --> C["Second press (Medium)"]
    C --> D["Third press (High)"]
    D --> E["Fourth press"]
    F["EVF or LCD Monitor"] --> G["Image of plant with curtains"]
    G --> H["Image of potted plants"]
    H --> I["Image of plant with eyes"]
    I --> J["Image of plant with mouth"]
    J --> K["Image of plant with eye"]
    K --> L["Image of plant with face"]
    L --> M["Image of plant with eye"]
    M --> N["Image of plant with face"]
24
For assistance, please call : 1-800-211-PANA(7262) or, contact us via the web at:http://www.panasonic.com/contactinfo
Before you begin...
- Connect Camcorder to power source.
- Set POWER to CAMERA.
Auto Focus
Camcorder automatically focuses on subject even during zooming.
Auto Focus is on when "MF" is not displayed in EVF or LCD monitor.
Press M.FOCUS to remove "MF" in EVF or LCD monitor if necessary.
Manual Focus
Use Manual Focus (MF) when :
- recording through glass.
- lighting is poor.
- subject is far away with objects in foreground.
- subject has distinct horizontal lines.
- subject is not centered in EVF or LCD monitor.
- subject has a shiny surface.
- subject is slanted.
- subject is bright and flat, like a white wall.
- subject has fast motion, like a golf swing.
EVF or LCD Monitor


1 Press M.FOCUS so "MF" (Manual Focus) appears in EVF or LCD monitor.
2 Press "T" (telephoto) on POWER ZOOM to maximum zoom in.
3 Press UP (FAR) or DOWN (NEAR) until subject is in focus.
- Back away from subject if necessary.
4 Press "W" (wide angle) on POWER ZOOM as desired.
- Refocus as needed when aiming at new scenes.
Special Features
Macro Focus (close-ups)
Auto Focus functions up to 12.7 mm (1/2 inch) from subject.
Press "W" on POWER ZOOM to maximum wide angle.
Bring Camcorder up close to the subject.
High Speed Shutter
Improves Still or Slow Motion playback picture of high speed subjects (e.g. a tennis stroke), when viewed on Camcorder (Still only) or a 3 or 4 head VCR (Still and Slow Motion).
Before you begin...
- Connect Camcorder to power source.
- Insert cassette with record tab (page 12).
- Set POWER to CAMERA.
Auto Shutter
In AUTO mode (no indication in EVF or LCD Monitor), shutter speed is auto-adjusted from 1/60 to 1/350 according to subject brightness.
- AUTO mode is selected each time POWER is set to CAMERA.
Manual Selection
The faster the shutter speed, the more light is needed for proper picture and color quality. High Speed Shutter indication flashes if light is inadequate. Provide additional light.
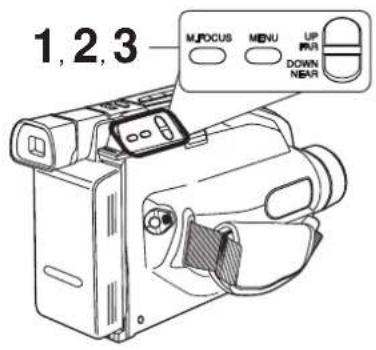
1 Press MENU for MENU mode. Press UP or DOWN to select SHUTTER.
2 Press M.FOCUS repeatedly to select shutter speed.

3 Press MENU to exit.
Note:
- Shutter speed cannot be set to 1/60 if Digital E.I.S. feature is set to ON.
- Provide additional halogen or tungsten light for use indoors or in poor light. Fluorescent light degrades picture.
- Auto Focus may not function properly if high speed shutter is used in inadequate light.
- Setting reverts to AUTO each time POWER is set to CAMERA.

An interesting way to open and close scenes.


flowchart
graph TD
    A["Start"] --> B["FADE White"]
    A --> C["FADE Black White"]
    B --> D["FADE White"]
    C --> E["FADE Black White"]
    D --> F["Black White"]
    E --> G["Black Black White"]
    H["Fade In"] --> I["End"]
    J["Fade Out"] --> K["End"]
Before you begin...
- Connect Camcorder to power source.
- Set POWER to CAMERA.
1
Press MENU for MENU mode.
Press UP or DOWN to select
DIGITAL EFFECTS

2
Press M.FOCUS for DIGITAL EFFECTS menu. Press UP or
DOWN to select FADE.
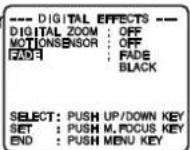
3
Press M.FOCUS for FADE menu.
Press UP or DOWN to select
AUTO FADE.

4
Press M.FOCUS for AUTO FADE; COLOR menu.
Press UP or DOWN to select BLACK or WHITE.

5
Press M.FOCUS to confirm entry. Press MENU twice to exit.
Fade In:
In RECORD/PAUSE mode, press
◀ (FADE) so "FADE" flashes in EVF or LCD monitor.
Press RECORD/PAUSE.
Recording starts as picture and sound gradually fade in.
Fade Out:
While recording, press ◀(FADE) so "FADE" flashes in EVF or LCD monitor.
Press RECORD/PAUSE.
Picture and sound gradually fade out, and recording is paused.
If ◀ (FADE) is pressed accidentally, press again so "FADE" disappears in EVF or LCD monitor.
Color Digital Fade
Choose from 7 fade effects in 8 different colors.


flowchart
graph TD
    A["SFT"] --> B["SHR"]
    C["SHR"] --> D["MSC"]
    E["SFT"] --> F["SHR"]
    G["SHR"] --> H["STR"]
    I["RDM"] --> J["SHR RED"]
    K["WHT"] --> L["YEL"]
    M["RED"] --> N["MAG"]
    O["BLU"] --> P["CYN"]
    Q["GRN"] --> R["BLK"]
■For more effects, stop fade in or fade out at any time (except RANDOM mode) by pressing ◀FADE). Then, press ◀FADE) to resume fade.
Note:
• Audio is not affected by fade.
• To cancel Digital Fade, do steps 1-3 and 6. In step 3, select AUTO FADE.
Before you begin...
- Connect Camcorder to power source. - Set POWER to CAMERA.
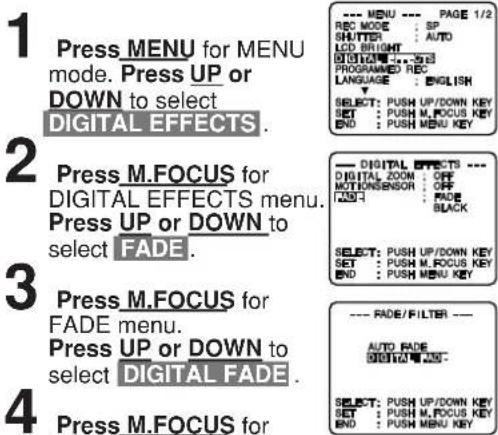

- A preview of each fade type is displayed as it is selected.


- A preview of each color is displayed as it is selected.


Press ◀ (FADE) for about 2 seconds to fade out during recording (selected fade type flashes). Press ◀ (FADE) again to fade in.
28
For assistance, please call : 1-800-211-PANA(7262) or, contact us via the web at:http://www.panasonic.com/contactinfo
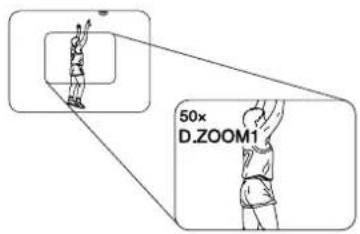
Digital Zoom
Power Zoom magnification is digitally increased.

Before you begin...
- Connect Camcorder to power source.
- Set POWER to CAMERA.
1
Press MENU for MENU mode. Press UP or DOWN to select DIGITAL EFFECTS.

2
Press M.FOCUS for DIGITAL EFFECTS menu. Press UP or DOWN to select DIGITAL ZOOM.

3
Press M.FOCUS repeatedly to select
D.ZOOM1, D.ZOOM2, or OFF.
D.ZOOM 1:150× maximum
D.ZOOM 2 : (PV-L354: 700× maximum)
(PV-L454: 750× maximum)
OFF:Turn off D.ZOOM
The Higher digital magnification levels may cause picture distortion.
4
Press MENU twice to exit.
5
Press "T" on POWER ZOOM.
Digital Zoom starts when normal zoom reaches maximum (20×).
- Zoom level appears in EVF or LCD monitor.
• POWER ZOOM switch controls digital zoom level. - Normal zoom resumes when level falls to 20×.
6
Repeat steps 2\~3 to select OFF to cancel this feature.
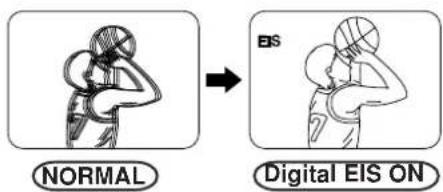
Digital Electronic Image Stabilization (E.I.S.)
Helps compensate for unintentional hand and/or Camcorder movement. Reduces jitter in recordings even if made from a moving car, etc.

Before you begin...
- Connect Camcorder to power source.
- Set POWER to CAMERA.
1
Press ▶▶ (EIS) to display "EIS" in the EVF or LCD monitor.
• Image becomes slightly enlarged and shutter speed auto-adjusts from 1/80 to 1/350 according to brightness.
- Use High Speed Shutter (page 26) if needed. Shutter speed setting remains after EIS is canceled.
2
Press ▶▶ (EIS) again to cancel when not in use.
E.I.S. may not function during...
• extreme Camcorder movement.
- recording of subjects with distinct horizontal or vertical stripes.
- low light situations (EIS indicator flashes).
• intense fluorescent lighting situations.
• recording of very fast motion.
MotionSensor
Recording starts automatically if motion is detected.

MotionSensor may mistakenly start when:
- background is plain, like a white wall, or has distinct vertical, horizontal, or slanted stripes, like a venetian blind.
• brightness suddenly changes.
MotionSensor may not start when:
• motion is very slow or fast.
- moving object is very small.
• motion occurs only in 1 corner of viewing area.
• in poor lighting (in this case, MOTIONSENSOR flashes).
- background is plain, like a white wall, or has distinct horizontal or vertical stripes.
Before you begin...
- Connect Camcorder to power source. Use AC Adaptor for longer recordings
- Insert cassette with record tab (page 12).
- Set POWER to CAMERA.
- Securely position and aim Camcorder.
1
Press MENU for MENU mode. Press UP or DOWN to select DIGITAL EFFECTS.
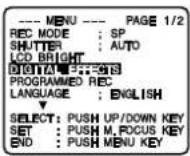
2
Press M.FOCUS for DIGITAL EFFECTS menu. Press UP or DOWN to select MOTIONSENSOR.

3
Press M.FOCUS to select ON.
4
Press MENU twice for MotionSensor stand-by mode. (If cassette is not inserted, "◆◆" will flash.)

flowchart
graph LR
    A["MOTION SENSOR STAND-BY"] <--> B["MOTION SENSOR REC"]
Special Features
- Recording will start about 3 seconds after motion is detected.
- Date and time are recorded if displayed in EVF or LCD monitor (page 16).
- Recording stops about 30 seconds after motion ceases.
To cancel MotionSensor Mode, set POWER to OFF.
Note:
- MotionSensor recording starts if Camcorder is bumped or repositioned.
- This feature is not available during normal recording.
- While in MotionSensor stand-by, the following functions are not available: Record/Pause, Stand-by mode, Digital E.I.S., Video Effects (Auto/Digital Fade).
Viewfinder/LCD Monitor Indications
Tape remaining and battery charge level can be displayed.

Before you begin...
- Connect Camcorder to power source.
1 Set POWER to CAMERA.
2 Press MENU for MENU mode.
Press UP or DOWN to select
DISPLAY SET.
PAGE 2/2
DISPLAY SET
CLOCK SET
STAND-BY RELEASE : OFF
LIGHT MODE : OFF/ON
SELF DEMO : OFF
SELECT: PUSH UP/DOWN KEY
SET : PUSH M,FOCUS KEY
END : PUSH MENU KEY
3 Press M.FOCUS for DISPLAY SET menu. Press UP or DOWN to select MODE SELECT. --- DISPLAY SET --- DISPLAY : ON MODE SET 21 SELECT: PUSH UP/DOWN KEY SET : PUSH V,FOCUS KEY END : PUSH MENU KEY
4 Press M.FOCUS for MODE SELECT menu.
5 Press M.FOCUS repeatedly to select the following displays.
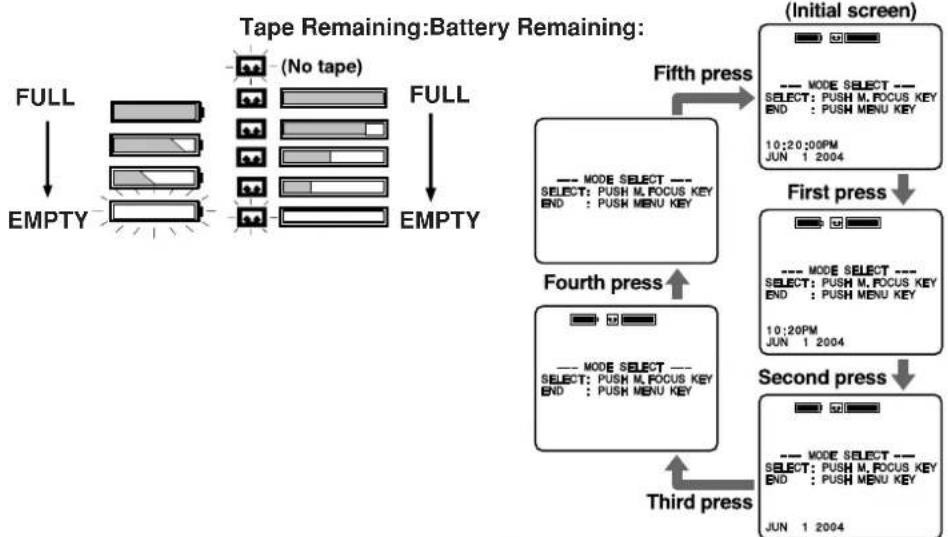
flowchart
graph TD
    A["FULL"] --> B["EMPTY"]
    B --> C["(No tape)"]
    C --> D["FULL"]
    D --> E["EMPTY"]
    E --> F["(Initial screen)"]
    F --> G["Fifth press"]
    G --> H["First press"]
    H --> I["Fourth press"]
    I --> J["Third press"]
    J --> K["Second press"]
    K --> L["Final state"]
6 Press MENU three times to exit.
- Tape remaining indicator operates a few seconds after tape starts moving.
Viewfinder/LCD Monitor Indications
Recording the Date and Time
1 Repeat steps 1-5 on page 32 to select time/date, date only, or no display.


2 Start a recording (page 18). • Only the Date and/or Time are recorded.
Display-Off Mode
A Set POWER to CAMERA or VCR.
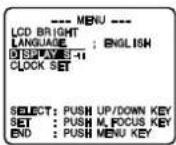
B Press MENU for MENU mode. Press UP or DOWN to select DISPLAY SET.

[CAMERA MODE] [VCR MODE]
C Press M.FOCUS for DISPLAY SET menu. Press UP or DOWN to select DISPLAY.

D Press M.FOCUS to select OFF. Press MENU twice to exit.
Indications are restored the next time Camcorder is turned on.

For Your Information
33
Viewfinder/LCD Monitor Indications
CAMERA/VCR mode

1 Zoom Magnification level (pages 24, 29).
2 Battery Remaining (page 32).
"WARNING LOW BATTERY" appears and Camcorder shuts off after 15 seconds.
3 Tape Remaining (page 32)
“◆◆” flashes and “TAPE END” appears for 5 seconds when:
• End of tape is reached.
“☑ashes for 1 minute and “CHECK TAPE” appears for 5 seconds when;
- RECORD/PAUSE is pressed with no cassette, or cassette has no record tab in Camera (RECORD) mode.
- PLAY, FF or REW is pressed with no cassette inserted in VCR mode.
4 10-Second Reminder
Each time a recording is started, a 10 second incremental display (up to 59:50) lets you monitor how long one scene is recorded.

5 TAPE SPEED (pages 12, 18).
(SP=standard play, SLP=super long play).
6 Digital E.I.S. (page 30).
7 Digital Zoom (page 29).
8 VCR-MODE
"VCR-MODE" appears for 1 minute when POWER is set to VCR or if RECORD/PAUSE is pressed in VCR mode.
9 DEW
If moisture condensation occurs in unit, "WARNING DEW DETECTED" appears, and Camcorder will shut off in 15 seconds. Wait until "WARNING" no longer indicates when Camcorder is turned on to use.
10 MotionSensor (page 31).
11 Date and Time (pages 15, 16).
12 Operating Mode
• REC (record) • PAUSE
- FF (fast forward) - PLAY
- REW (rewind)
13 Backlight (page 24).
14 Manual Focus (page 25).
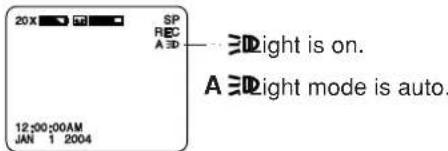
15 Light ON/OFF/AUTO (page 17).
16 High Speed Shutter (page 26).
17 Fade (page 27).
18 Color Digital Fade (page 28).
34
For assistance, please call : 1-800-211-PANA(7262) or, contact us via the web at:http://www.panasonic.com/contactinfo
Notes On Operations
Notice
This product has a fluorescent lamp that contains a small amount of mercury. It also contains lead in some components. Disposal of these materials may be regulated in your community due to environmental considerations. For disposal or recycling information please contact your local authorities, or the Electronics Industries Alliance: http://www.eiae.org.
U.S.A. CONSUMERS: ATTENTION :

A nickel cadmium battery that is recyclable powers the product you have purchased. At the end of its useful life, under various state and local laws, it is illegal to dispose of this battery into your municipal waste stream. Please call 1-800-8-BATTERY for information on how to recycle this battery.
or
U.S.A. CONSUMERS: ATTENTION :

A nickel metal hydride battery that is recyclable powers the product you have purchased. Please call 1-800-8-BATTERY for information on how to recycle this battery.
Replacing Clock Battery
The clock battery is pre-installed. Follow the steps below if replacement becomes necessary.
WARNING
- Replace Battery with Panasonic or LIXING type CR2025 only. Use of another battery may present a risk of fire or explosion.
•Battery may explode if mistreated. - As with any small object, this type of Battery can be swallowed by young children. Do not allow children to handle this Battery.
CAUTION
- Dispose of used battery promptly.
- Do not recharge, disassemble or dispose of in fire.
Clock Battery
Tripod Mounting Hole

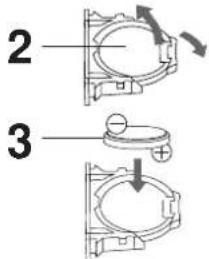
1 While pinching the 2 tabs, pull Battery Tray out.
2 Bend middle tab out and remove Battery.
3 Snap new Battery ( mark down) into Battery Tray.
- Do not reverse the polarity.
4 Insert Battery Tray so the triangle marks meet.
Note:
- Improper installation, discharge, or missing battery causes "PLEASE CHECK CLOCK BATTERY" to appear.
- Battery life is approximately 5 years.
Palmcorder Accessory System
To order instructions, see the Accessory Order Form page.
- The listed standard battery use times are based on continuous recording using this Palmcorder.
| Accessory # Figure Description Price | |||
| PV-A20 |  | AC Adaptor with DC Power Cable (Charging of the Nickel Cadmium Battery or Nickel Metal Hydride Battery) | Call For Pricing |
| HHR-V60A/1B |  | Up to 6 hr Battery Pack (Rechargeable Nickel 119.95 Metal Hydride Battery) | |
| HHR-V40A/1B (Recharge) |  69.95 69.95 | Up to 4 hr Battery Pack Metal Hydride Battery) | |
| HHR-V20A/1B (Recharge) |  59.95 59.95 | Up to 2 hr Battery Pack Metal Hydride Battery) | |
| PV-AA6 "AA" Battery Ca: |  | ||
| PV-C16 Car Battery C |  | ||
| PV-P1 VHS PlayPak | 39  | ||
| PV-H18A Carrying Case |  | ||
Note:
- Prices subject to change without notice.
Palmcorder Accessory Order Form
Please photocopy this form when placing an order.
-
Palmcorder Model # ____
-
Items Ordered
| QuantityAccessory | TotalPriceEach | |||
Description
Subtotal
Your State & Local Sales Tax
Shipping & Handling
6.95
Total Enclosed
- Method of payment (check one)
☐ Check or Money Order enclosed (NO C.O.D.SHIPMENTS)
□ VISA Credit Card #
□ MasterCard Expiration Date ____
☐ Discover Customer Signature
Make Check or Money Order to: PANASONIC ACCESSORIES
(Please do not send cash)
- Shipping information (UPS delivery requires complete street address)
Ship To:
Mr.
Mrs.
Ms.
First Last
Phone #:
Day ( )
Street Address
Night ( )
City State Zip
TO OBTAIN ANY OF OUR PALMCORDER ACCESSORIES YOU CAN DO ANY OF THE FOLLOWING:
20421 84th Avenue South Kent, WA. 98032
38
For assistance, please call : 1-800-211-PANA(7262) or, contact us via the web at:http://www.panasonic.com/contactinfo
Specifications
Power Source: Compact VHS Camcorder: DC 6 V
AC Adaptor: 110/120/220/240 V AC, 50/60 Hz
Battery: Nickel-Metal Hydride Type DC 6 V
/ Nickel-Cadmium Type DC 6 V (PV-L354)
Nickel-Cadmium Type DC 6 V (PV-L454)
Power Consumption: Compact VHS Camcorder: 6V DC 8.5 W (Max. 11.5 W)
AC Adaptor: 19 W
1.2 W (when not in use.)
Video Signal: EIA Standard (525 lines, 60 fields) NTSC color signal
Video Recording System: 2 rotary heads plus flying erase head
Helical scanning system
Audio: 1 track
Pick-Up System: Sequential color difference field reverse system
Pick-Up Device: One integral color filter Charge Coupled Device (CCD)
Lens: 20:1 zoom lens, F1:1.7 with auto iris control
Focal length: 2.8 mm - 56.0 mm
4 speed power zoom function
Viewfinder: 8.4 mm (0.33 inch) Electronic Viewfinder (PV-L354)
8.4 mm (0.33 inch)
Liquid Crystal Color Electronic Viewfinder (PV-L454)
LCD Monitor: 63.5 mm (2.5 inch) Liquid Crystal Display
Minimum Illumination Required: 1.6 lx (F1:1.7) 0.16 footcandles
Operating Temperature: 0 °C\~40 °C (32 °F\~104 °F)
Operating Humidity: 10%\~75%
Weight: Compact VHS Camcorder: 0.874 kg / 1.93 lbs. (PV-L354)
0.89 kg / 1.96 lbs. (PV-L454)
AC Adaptor: 0.3 kg
0.66 lbs.
Dimensions: Compact VHS Camcorder:
87.2 (W) × 123 (H) × 226 (D) mm
3-3/8 (W) × 4-7/8 (H) × 8-7/8 (D) inch
AC Adaptor:
Weight and dimensions shown are approximate.
Designs and specifications are subject to change without notice.
Before Requesting Service
If a problem arises, you may be able to correct it yourself. See Symptom and Correction list below.
| CorrectionSymptom | |
| No picture in EVF or LCD monitor ... | Connect Power Source. (pp. 10, 11)Set POWER to VCR or CAMERA. (pp. 18, 21)Check for Dew Indication. (p. 34)Use fully charged Battery. (p. 10)Firmly connect all needed cables. (p. 11) |
| Video cassette cannot be inserted ... | Connect Power Source. (pp. 10, 11)Insert cassette, window side facing out. (p. 12) |
| Video cassette cannot be removed ... | Connect Power Source. (pp. 10, 11) |
| Operation buttons do not work ... | Check for Dew Indication. (p. 34) |
| Recording cannot be done ... | Make sure record tab is intact. (p. 12)Check Battery Indicator. (p. 32)Check for Dew Indication. (p. 34) |
| Auto Focus does not operate ... | Set FOCUS to AUTO. (p. 25)Set POWER to CAMERA. (p. 18) |
| Sound from microphone can't be monitored ... | Set unit to REC or Record/Pause mode. |
| Camera picture is too dark ... | Set HIGH SPEED SHUTTER to AUTO. (p. 26) |
| No playback picture, or the playback picture is noisy or contains streaks ... | Press UP/DOWN button during playback(Tracking Control). (p.21) |
| “Panasonic ITS TAPES CAN PLAY IN YOUR VCR ...” appears in EVF or LCD Monitor ... | Set POWER to CAMERA, then set SELF DEMO :OFF in MENU screen to cancel Demo mode. (p. 8) |
| Top of playback picture waves back and forth excessively ... | A playback signal is not as stable as an off the air TV signal, so the top of your TV screen may appear bent or unstable during playback. This is called, “Horizontal AFC time constant change.” To correct, slowly turn the TV horizontal hold control.If your TV does not have this control, or adjusting it does not help, contact your TV service center.(Some nominal service charges may be required.) |
Video Head Cleaning

Clogged Video Head
While head cleaning is normally not needed, playing old or damaged tapes may clog the heads. When playback picture resembles example at the left, head cleaning is required.
Ideally, head cleaning should be performed by a qualified service technician. When this is not possible, purchase a head cleaning cassette. Be sure to follow cleaning cassette instructions exactly and only use when symptoms occur.
For assistance, please call : 1-800-211-PANA(7262) or, contact us via the web at:http://www.panasonic.com/contactinfo
Request for Service Notice
Please photocopy this form when making a request for service notice.
Request for Service Notice:
In the unlikely event this product needs service.
- Please include your proof of purchase (Failure to do so will delay your repair.)
• To further speed your repair please provide an explanation of what is wrong with the unit and any symptom it is exhibiting.
Mail this completed form and your Proof of Purchase along with your unit to:
Panasonic Services Company
1705 N. Randall Road
Elgin, IL. 60123-7847
Attn: Camcorder Repair
Limited Warranty
PANASONIC CONSUMER ELECTRONICS COMPANY, DIVISION OF MATSUSHITA ELECTRIC
CORPORATION OF AMERICA
One Panasonic Way Secaucus, New Jersey 07094
PANASONIC SALES COMPANY, DIVISION OF MATSUSHITA ELECTRIC OF PUERTO RICO, INC.,
AVE. 65 de Infantería, Km. 9.5 San Gabriel Industrial Park, Carolina, Puerto Rico 00985
Panasonic/Quasar Video Products Limited Warranty
Limited Warranty Coverage
If your product does not work properly because of a defect in materials or workmanship, Panasonic Consumer Electronics Company or Panasonic Sales Company (collectively referred to as "the warrantor") will, for the length of the period indicated on the chart below, which starts with the date of original purchase ("warranty period"), at its option either (a) repair your product with new or refurbished parts, or (b) replace it with a new or a refurbished product. The decision to repair or replace will be made by the warrantor.
| Product | Parts | Labor | Service | Contact Number |
| Camcorder | One (1) Year (except CCD Image Sensor)CCD Image Sensor - 6 (Six) Months | Ninety (90) DaysNinety (90) Days | Carry-In or Mail-In | 1-800-211-PANA(7262) |
| DVD/VCR Deck,A/V Mixer | One (1) Year | Ninety (90) Days | Carry-In or Mail-In | 1-800-211-PANA(7262) |
| TV/VCR, TV/DVD,TV/DVD/VCRCombination | One (1) Year (except CRT)CRT - Two (2) Years | Ninety (90) DaysNinety (90) Days | Carry-In: 21" CRT and SmallerIn-Home or Carry-In: 22"CRT and Larger | 1-800-211-PANA(7262) |
| TV/HDRCombination | One (1) Year (except CRT)CRT - Two (2) Years | Ninety (90) DaysNinety (90) Days | In-Home or Carry-In | 1-888-843-9788 |
| RechargeableBatteries(in exchange for defective item) | Ten (10) Days | Not Applicable | Carry-In or Mail-In | 1-800-211-PANA(7262) |
| Tape(in exchange for defective item) | Five (5) Days | Not Applicable | Carry-In or Mail-In | 1-800-211-PANA(7262) |
| Memory Cards(in exchange for defective item) | Ninety (90) Days | Not Applicable | Carry-In or Mail-In | 1-800-211-PANA(7262) |
During the "Labor" warranty period there will be no charge for labor. During the "Parts" warranty period, there will be no charge for parts. You must carry-in or mail-in your product or arrange for in-home service, as applicable, during the warranty period. If non-rechargeable batteries are included, they are not warranted. This warranty only applies to products purchased and serviced in the United States or Puerto Rico. This warranty is extended only to the original purchaser of a new product which was not sold "as is". A purchase receipt or other proof of the original purchase date is required for warranty service.
Carry-In, Mail-in or In-Home Service
For Carry-In, Mail-In or In-Home Service (as applicable) in the United States call toll free contact number listed above or visit Panasonic Web Site: http://www.panasonic.com
For assistance in Puerto Rico call Panasonic Sales Company (787)-750-4300 or fax (787)-768-2910.
In-Home service, if applicable, requires clear, complete and easy access to the product by the authorized servicer and does not include removal or re-installation of an installed product. It is possible that certain in-home repairs will not be completed in-home, but will require that the product, or parts of the product, be removed for shop diagnosis and/or repair and then returned.
Limited Warranty Limits And Exclusions
This warranty ONLY COVERS failures due to defects in materials or workmanship, and DOES NOT COVER normal wear and tear or cosmetic damage, nor does it cover markings or retained images on the picture tube resulting from viewing fixed images (including, among other things, letterbox pictures on standard 4:3 screen TV's, or non-expanded standard 4:3 pictures on wide screen TV's, or onscreen data in a stationary and fixed location). The warranty ALSO DOES NOT COVER damages which occurred in shipment, or failures which are caused by products not supplied by the warrantor, or failures which result from accidents, misuse, abuse, neglect, mishandling, misapplication, alteration, faulty installation, set-up adjustments, misadjustment of consumer controls, improper maintenance, power line surge, lightning damage, modification, or commercial use (such as in a hotel, office, restaurant, or other business), rental use of the product, service by anyone other than a Factory Servicenter or other Authorized Servicer, or damage that is attributable to acts of God.
THERE ARE NO EXPRESS WARRANTIES EXCEPT AS LISTED UNDER "LIMITED WARRANTY COVERAGE". THE WARRANTYOR IS NOT LIABLE FOR INCIDENTAL OR CONSEQUENTIAL DAMAGES RESULTING FROM THE USE OF THIS PRODUCT, OR ARISING OUT OF ANY BREACH OF THIS WARRANTY. (As examples, this excludes damages for lost time, cost of having someone remove or re-install an installed unit if applicable, or travel to and from the servicer, loss of media or images, data or other memory or recorded content. The items listed are not exclusive, but are for illustration only.) ALL EXPRESS AND IMPLIED WARRANTIES, INCLUDING THE WARRANTY OF MERCHANTABILITY, ARE LIMITED TO THE PERIOD OF THE LIMITED WARRANTY.
Some states do not allow the exclusion or limitation of incidental or consequential damages, or limitations on how long an implied warranty lasts, so the exclusions may not apply to you.
This warranty gives you specific legal rights and you may also have other rights which vary from state to state. If a problem with this product develops during or after the warranty period, you may contact your dealer or Servicenter. If the problem is not handled to your satisfaction, then write to the warrantor's Consumer Affairs Department at the addresses listed for the warrantor.
PARTS AND SERVICE (INCLUDING COST OF AN IN-HOME SERVICE CALL, WHERE APPLICABLE) WHICH ARE NOT COVERED BY THIS LIMITED WARRANTY ARE YOUR RESPONSIBILITY.
42
For assistance, please call : 1-800-211-PANA(7262) or, contact us via the web at:http://www.panasonic.com/contactinfo
Customer Services Directory
Obtain Product Information and Operating Assistance; locate your nearest Dealer or Servicenter; purchase Parts and Accessories; or make Customer Service and Literature requests by visiting our Web Site at:
http://www.panasonic.com/support
or, contact us via the web at:
http://www.panasonic.com/contactinfo
You may also contact us directly at:
1-800-211-PANA (7262),
Monday-Friday 9 am-9 pm; Saturday-Sunday 10 am-7 pm, EST.
For hearing or speech impaired TTY users, TTY : 1-877-833-8855
Accessory Purchases
Purchase Parts, Accessories and Instruction Books online for all Panasonic Products by visiting our Web Site at:
http://www.pasc.panasonic.com
or, send your request by E-mail to: npcparts@panasonic.com
You may also contact us directly at:
1-800-332-5368 (Phone) 1-800-237-9080 (Fax Only) (Monday-Friday 9 am to 8 pm, EST.)
Panasonic Services Company
20421 84th Avenue South,
Kent, WA 98032
(We Accept Visa, MasterCard, Discover Card, American Express, and Personal Checks)
For hearing or speech impaired TTY users, TTY : 1-866-605-1277
Product Repairs
Centralized Factory Servicenter
MAIL TO :
Panasonic Services Company
1705 N. Randall Road,
Elgin, IL 60123-7847
Attention: Camcorder Repair
Please carefully pack and ship, prepaid and insured, to the Elgin Centralized Factory Servicenter.
Customer's in Puerto Rico, please ship or carry in to location below ("Service in Puerto Rico").
Service in Puerto Rico
Matsushita Electric of Puerto Rico, Inc. Panasonic Sales Company
Factory Servicenter:
Accessories (Optional) ... 37
Accessories (Supplied) .... 2
AccuBrite™ Built-in Light 17
Audio/Video Cable ... 22, 23
Audio/Video Out ..... 22, 23
Auto Daylight Saving Time 16
B
Backlight.... 24
BACK LIGHT Button ..... 24
Battery Pack 10, 11
BATTERY RELEASE Button .... 10
Before Requesting Service 40
Built-in Microphone ..... 18
C
Camera Recording ... 18\~20
Car Battery Cord ...... 11
Cassette Information ..... 12
Charging Battery 10
Clock Battery 36
Clock Set 15, 16
Copying your Tapes ..... 23
Customer Services Directory 43
D
DC IN 11
DC Power Cable 11
Digital E.I.S. 30
Digital Zoom 29
Display-off Mode ...... 33
E
EIS Button 30
F
Fade 27, 28
FADE Button ...... 27, 28
FAST FORWARD/ SEARCH Button ...... 21
Focus 25
H
Hand Strap 13
High Speed Shutter ..... 26
L
LANGUAGE 7
LCD BRIGHT 18
LCD Monitor 18, 21
LCD-OPEN Button ... 18, 21
Lens Cap 13
LIGHT Switch 17
Limited Warranty 42
M
MENU Button 14
MENU Mode...... 14
M.FOCUS Button
14, 21, 25
MotionSensor 31
P
PLAY/ STILL Button ...... 21
Playback.... 21, 22
PlayPak (Optional) ...... 22
Power Supply 10, 11
POWER Switch .... 8, 18, 21
POWER ZOOM Button
24, 25, 29
Programmed Recording . 20
Q
Quick Operation Guide .... 9
R
RECORD/PAUSE Button
18
Record/Playback Time ... 12
Replacing Clock Battery . 36
Request for Service Notice
41
REWIND/SEARCH
Button 21
S
Safety Precautions ...... 3
Self Demo Mode 8
Shoulder Strap 13
Speaker 21
Special Effects ...... 21
Specifications 39
Still Picture 21
STOP Button 21
T
Tab 12
TAPE EJECT Switch
12
Tracking Control 21
Tripod Mounting Hole ..... 36
U
UP (FAR) / DOWN (NEAR)
Button ...... 14, 21, 25
V
VHF Connecting Cable .. 23
Video Cassettes (tapes) . 12
Video Head Cleaning ..... 40
Viewfinder/LCD Monitor
Indications ...... 32\~34
Viewing (TV/VCR) ...... 22
VISION ADJUSTMENT .. 18
VOLUME 21
Z
Zoom 24, 29
Panasonic Consumer Electronics Company,
Division of Matsushita Electric Corporation of America
One Panasonic Way Secaucus, New Jersey 07094
Panasonic Sales Company ("PSC"),
Division of Matsushita Electric of Puerto Rico, Inc.
Ave. 65 de Infanteria, Km. 9.5 San Gabriel Industrial Park Carolina,
Puerto Rico 00985

Printed in Indonesia
LSQT0753 A
S1203-1064
Palmcorder® Camcorder
VHSC
Panasonic®
Videocámara
natural_image
Illustration of a Panasonic video camera with lens and control panel (no text or symbols on body)natural_image
Line drawing of a portable electronic device connected to a power outlet (no text or symbols)Carga de la batería
natural_image
Technical line drawing of a mechanical device with directional arrows indicating components (no text or symbols)Inserte el cassette
natural_image
Line drawing of a digital camera with attached cable and lens (no text or symbols)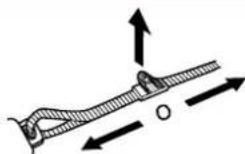
natural_image
Line drawing of a vintage camera with lens and base mount (no text or symbols)1
20421 84th Avenue South Kent, WA. 98032
Panasonic Services Company
1705 N. Randall Road
Elgin, IL. 60123-7847
20421 84th Avenue South, Kent, WA 98032
(Aceptamos tarjetas de crédito Visa, MasterCard, Discover Card o American Express, y cheques personales)
Panasonic Services Company
1705 N. Randall Road,
Elgin, IL 60123-7847
LCD (LCD-OPEN) ..... 18, 21
(POWER ZOOM) .... 24, 25, 29
Botón EIS 30
C
Panasonic Consumer Electronics Company,
División de Matsuchita Electric Corporation Of America,
One Panasonic Way Secaucus, New Jersey 07094
Panasonic Sales Company ("PSC"),
Division of Matsushita Electric of Puerto Rico, Inc.
- Panasonic®
- Operating Instructions
- Things You Should Know
- Thank you for choosing Panasonic!
- Unpack your Camcorder
- Safety Precautions
- WARNING: TO PREVENT FIRE OR SHOCK HAZARD, DO NOT EXPOSE THIS EQUIPMENT TO RAIN OR MOISTURE.
- CAUTION
- Important Safeguards
- Precautions
- WARNING
- USE & LOCATION
- CARE
- Table of Contents
- Getting Started
- Basic Operation
- Special Features
- For your information
- Select OSD Language
- Before you begin...
- Note:
- Self Demo Mode
- To turn Self Demo back on:
- Quick Operation Guide
- Charging the Battery Pack
- Insert Cassette
- Camera Recording
- Playback using the LCD Monitor
- Supplying Power
- Using the Battery Pack
- Battery Refresh
- Battery Care
- Battery Life and Protection
- Cassette Information
- Erase Protection Tab
- Before Using
- Attaching Shoulder Strap
- Lens Cap
- Using MENU Mode
- Setting the Clock
- 1
- 2
- 3
- 4
- 3a Setting the Time Zone
- Note :
- 3b Auto Daylight Saving Time
- 3c Setting Date and Time
- AccuBrite™ Built-in Light
- Using the Light
- DANGER:
- Recording via EVF or LCD Monitor
- To adjust LCD BRIGHT
- Set POWER to CAMERA.
- 5
- 6
- 18
- Stand-by Quick Release
- Manual Easy Editing
- Easy Edit Stand-by
- Programmed Recording
- Press M.FOCUS.
- Press DOWN to select REC TIME.
- Press M.FOCUS
- Press RECORD/PAUSE
- Playing Back Recordings
- Tracking Control
- Auto Tracking
- Manual Tracking
- Playback on EVF or LCD Monitor
- Special Effects
- Quick Visual Search
- Search Speed
- During playback, press:
- Still Picture
- TV Playback or Viewing
- VCR Playback using PlayPak (Optional)
- Load Battery in PlayPak
- Insert VDSGsette in PlayPak
- Remove VU50sette
- Copying your Tapes (dubbing)
- Connections
- Monitor with your TV
- CAUTION:
- Four-Speed Power Zoom
- Backlight
- Auto Focus
- Manual Focus
- Use Manual Focus (MF) when :
- Macro Focus (close-ups)
- High Speed Shutter
- Auto Shutter
- Manual Selection
- Fade In:
- Press RECORD/PAUSE.
- Fade Out:
- Color Digital Fade
- Digital Zoom
- Digital Electronic Image Stabilization (E.I.S.)
- E.I.S. may not function during...
- MotionSensor
- MotionSensor may mistakenly start when:
- MotionSensor may not start when:
- Viewfinder/LCD Monitor Indications
- Recording the Date and Time
- Display-Off Mode
- Notes On Operations
- Notice
- U.S.A. CONSUMERS: ATTENTION :
- or
- Replacing Clock Battery
- Clock Battery
- Palmcorder Accessory System
- Palmcorder Accessory Order Form
- Specifications
- Before Requesting Service
- Video Head Cleaning
- Request for Service Notice
- Request for Service Notice:
- Limited Warranty
- Panasonic/Quasar Video Products Limited Warranty
- Limited Warranty Coverage
- Carry-In, Mail-in or In-Home Service
- Limited Warranty Limits And Exclusions
- Customer Services Directory
- Accessory Purchases
- Product Repairs
- Centralized Factory Servicenter
- B
- C
- D
- E
- F
- H
- L
- M
- P
- Q
- R
- S
- T
- U
- V
- Z
- Carga de la batería
- Inserte el cassette
Brand : PANASONIC
Model : Palmcorder PV-L454
Category : Camcorder