RGOECGFM - Uncategorized R-Go Tools - Free user manual and instructions
Find the device manual for free RGOECGFM R-Go Tools in PDF.

| Product Type | Ergonomic Vertical Mouse |
| Brand | R-Go Tools |
| Model | RGOECGFM |
| Connection Type | Wireless (2.4 GHz USB Receiver) |
| Sensor Technology | Optical |
| Resolution (DPI) | 800 / 1200 / 1600 / 2400 |
| Number of Buttons | 6 (Left, Right, Scroll Wheel, DPI Switch, Forward, Back) |
| Ergonomic Design | Vertical grip for neutral wrist position |
| Dimensions (L x W x H) | Approx. 110 x 70 x 75 mm |
| Weight | Approx. 120 g (including battery) |
| Power Source | Built-in rechargeable lithium-ion battery (500 mAh) |
| Charging Interface | USB-C |
| Battery Life | Up to 4 weeks on full charge (typical use) |
| Compatible Operating Systems | Windows, macOS, Linux, Chrome OS |
| Maintenance & Cleaning | Clean with a soft, slightly damp cloth; avoid liquids entering the device |
| Safety Precautions | Do not disassemble, expose to heat, or use damaged charger |
| Spare Parts & Repairability | Replacement USB receiver and charging cable available; scroll wheel and switches not user-replaceable |
| Warranty | 2 years limited manufacturer warranty |
| Package Contents | Mouse, USB receiver, USB-C charging cable, user manual |
Frequently Asked Questions - RGOECGFM R-Go Tools
User questions about RGOECGFM R-Go Tools
0 question about this device. Answer the ones you know or ask your own.
Ask a new question about this device
Download the instructions for your Uncategorized in PDF format for free! Find your manual RGOECGFM - R-Go Tools and take your electronic device back in hand. On this page are published all the documents necessary for the use of your device. RGOECGFM by R-Go Tools.
USER MANUAL RGOECGFM R-Go Tools
text_image
GO FLEX Instructions steps 1-7 1 X 2 SIDE X 2 BRACESlide the plastic nuts into the slots in the Side and Brace sections. 1 nut in each Side and 2 in each Brace. If tight, simply press in from other side of panel.
natural_image
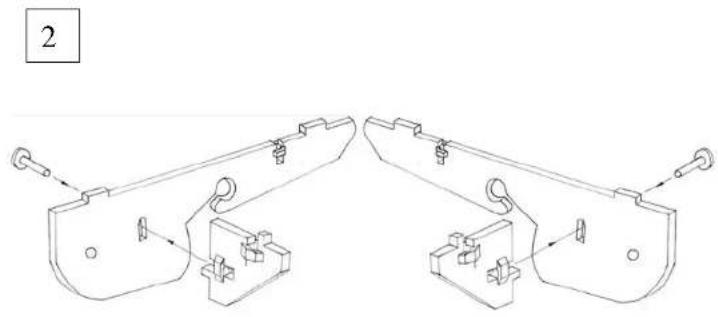
Technical line drawing of two mechanical bracket assemblies with mounting holes and internal components (no text or symbols)Secure the Brace sections to the Side sections as shown above with the thumb screws provided.

natural_image
Technical line drawing of a mechanical assembly with mounting brackets and a separate bracket (no text or symbols)Secure the Side/Brace assemblies to the underside of the main panel (Logo's are on the top side). Position the lugs into the slots and secure each side assembly with 2 screws.

natural_image
Technical line drawing of two mechanical components with mounting holes and a pull arrow indicating assembly (no text or symbols)Peel off the backing and secure the foam strip centrally along the front edge. 2 Small lines are positioned in the main panel to guide you.
TURN PAGE.
text_image
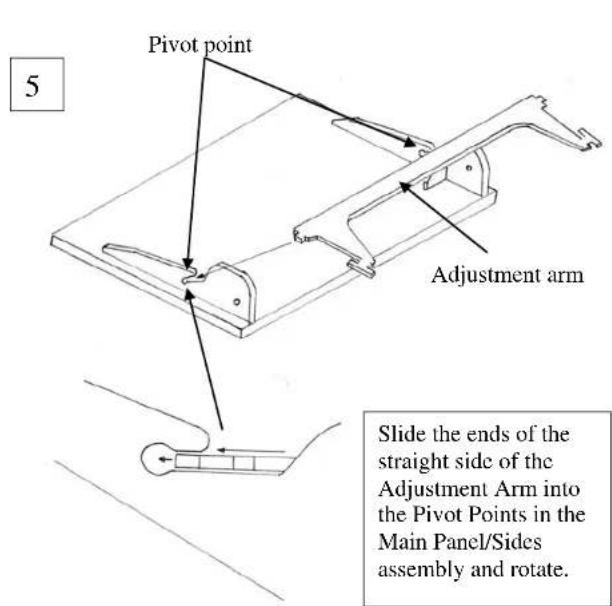
Pivot point Adjustment arm Slide the ends of the straight side of the Adjustment Arm into the Pivot Points in the Main Panel/Sides assembly and rotate.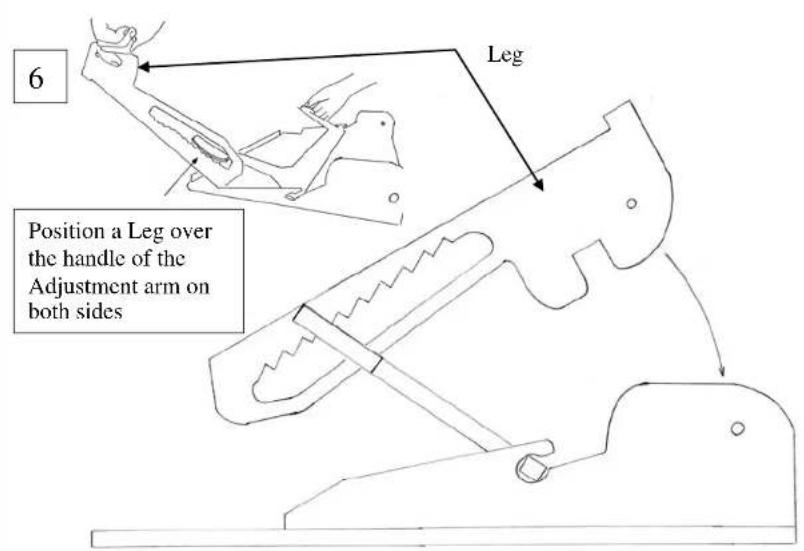
text_image
6 Leg Position a Leg over the handle of the Adjustment arm on both sides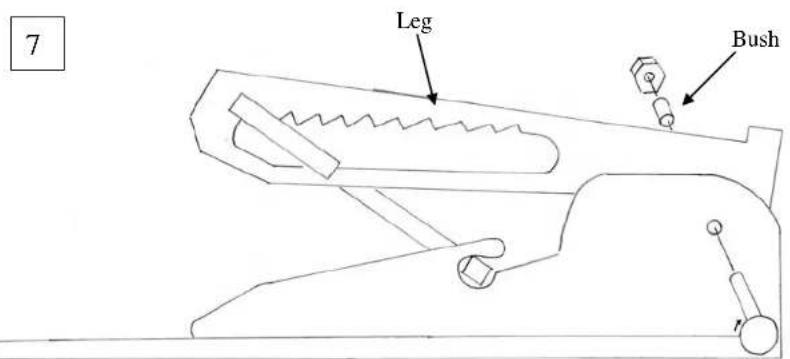
text_image
7 Leg BushPress the small cylindrical bush into the hole in the Leg, then secure the Leg to the Side assemblies (on the inside face) with the remaining Thumb Screws and Nuts.
Turn the unit over and enjoy from the ergonomic benefits of your Go Flex.
Parts list

X6 Thumb Screw

X2 bush

X6 Nut
You Tube assembly video: https://youtu.be/1VLyne6Fjb8
WARNING. Product contains small parts and not suitable for small children.