BG905X-F - Cooker Bellini - Free user manual and instructions
Find the device manual for free BG905X-F Bellini in PDF.


| Product Type | Freestanding Cooker |
| Fuel Type | Gas hob, Electric oven |
| Dimensions (H x W x D) | 850 x 600 x 600 mm |
| Weight | Approximately 50 kg |
| Power Supply | 230 V ~ 50 Hz, 2.5 kW (oven) |
| Number of Gas Burners | 4 |
| Oven Capacity | 65 liters |
| Oven Functions | Conventional heating, Grill, Defrost |
| Grill Type | Electric grill |
| Ignition | Automatic spark ignition |
| Safety Features | Flame failure device (gas burners), Automatic shut-off timer |
| Control Type | Rotary knobs (hob) + Push-button timer (oven) |
| Door Type | Drop-down door with window |
| Oven Light | Yes |
| Cleaning | Enamel interior, removable door for easy cleaning |
| Energy Class (Oven) | A |
| Spare Parts | Available through authorized service centers |
| Installation Requirements | Stand alone, requires gas connection (for hob) and electrical outlet (230 V) |
| Warranty | 2 years (standard) |
| Certification | CE, GS (if applicable) |
Frequently Asked Questions - BG905X-F Bellini
User questions about BG905X-F Bellini
0 question about this device. Answer the ones you know or ask your own.
Ask a new question about this device
Download the instructions for your Cooker in PDF format for free! Find your manual BG905X-F - Bellini and take your electronic device back in hand. On this page are published all the documents necessary for the use of your device. BG905X-F by Bellini.
USER MANUAL BG905X-F Bellini
natural_image
Front view of a stainless steel gas stove with five flanges and a central vent (no text or symbols visible)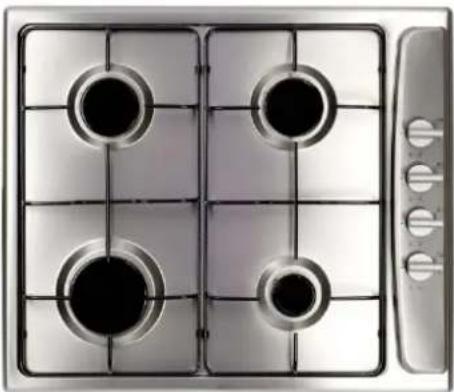
natural_image
Top-down view of a four-position gas stove with four vented lights (no text or symbols visible)60cm/90cm Built In Gas Cooktop
Model No.
CGH6401 Fineline: 5102031 Aust Only
CGH6401-F Only In Builders Pack BP270EG FINELINE: 5103595 Aus/NZ
BG905X Fineline: 5102304 Aust Only
BG905X-F Fineline: 266948 NZ Only
Thank you
Thank you for choosing Bellini Appliances.
Bellini prides itself on ‘affordable living’ making sure there is no compromise in your favourite room ... The Kitchen
All Bellini appliances carry a 3 year In Home warranty, be sure to retain your installation and user manual and receipt.
For all warranty and technical queries please contact
1300 373 199
Content
Safety instructions---- 2
Product description---- 4
Installation----5
Start using your appliance----8
Maintenance 16
Warranty---- 18
1. INTRODUCTION AND SAFETY WARNINGS
Congratulations on your investment in Bellini, quality stainless steel gas hotplates.
Please carefully read the following installation and operating instructions to ensure you get the safest operation from this appliance. All Bellini Appliances are for domestic use only.
These instructions apply only to the model BG905X - 5 burner models and the CGH6401-4 burner models, for use with Natural Gas or Universal LPG.
NOTE: Refer to gas type label and data plate label to ensure appliance is setup for the correct gas type. If in doubt, refer to gas supplier.
WARNINGS:
Do not use or store flammable materials in the appliance storage drawer or near this appliance.
Do not spray aerosols in the vicinity of this appliance while it is in operation.
- Do not modify this appliance.
- For Universal LPG appliance:- Where this appliance is installed in marine craft or caravans, it shall not be used as a space heater.
○ Disconnect electricity supply to the appliance before any servicing work is conducted.
This appliance is not intended for use by persons (including children) with reduced physical, sensory or mental capabilities, or lack of experience and knowledge, unless they have been given supervision or instruction concerning use of the appliance by a person responsible for their safety.
Children should be supervised to ensure that they do not play with the appliance.
- The appliance electrical supply must allow for disconnection after the installation of the appliance.
- Cord type Y – If the supply cord is damaged, it must be replaced by the manufacturer, its service agent or similarly qualified persons in order to avoid a hazard.
For future reference please store these instructions in a safe place.

DISPOSAL: Do not Dispose this product as unsorted municipal waste. Collection of such waste separately for special treatment is necessary.
By ensuring that this appliance is disposed of correctly, you will help prevent any possible damage to the environment and to human health, which might otherwise be caused if it were disposed of in the wrong way. The symbol indicates that it may not be treated as normal household waste. It should be taken to a collection point for the recycling of electrical and electronic goods. This appliance requires specialist waste disposal. For further information regarding the treatment, recovery and recycling of this product please contact your local council, your household waste disposal service, or the shop where you purchased it. For more detailed information about treatment, recovery and recycling of this product, please contact your local city office, your household waste disposal service or the shop where you purchased the product.
2. OPERATING INSTRUCTIONS
LIGHTING THE BURNER
The hotplates are fitted with mains powered electronic spark ignitors, so must be connected to mains power supply (i.e. nominal 230 V ac) to operate. If power is not available, the hotplate will still work but the burners will have to be lit with a match or similar.
Depressing the gas control knob of any burner will activate the spark ignition for all burners. To light the burner, turn the gas control knob to the High Flame setting of the burner to be lit, while at the same time depressing the gas control knob to activate the spark ignition.

natural_image
Sequence of five identical circular lanterns with candle and star symbols, arranged horizontally (no text or labels)A marking to each control knob, indicates which zone that it controls.
Once the burner is alight continue to depress the gas control knob for 5 – 10 seconds to allow the flame safeguard to activate. If when you release the gas control knob, the burner flame goes out the flame safeguard has not heated up enough so repeat the ignition procedure after waiting 1 minute for gas to disperse. If problems with burner lighting persist, refer to the TROUBLESHOOTING section of these instructions.
If power is not available, light a match or similar, then turn the gas control knob for the burner to be lit, to the High Flame setting. Once again if problems with burner lighting persist, refer to the TROUBLESHOOTING section of these instructions.
When burner lights, adjust desired flame height. On finishing, turn control knob to off position marked with a black DOT.
BURNER AND UTENSIL CHOICE
Depending on the hotplate model, the burner choices are:
Model CGH6401: Auxiliary (small), Semi-Rapid (medium), and Rapid (large) burners.
Model BG905X: Auxiliary (small), Semi-Rapid (medium), Rapid (large), and
Triple ring (wok) burners.
The maximum utensil (pan) diameters in millimetres (mm) for each burner are:
1. For Natural Gas hotplates
• Auxiliary (small) and Semi-Rapid (medium) = 195 mm
• Rapid (large) = 230 mm
• Triple ring (wok) = 270 mm
2. For Universal LPG hotplates
• Auxiliary (small), Semi-Rapid (medium) and Rapid (large) = 195 mm
• Triple ring (wok) = 230 mm
The minimum utensil (pan) diameters in millimetres (mm) for each burner are:
• Auxiliary (small) = 80 mm
• and Semi-Rapid (medium) = 140 mm
• Rapid (large) and Triple ring (wok) = 195 mm
For best efficiency and to ensure utensil handle does not overheat, place the utensil centrally on the burner and adjust the flame height so all the flame remains under the utensil.
3. CLEANING INSTRUCTIONS
GENERAL
Cleaning and maintenance should be carried out with the appliance cold especially when cleaning the enameled parts.
Avoid leaving alkaline or acid substances(lemon juice, vinegar etc.) on the surfaces.
STAINLESS STEEL
The stainless steel hob of the hotplate must be cleaned regularly (e.g. weekly) to ensure long life expectancy of the hotplate.
Ensure hotplate has cooled. Wash down with warm soapy water and rinse with clean water.
Dry with a clean soft cloth. A specialized stainless steel cleaning fluid may be used.
NOTE: Ensure that wiping is done along with the grain of the stainless steel to prevent any unsightly crisscross scratching patterns from appearing.
TRIVETS (UTENSIL SUPPORTS)
Enameled parts must only be washed with a sponge and soapy water or with non-abrasive products. Rinse with clean water. Dry with a clean soft cloth.
BURNERS
Remove trivets from hob. Ensure burners are cool. Remove the burners enameled cap (C) and aluminum burner crown (F).
Wash down with warm soapy water and rinse with clean water. Dry with a clean soft cloth.
Replace burners and ensure they are correctly re-positioned over the ignitor (S) and thermocouple (T). The ignitor (S) must be clean for trouble free sparking. Test burner ignition and burner flame for correct operation.
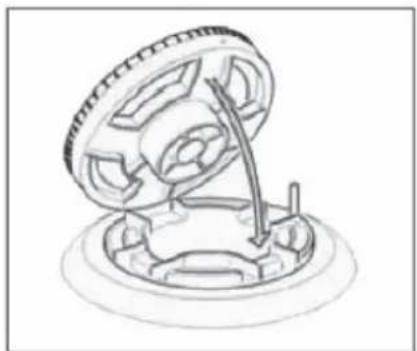
The Triple Ring (Wok) burner (diagrams below) does not fit over the ignitor or thermocouple but must be placed on its supports. If burner is placed correctly it will not rotate on its supports.

Refer to diagrams below.
natural_image
Mechanical assembly diagram showing a gear and rotor assembly with a directional arrow (no text or labels)
4. TROUBLESHOOTING
Servicing of the hotplates must only be done by an authorised service representative (see back of this booklet) and the hotplate must not be modified. Power must be disconnected before any servicing or maintenance is conducted.
Abnormal conditions include: Excessively yellow or sooting flame type.
: Flame lifting off the burner ports.
: Flame lighting back into the burner (normally associated with a popping sound).
: Objectionable odour of the flames combustion products.
Should a faulty condition develop in the hotplate that is not described above, refer to the following table first for possible causes and remedies prior to contacting an authorised service representative. Servicing beyond the remedies listed shall only be undertaken by an authorised service representative.
TROUBLESHOOTING TABLE
| FAULT | POSSIBLE CAUSE | REMEDY |
| No spark when gas control knob depressed. | No power. | Check plugged in and switched on. Check mains circuit breaker. |
| Loose sparker cable. | Call authorised representative. | |
| Burner not aligned properly. | Remove and re-fit burner. | |
| Burner not lighting when spark ignition working. | Gas supply off. | Check gas supply valve on. |
| Burner not aligned properly. | Remove and re-fit burner. | |
| Burner ports blocked. | Remove, clean and replace burner. | |
| Burner goes out when control knob released. | Flame safeguard not activated. | Re-light, allow more time for flame safeguard to activate. |
| Flame safeguard faulty connection or broken. | Call authorised representative. | |
| Uneven flame pattern or slight flame lifting. | Burner ports blocked. | Remove, clean and replace burner. |
| At minimum flame setting the flame is too high. | Turndown control setting incorrect. | Call authorised representative. |
| Small flame on High setting. | Regulator faulty. | Call authorised representative. |
| Gas supply pressure low. | Call authorised representative. | |
| Incorrect injector fitted. | Call authorised representative. | |
| Blocked injector or gas supply tube. | Call authorised representative. | |
| Incorrect utensil size. | Refer to operating instructions - utensil choice. | |
| Flame too high on High setting. | Regulator faulty. | Call authorised representative. |
| Incorrect injector fitted. | Call authorised representative. | |
| Incorrect utensil size. | Refer to operating instructions - utensil choice. |
5. INSTALLATION
IMPORTANT NOTE: Refer to the Warnings in Section 1 of these Instructions.
This hotplate must be installed in accordance with:
• AS 5601 - Gas Installations (for Australia)
- NZS 5261 – Code of Practice for the Installation of Gas Burning Appliances and Equipment (for New Zealand)
• Local gas fitting regulations
• AS/NZS 3000 – Electrical Installations (Wiring Rules)
• Building codes
• Any other relevant statutory regulations.
Check the gas type label on the underside of the hotplate, adjacent to the gas connection to ensure it corresponds to the installation gas supply. If in doubt contact the supply authority.
NOTE: Before cutting into any bench tops, ensure the minimum clearances to walls, adjacent surfaces and overhead surfaces required by the relevant gas appliance installation code (see above) will comply. Dimensions are specified in millimetres (mm)
MINIMUM CLEARANCES:
• Overhead cupboards and range hood = 600 mm.
• Side and rear clearance = 200 mm to any burner edge.
• Overhead exhaust/ceiling fan = 750 mm
• Horizontal surfaces adjacent the hob = less than or equal to the hob height.
- Ensure there is sufficient clearance to fit the regulator and/or flexible hose connection with the hotplate in the installed position.
GAS and ELECTRICAL CONNECTION LOCATIONS and OVERALL DIMENSIONS:
Model CGH6401: Bench cutout size, 555 mm wide x 473 mm deep. Bench top thickness, 30 - 40 mm (3 - 4 cm).

Model BG905X: Bench cutout size, 830 mm wide x 472 mm deep. Bench top thickness, 30 - 40 mm (3 - 4 cm).

Once satisfied that minimum clearances to combustible can be achieved, cut out the bench top to the dimensions specified.
Apply the adhesive sealing tape to the underside lip of the burner box. Shown at G opposite.
Place burner box into cutout hole and fit clamping brackets to clamp the hotplate to the bench.
See two clamping method diagrams below:


Then a particle board or similar heat baffle must be installed under the hob to prevent accidental touching of the underside surface.
Leave sufficient rear clearance to access gas and electrical connections.
ELECTRICAL CONNECTION:
Install a 10 amp general purpose outlet (GPO) in accordance with relevant electrical standards and/or codes of practice applicable.
The power supply cord (supplied) must not touch against any hot surfaces and must be placed so that its temperature does not exceed 75^ C at any point along its length.
After having installed the hotplate, the GPO must always be in an accessible position.

GAS CONNECTION:
Install in accordance with relevant gas standards and/or codes of practice applicable.
Connect the elbow fitting to the appliance gas manifold connection.
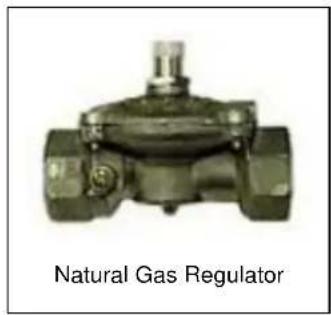
For Natural gas: connect the natural gas appliance regulator (pictured opposite) with integral test point using approved gas thread tape or compound to the elbow fitting.
For Universal LPG: connect the brass test point adaptor (pictured opposite) using approved gas thread tape or compound to the elbow fitting.
Ensure the supply connection point, test point and natural gas regulator adjustment screw (for Natural gas installation) are accessible for testing and/or adjustment with the hotplate in the installed position.
Where a flexible hose assembly is used, ensure it is approved to AS/NZS 1869, Class B. Any hose assembly used must be restrained from accidental contact with the flue outlet of an under bench oven.
natural_image
Illustration of a Natural Gas Regulator valve (no text or symbols on the device itself)
After connecting to gas, check for leaks using soapy solution, never a naked flame.
Fit the duplicate data plate (supplied in separate bag) on a surface adjacent to the hotplate, for example, the inside of the cupboard door so it is clearly visible for any service technician.
SETTING THE GAS PRESSURE:
Fit a manometer with a 6 mm rubber hose to the test point on the regulator (for natural gas).
For the Model CGH6401, light one Rapid and Auxiliary burner and adjust test point pressure to 1.00 kPa. Turn the two burners off and on again and recheck the pressure is same as set previously or adjust as required.
For the Model BG905X, light the Triple Ring and Auxiliary burner and adjust test point pressure to 1.00 kPa. Turn the two burners off and on again and recheck the pressure is same as set previously or adjust as required.
TEST FOR CORRECT OPERATION:
After installation and test point setting, each burner ignition and operation must be tested individually and with all burners operating.
This testing must be done by the installer before leaving.
NOTE: This adjustment can only be performed by authorised service personnel.
The minimum burner flame is factory adjusted for the gas type stated on the gas type label adjacent to the gas connection and should not require adjustment.
Adjustment may be required if the hotplate has been converted from Natural gas to Universal LPG or vice versa.
GAS CONVERSION INSTRUCTIONS:
The manufacturers servicing instructions detail how authorised personnel may convert the hotplate from Natural gas to Universal LPG or from Universal LPG to Natural gas.
Contact the manufacturer or agent as required.
| Model CGH6401 | NATURAL GAS | UNIVERSAL LPG | ||||
| Inj Diam | MJ/h | Test point kPa | Inj Diam | MJ/h | Test point kPa | |
| Auxiliary | 0.90 4.0 | 1.00 | 0.55 | 4.0 | 2.75 | |
| Semi rapid | 1.10 6.0 | 1.00 | 0.70 | 6.4 | 2.75 | |
| Semi rapid | 1.10 6.0 | 1.00 | 0.70 | 6.4 | 2.75 | |
| Rapid | 1.35 10.0 | 1.00 | 0.90 | 11.0 | 2.75 | |
| TOTAL NHGC | 26.0 MJ/h | 27.8 MJ/h | ||||
| Model BG905X | NATURAL GAS | UNIVERSAL LPG | ||||
| Inj Diam | MJ/h | Test pointkPa | Inj Diam | MJ/h | Test point kPa | |
| Auxiliary | 0.90 4.0 | 1.00 | 0.55 | 4.0 | 2.75 | |
| Semi rapid | 1.10 6.0 | 1.00 | 0.70 | 6.4 | 2.75 | |
| Semi rapid | 1.10 6.0 | 0.70 | 0.70 | 6.4 | 2.75 | |
| Rapid | 1.35 10.0 | 1.00 | 0.90 | 11.0 | 2.75 | |
| Triple ring | 1.70 14.0 | 1.00 | 0.98 | 12.5 | 2.75 | |
| TOTAL NHGC | 40.0 MJ/h | 40.3 MJ/h | ||||
WARRANTY
1.1 In this warranty:
1.1.1 Australian Consumer Law means the law as set out in Schedule 2 of the Competition and Consumer Act 2010;
1.1.2 Company means GSM Sales Pty Ltd ABN 53 007 682 475 of 142-144 Fullarton Road, Rose Park SA 5067. Telephone 1300 373 199. Email admin@gsmsales.com.au;
1.1.3 Consumer means a “consumer” as that term is defined in Section 3 of the Australian Consumer Law as the original purchaser of a Belliniproduct;
1.1.4 Consumer Guarantees means the guarantees under the Australian Consumer Law;
1.1.5 You means the Consumer.
1.2 Nothing in this warranty affects any person's rights under the Australian Consumer Law. The benefits to any Consumer under this warranty are in addition to the rights and remedies available under any Consumer Guarantees.
1.3 Subject to the other clauses of this warranty, the Company warrants to the Consumer that the Bellini product will be free of manufacturing defects and will perform to the Company's specifications.
1.4 The benefit of this warranty extends only to the Consumer as original purchaser of a Bellini product which is installed in a domestic household area.
*The in Home warranty does not apply to Commercial and or industrial usage. * Please See 1.7.7 for additional information
1.5 This warranty commences on the date of purchase of the Bellini product by the Consumer and continues for the benefit only of the Consumer until the expiry of three (3) year (Warranty Period).
1.6 If within the Warranty Period a manufacturing defect is discovered in the Bellini product or it fails to perform to the Company's specifications as a result of some defect in materials, components or workmanship (Defect) then the Company will, at its option, repair the Bellini product or supply a replacement Bellini product free of charge. A replacement Bellini product may differ from the original product purchased by the Consumer.
1.7 This warranty will not apply to any Bellini product:
1.7.1 Installed by any person other than a qualified tradesperson; or
1.7.2 Subjected to misuse, neglect, negligence or accidental damage; or
1.7.3 Operated in any way contrary to any operating or maintenance instructions; or
1.7.4 Improperly handled, installed or maintained; or
1.7.5 Altered or modified prior to or after installation; or
1.7.6 Damaged directly or indirectly by power surges, electrical storm damage or connection to incorrect power supply
1.7.7 Industrial and or Commercial usage is inclusive of staff areas in office/shop environments, hotel/motel or other similar accommodation or rental type properties including Bed and Breakfast establishments.
The Australian Consumer Law requires the inclusion of the following
statement with this warranty:
Our goods come with guaranteed that cannot be excluded under the Australian Consumer Law. You are entitled to a replacement or refund for a major failure and for compensation for any other reasonably foreseeable loss or damage. You are also entitled to have the goods repaired or replaced if the goods fail to be of acceptable quality and the failure does not amount to a major failure.
IN ORDER TO MAKE A CLAIM UNDER THIS WARRANTY THE CONSUMER MUST CALL 1300 373 199 (AUSTRALIA) OR 0508 123 108
(NEW ZEALAND) TO CONNECT TO THE NEAREST AUTHORISED CENTRE
1.8 You must provide proof of your purchase of the Bellini product and the date of purchase in order to obtain the benefit of this warranty.
1.9 If you live outside the service area of the Company or one of its service agents, this warranty does not cover the cost of transport of the Bellini product for service nor the service agent's traveling costs to and from your home.
1.10 If you are required to transport the Bellini product to the Company or its service agent, you must ensure it is safely disconnected by a qualified tradesman and securely packed and insured. The Company does not accept any responsibility for loss or damage of the Bellini product prior to it being received by the Company or its service agent.
1.11 You will be responsible for all costs of returning a Bellini product to the Company and for redelivery of the Bellini product by the Company (whether it is the original or a repaired and/or a replacement Bellini product) and for any other expenses you incur in claiming under this warranty.
1.12 The Company or its service agent will examine any Bellini product and if the Company determines that it is defective through no fault of the Owner and is otherwise undamaged, the Company will repair or replace the Bellini product in accordance with this warranty.
DO NOT SEND IN THIS WARRANTY
Fill out the following details and file with your purchase invoice.
RETAIN & FILE WITH YOUR RECEIPT
Your Purchase Receipt/Invoice is proof of date of purchase. If you are unable to establish the date of purchase, or if the fault is not covered by this warranty, or if the product is found to be in working order, you will be required to bear all service call charges.
GSM Sales Pty Ltd reserves the right to discontinue items, modify designs and change specifications without incurring obligation.
Whilst every effort is made to ensure that descriptions, specifications and other information in this publication is correct, no warranty is given in respect thereof and the company shall not be liable for any errors therein.
Purchased from:
Co. Name:
Address:
Date of Purchase:
Serial number:
NOTE: Consistent with our continuing product development policy, improvements may have been made which render the contents of this packaging slightly different to that shown.
FOR WARRANTY SERVICE CALL 1300 373 199 (AUSTRALIA) OR 0508 123 108 (NEW ZEALAND) TO CONNECT YOU TO THE NEAREST AUTHORISED SERVICE CENTRE




- Thank you
- Content
- INTRODUCTION AND SAFETY WARNINGS
- WARNINGS:
- OPERATING INSTRUCTIONS
- LIGHTING THE BURNER
- BURNER AND UTENSIL CHOICE
- For Natural Gas hotplates
- For Universal LPG hotplates
- CLEANING INSTRUCTIONS
- GENERAL
- STAINLESS STEEL
- TRIVETS (UTENSIL SUPPORTS)
- BURNERS
- TROUBLESHOOTING
- INSTALLATION
- MINIMUM CLEARANCES:
- GAS and ELECTRICAL CONNECTION LOCATIONS and OVERALL DIMENSIONS:
- ELECTRICAL CONNECTION:
- GAS CONNECTION:
- SETTING THE GAS PRESSURE:
- TEST FOR CORRECT OPERATION:
- GAS CONVERSION INSTRUCTIONS:
- WARRANTY
- In this warranty:
- DO NOT SEND IN THIS WARRANTY
- RETAIN & FILE WITH YOUR RECEIPT
- FOR WARRANTY SERVICE CALL 1300 373 199 (AUSTRALIA) OR 0508 123 108 (NEW ZEALAND) TO CONNECT YOU TO THE NEAREST AUTHORISED SERVICE CENTRE
Brand : Bellini
Model : BG905X-F
Category : Cooker