
LT3718 - Television CHANGHONG - Free user manual and instructions
Find the device manual for free LT3718 CHANGHONG in PDF.


| Product Type | LCD Television |
| Brand | Changhong |
| Model | LT3718 |
| Screen Size | 37 inches (diagonal) |
| Display Resolution | 1366 x 768 pixels (HD Ready) |
| Aspect Ratio | 16:9 |
| Refresh Rate | 60 Hz |
| Brightness | 500 cd/m² |
| Contrast Ratio | 1500:1 (typical) |
| Viewing Angle | 178° / 178° |
| Audio Output | 2 x 10W speakers |
| HDMI Ports | 2 x HDMI |
| Component Video Input | 1 x YPbPr |
| Composite Video Input | 1 x AV |
| VGA Input | 1 x D-Sub (PC) |
| USB Port | 1 x USB 2.0 |
| Tuner | Analog & Digital (DVB-T) |
| Power Consumption (Typical) | 120 W |
| Standby Power Consumption | < 1 W |
| Power Supply | AC 100-240V, 50/60Hz |
| Dimensions (With Stand) | 906 x 580 x 240 mm |
| Weight (With Stand) | 14 kg |
| VESA Mount Pattern | 200 x 200 mm |
| Cleaning Instructions | Wipe with a soft, dry cloth. Do not use liquid or spray cleaners. |
| Safety Note | Place on stable surface. Ensure adequate ventilation. |
Frequently Asked Questions - LT3718 CHANGHONG
User questions about LT3718 CHANGHONG
0 question about this device. Answer the ones you know or ask your own.
Ask a new question about this device
Download the instructions for your Television in PDF format for free! Find your manual LT3718 - CHANGHONG and take your electronic device back in hand. On this page are published all the documents necessary for the use of your device. LT3718 by CHANGHONG.
USER MANUAL LT3718 CHANGHONG
LCD COLOR TELEVISION
LT2618
LT3218
LT3718
LT4018
OPERATION MANUAL
Please read this manual carefully before operation.
CONTENTS
IMPORTANT SAFETY INSTRUCTIONS....1
USING THE REMOTE CONTROL .... 3
BATTERIES FOR REMOTE CONTROL 3
PACKING LIST 4
GENERAL INTRODUCTION 4
BRIEF INTRODUCTION....6
REMOTE CONTROL....9
Overview of the Remote Control 9
TV Functions 10
INSTALLATION 11
GENERAL OPERATION....11
MENU OPERATION 12
FUNCTION INTRODUCTION 12
Using the Channel Setting Menu....12
Using the Picture Setting Menu 13
Using the Audio Setting Menu 14
Using the General Setting Menu ....15
Using the Timer Setting Menu 15
Using the Child Lock Setting Menu 16
Using the PC Setting Menu 17
OTHER FUNCTIONS INTRODUCTION 17
Standby Mode 17
Signal Switch 17
Channel Selection 17
Volume Control 18
Mute 18
Sound Mode Selection 18
Picture Mode Selection 18
Information Display....18
Sleep Function 18
Recall 19
Zoom Mode 19
Still....19
PIP/POP/PBP Function 19
TROUBLESHOOTING....20
SPECIFICATIONS 21
Note:
The OSD and illustration in this manual may be somewhat different from the actual situation.
Please take the LCD TV for standard.
Important Safety Instructions
Electrical energy can perform many useful functions, but it can also cause personal injuries and property damage if improperly handled. This product has been engineered and manufactured with the highest priority on safety. But IMPROPER USE CAN RESULT IN POTENTIAL ELECTRICAL SHOCK OR FIRE HAZARD. In order to prevent potential danger, please observe the following instructions when installing, operating and cleaning the product. To ensure your safety and prolong the service life of your LCD TV product, please read the following precautions carefully before using the product.
- Read these instructions---All operating instructions must be read and understood before the product is operated.
- Keep these instructions---These safety and operating instructions must be kept in a safe place for future reference.
- Heed all warnings--- All warnings on the product and in the instructions must be observed closely.
-
Follow all instructions---All operating instructions must be followed.
-
Attachments---Only use attachments/accessories specified by the manufacturer. Do not use attachments not recommended by the manufacturer. Use of improper attachments can result in accidents.
-
Power source---This product is intended to be supplied by a listed power supply indicated on the marking label. If you are not sure of the type of power supply to your home, consult your product dealer or local power company. For added protection for this product during a lightning storm, or when it is left unattended and unused for long periods of time, unplug it from the wall outlet and disconnect the cable system.
-
Power cord protection ---Protect the power cord from being walked on or pinched particularly at plugs, convenience receptacles, and the point where they exit from the apparatus.
-
Overloading---Do not overload wall outlets, extension cords, or convenience receptacles on other equipment as this can result in a risk of fire or electric shock.
-
Entering of objects and liquids---Never insert an object into the product through vents or openings. High voltage flows in the product, and inserting an object can cause electric shock and/or short internal parts. For the same reason, do not spill water or liquid on the product.
-
Servicing---Refer all servicing to qualified service personnel. Servicing is required when the apparatus has been damaged in any way, such as power-supply cord or plug is damaged, liquid has been spilled or objects have fallen into the apparatus, the apparatus has been exposed to rain or moisture, does not operate normally, or has been dropped.
-
Damage requiring service---If any of the following conditions occurs, unplug the power cord from the AC outlet, and request a qualified service person to perform repairs.
a. When the power cord or plug is damaged.
b. When a liquid is spilled on the product or when objects have fallen into the product.
c. When the product has been exposed to rain or water.
d. When the product does not operate properly as described in the operating instructions.
Do not touch the controls other than those described in the operating instructions. Improper adjustment of controls not described in the instructions can cause damage, which often requires extensive adjustment work by a qualified technician.
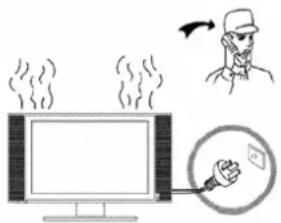
e. If the product has been dropped or the cabinet has been damaged in any way.
f. When the product displays an abnormal condition or exhibits a distinct change in performance. Any
noticeable abnormality in the product indicates that the product needs servicing.
-
Replacement parts---In case the product needs replacement parts, make sure that the service person uses replacement parts specified by the manufacturer, or those with the same characteristics and performance as the original parts. Use of unauthorized parts can result in fire, electric shock and/or other danger.
-
Safety checks---Upon completion of service or repair work, request the service technician to perform safety checks to ensure that the product is in proper operating condition.
-
Wall mounting---Be sure to install the product according to the method recommended by the manufacturer. This is a safety feature.
-
Stand---Use only with the cart, stand, tripod, bracket, or table specified by the manufacturer, or sold with the apparatus. Do not place the product on an unstable trolley, stand, tripod or table. Placing the product on an unstable base can cause the product to fall, resulting in serious personal injuries as well as damage to the product. When mounting the product on a wall, be sure to follow the manufacturer's instructions. Use only the mounting hardware recommended by the manufacturer.
-
Careful move---When a cart is used, use caution when moving the cart/apparatus combination to avoid injury from tip-over. Sudden stops, excessive force and uneven floor surfaces can cause the product to fall from the trolley.
-
Lightning---Unplug this apparatus during lightning storms or when unused for long periods of time.
For added protection for this television equipment during a lightning storm, or when it is left unattended and unused for long periods of time, unplug it from the wall outlet and disconnect the antenna. This will prevent damage to the equipment due to lightning and power-line surges.
- Do not use this apparatus near water---for example, near a bathtub, washbowl, kitchen sink, or laundry tub, in a wet basement, or near a swimming pool, and the like.
Do not use immediately after moving from a low temperature to high temperature environment, as this causes condensation, which may result in fire, electric shock, or other hazards.
-
Clean only with dry cloth---Unplug this product from the wall outlet before cleaning. Do not use liquid cleaners or aerosol cleaners. Use a damp cloth for cleaning.
-
Ventilation---Do not block any ventilation openings. Install in accordance with the manufacturer instructions. The vents and other openings in the cabinet are designed for ventilation. Do not cover or block these vents and openings since insufficient ventilation can cause overheating and/or shorten the life of the product. Do not place the product on a bed, sofa, rug or other similar surface, since they can block ventilation openings. This product is not designed for built-in installation; do not place the product in an enclosed place such as a bookcase or rack, unless proper ventilation is provided or the manufacturer's instructions are followed.
-
Heat sources---Do not install near any heat sources such as radiators, heat registers, stoves, or other apparatus (including amplifiers) that
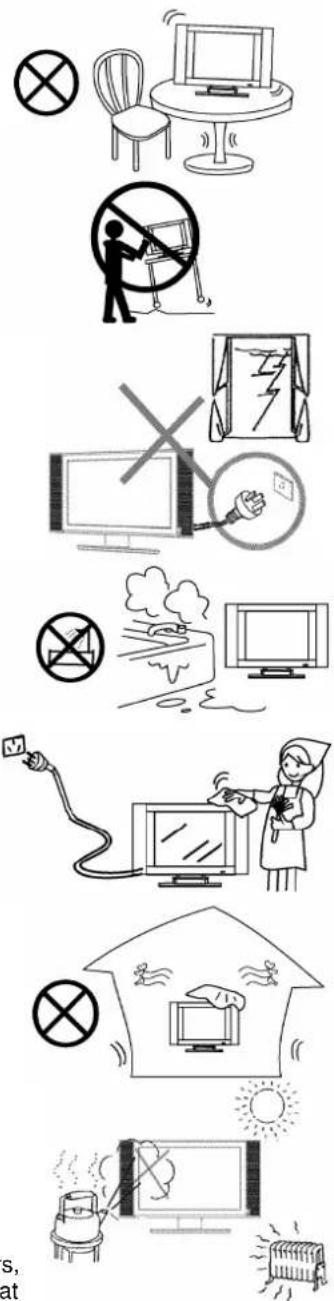
produce heat.
- Panel protection---The LCD panel used in this product is made of glass.
Therefore, it can break when the product is dropped or impacted upon by other objects. Be careful not to be injured by broken glass pieces in case the LCD panel breaks.

natural_image
Simple line drawing of a megaphone emitting sound waves toward a computer monitor (no text or symbols)- Pixel defect---The LCD panel is a very high technology product, giving you finely detailed pictures. Occasionally, a few non-active pixels may appear on the screen as a fixed point of blue, green or red. Please note that this does not affect the performance of your product.
Using the Remote Control
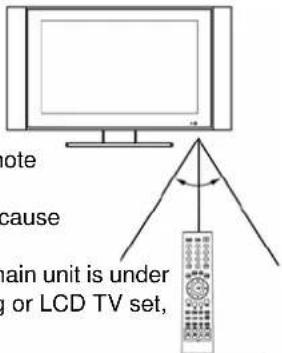
- Use the remote control by pointing it towards the remote sensor window of the set. Objects between the remote control and sensor window may prevent proper operation. Cautions regarding use of remote control
Note: the illustration is for your reference only, the remote sensor may locate differently with different model.
Cautions regarding use of remote control
- Do not expose the remote control to shock. In addition, do not expose the remote control to liquids, and do not place in an area with high humidity.
- Do not install or place the remote control under direct sunlight. The heat may cause deformation of the unit.
● The remote control may not work properly if the remote sensor window of the main unit is under direct sunlight or strong lighting. In such a case, change the angle of the lighting or LCD TV set, or operate the remote control closer to the remote sensor window.
Batteries for Remote Control
If the remote control fails to operate the LCDTV functions, replace the batteries in the remote control. 1 Open the battery cover. 2 Insert two size-AAA batteries. 3 Replace the cover and slide in
reverse until the lock snaps.

natural_image
Illustration of a hand holding a coiled spring attached to a rectangular device (no text or symbols visible)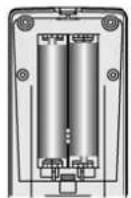

natural_image
Illustration of a hand holding a coiled spring device (no text or symbols visible)- Slide the cover while pressing down.
● Place the batteries with their terminals corresponding to the (+) and (-) indications in the battery compartment.
Precaution on battery use
Improper use of batteries can result in a leakage of chemicals and/or explosion. Be sure to follow the instructions below.
- Place batteries with their terminals corresponding to the (+) and (-) indications.
● Different types of batteries have different characteristics. Do not mix batteries of different types.
- Do not mix old and new batteries. Mixing old and new batteries can shorten the life of new batteries and/or cause old batteries to leak chemicals.
- Remove batteries as soon as they are non-operable. Chemicals that leak from batteries can cause a rash. If chemical leakage is found, wipe with a cloth.
- The batteries supplied with the product may have a shorter life expectancy due to storage conditions. If the remote control is not used for an extended period of time, remove the batteries from the remote control.
PACKING LIST
LCD TV 1
Operation Manual 1
Infrared Remote Control 1
3.5mm Audio Cable 1
AC Power Cable 1
AAA Batteries 2
Note:
Please keep the wrapping box and the padding well for future convenient use when you convey them.
GENERAL INFORMATION
■ Radio Frequency input; support CATV
Capable of receiving the full-append cable programs in 470MHZ
■ AV input
Capable of receiving PAL, NTSC, SECAM color systems; Very convenient to watch VCR (video cassette recorder), Pickup Camera, other Disc's programs
■ AV output
Capable of transmitting signal of different AV/RF systems to other AV receivers through the current AV cable
■ Y/C component signal input (same to S-Video input)
Convenient to receive the Y/C high definition component signal from DVD
■ YPbPr input
Capable of receiving the high definition YPbPr signal in 480i, 480p, 576i, 720p, 1080i, and 1080p formats
■ PC input
a. Connecting with the host computer
b. Use as the display terminal
c. Connect the 3.5mm(diameter) audio cord to your computer's audio main board, you can listening the beautiful music transmitted from your host computer
■ DVI input : Convenient to receive DVI signal
■ PIP, POP, PBP function
■ Program & Child Lock
■ Turn on with intelligence
■ Zoom mode
■ LTI, CTI, and black field
■ BBE sound technology
■ Trusurround sound technology
■ Full-light display
■ Picture amending display function
■ Fleshtone enhancement and improvement
■ Super definition display panel
■ 3:2, 2:2 Pull Down
■ TV program scan function
■ Timer function
Automatically off at certain preset time, and enters into the standby mode
■ Blue background with noise reduction
In TV, AV1, AV2 and YPbPr modes, screen displays soft blue background if there is no signal input
■ Auto Off if no signal input
In TV mode, the LCD TV will automatically power off within 15 minutes and enter into the Power Energy Saving Mode if there is no signal input.
■ Multi Language On-Screen Display menu
Ordinary and graphical user interface makes the menu operation more user-friendly
■ Plug and Play
No installation software is needed to use the TV as computer terminal display equipment
■ Auto adjustment in VGA mode
Adjust the picture's quality automatically
■ No flicker, no radiation, environment-protective and healthy
■ Legerity, convenient, low power consumption
BRIEF INTRODUCTION
Front Panel

| Button | Description |
| 【TV/AV】 | To scroll among TV, AV1, AV2, YPbPr, PC, and DVI modes.The same function to【OK】on R/C in menu operation. |
| 【MENU】 | To enter or exit from the OSD (On-Screen Display) menu.To browse the OSD menu. |
| 【VOL-】 | To decrease the sound volume. Adjust functions in menu operation. |
| 【VOL+】 | To increase the sound volume. Adjust functions in menu operation. |
| 【CH-】 | 1. In TV mode, decrease channel number2. To select functions in menu operation. |
| 【CH+】 | 1. In TV mode, increase channel number2. To select functions in menu operation. |
 | To power on or put the LCD TV to STANDBYThe same function to【○】on R/C . |
Note:
In this operation manual, 【】symbol means Button.
Rear Panel
LT2618/LT3218

LT3718

LT4018

| Items | Description |
| AC input AC power input | |
| AC power switch To turn on/off the TV | |
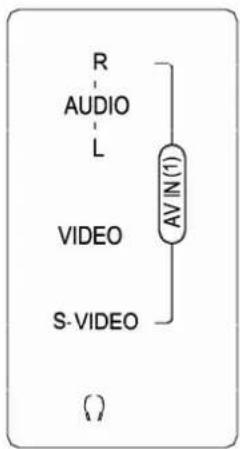
| Signal input/output terminals AV input (1), headphone output, see illustration 1 | |
| Signal input/output terminals | TV signal input, AV output, AV input (2), YPbPr input, see illustration 2 |
| Signal input/output terminals Including PC and DVI input, see illustration 3 |
Enlarged View of Signal Input/Output Terminals 1:
LT2618/LT3218/LT3718

LT4018
Enlarged View of Signal Input/Output Terminals 2:

Enlarged View of Signal Input/Output Terminals 3:

| Items Description | |
| AV IN (1) | One-way AV input port; one-way S-Video input terminal; S-Video 1 is the first if VIDEO, S-Video 1 connect at one time, and the screen displays AV1 (Y/C) |
| HEADPHONE OUT Headphone audio signal output | |
| AV IN (2) | One-way AV input port; one-way S-Video input terminal; S-Video 2 is the first if VIDEO, S-Video 2 connect at one time, and the screen displays AV2 (Y/C) |
| AV OUT For TV, AV1, and AV2 modes only | |
| COMPONENT IN | Capable of transmitting YPbPr signal from DVD or other equipments to YPbPr input port |
| DVI IN Digital video signal input | |
| PC IN PC signal input | |
REMOTE CONTROL

TV Functions
- RECALL : Return to last viewed program or source
- ZOOM : Adjust displayable aspect ratio
- POWER ON/OFF : Switch on or off TV set
- 0-9 Channel Keys : Key in the alphanumeric digits to switch to the designated channel directly
- AV : Toggle between different signal sources available
- MENU : To go to the On Screen Display(OSD) menus
- P MODE : Select different modes of picture settings
- S MODE : Select different modes of sound settings
- P+ : Scroll to next channel
- P- : Scroll to previous channel
- V- : Decrease audio volume
- V+ : Increase audio volume
- OK : Select or confirm sub menu of the OSD
- DISPLAY: Show info of current program
- SLEEP : Select time of TV to sleep mode
- MUTE : Mute sound
- STILL : Freeze or activate the image
- PIP SOURCE SELECTION : Select source of sub-picture source
- LOCATION : Adjust position of sub-picture frame
- PIP CHANNEL UP: Switch to the next channel of sub-picture
- PIP SWAP : Interchange main picture displayed with sub-picture source
- PIP STILL : Freeze or unfreeze screen sub-picture
- PIP SIZE : Adjust size or Mode of sub-picture
- PIP CHANNEL DOWN: Switch to the previous channel of sub-picture
- PIP ON/OFF: Turn on or off sub-picture function
Note:
- When in operation, please point your remote control directly to the infrared sensor.
- Do not subject the remote control to impacts, water or disassembly.
- When pressing the buttons on the remote control, allow interval of no less than one second between selections.
INSTALLATION
- Remove the LCD TV from the box and place it on a flat surface in a well-ventilated location.
- Connect the output terminal of RF cable to the corresponding TV input terminal.
- Connect AV signal output (DVD or other equipments) to AV input terminal of the LCD TV with AV connector. Ensure that every AV signal cable is connected correctly to the corresponding port.
- Connect one side of PC, DVI terminals to the corresponding signal source terminal, and connect the other side to the corresponding LCD TV terminal. Screw down the thumbscrews on both sides to secure it. Affix the plug with care to avoid damage.
- Connect the power cord to the AC outlet. Do ensure that other connected devices to the same power source are switched off.
Caution:
Please refer the power range of this product to the back label on the back cover, do not connect to any power supply, which is out of this range. When unplugging the power cord, do not touch the metal part.
GENERAL OPERATION
To Turn the TV On
- When you turn on the power, the indicator light on the front panel will blink till the TV displays pictures.
- In Standby mode, press 【💡】 on the remote control or front panel to enter to Power On mode.
To Turn the TV Off
- Press 【⏻】 on the remote control or 【⏻】 on the front panel to switch off the TV.
- Unplug the power cord from the AC outlet to turn the TV off completely.
Caution: The TV will be shut off automatically when the power trips. The following will occur if the power cord is plugged the AC outlet then:
a. The TV will be in standby mode when switched on
b. The TV will be automatically on if it was in other modes (such as AV/PC mode) apart from TV mode
Do not turn on/off the TV too often
Auto Off if No Signal Input
The TV will automatically switch off and enter into Standby mode after 15 minutes if there is no signal, in cases of no program signal transmitted from the TV station or no commands from the remote control.
The AUTO OFF will be invalid after 15 minutes when there is no signal input.
Indicator Light
| Status | Light | Color | Description |
| Working mode Blue The TV works normally | |||
| Standby Red In Standby Mode | |||
| Timer On | Blue | Timer On is valid. There is blue light when the TV is in Standby Mode | |
| Power Off | No Indicator | The TV is turned off |
MENU OPERATION
- Use the On Screen Display (OSD) menu to adjust the picture's quality.
- Multiple languages to choose from.
- The time range of the menu appearance is 3\~60 seconds, which can be adjusted in the General Setting menu.
- Use the Panel buttons or the Remote Control to operate the OSD MENU.
FUNCTION INTRODUCTION
Using the Channel Setting Menu (For TV Use Only)
Switch among PAL, NTSC, SECAM, PAL M, PAL N, N4.43, and AUTO modes.
Sound System
Switch among B/G, I, D/K and M systems.
Skip
After Auto Search, there may be some vacant and pseudo programs received. Skipping the undesired program position can dramatically quicken program selection.
- When one program is preset to Skip, you will find the program skipped during programs switch by pressing [P+] / [P-] .
- Input the channel number directly to watch the program again that has been skipped.
Auto Search
In the Channel Setting Menu, press 【P+】/【P-】 to select Auto Search and press 【OK】/【V+】 to start Auto Searching mode.
-
During searching, the sound and color systems are automatically adjusted and progr
-
When search is finished, all 236 channels are stored, or 【MENU】is pressed during the search process, the search will automatically stop and go to the channel setting

![Channel Setting Current Channel ▶ 13 ◀ Channel Label → Color System ▶ PAL ◀ Sound System ▶ DK ◀ Skip → Auto Search → Manual Search → Fine → Channel Table ▶ Cable ◀ Auto Scan → Exchange → [V+]/[V-]Select [P-]/[OK] Enter [Menu] Exit](/content/2026/05/1048726/images/c2501cff34f9a1ccd6df92cb34be59719a8e05821fb981cd721cf6b454f3e6fe.jpg)
![Channel Label 8 CCTV_8 9 CCTV_9 10 CCTV10 11 CCTV11 12 CCTV12 13 HUNAN 14 FENGH 15 [P+]/[P-] Select [Menu] Exit](/content/2026/05/1048726/images/e1a9b5d1e3a21f2c80679a02cf17ab1dc6d020ef4ff8449c6e2e4094319bd34e.jpg)
menu with channel one.
Manual Search
In TV mode, select Manual Search option and press 【OK】/【V+】 to enter into Manual Search. Use 【V+】/【V-】 to search programs. After searching, the TV will automatically store searched channels and return to the menu.

Fine
When the picture and sound of a channel are not satisfactory after Auto Search or Manual Search, Fine function can be used to adjust the pictures and sound.

-
In TV mode, select Fine and press 【OK】/【V+】 to enter the Fine Tuning mode.
-
Press [V+] / [V-] to increase or decrease the frequency value for fine-tuning.
Note:
During auto search, manual search, and fine tune operation, a password needs to be entered if any program is locked.
Channel Table
Two kinds of program list Air & Cable to be chosen, 2\~69 for Air list, and 1\~125 for Cable list.
Note: This function is for U.S.A users only.
Auto Scan
In TV mode, select Auto Scan to activate the scan mode. All pictures will be displayed in the current channel. The current program will be displayed in the middle of the screen, with twelve small pictures around the middle picture. All pictures are scanned, beginning with the current program, from the upper-left side screen in clockwise direction. Use 【P+】/【P-】 and 【V+】/【V-】 to select the desired channel; Use 【OK】 to exit from the Auto Scan mode and watch only the selected channel. Use 【MENU】to exit from the Auto Scan mode directly.
Note: There will be a stripe blank on the right side screen during Auto Scan, this situation is normal, for it is to better the viewing proportion.
Exchange
In TV mode, select Exchange to enter the PBP mode.
Press 【V+】/【V-】to switch between the main picture & sub-picture.
Press 【P+】/【P-】or the number buttons to select between the channel 1& channel 2.
Press【OK】to switch between the programs.
![Channel1 ⇌ Channel2 13 9 [Menu] Exit [OK] Exchange](/content/2026/05/1048726/images/344c8bb1661f490b53ee050c47a13bd85cf26c255b9f41c87e320b32a147ddd3.jpg)
Using the Picture Setting Menu
The TV adjusts the brightness of the LCD TV according to the environment.
Picture Mode
Four modes to be selected: Standard, Mild, Bright, User.
Brightness
To adjust the picture's brightness.
Contrast
To adjust the picture's contrast.
Saturation
To adjust the picture's saturation.
Sharpness
To adjust the picture's definition.
Hue
To adjust the picture's tint. (For NTSC signal only)
Color Temp
Four modes can be chosen: Warm, Normal, Cool, and User. (User mode is valid for PC & DVI only)
Fleshtone
To adjust the human skin tones
![Pictrue Setting Full light Watch Dim Pictrue Mode User Brightness 50 Contrast 50 Saturation 50 Sharpness 10 Hue 50 Color Temp Normal Fleshtone ON [V+]/[V-]Select [P-]/[OK] Enter [Menu] Exit](/content/2026/05/1048726/images/12102fa50e5d847ae5d1783e367e218d50f5ff5800e6b9080e36c63d9a897884.jpg)
Using the Audio Setting Menu
1) Press 【MENU】 and then use 【V+】 / 【V-】 to select the Audio Setting menu.
2) Press [P+] / [P-] to select the desired field.
Sound Mode
To select the desired sound mode among Standard, News, Music and User
Bass
To adjust the accompanying sound's bass
Treble
To adjust the accompanying sound's treble
Surround
To select the surround mode among Off, Normal and Spatial
Balance
To adjust the balance between the left and right soundtracks
MTS
To select the desired mode of MTS (for U.S.A users only)
BBE
To turn BBE On or Off
TruSurround
To turn TruSurround On or Off
Volume
To increase or decrease the volume
Using the General Setting Menu
To adjust the OSD position horizontally
OSD V Position
To adjust the OSD position vertically
OSD Timeout
To adjust the length of time the OSD to be displayed on the screen without any commands
Blue Screen
To set the Blue Screen on/off when there is no signal input in TV, AV, AV1, AV2, YPbPr modes
Close Caption
Only valid for U.S.A users
Scaler Mode
To select viewable screen modes of Fill Screen, 4:3, Wide, Cinema and Sub Title.
![General Setting Language OSD H Position OSD V Position OSD Timeout Blue Screen Close Caption Scaler Mode Factory Reset Transparency English 0 0 30 ON OFF Fill Screen 7 [V+]/[V-]Select [P-]/[OK] Enter [Menu] Exit](/content/2026/05/1048726/images/41f94c37cd0f8e1946644853e514c22d5d4871bf737865d5cb9324cf5eb55560.jpg)
![Timer Setting Sleep Time ▶ 20 Min Current Time 12 : 15 On Time 15 : 30 On Channel 8 Off Time 13 : 00 Timer Mode ▶ Once [V+]/[V-]Select [P-]/[OK] Enter [Menu] Exit](/content/2026/05/1048726/images/6aba15bd4e3991198b347551ca9339c717a6a12c643cce92496ab031cf16f9e1.jpg)
Factory Reset
All users' settings can be reset to the default settings except the TV programs
Transparency
To adjust the OSD transparency
Using the Timer Setting Menu
To set the sleep time of the TV. This can be set with the remote control 【SLEEP】button.
Current Time
To set the default channel when turning on the TV. Press [V_+] / [V_-] to change the channel number.
Off Time
Press 【V+】/【V-】 to set the Minute/Hour and press 【P+】/【P-】 to adjust the time value.
Timer Mode
To set the clock time mode.
Using the Child Lock Setting Menu
After entering "1601" for the first time, the screen displays the menu on the right.
Press the number button on the remote control to set the new password. When done, press【OK】, and the TV will go back to the main child lock mode.
Press 【P+】/【P-】to switch among Lock Status, Lock All and Clear All.
![Child Lock Lock Status Lock All Clear All [V+]/[V-]Select [P-]/[OK] Enter [Menu] Exit](/content/2026/05/1048726/images/5588e74e621071d7c315f1bb42aa2dbd0796944ba7eb4e13ca97796ece1b1860.jpg)
![Input your new password: * * * Confirm: * * + [OK] Enter [Menu] Exit [V-] Back](/content/2026/05/1048726/images/88e4d5616897378bab7b6dffe6f0694352bd82e3d09d5e93f22a892fd2f0781d.jpg)
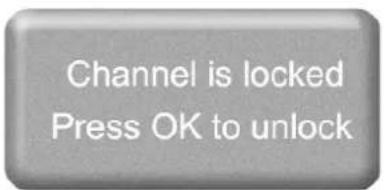
In Lock Status mode, press [OK]/[V+] to enter the set mode. Then press [P+] / [P-] to select the channel and press [V+] / [V-] to set lock/unlock.
◆ A prompt appears when a locked channel is switched. The password needs to be entered to watch the program.
◆ In Lock All mode, press【OK】/【V+】to lock all of the programs.
![Channel Label Lock/Unlock 6 CCTV_6 Lock 7 CCTV_7 Lock 8 CCTV_8 Lock 9 CCTV_9 Unlock 10 CCTV10 Unlock 11 Lock 12 Lock 13 Lock [P+]/[P-] Select [V-]/[V+]Change [Menu] Exit](/content/2026/05/1048726/images/f77b3ae04580bfed4f0682c0c8ff8a9c7a5fd70e44fa92104b18954316cc0a19.jpg)
◆ In Clear All mode, press 【OK】/【V+】 to unlock all of the programs.
Note: In child lock menu operation, each function cannot be activated until the correct password is entered. If the password is forgotten, the default password of "1601" is still valid.
Using the PC Setting menu (for PC mode only)
To adjust automatically the picture's clock, phase, H Position and V Position to get the best visual effect
- Phase
To adjust pictures' sampling phase in PC mode
- Clock
To adjust pictures' sampling frequency.
● H Position
To adjust picture's position horizontally in PC mode.
● V Position
Toadjust picture's position vertically in PC mode.
Note:
In the menu, gray items means invalid to operate in the current mode.
![PC Setting Auto Tracking Clock 50 Phase 50 H Position 50 V Position 10 [V+]/[V-]Select [P-]/[OK] Enter [Menu] Exit](/content/2026/05/1048726/images/493264525d42a126acae283de97fea06069b8bfa2c95e88a3d06ef2234f71b01.jpg)
OTHER FUNCTIONS INTRODUCTION
Standby Mode
Press the 【💡】 on the TV panel/Remote Control, the LCD TV will store the current setup and enter into the standby mode with a red indicator light. To Power on the LCD TV, press the button again.
Signal Switch
Press 【TV/AV】on the remote control to select the signal sources orderly. They are TV, AV1, AV2, YPbPr, PC, and DVI.
The upper-right corner of the screen will display the corresponding information.
Channel Selection
Press【CH+】/【CH-】on the panel or【P+】/【P-】on the remote control to increase/decrease the channel number. If a channel number is in SKIP ON mode, the next channel will display orderly.
Three numbers can be input at most, if you use the number button on the remote control.
The former two-digit input number is bigger than 23, the TV would come to the corresponding channel; If the input number is among 236 and 239, the current channel would not be replaced.
The program is the default setting if the range is 236\~239.
In AV1, AV2, YPbPr, PC, and DVI modes, press the number buttons to watch the corresponding program.
Note: The biggest number you can input is 235 and use number buttons to input your desired channel number. During this input operation you can change to the corresponding channel directly with pressing 【OK】, and press 【MENU】 to cancel.
Volume Control
Volume

50
Press 【V+】/【V-】 to decrease or increase the volume continuously when the main menu is not displayed on the screen. The range is 0-100.
The Volume menu will automatically be off if there is no operation about 4 seconds.
Mute
Press the【MUTE】on the remote control to turn On/Off the MUTE mode. Alternatively, press【MUTE】, change the volume level to turn the MUTE off.
The Mute symbol will appear bottom-left corner of the screen the Mute function is switched on. Press【MUTE】or increase the value of volume, or adjust the items of the sound menu to exit.
The Mute symbol is hidden when the menu operation is entered, but the feature is still valid. It appears again when the menu operation is exited. When there is no valid signal input, the TV will be mute (but no mute symbol) with a blue background.
Sound Mode Selection
Press【S.MODE】repeatedly to select standard, News, Music, and User modes.
The value of Standard, News, Music modes are the default setting, and they cannot be adjusted. Only User mode can be altered.
Picture Mode Selection
Press【P.MODE】to Switch among Standard, Mild, Bright and User modes
Information Display
Press 【DISPLAY】 to reveal the current signal source and its corresponding information of Channel Number, Channel label, Color System, Stereo/FM Mono and signal source of PIP. Characters in green on the upper-right side display information for the main picture in TV mode while characters in red displays the source information for the sub-picture.
Press again to exit.
Sleep Function
Press【SLEEP】to select the sleep time between intervals of 10, 20, 30, 60, 90, 120, 180 minutes or switch off the SLEEP function. A prompt will appear

TV will fall asleep after
30 Sec
Press any key to exit

when it is one minute from SLEEP. Press any button to exit.
Recall
In TV mode, press【RECALL】to view the previous channel or signal source. In the other modes, press【RECALL】to return to the previous signal source
Zoom Mode
Switch among Fill-screen, 4:3, Wide, Cinema and Subtitle modes.
Still
Press【STILL】to freeze or activate the current image.
PIP/POP/PBP Function
Press ☐ to enter into or exit from the sub-picture mode. In this mode, you can realize these functions as follows:
- Press 📋 to switch the sub-picture signal source among TV, AV1, AV2, YPbPr, PC and DVI in cycle.
- Press to switch the sub-picture mode among PIP, PBP and POP.
● Mode 1: To overlap a sub-picture (PIP) in small size wherever you want to locate;
- Mode 2: To place two pictures in the same size side by side. Both main picture and sub-picture (PBP) cover half area of the display screen.
- Mode 3: A main picture covers 12/16 area of the display screen while a sub-picture (POP) covers 1/16.
- Press ☐ to switch between main picture and sub-picture.
- Press to freeze or continue the current sub-picture.
- Press ↗ to adjust the sub-picture position on display in PIP mode.
Switches of the sub-picture's channel can be realized by pressing 【CH+】/【CH-】in TV mode.
The sub-picture can enter into TV mode directly by pressing [CH+] / [CH-] in other modes.
| Sub Pic\Main Pic | TV | AV1 | AV2 | PC | DVI | YPbPr |
| TV | ● | ● | ● | ● | ● | ● |
| AV1 | ● | ● | ● | ● | ● | ● |
| AV2 | ● | ● | ● | ● | ● | ● |
| PC | ● | ● | ● | ● | ● | |
| DVI | ● | ● | ● | ● | ● | ● |
| YPbPr | ● | ● | ● | ● | ● |
Note: All buttons mentioned in this operation are on the remote control, signs of “●” mean that both pictures can be displayed at the same time and the blanks mean that they can not be displayed at the same time.
TROUBLESHOOTING
Before calling a technician, please check the following items to see if the below mentioned symptoms can be diagnosed and fixed.
| Symptoms | Possible Reasons | Correction |
| No picture, no sound, and no indicator light on | 1.The power cord is not plugged in2.The power is off | 1.Plug the power cord in2.Turn the power on |
| No picture, no sound, but the green light indicator | 1.Contrast, sharpness, color and volume are all in the minimum value or TV is in mute mode2.PC has no signal in PC mode3.The signal cord is not correctly connected | 1.Alter the value of contrast, sharpness, color and volume2.Press any button or input PC signal3.Connect the signal cord correctly |
| Picture and sound with abnormality | 1.Contrast, sharpness, and color are set improperly2.Color system is set improperly3.Sound system is set improperly | 1.Adjust the value of Contrast, sharpness, and color2.Set the Color system to the country broadcasting standard3.Set the Sound system to the country broadcasting standard |
| Picture is spotted or with snow | Signal source is low-grade or the signal cord is in a lower quality | Use the qualified signal cord |
| Blue background in AV mode | No Video signal or the signal cord is improperly/not connected | Connect the signal cord properly |
| Picture is unclear, or moves or have black stripes on horizontal position in PC mode | Picture is not well adjusted | Adjust automatically by selecting Auto Adjust or adjust Clock、Phase、H Position、V Position manually after entering into the PC Setting menu to solve this problem |
| PC Picture is not in the middle of the screen | ||
| No sound | No Audio signal or the signal cord is improperly/not connected | 1.Connect the audio signal cord properly2.Set the sound system properly |
| The remote control does not work | Batteries are improperly installed or exhausted | 1.Make sure the positive and the negative polarities are correct.2.Check if there is a loose contact between the batteries and the springs3.Replace the batteries |
| Colors of PC Picture on display are improper | The user made the wrong Color Temp adjustment | Readjust the Color Temperature |
SPECIFICATIONS
Model: LT2618
| Items | Specifications |
| Color System PAL, NTSC, SECAM, PALM, PALN, N4.43 | |
| Sound System D/K, I, B/G, M | |
| PC, DVI Qualified Input Format VGA/SVGA/XGA/WXGA 60Hz | |
| YPbPr Input Format 480i, 480p, 576i, 576p, 720p, 1080i, 1080p | |
| Audio Output Consumption 2x5w | |
| AV Output One way | |
| Headphone Output One way | |
| AV (S-Video) Input Two ways (audio is using in community) | |
| YPbPr Input One way | |
| PC Input One way | |
| DVI Input One way | |
| Voltage Input | Please refer to the back label |
| Rated Power Consumption | |
| Standby Power Consumption | ≤slant 2W |
| Unit Dimension | 874mm (W) × 512mm(H) × 225mm(D)(including the pedestal)874mm (W) X488mm (H) X110mm (D)(Not Including the pedestal) |
| Recommended resolution in PC mode | 1280x768 60Hz |
| Unit Weight | 18.5kg(Approx.) |
SPECIFICATIONS
Model: LT3218
| Items | Specifications |
| Color System PAL, NTSC, SECAM, PALM, PALN, N4.43 | |
| Sound System D/K, I, B/G, M | |
| PC, DVI Qualified Input Format | VGA/SVGA/XGA/WXGA 60Hz |
| YPbPr Input Format 480i, 480p, 576i, 576p, 720p, 1080i, 1080p | |
| Audio Output Consumption 2x5w | |
| AV Output One way | |
| Headphone Output One way | |
| AV (S-Video) Input Two ways (audio is using in community) | |
| YPbPr Input One way | |
| PC Input One way | |
| DVI Input One way | |
| Voltage Input | Please refer to the back label |
| Rated Power Consumption | |
| Standby Power Consumption | ≤slant 2W |
| Unit Dimension | 1012.6mm (W) × 586mm(H) × 225mm(D)(including the pedestal)1012.6mm (W) X552.5mm (H) X112mm (D)(not including the pedestal) |
| Recommended resolution in PC mode | 1280x768 60Hz |
| Unit Weight | 21.5kg(Approx.) |
SPECIFICATIONS
Model: LT3718
| Items | Specifications |
| Color System PAL, NTSC, SECAM, PALM, PALN, | N4.43 |
| Sound System D/K, I, B/G, M | |
| PC, DVI Qualified Input Format | VGA/SVGA/XGA/WXGA 60Hz |
| YPbPr Input Format 480i, 480p, 576i, 576p, 720p, | 1080i, 1080p |
| Audio Output Consumption 2x5w | |
| AV Output One way | |
| Headphone Output One way | |
| AV (S-Video) Input Two ways (audio is using in community) | |
| YPbPr Input One way | |
| PC Input One way | |
| DVI Input One way | |
| Voltage Input | Please refer to the back label |
| Rated Power Consumption | |
| Standby Power Consumption | ≤slant 2W |
| Unit Dimension | 1152mm (W) × 628.5mm(H) × 113mm(D)(not including the pedestal)1152mm (W) X675mm (H) X272mm (D)(including the pedestal) |
| Recommended resolution in PC mode | 1280x768 60Hz |
| Unit Weight | 24.5kg(Approx.) |
SPECIFICATIONS
Model: LT4018
| Items | Specifications |
| Color System PAL, NTSC, SECAM, PALM, PALN, | N4.43 |
| Sound System D/K, I, B/G, M | |
| PC, DVI Qualified Input Format | VGA/SVGA/XGA/WXGA 60Hz |
| YPbPr Input Format 480i, 480p, 576i, 576p, 720p, | 1080i, 1080p |
| Audio Output Consumption 2x5w | |
| AV Output One way | |
| Headphone Output One way | |
| AV (S-Video) Input Two ways (audio is using in community) | |
| YPbPr Input One way | |
| PC Input One way | |
| DVI Input One way | |
| Voltage Input | Please refer to the back label |
| Rated Power Consumption | |
| Standby Power Consumption | ≤slant 2W |
| Unit Dimension | 1236mm (W) × 717mm(H) × 274mm(D)(including the pedestal)1236mm (W) X673mm (H) X106mm (D)(not including the pedestal) |
| Recommended resolution in PC mode | 1280x768 60Hz |
| Unit Weight | 27kg(Approx.) |
All the features and specifications are subject to change without notice for improvement.
LT2618/LT3218/LT3718/LT4018
JUJ6.491.1168

- LCD COLOR TELEVISION
- OPERATION MANUAL
- CONTENTS
- Note:
- Important Safety Instructions
- Using the Remote Control
- Cautions regarding use of remote control
- Batteries for Remote Control
- Precaution on battery use
- PACKING LIST
- GENERAL INFORMATION
- BRIEF INTRODUCTION
- Rear Panel
- Enlarged View of Signal Input/Output Terminals 1:
- Enlarged View of Signal Input/Output Terminals 2:
- Enlarged View of Signal Input/Output Terminals 3:
- REMOTE CONTROL
- TV Functions
- INSTALLATION
- Caution:
- GENERAL OPERATION
- To Turn the TV On
- To Turn the TV Off
- Do not turn on/off the TV too often
- Auto Off if No Signal Input
- Indicator Light
- MENU OPERATION
- FUNCTION INTRODUCTION
- Using the Channel Setting Menu (For TV Use Only)
- Sound System
- Skip
- Auto Search
- Manual Search
- Fine
- Channel Table
- Auto Scan
- Exchange
- Using the Picture Setting Menu
- Picture Mode
- Brightness
- Contrast
- Saturation
- Sharpness
- Hue
- Color Temp
- Fleshtone
- Using the Audio Setting Menu
- Sound Mode
- Bass
- Treble
- Surround
- Balance
- MTS
- BBE
- TruSurround
- Volume
- Using the General Setting Menu
- OSD V Position
- OSD Timeout
- Blue Screen
- Close Caption
- Scaler Mode
- Factory Reset
- Transparency
- Using the Timer Setting Menu
- Current Time
- Off Time
- Timer Mode
- Using the Child Lock Setting Menu
- Using the PC Setting menu (for PC mode only)
- OTHER FUNCTIONS INTRODUCTION
- Standby Mode
- Signal Switch
- Channel Selection
- Volume Control
- Mute
- Sound Mode Selection
- Picture Mode Selection
- Information Display
- Sleep Function
- Recall
- Zoom Mode
- Still
- PIP/POP/PBP Function
- TROUBLESHOOTING
- SPECIFICATIONS
Brand : CHANGHONG
Model : LT3718
Category : Television