IP-KEY01 - Remote control Provision-ISR - Free user manual and instructions
Find the device manual for free IP-KEY01 Provision-ISR in PDF.

| Product Type | Remote Control |
| Brand | Provision-ISR |
| Model | IP-KEY01 |
| Compatible Devices | Provision-ISR IP cameras, DVRs, NVRs |
| Dimensions | Approx. 120 x 60 x 20 mm |
| Weight | Approx. 80 g (with battery) |
| Power Supply | 2 x AAA batteries (not included) |
| Battery Life | Up to 12 months under normal use |
| Wireless Technology | Infrared (IR) with range up to 10 m |
| Main Functions | PTZ control, menu navigation, preset recall, patrol, record, playback, digital zoom |
| Number of Keys | 21 buttons including directional pad |
| Indicator Light | Red LED when key is pressed |
| Material | ABS plastic |
| Operating Temperature | 0°C to 45°C |
| Storage Temperature | -20°C to 60°C |
| Cleaning Instructions | Wipe with a dry cloth. Do not use liquids or sprays. |
| Safety Precautions | Keep away from water and direct sunlight. Replace batteries promptly when low. |
| Spare Parts Availability | Batteries are user-replaceable. Contact support for other parts. |
| Repairability | Battery compartment easily accessible. No other user-serviceable parts. |
| Warranty | 1 year limited warranty |
Frequently Asked Questions - IP-KEY01 Provision-ISR
User questions about IP-KEY01 Provision-ISR
0 question about this device. Answer the ones you know or ask your own.
Ask a new question about this device
Download the instructions for your Remote control in PDF format for free! Find your manual IP-KEY01 - Provision-ISR and take your electronic device back in hand. On this page are published all the documents necessary for the use of your device. IP-KEY01 by Provision-ISR.
USER MANUAL IP-KEY01 Provision-ISR
natural_image
Line drawing of a vintage computer control console with keypad and scroll (no text or symbols)
Preface:
Thank you for purchasing another product from the house of Provision-ISR. If you have any questions or concerns after reading this manual, please contact our technical support. This product is designed to independently control multi-IP PTZ dome cameras in local network (LAN). The IP-Key01 adopts ONVIF protocol for all communication, connection, and control and therefore compatible with different brands of IP PTZ cameras.
The IP-Key01 has an integrated Web-Page to support, manage and maintenance cameras connected to it. In order to adapt to different operating systems, this products support all main internet browsers such as: Internet Explorer, Firefox, Chrome and Safari.
Package Content:
IP-Key01 Network Keyboard 1
Power Adapter 1
Network Cable 1
Quick Guide CD 1
Quick Operation Guide 1
Statement:
Due to possible firmware updates, the contents described in this manual may differ from the version you are currently using. If you are in doubt when using this manual, please contact our technical support for help.
Provision-ISR reserve the right to modify this manual without advanced notice.
Table of Contents
1.Product Overview: 3
1.1 Description: 3
1.2 Product Features: 3
1.3 Connection diagram:....3
2. Technical Specifications: 4
3. Installation and Settings: 4
3.1.Connection network setup: 4
3.2 Search and add a device: ....5
3.3 Query and Control....6
4. Web Configuration:....7
5. Key combinations ....8
1.Product Overview:
1.1 Description:
The IP-Key01 Support ONVIF protocol which assures great compatibility with most IP PTZ Brands. The controller is integrated with a built-in web page, which makes the configuration process easy and simple.
1.2 Product Features:
• ONVIF protocol support.
• Support quick LAN device search and adding equipment.
• Support Operating presets, patrols and patterns.
• 3D joystick
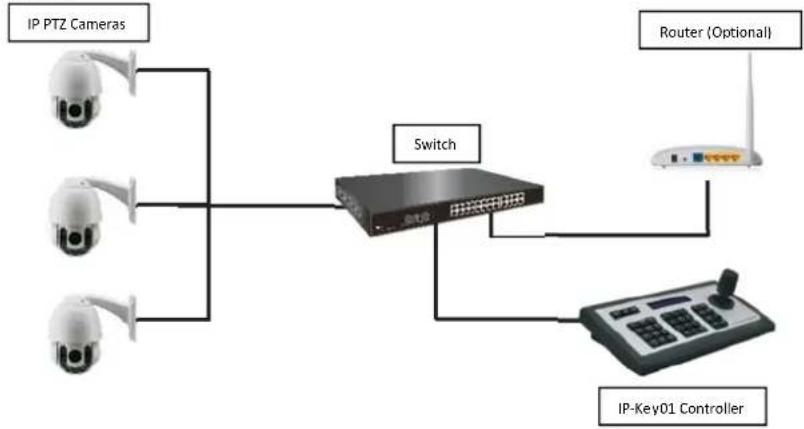
1.3 Connection diagram:
The controller and the IP PTZ cameras must be in the same network (LAN). For example: both 192.168.1.123 and 192.168.1.111 IP Addresses belong to the same network segment. 192.168.1.123 and 192.168.0.125 does not. The default IP Address of the controller will be set by DHCP and can be changed by the setting menu. At this point you need to ensure the correct IP address of the keyboard or the cameras.
flowchart
graph TD
    A["IP PTZ Cameras"] --> B["Switch"]
    C["Router (Optional)"] --> B
    D["IP-Key01 Controller"] --> B
    B --> E["IP Key01 Controller"]
2. Technical Specifications:
| Power supply | DC12V-1A |
| RS485 | Connecting terminal: TA/TB |
| RS232 | Db9 male port |
| Ethernet | RJ45 , IEEE 802.11b/g/n |
| Support protocol | ONVIF 2.4 |
| browser | IE, Firefox, Chrome, Safari. |
| Work temperature | 0°C~55°C / 14°F~131°F |
| Work humidity | 20%~80%(frostless) |
| Storage Temperature | -10°C~60°C / 14°F~140°F |
| Storage humidity | 0~90% (frostless) |
| Weight | 3kg |
| certification | CE, FCC, RoHS |
3. Installation and Settings:
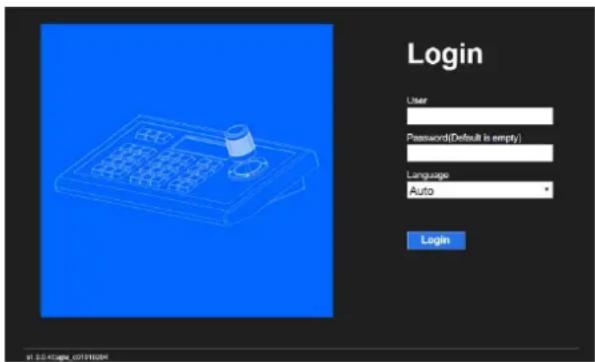
3.1. Connection network setup:
Connect the keyboard to the supplied power supply and network cable. After boot-up the screen will display the local IP received by DHCP (HOST: xxx.xxx.xxx.xxx). Input the IP address into the web-browser to access the login page. The default credentials are: Username: admin, Password should be empty.
If there is no DHCP server at present, the controller will not get an IP address. In this case you will have to configure the controller's address manually: Click on SET UP, Scroll down using the joystick to page 02/03. The screen will show IP: DHCP. Scroll right using the joystick. The display will change to IP: STATIC. Click on "Enter" – the display will show "IP ADDRESS":. Use the numeric keypad to set the static IP and press "Enter". The display will show "SUBNET MASK:" Use the numeric keypad to set the subnet mask and press "Enter", the display will show "GATEWAY":. Use the numeric keypad to set the gateway and press "Enter". The keyboard will prompt for a restart. Click "enter" to confirm and wait for the controller to restart. Once the keyboard have booted up – input the address you have configured into the web-browser.
3.2 Search and add a device:
There are two methods to add a device to the keyboard: Through the keyboard local interface or through the web-page.
- Using the keyboard to add PTZ Cameras:
a. Make sure that the keyboard is in the same network segment as the cameras.
b. Press "Search" button on your keyboard
c. After a few seconds, the keyboard will display a list of found cameras.
d. Use the joystick to scroll up/down until you locate the desired camera and click on "Add" (Please note: All IP cameras which support ONVIF and available on LAN will be found and displayed. Not only PTZ cameras)
e. Input the user name using the numeric keypad and click on "Enter"
f. Input the password using the numeric keypad and click on "Enter"
(The keypad is used for both numbers and letters. For example "2" is used for both 2 and A,B,C)
g. Repeat steps d-f if needed.
h. Press "ESC" to exit to main interface.
- Using the web-page to add PTZ Cameras:
a. Make sure that the keyboard is in the same network segment as the cameras.
b. Login to the web-page of the keyboard
c. Press "Search" on the bottom left and wait for the list to appear.
![NET KEYBOARD 10.0.0.86:50 10.0.0.11:50 10.0.0.30:50 10.0.0.89:50 10.0.0.32:50 10.0.0.21:00:50 10.0.0.36:50 10.0.0.29:50 10.0.0.35:50 10.0.0.31:50 10.0.0.26:50 10.0.0.15:50 10.0.0.94 Add All Add Delete Del All [0] 10.0.0.31:50 Device IP 24% Ctrl Port 2 Address 1 Username 4999 Password 24% Search Update Handle Save](/content/2026/05/1048593/images/39d86181fec672e4d048a91a59bd97a9146ee77dc3c97fe7529923bf89cdd533.jpg)
d. Choose a camera from the left pane (Green color) and click on add.
e. Choose the added camera in the middle pane (Blue color).
f. Input all the missing details in the right pane (Orange color). Make sure that all the other details are correct. (In most cases only the username/password will be missing).
g. For quick reference to this camera, you can input an address (Numbers only). This address can be later used to quickly gain access over the camera.
h. Click on "Save"
i. Repeat steps d-g if needed.
3.3 Query and Control
This stage refers to the local Interface only.
- Click on "INQUIRE" to view a list of the added cameras.
- Scroll up/down using the joystick to locate the desired camera and click on "Enter".
- The Keyboard will display "Connecting..." and upon successful connection the screen will show: "GOAL: xxx.xxx.xxx.xxx".
- You can now operate the controlled camera.
Troubleshooting:
- The keyboard displays "CONNECT TIMEOUT!" – Please make sure that both the camera and keyboard are well connected to the LAN.
- The keyboard displays "CONNECT ERROR!" – Please make sure that the username and password
are correct in the configuration menu.
Switching Cameras:
-
Option 1: If several PTZ cameras were configured, you can either repeat steps 1-3 from the section above or use the "NEXT" / "PREV" buttons to quickly switch control between configured cameras.
-
Option 2: Press on "IP" then input the address (If configured when you setup the camera) and then "Enter". The keyboard will take control over the defined camera.
4. Web Configuration:
Home Page
Use the IP Address displayed on the keyboard to access the web page. (Default user name: admin Password: empty - no password).
LAN Setting
You can modify the local network parameters of the keyboard as follows:
The default configuration is "Dynamic addresses" which means that the keyboard will automatically obtain an IP address from the DHCP server.
Static Address can be used when there is no DHCP server in the LAN connection or when the user wishes to fixate the IP address of the controller for easier connection.
After changing the setting to "Static Address", the user is required to fill in all the required information.
| LAN | |||
| Network Type | Static Address▼ | ||
| Users | |||
| Number | User | Password | Rights |
| 1 | admin | Super Admin▼ | |
| 2 | Visitor▼ | ||
| 3 | Visitor▼ | ||
| 4 | Visitor▼ | ||
User Management Configuration:
The defaulted account is super admin. We recommend on adding a password to the super admin account along with adding a regular user without admin permissions.
The user description is as follows:
-
Super administrator: default account. Have all authorities and permissions on all accounts.
-
Administrator: Have all authorities and permissions on all accounts except of the super administrator
-
Operator: They can control cameras but are not authorized to change any setting.
-
Visitor: can login to devices, but are not authorized to configure any parameters.
Upgrade:
Upgrade function is used to maintain and update the keyboard if necessary. After accessing the update menu, choose the correct update file and click "start". The keyboard will update and automatically reboot if the update was successful.
Important! During the update process, please don't operate the keyboard, shut down the power or disconnect the keyboard from the Internet!
Factory Reset
In case of any improper setting or configuration, select "Restore Factory" function to reset the device to its factory default.
Reboot:
After working for a long time, the keyboard might become slow on reaction or work slowly than expected. Select restart function to ensure the device get the proper maintenance.
5. Key combinations
Saving Presets:
- Gain control over the desired camera.
- Set the camera to the desired location.
-
Press on "PRESET" and make sure that "PRE" is displayed on the screen.
-
Enter the desired preset number and press "ENTER"
Calling Presets:
- Gain control over the desired camera.
- Press on "SHOT" and make sure that "SHOT" is displayed on the screen.
- Enter the desired preset number and press "ENTER"
Calling Cruise:
- Gain control over the desired camera.
- Press on "TOUR" and make sure that "TOUR" is displayed on the screen.
- Enter the desired cruise number and press "ENTER"