
OMS 102 - Cutting machine OK - Free user manual and instructions
Find the device manual for free OMS 102 OK in PDF.


| Product Type | Desktop Cutting Machine |
| Brand | OK |
| Model | OMS 102 |
| Dimensions (L x W x H) | 15.7 x 7.9 x 5.9 in (40 x 20 x 15 cm) |
| Weight | 4.4 lb (2 kg) |
| Power Supply | 100-240V AC, 50/60Hz |
| Power Consumption | 24 W |
| Max Cutting Width | 12 in (30.5 cm) |
| Compatible Materials | Paper, Cardstock, Vinyl, Fabric, Thin Plastic |
| Main Functions | Precision cutting, scoring, embossing with interchangeable blades |
| Connectivity | USB port for computer connection |
| Software Compatibility | Compatible with standard design software (e.g., Silhouette Studio, Cricut Design Space) |
| Maintenance | Clean blade holder with soft brush; replace blade when dull; lubricate moving parts |
| Safety Warnings | Keep hands away from blade; unplug when not in use; use on stable surface |
| Spare Parts Available | Replacement blades, cutting mats, blade holders |
| Repairability | User-replaceable blade and drive belt; service by authorized centers |
| Manual Language | English (PDF download available) |
| Warranty | 1 year limited warranty |
Frequently Asked Questions - OMS 102 OK
User questions about OMS 102 OK
0 question about this device. Answer the ones you know or ask your own.
Ask a new question about this device
Download the instructions for your Cutting machine in PDF format for free! Find your manual OMS 102 - OK and take your electronic device back in hand. On this page are published all the documents necessary for the use of your device. OMS 102 by OK.
USER MANUAL OMS 102 OK
IMPORTANT SAFETY INSTRUCTIONS. READ CAREFULLY AND KEEP FOR FUTURE REFERENCE.
- Read this user manual thoroughly before first use and pass it on with the product. Pay attention to the warnings on the product and in this user manual. It contains important information for your safety as well as for the use and maintenance of the equipment.
- Use the product only for its intended purpose and with recommended accessories and components. Improper use or wrong operation may lead to hazards.
- Never leave the product unsupervised while it is switched on.
• Do not place heavy objects on top of the product.
- Never immerse electrical parts of the product in water during cleaning or operation. Never hold the product under running water.
- Do not under any circumstances attempt (e.g. damage in power cord, product is dropped, etc.) to repair the product yourself. For servicing and repairs, please consult an authorised service agent.
- This product is not intended to be used by persons (including children) with reduced physical, sensory or mental abilities or lack of experience and / or lack of knowledge unless they are supervised by a person responsible for their safety or have received instructions on how to use the product.
• Children should be supervised to ensure that they do not play with the product.
• The mains voltage must match the information on the rating label of the product.
- Only unplug from the power socket can separate the product completely from the mains. Please be sure that the power plug is in operable condition.
- Avoid damages to the power cord that may be caused by kinks or contact with sharp corners.
- Keep this product including power cord and power plug away from all heat sources like for example, ovens, hot plates and other heat-producing products/objects.
- Only unplug from the power socket by the plug itself. Do not pull on the cord.
• Unplug the product ...
- when the product is not being used,
- in case of malfunctions,
- before attaching / detaching accessories and
-
before cleaning the product.
-
A damaged power cord may only be replaced by the authorised service agent in order to avoid hazards.
• Use this product in dry indoor areas only and never outdoors. - Place the product on a flat, sturdy and slip-resistant surface.
- Never use, expose or put the product near to:
- direct sunlight and dust;
- fire (fireplace, grill, candles), water (water splashes, vases, ponds, bath tube) or heavy moisture.
- This product is not intended for commercial use. It is designed for household use only.
- This product must be used with the sliding feed table and the piece holder in position unless this is not possible due to the size or shape of the food.
- Clean the product and all other accessories after each use.
• Follow the instructions in the chapter CLEANING AND CARE.
CONGRATULATIONS
Thanks for your purchase of ok. product. Please read this manual carefully and keep it for future reference.
INTENDED USE
The product is intended for the cutting of food, like bread, sausage and meat only. Any other use may result in damage to product or injuries.
This product is not suitable for cutting bones, meat with bones, foods with cores, hard, inedible parts of foods frozen foods or frozen cheese.
COMPONENTS
The product may be available in different colors.

- Slice thickness indicator
- Thickness adjusting knob
- Non-slippery feet
- Power cable with plug
- Food holder with hand rest
- Sliding feed table
-
Crumb tray
-
Platform
- Cutting blade
- Blade assembly knob
- On/Off Button
- Safety Button
- Thumb guard
BEFORE FIRST TIME USE
Remove the product and accessories carefully from the original packaging. Inspect the delivery contents for completeness and damages. Should the delivery contents be incomplete or damaged, contact your sales outlet immediately.
USING THE MEAT SLICER

natural_image
Close-up of a CD or DVD disc with an arrow indicating rotation (no text or symbols visible)123
Place the slicer on an even surface and unfold the platform.

natural_image
Close-up of a white 3D corner bracket with an arrow pointing downward (no text or symbols visible)Assemble the thumb guard with the sliding feed table.
natural_image
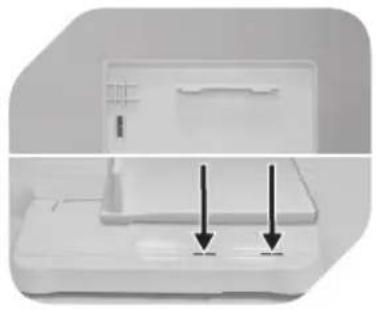
White plastic electronic device with two black arrows pointing to a component (no visible text or symbols)Align and place the sliding feed table on the platform.
natural_image
Close-up of a metallic mechanical component with a circular hole and a black arrow pointing to it (no text or symbols visible)4
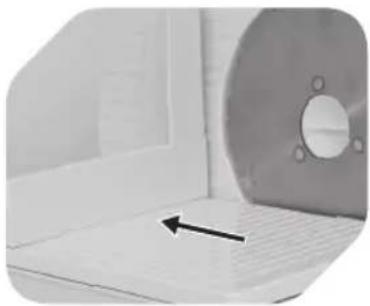
Slide the sliding feed table away from the blade.

natural_image
Close-up of a mechanical component with an arrow pointing downward (no visible text or symbols)5
Place the food holder on the sliding feed table.

natural_image
Close-up of a white plastic component with a circular button containing a curved arrow symbol (no text or labels visible)6
Set the thickness of the cutting with the adjusting knob.

789
Set thickness (in mm) will be shown on indicator.

natural_image
Close-up of a white electrical outlet plug with a cable inserted, showing a circular socket and an arrow pointing to it (no text or symbols visible)Connect the power plug to a suitable power outlet.
natural_image
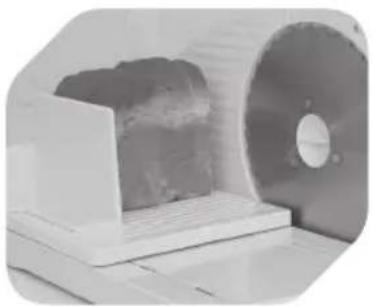
Close-up of a computer monitor displaying a textured object next to a circular disc (no visible text or symbols)Put the food on the sliding feed table.
USING THE MEAT SLICER
natural_image
Close-up of a computer monitor with a CD and an arrow pointing to its screen (no visible text or symbols)10 11
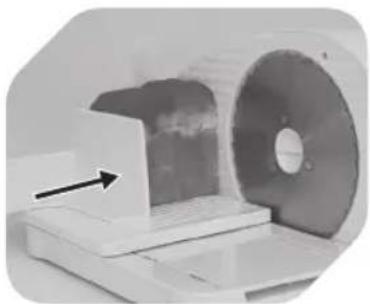
Press the food holder lightly in the direction of the cutting blade.

natural_image
Person operating a white electronic device with a circular button (no visible text or symbols)Put your right hand on the food holder and use the left hand to press the On/Off and safety button.

12
To operate the slicer, first press and hold the safety button. Then press the On/Off button.
natural_image
Person using a handheld device to press or install a white electronic device with arrows indicating internal components (no visible text or symbols)13 14
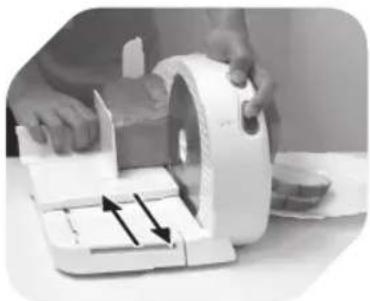
Move the sliding feed table with slight pressure back and forth in even movements. The sliced food can fall onto the plate, placed beside the slicer.

natural_image
Close-up of a white electrical outlet plug with a cable inserted, showing internal socket and wire (no text or symbols)Unplug the power plug from the power outlet.
CAUTION
Risk of Injury! Only remove the sliced food when the cutting blade is at a complete standstill and both safety and on/off buttons are released.
Do not cut:
- bone
- meat with bones
- foods with cores
- hard, inedible parts of foods
- frozen foods
- frozen cheese.

NOTE
Do not continuously using the slicer longer than 5 minutes. Allow the product to cool down.
CAUTION
- Before replacing any accessories always disconnect the product from the mains.
- Blade is very sharp!
CLEANING AND CARE
- Warning! Unplug the product and let it cool down completely before cleaning. Never immerse electrical parts of the product in water during cleaning or operation. Never hold the product under running water.
- Warning! When cleaning, never use solvents or abrasive materials, hard brushes, metallic or sharp objects. Solvents are harmful to human health and can attack plastic parts, while abrasive cleaning mechanisms and tools may scratch the surface(s).
- Clean the product's exterior surfaces with a slightly damp cloth and then dry them thoroughly.
- Make sure that no water enters the product interior (for example, through the switch).
- Keep the product in a dry, cool location which is protected against moisture and direct sunlight. Keep this product out of the reach of children.
• Take out the crumb tray after each usage and rinse it with water (Fig. A). -
Remove the cutting blade for cleaning:
-
Carefully remove the cutting unit (Fig. B). Caution! Blade is very sharp!
- Now you can clean the cutting blade, slide feeding table and food holder with hand rest with water and a soft cleaning detergent. Dry all parts.
- After cleaning re-insert the cutting blade (Fig. C).

natural_image
Close-up of a medical imaging scanner with a circular lens and an arrow indicating rotation (no text or symbols visible)
natural_image
Circular metallic disc with a central hole and four small holes, no text or symbols visible.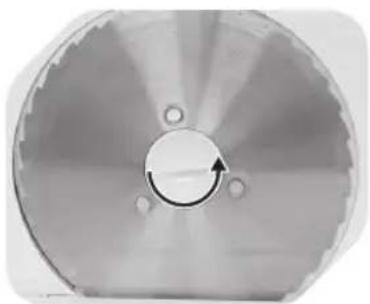
natural_image
Circular mechanical component with a central hub and three small holes, no visible text or symbols.Fig. A Fig. B Fig. C
Take out the crumb tray. Turn the blade assembly knob clockwise to unlock it.
Turn the assembly knob counter-clockwise to lock it.
SPECIFICATION
Rated voltage: 220-240 V\~, 50 Hz / Rated power input: 100 W / Operation time: 5 min / Protection class II
DISPOSAL
Do not dispose of this appliance as unsorted municipal waste. Return it to a designated collection point for the recycling of WEEE. By doing so, you will help to conserve resources and protect the environment. Contact your retailer or local authorities for more information.

OMS102.13.07.16(1.3)

Imtron GmbH
Wankelstrasse 5
D-85046 Ingolstadt

Brand : OK
Model : OMS 102
Category : Cutting machine