8007 - Elliptical bike SportsArt - Free user manual and instructions
Find the device manual for free 8007 SportsArt in PDF.

| Product Type | Elliptical Trainer (Cross Trainer) |
| Brand | SportsArt |
| Model | 8007 |
| Dimensions (L x W x H) | 170 x 65 x 170 cm (approx.) |
| Weight | 80 kg (approx.) |
| Max User Weight | 150 kg |
| Power Source | Self-powered (no external power required) |
| Resistance Type | Magnetic / Electromagnetic |
| Resistance Levels | 16 (typical) |
| Display Type | LCD with backlight |
| Display Metrics | Time, Distance, Speed, Calories, Pulse, RPM |
| Programs | 12 preset programs + manual |
| Heart Rate Monitor | Contact grips + wireless receiver (optional) |
| Stride Length | 45 cm (approx.) |
| Pedals | Oversized with anti-slip surface |
| Transport Wheels | Yes, front-mounted |
| Levelers | Adjustable rear feet |
| Warranty | 2 years parts and labor (typical) |
| Assembly Required | Yes, partial assembly |
| Maintenance | Clean with damp cloth; lubricate moving parts annually |
Frequently Asked Questions - 8007 SportsArt
User questions about 8007 SportsArt
0 question about this device. Answer the ones you know or ask your own.
Ask a new question about this device
Download the instructions for your Elliptical bike in PDF format for free! Find your manual 8007 - SportsArt and take your electronic device back in hand. On this page are published all the documents necessary for the use of your device. 8007 by SportsArt.
USER MANUAL 8007 SportsArt
ASSEMBLY INSTRUCTIONS
SPORTS ART COMMERCIAL GRADE 8007 Elliptical Trainer Assembly Manual
TABLE OF CONTENTS
- SAFETY GUIDELINES .... 1
- INTRODUCTION.... 2
- ASSEMBLING YOUR ELLIPTICAL TRAINER.... 3
List of parts.... 3
Assembly instructions.... 4
Step by step instructions.... 4
Floor level adjustment.... 10
- EXERCISING ON YOUR ELLIPTICAL 8007....11
Electronics package.... 11
Manual.... 11
Set 11
Using the interval mode.... 12
Interval 1....12
Interval 2....13
Program....13
Reset 14
Mode.... 15
- MAINTAINING THE ELLIPTICAL 8007....16
Cleaning the elliptical 8007....16
- GUIDELINES FOR EXERCISE.... 16
How long should I exercise.... 16
How often should I exercise.... 16
- TROUBLE SHOOTING.... 17
No display.... 17
If the LOAD does not respond properly 17
Replace Fuse....17
SAFETY GUIDELINES:
Please read and follow the following safety guidelines:
- Keep this owner's manual for future use and reference.
- Read this owner's manual and follow the instructions.
- Assemble and operate the Sports Art 8007 Elliptical Trainer on a solid, level surface.
- Never allow children on or near the machine.
- Check the machine before every use. Make sure all parts are assembled, and all nuts and bolts are tightened. Do not use the machine if the unit is disassembled in any way.
- Keep your hands away from moving parts.
- Wear proper workout clothing: Do NOT wear loose clothing. Do not wear shoes with leather soles or high heels. Tie all long hair back.
- Don't rock the unit from side to side, and use care when mounting and dismounting the unit.
- Do not use any accessories that aren't specifically recommended by the manufacturer these might cause injuries or cause the unit to fail.
• Work within your recommended exercise leveldo NOT work to exhaustion.
- If you feel any pain or abnormal sensations, STOP YOUR WORKOUT. And consult your physician immediately.
- The weight limit for this elliptical trainer is 330 LBS (150 KGS)
- Allow sufficient space on both sides of the elliptical for users to mount and dismount the machine.
- Please reserve a space for plug accessible when assembled or using the machine.
- The power cord must be replaced by a qualified technician only if the cord is damaged and have to be replaced
- If any parts fail or are defective, please stop your workout immediately and contact your authorized dealer for repairs.
CAUTION:
Before beginning any exercise program, you should consult with your doctor. It is recommended that you undergo a complete physical examination.
INTRODUCTION:
Congratulations on purchasing one of the finest piece of exercise equipment on the market today, the Sports Art 8007. Constructed of high quality materials and designed for years of trouble-free usage, the Sports Art 8007 will be an integral part of your fitness regimen.
Before using your Sports Art 8007, we recommend that you familiarize yourself with this Owner's Manual. Whether you are a first time user of an elliptical trainer or a seasoned "pro", understanding the correct use of the equipment will enhance your ability to achieve your exercise goals safely and successfully.
ASSEMBLING YOUR ELLIPTICAL TRAINER:
LIST OF PARTS
Before assembling this machine, make sure that you have all the following items:
| No. | Description | specification | purpose | pieces |
| 1. | hexagonal head bolt | 5/16" x 18UNC x L3/4" | Electronic post | 6 |
| 2. | Flat washer | 5/16" x t 2 | Electronic post | 6 |
| 3. | Bolt | 1/2 x 12UNC x L22mm | For Elliptical Arm | 4 |
| 4. | Philip Head Bolt | M5 x P0.8 x L12 | For Hinge Safety Cover | 4 |
| 5. | Philip Head Bolt | M5 x P0.8 x L12 | For water bottle | 2 |
| personal stere on holder | ||||
| 6. | screw | 5/16" x 18UNC x L3/8" | For Hex head | 8 |
| 7. | Flat Washer | 5/16" x t 2 | For Hex head | 8 |
| 8. | Spring washer | 5/16" x t 2 | For Hex head | 8 |
| 9. | hexagonal head bolt | 1/4" x 20UNC x L1-1/2" | For handlebar | 4 |
| 10. | hexagonal head bolt | 1/4" x 20UNC x L2" | For handlebar | 2 |
| 11. | Screw Driver | For Hinge Safety Cover | 1 | |
| 12. | Wrench | 14 x 19 mm | For arm hinge | 2 |
| 13. | Wrench | 12 x 15 mm | Floor level adjustment | 1 |
| 14. | Wrench Hexagonal Head | 5mm | For handlebar | 1 |
| 15. | Fuse | 1.5AMP,A(F) | For drive board | 1 |
| 16. | Wood block | 80 x 80 x t 30 | Underneath the front frame | 1 |
If any items are missing, contact your authorized service dealer.
ASSEMBLY INSTRUCTIONS:
Installation Requirements:
Read this owner's manual and follow the instructions contained herein.
Caution: Helpers are recommended to assemble the 8007 Elliptical Trainer. To avoid back strain, and to ensure safety to the unit and yourself, we suggest you to open out the folding covers on top and remove the parts inside, then remove the surrounding cover, then finally remove the frame.
Important: The packing for this unit is designed to protect it during transportation. Please store the original packaging in a safe place in case you need to move the unit in the future.
Step By Step Instructions:
This equipment is packed in 2 cartons.
When you remove the 8007 Elliptical Trainer from its box, first check to make sure all of the parts is present. Then, read through the assembly instructions before you begin.
- Put the wood block underneath the front frame (see Fig.1):
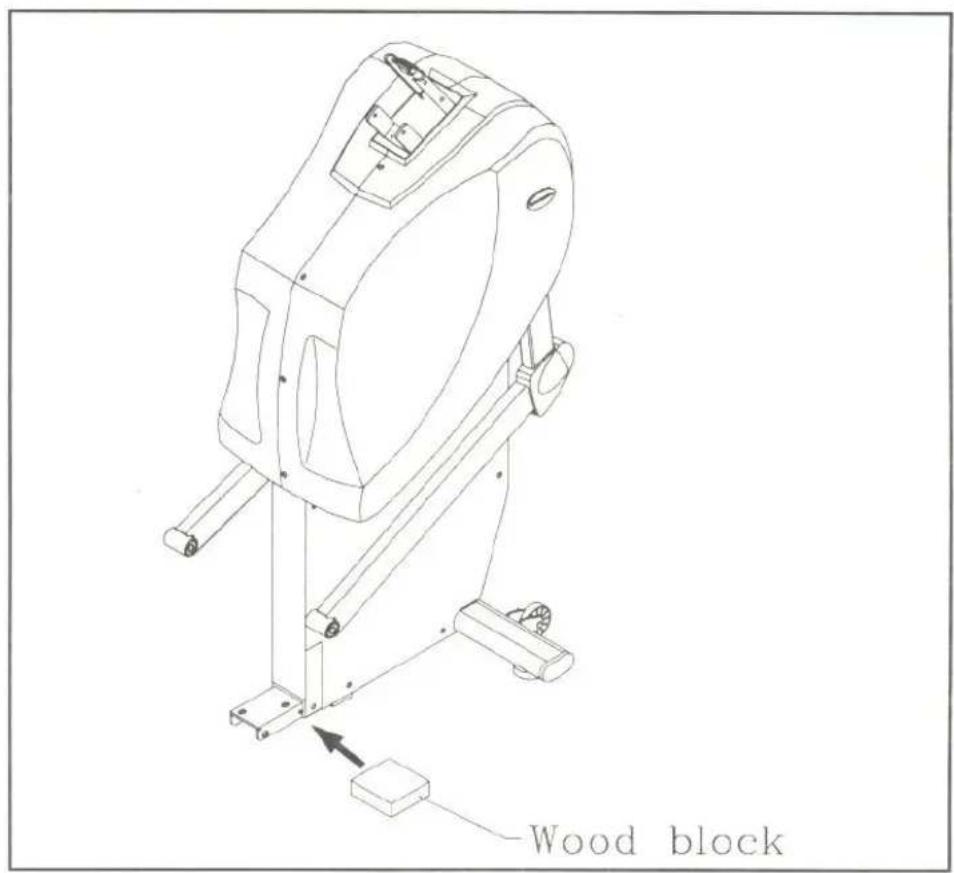
Fig.1
- Lift the rear frame and move forward to the front frame (see Fig.2).
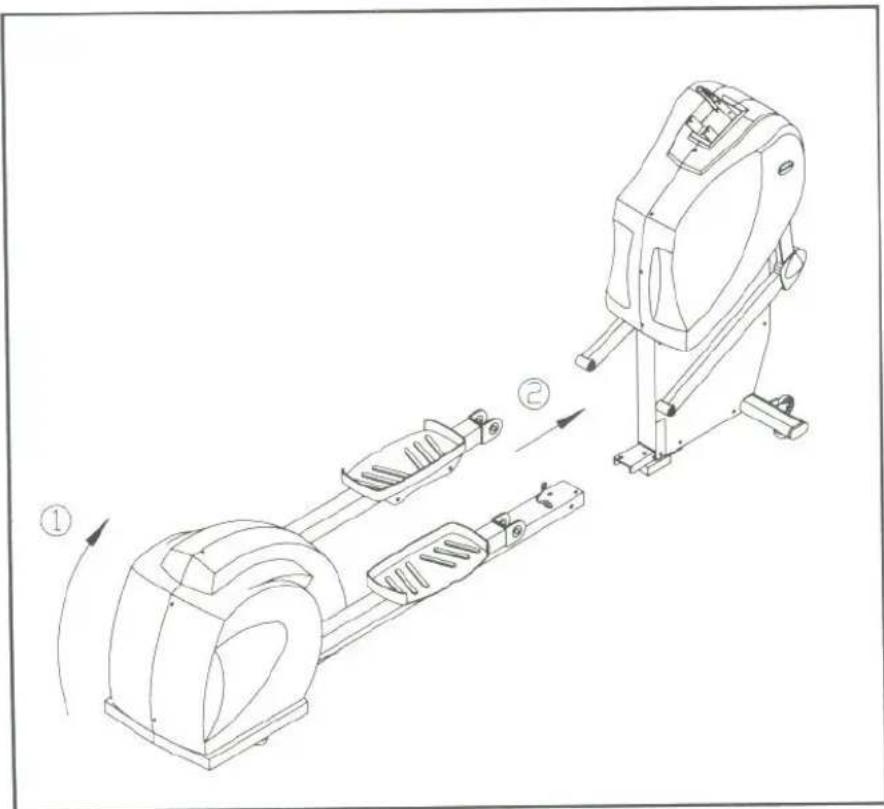
Fig.2
- Assemble the rear of the ELLIPTICAL frame to the front frame, secure frames by using two bolts, flat washers and spring washers provided.
Then take out wood block. (see Fig.3)
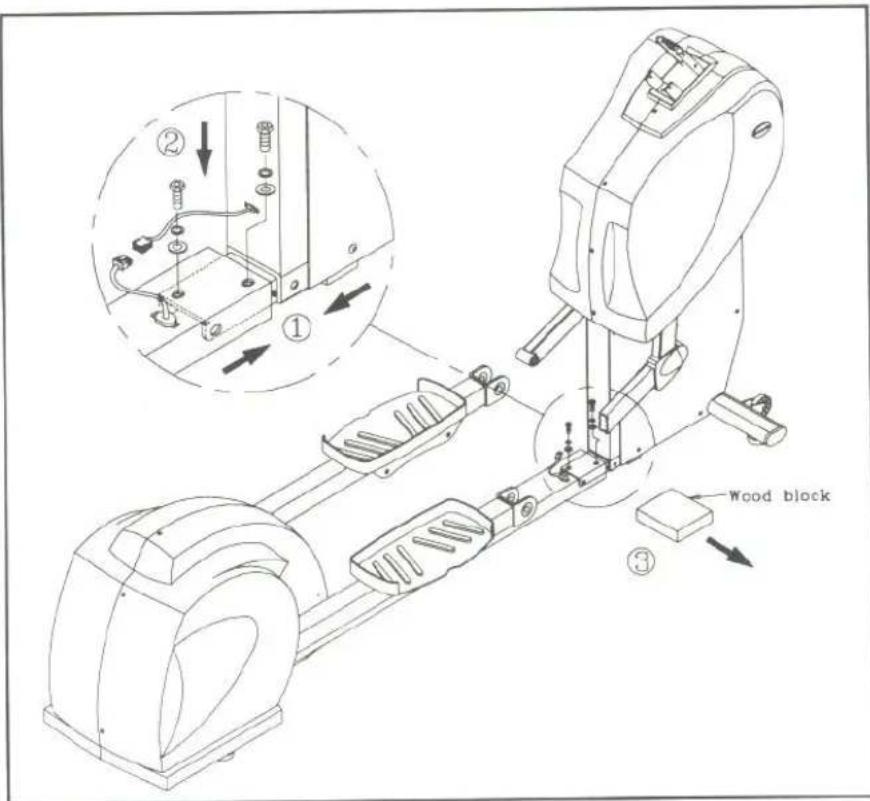
Fig.3
- Connect the ELECTRONICS WIRE on to the FRAMES, make sure securely plugged into its sockets (see Fig.4)
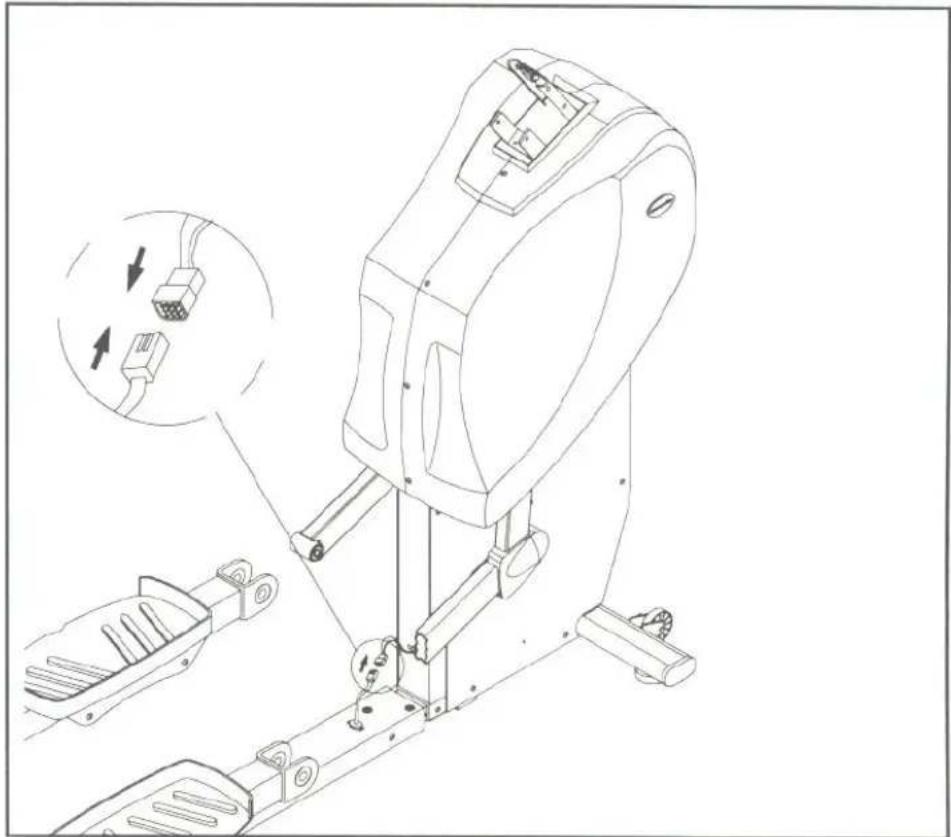
natural_image
Technical line drawing of a mechanical device with exploded view and internal component details (no text or symbols)Fig.4
- Assemble the HEX HEAD with six bolts, flat washers and spring washers provided. (see Fig. 5)
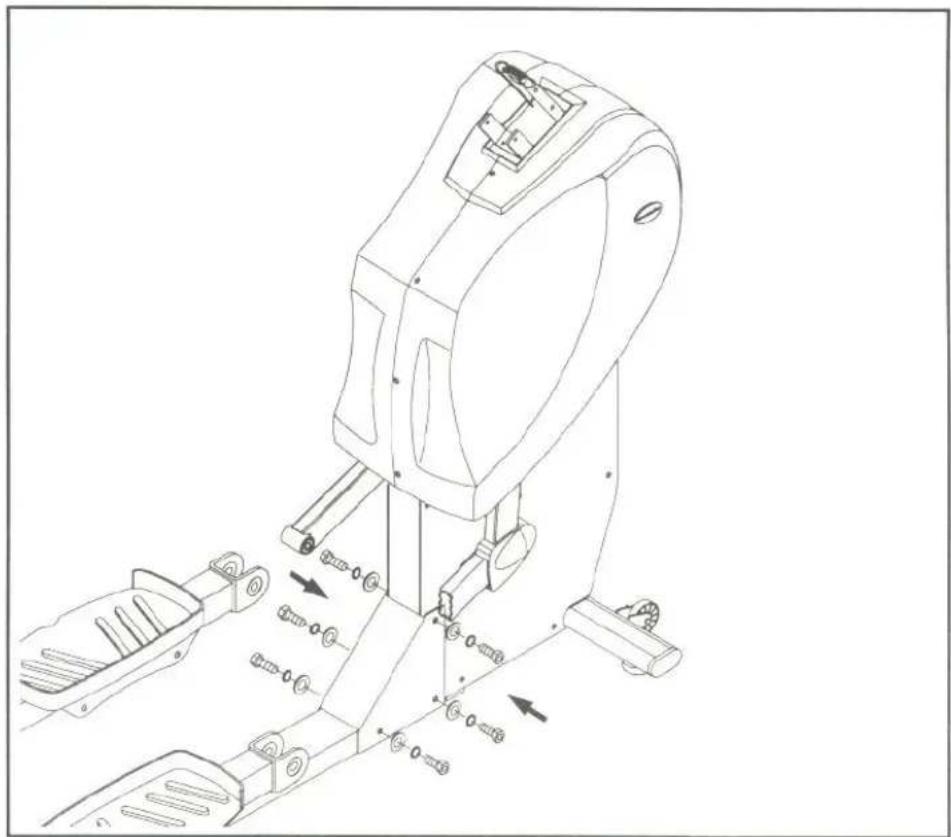
natural_image
Technical line drawing of a mechanical device with multiple components and directional arrows indicating motion (no text or symbols present)Fig.5
- While you cut the string, please take care of your body. (see Fig.6)
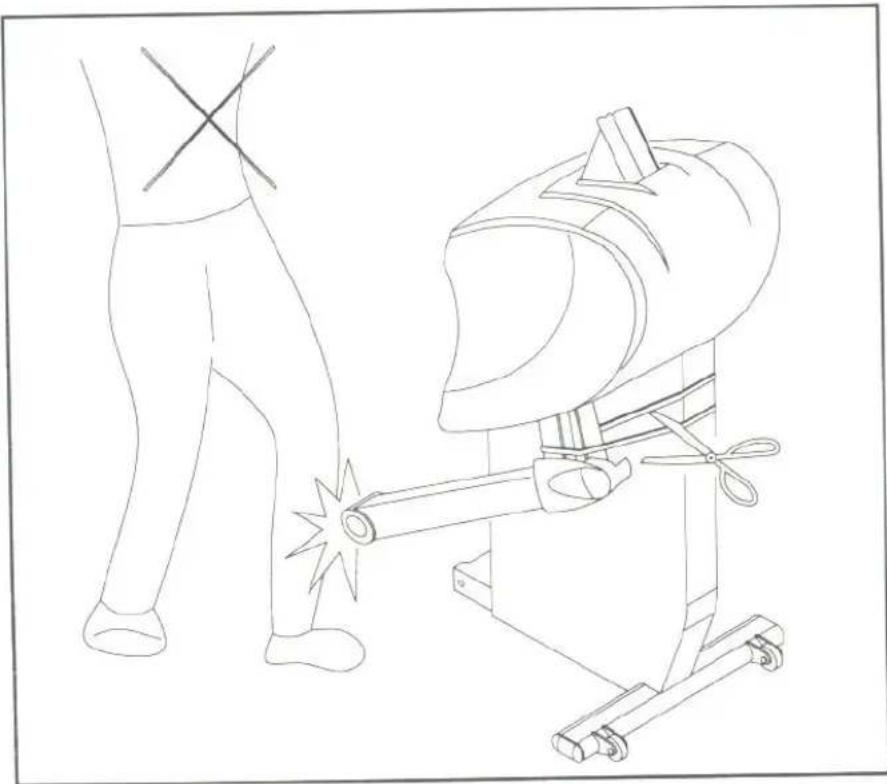
natural_image
Line drawing of a welding machine with a worker standing nearby (no text or symbols)Fig.6
- Connect each elliptical arm HINGE using the two bolts and washers provided, secure with an open-ended wrench.
Put HINGE SAFETY COVERS in place and secure using two screws on each side (see Fig. 7).
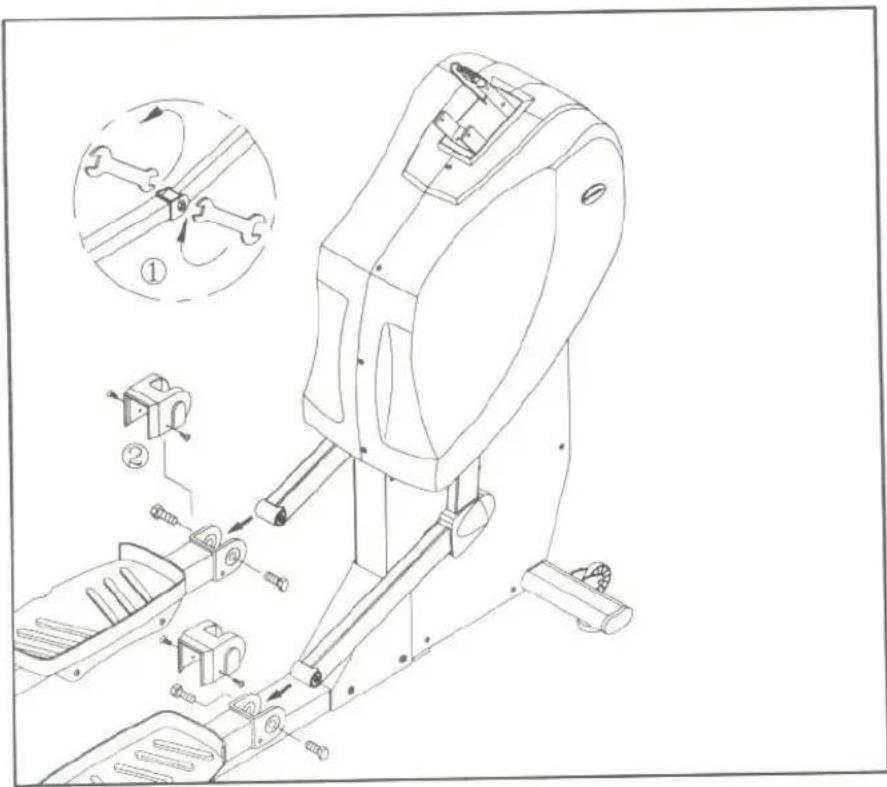
Fig.7
- Locate the 16 pin cable connector inside the front electronics post and insert it into the socket at the top of the unit's front cover. Tighten the connection securely by turning both screw pins clockwise (see Fig.8).
Insert the ELECTRONICS POST into its socket using six bolts, flat washers and spring washers provided. Secure with an open-ended wrench. Put WATER BOTTLE/PERSONEL STEREO HOLDER and BAR CLAMP on the UPRIGHT COLUMN - HANDLEBAR SUPPORT and screw them with each two screws, please don't screws, then too tight at this step (see Fig. 8\~9).
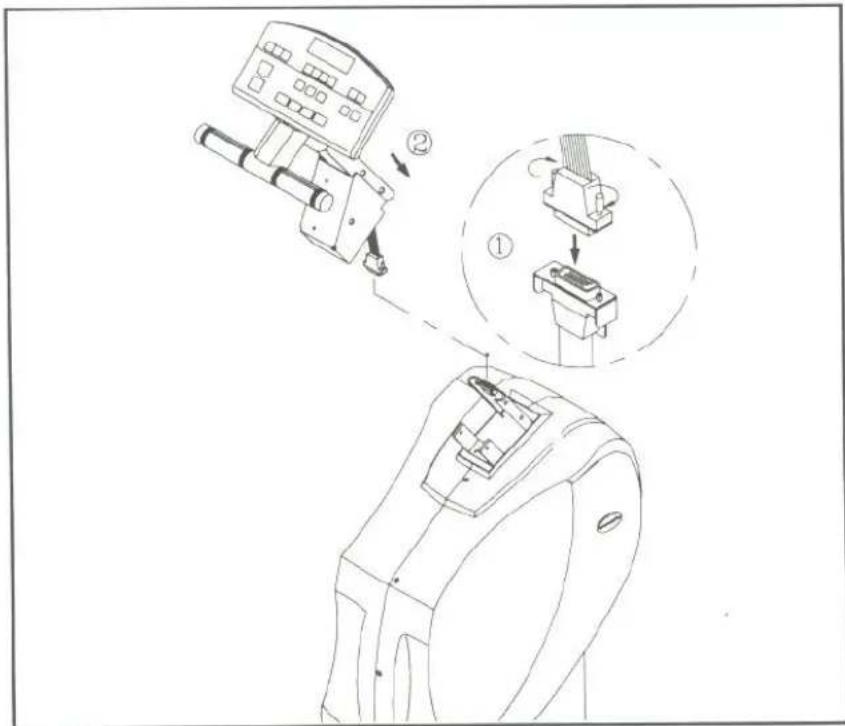
Fig.8
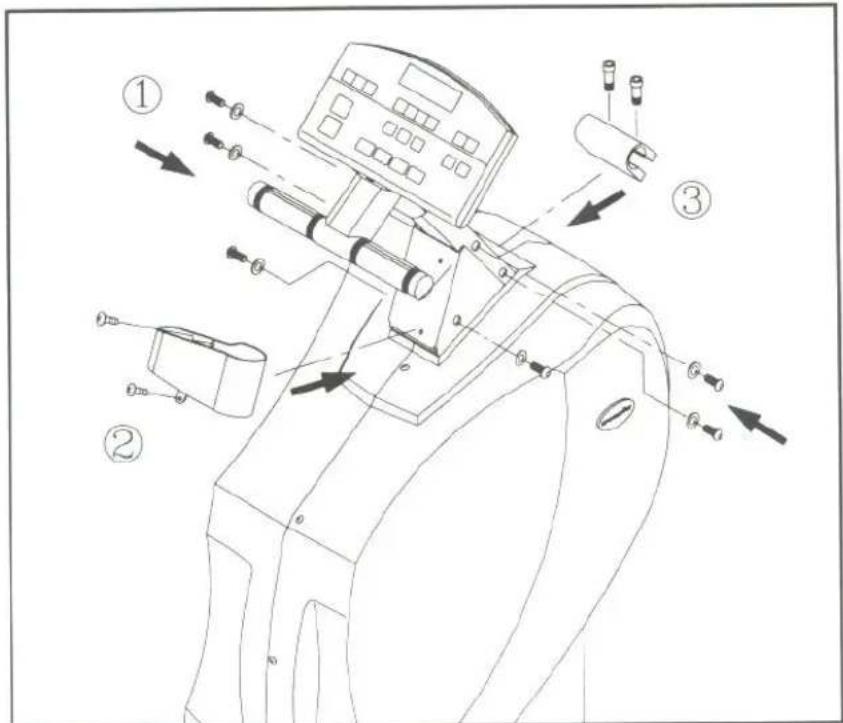
Fig.9
- Attach the HANDLEBARS into place and secure bolts provided, four 1 1/2" long bolts on the upper holder and two 1" long bolts on the lower holder, then secure with the hex Allen wrench (see Fig. 10).
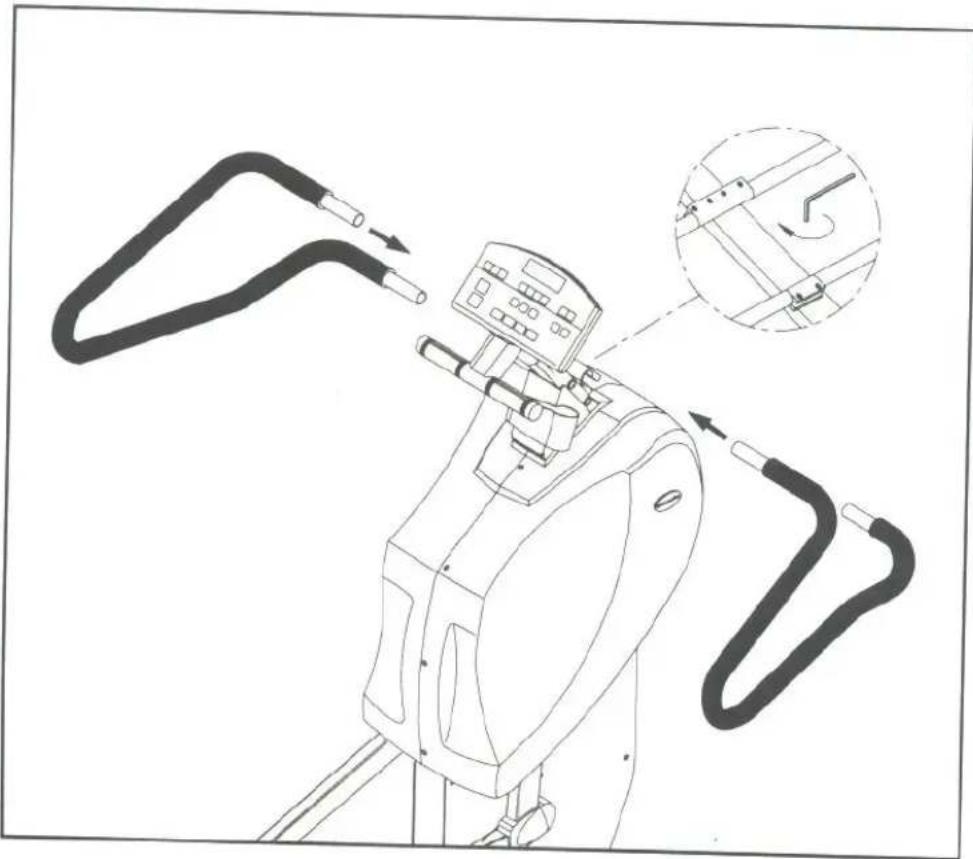
natural_image
Line drawing of a camera with attached cables and a magnified inset showing the cable being adjusted (no text or symbols present)Fig.10
Floor Level Adjustment:
If the 8007 is unsteady on your floor, turn the FLOOR LEVEL ADJUSTMENTS on the front feet of the 8007. Raise or lower the floor level adjustment to steady your 8007.(see Fig.11).
natural_image
Technical line drawing of a mechanical device with levers and a wrench, showing no text or symbolsFig.11
For a more steady operation during your workout, please turn the floor level adjustments to keep 4 \~ 6 mm as the space between the shoes and the floor. (see Fig. 12)
Fig.12
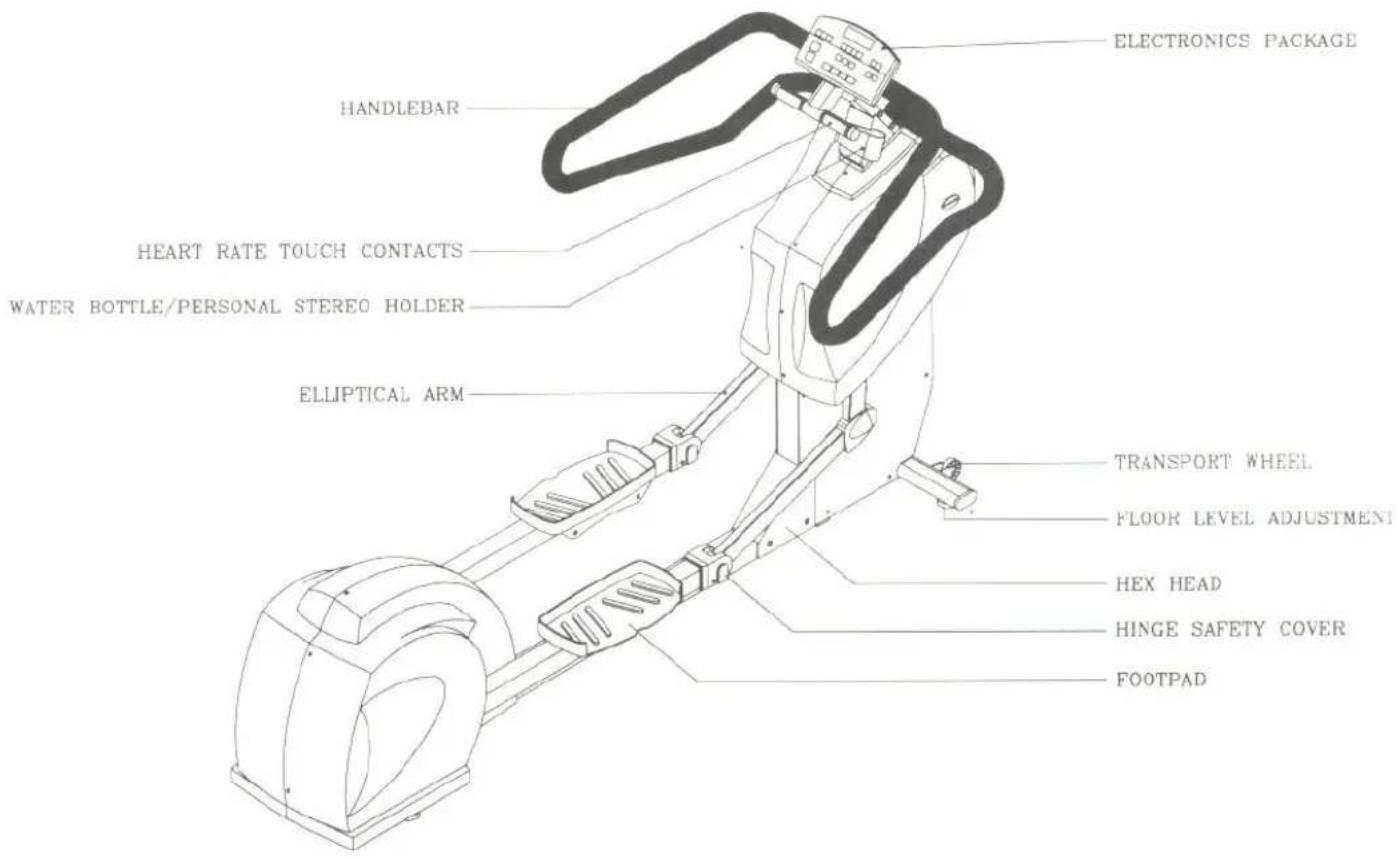
ELECTRONICS PACKAGE
As soon as you press the button "ON" in the ELECTONICS PACKAGE or pedal your elliptical 8007, you will automatically enter the MANUAL Mode, starting at "LEVEL 5." If this is the MODE you wish to use, you may begin. The equipment will shut off the power automatically when you stop to pedal it more than two minutes.
PLEASE NOTE: There are 14 levels, with Level 1 being the easiest workout (the steps fast and light), and LEVEL 14 being the hardest workout. Use the ≧ ≧ buttons to choose the desired level.
Once you have made your choice, the electronics will display the word "MAN'L," and you will be prompted to "STEP TO START."
MANUAL
- When "MAN'L" appears in the display window, you can adjust the LEVEL to your desired level.
- Press the LEVEL ≧ button to choose your desired workout LEVEL. The display will prompt you to "STEP TO START."
- If you stop in the middle of your workout, you will be prompted to "STEP TO START". All input data (TIME, STEPS, CAL., etc.) will be retained.
- You can use the MODE button to switch between SCAN, TIME, STEPS, CAL or PULSE. Use the = ≠ buttons to set the desired TIME or STEPS.
SET:
Press the MANUAL/SET button, and "MAN'L" will show in the display. Press the button once again, and "SET" will appear in the display. Then press ENTER.
INPUT YOUR WEIGHT
- You can choose between KG/LB while you are in the SET MODE.
- The readout will display "PRESS+ - TO SELECT KG/LB." Press = # buttons to select either KG or LB, then press ENTER to save your selection.
- Next you will be prompted to "PRESS + -TO INPUT WEIGHT", a starting weight (either 50 LB or 22 KG) will appear. Use the = # buttons to change the weight. Pressing the button once changes the weight 1 LB or 1 KG. Holding the button down will change the weight 10 LB or 5 KG every 0.5 seconds. The weight range available is 50-330LB and 22-150 KG. Press ENTER to save your data and the system will return to MANUAL mode.
USING THE INTERVAL MODE
This outstanding equipment can provide varied choice function in exercise as your need.
A. INTERVAL 1:
INTERAL Mode can provide two exercise workload - REST and WORK in turn. The LEVEL will alternate with each other basis on your setting.
1. Setting the REST workload:
Press the INTERVAL button and you will be in "INTV. 1". If this is what you need, then press ENTER. The LED will display the message: "INPUT REST LEVEL & TIME", then press ENTER. Proceoure as below.
a. When REST appears in the main display.
b. Adjust the desired level by using the ≧ ≧ buttons.
c. Select the desired REST time (in seconds) by using the = + buttons.
d. Then press ENTER to confirm your input data.
2. Setting the WORK workload:
After the REST level and time have been set, the LED will display the message: "INPUT WORK LEVEL & TIME", then press ENTER.
When WORK appears in the main display, adjust the desired level by using the ≧ ≧ buttons. Select the desired WORK time (in seconds) by using the ≧ ≧ buttons, then press ENTER to confirm your input data.
Then the LED will display the massage: "ENTER TOTAL TIME." Adjust the total time by using the = # buttons, and press ENTER to complete INTERVAL1.
- If you forget to press the "ENTER", the display will remind you to press the "ENTER".
- You can change the level in REST or WORK by using the ≧∧buttons at any time during your workout.
When you exercise in reaching your setting time under the REST level, the readout will display the words of "GOING TO WORK LOAD" and then will automatically change to the WORK MODE as your previous setting.
After you workout in reaching your setting time in the state of the WORK level, the readout will display the words of "GOING TO REST LOAD" and then will automatically alternate the REST MODE.
PLEASE KEEP BELOW SETTING RANGE IN MIND
The TIME setting of REST/WORK: 60\~250 seconds.
B. INTERVAL 2 :
Interval 2 allows you to design your own workout program. There are eight segments in Interval 2. Press the INTERVAL button until you see INTV 2 in the window, then press ENTER.
You will be prompted to "ENTER SEGMENT 1 LEVEL & TIME." Input the data of level and time for segment 1, press ENTER and then SEG 1 will appear on the display.
a) Use the ≧ or ≧ buttons to select the desired LEVEL.
b) Then, use the = # buttons to select the desired TIME (in seconds).
Press ENTER to confirm your desired SEG. 1 setting, then "ENTER SEG 2 LEVEL & TIME" will appear in the window. For Segments 2-8 setting, please refer to the instructions above. Once all segments are set, the SEGMENT figure will appear on the display. It means that's your own program, under INTV. 2, has been recorded. If you don't want to set all the 8 segments, you can set a value of zero in your desired ending segment. For example, if you only want to set four segments, leave the TIME of SEG 5 with a value of zero, and the Elliptical 8007 will use only your desired four segments.
You can promote your exercised load LEVEL more or less by using the ≧ ≧ buttons at any time during your workout.
If you stop in the middle of your workout, you will be prompted to "STEP TO START." All input data (TIME, CAL., LEVEL, etc.) will be retained.
PROGRAM
The Elliptical 8007 features a total of twelve (12) professionally designed workout programs. These programs control the level of your workout.
-
Press the PROGRAM button to scroll between the 12 Programs. When you have selected the program you want, press the "ENTER". You will be prompted to "PRESS + - TO SELECT TIME/STEPS", use the # = buttons to switch between TIME and STEPS, then press ENTER. Use the # or = button to set your desired STEPS or TIME. Once you have set your desired steps or time, press ENTER. If you don't press ENTER, the display will remind you to "PRESS ENTER"
-
The program profile will be displayed in the LED window, and the program will begin when you start stepping. If you do not begin stepping immediately, you will be prompted to "STEP TO START."
- During these programs, the unit will automatically switch between levels, varying your workout.
- When your desired STEPS or TIME is reached, a beep will sound for 10 seconds, after which the machine will begin to count up.
THE COURSE PROFILES FOR EACH PROGRAM ARE AS FOLLOWS:
Even though the programs feature preprogrammed levels, you can change the level anytime during your workout.
If you stop in the middle of your workout, you will be prompted to "STEP TO START." All input data (TIME, , LEVEL, CAL., etc.) will be retained.
RESET
To change any of the data in MAN'L, SET, INTV., PROGRAM and MODE, simply press the RESET button, and the existing data will be cleared. Then you can re-enter the new data.
MODE (What each of these categories means):
SCAN: Pressing the MODE button to "SCAN" mode will result in the display alternating between Mode of TIME, STEPS, CAL, PULSE readouts every 4 seconds.
TIME: Use the =# buttons to set the desired time of your workout. Each press of the button changes the time in change of 1 minute. Pressing and holding the button will change the display by 5 minutes every 0.5 seconds. When you have reached the desired time, press ENTER.
During your workout, the electronics package will count down, and then beep for 10 seconds when your desired time is reached. If your workout continues, the unit will start to count up.
STEPS: Use the = # buttons to set your desired steps. Each press changes 10 steps. Pressing and holding the button will change the display by 50 steps every 0.5 second. When you have reached your desired steps, press ENTER to confirm your steps.
During your workout, the electronics package will count down, and then beep for 10 seconds when your desired steps have been reached. If your workout continues, the unit will start to count up.
CAL: This readout gives you the amount of calories burned, based on the weight entered and steps during your workout.
STEPS/MIN: This readout displays the steps per minute.
If your machine is equipped with heart rate control (HRC) or hand touch readout (HTR) function, please refer to its respective Instruction manual as attached for more information.
MAINTAINING THE ELLIPTICAL 8007
This ELLIPTICAL 8007 requires little maintenance. The ELLIPTICAL 8007 smooth operation is dependent on keeping the unit as clean as possible. See "Cleaning the Elliptical 8007" for further information.
CLEANING THE ELLIPTICAL 8007
Regular cleaning is recommended to keep your ELLIPTICAL 8007 at peak performance.
Before your workout, use a dry cloth to clean the surface of the electronics package.
NOTE: NEVER POUR LIQUIDS ON THE ELECTRONICS PACKAGE.
Should water, for some reason, get in the electronics package, immediately blow dry the electronics package.
To clean the plastic parts, use a mild detergent and make sure the unit is completely dry before operating.
It is recommended that you keep all liquids away from the unit during operation. Spillage of liquids onto or into the machine will void the warranty.
GUIDELINES FOR EXERCISE
How long should I exercise?
The duration of your exercise session is dependent on your fitness level. In general, it is recommended that you maintain your heart rate in the training zone for at least 10 minutes to realize an aerobic benefit. As your fitness level increases, you will be able to maintain your heart rate in the training zone for longer periods, usually between 20 and 30 minutes.
When first starting your workout, use the first several minutes to warm up, then slowly increase your workload to bring your heart rate into your specific training zone. At the end of your workout, gradually decrease your workload, then exercise lightly as a "cool down".
How often should I exercise?
Aerobic exercises, to achieve the greatest benefits, should be performed 3-5 times a week. It is important to allow sufficient time, at least 24 hours, for your body to recover after exercise.
TROUBLE SHOOTING:
NO DISPLAY:
If there is still no response after you pedal more than 2 minutes, please contact your dealer for further details.
IF THE LOAD DOES NOT RESPOND PROPERLY :
If there is no load or the load does not respond properly when you set the LEVEL, please contact your dealer for further details.
Replace Fuse:
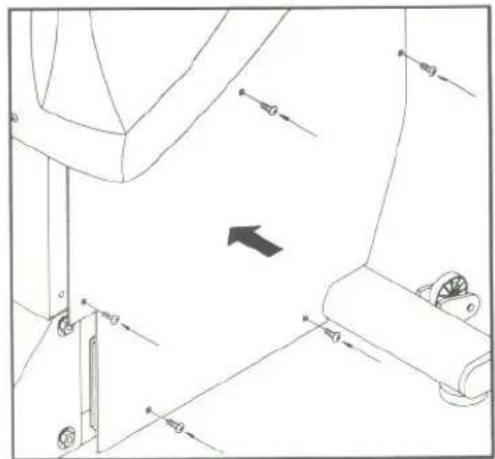
Unsecure 5 screws from right sidecover. (see Fig.13-1)
There is fuse holder near battery. Press both ends ① together and turn counterclockwise ② to remove the damaged fuse ③ (see Fig.13-2)
Insert a new fuse in the holder ④. Press both ends of holders ⑤, then turn clockwise to secure the fuse holder ⑥. (see Fig.13-3)
Secure 5 screws back on front sidecover. (see Fig.13-4)
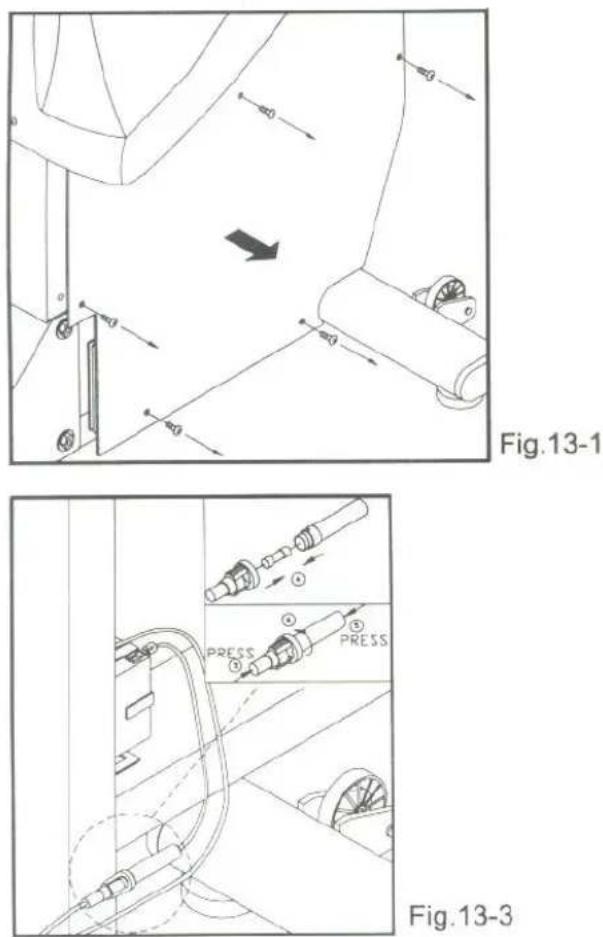
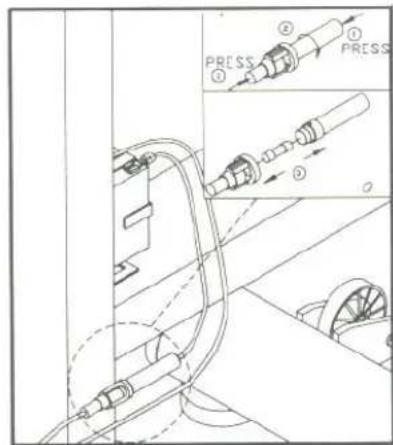
Fig.13-2
natural_image
Technical line drawing of a mechanical assembly with no visible text or symbolsFig.13-4
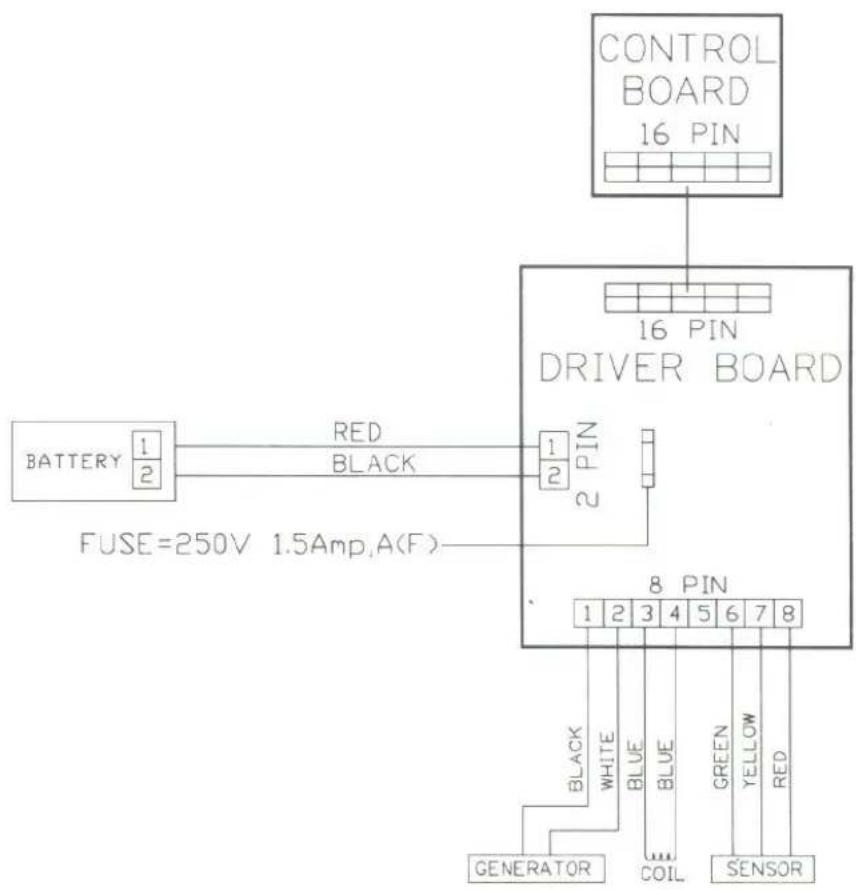
flowchart
graph TD
    A["CONTROL BOARD\n16 PIN"] --> B["16 PIN DRIVER BOARD"]
    B --> C["8 PIN"]
    C --> D["GENERATOR"]
    C --> E["COIL"]
    C --> F["SENSOR"]
    G["BATTERY"] --> H["1/2"]
    H --> I["FUSE=250V 1.5Amp,A(F)"]
    I --> J["RED BLACK"]
    J --> K["2 PIN"]
    K --> L["1/2"]
    L --> M["8 PIN"]
    M --> N["1 2 3 4 5 6 7 8"]
    O["BLACK"] --> P["BLUE"]
    Q["WHITE"] --> R["GREEN"]
    S["COIL"] --> T["YELLOW"]
    U["RED"] --> V["SENSOR"]
Your Authorized SPORTS ART Distributor

TÜV-CERT ISO 9001 AND 9002
CERTIFIED QUALITY PRODUCTS
SPORTS ART INDUSTRIAL CO., LTD.