
KA CEH 11 - Heating KALORIK - Free user manual and instructions
Find the device manual for free KA CEH 11 KALORIK in PDF.


| Type of product | Fan Heater |
| Brand | Kalorik |
| Model | KA CEH 11 |
| Power | 2000W |
| Heating type | Ceramic |
| Number of heat settings | 2 (1000W / 2000W) |
| Fan only mode | Yes |
| Thermostat | Adjustable |
| Oscillation | Yes |
| Overheat protection | Yes |
| Tip-over switch | Yes |
| Dimensions (H x W x D) | 22 x 15 x 13 cm |
| Weight | 1.2 kg |
| Noise level | ≤ 45 dB |
| Power supply | 220-240 V, 50 Hz |
| Power cord length | 1.5 m |
| Carrying handle | Yes |
| Indicator light | Yes |
| Protection class | Class II |
| Cleaning instructions | Unplug and wipe with a dry cloth |
| Accessories included | None |
| Repairability | Non-repairable by user; contact service center |
Frequently Asked Questions - KA CEH 11 KALORIK
User questions about KA CEH 11 KALORIK
0 question about this device. Answer the ones you know or ask your own.
Ask a new question about this device
Download the instructions for your Heating in PDF format for free! Find your manual KA CEH 11 - KALORIK and take your electronic device back in hand. On this page are published all the documents necessary for the use of your device. KA CEH 11 by KALORIK.
USER MANUAL KA CEH 11 KALORIK
☐ Please read these instructions carefully, most of all the instructions concerning the installation of the appliance, before using the appliance.
☐ Check that your mains voltage corresponds to that stated on the rating plate of the appliance.
☐ Never leave the appliance unsupervised when in use. Keep out of reach of children or incompetent persons.
From time to time check the cord for damages. Never use the appliance if cord or appliance shows any signs of damage but have it checked and repaired by a competent qualified service(*). Should the cord be damaged, it must be replaced by a competent qualified service (*)
☐ Only use the appliance for domestic purposes and in the way indicated in these instructions.
☐ Never immerse the appliance in water or any other liquid for any reason whatsoever. When cleaning the appliance, refer to the instructions in the paragraph "Cleaning and care" because the water penetration through the openings can be very dangerous for your appliance.
☐ Never use the appliance near hot surfaces.
Before cleaning and when you do not use the appliance, always unplug the appliance from the power supply. Do not attempt to remove the plug from the wall socket with wet hands.
□ Never use the appliance outside and always place it in a dry environment.
☐ Never use accessories that are not recommended by the producer. They could constitute a danger to the user and risk to damage the appliance.
☐ Never move the appliance by pulling the cord. Make sure the cord cannot get caught in any way. Do not wind the cord around the appliance and do not bend it.
☐ No responsibility is accepted if damage results from improper use, or if these instructions are not complied with.
□ Always position the heater in such a way that inflammable materials (such as curtains) cannot be ignited.
☐ Your appliance should be mounted at a height of at least 1.8m from the floor and at a distance of at least 30 cm from the ceiling and at least 20 cm from the side walls.
Do not place the appliance under a power socket. The power socket must not be in the hot airflow of the appliance in order to avoid overheat.
☐ Never orient the appliance towards the ceiling, but orient it horizontally or downwards. This safeguard is primordial in order to avoid excessive heating of the ceiling that could result in the deterioration of its coating.
To avoid any risk of fire, do not cover the heater with clothes or any other object.
☐ Warning: Do not operate the heater near baths, showers, washbasins, swimming pools or any other water container. It must be impossible to reach the commands of your appliance when you are in contact with water.
☐ Do not allow the power cord to touch any hot part of the appliance.
☐ Never use the appliance near inflammable or explosive materials.
☐ Do not insert any objects through the grid or into the interior of the appliance.
POSITIONING OF THE APPLIANCE
This heater is specially designed so that it can be used in any room in your house, including those where there is a risk of water being splashed onto it from above (kitchen, bathroom, etc.) However, the electrical installation in the room, the installation of the unit and the way the unit is used must all comply with safety rules standards in force in your country.
The safety rules define 3 volumes in a bathroom (see diagram on page 2). This unit must only be installed in zone 3 of the room so that the control panel cannot be touched by anyone using the bath or shower. For other rooms in the house, please follow this rule: The heater should only be operated at a minimum distance of 50cm from any other object.
Position the air flow in order to optimise the heating of the room. Avoid corners, small volumes, floors and ceilings.
Caution: the heater is to be installed at least 1m80 above the floor.
WALL-MOUNTING
Make sure all the packaging has been removed before any operation.
This appliance is intended to be wall-mounted.
For wall-mounting, proceed as follows:
Caution: the heater is to be installed at least 1m80 above the floor.
• Measure the distance between the 2 slots on the back of the heater (see figure below).
- Take a pencil and mark 2 dots on the wall making sure the distance between them is the same as the one you just measured.
- Drill a hole on each dot you just marked.
- Put a plug in the holes, put the brackets against the holes and tighten the screws.
- Put a rubber protection cap (the small part inside the appliance) in each of the 4 holes on the back of the heater in order to protect the wall.
• To fix the appliance on the brackets, slide it from top to bottom in the slots.
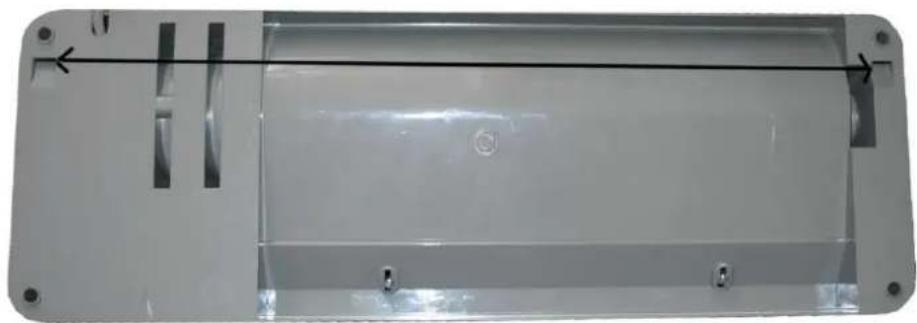
natural_image
Exterior view of a white plastic enclosure with mounting holes and internal compartments (no text or symbols visible)BATTERIES
- In order to be able to use the remote control, you first have to insert the batteries in it. To do so:
- Open the battery compartment.
- Insert the batteries, making sure you respect the + and - polarity.
- Close the compartment. Use 2 AAA-type batteries of 1.5 V. Never mix up new and old batteries or batteries of different types.
- When you decide to throw away the appliance, make sure to remove the batteries and to dispose of them in an ecological manner by handing them in a place intended for this end.
Caution: if you don't use your remote control for a long time, it is recommended to remove the batteries because they could run.
USE
When the appliance is switched on for the first time, a slight smell may be emitted. Please ensure sufficient ventilation. This smell will disappear very quickly.
The heater may be operated with the control panel located on the heater or with your remote control.
- Mount the heater on the wall as explained in the "wall-mounting" paragraph. CAUTION: NEVER USE THE APPLIANCE WHEN NOT MOUNTED ON THE WALL.
-
Plug in the appliance. Press the "Function ON/OFF" button on the control panel or the "ON/OFF" button of the remote control to switch on the heater. A beep will sound and the red light will come on indicating that there is power to the unit. The heater is ready for use. The red light will remain lighted during functioning.
-
Upon turning the heater on, the unit will be in the fan mode.
-
To select a temperature, proceed as follows: To select the minimum temperature (1000W), press the 1000W button of the remote control or the "Function ON/OFF" button on the control panel several times until the corresponding green pilot light switches on. To select the maximum power, press the 2000W button on the remote control or press the "Function ON/OFF" button on the control panel several times until the corresponding green pilot light switches on.
-
By pressing the "TIMER" button on the control panel or of the remote control, you can set the switch-off time of the appliance. The timer is adjustable from 0.5 hour (min) up to 7.5 hours (max). Every pressing corresponds to 0.5 hour. Some settings will switch on several pilot lights. For instance, if you select 1 hour and 30 minutes, the pilot lights corresponding to 0.5h and 1h will be on.
-
Your appliance is fitted with a swing function that allows the air flow to change direction. To switch on this function, press the "SWING" button of the remote control or press the "Function ON/OFF" button on the control panel several times until the corresponding green pilot light switches on. If you switch on the swing function with the control panel, it will only work in combination with 2000W power. If you switch it on with the remote control, it will work with any power (1000W, 2000W or cool air).
-
To switch off the appliance, press the "Function ON/OFF" button on the control panel several times until only the red light stays on or the "ON/OFF" button of the remote control. The fan will stay on for a few minutes so that the appliance cools down. Unplug the heater when you do not use it.
SAFETY DEVICES
- This heater is protected with an overheat protection that switches off the appliance automatically in case of overheat, e.g. due to the total or partial obstruction of the grids. In this case, unplug the appliance, wait about 10 minutes for it to cool and remove the object that is obstructing the grids. Then switch it back on as described above. The appliance should operate normally. Should the problem persist, please contact the nearest customer service.
6 KA CEH 11 - 060622
MAINTENANCE AND CLEANING
- Before cleaning the appliance, ensure it is disconnected from the power supply and has cooled down completely.
- The housing may be wiped with a slightly damp, lint-fee cloth; do not use any abrasive scouring pad or steel wool.
• The grids are particularly delicate; to clean them you can carefully use a vacuum cleaner. - When you do not use the appliance, place it in a dry environment.
PROTECTION OF THE ENVIRONMENT- DIRECTIVE 2002/96/EC
In order to preserve our environment and protect human health, the waste electrical and electronic equipment should be disposed of in accordance with specific rules with the

implication of both suppliers and users. For this reason, as indicated by the symbol was the rating label or on the packaging, your appliance should not be disposed of as unsorted municipal waste. The user has the right to bring it to a municipal collection point performing waste recovery by means of reuse, recycling or use for other applications in accordance with the directive.
P MODO DE EMPREGO
PENSANDO NA VOSSA SEGURANÇA
natural_image
Exterior view of a transparent plastic enclosure with mounting holes and internal structure (no text or symbols)9 KA CEH 11 - 060622
COLOCAR AS PILHAS
- POSITIONING OF THE APPLIANCE
- WALL-MOUNTING
- Caution: the heater is to be installed at least 1m80 above the floor.
- BATTERIES
- Caution: if you don't use your remote control for a long time, it is recommended to remove the batteries because they could run.
- USE
- SAFETY DEVICES
- MAINTENANCE AND CLEANING
- PROTECTION OF THE ENVIRONMENT- DIRECTIVE 2002/96/EC
- P MODO DE EMPREGO
- PENSANDO NA VOSSA SEGURANÇA
- COLOCAR AS PILHAS
Brand : KALORIK
Model : KA CEH 11
Category : Heating