
DVRTAXI - Security Camera ELRO - Free user manual and instructions
Find the device manual for free DVRTAXI ELRO in PDF.


| Product Type | Security Camera |
| Model | DVRTAXI |
| Brand | ELRO |
| Dimensions | Approximately 10 x 5 x 5 cm |
| Weight | Approximately 150 g |
| Power Supply | DC 12V, 1A |
| Main Functions | Video recording, motion detection, night vision, loop recording |
| Storage | MicroSD card up to 32 GB (not included) |
| Lens Angle | 120 degrees |
| Video Resolution | 1080p Full HD |
| Night Vision Range | Up to 10 meters |
| Operating Temperature | -10°C to 50°C |
| Material | Plastic housing |
| Mounting | Wall mount or suction cup mount |
| Connectivity | AV output, USB (for power) |
| Care Instructions | Clean lens with soft cloth; avoid moisture and dust |
| Safety Warnings | Do not disassemble; use only supplied power adapter |
| Spare Parts | Power adapter, mounting bracket, USB cable |
| Repairability | Not user-serviceable; contact manufacturer for repairs |
| General Information | Designed for vehicle or home security use |
Frequently Asked Questions - DVRTAXI ELRO
User questions about DVRTAXI ELRO
0 question about this device. Answer the ones you know or ask your own.
Ask a new question about this device
Download the instructions for your Security Camera in PDF format for free! Find your manual DVRTAXI - ELRO and take your electronic device back in hand. On this page are published all the documents necessary for the use of your device. DVRTAXI by ELRO.
USER MANUAL DVRTAXI ELRO
SAFETY AND MAINTENANCE INSTRUCTIONS
- Make sure that all electric connections and connection cables meet the pertaining regulations and are in conformity with the operating instructions.
- Do not overload electrical outlets or extension cords. Fire or electric shocks can be the result
- Please contact an expert in case you have any doubts about the mode of operation, the safety or
connecting the appliances
- Keep all parts away from young children's reach
- Do not store this item on wet, very cold or warm places, this can damage the electronic circuit boards.
- Avoid dropping or shocks, this can damage the electronic boards
- Never replace damaged power cables yourself! In such a case, remove them from the net and take the
devices to a workshop.
- Repairs or opening of this item may only be performed by an authorised workshop.
- Wireless systems are subject to interference from cordless phones, microwaves, and other wireless devices operating in the 2.4GHz range. Keep the system AT LEAST 10.8 GHz from the devices during
devices operating in the 2.4GHz range. Keep the system installation and operation
In favor of the
Maintenance
The devices are maintenance-free, so never open them. The guarantee becomes void when you open the appliance. Only clean the outside of the devices with a soft, dry cloth or a brush. Prior to cleaning, remove the devices from all voltage sources.

Do not use any carboxylic cleaning agents or petrol, alcohol or similar. These attack the
surfaces of the devices. Besides, the vapors are hazardous to your health and explosive. Do not
use any sharp edged tools, screw drivers, metal brushes or similar for cleaning
Max. storage capacity
Sensor : 1/4 Upgraded CMOS
表决方式:
Resolution
Lens View angle
View angle Cable
Night vision
Camera waterproof
Power supply : 12/24V DC and 230VAC adapter
Power consumption Operating temperature
Operating temperature
"For best performance, it is suggested to
For best performance, it is suggested to use SD memory that is supplied with the
use 3D memory product"
product .


DVRTAXI
CAR DVR SYSTEM


natural_image
Exterior view of a gray rectangular electronic device labeled 'TAXI RECORER' with control buttons and ports (no readable text beyond branding)

USER'S MANUAL

BEDIENUNGSANLEITUNG

PODRE CZNIK UZYTKOWNIKA

HANDLEFIDING

MANUEL DE L'UTILISATEUR

MANUAL DEL USUARIO

HIZLI KLAVUZ

EGE EEE EE EE

UŽIVATELSKÝ MANUÁL

HASZNBLATI BTMUTATY

MANUALUL UTILIZATORULUI

UPUTSTVA ZA UPORABU

natural_image
Assorted electronic devices including a charging plug, cable bundles, and power cord (no visible text or labels)2

BACK

3
4
5

6
©
©

7
8

9

10

GB
The DVRTAXI allows for easy storage or images, the maximum recording time depends on the SD card capacity. The standard LJ01MB SD card can store about 33 minutes of recording. The various
recording options make the recorder suitable for different situations and demands. DVIRTAXI product is especially made for taxi drivers.
CONTENTS OF THE PACKAGING (1)
a. Digital SD recorder with border+veacro for car b. Camera with 5m cable and extra magnet sheets
c. Video cable d. Power adapter
e. Remote contro
t. Wired control switch g. Cigarette's lighter adapt
h. SD card RECORNER'S FR
a. DC IN Jack f. SD Ca
b. CH3 Camera 1 Input Jack p. Low Memory/Record Indicator c. CH2 Camera 2 Input Jack (optional) h. Remote Controller Reception
d. AV OUT Jack e. BC Wind Control Switch Jack
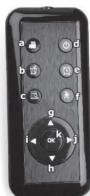
REMOTE CONTROLLER VIEW (3)
a. RBC - start/stop manual recording g. ▲ - navigator UP; channel switch b. DELL -delete selected file('playback mode') h. ▼ - navigator DOWN; channel switch
c. MENU - enter/exit menu d. STANDRY - menu to enter standby mode e. - navigator LEFT
e. STARTDAY - press to error standby mode e. SCH - turn on/off schedule record k. OK - enter/save changes; event playback
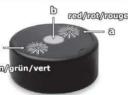
f. MD - turn on/off the motion detectable WIRED CONTROL SWITCH VIEW [4]
a. Low Memory Indicator (Red) – when SD storage room is below 100MB value, it will double once every second.
b. Record Key -
c. Record Indicator - twinkle once every sec DVRTAXI SETTING BEFORE CAR USAGE (S)
- Put in SD card (1h) to recorder before turns - Convert 34th plus of mixed camera (1h) to
- Connect Jack plug or wireo camera (10) to DATE SOCKET ON RECORD - Connect Jack end of the connecting cable (1c) to the AV OUT connector, and the Cir
to the AV input of a TV or monitor (yellow = Video.) Connect Jack of wired control switch (3f) to RC input on recorder
- Connect DC lack of power adapter(1d) to recorder and then one to a wall outlet.
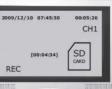
MAIN SCREEN SCORE VIEW (a) On main screen viewing on TV or monitor you can see following informations: date
recording time, current camera channel, recording indicator, remaining storage time, SD car status indicator.
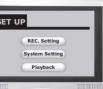
SYSTEM SETUP (7) The previous settings for the OS/THX1 or
the random settings for the DVR, SOUs are performed with the remote controller (3c) via a deal menu shown on the monitor. Press MENU button (3c) on remote controller for setup.
A. REC. SETTING * Scheduled Time - it will record out
to select the item you desired. Press ▼buttons to change Date and Time. Then press OK to save and exit
* Overwrite - if the memory is below
and overwrite the old one. Press ▼Buttons to select between Yes or No, then press OK to save and exit.
* Frame Rate – set up the recording
One key to record. Recording frame rates range: 5, 15, 30 fps. Lower fps consumes less storage space. Press ▼ buttons to set the frame rate. Then press OK to save and exit.
Motion Detection * Mask Area (8): Jiank rectangle array
Rectangle area will be ignored. Once the system picks up any movement within the area, it will progress and move automatically. Press ▪ that leaves to move the online network.
Will capture and record automatically. Press ▼▲▼ buttons to move the yellow recange area. Press OK button to save the ignored area and press MENU button to exit.
* Sensitivity – it increases when the sensitivity level increases. Slight movements will be inferred with low sensitivity. Press ▼buttons to change the sensitivity settings (H = high
M- medium, L- low). Press OK to say
- Alarm Period – select it when MD is triggered by movement. Press ▼Buttons to select (Always Off, 10sec, 20sec, 30sec), press OK to save and exit.
B. SYSTEM SETTING * Language - system defaults to English. Press ▼buttons to select system language
between English, German and French. Press OK to save and exit.
Time - to set date and time for the system clock. Press ← buttons to move around the content. Press ▼ buttons to change Date and Time. Press OK to save and exit.
* Format - storage files on SD card will be erased. Press ▼ buttons to select Yes or No and then press OK button
* Card Info - It shows SD card total
C. PLAYBACK (9) Playback list shows File Name, Date and Start Time. Press ▼ buttons to select among
record file. Press OK button to play the recorded file you selected, press again to pause. Press 14 Buttons to volume down up and raise down up. Press ▼ buttons to switch
Press MENU to stop and leave. After finish the playing recorded
file, it goes on automatically to the next one RECORDING IMAGES
- Press the REC button (3a) on the remote controller (1e) or press record key (4b) on wired control switch (1D).
- The icon REC will appear on the screen and a recording time starts running
- The record indicator on recorder (2g) and on wired control switch (-4c) flashes - Press the REC button (3a) on the remote controller (.1e) again to stop record
record key (4b) on wired control switch (1f) to stop recording.
- Press the OK button (3k) on the rem
- Then follow the instruction described in System Setup Playback a
- Use DEL button (3b) on remote controller to remove recordings.
CAR INSTALLATION (10) - Spin off twin adhesive and stick on the magnet sheet
- Choose a place at rearview mirror of car you wish to stick, and then stick the magnet sheet to the top of rearview mirrors. There make sure the mirrors shelf is dry and fine from
to the tip of rearview mirror. Please make sure the mirror shall be dry and free from excessive dust
- Place the camera (1b) onto magnet sheet, then adjust view angle of camera you desired - Put the recorder (1a) into the recorder builder
- Connect Jack plug of wired control switch (1F) to RC socket on recorder (2e) - Connect Jack plug of wired capacitor (1h) to 4V/1 socket on recorder (7h)
- Connect Jack plug of Wi-Fi camera (10) to AV1 socket off recorder (2a) - Connect DC Jack of cigarette adaptor (1g) to recorder (2a), then plug in cigarette adaptor
to power supply of car, operate in the condition of starting engine - Position the recorder you desired and fasten the recorder in car by using the veikro.
TIPS - For first time one of SD and it is recommended to have at one
- For first time use of SD card it is recommended to format one. - Choose a frame rate which is not too high, to store more images on SD card.
- Set the motion detection and detection area to prevent unnecessary recording - Only AVL is available if press wired control switch to RC jack
- Always turn off the system before removing SD card. Reverse demand SD card
- If you want to record longer period on SD card it is good to be
- For better car settings use small TV or AV monitor in your car with DVIRTAX1.
[Non-Text]
[Non-Text]
(No text)
-
DVRTAXI ARAÇ DVR SİSTEMİ
Brand : ELRO
Model : DVRTAXI
Category : Security Camera