CO2210SHX - Fridge Ardo - Free user manual and instructions
Find the device manual for free CO2210SHX Ardo in PDF.

User questions about CO2210SHX Ardo
0 question about this device. Answer the ones you know or ask your own.
Ask a new question about this device
Download the instructions for your Fridge in PDF format for free! Find your manual CO2210SHX - Ardo and take your electronic device back in hand. On this page are published all the documents necessary for the use of your device. CO2210SHX by Ardo.
USER MANUAL CO2210SHX Ardo
natural_image
Illustration of white furniture racks on a blue background, no text or symbols presentITALIANO IT
Installation, use and maintenance instructions
DEUTSCH \_\_\_\_ DE
natural_image
Line drawing of a modern refrigerator with two doors and handlebars (no text or symbols)4

NORMATIVE-AVVERTENZE E CONSIGLI IMPORTANTI
IT
STANDARDS-WARNINGS AND RECOMMENDATIONS
GB
Thank you for purchasing one of our appliances.
Please read these notes thoroughly as they have been written to help you obtain the maximum performance from the appliance.
The quality of the appliance is guaranteed as each one of our products is fully tested as it comes off the production line.
Use the appliance and you will see just how much satisfaction you will get.
This product complies with current European safety standards governing electrical appliances.
It has been subjected to thorough and meticulous testing to assess its safety and reliability.
Before using the appliance, read this manual carefully as it will tell you what
to do and what not to do.
Improper use of the appliance can be dangerous, above all for children.
Before connecting the appliance, make sure that the data on the rating plate complies with that of the domestic supply.
Do not dispose of the recyclable packing materials in an unauthorised manner.
Take them to an appropriate plant for recycling.
The electrical safety of this appliance is only guaranteed when it has been connected to a mains supply with an efficient earthing system as provided for by law.
This is an important safety requirement and must be complied with.
natural_image
Illustration of a refrigerator with open doors showing internal compartments (no text or symbols)6

NORMATIVE-AVVERTENZE E CONSIGLI IMPORTANTI
IT
STANDARDS-WARNINGS AND RECOMMENDATIONS
GB
In case of doubt, have the mains supply checked by a qualified electrician. As with any other electrical appliance, a few fundamental rules must be observed during use:
- do not touch the appliance with wet or damp hands or feet.
- do not pull the power cable to remove the plug from its socket.
• do not expose the appliance to atmospheric agents. - do not allow the appliance to be used by unsupervised children.
- do not plug-in or unplug the appliance using wet hands. - before carrying out any cleaning or maintenance operation, disconnect the appliance from the mains supply by either unplugging it or switching the mains power supply off at the main switch:
- in the case of a fault or malfunction, switch off the appliance and do not attempt any repairs.
This appliance is marked as complying with European Directive 2002/96/EC, Waste Electrical and Electronic Equipment (WEEE).
Make sure that the product is disposed of in a correct manner. The user is obliged to contribute towards preventing any negative consequences for health and the environment.
The symbol affixed to the product or accompanying documents signifies that the product must not be treated as normal domestic refuse, but must be delivered to an authorised collection centre to enable the electric and electronic equipment to be recycled.
When disposing of the appliance, comply with local waste disposal regula-
614
STANDARDS-WARNINGS AND RECOMMENDATIONS
GB
tions. For further information on the treatment, recovery and recycling of this product, refer to the appropriate offices, local domestic waste collection service or the retailer from where the appliance was purchased.
WARNING! At the end of the useful life of an appliance that makes use of R 600a refrigeration gas (isobutane) and flammable gas in the insulation foam, it must be made safe prior to being transported to the place of disposal. To do this, refer to the retailer or the appropriate local authority.
WARNING! When installing the appliance, consideration must be given to the climatic category of the product itself. The climatic category of the appliance is written on the rating plate. The appliance will function correctly within the ambient temperature range in the table for
the particular climatic category.
WARNING! Make sure that the ventilation openings in the appliance body or built-in units are not obstructed.
WARNING! if the appliance is to be left unused for a long period of time, e.g. holidays, it must be unplugged, emptied, cleaned and dried. The door must be left open to prevent the formation of bad smells.
WARNING: Do not damage the cooling circuit.
10
DESCRIPTION OF THE APPLIANCE
Upright units are large capacity domestic appliances for freezing, storing and refrigerating any types of food.
The load-bearing STRUCTURE has been fabricated in steel panels which have been treated and electrostatically painted to resist mistreatment and to ensure that its "new" look remains unaltered over time. The INSULATION MATERIALS have been specially selected to ensure that the INTERNAL temperature remains constant and to provide maximum storage space. The internal STORAGE SPACE has been designed to store any type of food thanks to the easily removable shelves.
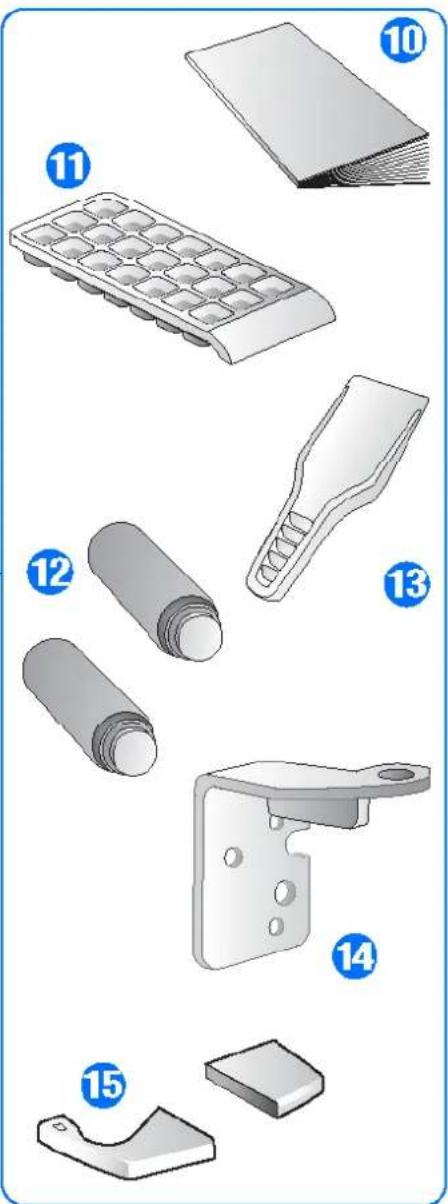
1 THERMOSTAT
2 ADJUSTABLE SHELVES
3 FRUIT AND VEG BOX WITH REMOVABLE SHELF
5 CASSETTI FREEZER
6 BALCONCINO PORTASCATOLE
7 BALCONCINO BOTTIGLIE
8 LUCE INTERNA
9 SCATOLA CARNE
10 LIBRETTO D'ISTRUZIONE
11 BACINELLA GHIACCIO
12 DISTANZIALI
13 SPATOLA GHIACCIO
14 CERNIERA
15 TAPPO PER ZOCCOLO
4 DRAWER FOR FREEZING FOOD
5 FROZEN FOOD STORAGE DRAWERS
G CONTAINER SHELF
7 BOTTLE SHELF
8 INTERNAL LIGHT
9 MEAT BOX
10 INSTRUCTION BOOK
11 ICE TRAY
12 SPACERS
13 ICE SPATULA
14 HINGE
15 PLINTH COVER PLATE
6|4
GB
NL BESCHRIJVING VAN HET APPARAAT

12

Check that the appliance is undamaged.
The retailer must be informed of any damage to the appliance within 24 hours of delivery.
1 Remove the protection from the door gasket.
The protection is used to protect the gasket during transport.
The protection must be removed in order to ensure that the door seal functions correctly.
To remove the protection, lightly pull one end while rotating it outwards.
2 Remove the glass shelf locking devices
These plastic elements prevent the shelves from moving during transport.
To remove the shelf locking devices, proceed as follows:
a) Grasp the plastic locking device and rotate it until it comes away from the shelf.
b) Remove the locking device by pulling it outwards.
natural_image
Mechanical assembly diagram showing a bracket with two screws and a central knob (no text or symbols)2a
natural_image
Diagram of a white appliance with a door and control panel, showing internal structure and a blue arrow labeled 'A' pointing to a component (no text or symbols on the diagram itself)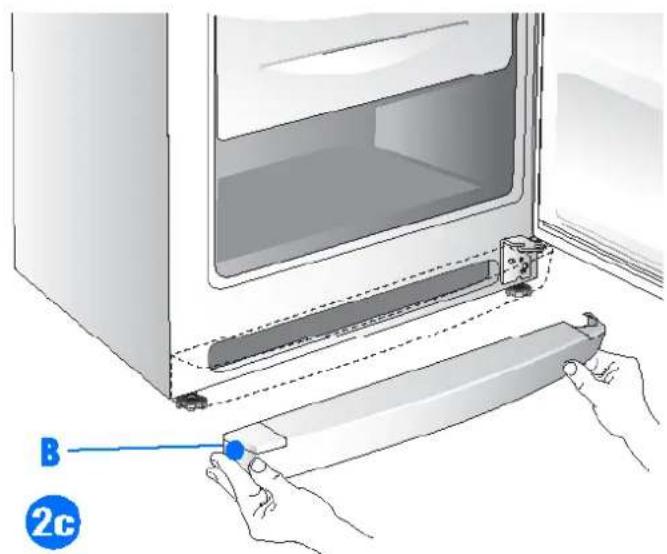
natural_image
Illustration of a white oven with a person holding a small electrical outlet, no text or symbols present14
POSITIONING AND INSTALLING THE APPLIANCE
GB
1 Once the appliance has been unpacked, check that the mains voltage is the same as that indicated on the rating plate.
2 If the door opening direction is as required, go to Point 3.
Otherwise, reverse the position of the hinges.
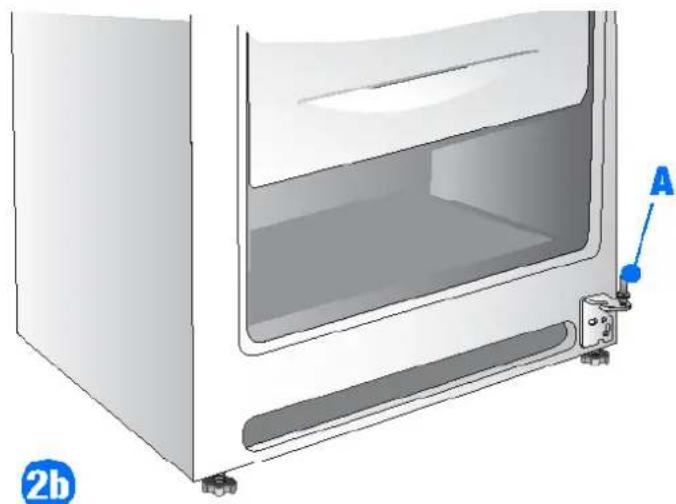
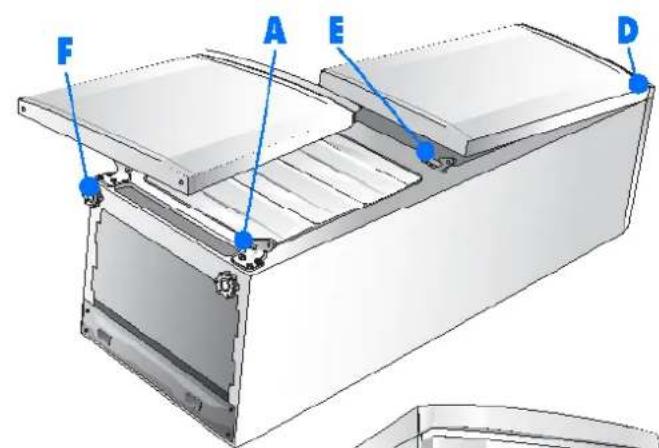
To do this, carefully place the appliance on its back. Use spacers to prevent crushing the condenser pipes and damaging the compressor unit.
2a Remove the centre hinge and, at the same time, remove both the upper and lower doors. Close off the slot using the cover from the other side.
2b Remove pin "A" and washer from the bottom hinge.
2c Remove the bottom plinth by lightly pulling along the entire surface,
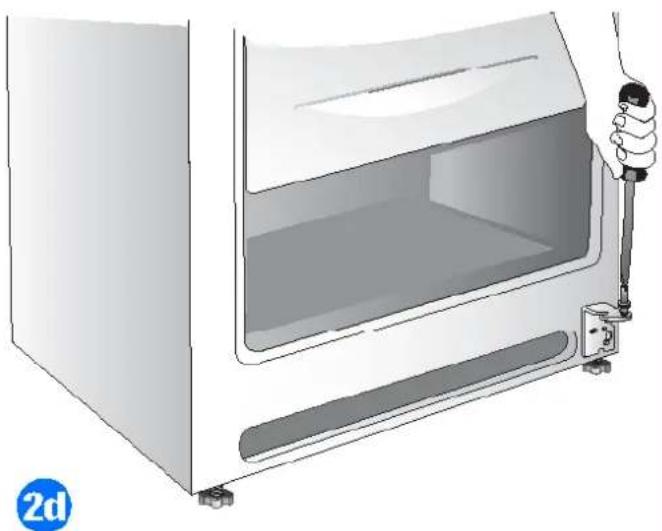
2d Cover hinge slot "B" using the cover plate supplied and remove the cover plate from the other side.
2e Remove the bottom hinge Fit the hinge supplied on the opposite side.
natural_image
Technical diagram of a mechanical linkage or bracket assembly with two curved components and alignment markers (no text or symbols)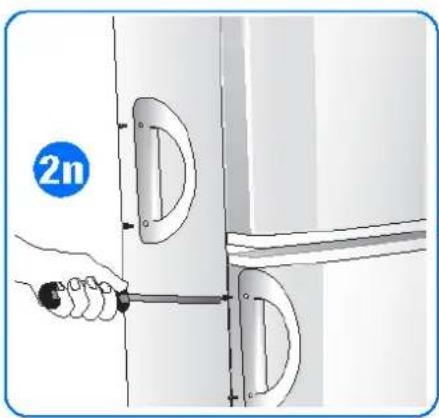
natural_image
Illustration of a double refrigerator with a blue cable inserted, shown from the side (no text or symbols)16
POSITIONING AND INSTALLING THE APPLIANCE
GB
2f Unscrew the top pin and screw it in on the opposite side.
2g Replace the bottom plinth.
2h Replace pin "A" and washer on the bottom hinge.
2i Position the upper door "E" by inserting it in top pin "D".
21 Position the lower door "F" by inserting it in bottom pin "A"
2m Position the centre hinge "H" by inserting in bushes "I" of the two doors Fix the hinge in position using the two screws.
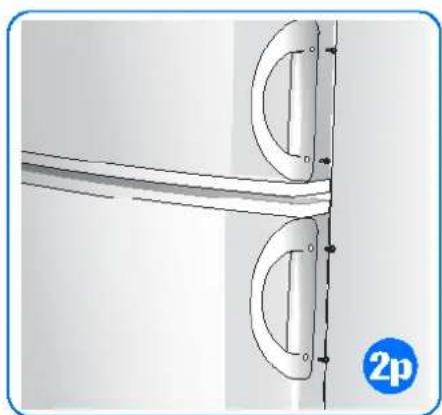
REVERSING THE VERTICAL HANDLE
If the appliance is delivered with the vertical handle already fitted and the door opening direction needs to be changed, the handle itself must also be moved as follows:
2n Remove the handle by unscrewing the two fixing screws.
20 Remove the hole plugs on the opposite side of the door by pressing them lightly
2p Rotate the handle 180° and fit it in place using the two fixing screws. Insert the plugs in the holes left on the opposite side.
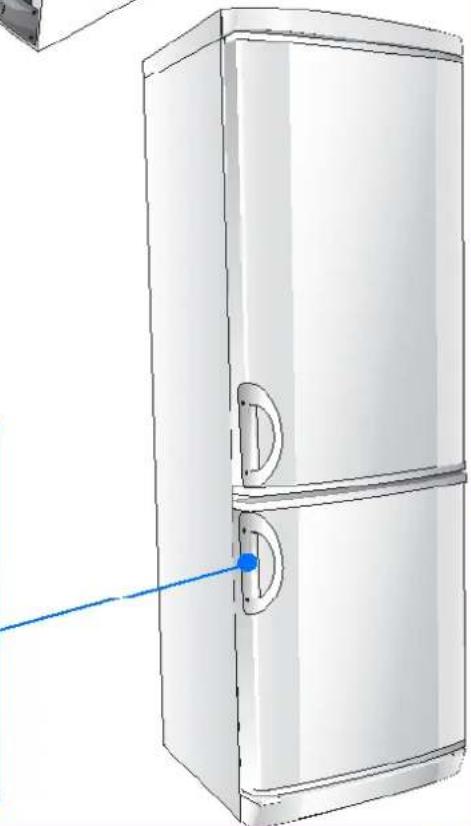
FITTING THE VERTICAL HANDLE
If the appliance is supplied with a separate vertical handle, it can be fitted as follows:
1 Take the handle and screws supplied.
2 Position the handle over the holes and fix it in position using the screws supplied.
6|4
18

POSITIONING AND INSTALLING THE APPLIANCE
GB
3 Level the fridge by adjusting the feet.
When installing the appliance, remember the following:
A Do not install it near to sources of heat such as heaters, radiators, cookers, etc. or in direct sunlight
B Position the appliance in a dry well-ventilated location.
C Do not install the appliance in non-ventilated spaces such as wall niches.
D Make sure that during the automatic defrost, any water on the back wall of the compartment runs into the drain channel.
E If the appliance is supplied with spacers, fit them to the upper part of the condenser on the back.
F After the appliance has been placed in its final position, leave it for about an hour before connecting it to the power supply.
G Make sure that the appliance is working properly before placing any food in it.
H Leave a space of at least 5 cm between the top of the appliance and any wall cupboards.
I Some appliances are fitted with rear wheels to enable them to be moved easily.
WARNING: DO NOT INSTALL THE APPLIANCE NEAR TO ANY HEAT SOURCES AND LEAVE A GAP OF AT LEAST 5 CM ABOVE IT
20

Check that the mains voltage complies with that indicated on the rating plate located on the bottom left of the freezer compartment.
If the mains socket does not have an earth connection or if the plug is not suitable for the mains supply system, refer to a qualified electrician.
Do not use adapters or extension leads, as these may overheat and burn.
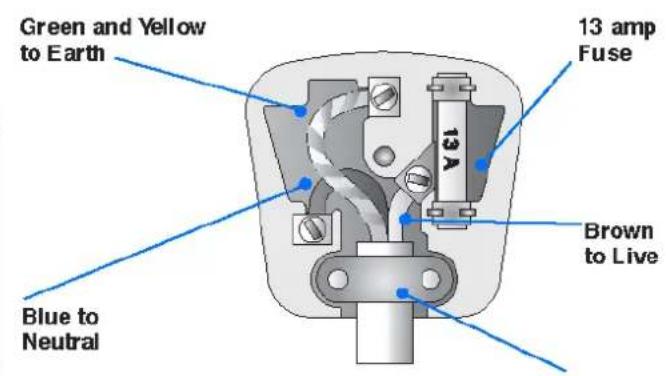
Warning: this appliance must be earthed
If the appliance has been fitted with a non-rewirable plug of the incorrect type for the mains socket, cut off the plug and fit a new one. The removed plug must be thrown away. Inserting an unsuitable plug into a 13 Amp socket is likely to cause an electrical hazard. When a non rewirable plug or rewirable
13 Amp (BS1363) plug is used, it must be fitted with a 15 Amp ASTA approved (BS1362) fuse. If any other type of plug is used it must be wired as follows.
Connect the GREEN & YELLOW wire to the earth terminal marked with the letter "E" or earth symbol, 12 or coloured green or green & yellow.
Connect the BLUE wire to the neutral terminal marked with the letter "N" or coloured black.
Connect the BROWN coloured wire to the live terminal marked with the letter "L" or coloured red.
DE STROMANSCHLUSS
natural_image
Illustration of a hand holding a small object on a device panel (no text or symbols visible)22
USO DEL REPARTO FRIGORIFERO
IT
DISPOSITIVO DI REGOLAZIONE
TERMOSTATO ELETTRONICO FRIGORIFERO
DESCRIZIONE DELL'APPARECCHIO
USING THE FRIDGE COMPARTMENT
GB
REGULATING DEVICE
ELECTRONIC FRIDGE THERMOSTAT
DESCRIPTION OF THE APPLIANCE
The appliance consists of two cells:
- A fridge (upper part) for storing fresh food and drinks
- A freezer (lower part) for long-term storing of frozen products (bottom compartment) and for freezing fresh products (top compartment).
USING THE FRIDGE
Switching on and regulating the temperature
- Connect the plug to the mains supply.
- Position knob K at an intermediate position between 1 and 5.
- The internal light will switch on when the door is opened.
- The green light A will light up to indicate that the compartments are working.
- Adjust the temperature by rotating knob K from position 1 (warmest) to position 5 (coldest).
DESCRIPTION OF THE APPLIANCE
The appliance is switched off by placing knob K at position 0
WARNING!! If the appliance is switched off and then switched back on soon after, the compressor will start up after approximately 10 minutes. This is part of the normal operation of the appliance.
EINSTELLVORRICHTUNG
ELEKTRONIK-THERMOSTAT DES KÜHLSCHRANKS
BESCHRIJVING VAN HET APPARAAT
BESCHRIJVING VAN HET APPARAAT
24
USO DEL REPARTO FRIGORIFERO
IT
USING THE FRIDGE COMPARTMENT
GB
The temperature should nevertheless be regulated taking into account the following factors:
- the ambient temperature and the door opening frequency
- the quantity of food stored and the actual location of the appliance
Do not put very hot steaming food or drinks in the fridge. Cover or wrap the food, especially if it contains herbs or spices. Do not cover the shelves with paper or plastic as this would prevent the circulation of air through the shelves themselves.
Do not place food in contact with the evaporator as the paper wrap will stick to it and, during defrosting, could block the condensation drain hole.
The fridge defrosts automatically during normal operation: the water pro-
duced is collected through a drip system and evaporated by the heat from the compressor.
FRIDGE COMPARTMENT LIGHT
When the appliance is connected to the mains supply, the fridge compartment light switches on when the door is opened, and switches off when the door is closed.
Warning: make sure that the drain hole is not blocked.
N.B. If the door is left open for a long time, the light will switch off automatically. The light can only be switched on again after the door has been closed.
natural_image
Line drawing of a hand holding a rectangular electronic device with a scroll wheel (no text or symbols)26
USO DELLO SCOMPARTO CONGELATORE
IT
The freezer compartment is switched on automatically
Once the appliance is switched on, approximately three hours are needed to reach the temperature at which frozen foods can be stored.
"SUPER" FUNCTION

This function has been designed to freeze foods quickly and must be activated when introducing foods in the freezer compartment. The super function is activated by pressing the SUPER button for at least 0.5 seconds and is indicated by the yellow "super" light. The super function switches off automatically after 24 hours. It can also be switched off manually at any time by pressing the super button for at least one second. During the 24 hours of the quick freeze function, the compressor operates in cycles of 65
minutes on and 35 minutes off.
"ECO" FUNCTION
The ECO function ensures that the food is stored in both compartments at the ideal temperature, producing a substantial saving in energy. The function is activated using potentiometer knob K and is indicated by the letter "E". When the ECO function is active, the blue "ECO" indicator lights up. The ECO function is switched off by rotating knob K until the blue indicator light switches off. If the SUPER function is switched on with the ECO function active, the SUPER function has priority. In this case, ECO function is switched off temporarily, together with the blue indicator light, until the appliance exits the SUPER mode.
DE GEBRAUCH DES GEFRIERTEILS
natural_image
Illustration of a refrigerator with open door and side panel, showing internal structure and mounting detail (no text or symbols)
USO DELLO SCOMPARTO CONGELATORE
IT
The freezer has two distinct compartments:
- The top drawer, used for freezing fresh food.
- The bottom and centre drawers, used exclusively for storing frozen food. Prepare the food to be frozen in small portions (max 1 kg) for ease of freezing and eventual thawing. Wrap the food in purpose made polythene or aluminium foil, if possible airtight. Make a note of the date of freezing on the wrap and place it in the freezer drawer.
The thermostat setting does not need to be altered when freezing food. To make freezing easier and more efficient, follow the recommendations given below:
- The maximum quantity of fresh food to freeze is reported in kg/24 hrs on
the rating plate inside the fridge located on the left alongside the fruit and veg box.
- Divide the food to be frozen into small portions to ensure rapid freezing and defrosting of the quantity required.
- Avoid placing food to be frozen into contact with already frozen food to prevent the latter from increasing in temperature.
DE GEBRAUCH DES GEFRIERTEILS
natural_image
Line drawing of a refrigerator with open door and side drawer, showing internal compartments and exterior panel (no text or symbols)
natural_image
Illustration of a hand pouring liquid into a tray with seedlings (no text or symbols)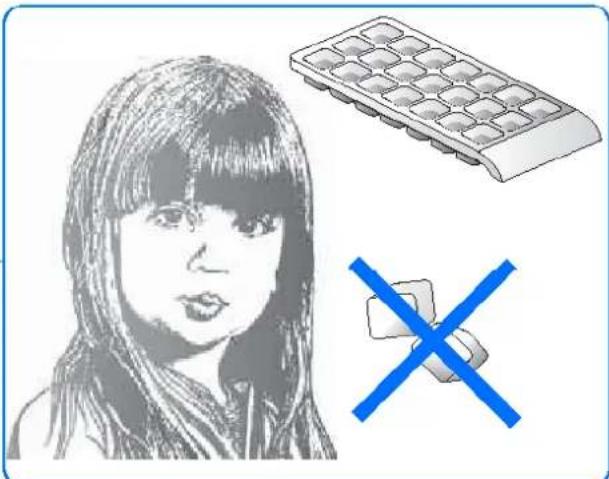
natural_image
Illustration of a girl with a computer and a blue X symbol (no text or symbols present)30
USO DELLO SCOMPARTO CONGELATORE
IT
RACCOMANDAZIONI:
NEVER place ice cubes in the mouth or eat ice-lollies that have just been taken out of the freezer, as these can cause ice burns.
DO NOT place sealed containers containing liquids such as soft-drinks or similar in the freezer.
Hot foods and drinks must be allowed to cool before being placed in the freezer.
STORING FROZEN FOOD
It is impossible to accurately predict the effective storage period for frozen food in that this varies considerably according to the nature of the food itself.
To be safe, always follow the instructions reported on the packaging of fro-
zen food products
ICE-CUBE PRODUCTION
Fill the ice-tray 3/4 full with water. Place it in the sliding drawer (where fitted) in the freezer compartment.
GENERAL ADVICE:
Make sure that the packaging is intact and that there are no damp marks or swelling, in that these indicate that the frozen product may already have deteriorated.
Any food that has started to thaw out must not under any circumstances be re-frozen.
Do not store frozen foods for longer than the recommended time period.
DE GEBRAUCH DES GEFRIERTEILS
EMPFEHLUNGEN:
BEWAREN VAN DIEPVRIESPRODUCTEN
natural_image
Illustration of a refrigerator interior showing open doors, front shelves, and close-ups of the door panel (no text or symbols)32

SBRINAMENTO
IT
If a power cut should occur, try to establish its duration. If the forecast is less than 12 hours, leave the food in the freezer and keep the door closed. If the power cut lasts for longer than 12 hours and part of the food starts to thaw out, this should be consumed as soon as possible. Frost that forms on the cooling grids must be removed when it reaches a thickness of approximately 3-4 mm. Otherwise, the cold transfer will be impeded and the energy consumption will increase. The layer of frost must be removed using the plastic scraper supplied. Any damage caused by the use of the scraper is not covered by the guarantee.
Generally speaking, the freezer should be defrosted at least twice a year as follows:
- Remove the food, wrap it in several layers of newspaper and place it in the fridge or in a cool location.
- Remember that an increase in the temperature of the food will greatly reduce its storage life.
- Remove the racks, ice-trays and leave the door open.
- Use a sponge to mop up the water that collects at the bottom of the appliance.
- To accelerate the defrosting action, scrape off the layer of frost using the spatula supplied.
WARNING! Do not use any mechanical devices or other artificial methods other than those recommended by the manufacturer for accelerating the defrosting process.
WARNING: Unless otherwise approved by the manufacturer, do not use electrical appliances inside the food storage compartment.
natural_image
Illustration of hands pouring liquid from a teapot into a container with a blue X mark (no text or symbols)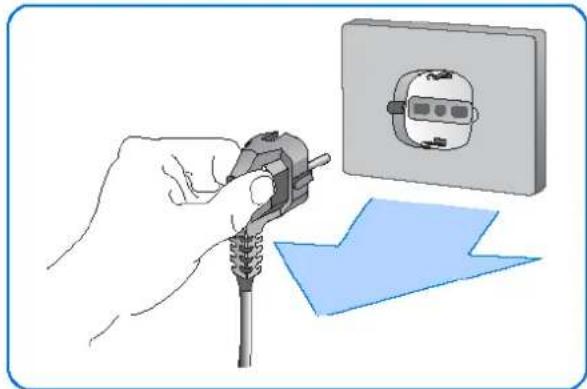
natural_image
Illustration of a hand using a power plug to install an electrical socket (no text or symbols present)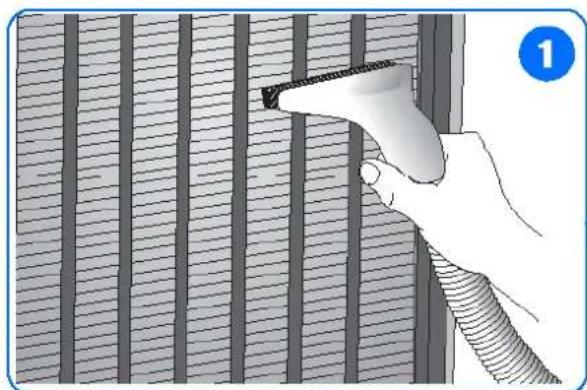
natural_image
Illustration of a hand holding a tool near vertical striped panels, no text or symbols present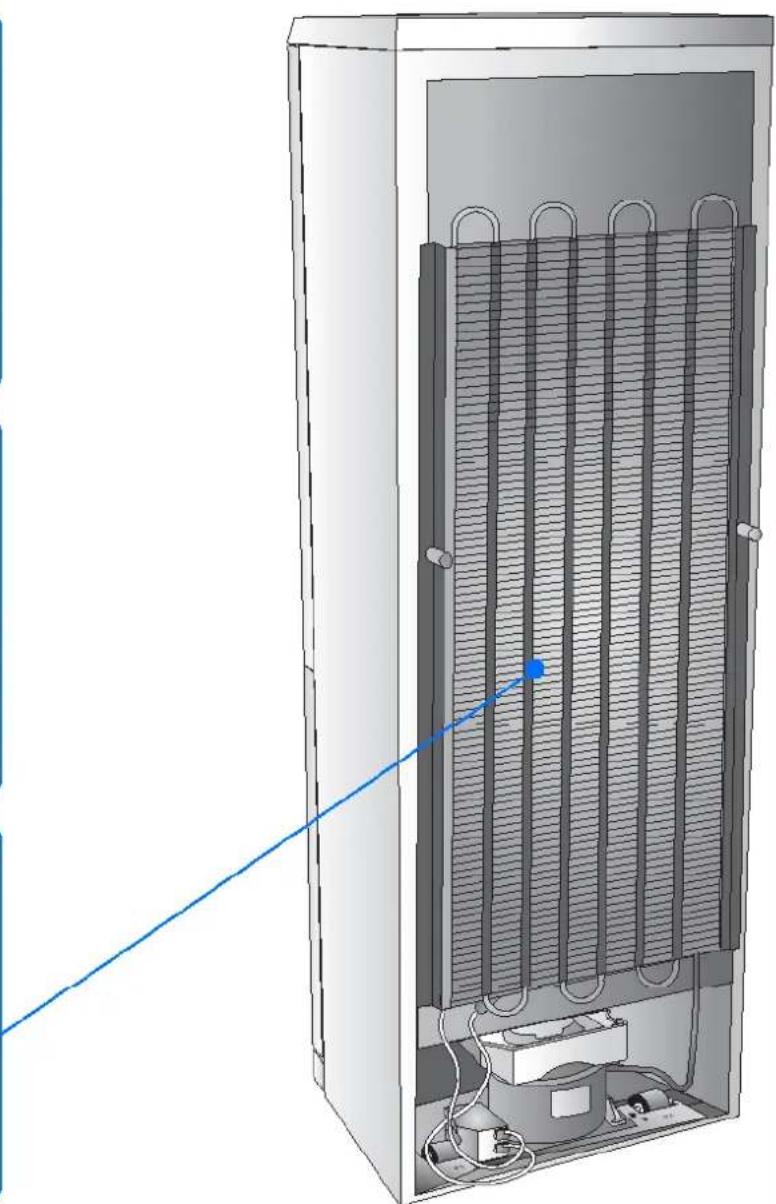
natural_image
3D technical illustration of a vertical cylindrical device with internal heat exchanger and connected tubing (no text or symbols)34

PULIZIA
IT
Before starting any cleaning, disconnect the appliance from the mains electricity supply.
The protections (wire grill, covers) must not be removed by unqualified personnel: do not use the appliance if the protections have been removed.
When cleaning the internal plastic parts and the door gasket:
do not use abrasives or detergents of any kind.
- Use a warm solution of bicarbonate of soda (two spoonfuls in two litres of water).
1 Cleaning the condenser
- This should be carried out at least twice a year.
- Clean using a domestic vacuum cleaner or a brush. A dirty condenser will have a negative effect on the appliance and reduce its performance.
For prolonged absences
- Empty the compartments.
- Disconnect the appliance from the mains electricity supply.
- Clean both the compartments and dry them.
- Leave the doors open to prevent bad smells or mould from forming
36

PULIZIA
IT
Cleaning the water drain
When cleaning the condenser, check that the rear drain pipe R is not blocked
- Remove drain pipe R from the container V and if necessary clean it.
Power supply cable
- Periodically inspect the power cable to check its condition.
- If the cable is damaged, do not use the appliance and do not attempt any repairs. Call a qualified technician to replace the faulty cable.
natural_image
Illustration of an open refrigerator with a person inside, showing the refrigerator interior and a blue X mark (no text or symbols)38

RICERCA GUASTI
IT
1) The appliance does not work.
- Is there a power cut?
- Is the plug inserted properly in the mains socket?
- Is the power supply cable damaged?
- Is the temperature setting correct?
2) The temperature inside the compartments is not low enough.
- Do the doors close properly?
- Is the appliance installed near to a heat source?
-
Is the temperature setting correct?
-
Is the condenser clean?
- Is the thermostat in the right position?
3) The temperature inside the fridge compartment is too low.
4) The appliance is very noisy.
- Is the appliance in contact with other furniture or objects?
- Are the pipes on the back touching or vibrating?
- Is the appliance level?
natural_image
Illustration of a hand holding a tool inside a cabinet or storage unit, with no visible text or symbols.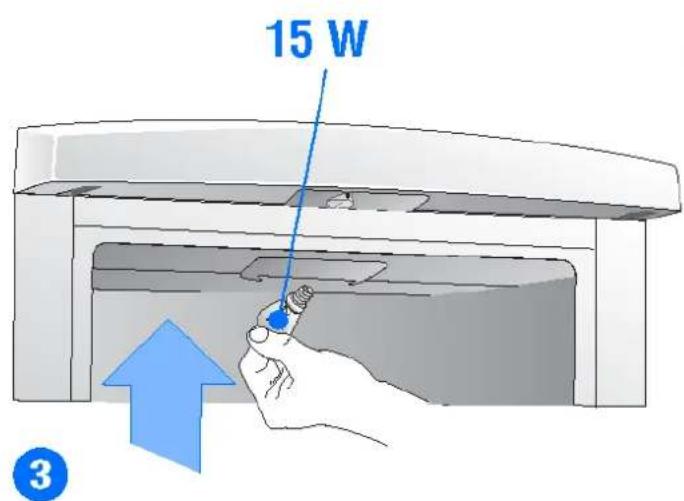
40

RICERCA GUASTI
IT
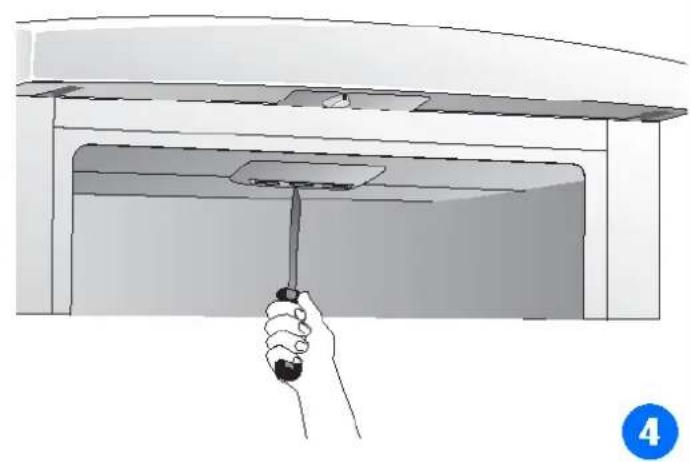
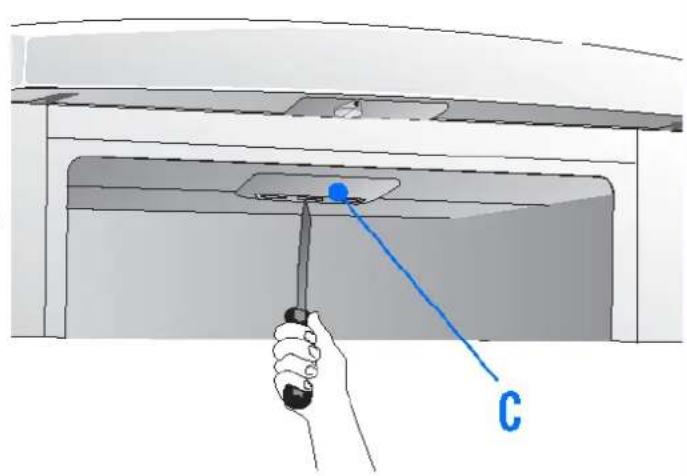
5) The interior light does not work
- First check point 1, then: REPLACING THE LIGHT BULB.
- Disconnect the appliance from the mains electricity supply.
- Remove light bulb cover C
- Check the bulb and replace if necessary (for the bulb rating, refer to the figure). Replace cover C.
6) There is water on the floor
- Is tray V inserted correctly and in contact with the compressor?
- Is drain pipe R correctly inserted in the tray?
Before contacting the Assistance Service:
- Check whether it is possible to rectify the problem by referring to the "Troubleshooting" guide.
- Restart the appliance to check whether the problem has been resolved. If the problem still exists, disconnect the appliance from the mains electricity supply and repeat the operation after one hour.
If the appliance is not working properly or not working at all, before calling the Technical Assistance Service check that:
- The doors close properly.
- The power supply voltage corresponds to that of the appliance (± 6%).
- If the problem still exists, call the Assistance Service.
Inform the Assistance Service of:
- The type of malfunction
- The appliance model
- The serial number