
Voice yepp BR-1320 - Voice recorder SAMSUNG - Free user manual and instructions
Find the device manual for free Voice yepp BR-1320 SAMSUNG in PDF.


| Product Type | Digital Voice Recorder |
| Brand | Samsung |
| Model | Voice Yepp BR-1320 |
| Dimensions (W x H x D) | 34 x 117 x 15 mm |
| Weight (including batteries) | 61.5 g |
| Power Supply | 2 x AAA 1.5V batteries |
| Recording Medium | Flash Memory (32 MB) |
| Maximum Number of Recordings | 396 (99 per folder, 4 folders) |
| Recording Modes / Maximum Time | SP: 8h50m, HQ: 2h10m, SHQ: 1h30m |
| Frequency Range | 100 Hz – 4 kHz |
| Input | Internal non-directional condenser mic (mono), external plug-in power mic (mini plug/mono, ≤3 kΩ) |
| Output | Earphone (mini plug/stereo, 8-32 Ω), built-in speaker (16 Ω, 9 mW) |
| Key Functions | Voice recording, playback, repeat playback, VOR, mic/recording mode select, intro scan, playback speed control, bass control (MP3 only), backlight, folder management, auto power off, voice edit & email send via PC |
| PC Connectivity | USB 1.1, Voice Yepp Manager & Player software |
| File Formats | SC4 (recordings), MP3 (music), WAV (via conversion) |
| Accessories Included | External microphone, earphones, USB cable, installation CD, 2 AAA batteries, user manual |
| Operating Environment | Temperature 0°C – 40°C |
| Safety Precautions | Do not disassemble; avoid high heat, humidity, dust; keep away from magnetic sources |
| Maintenance | Remove batteries if not used for long periods; protect from moisture and extreme temperatures |
| Spare Parts / Repairability | Contact authorized service center; no user-serviceable parts inside; accessories may be replaced |
Frequently Asked Questions - Voice yepp BR-1320 SAMSUNG
User questions about Voice yepp BR-1320 SAMSUNG
0 question about this device. Answer the ones you know or ask your own.
Ask a new question about this device
Download the instructions for your Voice recorder in PDF format for free! Find your manual Voice yepp BR-1320 - SAMSUNG and take your electronic device back in hand. On this page are published all the documents necessary for the use of your device. Voice yepp BR-1320 by SAMSUNG.
USER MANUAL Voice yepp BR-1320 SAMSUNG
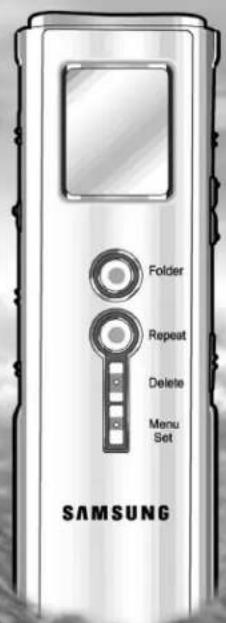
Pictures shown in this manual are for illustrative purposes only and may be different from actual product.
Features
What is a digital recorder?
It is a miniature recorder that stores sound and voice data in an electronic memory chip, without using cassette tapes.
Long Recording Function (about)
| Model\Mode | SP(standard play) | HQ(high quality) | SHQ(super high quality) |
| BR-1320 | 8 hours and 50 minutes | 2 hours and 10 minutes | 1 hours and 30 minutes |
| BR-1640 | 17 hours and 40 minutes | 4 hours and 20 minutes | 3 hours and 8 minutes |
Digital Interface Function
You can upload recordings to and download recordings from your PC, including MP3 files.
Repeat Playback Function
You can listen to a selected recording repeatedly.
MIC/Recording Mode Select Function
You can set the microphone sensitivity according to the distance from a sound source, the amount of ambient noise, etc.
VOR Function
You can set the recorder so that recording is activated only by voice or sound.
Auto Power Off Function
The Voice Yepp is automatically turned off when it is not used for over 1 minute.
■ Recording Folder Management Function
Recordings can be stored in up to four separate folders (A, B, C, and D). MP3 files can be stored separately in the MP3 folder.
■ Intro-Scan Function
You can search quickly through multiple recordings to find specific ones by listening to each recording for 10 seconds.
■ Voice Edit and E-mail Send Functions
After uploading files to a PC, you can use the Voice Yepp Player program to edit recordings and send e-mails.
Contents
Features....1
Descriptions ....3
Using Voice Yepp
• Turning the Power On/Off......5 - Recording......6 - Playing back......7 - Playback Speed Control Function......8 - Deleting....9
Convenient Functions
- Recording Search Function......11 • Main Information Display Function .....11 • VOR Function.....12
- Mic Mode Select Function....12 • Recording Mode Select Function......12
- Backlight Function....13 • Bass Control Function......13
- Repeat Playback Function......14
Connecting to a PC....15
Cautions ....30
Troubleshooting....32
Specifications....34

Accessories: External Microphone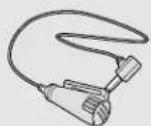
Earphone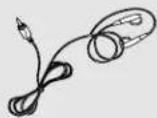
USB Cable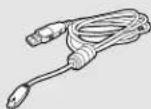
Program Installation CD for PC
Two batteries, User's Manual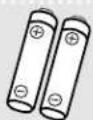

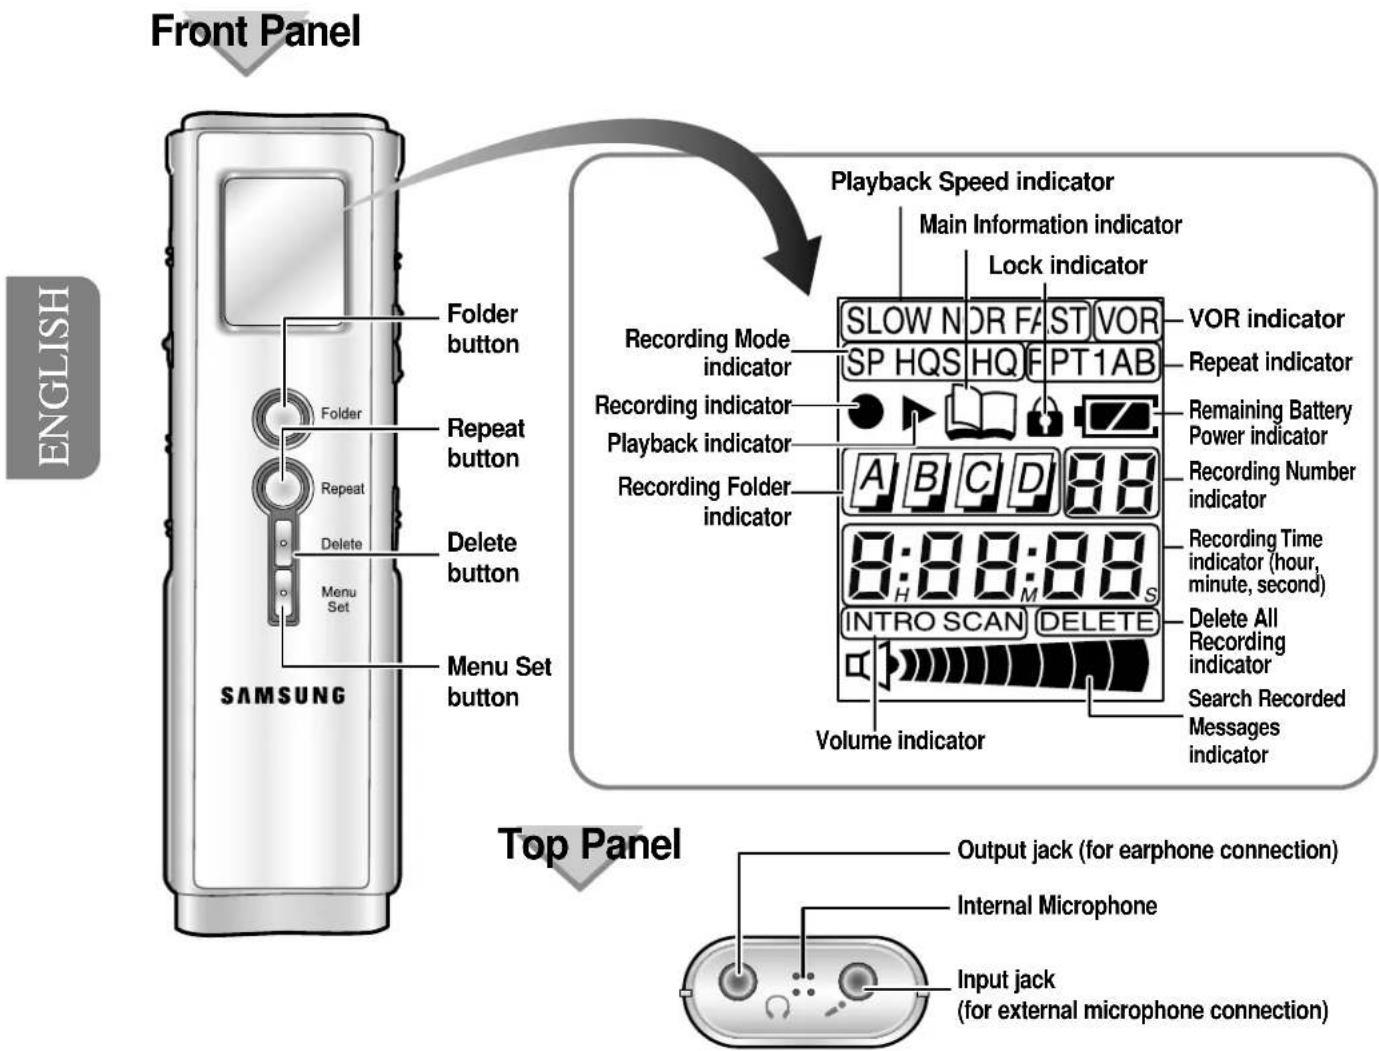
Rear Panel, Left Panel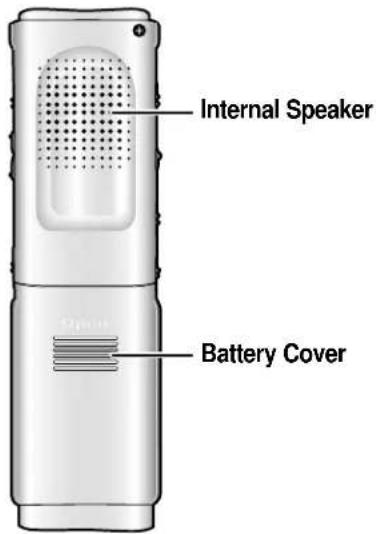

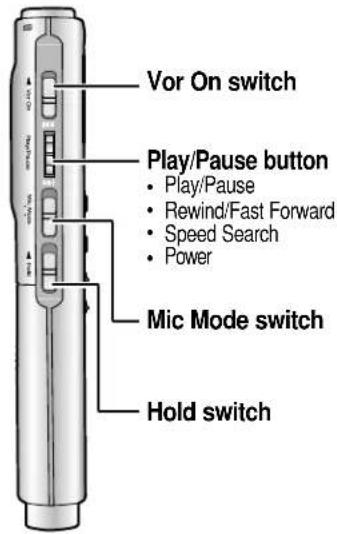
Right Panel
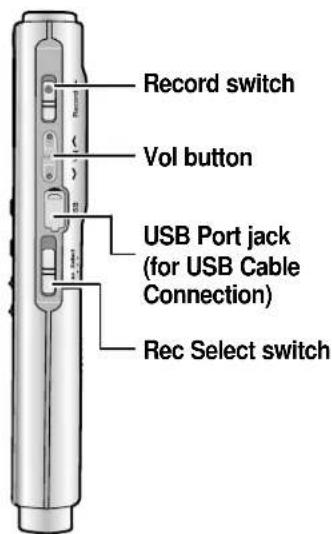
Inserting the Batteries
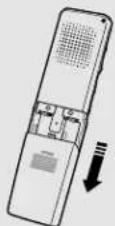
1. Open the battery cover on the back of the device.
- While pressing the part indicated by the Open mark, slide the cover in the direction of the arrow.
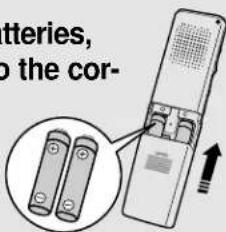
Insert two AAA batteries, paying attention to the correct polarities (+ and -). Replace the battery cover.
Battery Life: Battery Operating Time (LR03 Alkaline Battery)
| Type | Recording (SP mode) | Voice Recorder mode | MP3 mode | ||
| Earphone playback | Speaker playback (Volume level 7 as a norm) | Earphone playback | Speaker playback (Volume level 7 as a norm) | ||
| Time | 7 hours and 30 minutes | 8 hours | 8 hours and 30 minutes | 3 hours and 30 minutes | 5 hours |
Checking the remaining battery power

Sufficient battery life

Low battery consumption
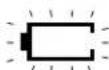
Time to replace battery
Note

• Recordings will not be lost when replacing batteries. - Depending on the battery type, the length of playback time, and the sound output volume, etc., the battery operating time may vary.
Turning the Power On/Off
To turn on Power
Press the Play/Pause button while the recorder is not in lock mode.
• The power comes on.

- If you slide the Record switch up while the power is turned off, power will be turned on and recording will start.
To turn off Power
Slide the Hold switch up while recording or while playback is in the stop mode.
• The power turns off.

- The recorder is automatically turned off when it is not used for over 1 minute.
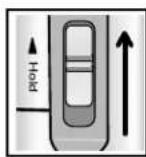
Setting Lock Function
This disables all buttons while preserving the existing mode. However, the recording function can be used even in lock mode.
Slide the Hold switch up.
- The recorder is now set to lock mode.

- If you set the recorder to lock mode while recording or playback is in stop mode, the power will be turned off.
Listening through earphones
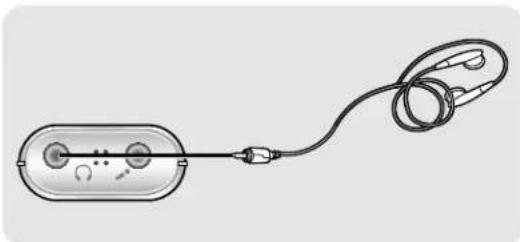
You can listen to the sounds currently being recorded or played.
Connect the earphone to the output jack.
Sound can be heard over the earphones. Press the Vol button to adjust sound output volume.

- During recording, the Vol button does not work.
Making a recording
You can make a recording using either the internal or external microphone.
1 Press the Play/Pause button to turn the power on (see page 5).
2 Press the Folder button to select the folder where recordings will be stored.
- Each time the button is pressed, the folder switches as follows: A → B → C → D → ΓNP3 (MP3). Select from the following: A, B, C, and D.
3 Slide the Record switch up.
- The recording number and time appears on the display and recording begins.
- Each recording is automatically assigned a recording number, which is the next number up from the previous one. Up to maximum of 99 files can be stored in each folder.
- If recording is performed in the MP3 folder, the folder will automatically switch to A. If folder A already contains 99 files, recording will automatically switch to folder B.
- Direct the microphone towards a sound source.
Note
- During recording, all other functions, except the VOR and Hold functions, are disabled.
- If you plug the earphones in during recording, you can listen to the sounds currently being recorded.
To end recording
Slide the Record switch down.
- Recording stops and the current recording is saved automatically.
To see the available recording time
While in stop mode, press the Folder button and keep it pressed.
- The available recording time is shown on the display.
Information shown on the LCD display
• Full - n: indicates that all folders (A, B, C, and D) are full, each containing 99 files. • Full - d: indicates that the memory is full. - S - File: indicates that the recording is now being stored in the memory.
Using Voice Yepp (continued)
Playing back
1 Press the Play/Pause button to turn the power on (see page 5).
2 Press the Folder button to select the folder containing the file you want to play.
- Each time the button is pressed, the folder switches as follows: A → B → C → D → MP3 (MP3).
3 Slide the Play/Pause button up or down to select the recording number of the file you want to play.
4 Press the Play/Pause button.
- The total playback time is displayed and playback starts.
To stop playback
Press the Play/Pause button.
- Playback stops.
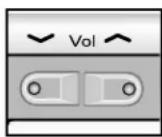
To adjust sound output volume
Press the Vol button.
- You can adjust the volume from 0 to 20.
To locate a specific point within your audio file
Fast Forward (during playback) Slide and hold down the Play/Pause button for over 3 seconds.
- As long as the Play/Pause button is slid down, the Voice Yepp will fast forward. The moment you release the button, the fast forward function will stop and the recording file will start playing again from that location.
Rewind (during playback) Slide and hold up the Play/Pause button for over 3 seconds.
- As long as the Play/Pause button is slid up, the Voice Yepp will rewind. The moment you release the button, the rewind function will stop and the recording file will start playing again from that current location.
Playback speed control function
The playback speed cannot be adjusted during playback.
To listen at slow speed
While in stop mode
1 Press the Menu Set button briefly until 'SLOW' appears on the display.
- 'SLOW' lights up.
2 Press the Menu Set button longer.
- 'SLOW' appears on the display and the recording is played back at slow speed when the Play/Pause button is pressed.
To listen at normal speed
While in stop mode
1 Press the Menu Set button briefly until 'NOR' appears on the display.
- 'NOR' lights up.
2 Press the Menu Set button longer.
- 'NOR' appears on the display and the recording is played back at normal speed when the Play/Pause button is pressed.
To listen at fast speed
While in stop mode
1 Press the Menu Set button until 'FAST' appears on the display.
2 Press the Menu Set button longer.
- 'FAST' appears on the display and the recording is played back at fast speed when the Play/Pause button is pressed.

- Set the playback speed before beginning playback. Note that MP3 playback speed cannot be adjusted.
- If the batteries have been replaced or if the power has been turned off, playback speed automatically switches back to normal (NOR mode).
Using Voice Yepp (continued)
Deleting
To delete a single recording
You can delete a particular recording number.
1 Press the Play/Pause button to turn the power on (see page 5).
2 Press the Folder button to select the folder.
3 Slide the Play/Pause button up or down to select the recording number of the file you want to delete.
4 Press and hold the Delete button.
- The selected recording number is deleted and the rest of the recording numbers are automatically sorted.
- Each time the Delete button is pressed briefly, the selection switches between the recording number and the folder. The selection lights up.
To delete all the recordings in a folder
You can delete all recordings stored in a given folder.
1 Press the Folder button to select the folder you want to delete.
2 Press the Delete button briefly.
• The selected folder lights up. - Each time the Delete button is pressed briefly, the selection switches between the recording number and the folder. The selection lights up.
3 Press and hold the Delete button.
- All recordings in the selected folder will be deleted.
To delete all recordings
You can delete all the recordings stored in the Voice Yepp in one operation.
While in the stop mode
1 Press the Menu Set button briefly until 'Delete' appears on the display.
- 'Delete' lights up.
2 Press the Menu Set button once again, this time a little longer.
- 'DEL All' appears on the display and all recordings will be deleted.
- Delete process is cancelled if another button is pressed during 5 seconds while 'Delete' lights up.
To delete the recording currently being played back
You can also delete the recorded message currently being played.
During playback, press the Delete button and hold it for a bit.
- The recorded message that was being played is now deleted.

- Deleted recordings cannot be recovered.
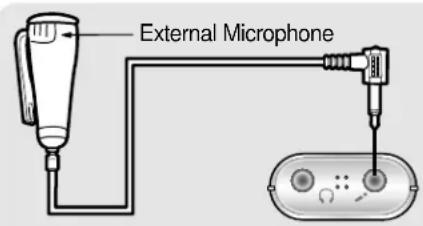
Connecting an external microphone
You can voice record while moving freely around your home or classroom, by attaching the microphone to your lapel or shirt.
Connect the external microphone as shown in the picture.
Recording steps are the same as those given on page 6.

Convenient Functions
Recording Search Function
Because the beginning of each recording in a given folder is played back for 10 seconds, it is easy to search for a specific recording.
1 Press the Menu Set button briefly until 'INTRO SCAN' appears on the display.
- 'INTRO SCAN' lights up.
2 Press the Menu Set button again, this time longer.
- 'INTRO SCAN' appears on the display and the beginning of each recording in a given folder is played back.
Main Information Display Function
If you have an important message, you can display main information.
While in the stop mode
1 Press the Menu Set button briefly until 📁 appears on the display.
- lights up.
2 Press the Menu Set button longer.
• appears by the selected recording number.
Note
To cancel the main information display function
- Select the main information display again. Main information display is cleared.
VOR Function
With the VOR (Voice Operating Record) function enabled, the recorder can record only when it detects a voice or other sound; otherwise it remains in the pause state.
| To set VOR | To cancel the VOR function |
| Slide the Vor On switch up. | Slide the Vor On switch down. |
Mic Mode Select Function
You can adjust the microphone's sensitivity according to its distance from the sound source, and the amount of ambient noise.
| Meeting mode | Lecture mode |
| Use this when the sound source is close to the microphone or when the noise level is high.• Slide the Mic Mode switch down. | Use this when the sound source is far away or when the noise level is fairly low.• Slide the Mic Mode switch up. |
Recording Mode Select Function
Using the Rec Select switch, select the desired recording mode.
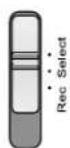
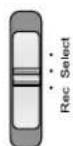
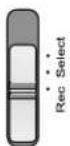
SHQ mode: super high quality, HQ mode: high quality recording, SP mode: standard recording

- When you select a recording mode, the selection appears on the display.
Backlight Function
You can set the recorder so that the LCD display lights each time a button is pressed.
Setting the back-light function
1 Press the Menu Set button until 'EL ON' appears on the display.
- 'EL ON' lights up.
2 Press the Menu Set button longer.
- 'EL ON' light goes off and the LCD lights each time a button is pressed.
Canceling the backlight function
1 Press the Menu Set button until 'EL OFF' appears on the display.
- 'EL OFF' lights up.
2 Press the Menu Set button again, this time longer.
- 'EL OFF' light goes off and the backlight function will be cancelled.
Bass Control Function
Setting the back-light function
1 Press the Folder button to select the MP3 folder.
2 Press the Menu Set button until 'b_06' appears on the display.
- 'b_06' lights up.
3 Press the Menu Set button again, this time longer.
4 Press the Vol button to select the desired bass level.
- You can adjust it from 0 to 12.
Note
- The Bass control function only works in MP3 mode.
Repeat Playback Function
1 During playback, press the Repeat button briefly at the start point of the A-B section you want to repeat.
• 'RPT A', the start point of the A-B section, is displayed.
2 During playback, press the Repeat button briefly at the end point of the A-B section you want to repeat.
- The end point 'B' appears beside 'RPT A', and repeat playback of the A-B section starts.
To repeat the current playback
During playback, press the Repeat button longer.
- 'RPT I' appears on the display and the recording that is currently being played will be played back repeatedly.
To cancel repeat playback
Press the Repeat button again.
- Repeat playback stops.

Connecting to a PC
By installing the Voice Yepp program and the USB driver, you can transfer the recording from the Voice Yepp to your PC. You can also perform record, edit, play, and voice e-mail send operations.
Connecting Voice Yepp to a PC
Using a USB cable, connect the Voice Yepp to your PC as shown in the picture.
![graph TD A["Voice Yepp"] -->|USB Port| B["USB Port"] B --> C["USB Cable"] C --> D["PC"] D --> E["Soundcard Input jack"] E --> F["External Microphone"] style A fill:#f9f,stroke:#333 style B fill:#ccf,stroke:#333 style C fill:#cfc,stroke:#333 style D fill:#fcc,stroke:#333 style E fill:#cff,stroke:#333…](/content/2026/05/1047347/images/a2276f2b2e7de5628e9c0f321e65277165b51af5c88b120b72d631dc0a20a9d0.jpg)
System Requirements
- Computer: IBM compatible PC (Pentium or higher) with USB port support • Memory: 64MB or higher
- Operating System: Windows 98/SE/NT5.0/2000/Me/XP • Available Hard Disk Space: above 100 MB
- Microphone (for recording), Speaker (for playing)
Installing the Voice Yepp Software
When you insert the installation CD into your CD-ROM drive, the CD starts automatically and a menu appears on the screen as follows.
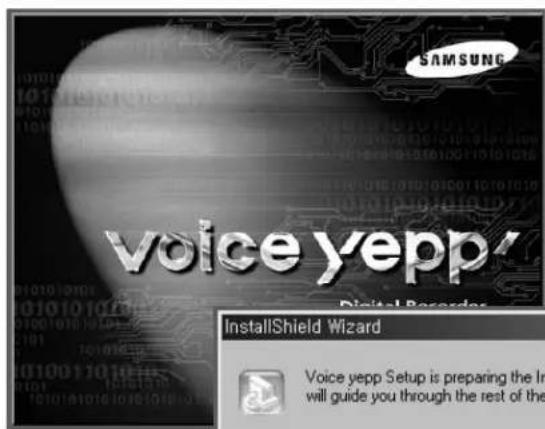

If the CD does not start automatically
- Double left click on the My Computer icon in desktop to open it, select the CD-ROM drive, and open the Setup folder, which should contain the "Setup.exe" file. Double-click on "Setup.exe".
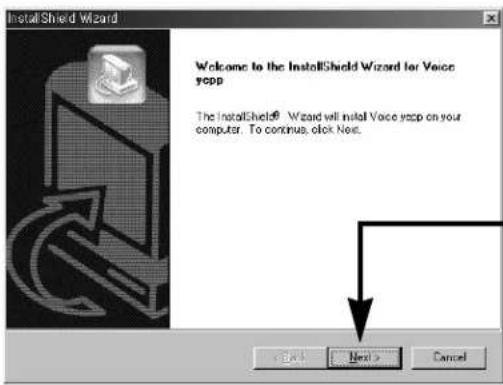
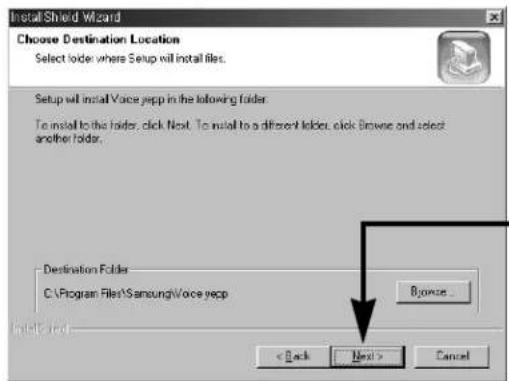
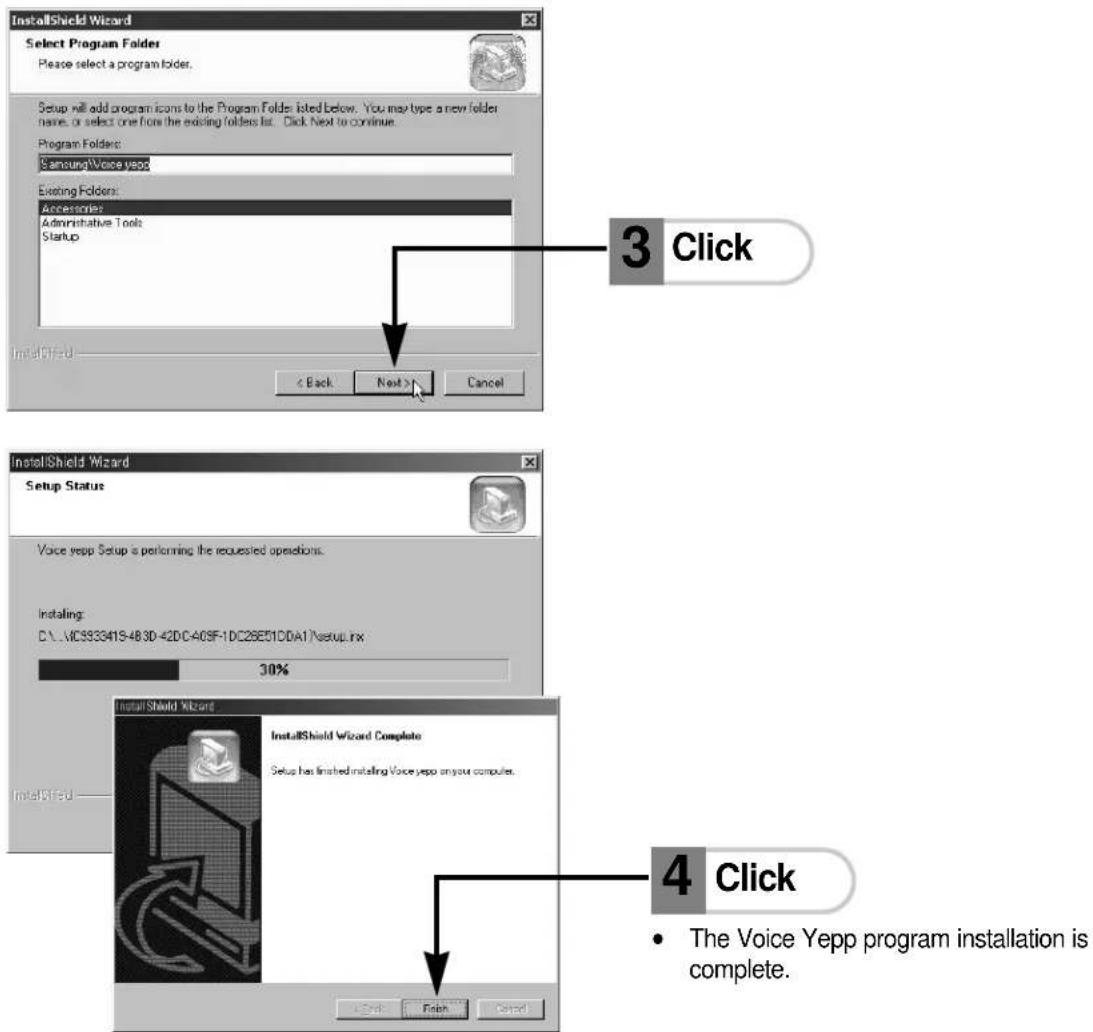

To uninstall the Voice Yepp program
- An 'Uninstall' window appears when you insert the CD into your CD-ROM drive.

Connecting to a PC (continued)
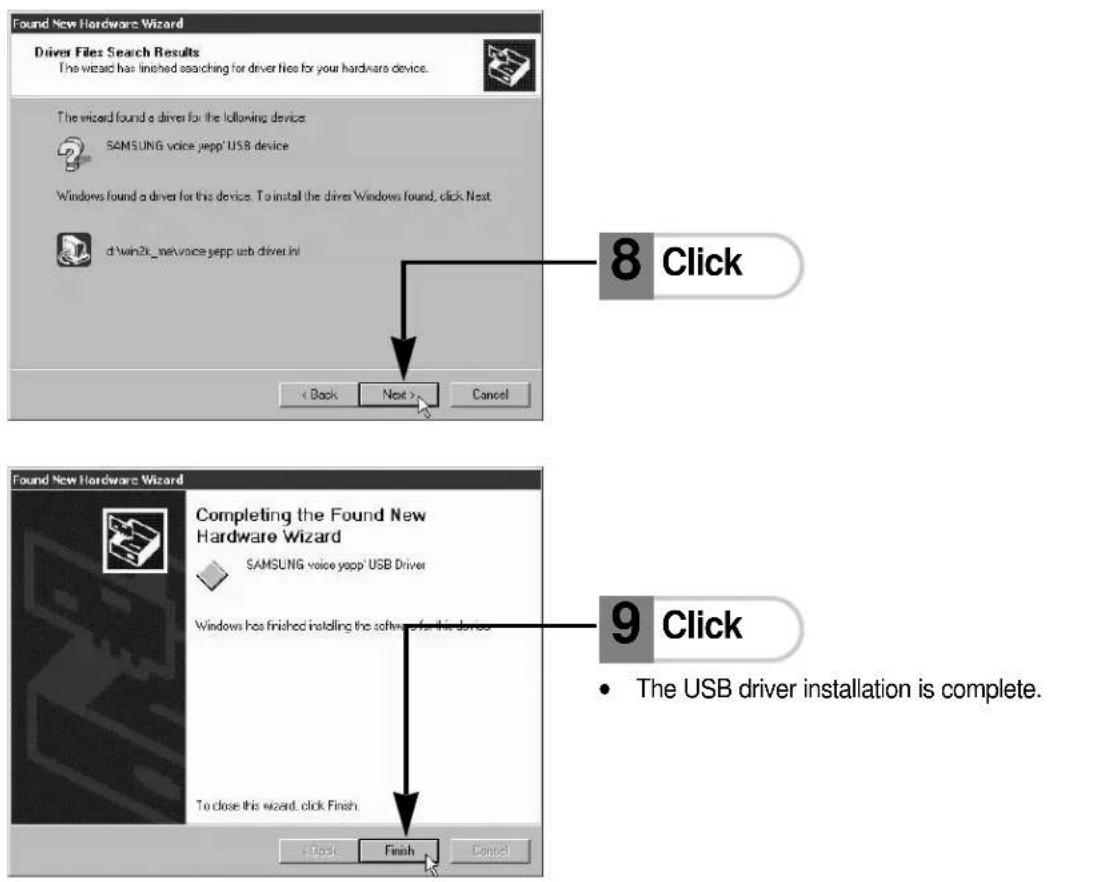
Installing USB driver
Switch the Voice Yepp on, connect it to your PC, and then install the USB cable as shown below.
Caution: The picture below depicts installation in Windows 2000.
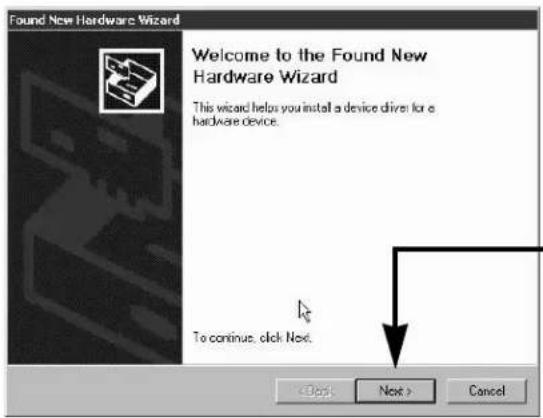
1 Click
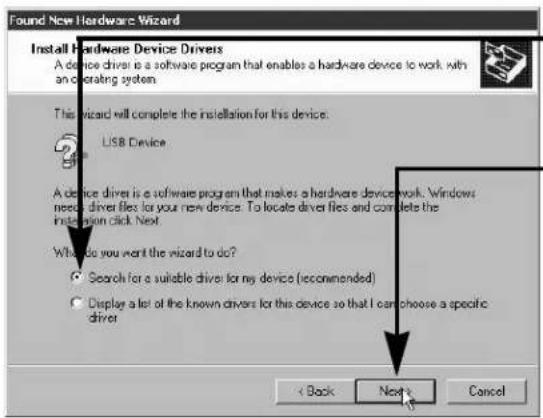
2 Select
3 Click
4 Insert the installation CD into your CD-ROM drive.
- Skip this step if the CD is already in your CD-ROM drive.
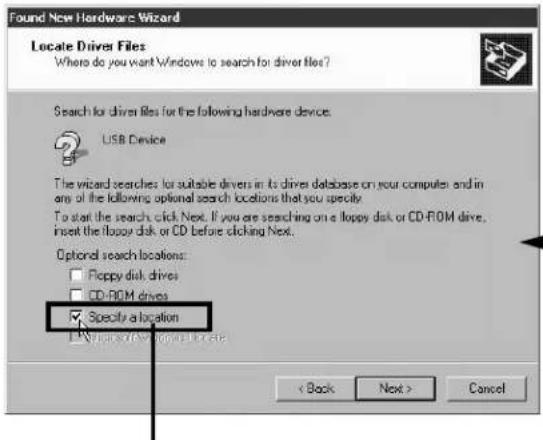
5 Click
Caution: Make sure only that this area is selected.
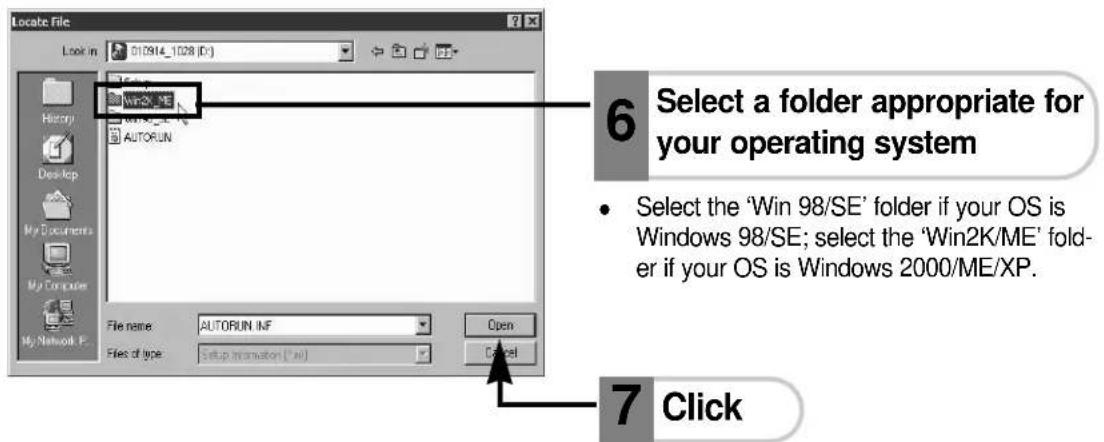
- If the Browse window closes when you click, click from the number 4 window.
Using Voice Yepp Manager
- First, connect the Voice Yepp to a PC. If you disconnect the cable connecting this device to your PC, 'Pro-F' appears on the display and the number increases to show the total number of MP3 music files. This indicates that the Voice Yepp is in the process of encryption. Wait a moment.
- This program allows you to upload/download voice files. The program starts when you double-click on the Voice Yepp manager icon on the desktop.
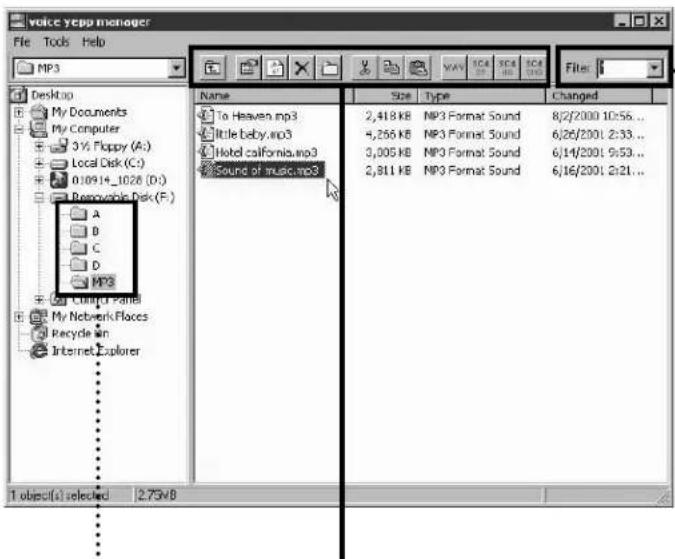
Selecting the file format
- You can choose to display only those file formats that you want to see.
Voice Yepp Folder

Moving to Upper Folder

Cutting the Selected Folder/File

Setup

Copying the Selected Folder/File Copy

Refresh

Pasting Cut/Copied Folder or File

Deleting the Selected Folder/File

Converting SC4 file to WAV file

Making New Folder

Converting WAV file to SC4 file (standard play, high quality, and super high quality)
- For detailed instruction on file conversion, see page 23.
LCD display information during connecting to PC
• PC-in: indicates that the Voice Yepp is connected to a PC • PC-tr: indicates that data is being transferred • Pro-F: indicates that MP3 files are being encrypted
When you disconnect the connection between the Voice Yepp and your PC while 'PC-tr' is displayed, the data in transit may be corrupted. Wait until 'PC-in' appears on the display and then unplug the USB cable.

- Since your PC recognizes this device as a moveable disk, you can use it as a separate recording medium by using Windows Explorer, without the need for the Voice Yepp manager or Voice Yepp player. Thus all types of file, as well as voice and music files, can also be stored as in a moveable disk and then be used on other PCs.
- If you re-connect the USB cable to Voice Yepp after formatting the portable disk drive on your PC, folders A, B, C, D and MP3 will automatically be created.
Connecting to a PC (continued)
Using Voice Yepp Manager (Continued)
File Conversion
WAV files can be converted into SC4 files which you can listen to using the Voice Yepp or the Voice Yepp Player, and similarly SC4 files can be converted into WAV files.
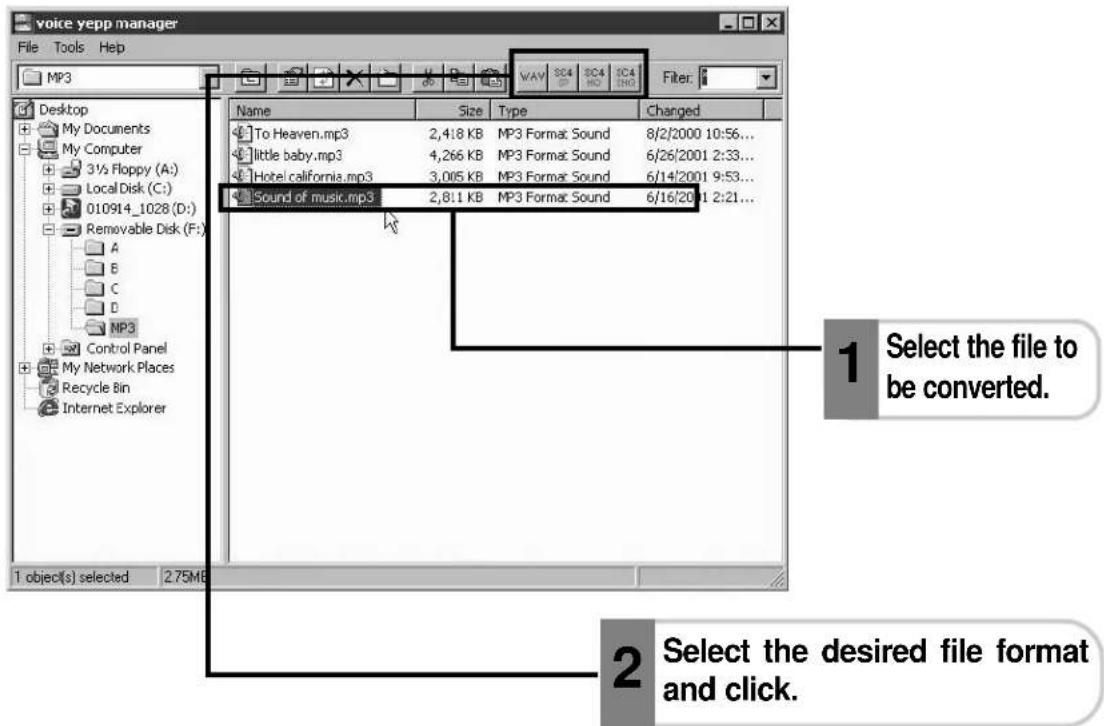
- Converts to the selected file format.

SC4 files
- As it only contains the recorded voice, this file can only be listened to using the Voice Yepp or the Voice Yepp Player.

Converting SC4 file to WAV file

Converting WAV file to a standard quality SC4 file

- MP3 files must be saved only to the MP3 folder, and SC4 files to the A, B, C, or D folders only.

Converting WAV file to a high quality SC4 file

Converting WAV file to a super high quality SC4 file
Voice File Download/Upload
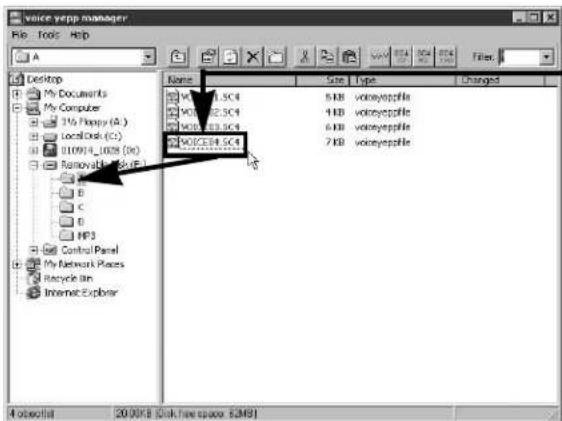
1 Select a file to download/upload
2 Drag and drop to the folder into which you want to do the upload/download
- The selected file is copied to the relevant folder.

Notes on voice download/upload
- When downloading voice files to folders A\~D, name the files as Voice00, Voice01,... Voice99. Otherwise the Voice Yepp cannot recognize the files and you won't be able to locate them.
- Download only SC4 files to folders A\~D and only MP3 files to the MP3 folder. Otherwise the Voice Yepp cannot recognize the files and you won't be able to locate them.
- If you disconnect the USB cable once you've downloaded SC4 files, those files will be automatically sorted. Example: Voice02, Voice03, and Voice10 are automatically sorted as Voice01, Voice0 Voice03 respectively.
- The law prohibits uploading MP3 files. So the Voice Yepp comes with an MP3 encryption feature and when you upload MP3 files the sound is distorted.

Connecting to a PC (continued)
Using the Voice Yepp Player
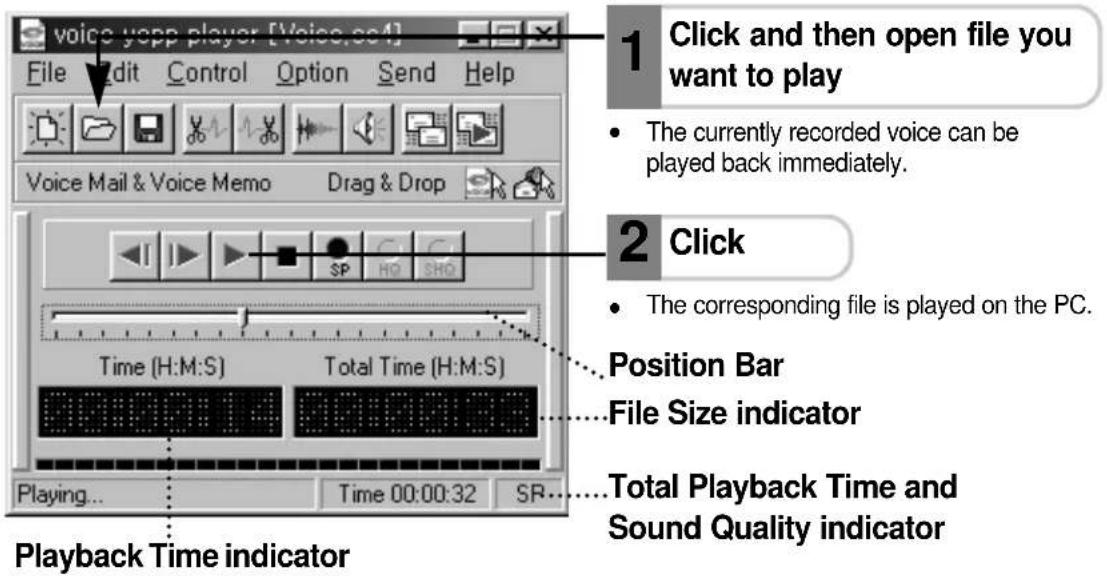
You can perform Record, Edit, and Voice E-mail Send operations from your PC using the Voice Yepp program. Double-click on the Voice Yepp Player icon the Desktop.
Voice Recording
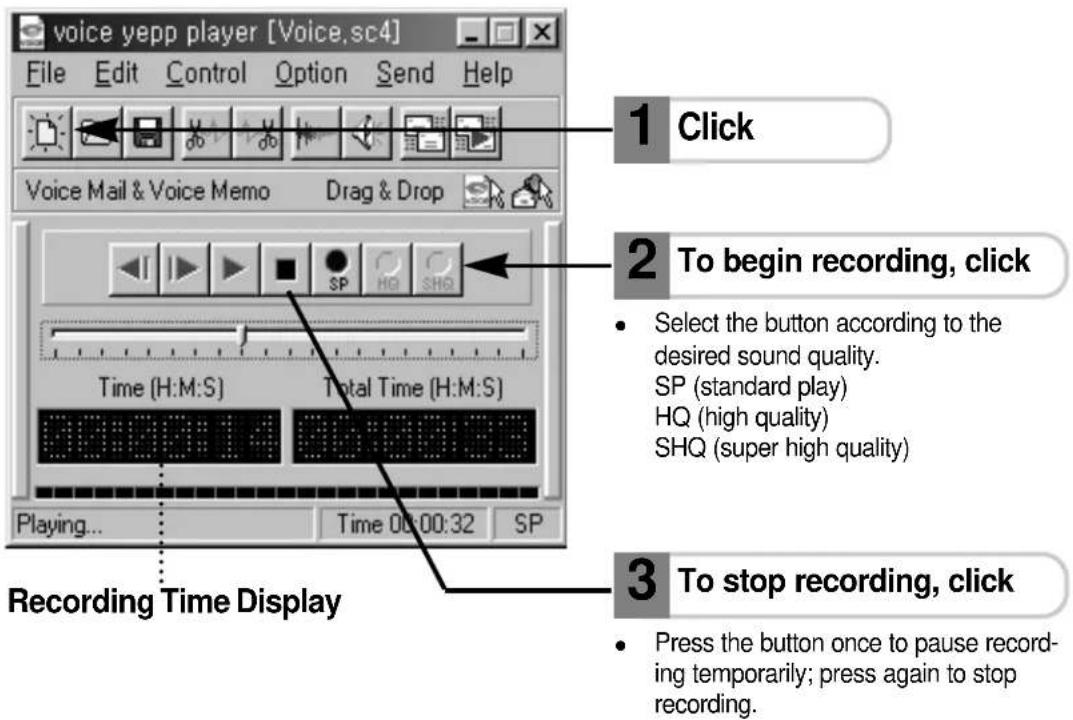

To given sound effect
Click
• A window appears, where you can set various sound effects and their levels.
Voice File Playback
Note
To move forward/backward
Click at the desired position.
Playback restarts from the new position.
• You can move to the beginning by clicking

and to the end by clicking

Note
To adjust sound volume output
Click

- Windows' Volume Control window appears.

Connecting to a PC (continued)
Using Voice Yepp Player (continued)
Voice File Edit
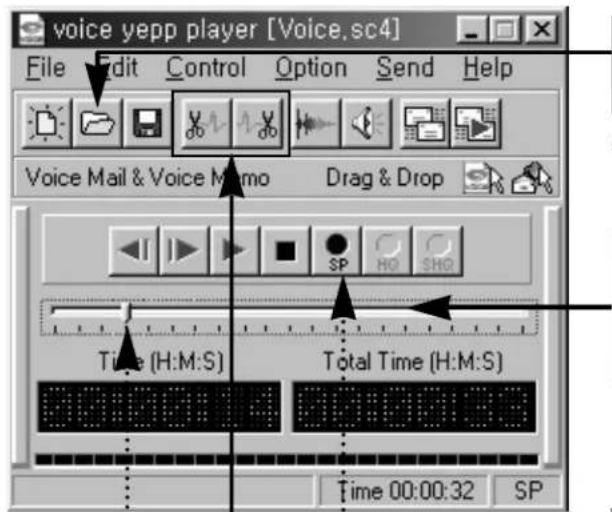
1 Click and then open the file you want to edit.
- The currently recorded voice can be edited immediately.
2 Using the position shifting bar, select the section you want to remove.
3 Click
• Deletes the section prior to the selected position. • Deletes the section following the selected position.
If the SP (HQ, SHQ) button is pressed after dragging the bar to the desired position, the current recording will be inserted at the relevant position in the file. At this time, recording can be done only in the existing recording modes (SP, HQ, and SHQ).
Voice File Save
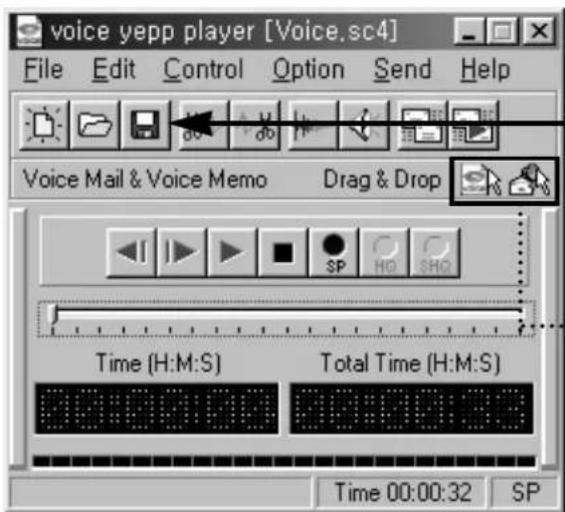
1 Click
- A window appears, where you can save a voice file either as SC4 or exe format.
Quick Save
- Drag 📄 or 🌐 to the desired location. The currently recorded or opened file is automatically saved in the relevant folder.
Note: SC4 files
- As they only contain the recorded voice, you can only listen to these files with the Voice Yepp or the Voice Yepp Player.
exe files
- As they contain both the voice (or data) and a player, you can listen to these files without using the Voice Yepp Player.

Connecting to a PC (continued)
Using Voice Yepp Player (continued)
Sending recorded voice messages via e-mail
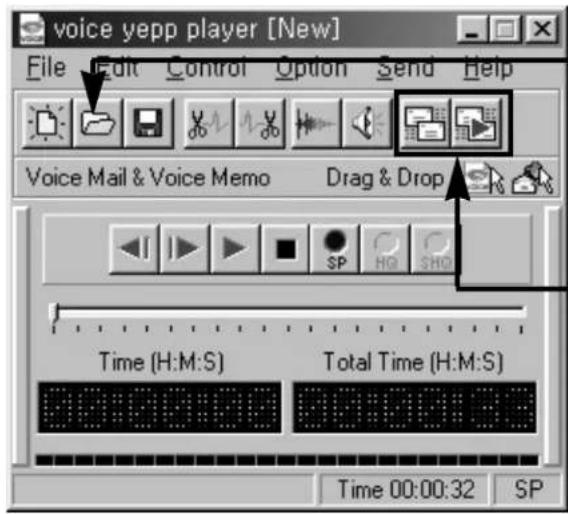
1. Click and then open the file you want to attach.
- The currently recorded voice can be attached right away.
2. Click
- Attaches SC4 file.
- Attaches exe file.
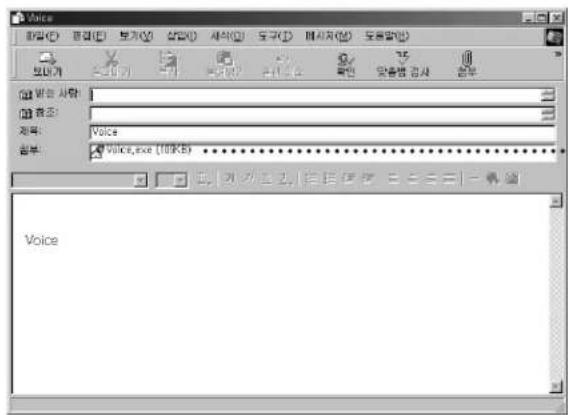
The selected file is automatically attached.
3. Write your message and then send.
Note
- To send e-mails with voice file attachments, the user's mail program must first be set in the Voice Yepp Player.
Set the mail program by selecting Option → Mail Program.
Cautions
Operating Precautions
Do not drop or use force on the device.
Such actions will damage the Voice Yepp.
Do not expose this device to the following conditions:
- places subject to extremely high temperatures (60°C);
- a place exposed to direct sunlight or near a heater; • inside a car, especially in summer; • high humidity such as near a bath; or
- dusty places.
Be careful not to apply excessive force to the LCD display, as the display may easily break or be rendered inoperable due to its fragile nature.
Keep ATM cards, credit cards, and any other magnetic card away from the recorder as the magnetic force generated by its speaker can render magnetic cards unusable.
The Manufacturer does not warrant and will not be held responsible in any way for damages or loss of data, including loss of data stored on this device, resulting from a cause other than defects in materials or workmanship, including damage or loss caused by servicing or modification by anyone other than an authorized service center. You will be responsible for safeguarding all data stored on this device.
Do not remove batteries during recording.
Safety Precautions
Do not attempt to service this device yourself. Never disassemble or modify this device in any way.
If smoke emerges from the device, or the device distorts due to heat generation, immediately remove the batteries and then contact an authorized service center.
Do not use this device where the use of electronic devices is restricted, such as in an airplane.
Doing so can cause an accident.
Notes on batteries
Do not use different types of batteries together.
Remove the batteries when not planning to use the device for a long period of time.
Do not short-circuit, disassemble, heat or dispose of batteries by fire.
- Should fluid from a battery ever accidentally get into your eyes, do not rub them. Rinse your eyes with tap water and then consult your physician immediately.
- Misuse of batteries can cause them to leak, which damages and corrodes the area around the battery, creating the danger of fire, explosion and personal injury.
Note on the LCD display
Wait a moment when any of the following messages is shown on the LCD display.
• Pro-d: Sorting Memory • Pro-F: Encoding MP3 files • S-File: Saving Recording
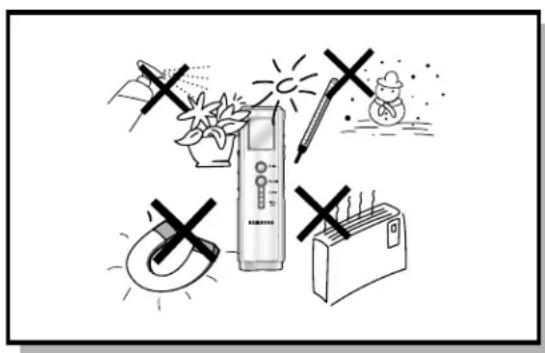
Protect the player from moisture (dripping or splashing and that no objects filled with liquids, such as vases, shall be placed on the player), and excess heat (e.g. fireplace) or equipment creating strong magnetic or electric fields (i.e. speakers...). Disconnect the power cable from the mains electricity supply if the player malfunctions. Your player is not intended for industrial use but for domestic purposes only. Use of this product is for personal use only. Condensation: If your player or disc have been stored in a cold atmosphere, as for example during transportation in the winter, wait for approximately 2 hours until they have reached room temperature.
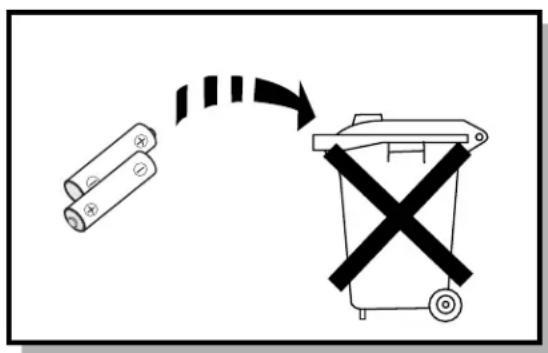
The battery used in this product contains chemicals that are harmful to the environment. Do not dispose of batteries in the general household waste. It is recommended that the replacement of the battery should be done by a technician.
Troubleshooting
LCD does not work.
Check 1
Are the batteries drained?
⇒ Replace the batteries with new ones.
Check 2
Is the polarity of the batteries correct?
→ Make sure the polarities (+ and -) are aligned correctly.
Sound recording does not work.
Check 1
Is the memory full, or have all available recording numbers been used?
→ Delete unnecessary files.
Check 2
Are the batteries drained?
→ Replace the batteries with new ones.
Playback does not work
Check 1
Is the Voice Yepp set to lock mode?
⇒ Change the HOLD switch to the 'Unlock' position.
Check 2
Are any recordings present?
→ Check the recording number.
Check 3
Are the batteries drained?
⇒ Replace the batteries with new ones.
Speaker doesn't work.
Check 1
Is the volume turned down to 0?
→ Adjust the volume output.
Check 2
Is the earphone plugged in?
⇒ Disconnect the earphones.
The earphones don't work.
Check 1
Is the volume turned down to '0'?
⇒ Adjust the volume output.
Check 2
Is the earphone securely plugged in?
⇒ Plug the earphone into the jack.

Troubleshooting (continued)
'Error' message appears on the LCD display
Check 1
The Voice Yepp memory is unstable.
→ Connect the device to a PC to save important files. Then format the memory.
Buttons do not work
Check 1
Is the LCD back light turned on?
- If you press the Play/Pause button to turn on the power while the Menu Set button is held down, you will get to the program support mode.
- This function is reserved for future upgrades. Do not use this repeatedly (intentionally or otherwise) since doing so may cause damage to the product.
Remove and then replace the batteries.
Check 2
Is the total memory displayed on the LCD?
The device is in format mode (see below for formatting details).
Press the Repeat button or remove and then replace the batteries.
Reset function (All data on the Voice Yepp will be erased.)
- When the Voice Yepp does not operate correctly due to some external influence, perform a reset. When you turn on the power by pressing the Play/Pause button while holding down the Folder button, the Voice Yepp's total memory size will be displayed. At this point, press the Delete button. The Voice Yepp will be reformatted and all settings will be restored to defaults.
Specifications
| Model | BR-1320/1640 |
| Dimensions | 34(W) X 117(H) X 15(D)mm |
| Weight | 61.5g (Batteries included) |
| Power Supply | AAA 1.5V X 2EA |
| Recording Medium | FLASH MEMORY (32MB/64MB) |
| Maximum number of recordings | Total 396 recordings |
| Practical Maximum Output | 9mW (SPEAKER) |
| Frequency Range | 100Hz ~ 4KHz |
| Input | Internal non-directional electric condenser microphone (mono) |
| Plug-In power microphone (mini plug/mono)IMP 3KΩ and below | |
| Output | Earphone (mini plug/stereo)IMP 8Ω and above(recommended output 32Ω) |
| Diameter 23mm, 16Ω speaker | |
| Operating Environment | Temperature 0°C ~ 40°C |
SAMSUNG
AH68-00996B


- FEATURES
- WHAT IS A DIGITAL RECORDER
- LONG RECORDING FUNCTION (ABOUT)
- DIGITAL INTERFACE FUNCTION
- REPEAT PLAYBACK FUNCTION
- MIC/RECORDING MODE SELECT FUNCTION
- VOR FUNCTION
- AUTO POWER OFF FUNCTION
- RECORDING FOLDER MANAGEMENT FUNCTION
- INTRO-SCAN FUNCTION
- VOICE EDIT AND E-MAIL SEND FUNCTIONS
- CONTENTS
- USING VOICE YEPP
- CONVENIENT FUNCTIONS
- INSERTING THE BATTERIES
- OPEN THE BATTERY COVER ON THE BACK OF THE DEVICE
- CHECKING THE REMAINING BATTERY POWER
- NOTE
- TURNING THE POWER ON/OFF
- TO TURN ON POWER
- TO TURN OFF POWER
- SETTING LOCK FUNCTION
- SLIDE THE HOLD SWITCH UP
- LISTENING THROUGH EARPHONES
- CONNECT THE EARPHONE TO THE OUTPUT JACK
- MAKING A RECORDING
- TO END RECORDING
- TO SEE THE AVAILABLE RECORDING TIME
- INFORMATION SHOWN ON THE LCD DISPLAY
- USING VOICE YEPP (CONTINUED)
- PLAYING BACK
- TO STOP PLAYBACK
- TO ADJUST SOUND OUTPUT VOLUME
- TO LOCATE A SPECIFIC POINT WITHIN YOUR AUDIO FILE
- PLAYBACK SPEED CONTROL FUNCTION
- TO LISTEN AT SLOW SPEED
- WHILE IN STOP MODE
- TO LISTEN AT NORMAL SPEED
- TO LISTEN AT FAST SPEED
- DELETING
- TO DELETE A SINGLE RECORDING
- TO DELETE ALL THE RECORDINGS IN A FOLDER
- TO DELETE ALL RECORDINGS
- WHILE IN THE STOP MODE
- TO DELETE THE RECORDING CURRENTLY BEING PLAYED BACK
- CONNECTING AN EXTERNAL MICROPHONE
- RECORDING SEARCH FUNCTION
- MAIN INFORMATION DISPLAY FUNCTION
- MIC MODE SELECT FUNCTION
- RECORDING MODE SELECT FUNCTION
- BACKLIGHT FUNCTION
- BASS CONTROL FUNCTION
- TO REPEAT THE CURRENT PLAYBACK
- TO CANCEL REPEAT PLAYBACK
- CONNECTING TO A PC
- CONNECTING VOICE YEPP TO A PC
- SYSTEM REQUIREMENTS
- INSTALLING THE VOICE YEPP SOFTWARE
- IF THE CD DOES NOT START AUTOMATICALLY
- TO UNINSTALL THE VOICE YEPP PROGRAM
- CONNECTING TO A PC (CONTINUED)
- INSTALLING USB DRIVER
- USING VOICE YEPP MANAGER
- SELECTING THE FILE FORMAT
- LCD DISPLAY INFORMATION DURING CONNECTING TO PC
- USING VOICE YEPP MANAGER (CONTINUED)
- FILE CONVERSION
- SC4 FILES
- VOICE FILE DOWNLOAD/UPLOAD
- NOTES ON VOICE DOWNLOAD/UPLOAD
- USING THE VOICE YEPP PLAYER
- VOICE RECORDING
- TO GIVEN SOUND EFFECT
- VOICE FILE PLAYBACK
- TO MOVE FORWARD/BACKWARD
- TO ADJUST SOUND VOLUME OUTPUT
- USING VOICE YEPP PLAYER (CONTINUED)
- VOICE FILE EDIT
- CLICK AND THEN OPEN THE FILE YOU WANT TO EDIT
- USING THE POSITION SHIFTING BAR, SELECT THE SECTION YOU WANT TO REMOVE
- CLICK
- VOICE FILE SAVE
- QUICK SAVE
- NOTE: SC4 FILES
- EXE FILES
- SENDING RECORDED VOICE MESSAGES VIA E-MAIL
- CLICK AND THEN OPEN THE FILE YOU WANT TO ATTACH
- WRITE YOUR MESSAGE AND THEN SEND
- CAUTIONS
- OPERATING PRECAUTIONS
- SAFETY PRECAUTIONS
- NOTES ON BATTERIES
- NOTE ON THE LCD DISPLAY
- TROUBLESHOOTING
- TROUBLESHOOTING (CONTINUED)
- IS THE LCD BACK LIGHT TURNED ON
- IS THE TOTAL MEMORY DISPLAYED ON THE LCD
- RESET FUNCTION (ALL DATA ON THE VOICE YEPP WILL BE ERASED.)
- SPECIFICATIONS
- SAMSUNG
Brand : SAMSUNG
Model : Voice yepp BR-1320
Category : Voice recorder