
DHT-E251BA - Home Theater DENON - Free user manual and instructions
Find the device manual for free DHT-E251BA DENON in PDF.


| Product Type | Home Theater Receiver |
| Brand | Denon |
| Model | DHT-E251BA |
| Power Output (per channel) | 75 W (8 ohms, 20 Hz - 20 kHz, 0.08% THD) / 110 W (6 ohms, 1 kHz, 0.7% THD) |
| Number of Amplifier Channels | 5 |
| Speaker Impedance | 6 - 16 ohms |
| HDMI Inputs / Output | 4 inputs / 1 output |
| HDMI Features | 3D, Deep Color, x.v.Color, HDCP |
| Audio Decoding | Dolby TrueHD, Dolby Digital Plus, DTS-HD Master Audio, DTS 96/24, Dolby Pro Logic II, DTS NEO:6 |
| Compressed Audio Restorer | Yes |
| Tuner | FM/AM with auto preset (up to 56 stations) |
| Portable Input | Front panel 3.5mm stereo mini jack |
| Power Consumption | 330 W (0.3 W standby) |
| Power Supply | AC 120 V, 60 Hz |
| Weight | 17 lbs 7 oz (7.9 kg) |
| Remote Control | RC-1180 with batteries (R03/AAA) |
| Quick Select Function | 4 presets for input, volume, sound mode |
| Sleep Timer | Yes, selectable times |
| Special Features | GUI overlay on HDMI, Auto Standby, Setup Lock, Night Mode, RESTORER |
| Included Accessories | Getting Started guide, CD-ROM (Owner's Manual), Safety Instructions, Warranty (NA model), Remote control, Batteries, AM loop antenna, FM indoor antenna, Speaker cable labels |
Frequently Asked Questions - DHT-E251BA DENON
User questions about DHT-E251BA DENON
0 question about this device. Answer the ones you know or ask your own.
Ask a new question about this device
Download the instructions for your Home Theater in PDF format for free! Find your manual DHT-E251BA - DENON and take your electronic device back in hand. On this page are published all the documents necessary for the use of your device. DHT-E251BA by DENON.
USER MANUAL DHT-E251BA DENON
The lightning flash with arrowhead symbol, within an equilateral triangle, is intended to alert the user to the presence of uninsulated "dangerous voltage" within the product's enclosure that may be of sufficient magnitude to constitute a risk of electric shock to persons.

The exclamation point within an equilateral triangle is intended to slert the user to the presence of important operating and maintenance (servicing) instructions in the literature accompanying the appliance.
WARNING:
TO REDUCE THE RISK OF FIRE OR ELECTRIC SHOCK, DO NOT EXPOSE THIS APPLIANCE TO RAIN OR MOISTURE.

CAUTION: HOT SURFACE. DO NOT TOUCH.
The top surface over the internal heat sink may become hot when operating this product continuously. Do not touch hot areas, especially around the "Hot surface mark" and the top panel.
IMPORTANT SAFETY INSTRUCTIONS
- Read these instructions.
- Keep these instructions.
- Heed all warnings.
- Follow all instructions.
- Do not use this apparatus near water.
- Clean only with dry cloth
-
Do not block any ventilation openings.
Install in accordance with the manufacturer's instructions. -
Do not install near any heat sources such as radiators, heat registers, stoves, or other apparatus (including amplifiers) that produce heat.
-
Do not defeat the safety purpose of the polarized or grounding-type plug. A polarized plug has two blades with one wider than the other. A grounding type plug has two blades and a third grounding prong. The wide blade or the third prong are provided for your safety. If the provided plug does not fit into your outlet, consult an electrician for replacement of the obsolete outlet.
-
Protect the power cord from being walked on or pinched particularly at plugs, convenience receptacles, and the point where they exit from the apparatus.
-
Only use attachments/accessories specified by the manufacturer.
-
Use only with the carl, stand, tripod, bracket, or table specified by the manufacturer, or sold with the apparatus. When a carl is used, use caution when moving the carl/ apparatus combination to avoid injury from tip-over.
-
Unplug this apparatus during lightning storms or when unused for long periods of time.
-
Ruler all servicing to qualified service personnel. Servicing is required when the apparatus has been damaged in any way, such as power-supply cord or plug is damaged, liquid has been spilled or objects have fallen into the apparatus, the apparatus has been exposed to rain or moisture, does not operate normally, or has been dropped.
-
Batteries shall not be exposed to excessive heat such as sunshine, fire or the like.

CAUTION:
To completely disconnect this product from the mains, disconnect the plug from the wall socket outlet. The mains plug is used to completely interrupt the power supply to the unit and must be within easy access by the user
FCC INFORMATION (For US customers)
1. PRODUCT
This product complies with Part 15 of the FCC Rules. Operation is subject to the following two conditions: (1) this product may not cause harmful interference, and (2) this product must accept any interference received, including interference that may cause undesired operation.
2. IMPORTANT NOTICE: DO NOT MODIFY THIS PRODUCT
This product, when installed as indicated in the instructions contained in this manual, meets FCC requirements. Modification not expressly approved by Donon may void your authority, granted by the FCC, to use the product.
3. NOTE
This product has been tested and found to comply with the limits for a Class B digital device, pursuant to Part 15 of the FCC Rules. These limits are designed to provide reasonable protection against harmful interference in a residential installation.
This product generates, uses and can radiate radio frequency energy and, if not installed and used in accordance with the instructions, may cause harmful interference to radio communications. However, there is no guarantee that interference will not occur in a particular installation. If this product does cause harmful interference to radio or television reception, which can be determined by turning the product OFF and ON, the user is encouraged to try to correct the interference by one or more of the following measures:
- Recruit or relocate the receiving antenna.
- Increase the separation between the equipment and receiver.
- Connect the product into an outlet on a circuit different which the receiver is connected.
- Consult the local retailer authorized to distribute this type of product or an experienced radio/TV technician for help.
For Canadian customers:
This Class B digital apparatus complies with Canadian ICES-003.
NOTES ON USE
WARNINGS
- Avoid high temperatures
Allow for sufficient heat dispersion when installed in a rack. - Handle the power cord carefully
Hold the plug when unplugging the cord. - Keep the unit free from moisture, water, and dust.
- Unplug the power cord when not using the unit for long periods of time.
- Do not obstruct the ventilation holes.
• Do not let foreign objects into the unit.
* Do not let insecticides, benzene, and thinner come in contact with the unit. - Never disassemble or modify the unit in any way.
- Ventilation should not be impeded by covering the ventilation openings with items, such as newspapers, tablecloths or curtains.
- Naked flame sources such as lighted candles should not be placed on the unit.
- Observe and follow local regulations regarding battery disposal.
- Do not expose the unit to dripping or splashing fluids.
- Do not place objects filled with liquids, such as vases, on the unit
- Do not handle the mains cord with wet hands.
- When the switch is in the OFF (STANDBY) position, the equipment is not
completely switched off from MAINS.
• The equipment shall be installed near the power supply so that the power
supply is easily accessible. - Do not keep the battery in a place exposed to direct sunlight or in places
with extremely high temperatures, such as near a heater.
□ CAUTIONS ON INSTALLATION
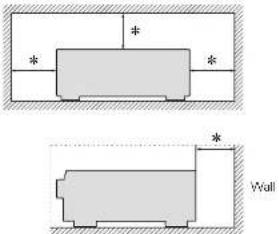
* For proper heat dispersal, do not install this unit in a confined
space, such as a bookcase or similar enclosure.
- More than 12 in. (0.3 ml) is recommended.
Getting started
Thank you for purchasing this Denon product. To ensure proper operation, please read this owner's manual carefully before using the product. After reading this manual, be sure to keep it for future reference.
Contents
| Getting started | 1 |
| Accessories | 1 |
| Features | 2 |
| Cautions on handling | 2 |
Basic instructions
| Connections | 4 |
| Important information | 4 |
| Connecting HDMI devices | 5 |
| Connecting other devices | 9 |
| Connecting the power cord | 14 |
| Playback (Basic operation) | 15 |
| Important information | 15 |
| Playing a Blu-ray Disc player/DVD player | 16 |
| Playing a portable player | 16 |
| Tuning in radio stations | 17 |
| Selecting a listening mode (Surround mode) | 19 |
| Standard playback | 20 |
| Multi-channel stereo playback | 21 |
| Virtual playback | 21 |
| Stereo playback | 21 |
| Direct playback | 21 |
Advanced instructions
| Installation/connection/setup of speakers (Advanced) | 23 |
| Speaker installation | 23 |
| Speaker connection | 24 |
| Playback (Advanced operation) | 27 |
| Adjusting the volume of the speakers | 27 |
| Sleep timer function | 28 |
| Quick select function | 28 |
| Various memory functions | 28 |
| How to make detailed settings | 29 |
| Menu map | 29 |
| Examples of menu and front display | 30 |
| Inputs | 31 |
| Speakers | 34 |
| General | 37 |
| Adjusting the sound field effects | 39 |
| Information | 43 |
Information 64
| Part names and functions | 45 |
| Front panel | 45 |
| Display | 46 |
| Rear panel | 47 |
| Remote control unit | 48 |
| Other information | 50 |
| Trademark information | 50 |
| Surround | 51 |
| Relationship between video signals and monitor output | 53 |
| Explanation of terms | 54 |
| Troubleshooting | 56 |
| Resetting the microprocessor | 58 |
| Specifications | 58 |
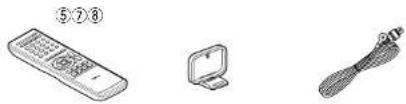
Accessories
Check that the following parts are supplied with the product.
① Getting Started....1
② CD-ROM (Owner's Manual) 1
③ Safety Instructions 1
④ Warranty (for North America model only)....1
⑤ Remote control unit (RC-1180) 1
⑥ R03/AAA batteries....2
⑦ AM loop antenna....1
⑧ FM indoor antenna 1
⑨ Speaker cable label....1
natural_image
Three simple line drawings of remote control, a small device, and a cord (no text or symbols)Features
With discrete circuit technology, the power amplifier provides identical quality for all 5 channels (110 Watts x 5 channels)
For optimum realism and stunning dynamic range, the power amplifier section features discrete power devices (not integrated circuitry).
By using high current, high power discrete power devices, the amplifier is able to easily drive high quality speakers.
HDMI connections enable quick connection to various digital AV devices (4 inputs, 1 output) (page 5)
The unit is equipped with 4 HDMI input connectors for connecting devices with HDMI connectors, such as a Blu-ray Disc player, game console, HD digital camcorder, etc.
Supports HDMI (3D, Deep Color and "x.v.Color") (1 page 8)
Advanced HDMI features are supported, including 3D passthrough, Deep Color and "x.v.Color".
High definition audio support
The unit is equipped with a decoder which supports high-quality digital audio format for Blu-ray Disc players such as Dolby TrueHD, DTS-HD Master Audio, etc.
Features an PORTABLE input jack on the front panel for connecting portable audio player (page 13)
Compressed Audio Restorer is Denon technology that restores compressed music sources to their original pre-compressed quality to give you a lively sonic ambience with greater detail and depth.
GUI overlay on HD source
You can easily make settings for your home theatre system while viewing menus on the TV screen. These menu displays can also be output to the monitor over HDMI.
Easy to use, screen display
Simple settings are enabled with the setting menus displayed on the TV screen. When you control the sound volume, the volume level is displayed on the screen, and when you switch the input source, the name of the input source is displayed.
Cautions on handling
• Before turning the power on
Check once again that all connections are correct and that there are no problems with the connection cables.
- Power is supplied to some of the circuitry even when the unit is set to the standby mode. When going on vacation or leaving home for long periods of time, be sure to unplug the power cord from the power outlet.
- About condensation
If there is a major difference in temperature between the inside of the unit and the surroundings, condensation (dew) may form on the operating parts inside the unit, causing the unit not to operate properly.
If this happens, let the unit sit for an hour or two with the power turned off and wait until there is little difference in temperature before using the unit.
• Cautions on using mobile phones
Using a mobile phone near this unit may result in noise. If that occurs, move the mobile phone away from this unit when it is in use.
- Moving the unit
Turn off the power and unplug the power cord from the power outlet. Next, disconnect the connection cables to other system units before moving the unit.
- About care
- Wipe the cabinet and control panel clean with a soft cloth.
- Follow the instructions when using a chemical cleaner.
- Benzene, paint thinner or other organic solvents as well as insecticide may cause material changes and discoloration if brought into contact with the unit, and should therefore not be used.
Basic instructions
Basic instructions
Here we explain the connections and basic operation methods for this unit.
● Connections page 4
● Playback (Basic operation) page 15
- Selecting a listening mode (Surround mode) page 19
For speaker connections, see page 24.
Connections
Important information
Make connections before using this unit.
To create a home theater that can play back higher quality video and audio by fully utilizing the capabilities of the unit and your video devices, connect the unit to each of your video devices with HDMI cables.

HDMI-compatible device

page 6 page

age 7


page 7 page

(No text)
If your video device does not support HDMI connections, use the following connection.
☐ HDMI-incompatible device

page 10 pag

page 12


page 12

page 13 page

This unit can change the source that is assigned to the DIGITAL AUDIO IN connectors.
You can change the source for connectors listed in Input connector setting within pages that describe connections for devices.
For details on assigning a source to connectors, see "Changing the source assigned to connectors" (page 9). For the setting method, see "Input Assign" (page 32).
NOTE
- The menu screen is only displayed on TV connected to this unit via HDMI. If your TV is connected to this unit via other video output connectors, perform menu operations while seeing the display on this unit.
- Do not plug in the power cord until all connections have been completed.
- When making connections, also refer to the operating instructions of the other devices being connected.
- Be sure to connect the left and right channels properly (left with left, right with right).
- Do not bundle power cords together with connection cables. Doing so can result in noise.
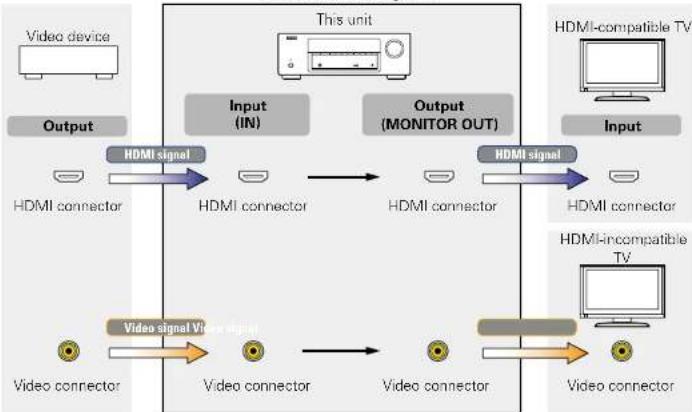
Relationship between video signals and monitor output
This unit is equipped with two types of video input connectors (HDMI and composite video) and two types of video output connectors (HDMI and composite video).
[Flow of video signals]
flowchart
graph LR
    A["Video device"] --> B["Output"]
    B --> C["HDMI connector"]
    C --> D["Input (IN)"]
    D --> E["HDMI connector"]
    E --> F["Output (MONITOR OUT)"]
    F --> G["HDMI connector"]
    G --> H["Output (MONITOR OUT)"]
    H --> I["HDMI incompatible TV"]
    I --> J["Input"]
    J --> K["HDMI-compatible TV"]
    K --> L["Output (MONITOR OUT)"]
    L --> M["HDMI incompatible TV"]
    M --> N["Output (MONITOR OUT)"]
    N --> O["HDMI incompatible TV"]
    O --> P["Output (MONITOR OUT)"]
    P --> Q["HDMI incompatible TV"]
    Q --> R["Output (MONITOR OUT)"]
    R --> S["HDMI incompatible TV"]
    S --> T["Output (MONITOR OUT)"]
    T --> U["HDMI incompatible TV"]
    U --> V["Output (MONITOR OUT)"]
    V --> W["HDMI incompatible TV"]
    W --> X["Output (MONITOR OUT)"]
    X --> Y["HDMI incompatible TV"]
    Y --> Z["Output (MONITOR OUT)"]
NOTE
- The menu screen is only displayed on TV connected to this unit via HDMI. If your TV is connected to this unit via other video output connectors, perform menu operations while seeing the display on this unit.
- HDMI signals cannot be converted into analog signals (1 page 53).
- Analog signals cannot be converted into HDMI signals (12 page 53).
Important information
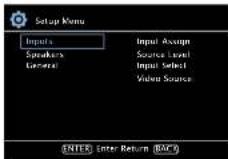
Examples of screen display
- Setup Menu screen
• Status display screen When the input source is
When the volume is adjusted.


Status display: The operating status appears briefly on the screen when the input source is switched or the volume is changed.
NOTE
- The menu screen is only displayed on TV connected to this unit via HDMI. If your TV is connected to this unit via other video output connectors, perform menu operations while seeing the display on this unit.
- If you operate the menu while playing back 3D video content or computer's resolution (e.g. VGA), the playback video is replaced by the menu screen. The playback video is not displayed behind the menu screen.
- This unit does not show the status display while playing back 3D video content or computer's resolution (e.g. VGA).
Connecting HDMI devices
You can connect up to five HDMI-compatible devices (4-inputs/1-output) to the this unit.
If the device connected to this unit is equipped with an HDMI connector, it is recommended to use HDMI connections. Connections with an HDMI cable offer the following benefits that can not be achieved with other connection methods.
• High quality playback by transmitting audio and video via digital signals
HDMI connections can transmit high definition video and high quality audio formats adopted by Blu-ray disc players (Dolby Digital Plus, Dolby TrueHD, DTS-HD, DTS-HD Master Audio).
HDMI connections also convey information required for playback between devices. This information is used for copyright protection and TV resolution recognition.
• Transmission of audio and video signals with a single HDMI cable
Previous connections required multiple audio and video cables, but HDMI connections require only a single HDMI cable to transmit audio and video signals. This allows wires in a home theater system, which tend to be complicated, to be more easily organized.
• Pass Through (page 38)
Outputs signals received from the HDMI input connector to the TV connected to the HDMI output connector even when the unit is in standby mode.
- This unit also supports 3D video playback and other functions related to video and audio (page 8).

- There is more than one version of the HDMI standard. The supported functions and the performance vary according to the version. This unit complies with the HDMI standard that supports the 3D playback functions. To enjoy these functions, the HDMI device connected to this unit also needs to use the same version of the standard. For the version of the HDMI standard on the device connected to this unit, see the device's manual.
- Some TVs do not support audio input via HDMI connections. For details, see your TV's manual.
- When "Pass Through" is set to other than "Off", more power is consumed than in normal standby mode.
Connecting this unit to a TV via HDMI connections (page 6)
☐ Connecting this unit to video devices via HDMI connections (page 7)
HDMI function (page 8)
□ Settings related to HDMI connections (page 8)
Connecting this unit to a TV via HDMI connections
Cables used for connections

- This interface allows transfer of digital video signals and digital audio signals over a single HDMI cable.

Connecting HDMI devices

- Video signals are not output if the input video signals do not match the display's resolution. In this case, switch the Blu-ray Disc/DVD player's resolution to a resolution with which the display is compatible.
- When this unit and monitor are connected with an HDMI cable, if the display or monitor is not compatible with HDMI audio signal playback, only the video signals are sent to the display or monitor. Make audio connections (IF page 10 "Connecting a TV").
NOTE
- The audio signal from the HDMI output connector (sampling frequency, number of channels, etc.) may be limited by the HDMI audio specifications of the connected device regarding permissible inputs.
- Only an HDMI signal is output from the HDMI MONITOR OUT connector
Connecting to a device equipped with a DVI-D connector
The DVI-D (Digital Visual Interface) method is also used for video transmission via digital signals. This is developed mainly for computers, and some displays such as projectors are equipped with this interface. To output HDMI video signals to a DVI-D video input compatible device, use an HDMI/DVI conversion cable or adapter.
The DVI-D connector can transmit high quality digital video signals, but copy guard and other issues may hinder normal operations for some device combinations.
NOTE
- No sound is output when connected to a device equipped with a DVI-D connector. Make audio connections as described in "Connecting a TV" (12 page 10).
- Signals cannot be output to DVI-D devices that do not support HDCP.
- Depending on the combination of devices, the video signals may not be output.
Connecting this unit to video devices via HDMI connections
Cables used for connections

[Rear panel]

- When this unit is connected to other devices with HDMI cables, connect this unit and TV also with an HDMI cable.
- When connecting a device that supports Deep Color, please use a "High Speed HDMI cable" or "High Speed HDMI cable with Ethernet".
Connecting HDMI devices
![Video camcorder HDMI OUT [Front panel]](/content/2026/05/1047343/images/498095f99be268fb7cb7f19815a398fd729c0755754d818be5f6cbe346279fc7.jpg)

You can enjoy games by connecting a game machine via the AUX HDMI connector. In this case, select the input source to "AUX".
HDMI function
This unit supports the following HDMI functions:

About 3D function
This unit supports input and output of 3D (3 dimensional) video signals of HDMI.
To play back 3D video, you need a TV and player that provide support for the HDMI 3D function and a pair of 3D glasses.
NOTE
- When playing back 3D video, refer to the instructions provided in the manual of your playback device together with this manual.
- If you operate the menu while playing back 3D video content, the playback video is replaced by the menu screen. The playback video is not displayed behind the menu screen.
- This unit does not show the status display while playing back 3D video content.
- If 3D video with no 3D information is input, the menu screen and status display on this unit are displayed over the playback video.
- If 2D video is converted to 3D video on the television, the menu screen and status display on this unit are not displayed correctly. To view the menu screen and status display on this unit correctly, turn the television setting that converts 2D video to 3D video off.
Deep Color (page 54)
When a device supporting Deep Color is connected (such as an HD camcorder), use a cable compatible with "High Speed HDMI cable" or "High Speed HDMI cable with Ethernet".
☐ "x.v.Color", sYCC601 color, Adobe RGB color, Adobe YCC601 color (page 54, 55)
☐ High definition digital audio format
Copyright protection system
In order to play back digital video and audio such as BD-Video or DVD-Video via HDMI connection, both this unit and TV or the player need to support the copyright protection system known as HDCP (High-bandwidth Digital Content Protection System). HDCP is copyright protection technology comprised of data encryption and authentication of the connected AV devices. This unit supports HDCP. • If a device that does not support HDCP is connected, video and audio are not output correctly. Read the owner's manual of your television or player for more information.
Settings related to HDMI connections
Set as necessary. For details, see the respective reference pages.
HDMI (page 38)
Make settings for HDMI.
• HDMI Audio Out
• Pass Through
- Pass Source
NOTE
The audio signal input from the HDMI input connector can be output as an output signal from the HDMI output connector by setting the HDMI audio output destination to TV. Audio signal's input via the Analog/Coaxia/Optical input connectors cannot be output from the HDMI output connector.
Connecting other devices
For highest quality video and surround playback, it is recommended to use an HDMI cable to connect this unit to TV and other video devices (page 5 "Connecting HDMI devices").
This section describes alternate connection methods when your device does not support HDMI connections.
Connection methods for various devices
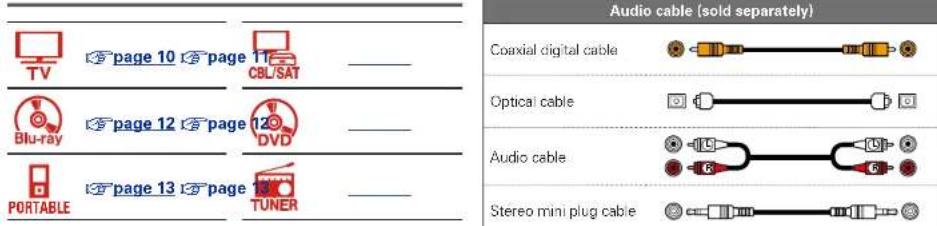
Cables used for connections

Changing the source assigned to connectors
This unit can change the source that is assigned to the DIGITAL AUDIO IN connectors.
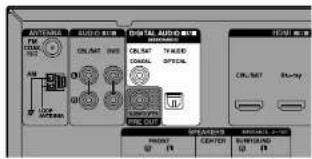
Here, a connection to the DVD player is taken as an example for explanation. The rear panel digital audio input connectors do not have the input connector indication for DVD players (DVD). However, DIGITAL AUDIO IN connectors have the "ASSIGNABLE" indication, which means that you can change the source assigned to these connectors. You can assign DVD players to these connectors to use them for DVD players. If you select "DVD" when you switch the input source for this unit, you can play back the source connected to these connectors.
How to change the source assigned to connectors (page 32)
Connecting a TV
• This section describes how to connect when your TV does not support HDMI connections.
For instructions on HDMI connections, see "Connecting HDMI devices" ( page 5).
• To listen to TV audio through this unit, use the optical digital connection.
Audio connection
The following methods are available for connecting to this unit. Use either of the methods to make a connection.
The numbers prefixed with connectors indicate the recommendation order. The smaller the number is, the higher playback quality is achieved.
1 DIGITAL AUDIO COAXIAL connector \* DIGITAL AUDIO OPTICAL connector
When a multichannel audio (digital bit stream audiol) is input, this unit decodes the audio to play back surround sound.
* When making this type of connection, you must change the settings on this unit.

□ Video connection
The following methods are available for connecting to this unit.
1 VIDEO OUT (MONITOR) connector
This makes an analog video connection.
Input connector setting
When making the following connection, you must change the input connector settings.
1 DIGITAL AUDIO COAXIAL connector
Change the default "CBL/SAT" to "TV AUDIO"
For how to change, see "Input Assign" (page 32).

NOTE
- The menu screen is only displayed on TV connected to this unit via HDMI. If your TV is connected to this unit via other video output connectors, perform menu operations while seeing the display on this unit.
- If the VIDEO input connector is to be used, be sure to connect the MONITOR output connector of the unit and the VIDEO input connector of the TV, using a video cable.
Connecting a set-top box (Satellite tuner/Cable TV)
This section describes how to connect when your satellite tuner or cable TV does not support HDMI connections.
For instructions on HDMI connections, see "Connecting HDMI devices" (page 5).
Audio connection
The following methods are available for connecting to this unit. Use either of the methods to make a connection.
The numbers prefixed with connectors indicate the recommendation order. The smaller the number is, the higher playback quality is achieved.
1 DIGITAL AUDIO COAXIAL connector DIGITAL AUDIO OPTICAL connector
When a multichannel audio (digital bit stream audio) is input, this unit decodes the audio to play back surround sound.
* When making this type of connection, you must change the settings on this unit.

2 AUDIO IN (CBL/SAT) connector
This makes an analog audio connection. This type of connection converts digital audio to analog audio, so the output audio may be degraded compared to connections [1].
□ Video connection
The following methods are available for connecting to this unit.
1 VIDEO IN (CBL/SAT) connector
This makes an analog video connection.
Input connector setting
When making the following connection, you must change the input connector settings.
① DIGITAL AUDIO OPTICAL connector
Change the default "TV AUDIO" to "CBL/SAT"
For how to change, see "Input Assign" (page 32).

Connecting a Blu-ray Disc player/DVD player
This section describes how to connect a Blu-ray Disc player and DVD player that does not support HDMI connections.
For instructions on HDMI connections, see "Connecting HDMI devices" ( page 5).
Audio connection
The following methods are available for connecting to this unit. Use either of the methods to make a connection.
The numbers prefixed with connectors indicate the recommendation order. The smaller the number is, the higher playback quality is achieved.
1 DIGITAL AUDIO COAXIAL connector DIGITAL AUDIO OPTICAL connector
When a multichannel audio (digital bit stream audiol) is input, this unit decodes the audio to play back surround sound. However, digital bit stream audio signals for HD audios from Blu-ray disc players (such as Dolby Digital Plus and DTS-HDI) can not be transmitted. When making this type of connection, you must change the settings on this unit.

2 AUDIO IN (DVD) connector
This makes an analog audio connection. This type of connection converts digital audio to analog audio, so the output audio may be degraded compared to connections [1].
Video connection
The following methods are available for connecting to this unit
1 VIDEO IN (DVD) connector
This makes an analog video connection.
Input connector setting
When making the following connection, you must change the input connector settings.
① DIGITAL AUDIO COAXIAL connector
Change the default "CBL/SAT" to "DVD".
DIGITAL AUDIO OPTICAL connector
Change the default "TV AUDIO" to "DVD".
For how to change, see "Input Assign" (page 321).


When you want to play back HD Audio IDolby TrueHD, DTS-HD, Dolby Digital Plus, DTS Express and Multi-channel PCM with this unit, use an HDMI connection (12 page 5 "Connecting HDMI devices").
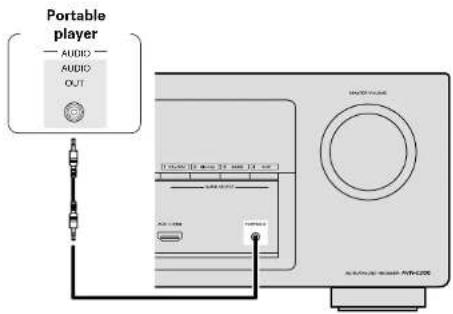
Connecting a portable player
If a portable player is connected via the PORTABLE input jack of the unit, music from the portable player can be played.
Connecting an FM/AM antenna
- Connect the FM antenna or AM loop antenna supplied with the unit to enjoy listening to radio broadcasts.
- After connecting the antenna and receiving a broadcast signal (IF page 17 "Listening to FM/AM broadcasts"), fix the antenna with tape in a position where the background noise level becomes minimal and the sound quality is most clear.

□ AM loop antenna assembly
1 Put the stand section through the bottom of the loop antenna from the rear and bend it forward.

2 Insert the projecting part into the square hole in the stand.
□ Using the AM loop antenna
Suspending on a wall
Suspend directly on a wall without assembling.

Standing alone
Use the procedure shown above to assemble.

NOTE
- Do not connect two FM antennas simultaneously.
- Even if an external AM antenna is used, do not disconnect the AM loop antenna.
- Make sure the AM loop antenna lead terminals do not touch metal parts of the panel.
- If the signal has noise interference, connect the ground terminal (GND) to reduce noise.
- If you are unable to receive a good broadcast signal, we recommend installing an outdoor antenna. For details, inquire at the retail store where you purchased the unit.
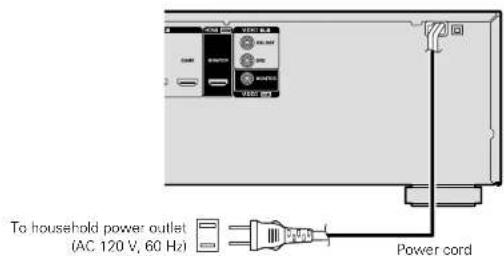
Connecting the power cord
After completing all the connections, insert the power plug into the power outlet.
NOTE
Do not bundle power cords together with connection cables. Doing so can result in humming or noise.
Playback (Basic operation)
□ Turning the power on (page 15)
☐ Selecting the input source (page 15)
☐ Adjusting the master volume (page 16)
□ Turning off the sound temporarily (page 16)
□ Switching the brightness of the display (page 16)
□ Playing a Blu-ray Disc player/DVD player (page 16)
Playing a portable player (page 16)
□ Tuning in radio stations (page 17)
Selecting a listening mode (Surround mode) (page 19)
Playback (Advanced operation) (page 27)
Important information
Before starting playback, make the connections between the different devices and the settings on the unit.
NOTE
Also refer to the operating instructions of the connected devices when playing them.
Turning the power on
Press POWER ⏻ to turn on power to the this unit. The power indicator flashes green and the power turns on.


You can also switch the power to standby by pressing ⏻ on the main unit.
☐ When power is switched to standby Press POWER ⏻.
[Power indicator status in standby mode]
- Normal standby : Off
- When "Pass Through" (page 38) is set to "On": Red
Selecting the input source
Press the input source select button (CBL/SAT, DVD, Blu-ray, GAME,
AUX, PORTABLE, TV AUDIO or TUNER) to be played back.
The desired input source can be selected directly.

You can also use the following operation to select an input source.
☐ Select the input source using the main unit Use SOURCE SELECT ◀▶.
- Use SOURCE SELECT ◀▶ switches the input source, as shown below.

Adjusting the master volume
Use VOLUME ▲▼ to adjust the volume.
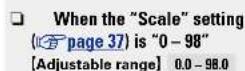

☐ When the "Scale" setting (1- page 37) is "-79.5dB - 18.0dB"
[Adjustable range] ---- -79.5dB - 18.0dB • The variable range differs according to the input signal and channel level setting.

You can also operate via the main unit. In this case, perform the following operations.
Turn MASTER VOLUME to adjust the volume.
Turning off the sound temporarily
Press MUTE ✗.
- "MUTE" indicator on the display flashes.
• 📁X appears on the TV screen.


- The sound is reduced to the level set at "Mute Level" (page 37).
- To cancel, press MUTE 📁X again. Muting can also be cancelled by adjusting the master volume.
Important information
Switching the brightness of the display
Press DIMMER.
- The display brightness of this unit switches each time the button is pressed.

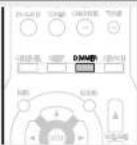
Bright Normal display brightness.
Dim Reduced display brightness.
Dark Very low display brightness.
Off Turns the display off.
NOTE
When the brightness of the display is set to "Off", the display turns off and appears as if there is no electricity.
Playing a Blu-ray Disc player/DVD player
The following describes the procedure for playing Blu-ray Disc player/DVD player.
1 Prepare for playback.
① Turn on the power of the TV, subwoofer and player.
② Change the TV input to the input of this unit.
③ Load the disc in the player.
2 Press POWER ⏻ to turn on power to the unit.

3 Press Blu-ray or DVD to switch an input source for a player used for playback.
4 Play the Blu-ray Disc player or DVD player.
- Make the necessary settings on the player (language setting, subtitles setting, etc.) beforehand.
Playing a portable player
The following describes the procedure for playing portable player.
1 Connect the portable player to this unit (page 13 "Connecting a portable player").
2 Press POWER ⏻ to turn on power to the unit.
3 Press PORTABLE to switch the input source to "PORTABLE".
4 Play the portable player.

Tuning in radio stations
For antenna connections, see "Connecting an FM/AM antenna" (page 13).
How to tune in
The modes for receiving FM/AM broadcasts consists of "AUTO" mode that automatically searches available broadcast stations and "MANUAL" mode that lets you tune in using buttons to change the frequency. The default setting is "AUTO".
In "AUTO" mode, you cannot tune in to radio stations if the reception is not good. If this is the case, then use the "MANUAL" to tune in.
Listening to FM/AM broadcasts
1 Press TUNER to switch the input source to "TUNER".
2 Press BAND to select "FM" or "AM".
FM When listening to an FM broadcast.
AM When listening to an AM broadcast.
[TV Screen]
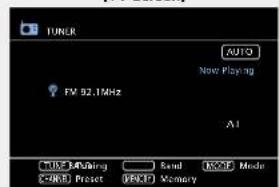
[Display of this unit]
R1 FM 92.1MHz
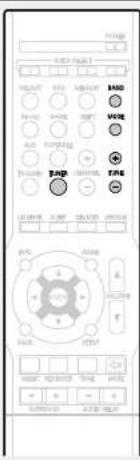
3 Tune in the desired broadcast station.
AUTO Automatically tune to the station.
① Press MODE to select "AUTO".
MODE:AUTO
② Press TUNE + or TUNE – to select the station you want to hear.
- The frequency changes in steps each time the button is pressed.
MANUAL Manually tune to the station.
① Press MODE to select "MANUAL".
MODE: MANUAL
② Press TUNE + or TUNE – to select the station you want to hear.
- The frequency changes in steps each time the button is pressed.

When tuning in stations manually, press and hold TUNE + or TUNE - to change frequencies continuously.
☐ Presetting radio stations (Manual preset)
Your favorite broadcast stations can be preset so that you can tune them in easily. Up to 56 stations can be preset.
- Stations can be preset automatically at "Auto Preset"
(page 32). If "Auto Preset" is performed after performing
"Manual preset", the "Manual preset" settings will be overwritten.
1 Tune in the broadcast station you want to preset.
2 Press MEMORY.
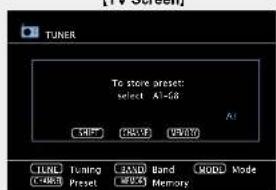
[Display of this unit]
Storing Station

3 Press CHANNEL + or CHANNEL - to select the preset number.
- Press SHIFT, and then the block (A - G) can be selected.
4 Press MEMORY again to complete the setting.
• To preset other stations, repeat steps 1 to 4.
Tuning in radio stations
Default settings
| Block (A – G) and Channel (1 – 8) | Default Settings |
| A1 – A8 | 92.1 / 92.3 / 92.5 / 92.7 / 93.1 / 93.5 / 93.7 / 94.1 MHz |
| B1 – BB | 94.3 / 94.5 / 94.7 / 94.9 / 95.1 / 95.3 / 95.5 / 95.7 MHz |
| C1 – CB | 98.1 / 98.3 / 98.5 / 98.7 / 98.9 / 99.1 / 100.1 / 100.3 MHz |
| D1 – D8 | 100.5 / 100.7 / 100.9 / 101.1 / 101.3 / 101.5 / 101.7 / 101.9 MHz |
| E1 – E8 | 103.1 / 103.3 / 103.5 / 103.7 / 103.9 / 104.1 / 104.3 / 104.5 MHz |
| F1 – F8 | 104.7 / 104.9 / 105.1 / 105.3 / 105.5 / 105.7 / 105.9 / 106.1 MHz |
| G1 – GB | 106.3 / 106.5 / 106.7 / 106.9 / 107.1 / 107.3 / 107.5 / 107.9 MHz |
□ Listening to preset stations
1 Press SHIFT to select the memory block (A to G).

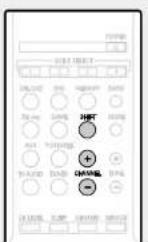
2 Press CHANNEL + or CHANNEL - to select the desired preset channel.

You can also operate via the main unit. In this case, perform the following operations.
Press TUNER PRESET CH + or TUNER PRESET CH - to select a preset radio station.
☐ Tuner (FM/AM) operation buttons
| Operation buttons Function | |
| MEMORY Preset memory registration | |
| BAND HV/AM switching | |
| SHIFT Preset channel block selection | |
| MODE Switch search modes | |
| CHANNEL +, - Preset channel selection | |
| TUNE +, - Tuning (up/down) | |
| INFO | Display of information such as the source name, volume, and surround mode name |
| △▽◀▶ | Cursor operation |
| ENTER Enter | |
| BACK Return | |
| SETUP Setup menu | |

Selecting a listening mode (Surround mode)
This unit can play input audio signals in multi-channel surround mode or in stereo mode.
You can set various surround modes based on the audio input signal from the playback source. Try out different surround modes based on the content you play back and find your favorite surround mode.
Listening mode
| Input audio signal | Playback Listening mode | ||
| 2-channelMulti-channel | →Surround | →“Standard playback”(ICpage 20) | For 2-channel signal input:Surround-channel signals are created and played with surround playback.For multichannel signal input:The surround signal recorded in source is played as surround playback.(The sound is played according to the settings of the speaker size in “Speaker Config.” (ICpage 35). |
| 2-channelMulti-channel | →Surround | →“Multi-channel stereo playback”(ICpage 21) | This mode is for enjoying stereo sound from all speakers. |
| 2-channelMulti-channel | →Surround | →“Virtual playback”(ICpage 21) | This mode is for enjoying surround effects using only the front speakers or headphones. |
| 2-channelMulti-channel | →Stereo | →“Stereo playback”(ICpage 21) | If multichannel signals are input, they are mixed down to 2-channel audio and are played.Subwoofer signals are also output. |
| 2-channelMulti-channel | →Stereo | →“Direct playback”(ICpage 21) | Sound recorded in source is played as is.In this mode, the following items cannot be adjusted.Tone (ICpage 41) • RESTORER (ICpage 42) |

- Some listening modes cannot be selected, depending on the audio format or number of channels of the input signal. For details, see "Types of input signals, and corresponding surround modes" (ICF page 52).
- Adjust the sound field effect with the menu "Audio Adjust" (page 39) to enjoy your favorite sound mode.
- Buttons on the remote control unit can be used for operations.
Press SURROUND ◀ or SURROUND ▶ and the modes are switched as shown below.

* The display varies depending on the audio format or the number of channels of input signals.
Standard playback
□ Surround playback of 2-channel sources
1 Play the selected device (page 16, 17).
2 Press SURROUND ◀ or SURROUND ▶ to select the surround decoder to play back multi-channel sound.
Select the surround mode while viewing the display on the TV screen.
- Which decoder can be selected depends on the settings of "Speaker Config." (page 35)
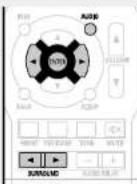
DOLBY PLII This mode can be selected when a Dolby Pro Logic II decoder is used to play back
2-channel source in 5.1-channel surround sound with a natural, realistic feel.
- "PLII Cinema", "PLII Music", "PLII Game" or "Pro Logic" is displayed.
DTS NEO:6 This mode can be selected when a DTS NEO:6 decoder is used to play back 2-channel
source in 5.1-channel surround sound.
- "DTS NEO:6 Cinema" or "DTS NEO:6 Music" is displayed.
3 Press AUDIO and then press ENTER.
4 Use ◀ ▷ to select the mode according to the content to be played and then press ENTER.
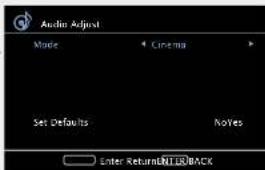
Cinema This mode is suited for movie sources.
Music This mode is suited for music sources. More sound is sent to the front speakers than in "Cinema" mode.
Game This mode is suited for games.
Pro Logic This mode is suitable for playback of 2-channel sources recorded with Dolby Pro Logic.
5 Press AUDIO.
The menu display disappears.
□ Surround playback of multi-channel sources (Dolby Digital, DTS etc.)
1 Play the selected device (page 16, 17).
2 Press SURROUND ◀ or SURROUND ▶ to select the surround decoder to play back multi-channel sound.
Select the surround mode while viewing the display on the TV screen.
- Which decoder can be selected depends on the input signal, the settings of "Speaker Config." (ICE page 35).

Displaying the currently playing surround mode
| Input audio signal Surround mode | |
| DOLBY DIGITAL(other than 2-channel) | DOLBY DIGITAL |
| DOLBY DIGITAL Plus DOLBY DIGITAL Plus | |
| DOLBY TrueHD DOLBY TrueHD | |
| DTS (5.1-channel)/DTS 96/24 | DTS SURROUND |
| DTS 96/24 * | |
| DTS-HD | DTS-HD HI RES |
| DTS-HD MSTR | |
| DTS Express | |
| PCM (multi-channel) MULTI CH IN | |
* This is displayed when the input signal is "DTS 96/24".
Views on the display

① Shows a decoder to be used.
- A DOLBY DIGITAL decoder is displayed as "DOLEY_D".
- A DOLBY DIGITAL Plus decoder is displayed as "QID +".
② Shows the name of the input source being played back.

For an input signal that can be reproduced in each surround mode, see "Surround modes and surround parameters" (page 51).
Multi-channel stereo playback
This mode is for enjoying stereo sound from all speakers.
NOTE
When the input signal is Dolby TrueHD, Dolby Digital Plus, DTS-HD or DTS Express, you cannot select multi-channel stereo mode.
Virtual playback
This mode is for enjoying surround effects using only the front speakers or headphones.

NOTE
When the input signal is Dolby TrueHD, Dolby Digital Plus, DTS-HD or DTS Express, you cannot select virtual mode.
Stereo playback
This is the mode for playing in stereo. The tone can be adjusted. - Sound is output from the front left and right speakers and subwoofer. - If multi-channel signals are input, they are mixed down to 2-channel audio and are played.

Direct playback
Sound recorded in source is played as is. - In this mode, the following items cannot be adjusted. - Tone (12 page 41) - RESTORER (12 page 42)

Advanced instructions
Advanced instructions
Here we explain functions and operations in more detail so that you can maximize your enjoyment with this unit.
● Installation/connection/setup of speakers (Advanced) page 23
● Playback (Advanced operation) page 27
● How to make detailed settings page 29
Installation/connection/setup of speakers (Advanced)
Procedure for speaker settings
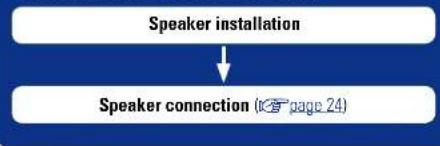
flowchart
graph TD
    A["Speaker installation"] --> B["Speaker connection (page 24)"]
Speaker installation
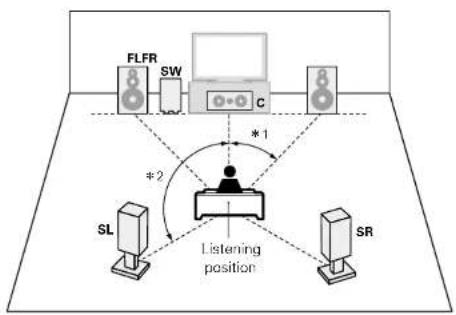
- Determine the speaker system depending on the number of speakers you are using and install each speaker and subwoofer in the room. Here, we explain how to install the speakers using a typical example.
• The speaker impedance should be from 6 to 16 Ω/ohms.

Use the illustration below as a guide for how high each speaker should be installed. The height does not need to be exactly the same.

When 2.1 ch speakers are installed
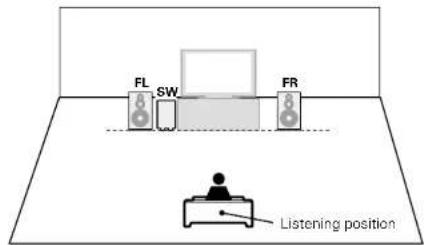
[Speaker abbreviations]
When 5.1 ch speakers are installed
flowchart
graph TD
    A["FLFR"] --> B["SW"]
    B --> C["C"]
    D["SL"] --> E["Listening position"]
    F["SR"] --> E
    E --> G["*1"]
    E --> H["*2"]
    style E fill:#f9f,stroke:#333
*1 22^-30^ *2 120^
FL Front speaker (LI) SW Subwoofer
FR Front speaker (R) SL Surround speaker (L)
C Center speaker SR Surround speaker (R)
Speaker connection
Here we connect the speakers in the room to this unit.
This section explains how to connect them using typical examples.
- For TV connections, see "Connecting this unit to a TV via HDMI connections" ( page 6) or "Connecting a TV" ( page 10).
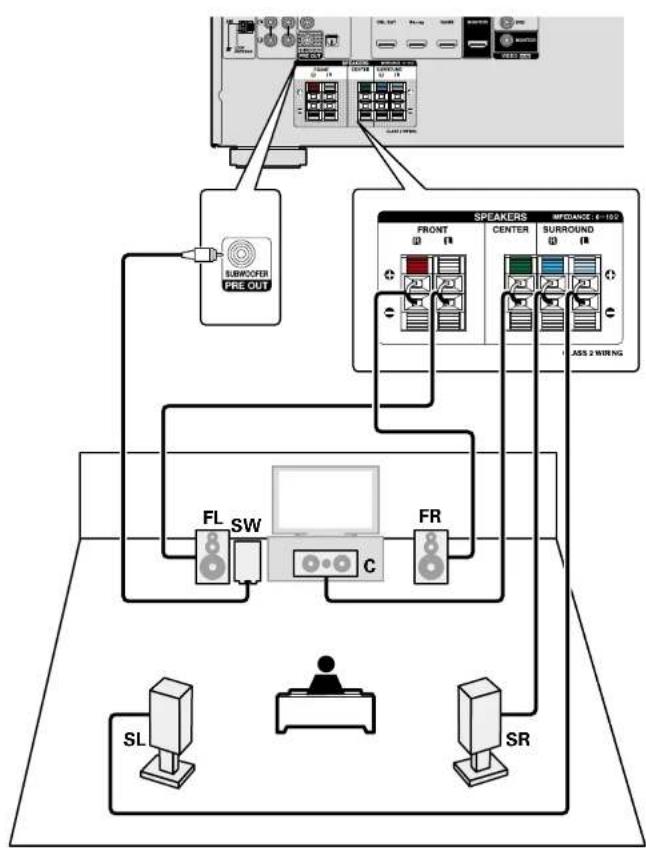
□ Connecting 5.1-channel speakers (page 26)
□ Connecting 2.1-channel speakers (page 26)
NOTE
- Disconnect this unit's power plug from the power outlet before connecting the speakers. Also, turn off the subwoofer.
- Connect so that the speaker cable core wires do not protrude from the speaker terminal. The protection circuit may be activated if the core wires touch the rear panel or if the + and - sides touch each other (page 54 "Protection circuit").
- Never touch the speaker terminals while the power cord supply is connected. Doing so could result in electric shock.
- Use speakers with the speaker impedances shown below.
| Speaker terminals Speaker impedance | |
| FRONT | 6 – 16 Ω/ohmsCENTER |
| SURROUND | |
Connecting the speaker cable
Carefully check the left (L) and right (R) channels and + (red) and - (black) polarities on the speakers being connected to the this unit, and be sure to interconnect the channels and polarities correctly.

1 Peel off about 3/8 inch/10 mm of sheathing from the tip of the speaker cable, then either twist the core wire tightly or terminate it.
2 Press the lever on the speaker terminal.
3 Holding the lever on the speaker terminal, insert the core wire of the speaker cable all the way into the speaker terminal.
4 Release your finger from the lever on the speaker terminal.
Cables used for connections

Connecting the subwoofer
Use a subwoofer cable to connect the subwoofer.

Speaker connection
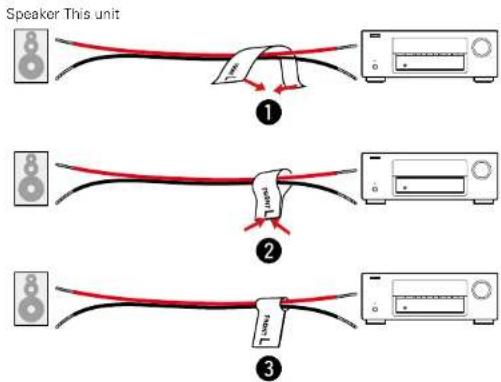
☐ About the speaker cable label (supplied) for channel identification
The channel display section for speaker terminals on the rear panel is color-coded for each channel to be identifiable.
| Speaker terminals Color | |
| FRONT L White | |
| FRONT R | |
| CENTER | |
| SURROUND L Light blue | |
| SURROUND R Blue |
Attach the speaker cable label for each channel to its speaker cable as shown in the diagram.
Then, make connection so that the color of the speaker terminal matches that of the speaker cable label.
[How to attach the speaker cable label]
Connecting 5.1-channel speakers
flowchart
graph TD
    A["Speaker System"] -->|FR| B["Audio System"]
    A -->|FL| C["Audio System"]
    A -->|SW| D["Audio System"]
    A -->|C| E["Audio System"]
    A -->|FR| F["Audio System"]
    A -->|SL| G["Audio System"]
    A -->|SR| H["Audio System"]
    A -->|OFF| I["Audio System"]
    A -->|OFF| J["Audio System"]
    A -->|OFF| K["Audio System"]
    A -->|OFF| L["Audio System"]
    A -->|OFF| M["Audio System"]
    A -->|OFF| N["Audio System"]
    A -->|OFF| O["Audio System"]
    A -->|OFF| P["Audio System"]
    A -->|OFF| Q["Audio System"]
    A -->|OFF| R["Audio System"]
    A -->|OFF| S["Audio System"]
    A -->|OFF| T["Audio System"]
    A -->|OFF| U["Audio System"]
    A -->|OFF| V["Audio System"]
    A -->|OFF| W["Audio System"]
    A -->|OFF| X["Audio System"]
Speaker connection
Connecting 2.1-channel speakers

flowchart
graph TD
    A["2-channel playback"] --> B["SWFLFR"]
    B --> C["Subwoofer PRE OUT"]
    C --> D["Control panel with SPE"]
    D --> E["Front"]
    E --> F["Display unit"]
    style A fill:#f9f,stroke:#333
    style B fill:#ccf,stroke:#333
    style C fill:#cfc,stroke:#333
    style D fill:#fcc,stroke:#333
    style E fill:#cff,stroke:#333
    style F fill:#ffc,stroke:#333
NOTE
- For speaker cable connections, see page 25.
- For speaker impedance, see page 24.
Playback (Advanced operation)
Playback (Basic operation) (page 15)
Selecting a listening mode (Surround mode) (page 19)
□ Adjusting the volume of the speakers (page 27)
□ Sleep timer function (page 28)
Quick select function (page 28)
□ Various memory functions (page 28)
Adjusting the volume of the speakers
You can adjust the channel level either according to the playback sources or to suit your taste, as described below.
Adjusting the volume of the different speakers
1 Press CH LEVEL.
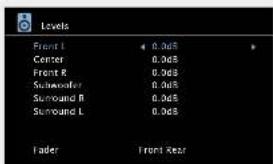

2 Use to select the speaker.
The speaker that can be set switches each time one of the buttons is pressed.
3 Use ◀ ▷ to adjust the volume.
- In the case of a subwoofer, pressing ◀ when it is at "-12 dB" will change the setting to "Off".

- If you do not press any button for approximately 5 seconds, the menu screen light turns off.
- When a headphone jack is inserted, the headphone channel level can be adjusted.
Adjusting the volume of groups of speakers (Fader function)
This function lets you adjust (fadel the sound all at once from the front (front speaker / center speaker) or rear (surround speaker).
1 Press CH LEVEL.
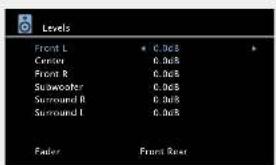

2 Press ∇ to select "Fader", then select the item to be adjusting using ◀ ▷.

3 Use ◀▷ to adjust the volume of the speakers. (<: front, ▷: rear)

- If you do not press any button for approximately 5 seconds, the menu screen light turns off.
• The fader function does not affect the subwoofer. - The fader can be adjusted until the volume of the speaker is adjusted to the lowest value of -12 dB.
Sleep timer function
You can have the power automatically switched to standby once a set time has elapsed. This is convenient for viewing and listening while going to sleep.
Press SLEEP and display the time you want to set.
The SLEEP indicator on the display lights.
- The time switches as shown below each time SLEEP is pressed.

To cancel the sleep timer
Press SLEEP to set "Off"
The SLEEP indicator on the display turns off.

- If you do not press any button for approximately 5 seconds, the menu screen light turns off.
- The sleep timer setting is cancelled if this unit's power is set to standby or turned off.
NOTE
The sleep timer function cannot turn off the power of devices connected to this unit. To turn off the power of those connected devices, set up sleep timers on the connected devices themselves.
Quick select function
You can save settings such as the input source selection, volume level, and sound mode at the QUICK SELECT 1-4 buttons. You can simply press one of the set QUICK SELECT buttons for subsequent playback to switch to various saved settings all at once.
- By saving frequently used settings at the QUICK SELECT 1 - 4 buttons, you will always be able to easily call up the same playback environment.
Press QUICK SELECT.
The Quick Select settings for the button you pressed are called up.
- The default settings of each Quick Select function are as shown below.
| Button | Input source | Volume | Sound Mode | Video Source |
| QUICK SELECT 1 | CBL/SAT | 40 | MULTI CH STEREO | SOURCE |
| QUICK SELECT 2 | Blu-ray | |||
| QUICK SELECT 3 | GAME | |||
| QUICK SELECT 4 | AUX |
Changing the settings
1 Set the items below to the settings you want to save.
① Input source (page 15)
② Volume (page 16)
③ Surround mode (page 19)
④ Video Source (page 33)

2 Press and hold the desired QUICK SELECT until "Quick\* Memory" appears on the display.
The current settings will be memorized.

If QUICK SELECT on the main unit is pressed, the same function as with the remote control unit can be obtained.
Various memory functions
Personal memory plus function
This function sets the settings (input mode, surround mode, HDMI output mode, audio delay etc.) last selected for the individual input sources.

The surround parameters, tone control settings and the volumes of the different speakers are stored for the individual surround modes.
Last function memory
This function stores the settings which were made before going into the standby mode.
When the power is turned back on, the settings are restored.
How to make detailed settings
Menu map
For menu operation, connect a TV to this unit and display the menu on the TV screen. For menu operations, see the following page. By default, this unit has recommended settings defined. You can customize this unit based on your existing system and your preferences. The menu displayed depends on the input source and usage.
| Setting items Detailed items Description Page | |||
| Inputs Displayed items of the "Inputs" menu differs, depending on the selected input source. | Input Assign Changes input connector assignment. | 32 | |
| Auto Preset Uses the auto preset function to program radio stations. | 32 | ||
| Preset Skip Sets the preset memories that you do not want to display when tuning. | 33 | ||
| Source Level Adjusts the playback level of the audio input. | 33 | ||
| Input Select Sets the audio input mode and decode mode. | 33 | ||
| Video Source Video of another input source is played back combined with the playing audio. | 33 | ||
| Speakers Speaker Config. Selects speaker configuration and size (bass reproduction capability). | 35 | ||
| 35 | |||
| 35 | |||
| 35 | |||
| 36 | |||
| 36 | |||
| 36 | |||
| General Volume Sets the volume setting. | 37 | ||
| HDMI | Makes settings for HDMI. | ||
| Other | Makes various other settings. | ||
| Audio Adjust | Adjusts surround sound parameters. | ||
| Tone | Adjusts the tonal quality of the sound. | ||
| NIGHT MODE | Optimized setting for late-night listening. Compress dynamic range (difference between loud and soft sounds). | ||
| RESTORER | Expands the lower and higher regions of compressed audio to enable richer audio playback. | ||
| Audio Delay | Compensates for incorrect timing between video and audio. | ||
Examples of menu and front display
Below we describe typical examples of displays on the TV screen and on the set's display window.
| Menu display Front display Description | ||||
| Top menu display |  |  | 1PressSETUpto display the menu screen.2TV screen: Displays the selected line. Display: Displays the selected item.• Use △▽ to move to the item you want to set.3The number of the current selected setting menu is displayed. |  |
| Display when changing settings |  ↓4Press ENTER. ↓4Press ENTER. — —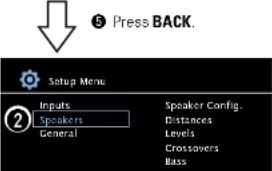 |  ↓74Press ENTER. ↓74Press ENTER.  | 1The number of the current selected setting menu is displayed.2TV screen: Displays the selected line. Display: Displays the selected item.• Use △▽ to move to the item you want to set.3◀▶is displayed at the sides of items whose setting can be changed. Use◀Dto change to the desired setting.4PressENTERto set to the mode in which the setting can be made.5PressBACKto return to the previous menu. | |
| Display when resetting | 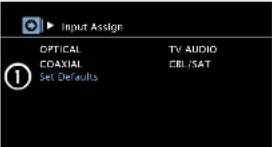 |  √2Default? : < No √2Default? : < No | 1Press▽to select "Set Defaults", then pressENTER.2The number of the current selected setting menu is displayed.3Press◀to select "Yes", then pressENTER. | |

Inputs
Perform settings related to input source playback.
- You do not have to change the settings to use the unit. Make settings when needed.
Menu operation
| 1 | Press SETUP.The menu is displayed on the TV screen. |
| 2 | Use △▽ to select “Inputs”, and then press ENTER. |
| 3 | Use △▽ to select the menu to be set or operated. |
| 4 | Press ENTER to enter the setting. |
| • To return to the previous item, press BACK.• Exiting the Menu, press SETUP while the menu is displayed.The menu display disappears. |
Important information
☐ About the display of input sources
In this section, the configurable input sources for each item are shown as follows.
Blu-ray DVD TV AUDIO CBL/SAT GAME AUX PORTABLE TUNER
Items that can be set with the "Inputs" procedure
| Input Assign (page 32) |
| Auto Preset (page 32) |
| Preset Skip (page 33) |
| Source Level (page 33) |
| Input Select (page 33) |
| Video Source (page 33) |
Input Assign Default settings are underlined.
This unit has certain input sources such as "CBL/SAT" assigned to audio and video connectors by default. By making the default connections, you can simply press an input source select button to play back audio or video from the connected device with ease.
When making connections other than the default settings, you must change settings in this section.
Examples of "Input Assign" menu screen displays
This screen appears when the "Inputs" – "Input Assign" menu is selected. Use the "Input Assign" menu to change the digital input connectors that are assigned to the input sources in default settings.

Input assignments menu operations
1 Use to select “Input Assign”, and then press ENTER.
2 Use to select the input connector to be assigned.
3 Press ENTER to enter the setting.

NOTE
- If all "OPTICAL" and "COAXIAL" assignment of the TV source are set to "Off", TV source cannot be selected with the input source selection.
• The unit supports 3 types of digital audio connection (HDMI, OPTICAL, and COAXIAL). Do not make multiple digital audio connections with a single device. However, you can make both analog and digital connections with the same source. In this case, priority is given to the HDMI input signal when making both analog and HDMI connections. Priority is also given to the digital input signal (OPTICAL/COAXIAL) when making both analog and digital connections (OPTICAL/COAXIAL).
Inputs
Setting items Setting details
| OPTICALSet this to change the optical input connectors assigned to the input sources. | CBL/SAT / DVD / Blu-ray / GAME / AUX / TV AUDIOOff : Do not assign a optical input connector to the selected input source. | |
| CBL/SAT | DVD | |
| Blu-ray | GAME | |
| AUX | TV AUDIO | |
| COAXIALSet this to change the coaxial input connectors assigned to the input sources. | CBL/SAT / DVD / Blu-ray / GAME / AUX / TV AUDIOOff : Do not assign a coaxial input connector to the selected input source. | |
| CBL/SAT | DVD | |
| Blu-ray | GAME | |
| AUX | TV AUDIO | |
| Set DefaultsThe "Input Assign" settings are returned to the default settings. | Yes : Reset to the defaults.No : Do not reset to the defaults.If you select "Set Defaults" and press ENTER, the message "Return settings to the default?" is displayed. Select "Yes" or "No", and then press ENTER. | |
Auto Preset
Use the auto preset function to program radio stations.
Setting items Setting details
| StartStart the auto preset process. | If an FM station cannot be preset automatically, select the desired station by tuning it in manually, then preset it manually. |
| TUNER | |
Preset Skip Default settings are underlined.
Set the preset memory block (from A to G) you do not want to display.
Setting items Setting details
| Block A – Block GSelect a block to be skipped from among preset blocks (from A to G).TUNER | On : Display the selected preset memory block.SKIP : Do not display the selected preset memory block. |
Source Level Default settings are underlined.
This function corrects the playback level of the selected input source's audio input. Make this setting if there are differences in the input volume levels between the different sources.
Setting items Setting details
| Source Level | -12dB - +12dB (0dB) |
Input Select Default settings are underlined.
Set the audio input mode and decode mode of each input source. The input modes available for selection may vary depending on the input source.
Setting items Setting details
| Input source CBL/SAT DVD Blu-ray GAME | ||
| Default setting Auto Analog HDMI HDMI | ||
| Input source AUX | TV AUDIO | |
| Default setting HDMI Digital Analog |
Setting items Setting details
| Input Mode(Continued) | |
| “Digital” can be set for the input source assigned to “OPTICAL” or “COAXIAL” under “Input Assign” in the menu.If the input source is set to “Blu-ray”, “GAME”, “AUX” or “TV AUDIO”, it cannot be set to “Analog”.If an input source is “TUNER” or “PORTABLE” the setting is fixed to “Analog”.When digital signals are properly input, theDIGindicator lights on the display. If theDIGindicator does not light, check the digital input connector assignment and the connections. | |
| Decode ModeSet the audio decode mode for input source. | Auto: Detect type of digital input signal and decode and play automatically.PCM: Decode and play only PCM input signals.DTS: Decode and play only DTS input signals. |
| CBL/SAT DVD | This item can be set for input sources for which “OPTICAL” or “COAXIAL” is assigned at “Input Assign” (page 32).This item can be set for HDMI input sources (CBL/SAT, Blu-ray, GAME or AUX).Normally set this mode to “Auto”. Set “PCM” and “DTS” when inputting the corresponding input signal. |
| Blu-ray GAME | |
| AUX TV AUDIO | |
| PORTABLE | |
Video Source
Default settings are underlined.
Video of another input source is played back combined with the playing audio.
Setting items Setting details
| Video Select | Default: Play the picture and sound of the input source.CBL/SAT / DVD: Select video input source to view. The video of the selected input source is played along with the audio currently being played. This can be set for individual input sources.NOTEIt is not possible to select HDMI input signals. |

Speakers
For optimum surround playback, adjustment of the distance of speakers and sound level of each channel, using the test tone, are required, depending on the environment for speakers to be used.
Menu operation
| 1 | Press SETUP.The menu is displayed on the TV screen. |
| 2 | Use △▽ to select “Speakers”, and then press ENTER. |
| 3 | Use △▽ ◀> to select the menu to be set or operated. |
| 4 | Press ENTER or ▷ to enter the setting.To return to the previous item, press ◀ or BACK.Exiting the Menu, press SETUP while the menu is displayed.The menu display disappears. |
Items that can be set with the "Speakers" procedure
| Speaker Config. ( page 35) |
| Distances ( page 35) |
| Levels ( page 35) |
| Crossovers ( page 36) |
| Bass ( page 36) |
Speaker Config.
Default settings are underlined.
Indicate speaker presence and select speaker size categories based on bass reproduction capability.
NOTE
Do not use the outward shape of the speaker to determine selection of a "Large" or "Small" speaker. Instead, use the frequencies set in "Crossovers" (27 page 36) as the standard for determining bass reproduction capability.
Setting items Setting details
| FrontSet the front speaker size. | Large: Use a large speaker that can adequately play back very low bass frequencies.Small: Use a small speaker that has inadequate playback capacity for very low bass frequencies. Note that for most multi-channel speakers, this is the best choice.When "Subwoofer" is set to "No", "Front" is automatically set to "Large".When "Front" is set to "Small", "Center" and "Surround" can not be set to "Large". |
| CenterSet the presence and size of the center speaker. | Large: Use a large speaker that can adequately play back very low bass frequencies.Small: Use a small speaker that has inadequate playback capacity for very low bass frequencies. Note that this is almost always the best choice.None: Select when a center speaker is not connected."Large" is not displayed when "Front" is set to "Small". |
| SurroundSet the presence and size of the surround speakers. | Large: Use a large speaker that can adequately play back very low bass frequencies.Small: Use a small speaker that has inadequate playback capacity for very low bass frequencies. Note that this is almost always the best choice.None: Select when the surround speakers are not connected. |
| SubwooferSet the presence of a subwoofer. | Yes: Use a subwoofer.No: Select when a subwoofer is not connected.When "Front" is set to "Small", "Subwoofer" is automatically set to "Yes". |
Distances
Default settings are underlined.
Set distance from listening position to speakers. Measure beforehand the distance from the listening position to each speaker.
Setting items Setting details
| StepSet the minimum variable width of the distance. | 1ft: For changing in 1-foot steps.0.1ft: For changing in 0.1-foot steps. |
| Front L / Front R / Center / Subwoofer / Surround L / Surround RSelect speaker for distance setting | 0.0ft - 60.0ft: Set the distance.The speakers that can be selected differ depending on the "Speaker Config." ( page 35) settings.Default settings :Front L / Front R / Center / Subwoofer : 12.0 ftSurround L / Surround R : 10.0 ft:Set the difference in the distance between the speakers to less than 20 ft.NOTESpeakers set to "None" in "Speaker Config." ( page 35) are not displayed. |
Levels
Default settings are underlined.
Set the volume of the test tone to be the same when it is output from each speaker.
Setting items Setting details
| Test Tone StartOutput test tone. | Front L / Center / Front R / Surround R / Surround L / Subwoofer : A test tone is output from the selected speaker. While listening to the test tone, adjust the volume output from the selected speaker.-12.0dB – +12.0dB (0.0dB) : Adjust the volume.When ◀ is pressed while the subwoofer volume is set to “-12 dB”, the "Subwoofer" setting switches to "Off".When "Levels" is adjusted, the adjusted values are set for all the surround modes.NOTESpeakers set to "None" in the "Speaker Config." ( page 35) settings are not displayed.When a headphones jack is inserted in the PHONES jack of this unit, the "Levels" is not displayed. |
| Setting items Setting details | ||
| Set DefaultsThe "Levels" settings are returned to the default settings. | Yes: Reset to the defaults.No: Do not reset to the defaults.When you select "Set Defaults" and press ENTER, the "Return settings to the default?" prompt is displayed. Select either "Yes" or "No", and press ENTER. |  |
| CrossoversDefault settings are underlined. | ||
| Set the maximum frequency of the bass signal output from each channel to the subwoofer.Set the Crossover Frequency to suit the bass reproduction capability of the speaker being used. | ||
| Setting items Setting details | ||
| Front / Center / SurroundSelect speaker for setting of crossover frequency. | 40Hz / 60Hz / 80Hz / 90Hz / 100Hz / 110Hz / 120Hz / 150Hz / 200Hz / 250Hz: Set the crossover frequency."Crossovers" can be set when the "Bass" - "SW Mode" (LFE page 36) setting is "LFE+Main", or when you have a speaker that is set to "Small".The default crossover frequency is "80Hz", which will work best with the widest variety of speakers. When using very small speakers, however, you can choose a higher setting based on the specified frequency response of the speakers. If the speaker has a specified frequency response of 120 Hz - 20 kHz (as an example), then choose the 120 Hz crossover frequency.For speakers set to "Small", low frequency content below the crossover frequency is attenuated to the speakers and the low bass content is then re-delivered to the subwoofer(s), or the front (L/R) speakers if they have been set to Large. | BassSet subwoofer and LFE signal range playback. |
| Setting items Setting details | ||
| LPF for LFESet LFE signal playback range. Set this when you want to change the playback frequency (low pass filter point) of the subwoofer. | ||
| SW ModeSelect low range signals to be reproduced by subwoofer.LFE: The low range signal of the channel set to "Small" speaker size is added to the LFE signal output from the subwoofer.LFE+Main: The low range signal of all channels is added to the LFE signal output from the subwoofer. This is usually the best setting for most systems."“SW Mode” can be set when “Speaker Config.” - “Subwoofer” (LFE page 35) is set to other than "No".Play music or a movie source and select the mode offering the strongest bass.Select "LFE+Main" if you want the bass signals to always be produced from the subwoofer.NOTEIf "Front" and "Center" for "Speaker Config." are set to "Large", and "SW Mode" is set to "LPF for LFE", no sound may be output from the subwoofer, depending on the input signal or selected surround mode. | ||

General
Make various option settings.
Menu operation
| 1 | Press SETUP.The menu is displayed on the TV screen. |
| 2 | Use △▽ to select “General”, and then press ENTER. |
| 3 | Use △▽ to select the menu to be set or operated. |
| 4 | Press ENTER to enter the setting. |
| • To return to the previous item, press BACK.• Exiting the Menu, press SETUP while the menu is displayed.The menu display disappears. |
Items that can be set with the "General" procedure
| Volume (page 37) |
| HDMI (page 38) |
| Other (page 38) |
Volume
Default settings are underlined.
| Sets the volume setting. | |
| Setting items Setting details | |
| ScaleSet how volume is displayed. | 0 – 98 : Display in the range 0.0 (Min) to 98.-79.5dB – 18.0dB : Display —cB (Min), in the range -79.5 dB to 18 dB.➤ The “Scale” setting is applied also to the “Limit” and “Power On Level” display method. |
| LimitMake a setting for maximum volume. | 60 (-20dB) / 70 (-10dB) / 80 (0dB)Off : Do not set a maximum volume.➤ If “Scale” is set to “-79.5dB – 18.0dB”, the value in ( ) is displayed. |
| Power On LevelDefine the volume setting that is active when the power is turned on. | Last : Use the memorized setting from the last session.Mute : Always use the muting on condition when power is turned on.1 – 98 (-79dB – 18dB) : The volume is adjusted to the set level. |
| Mute LevelSet the amount of attenuation when muting is on. | Full : The sound is muted entirely.-40dB : The sound is attenuated by 40 dB down.-20dB : The sound is attenuated by 20 dB down. |
HDMI Default settings are underlined.
| Setting items Setting details | |
| HDMI Audio OutSelect HDMI audio output device. | AVR: Play back through speakers connected to the unit.TV: Play back through TV connected to the unit.If "TV" is selected, only an HDMI audio signal is output from the TV. |
| Pass ThroughSelects how the AV receiver will pass HDMI signals to the HDMI output in standby power mode. | On: Passes the selected HDMI input through the AV receiver's HDMI output when the AV receiver is in standby power mode.Off: No HDMI signals are passed through the AV receiver's HDMI output in standby power mode.When this setting is enabled, the "Sleep timer function" (ICE page 28) is turned "Off" and the "Auto Standby" (ICE page 38) setting is disabled.NOTEWhen "Pass Through" is set to "On", it consumes more standby power. If you are not using this unit for an extended period, it is recommended that you unplug the power cord from the power outlet. |
| Pass SourceThe AV receiver will "pass through" the sources HDMI video signal when in standby. | Last: Choose this option to "pass through" the last used HDMI input video source.CBL/SAT / Blu-ray / GAME / AUX: Choose one of these HDMI sources to be passed through when the AV receiver is in standby. |
Other Default settings are underlined.
| Setting items Setting details | |
| Auto StandbyWhen you do not perform any operation on this unit with no audio or video input for a specified time, this unit automatically enters the standby mode. Before it enters the standby mode, "Auto Standby" is displayed on the display of this unit and the menu screen. | 2Hours: The unit goes into standby after 2 hours.4Hours: The unit goes into standby after 4 hours.8Hours: The unit goes into standby after 8 hours.Off: The unit does not go into standby automatically. |
| Setup LockProtect settings from inadvertent changes. | On: Turn protection on.Off: Turn protection off.To turn "Off" the "Setup Lock", follow the procedure below.1Press and holdSETUPfor at least 3 seconds."Setup Lock:On" appears on the display.2Useto select "Off", and then press ENTER. |
| NOTEWhen "Setup Lock" is set to "On", the settings listed below can no longer be changed. Also, "Setup Lock!" is displayed if you attempt to operate related settings.· Setup menu operations · Levels· RESTORER · Audio Adjust etc. | |

Adjusting the sound field effects
The sound being played in the surround mode can be adjusted to your liking.
The items (parameters) that can be adjusted depend on the signal being input and the currently set surround mode. For details on the adjustable parameters, see "Surround modes and surround parameters" ( page 51).
NOTE
Some setting items cannot be set while playback is stopped. Make the settings during playback.
Items that can be set with the audio adjust procedure
| Audio Adjust (page 39) |
| Tone (page 41) |
| NIGHT MODE (page 41) |
| RESTORER (page 42) |
| Audio Delay (page 42) |
Audio Adjust Default settings are underlined.
Adjust surround sound parameters. It may not be possible to set this item depending on the input signal.
Menu operations
| 1 Press AUDIO and then press ENTER.The menu is displayed on the TV screen. |  |
| 2 Use △▽ to select the menu to be set or operated. | |
| 3 Use ◀▷ to enter the setting. | |
| To return to the previous item, press BACK.Exiting the Menu, pressAUDIOwhile the menu is displayed.The menu display disappears. |
| Setting items Setting details | |
| ModeSet the play modes for the different surround modes. | In the PLIT modeCinema : Surround sound mode optimized for movie sources.Music : Surround sound mode optimized for music sources.Game : Surround sound mode optimized for games.Pro Logic : Dolby Pro Logic playback mode.In the DTS NEO:6 modeCinema : Surround sound mode optimized for movie sources.Music : Surround sound mode optimized for music sources.The "Music" mode is also effective for movie sources including a lot of stereo music. |
| D.CompCompress dynamic range (difference between loud and soft sounds) | Low / Mid / High : These set the compression level.Off : Dynamic range compression is always off. |
| DRCThis can be set in the Dolby TrueHD mode.Compress dynamic range (difference between loud and soft sounds) | Auto : Automatic dynamic range compression on/off control according to source.Low / Mid / High : These set the compression level.Off : Dynamic range compression is always off. |
Adjusting the sound field effects
| Setting items Setting details | |
| LFEAdjust the low-frequency effects level (LFE). | -10dB - 0dBFor proper playback of the different sources, we recommend setting to the values below:Dolby Digital sources : 0dBDTS movie sources : 0dBDTS music sources : -10dB |
| Center ImageDistributes the dialogue output from the center channel to the front left and right channels and widens the sound image in the front. You can set this when the surround mode is set to DTS NEO:6 in the "Music" mode. | 0.0 - 1.0 (0.3)The smaller the value, the more dialogue is concentrated on the center channel. The larger the value, the more dialogue is distributed to front left and right channels, and the more the sound image widens in the front. |
| PanoramaAssign front L/R signal to also go to the surround channels for wider sound. You can set this when the surround mode is Dolby PLII in the "Music" mode. | On : Set,Off : Do not set. |
| DimensionShift sound image center to front or rear to adjust playback balance. You can set this when the surround mode is set to Dolby PLII in the "Music" mode. | 0 - 6 (3)As you set a smaller number, the surround sound field shifts backward; as you set a larger number, the surround sound field shifts forward. |
| Setting items Setting details | |
| Center WidthDistributes the dialogue output from the center channel to left and right channels and widens the sound image in the front.You can set this when the surround mode is set to Dolby PLII in the "Music" mode. | 0-7 (3)The smaller the value, the more dialogue is concentrated on the center channel. The larger the value, the more dialogue is distributed to front left and right channels, and the more the sound image widens in the front. |
| SubwooferTurn subwoofer output on and off. | On: The subwoofer is used.Off: The subwoofer is not used.NOTEThis can be set when the surround mode is "DIRECT" (page 21) and the "SW Mode" (page 36) is "LFE+Main". |
| Set DefaultsThe "Audio Adjust" settings are returned to the default settings. | Yes: Reset to the defaults.No: Do not reset to the defaults. |
Tone
around items indicate the settings made upon purchase.
Adjust the tonal quality of the sound.
1
Press TONE.


2
Use ◀▷ to select “On”.
On Allow tone adjustment (bass, treble).

Playback without tone adjustment.
NOTE
The tone cannot be adjusted in the DIRECT mode.
3
Press to select an item to be set, and use to select a setting value.
Bass Adjust bass.
- -6dB - +6dB (0dB)
Treble Adjust treble.
-6dB - +6dB (0dB)
NIGHT MODE
around items indicate the settings made upon purchase.
Optimized setting for late-night listening.
- If you do not press any button for approximately 5 seconds, the menu screen light turns off.
Press NIGHT to select your desired mode.
Low Set the adjusted value to "Low".
Mid Set the adjusted value to "Middle".
High Set the adjusted value to "High".

Not set.

When a Dolby TrueHD signal is output, "DRC" is displayed on the TV screen. The setting mode is also changed as shown below.

Set the adjusted value to "Low".

Set the adjusted value to "Middle".

Set the adjusted value to "High"

Automatic dynamic range compression on/off control according to the source.

Not set.

"Bass" or "Treble" can be set when the menu "Tone Control" setting is "On".
RESTORER
around items indicate the settings made upon purchase.
Compressed audio formats such as MP3, WMA (Windows Media Audio) and MPEG-4 AAC reduce the amount of data by eliminating signal components that are hard for the human ear to hear. The RESTORER function generates the signals eliminated upon compression, restoring the sound to conditions near those of the original sound before compression. It also restores the original bass characteristics for a rich and expanded tonal range.
- If you do not press any button for approximately 5 seconds, the menu screen light turns off.
Press RESTORER to select "On" or "Off".

On Use RESTORER function.
Off Do not use RESTORER function.


- This item can be set with analog signals or PCM signal (Sample Rate = 44.1/48 kHz) is input.
- This cannot be set when the surround mode is set to "DIRECT".
Audio Delay
around items indicate the settings made upon purchase.
While viewing video, manually adjust the time to delay audio output so that the video and audio are synchronized.
- If you do not press any button for approximately 5 seconds, the menu screen light turns off.
Use AUDIO DELAY +, - to select the value to be set.

0ms - 200ms


Store "Audio Delay" for each input source.
Information
Information on the main unit's various settings (Status) and on input signals (Audio Input Signal) is shown on the display.
The information displayed changes each time you press STATUS on the main unit.
The information is displayed for several seconds before the display returns to its original condition.
[Items to be checked]
- Input source
- Surround mode
- Input digital terminal
etc.
![DENON DHT-E251BA - [Items to be checked] - 1](/content/2026/05/1047343/images/343838d4eef6932b0503fd660ff9ff2bc92ee58ca2b5e319e95efd8eae7140a0.jpg)
Press INFO to display current source name, volume, surround mode name, and other information at the bottom of the screen.

![DENON DHT-E251BA - [Items to be checked] - 3](/content/2026/05/1047343/images/58a42b8bd9bb9ea7b4df5f156106eff7c6043e8a86c8c8d21c0989fc7d9cc8d5.jpg)
NOTE
The information displayed differs according to the input source.
Dialogue normalization function
This function is automatically activated when playing Dolby Digital sources.
It automatically corrects the standard signal level for individual program sources.
The correction value can be checked using STATUS on the main unit.
$$ 0 \text { offset }: - 4 \mathrm{dB} $$
The figure is the corrected value. This cannot be changed.
Information
Information
Here we list other information related to this unit. Please refer to this information as needed.
● Part names and functions page 45
● Other information page 50
● Troubleshooting page 56
Specifications page 58
Index page 59
Part names and functions
Front panel
For buttons not explained here, see the page indicated in parentheses ().

① Power operation button (⏻)....(15) Turns power to this unit on and off (standby).
② Power indicator....(15) [Power indicator status]
• Power on : Green
• Normal standby : Off
- Standby when "Pass Through" (page 38) is not set to "Off": Red
③ Headphones jack (PHONES)
When the headphones are plugged into this jack, audio will no longer be output from the connected speakers.
NOTE
To prevent hearing loss, do not raise the volume level excessively when using headphones.
4 AUX HDMI connector....(7)
5 PORTABLE input jack (13)
⑥ MASTER VOLUME control knob …… (16)
⑦ Display (46)
8 Remote control sensor 49
9 SOURCE SELECT buttons (◀ ▶) ...... (15)
⑩ Tuner preset channel buttons
(TUNER PRESET CH +, -)....(1B)
⑪ DIMMER button (16)
⑫ STATUS button (43)
⑬ QUICK SELECT buttons ...... (28)
Display

① Information display
The input source name, surround mode, setting values and other information are displayed here.
② Input signal indicators
③ MUTE indicator
This lights when the audio mute mode is selected (page 16).
④ Master volume indicator
⑤ Sleep timer indicator
This lights when the sleep mode is selected (page 28).
⑥ Tuner reception mode indicators
These light according to the reception conditions when the input source is set to "TUNER".
TUNED: Lights up when the broadcast is properly tuned in.
STEREO : In the FM mode, this lights up when receiving stereo
broadcasts.
⑦ Decoder indicators
These light when Dolby or DTS signals are input or when the Dolby or DTS decoder is running.
⑧ Input mode indicators
Set the audio input modes for the different input sources (page 33).
Rear panel
See the page indicated in parentheses (1).
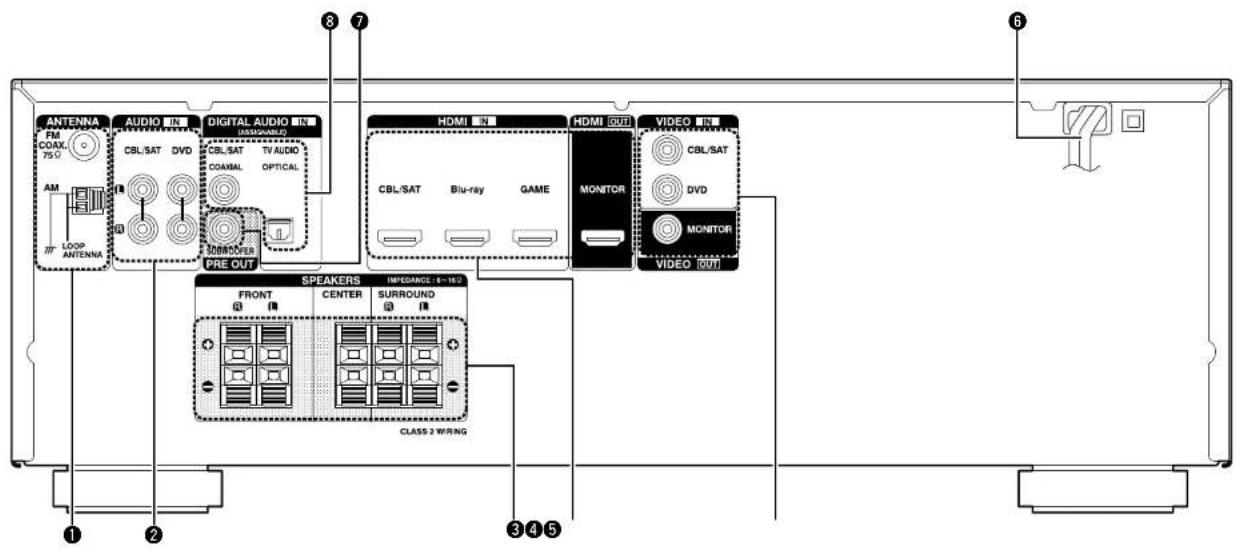
① FM/AM antenna terminals (ANTENNA) …… (13)
② Analog audio connectors (AUDIO) ..... (11, 12)
③ Speaker terminals (SPEAKERS)....(26)
④ HDMI connectors....(6.7)
⑤ VIDEO connectors (10, 11, 12)
6 Power cord (14)
⑦ PRE OUT connector....(26)
⑧ Digital audio connectors (DIGITAL AUDIO) .....(10, 11, 12)
NOTE
Do not touch the inner pins of the connectors on the rear panel. Electrostatic discharge may cause permanent damage to the unit.
Remote control unit
For buttons not explained here, see the page indicated in parentheses ( ).
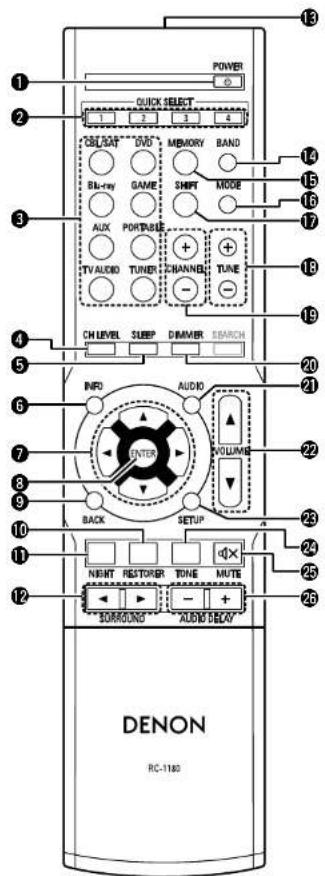
| 1 POWER button (∅) | (15) | 15 MEMORY button | (17) |
| 2 QUICK SELECT buttons (1 - 4) | (28) | 16 MODE button | (17) |
| 3 Input source select buttons | (15) | 17 SHIFT button | (17, 18) |
| 4 Channel level button (CH LEVEL) | (27) | 18 Tuning buttons (TUNE +, -) | (17) |
| 5 SLEEP button | (28) | 19 CHANNEL buttons (+, -) | (17, 18) |
| 6 Information button (INFO) | (43) | 20 DIMMER button | (16) |
| 7 Cursor buttons (△▽◀▶) | (30, 31) | 21 AUDIO button | (20, 39) |
| 8 ENTER button | (30, 31) | 22 VOLUME buttons (▲▼) | (16) |
| 9 BACK button | (30, 31) | 23 SETUP button | (30, 31) |
| 10 RESTORER button | (42) | 24 TONE button | (41) |
| 11 NIGHT button | (41) | 25 MUTE button (◀×) | (16) |
| 12 SURROUND buttons(◀▶) | (19, 20, 21) | 26 AUDIO DELAY buttons (+, -) | (42) |
| 13 Remote control signal transmitter | (49) | NOTEThe SEARCH button cannot be used. | |
| 14 BAND button | (17) | ||
Remote control unit
Inserting the batteries
① Remove the rear lid in the direction of the arrow and remove it.
② Load the two batteries properly as indicated by the marks in the battery compartment.

③ Put the rear cover back on.
NOTE
- Insert the specified batteries in the remote control unit.
- Replace the batteries with new ones if the set does not operate even when the remote control unit is operated close to the unit. (The supplied batteries are only for verifying operation.)
- When inserting the batteries, be sure to do so in the proper direction, following the and marks in the battery compartment.
• To prevent damage or leakage of battery fluid: - Do not use a new battery together with an old one.
- Do not use two different types of batteries.
- Do not attempt to charge dry batteries.
- Do not short-circuit, disassemble, heat or dispose of batteries in flames.
- Do not keep the battery in a place exposed to direct sunlight or in places with extremely high temperatures, such as near a heater.
- If the battery fluid should leak, carefully wipe the fluid off the inside of the battery compartment and insert new batteries.
- Remove the batteries from the remote control unit if it will not be in use for long periods.
- Used batteries should be disposed of in accordance with the local regulations regarding battery disposal.
- The remote control unit may function improperly if rechargeable batteries are used.
Operating range of the remote control unit
Point the remote control unit at the remote sensor when operating it.

NOTE
- The set may function improperly or the remote control unit may not operate if the remote control sensor is exposed to direct sunlight, strong artificial light from an inverter type fluorescent lamp or infrared light.
- When using 3D video devices that transmit infrared communication signals (such as infrared signals etc) between the various units (such as the monitor, 3D glasses, 3D transmitter unit etc), the remote control unit may not operate due to interference from those communication signals. If this occurs, adjust the direction and distance of the 3D communication for each unit, and check that the remote control unit operation is not affected by these signals.
Other information
□ Trademark information (page 50)
□ Surround (page 51)
☐ Relationship between video signals and monitor output (page 53)
Explanation of terms (page 54)
☐ Explanation of terms (page 54)
Trademark information
This product uses the following technologies:



Manufactured under license from Dolby Laboratories. "Dolby", "Pro Logic" and the double-D symbol are trademarks of Dolby Laboratories.
Manufactured under license under U.S. Patent Nos: 5,956,674; 5,974,380; 6,226,616; 6,487,535; 7,212,872; 7,333,929; 7,392,195; 7,272,567 & other U.S. and worldwide patents issued & pending. DTS-HD, the Symbol, & DTS-HD and the Symbol together are registered trademarks of DTS, Inc. Product includes software. © DTS, Inc. All Rights Reserved.
The terms HDMI and HDMI High-Definition Multimedia Interface, and the HDMI Logo are trademarks or registered trademarks of HDMI Licensing LLC in the United States and other countries.
Surround
This unit is equipped with a sophisticated digital signal processing circuit that lets you play your favorite movie and music sources and listen to them with a wide range of surround sound mode choices.
Surround modes and surround parameters
This table shows the speakers that can be used in each surround mode and the surround parameters adjustable in each surround mode.
Symbols in the table
○ This indicates the audio output channels or surround parameters that can be set.
© This indicates the audio output channels. The output channels depend on the settings of "Speaker Config." (37 page 35).
| Surround mode (CP page 15) | Channel output | Audio Adjust (CP page 38) | Trone (CP page 41) | PLESTONEH *5 (CP page 47) | |||||||||||
| Front L/H Center Surround L/H | Subwoofer | Mode (CP page 39) | LFE *2 (CP page 40) | D. Comp *3 (CP page 35) | DRC *4 (CP page 39) | Subwoofer (CP page 40) | PRO LOGIC II Music mode only | NLC 6 Music mode only | |||||||
| Panorama (CP page 40) | Dimension (CP page 40) | Center Width (CP page 40) | Cancer Image (CP page 40) | ||||||||||||
| DIRECT (2-channel) | ○ | ○*1 | ○○○ | *1 | |||||||||||
| DIRECT (Multi-channel) | ○○○○○○○ | ||||||||||||||
| STEREO | ○○○○○○○ | ||||||||||||||
| MULTI CH IN | ○○○○○○ | ||||||||||||||
| DCIBY PRO LOGIC II ○○○○○○○ | ○○○○ | ||||||||||||||
| DTS NEOE | ○○○○○○○ | ○○○ | |||||||||||||
| DCIBY DIGITAL | ○○○○○○○ | ||||||||||||||
| DCIBY DIGITAL Plus | ○○○○○○○ | ||||||||||||||
| DCIBY TrueHD | ○○○○ | ||||||||||||||
| DTS SURROUND | ○○○○○○○ | ||||||||||||||
| DTS 96/24 | ○○○○○○○ | ||||||||||||||
| DTS HD | ○○○○○○ | ||||||||||||||
| DTS Express | ○○○○○○○ | ||||||||||||||
| MULTI CH STEREO | ○○○○○○○ | ○ | |||||||||||||
| VIRTUAL | ○ | ○*1 | ○○○ | ○ | |||||||||||
*1 Only when "SW Mode" is set to "LFE+Main" [137 page 36], sound is output from the subwoofer.
*2 This item can be selected when a Delby Digital or DTS signal or DVD-Audio is played.
*3 This item can be selected when a Dolby Digital or DTS signal is played
*4 This item can be selected when a Delby TrueHD signal is played.
*5 This item can be set when the input signal is analog, PCM 48 kHz or 44.1 kHz.
Surround
□ Types of input signals, and corresponding surround modes
This table shows the input signal that can be played in each surround mode. Check the audio signal of the input source then select the surround mode.
Symbols in the table
● This indicates the default surround mode.
○ This indicates the selectable surround mode.
| Surround mode (CS type 39) | Input signal types and formats | ||||||||||
| ANALOG | PCM DTS HD DTS DO BY DOBY DIGITAL | ||||||||||
| PCM [Multi-channel] | PCM 12 channel] | DTS HD Master Audio | DTS HD High Resolution Audio | DTS EXPRESS | DTS (5.1 channel) | DTS 96/24 D01 BY True ID | DOBY DIGITAL Plus | DOBY DIGITAL (5.1 channel) | DOBY DIGITAL (2 channels) | ||
| DTS SURROUND | |||||||||||
| DTS-HD MSTR | ● | ||||||||||
| DTS-HD HI RES | ● | ||||||||||
| DTS SURROUND | ● | ||||||||||
| DTS 96/24 | ● | ||||||||||
| DTS EXPRESS | ● | ||||||||||
| DTS NEC-6 CINEMA | ○ ○ ○ | ||||||||||
| DTS NEC-6 MUSIC | ○ ○ ○ | ||||||||||
| DOBY SURROUND | |||||||||||
| DOBY TrueHD | ● | ||||||||||
| DOBY DIGITAL+ | ● | ||||||||||
| DOBY DIGITAL | ● | ||||||||||
| DOBY PROLOGIC II CINEMA ○ ○ ○ | |||||||||||
| DOBY PROLOGIC II MUSIC ○ ○ ○ | |||||||||||
| DOBY PROLOGIC II GAME ○ ○ ○ | |||||||||||
| DOBY PROLOGIC | ○ ○ ○ | ||||||||||
| MULTI CH IN | |||||||||||
| MULTI CH IN | ● | ||||||||||
| DIRECT | |||||||||||
| DIRECT | ○ ○ ○ | ○ ○ ○ ○ ○ | ○ ○ ○ | ||||||||
| DSP SIMULATION | |||||||||||
| MULTI CH STEHLO | ○ ○ ○ | ○ ○ | ○ ○ | ||||||||
| VIRTUAL | ○ ○ ○ | ○ ○ | ○ ○ | ||||||||
| STERRE | |||||||||||
| STEREO | ● ○ ● | ○ ○ ○ ○ ○ | ○ ○ ○ | ||||||||
Relationship between video signals and monitor output
○ Video signal input present
○ < > The input signal between the
○ (1) Superimposed on the picture
< > marks is output.
indicated in ( )
× No video signal input
× No video signal output
× ( ) Only the picture in ( ) is output.
NOTE
- If you operate the menu while playing back 3D video content or computer's resolution (e.g. VGA), the playback video is replaced by the menu screen. The playback video is not displayed behind the menu screen.
- This unit does not show the status display while playing back 3D video content or computer's resolution (e.g. VGA).
Explanation of terms
A
Adobe RGB color, Adobe YCC601 color
The color space defined by Adobe Systems Inc. Because it is a wider color space than RGB, it can produce more vivid and natural images.
D
Deep Color
An imaging technology supported by HDMI. Unlike RGB, which uses 8 bits (256 shades) per color, it can use 10 bits (1024 shades), 12 bits (4096 shades), or 16 bits (65536 shades) to produce colors in higher definition.
Both devices linked via HDMI must support Deep Color.
Dolby Digital
Dolby Digital is a multi-channel digital signal format developed by Dolby Laboratories.
A total of 5.1 channels are played: 3 front channels ("FL", "FR" and "C"), 2 surround channels ("SL" and "SR") and the "LFE" channel for low frequencies.
Because of this, there is no crosstalk between channels and a realistic sound field with a "three-dimensional" feeling (sense of distance, movement and positioning) is achieved. This delivers a thrilling surround sound experience in the home.
Dolby Digital Plus
Dolby Digital Plus is an improved Dolby Digital signal format that is compatible with up to 7.1 channels of discrete digital sound and also improves sound quality thanks to extra data bit rate performance. It is upwardly compatible with conventional Dolby Digital, so it offers greater flexibility in response to the source signal and the conditions of the playback device.
Dolby Pro Logic II
Dolby Pro Logic II is a matrix decoding technology developed by Dolby Laboratories.
Regular music such as that on CDs is encoded into 5 channels to achieve an excellent surround effect. The surround channel signals are converted into stereo and full band signals (with a frequency response of 20 Hz to 20 kHz or greater) to create a "three-dimensional" sound image offering a rich sense of presence for all stereo sources.
Dolby TrueHD
Dolby TrueHD is a high definition audio technology developed by Dolby Laboratories, using lossless coding technology to faithfully reproduce the sound of the studio master.
This format provides the facility to support up to 8 audio channels with a sampling frequency of 96kHz/24bit resolution and up to 6 audio channels with a sampling frequency of 192kHz/24bit resolution. Dolby TrueHD is adopted for applications that put very high importance on sound quality.
Downmix
This function converts the number of channels of surround audio to a lower number of channels and plays back according to the system's configuration.
DTS
This is an abbreviation of Digital Theater System, which is a digital audio system developed by DTS. DTS delivers a powerful and dynamic surround sound experience, and is found in the world's finest movie theaters and screening rooms.
DTS 96/24
DTS 96/24 is a digital audio format enabling high sound quality playback in 5.1 channels with a sampling frequency of 96 kHz and 24 bit quantization on DVD-Video.
DTS Digital Surround
DTS Digital Surround is the standard digital surround format of DTS, Inc., compatible with a sampling frequency of 44.1 or 48 kHz and up to 5.1 channels of digital discrete surround sound.
DTS Express
DTS Express is an audio format supporting low bit rates (max. 5.1 channels, 24 to 256 kbps).
DTS-HD
This audio technology provides higher sound quality and enhanced functionality than the conventional DTS and is adopted as an optional audio for Blu-ray Disc. This technology supports multi-channel, high data transfer speed, high sampling frequency, and lossless audio playback. Maximum 7.1-channels are supported in Blu-ray Disc.
DTS-HD High Resolution Audio
DTS-HD High Resolution Audio is an improved version of the conventional DTS, DTS-ES and DTS 96/24 signal formats, compatible with sampling frequencies of 96 or 48 kHz and up to 7.1 channels of discrete digital sound. High data bit rate performance provides high quality sound. This format is fully compatible with conventional products, including conventional DTS digital surround 5.1-channel data.
DTS-HD Master Audio
DTS-HD Master Audio is a lossless audio format created by Digital Theater System (DTS). This format provides the facility to support up to 8 audio channels with a sampling frequency of 96kHz/24bit resolution and up to 6 audio channels with a sampling frequency of 192kHz/24bit resolution. It is fully compatible with conventional products, including conventional DTS digital surround 5.1-channel data.
DTS NEO:6 ^TM Surround
DTS NEO:6™ is a matrix decoding technology for achieving 6.1-channel surround playback with 2-channel sources. It includes "DTS NEO:6 Cinema" suited for playing movies and "DTS NEO:6 Music" suited for playing music.
Dynamic range
The difference between the maximum undistorted sound level and the minimum discernible level above the noise emitted by the device.
H
HDCP
When transmitting digital signals between devices, this copyright protection technology encrypts the signals to prevent content from being copied without authorization.
HDMI
This is an abbreviation of High-Definition Multimedia Interface, which is an AV digital interface that can be connected to a TV or amplifier. Video signals and audio signals can be connected using a single cable.
L
LFE
This is an abbreviation of Low Frequency Effect, which is an output channel that emphasizes low frequency effect sound. Surround audio is intensified by outputting 20 Hz to 120 Hz deep bass to the system subwoofer.
M
MP3 (MPEG Audio Layer-3)
This is an internationally standardized audio data compression scheme, using the "MPEG-1" video compression standard. It compresses the data volume to about one eleventh its original size while maintaining sound quality equivalent to a music CD.
MPEG (Moving Picture Experts Group), MPEG-2, MPEG-4
These are the names for digital compression format standards used for the encoding of video and audio. Video standards include "MPEG-1 Video", "MPEG-2 Video", "MPEG-4 Visual", "MPEG-4 AVC". Audio standards include "MPEG-1 Audio", "MPEG-2 Audio", "MPEG-4 AAC".
P
Protection circuit
This is a function to prevent damage to devices within the power supply when an abnormality such as an overload, excess voltage occurs or over temperature for any reason.
In this unit, the power indicator blinks and the unit enters standby mode when an abnormality occurs.
s
Sampling frequency
Sampling involves taking a reading of a sound wave (analog signal) at regular intervals and expressing the height of the wave at each reading in digitized format (producing a digital signal).
The number of readings taken in one second is called the "sampling frequency". The larger the value, the closer the reproduced sound is to the original.
Speaker impedance
This is an AC resistance value, indicated in (ohms). Greater power can be obtained when this value is smaller.
Explanation of terms
sYCC601 color
Like "x.v.Color", each of these color spaces defines a palette of available colors that is larger than the traditional RGB color model.
w
WMA (Windows Media Audio)
This is audio compression technology developed by Microsoft Corporation.
WMA data can be encoded using Windows Media ^® Player Ver.7, 7.1, Windows Media ^® Player for Windows ^® XP and Windows Media ^® Player 9 Series.
To encode WMA files, only use applications authorized by Microsoft Corporation. If you use an unauthorized application, the file may not work properly.
x
x.v.Color
This function lets HDTV's display colors more accurately. It enables display with natural, vivid colors. "x.v.Color" is a Sony registered trademark.
Troubleshooting
If a problem should arise, first check the following:
-
Are the connections correct?
-
Is the set being operated as described in the owner's manual?
-
Are the other devices operating properly?
If this unit does not operate properly, check the items listed in the table below. Should the problem persist, there may be a malfunction.
In this case, disconnect the power immediately and contact your store of purchase.
[General]
| Symptom Cause/Solution Page | ||
| Power does not turn on. | Check whether the power plug is correctly inserted into the power outlet.The protection circuit is active. Disconnect the power plug from the electric outlet, wait 5 to 10 seconds and then insert it back into the outlet. | 1454 |
| Power automatically switches to standby mode. | The sleep timer is set. Turn on the power again, or change the sleep timer settings."Auto Standby" is triggered when there is no operation for a set amount of time. To disable "Auto Standby", set "Auto Standby" on the menu to "Off". | 2838 |
| Display is off. | Press DIMMER and apply any setting except "Off". | 16 |
| The power indicator is blinking red. | The temperature inside the unit has risen. Please turn off power once, and re-apply the power after the temperature has fallen sufficiently.Please re-install this unit in a place having good ventilation.Please use speakers which have the specified impedance.The speaker cable has shorted its touching. Firmly twist the core wire in the speaker cable, and then re-connect it to the speaker terminal. | --2425 |
| After turning on the power, the power indicator is blinking red. | This unit's amplifier circuit has failed. Turn off the power and please contact the Denon service adviser. | - |
| Set does not operate properly. | Reset the microprocessor. Note that re-setting the microprocessor restores all pre-configured settings to the factory defaults. | 58 |
[HDMI]
| Symptom Cause/Solution Page | ||
| No audio is output with HDMI connection. | Check the connection of the HDMI connectors.When outputting HDMI audio from the speakers, set "HDMI Audio Out" on the menu to "Amp",When outputting HDMI audio from a TV, set "HDMI Audio Out" on the menu to "TV". | 63838 |
| No video is output with HDMI connection. | Check the connection of the HDMI connectors.Set the input source to match the connected HDMI connector.Check whether the TV is compatible with copyright protection (HDCP). If connected to a device not compatible with HDCP, video will not be output correctly. | 66.158 |
| No audio is output when "Pass Through" is set. | Check the TV settings. Refer to the owner's manual for your TV for more details.Set the speaker to the TV speakers.Set HDMI control to "Off". | - |
[Video]
| Symptom Cause/Solution Page | ||
| No picture appears. | Check the TV connection. | 6, 10 |
| Set the TV input correctly. | 6, 10 | |
[Audio]
| Symptom Cause/Solution Page | ||
| Audio is not output. | Check the connections for all devices.Check the speaker connections and configurations.Check whether the audio device power is turned on.Adjust the master volume.Cancel the mute mode.Select a suitable input source.Select a suitable input mode.Disconnect the headphones. No sound is output from the speakers when headphones are connected. | 6,7,10,11,12,1326-1616153345 |
| The volume does not increase. | The maximum volume is set too low. Set the maximum volume using "Limit" on the menu.Power for external devices connected to the output connectors of the unit may not be turned on. Check the power of connected external devices. | 37- |
| No sound is produced from surround speakers. | Check if the surround speakers are connected to the SURROUND terminals. | - |
| No sound is produced from subwoofer. | Check the subwoofer connections.Turn on the subwoofer's power.Set "Speaker Config." - "Subwoofer" on the menu to "Yes".If "Front" and "Center" for "Speaker Config." are set to "Large", and "SW Mode" is set to "LFF", no sound may be output from the subwoofer, depending on the input signal or selected surround mode. | 24-3536 |
| DTS sound is not output. | Set "Decode Mode" on the menu to "Auto" or "DTS". | 33 |
| Dolby TrueHD, DTS-HD, Dolby Digital Plus audio is not output. | Make HDMI connections. | 6 |
| Dolby PLII mode or DTS NEO:6 mode cannot be selected. | Check that "Speaker Config." - "Center" or "Surround" is set to other than "None". If the speaker system is 2.0/2.1ch, this surround mode cannot be selected.When headphones are used, Dolby PLII or DTS NEO:6 cannot be selected. | 36- |
| RESTORER cannot be selected. | Check that an analog signal or PCM signal (fs=44.1/48 kHz) is input. For playback of multi-channel signals such as Dolby Digital or DTS surround, RESTORER cannot be used. | 42 |
[Radio]
| Symptom Cause/Solution Page | ||
| Reception falls, or there is a lot of noise or distortion. | Change the antenna orientation or position.Separate the AM loop antenna from the unit.Use an FM outdoor antenna.Separate the antenna from other connection cables. | 13131313 |
[Remote Control Unit]
| Symptom Cause/Solution Page | ||
| The set cannot be operated with the remote control unit. | ● Batteries are worn out. Replace with new batteries.● Operate the remote control unit within a distance of about 23 ft/7 m from this unit and at an angle of within 30^ .● Remove any obstacle between this unit and the remote control unit.● Insert the batteries in the proper direction, checking the ⊕ and ⊖ marks.● The set's remote control sensor is exposed to strong light (direct sunlight, inverter type fluorescent bulb light, etc.). Move the set to a place in which the remote control sensor will not be exposed to strong light. | 4949494949 |
Resetting the microprocessor
Perform this procedure if the display is abnormal or if operations cannot be performed.
Note that when the microprocessor is reset, all the settings are reset to their default values.

1 Turn off the power using ⏻.
2 Press ⏻ while simultaneously pressing SOURCE SELECT ◀ and SOURCE SELECT ▶.
3 Once the display starts flashing at intervals of about 1 second, release the two buttons.
The image is too blurry to recognize any text content.
If in step 3 the display does not flash at intervals of about 1 second, start over from step 1.
Specifications
□ Audio section
• Power amplifier Rated output: [1]
75 W + 75 W (8 Ohms, 20 Hz - 20 kHz with 0.08 % T.H.D.I 110 W + 110 W (6 Ohms, 1 kHz with 0.7 % T.H.D.I
Center
75 W 18 Ω/ohms, 20 Hz – 20 kHz with 0.08 % T.H.D.
110 W (6 Ω/ohms, 1 kHz with 0.7 % T.H.D.)
Surround: 75 W + 75 W (8 Ω/ohms, 20 Hz - 20 kHz with 0.08 % T.H.D.I) 110 W + 110 W (6 Ω/ohms, 1 kHz with 0.7 % T.H.D.I)
Output connectors: 6 - 16 Ω/chms
Analog
Input sensitivity/Input impedance: 200 mV/47 kΩ/kohms
Frequency response: 10 Hz - 100 kHz — +1, -3 dB (DIRECT mode)
S/N: 98 dB (IHF-A weighted, DIRECT mode)
□ Video section
• Standard video connectors
Input/output level and Impedance: 1 Vp-p, /5 Ω/ahms Frequency response: 5 Hz - 10 MHz - 0, -3 dB
Tuner section [FM] [AM]
(Note: V at 75 Ohms, 0 dB) = 1 x 10^-15 W
Receiving Range: 87.5 MHz - 107.9 MHz 520 kHz - 1710 kHz
Usable Sensitivity: 1.2 μV (12.8 dB) 18 μV
50 dB Quieting Sensitivity:
S/N: MONO 70 dB (IHF-A weighted,
MONO 2.8 μV (20.2 dB)
DIRECT model
STEREO 67 dB (HF-A weighted, DIRECT model)
Total harmonic Distortion (at 1 kHz):
MONO 0.7% (1 kHz)
STEREO 1.0 % (1 kHz)
□ General
Power supply
AC 120 V, 60 Hz
Power consumption:
330 W
Power consumption in standby mode:
0.3 W
For purposes of improvement, specifications and design are subject to change without notice.
Index
| Numerics | |
| 2.1-channel | 23, 26 |
| 3D | 8 |
| 5.1-channel | 23, 26 |
A
| Accessories | 1 |
| Adjusting the master volume | 16 |
| Adobe RGB color / Adobe YCC601 color | 8, 54 |
| AM loop antenna | 13 |
| Audio Adjust | 39 |
| Audio Delay | 42 |
| Auto Preset | 32 |
| Auto Standby | 38 |
B
| Bass | 29,41 |
C
| Cable | |
| Audio cable | 9 |
| Coaxial digital cable | 9 |
| HDMI cable | 6, 7 |
| Optical cable | 9 |
| Speaker cable | 24 |
| Stereo mini plug cable | 9 |
| Subwoofer cable | 24 |
| Video cable | 9 |
| Center Image | 40 |
| Center Width | 40 |
| Condensation | 2 |
| Connection | |
| Antenna | 13 |
| Blu-ray Disc player | 7, 12 |
| Cable TV | 7, 11 |
| DVD player | 7, 12 |
| Game console | 7 |
| HDMI | 6, 7 |
| Portable player | 13 |
| Power cord | 14 |
| Satellite tuner | 7, 11 |
| Set-top box | 7, 11 |
| Speaker | 24 |
| TV | 6, 10 |
| Video camcorder | 7 |
| Crossovers | 29 |
D
| D.Compo | 39 |
| Decode Mode | 33 |
| Deep Color | 8, 54 |
| Dimension | 40 |
| Display | 46 |
| Distances | 29 |
| Dolby | |
| Dolby Digital | 20, 54 |
| Dolby Digital Plus | 20, 54 |
| Dolby Pro Logic II | 20, 54 |
| Dolby TrueHD | 20, 54 |
| Downmix | 54 |
| DRC | 39 |
| DTS | 20, 54 |
| DTS 96/24 | 20, 54 |
| DTS Digital Surround | 54 |
| DTS Express | 54 |
| DTS-HD | 20, 54 |
| DTS-HD High Resolution Audio | 54 |
| DTS-HD Master Audio | 54 |
| DTS NEO:6TM Surround | 20, 54 |
| Dynamic range | 54 |
F
| Fader function | 27 |
| FM/AM | 17 |
| FM indoor antenna | 13 |
| Front Panel | 45 |
G
| General | 37 |
| HDMI | 38 |
| Other | 38 |
| Volume | 37 |
H
| HDCP | 8, 54 |
| HDMI | 5, 8, 38, 54 |
| HDMI Audio Out | 38 |
| Headphones | 45 |
1
| Information | 43 |
| Input Assign | 32 |
| Input Mode | 33 |
| Inputs | 31 |
| Input signal | 20, 52 |
L
| Levels | 27, 29 |
| LFE | 40, 54 |
| Limit | 37 |
| Listening mode | 19 |
M
| Menu map | 29 |
| Mode | 39 |
| MP3 | 42, 54 |
| MPEG | 42, 54 |
| Mute Level | 37 |
N
| NIGHT MODE | 41 |
P
| Panorama | 40 |
| Pass Source | 38 |
| Pass Through | 38 |
| Playback | |
| Blu-ray Disc player | 16 |
| Direct | 21 |
| DVD player | 16 |
| FM/AM | 17 |
| Multi channel stereo | 21 |
| Portable player | 16 |
| Standard | 20 |
| Stereo | 21 |
| Virtual | 21 |
| Power On Level | 37 |
| Preset Skip | 33 |
| Presetting radio stations | 17 |
| Protection circuit | 24, 54 |
Q
| Quick select | 28 |
R
| Rear panel | 47 |
| Remote control unit | 48 |
| Inserting the batteries | 49 |
| Resetting the microprocessor | 58 |
| RESTORER | 42 |
S
| Sampling frequency | 54 |
| Scale | 37 |
| Selecting the input source | 15 |
| Setup Lock | 38 |
| Sleep timer | 28 |
| Source Level | 33 |
| Speaker | |
| Connect | 24 |
| Install | 23 |
| Speaker cable label | 25 |
| Speaker Config | 29 |
| Speaker impedance | 24, 54 |
| Speakers | 29 |
| Subwoofer | 40 |
| Surround Mode | 19, 51 |
| Switching the brightness of the display | 16 |
| sYCC601 color | 8, 55 |
T
| Tone | 41 |
| Trademark | 50 |
| Treble | 41 |
| Troubleshooting | 56 |
| Turning off the sound temporarily | 16 |
| Turning the power on | 15 |
V
| Video Source | 33 |
| Volume | 37 |
W
| WMA | 42, 55 |
X
| x.v.Color | 8,55 |
Dimensions
Unit : in. (mm)
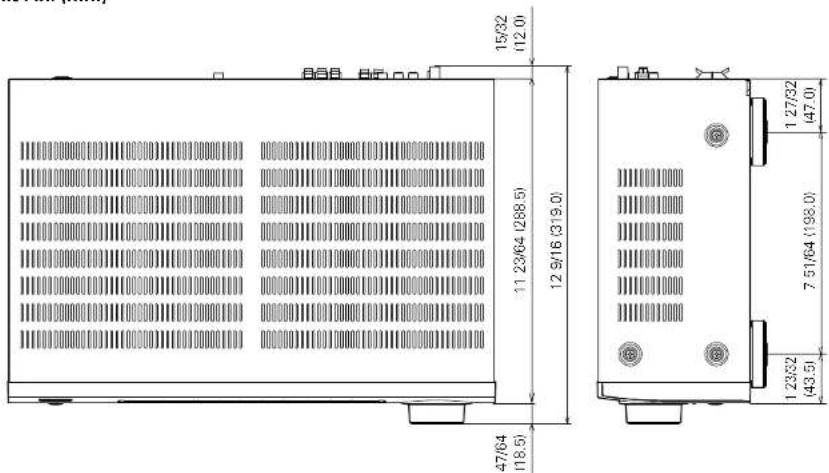
Weight : 17 lbs 7 oz (7.9 kg)

DENON
www.denon.com
D&M Holdings Inc. 3520 10205 00AD
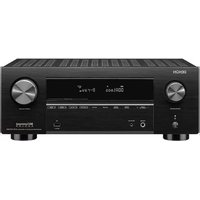
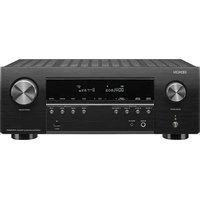
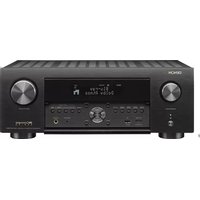
- WARNING:
- CAUTION: HOT SURFACE. DO NOT TOUCH.
- IMPORTANT SAFETY INSTRUCTIONS
- CAUTION:
- FCC INFORMATION (For US customers)
- PRODUCT
- IMPORTANT NOTICE: DO NOT MODIFY THIS PRODUCT
- NOTE
- For Canadian customers:
- NOTES ON USE
- WARNINGS
- □ CAUTIONS ON INSTALLATION
- Getting started
- Contents
- Accessories
- Features
- Cautions on handling
- Basic instructions
- Connections
- Important information
- NOTE
- Relationship between video signals and monitor output
- Examples of screen display
- Connecting HDMI devices
- Connecting this unit to a TV via HDMI connections
- Cables used for connections
- Connecting to a device equipped with a DVI-D connector
- Connecting this unit to video devices via HDMI connections
- HDMI function
- About 3D function
- Deep Color (page 54)
- Copyright protection system
- Settings related to HDMI connections
- HDMI (page 38)
- Connecting other devices
- Changing the source assigned to connectors
- Connecting a TV
- Audio connection
- DIGITAL AUDIO COAXIAL connector \* DIGITAL AUDIO OPTICAL connector
- □ Video connection
- VIDEO OUT (MONITOR) connector
- Input connector setting
- DIGITAL AUDIO COAXIAL connector
- Connecting a set-top box (Satellite tuner/Cable TV)
- DIGITAL AUDIO COAXIAL connector DIGITAL AUDIO OPTICAL connector
- AUDIO IN (CBL/SAT) connector
- VIDEO IN (CBL/SAT) connector
- ① DIGITAL AUDIO OPTICAL connector
- Connecting a Blu-ray Disc player/DVD player
- AUDIO IN (DVD) connector
- Video connection
- VIDEO IN (DVD) connector
- ① DIGITAL AUDIO COAXIAL connector
- Connecting a portable player
- Connecting an FM/AM antenna
- □ AM loop antenna assembly
- □ Using the AM loop antenna
- Suspending on a wall
- Standing alone
- Connecting the power cord
- Playback (Basic operation)
- Turning the power on
- Selecting the input source
- Adjusting the master volume
- Turning off the sound temporarily
- Switching the brightness of the display
- Playing a Blu-ray Disc player/DVD player
- Playing a portable player
- Tuning in radio stations
- How to tune in
- Listening to FM/AM broadcasts
- Tune in the desired broadcast station.
- ☐ Presetting radio stations (Manual preset)
- □ Listening to preset stations
- Selecting a listening mode (Surround mode)
- Standard playback
- □ Surround playback of 2-channel sources
- □ Surround playback of multi-channel sources (Dolby Digital, DTS etc.)
- Displaying the currently playing surround mode
- Views on the display
- Multi-channel stereo playback
- Virtual playback
- Stereo playback
- Direct playback
- Advanced instructions
- Installation/connection/setup of speakers (Advanced)
- Speaker installation
- Speaker connection
- Connecting the speaker cable
- ☐ About the speaker cable label (supplied) for channel identification
- Playback (Advanced operation)
- Adjusting the volume of the speakers
- Adjusting the volume of the different speakers
- Use to select the speaker.
- Use ◀ ▷ to adjust the volume.
- Adjusting the volume of groups of speakers (Fader function)
- Press ∇ to select "Fader", then select the item to be adjusting using ◀ ▷.
- Use ◀▷ to adjust the volume of the speakers. (<: front, ▷: rear)
- Sleep timer function
- Press SLEEP and display the time you want to set.
- To cancel the sleep timer
- Quick select function
- Press QUICK SELECT.
- Changing the settings
- Set the items below to the settings you want to save.
- Press and hold the desired QUICK SELECT until "Quick\* Memory" appears on the display.
- Various memory functions
- Personal memory plus function
- Last function memory
- How to make detailed settings
- Menu map
- Examples of menu and front display
- Inputs
- Menu operation
- ☐ About the display of input sources
- Items that can be set with the "Inputs" procedure
- Input Assign Default settings are underlined.
- Examples of "Input Assign" menu screen displays
- Input assignments menu operations
- Setting items Setting details
- Auto Preset
- Preset Skip Default settings are underlined.
- Source Level Default settings are underlined.
- Input Select Default settings are underlined.
- Video Source
- Speakers
- Speaker Config.
- Distances
- Levels
- General
- Adjusting the sound field effects
- Audio Adjust Default settings are underlined.
- Tone
- NIGHT MODE
- RESTORER
- Audio Delay
- Information
- [Items to be checked]
- Dialogue normalization function
- Part names and functions
- Front panel
- Display
- Rear panel
- Remote control unit
- Inserting the batteries
- Operating range of the remote control unit
- Other information
- Trademark information
- Surround
- Surround modes and surround parameters
- Symbols in the table
- □ Types of input signals, and corresponding surround modes
- Explanation of terms
- A
- Adobe RGB color, Adobe YCC601 color
- D
- Deep Color
- Dolby Digital
- Dolby Digital Plus
- Dolby Pro Logic II
- Dolby TrueHD
- Downmix
- DTS
- DTS 96/24
- DTS Digital Surround
- DTS Express
- DTS-HD
- DTS-HD High Resolution Audio
- DTS-HD Master Audio
- DTS NEO:6 TM Surround
- Dynamic range
- H
- HDCP
- HDMI
- L
- LFE
- M
- MP3 (MPEG Audio Layer-3)
- MPEG (Moving Picture Experts Group), MPEG-2, MPEG-4
- P
- Protection circuit
- s
- Sampling frequency
- Speaker impedance
- sYCC601 color
- w
- WMA (Windows Media Audio)
- x
- x.v.Color
- Troubleshooting
- Resetting the microprocessor
- Specifications
- □ Audio section
- □ Video section
- Tuner section [FM] [AM]
- □ General
- Dimensions
- DENON
Brand : DENON
Model : DHT-E251BA
Category : Home Theater