
TVF760G - Tumble drier HOTPOINT - Free user manual and instructions
Find the device manual for free TVF760G HOTPOINT in PDF.

| Product Type | Tumble Dryer |
| Brand | Hotpoint |
| Model | TVF760G |
| Installation Type | Freestanding |
| Drying System | Condenser |
| Capacity | 7 kg |
| Energy Class | B |
| Number of Programs | 16 |
| Maximum Spin Speed | 1400 rpm |
| Noise Level | 66 dB |
| Dimensions (H x W x D) | 85 x 59.5 x 61 cm |
| Weight | 45 kg |
| Power Consumption (per cycle) | 4.5 kWh |
| Voltage | 220-240 V |
| Frequency | 50 Hz |
| Features | Sensor drying, delay start, anti-crease, reverse tumble |
| Display | LED |
| Door | Reversible |
| Safety | Child lock, overheating protection |
| Maintenance | Lint filter, condenser cleaning |
| Spare Parts Availability | Available |
| Warranty | 2 years |
Frequently Asked Questions - TVF760G HOTPOINT
User questions about TVF760G HOTPOINT
0 question about this device. Answer the ones you know or ask your own.
Ask a new question about this device
Download the instructions for your Tumble drier in PDF format for free! Find your manual TVF760G - HOTPOINT and take your electronic device back in hand. On this page are published all the documents necessary for the use of your device. TVF760G by HOTPOINT.
USER MANUAL TVF760G HOTPOINT
Where to put your dryer
Ventilation
Electrical connection
Levelling your dryer
Before you start using your dryer
Dryer description, 5
The front
The back
Control panel
Start and programmes, 6-8
Choosing a programme
Table of programmes
TVF760
Laundry, 9-10
Sorting your laundry
Wash care labels
Special clothing items
Drying times
Warnings and Suggestions, 11
General safety
Disposal
Saving energy and respecting the environment
Maintenance and Care, 12
Switching off the electricity
Cleaning the filter after each cycle
Check the drum after each cycle
Cleaning the dryer
Troubleshooting, 13
Service, 14
Hotpoint Guarantee, 15
Hotpoint After Sales Service, 16
! Keep this instruction booklet on hand in order to refer to it when necessary. Take it with you when you move, and should you sell this appliance or pass it on to another party, make sure that this booklet is supplied along with the dryer so that the new owner may be informed about warnings and suggestions on how the appliance works.
! Read these instructions carefully; the following pages contain important information on installation and suggestions on how the appliance works.

This symbol reminds you to read this booklet.

Hotpoint
GB
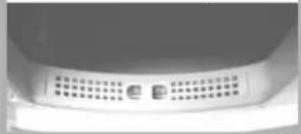
For your Venting dryer to operate efficiently, you must follow the regular maintenance schedule shown below:
Fluff Filter...
! You MUST clean the fluff filter after EVERY drying cycle.
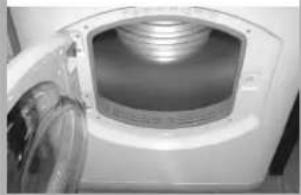
STEP 1.
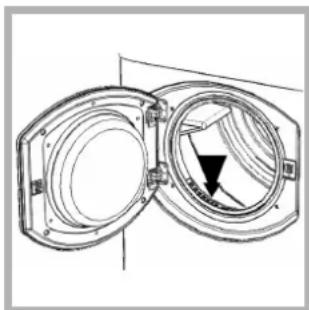
Open the door of your dryer.
natural_image
Close-up of a white electronic device with a recessed top and internal structure, no visible text or symbols.STEP 2.
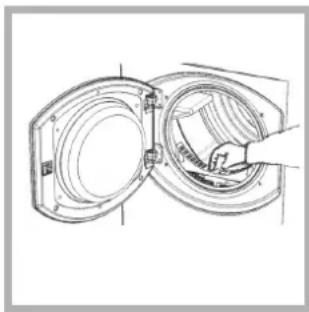
Pull out the filter (using the two finger grips).
natural_image
Close-up of a perforated metal grate with a small square object inserted, no visible text or symbolsSTEP 3.
Clean any fluff deposits from the filter mesh.
natural_image
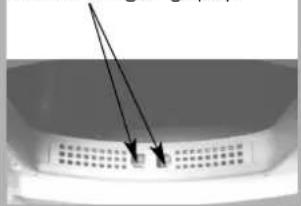
Metallic frame structure with two arrows pointing to a central slot (no text or symbols)STEP 4.
Refit the filter.
- Make sure the arrows are facing you.
natural_image
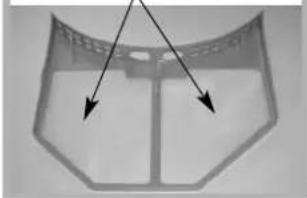
Interior view of a metallic cylindrical device with ventilation grilles and mounting brackets (no visible text or symbols)STEP 5.
Make sure the filter is pushed fully home.
- NEVER run the dryer without the filter in position.
! Failure to clean the filter after EVERY drying cycle will affect the drying performance of your machine.
- It will take longer to dry and as a result will use more electricity during drying.
! You MUST clean fluff build up around the filter housing and the vent tube periodically, EVERY two or three months:
- Check the vent tube and any permanent venting fixture to make sure that there has been no accumulation of fluff or lint, and remove it.
- Remove lint that collects around the filter and the outlet vents.
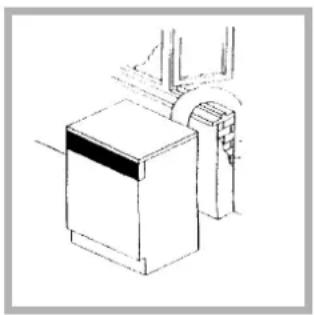
Where to put your dryer
- Place your dryer at a distance from gas ranges, stoves, heaters, or cook tops because flames can damage the appliance.
Minimum gap 10mm
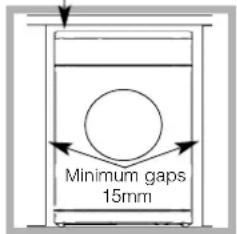
- If you are going to install the appliance under a work counter, be sure to leave a 10mm space between the top and any other objects on or above the machine and a 15mm space between the sides and lateral furnishings or walls. This is to ensure
proper air circulation. Make sure that the back vents are not obstructed.
- Make sure you put your dryer in an environment that is not damp and has proper air circulation throughout, the dryer will not operate efficiently in an enclosed space or cupboard.
! We do not recommend that the dryer is installed in a cupboard but the dryer must never be installed behind a lockable door, a sliding door or a door with a hinge on the opposite side to that of the dryer door.
Ventilation
The Dryer dries your laundry by drawing in cool, clean and relatively dry air, heating it, and then distributing it through the clothes as they are gently tumbled. For optimum performance, the moist air is then blown out through a vent tube at the back of the dryer.
When the dryer is in use, there has to be adequate ventilation to avoid the back flow of gases into the room from appliances burning other fuels, including open fires.
Mobile venting
A vent tube must always be fitted when the dryer is used in conjunction with Mobile Venting.
The tube must be fitted securely into the back of the dryer (see Dryer Description). If possible, it is always best to connect the tube to a permanent outlet close to the dryer. If permanent installation is not possible, the dryer will work just as well with the tube passing through a partly-opened window.
! Ensure that the end of the tube is not directed toward the air intake vent at the rear of the dryer.
! The vent tube should not exceed 2.4 metres in length and should be kept free of any possible accumulation of fluff, lint and water by shaking it out frequently. Always ensure that the tube is not squashed.
Permanent venting
In conjunction with the vent tube we recommend using a Wall/Window Vent Kit, available at a retail location or the nearest Spare Parts Dealer.
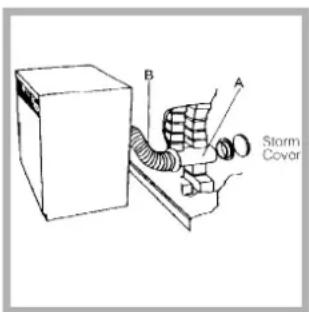
Wall mounting
- Leave an opening in the wall to the left of the dryers proposed position.
- Keep the tube as short and straight as possible to prevent condensed moisture from backing up into the dryer.
- Similarly, the duct in the wall should slope downwards towards the outside.
natural_image
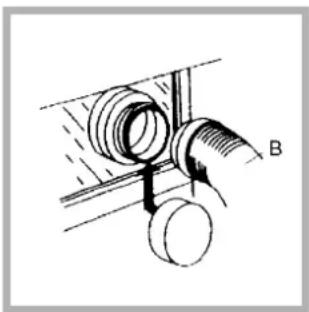
Technical diagram of a pipe fitting with two circular components, labeled B (no text or symbols present)Window mounting
- With a stacked dryer the hole in the window should ideally be made below the vent.
- The tube should be kept as short as possible.
Depending on how often you use your dryer, it is essential that areas A and B are checked periodically to remove lint or debris.
The vent tube adaptor must be fitted securely thus preventing any humid air from being emitted back into the room.
! The Dryer should not be pushed so far back that the tube adaptor is pulled out of position or the tube is squashed or bent.
! The tube should be kept clear of the air intake vent and kinks or 'U' bends must be avoided as these will obstruct the tube or trap condensation.
Open window venting
natural_image
Simple line drawing of a washing machine with a handle and base (no text or symbols)The end of the tube should be directed downwards, to prevent warm moist air from condensing in the room or in the dryer.
! Ensure that the dryer is adequately ventilated and that the end of the vent tube is not directed towards the air intake duct.
! The vent tube must always be fitted for optimum performance.
! Make sure that the vent tube and air intake vents are not obstructed or blocked.
! The dryer must not recycle exhaust air.
! Misusing a tumble dryer may create a fire hazard.
! Do not discharge exhaust air into a flue which is used for exhaust fumes from other appliances that burn gas or other fuels.
! Do not discharge exhaust air into an extraction system or any duct with an extractor fan. This will affect the way the thermal controls operate and can result in a fire hazard.
Electrical connections
Make sure of the following before you insert the plug into the the electrical socket:
• The socket must be grounded.
- The socket must be able to sustain the machines maximum power, which is indicated on the rating label (see Dryer Description).
- Power voltage must be within the values indicated on the rating label (see Dryer Description).
- The socket must be compatible with the dryers plug. Should this not be the case, replace the plug or the socket.
! The dryer must not be installed outdoors, even if the space is sheltered. It can be very dangerous if it is exposed to rain or storms.
! Once installed, the dryers electrical wire and plug must be within easy reach.
! Do not use extension cords.
! The power cord must not be bent or squashed.
! The power supply cord should be checked periodically and replaced by a cord specially prepared for this dryer and fitted only by authorised technicians (see Service). New or longer power cords are supplied at an extra charge by authorised dealers..
! The manufacturer denies any responsibility should any of these rules not be followed.
! If in doubt about any of the above consult a qualified electrician.
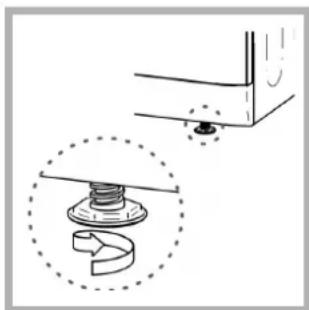
Levelling your dryer
The dryer must be installed level for correct operation.
natural_image
Line drawing of a briefcase with handle and mounting bracket (no text or symbols)When you have installed your dryer in its final location check that it is level first side to side, then front to back.
natural_image
Technical diagram showing a mechanical assembly with a spring and nut, no text or symbols presentIf the dryer is not level, use a wooden block to support it while adjusting the two front legs up or down, until your dryer is level.
Before you start using your dryer
Once you have installed your dryer and before you use it, clean the inside of the drum to remove any dust that could have accumulated during transport.
The front The back
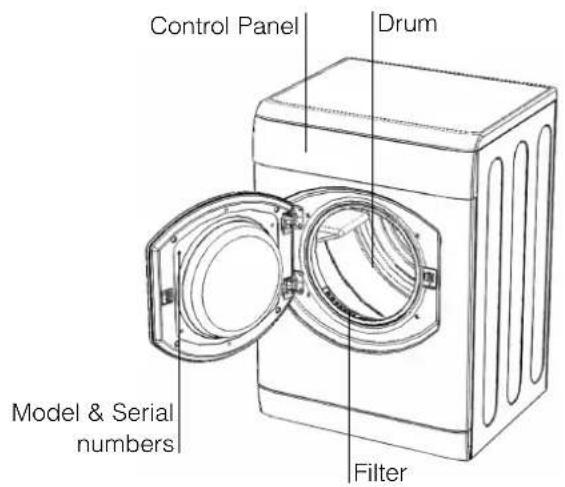
Control panel
The ON/OFF button/light ⏻: If the dryer is running and this button is pressed, the dryer is turned off. Press again, the dryer restarts. The light signals that your dryer is in use or ready to select a programme.
The Programme Guide allows you to consult a user friendly table of the available programmes.
The PROGRAMMES knob sets the programme: rotate it until the indicator is pointing to the programme you want to select (see Start and Programmes).
The OPTION buttons/lights select available options for your selected programme. The lights indicate that the option has been selected. If an option is not available the buzzer will beep three times (see Start and Programmes).
The Start/Pause button/light >II starts a selected programme. When you press this button there will be one beep and the progress lights will flash to confirm the action. When a programme is running, holding this
button in pauses the programme and stops the dryer. The light is green when the programme is running, flashing amber if the programme has been paused or flashing green if on standby waiting to start a programme (see Start and Programmes).
The Child Lock button/light: Press and hold this button after selecting your programme and any options, this prevents the programme settings from being changed. When the light is lit the other buttons and the programme knob are disabled. Hold the button to cancel and the light will go out.
The Progress lights show you the status of the programme. As each stage of the programme starts the corresponding light turns on.
The Clean Filter light gives you a reminder before every programme that it is essential to clean the filter every time the dryer is used (see Maintenance and Care).
Choosing a programme
-
Plug the dryer into the electrical socket.
-
Sort your laundry according to fabric type (see Laundry).
-
Open the door and make sure the filter is clean and in place (see Maintenance).
-
Load the machine and make sure items are not in the way of the door seal. Close the door.
-
If the On/Off light is not lit: Press the ON/OFF button ⏻.
-
Choose a programme by checking the Programmes Guide (see Programmes) as well as the indications for each type of fabric (see Laundry).
- select a programme by rotating the PROGRAMMES knob.
-
Set a delay time and other options if necessary.
-
The START/PAUSE light is flashing green:
- press the START/PAUSE>II button to begin. The green light stops flashing and the display will show the estimated time to end. During the drying programme, you can check on
your laundry and take out items that are dry while others continue drying. When you close the door again, press the START/PAUSE button >II in order to resume drying.
(When the door is opened the START/PAUSE light will flash Amber, after the door is closed and the START/PAUSE button pressed, the START/PAUSE light will stop flashing and show green.)
-
During the last few minutes of Drying Programmes, before the programme is completed, the final COOL TUMBLE phase is entered (fabrics are cooled), this phase should always be allowed to complete.
-
The buzzer will warn you when the programme is complete. Open the door, take the laundry out, clean the filter and replace it (see Maintenance). If the Post Creasecare Option has been selected and you do not remove the laundry immediately, the dryer will tumble occasionally for 10 hours or until you open the door.
-
Unplug the dryer.
Note:
This tumble dryer, in compliance with new energy saving regulations, is fitted with an automatic standby system which is enabled after about 30 minutes if no activity is detected. Press the ON/OFF button briefly and wait for the machine to start up again.
Easy Iron Programme
'Easy Iron' is a short 10 minute programme (8 minutes of heat followed by a 2 minute cool tumble period) which fluffs the fibres of clothing that have been left in the same position/location for an extended period of time. The cycle relaxes the fibres and makes them easier to iron and fold.
! 'Easy Iron' is not a drying programme and should not be used for wet articles of clothing. For best results:
- Do not load more than the maximum capacity. These numbers refer to the dry weight:
Fabric Maximum load
Cotton and Cotton mixtures 2.5kg Synthetics 2kg Denim 2kg
- Unload the dryer immediately after the end of the programme, hang, fold or iron the articles and put them away in the closet. Should this not be possible repeat the programme.
The 'Easy Iron' effect varies from one fabric to the next. It works well on traditional fabrics like Cotton or Cotton mix, and less well on acrylic fibres and on materials such as Tencel®.
Wool Programme

- This is a programme for tumble dryer safe garments marked with the symbol ☐.
- It can be used for load sizes up to 1kg (approximately 3 sweaters).
• We recommend that garments are turned inside out before drying. - This programme will take about 60 minutes, but may take longer depending on the size and density of the load and the spin speed used in your washer.
- Loads dried using this programme are usually ready to wear, but on some heavier garments the edges may be slightly damp. Allow these to dry naturally as over-drying could damage garments.
! Unlike other materials, the mechanism of wool shrinkage is irreversible; i.e. it will not stretch back to original size and shape.
! This programme is not suitable for Acrylic garments.
The wool drying cycle of this tumble dryer has been approved by The Woolmark Company for the drying of Woolmark garments labelled as machine wash and tumble dry, provided that the garments are dried according to instructions on the garment label and those issued by the manufacturer of this tumble dryer (M0615).
Programmes
! If the On/Off light ⏻ is not lit; Press the ON/OFF button ⏻ and then select programme.
| Programme | What it does... How to set it... Note: | |
| 1CottonsExtra Dry [IMAGE] | Dries your clothes on High heat setting, ready for wearing. | 1. Position the PROGRAMME knob on 1.2. Select any Options, if required.3. Press the START/PAUSE button >II . |
| 2CottonsCupboard Dry [IMAGE] | Dries your clothes on High heat setting, ready for putting away. | 1. Position the PROGRAMME knob on 2.2. Select any Options, if required.3. Press the START/PAUSE button >II . |
| 3CottonsHanger Dry [IMAGE] | Dries your clothes on High heat setting, ready for hanging. | 1. Position the PROGRAMME knob on 3.2. Select any Options, if required.3. Press the START/PAUSE button>II . |
| 4CottonsIron Dry [IMAGE] | Dries your clothes on High heat setting, ready for ironing. | 1. Position the PROGRAMME knob on 4.2. Select any Options, if required.3. Press the START/PAUSE button>II . |
| 5SyntheticsCupboard Dry [IMAGE] | Dries your clothes on High heat setting , ready for putting away. | 1. Position the PROGRAMME knob on 5.2. Select any Options, if required.3. Press the START/PAUSE button>II . |
| 6Bed & Bath [IMAGE] | Dries your bedding and towels on High heat setting, ready for putting away. | 1. Position the PROGRAMME knob on 6.2. Select any Options, if required.3. Press the START/PAUSE button>II . |
| 7Delicates (e.g. Acrylics) [IMAGE] | Dries your clothes on Low heat setting, ready to be worn. | 1. Position the PROGRAMME knob on 7.2. Select any Options, if required.3. Press the START/PAUSE button >II . |
| 8Wool [IMAGE] | Dries your Woollen clothes, (see previous page). | 1. Position the PROGRAMME knob on 8.2. Press the START/PAUSE button >II . |
| 9AIRING [IMAGE] | Airs your clothes with cool air, use also to cool warm clothes. | 1. Position the PROGRAMME knob on 9.2. Press the START/PAUSE button >II . |
| 10Easy Iron [IMAGE] | Brief programme (approximately 10 minutes) that softens fibres of clothing that is ready for ironing. | 1. Position the PROGRAMME knob on 10.2. Press the START/PAUSE button >II . |
| Timed Drying(120, 90, 60, 30 or 20 minutes) | Dries wet clothing that you wish to dry on low heat or small loads (less than 1kg).Can be used with high heat option if you prefer to use a timed programme. | 1. Position the PROGRAMME knob on the desired time: 120, 90, 60, 30 or 20.2. Select any Options, if required.3. Press the START/PAUSE button >II . |
| 11Cool Tumble [IMAGE] | Brief programme (approximately 10 minutes) that cools fibres or clothing. | 1. Position the PROGRAMME knob on 112. Press the START/PAUSE button >II . |
GB
The Controls
• PROGRAMMES knob
! Warning, if after pressing the Start/Pause button >II the programme knob position has changed, the new position will NOT change the programme selected. To change a selected programme, press the Start/Pause button >II, the light flashes Amber to indicate the programme is paused. Select the new programme and any options required, the light will then flash green. Press the Start/Pause button >II again and the new programme will start.
• OPTION buttons / lights
These buttons are used to customise the selected programme to your requirements. A programme must have been selected on the programmes knob before an option can be selected. Not all options are available for all programmes (see Start and Programmes). If an option is not available and you press the button, the buzzer will beep three times. If the option is available there will be one beep and the option light next to the button lights to confirm the selection. After the Start/Pause button has been pressed only the Pre Care and Post Care options can be changed.
Time Delay (Delay Start)
The start of some programmes (see Start and Programmes) can be delayed for up to 24 hours. Press this button, the display shows OFF and the option light comes on. Press again and a 1 hour delay is selected and the display indicates 1hr, each further press of the button adds 1hr to the delay. When 24hr is displayed a further press the display shows OFF and after a couple of seconds cancels the delay. You can also cancel the delay by pressing the On/Off button.
Pre Creasecare (Pre Care)
This option is only available if a delayed start has been selected. It tumbles the clothes occasionally during the delayed period to help prevent creases developing.
High Heat
Available for Timed Drying programmes. Press this button and a High Heat setting is selected and the light next to the button comes on.
Timed programmes have a default of low heat, if the light next to the button is on then pressing this button selects a low heat setting and the light goes out.
Post Creasecare (Post Care)
When available and selected, the clothes are occasionally tumbled after the end of the drying and cool tumble cycles, to help prevent creases developing should you not be available to remove the load immediately the programme is complete.
• DISPLAY

The display shows either the amount of time delay remaining or an indication of the amount of time left for a drying programme.
The delay time is displayed in hours and counts down each minute.
The time to end is displayed in hours and minutes and counts down each minute, this includes the cool tumble phase. When timed programmes are selected the time displayed throughout the cycle is the actual time remaining.
When a sensing programme is selected the time displayed is an estimate of the time remaining. When the programme is selected the display shows the time required to dry a full load, after around 10 minutes the controller calculates a better estimate of the cycle time. The colons between the hours and minutes in the display flash to show that the time is counting down. When the programme finishes its cool tumble phase the display will show E88.
The display also shows if there is a problem with your dryer, if this occurs the display will show F followed by a fault code number (see Troubleshooting).
- Door Opening
Opening the door (or pressing the Start/Pause button >II) during a programme will stop the dryer and have the following effects:
• The Start/Pause light flashes Amber.
- During a delay phase the delay will continue to count down. The Start/Pause button >ll must be pressed to resume the delay programme. The progress lights will change to show current status.
- During the drying part of the programme, the time to end count continues but the colons do not flash. The Start/Pause button >ll must be pressed to resume the programme. The progress lights will change to show the current status.
- During the post creasecare phase of a drying programme, the programme will finish. Pressing the Start/Pause button >II will re-start a new programme at the beginning.
- The Start/Pause button >II must be pressed to resume the programme. The progress lights will change to show the current status and the Start/Pause light will stop flashing and turn green.
- Changing the Programmes knob will select a new programme and the Start/Pause light will flash green. You can use this to select the Cool Tumble programme to cool the clothes, if you find them dry enough. Press the Start/Pause button >II to begin a new programme.
- Note
If you have a power cut, switch off the power or remove the plug. When the power is restored, press the Start/Pause button >II and the programme will resume.
Sorting your laundry
- Check symbols on clothing labels to make sure that the articles can be tumble dried.
- Sort laundry by fabric type.
• Empty pockets and check buttons. - Close zippers and hooks and tie loose belts and strings.
- Wring out each item in order to eliminate as much excess water as possible.
! Do not load dripping wet clothes into the dryer.
Maximum load size
Do not load more than maximum capacity.
These numbers refer to dry weight:
Natural fibres: 6kg max (13lb)
Synthetic fibres: 3kg max (6.6lb)
! DO NOT overload the dryer as this could result in reduced drying performance.
Typical load
Note: 1kg = 1000g (1lb = 16oz)
| Clothes | |
| Blouse Cotton 150g (5oz)Other 100g (3oz) | |
| Dress Cotton 500g (1lb 2oz)Other 350g (12oz) | |
| Jeans 700g (1lb 6oz) | |
| 10 nappies | 1000g (2lb 3oz) |
| Shirt | Cotton 300g (10oz)Other 200g (7oz) |
| T-Shirt | 125g (4oz) |
| Household Items | ||
| Duvet cover (Double) | Cotton 1500g | (3lb 5oz) |
| Other 1000g | (2lb 3oz) | |
| Large Tablecloth | 700g (1lb 6oz) | |
| Small Tablecloth | 250g (9oz) | |
| Tea Towel | 100g (3oz) | |
| Bath Towel | 700g (1lb 6oz) | |
| Hand Towel | 350g (12oz) | |
| Double Sheet | 500g (1lb 2oz) | |
| Single Sheet | 350g (12oz) | |
At the end of a drying cycle, cottons could still be damp if you grouped cottons and synthetics together. If this happens simply give them an additional short period of drying.
- Note: The last 10 minutes of any time set is the Cool Tumble, so allow for this when setting the time, as this period will not dry your laundry.
Wash Care Labels
Look at the labels on your garments, especially when tumble drying for the first time. The following symbols are the most common:
Items not suitable for tumble drying
- Articles that containing rubber or rubber-like materials or plastic film (pillows, cushions, or PVC rainwear), any other flammable articles or objects that contain flammable substances (towels soiled with hair spray).
• Glass fibres (certain types of draperies) - Items which have been dry cleaned
- Items with the ITCL Code ☒ (see Special clothing items). These can be cleaned with special at-home dry cleaning products. Follow instructions carefully.
- Large bulky items (quilts, sleeping bags, pillows, cushions, large bedspreads etc). These expand when drying and would prevent airflow through the dryer.
GB
Special clothing items
Blankets and Bedspreads: acrylic items (Acilan, Courtelle, Orion, Dralon) must be dried with special care on LOW heat setting. Avoid drying for a long period of time.
Pleated or creased garments: read the manufacturer's drying instructions on the garment.
Starched articles: do not dry these with non-starched items. Make sure that as much of the starch solution is removed from the load as possible before placing it in the dryer. Do not over-dry: the starch will become powdery and leave your clothing limp, which defeats the purpose of starch.
Drying times
The table below presents APPROXIMATE drying times in minutes. Weights refer to dry garments:
| CottonsHigh (full) Heat | |||||
| Drying times 800-1000rpm in washing machine | |||||
| Half Load | Full Load | ||||
| 1kg 2kg | 3kg 4kg | 5kg 6kg | |||
| 20-30 35 | -45 45-60 | 60-70 7 | 0-80 80- | 100 | |
| SyntheticsHigh (full) Heat | |||||
| Drying times on reduced spin in washing machine | |||||
| Half Load Full Load | |||||
| 1kg 2kg 3kg | |||||
| 20-40 30-50 | 40-70 | ||||
| Delicates (e.g.Acrylics)Low (gentle) Heat | |||||
| Drying times on reduced spin in washing machine | |||||
| Half Load | Full Load | ||||
| 1kg | 2kg | ||||
| 50-70 | 90-130 | ||||
Times are approximate and can vary depending upon:
- Amount of water retained in clothes after spin cycle: towels and delicates retain a lot of water.
- Fabrics: items that are the same type of fabric but different textures and thicknesses may not have the same drying time.
- Quantity of laundry: single items or small loads may take longer to dry.
- Dryness: If you are going to iron some of your clothes, they can be taken out while still a bit damp. Others can be left longer if you need them to be completely dry.
- Heat setting.
- Room temperature: if the room where the dryer is located is cold, it will take longer for the dryer to dry your clothes.
- Bulk: some bulky items can be tumble dried with care. We suggest that you remove these items several times, shake them out, and return them to the dryer until finished.
! Do not over-dry your clothes.
All fabrics contain a little natural moisture, which keeps them soft and fluffy.
! The appliance has been designed and built according to international safety standards.
These warnings are given for safety reasons and must be followed carefully.
General safety
- This tumble dryer is not intended for use by persons (including children) with reduced physical, sensory or mental capabilities, or lack of experience and knowledge, unless they have been given supervision or instruction concerning use of the appliance by a person responsible for their safety.
- This tumble dryer has been designed for home, and not professional use.
- Do not touch the appliance while barefoot or with wet hands or feet.
- Unplug the machine by pulling on the plug, not the cord.
- Children must not be in proximity of the dryer when in use. After using the dryer, turn it off and unplug it. Keep the door closed to make sure that children do not use it as a toy.
- Children should be supervised to ensure that they do not play with the dryer.
- The appliance must be installed correctly and have proper ventilation. The air intake vents behind the machine, the outlet vents and the vent tube should never be obstructed (see Installation).
- Never direct the vent tube outlet towards the air intake at the back of the machine.
- Never allow the tumble dryer to recycle exhaust air.
- Never use the dryer on carpeting where the pile height would prevent air from entering the dryer from the base.
- Check to see if the dryer is empty before loading it.
• The back of the dryer could become very hot. Never touch it while in use.
- Do not use the dryer unless the filter is securely in place (see Maintenance).
- Do not use liquid fabric softeners in the dryer, add it to the final rinse of your wash.
- Do not overload the dryer (see Laundry) for maximum loads.
- Do not load items that are dripping wet.
- Tumble dry items only if they have been washed with detergent and water, rinsed and been through the spin cycle. It is a fire hazard to dry items that HAVE NOT been washed with water.
- Carefully check all instructions on clothing labels (see Laundry).
- Do not dry garments that have been treated with chemical products.
- Never dry articles that are contaminated with flammable substances (cooking oil, acetone, alcohol, petrol, kerosene, spot removers, turpentine, waxes, wax removers and hair sprays), unless washed in hot water with an extra amount of detergent.
- Do not tumble dry rubber, rubber backed articles and clothes, pillows fitted with foam rubber pads, foam (latex foam), rubber, plastic, shower caps, waterproof textiles, nappy pants or liners, polythene or paper.
- Do not tumble dry large, very bulky items.
- Do not tumble dry acrylic fibres at high temperatures.
- Remove all objects from pockets, especially lighters (risk of explosion).
- Complete each programme with its Cool Tumble Phase.
- Do not turn off the dryer when there are still warm items inside.
- Clean the filter after each use (see Maintenance).
- Do not allow lint to collect around the dryer.
- Never climb on top of the dryer. It could result in damage.
- Always follow electrical standards and requirements (see Installation).
- Always buy original spare parts and accessories (see Service).
! WARNING: Never stop the dryer before the end of the drying cycle unless all items are quickly removed and spread out so that the heat is dissipated.
Recycling and disposal information

As part of our continued commitment to helping the environment, we reserve the right to use quality recycled components to keep down customer costs and minimise material wastage.
- Disposing of the packaging material: follow local regulations, so the packaging can be recycled.
- To minimise risk of injury to children, remove the door and plug - then cut off mains cable, flush with the appliance. Dispose of these parts separately to ensure that the appliance can no longer be plugged into a mains socket.
Disposal of old electrical appliances
The European Directive 2002/96/EC on Waste Electrical and Electronic Equipment (WEEE), requires that old household electrical appliances must not be disposed of in the normal unsorted municipal waste stream. Old appliances must be collected separately in order to optimise the recovery and recycling of the materials they contain and reduce the impact on human health and the environment.
The crossed out "wheeled bin" symbol on the product reminds you of your obligation, that when you dispose of the appliance it must be separately collected.
Consumers should contact their local authority or retailer for information concerning the correct disposal of their old appliance.
Saving energy and respecting the environment
- Wring out items to eliminate excess water before tumble drying (if you use a washing machine first, select a high spin cycle). Doing this will save time and energy during drying.
- Always dry full loads - you save energy: single items or small loads take longer to dry.
- Clean the filter after each use to contain energy consumption costs (see Maintenance).
GB
Switching off the electricity
Unplug your dryer when not using it, when cleaning it and during all maintenance operations.
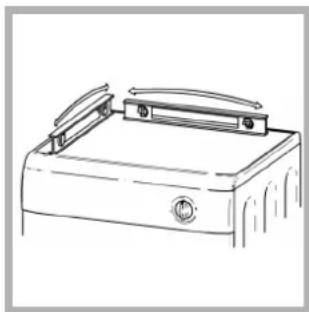
Clean the filter after each cycle
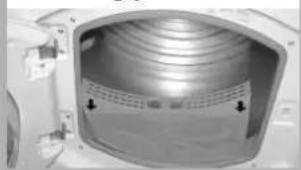
The filter is an important part of your dryer: it accumulates lint and fluff that is formed while drying. Small items could also become trapped in the filter. When finished drying, therefore, clean the filter by rinsing it under running water or with your vacuum cleaner. Should the filter become clogged up, the airflow inside the dryer will be seriously compromised: drying times lengthen and you will consume more energy. It may also damage your dryer.
natural_image
Technical line drawing of two open mechanical components with a central circular opening and a black arrow indicating direction (no text or symbols)The filter is found in front of the dryer trim (see diagram).
natural_image
Technical line drawing of a mechanical assembly with two open chambers and a handle (no text or symbols)Removing the filter:
1. Pull the plastic grip of the filter upwards (see diagram).
2. Clean the filter and replace it correctly. Ensure the filter is fully located flush into the tumble dryer trim.
! Do not use the dryer without replacing the filter..
Check the drum after each cycle
Turn the drum manually in order to remove small items (handkerchiefs) that could have been left behind.
Cleaning the drum
! Do not use abrasives, steel wool or stainless steel cleaning agents to clean the drum.
A coloured film may start to appear on the stainless steel drum, this may be caused by a combination of water and, or cleaning agents such as fabric conditioner from the wash. This coloured film will not affect the dryer performance.
Cleaning
- External parts in metal or plastic and rubber parts can be cleaned with a damp cloth.
- Periodically check the vent tube and any permanent venting fixture to make sure that there has been no accumulation of fluff or lint, and remove it.
- Remove lint that collects around the filter and the outlet vents.
! Do not use solvents or abrasives.
! Your dryer uses special bearing components which do not need lubrication.
! Have your dryer checked regularly by authorised technicians to ensure electrical and mechanical safety (see Service).
One day your dryer seems not to be working. Before you call your Service Centre (see Service), go through the following troubleshooting suggestions:
Problem:
The tumble dryer won't start.
Possible causes / Solution:
- The plug is not plugged into the socket, or not making contact.
• There has been a power failure. - The fuse has blown. Try to plug another appliance into the socket.
- You are using an extension cord? Try to plug the dryer's power cord directly into the socket.
• The door is not closed securely? - The PROGRAMMES knob has not been set properly (see Start and Programmes).
- The START/PAUSE button has not been pressed (see Start and Programmes).
Drying cycle will not begin.
| • You have set a delayed time (see Start and Programmes). |
Its taking a long time to dry.
- The filter has not been cleaned (see Maintenance).
- The correct programme has not been selected for the load (see Start and Programmes).
- The flexible vent tube is obstructed (see Installation).
- The air intake vent is obstructed (see Installation).
- The permanent ventilation flap on the storm cover is obstructed (see Installation).
• The items were too wet (see Laundry).
• The dryer was overloaded (see Laundry).
Programme finishes and clothes are damper than expected.
! For safety the dryer has a maximum programme time of 3 hours. If an automatic programme has not sensed the required final moisture in this time the dryer will complete the programme and stop. Check the above points and run the programme again, if the results are still damp, contact the Service Centre (see Service).
The display shows a fault code F followed by one or two numbers.
• If the display shows F10 or F15:
- Turn off and remove the plug. Clean the filter (see Maintenance). Then replace the plug, turn on and start another programme. If F10 or F15 is still displayed contact the Service Centre (see Service).
- If any other number is shown: Note down the code and contact the Service Centre (see Service).
The display briefly shows every 6 seconds.
- The dryer is in 'Demo' mode. Press and hold both the On/Off and Start/Pause buttons for 3 seconds. The display will show ONPP for 3 seconds and then the dryer will resume normal operation.
Before calling the Service Centre:
- Use the troubleshooting guide to see if you can solve the problem yourself (see Troubleshooting).
- If not, turn off the dryer and call the Service Centre closest to you.
What to tell the Service Centre:
• name, address and post code.
- telephone number.
• the type of problem.
• the date of purchase.
• the appliance model (Mod.).
• the serial number (S/N).
This information can be found on the data label inside the door of the machine.
Spare Parts
This dryer is a complex machine. Repairing it yourself or having a non-authorised person try to repair it could cause harm to one or more persons, could damage the machine and could invalidate the spare parts warranty.
Call an authorised technician if you experience problems while using the machine.
The spare parts have been designed exclusively for this appliance and not for other uses.
Comparative Programmes
- Programmes recommended for comparative test to EN61121
| Programme Programme to select Load size(EN61121) | ||
| Dry Cotton 2 Cottons - Cupboard Dry 6 kg | ||
| Iron Dry Cotton 4 Cottons - Iron Dry 6 kg | ||
| Easy-care textile 5 Synthetics - Cupboard Dry 3 kg |
! Note: This is not a full list of programme options (see Start and Programmes).
CE This appliance conforms to the following EC Directives:
- 2006/95/EC (Low Voltage Equipment)
- 89/336/EEC, 92/31/EEC and 93/68/EEC (Electromagnetic Compatibility)
Hotpoint
Guarantee
12 months Parts and Labour Guarantee
Your appliance has the benefit of our manufacturer's guarantee, which covers the cost of breakdown repairs for twelve months from the date of purchase.
This gives you the reassurance that if, within that time, your appliance is proven to be defective because of either workmanship or materials, we will, at our discretion, either repair or replace the appliance at no cost to you.
The guarantee is subject to the following conditions:
- The appliance has been installed and operated correctly and in accordance with our operating and maintenance instructions.
- The appliance is only used on the electricity or gas supply printed on the rating plate.
- The appliance has been used for normal domestic purposes only.
- The appliance has not been altered, serviced, maintained, dismantled or otherwise interfered with by any person not authorised by us.
- Any repair work must be undertaken by us or our appointed agent.
- Any parts removed during repair work or any appliance that is replaced become our property.
- The appliance is used in the United Kingdom or Republic of Ireland.
The guarantee does not cover:
- Damage resulting from transportation, improper use, neglect or interference or as a result of improper installation.
- Replacement of any consumable item or accessory. These include but are not limited to: plugs, cables, batteries, light bulbs, fluorescent tubes and starters, covers and filters.
- Replacement of any removable parts made of glass or plastic.
THE GUARANTEE WILL NOT APPLY IF THE APPLIANCE HAS BEEN USED IN COMMERCIAL OR NON-DOMESTIC PREMISES.
5 Year Parts Guarantee
Hotpoint also offers you a FREE 5 year parts guarantee. This additional guarantee is conditional on you registering your appliance with us and the parts being fitted by one of our authorised engineers. There will be a charge for our engineer's time.
To activate the extra parts warranty on your appliance, simply call our registered line on 08448 24 24 24 (Republic of Ireland 01 230 0800)
Extended Guarantees
We offer a selection of protection plans that enable you to fully cover yourself against the expense of repair bills for the life of your policy. To find the ideal plan for you please call our advice line on 08448 226 226 (Republic of Ireland 01 230 0233)
Free Helpdesk Service
We have a dedicated team who can provide free advice and assistance with your appliance if you experience any technical difficulties within the first 90 days of ownership. Simply call our Hotpoint Service Hotline on 08448 224 224 (Republic of Ireland 0818 313 413) for telephone assistance, or, where necessary, to arrange for an engineer to call.

After Sales Service
No one is better placed to care for your Hotpoint appliance during the course of its working life than us - the manufacturer.
Essential Contact Information Hotpoint Service
We are the largest service team in the country offering you access to 400 skilled telephone advisors and 1100 fully qualified engineers on call to ensure you receive fast, reliable, local service.
UK: 08448 224 224
Republic of Ireland: 0818 313 413
www.hotpointservice.co.uk
Please note: Our advisors will require the following information:
Model number
Serial number
Parts and Accessories
We supply a full range of genuine replacement parts as well as accessory products that protect and hygienically clean your appliance to keep it looking good and functioning efficiently throughout its life.
UK: 08448 225 225
Republic of Ireland: 0818 313 413
www.hotpointservice.co.uk
Appliance Registration
We want to give you additional benefits of Hotpoint ownership. To activate your FREE 5 year parts guarantee you must register your appliance with us.
UK: 08448 24 24 24
Republic of Ireland: 01 230 0800
www.hotpointservice.co.uk
Recycling and Disposal Information
As part of Hotpoint's continued commitment to helping the environment, Hotpoint reserves the right to use quality, recycled components to keep down customer costs and minimise material wastage.
Please dispose of packaging and old appliances carefully. To minimise the risk of injury to children, remove the door, plug, and cut the mains cable off flush with the appliance. Dispose of these parts separately to ensure that the appliance can no longer be plugged into a mains socket and the door cannot be locked shut.
- Dryer description, 5
- Start and programmes, 6-8
- TVF760
- Laundry, 9-10
- Warnings and Suggestions, 11
- Maintenance and Care, 12
- Troubleshooting, 13
- Service, 14
- Hotpoint Guarantee, 15
- Hotpoint After Sales Service, 16
- Fluff Filter...
- STEP 1.
- STEP 2.
- STEP 3.
- STEP 4.
- STEP 5.
- Where to put your dryer
- Ventilation
- Mobile venting
- Permanent venting
- Wall mounting
- Window mounting
- Open window venting
- Electrical connections
- Levelling your dryer
- Before you start using your dryer
- Choosing a programme
- Note:
- Easy Iron Programme
- Fabric Maximum load
- Wool Programme
- Programmes
- The Controls
- • PROGRAMMES knob
- • OPTION buttons / lights
- Time Delay (Delay Start)
- Pre Creasecare (Pre Care)
- High Heat
- Post Creasecare (Post Care)
- • DISPLAY
- - Door Opening
- - Note
- Sorting your laundry
- Maximum load size
- Typical load
- Wash Care Labels
- Items not suitable for tumble drying
- Special clothing items
- Drying times
- General safety
- Recycling and disposal information
- Disposal of old electrical appliances
- Saving energy and respecting the environment
- Switching off the electricity
- Clean the filter after each cycle
- Check the drum after each cycle
- Cleaning the drum
- Cleaning
- Before calling the Service Centre:
- What to tell the Service Centre:
- Spare Parts
- Comparative Programmes
- Hotpoint
- Guarantee
- months Parts and Labour Guarantee
- The guarantee is subject to the following conditions:
- The guarantee does not cover:
- Year Parts Guarantee
- Extended Guarantees
- Free Helpdesk Service
- After Sales Service
- Essential Contact Information Hotpoint Service
- Parts and Accessories
- Appliance Registration
Brand : HOTPOINT
Model : TVF760G
Category : Tumble drier