
W711 - Washing machine Avanti - Free user manual and instructions
Find the device manual for free W711 Avanti in PDF.


| Product Type | Portable Top-Load Washing Machine |
| Brand | Avanti |
| Model | W711 |
| Capacity | 1.5 cu ft (estimated) |
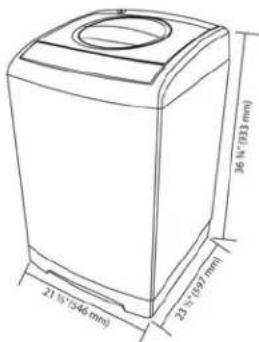
| Dimensions (H x W x D) | 33 x 21 x 21 inches (estimated) |
| Weight | 55 lbs (estimated) |
| Power Requirements | 115 V, 60 Hz, 15 A |
| Water Pressure | 0.05 - 0.5 MPa |
| Drain Hose Height | 2.25 - 4 ft |
| Control Type | Electronic with LED Display |
| Wash Programs | Normal, Quick, Anti-Wrinkle, Jeans, Cotton, Air Dry |
| Manual Cycles | Wash Only, Wash & Rinse, Rinse & Spin, Spin Only |
| Water Temperature Options | Cold, Warm, Hot |
| Water Level Settings | 4 levels |
| Delay Start | Up to 48 hours |
| Safety Features | Auto-Locking Lid, Child Lock |
| Noise Damper Plate | Included |
| Water Inlet Hoses | 2 (cold and hot) |
| Drain Hose | Included |
| Warranty | 1 year limited, 5 year plastic tub, 7 year stainless steel tub |
| Care | Clean lint filter and inlet filter regularly |
| Spare Parts Availability | Order via Avanti Customer Service (800-220-5570) |
Frequently Asked Questions - W711 Avanti
User questions about W711 Avanti
0 question about this device. Answer the ones you know or ask your own.
Ask a new question about this device
Download the instructions for your Washing machine in PDF format for free! Find your manual W711 - Avanti and take your electronic device back in hand. On this page are published all the documents necessary for the use of your device. W711 by Avanti.
USER MANUAL W711 Avanti
natural_image
Line drawing of a single washing machine with a circular top and side base (no text or symbols)BEFORE USE, PLEASE READ AND FOLLOW ALL SAFETY RULES AND OPERATING INSTRUCTIONS.
Avanti has a policy of continuous improvement on its products and reserves the right to change materials and specifications without notice.
Avanti Products, A Division of the Mackle Co., Inc.
P.O. Box 520604 - Miami, Florida 33152
www.avantiproducts.com
TABLE OF CONTENTS
Appliance Safety 4
Important Safeguides 5
Help Us Help You / If You Need Service 6
Parts, Features, and Accessories 7
Important Safety Instructions 8
Installation Instructions 9
Before Using Your Portable Washer 9
Selecting a Location 9
Installing the Noise Damper Plate 10
Connecting the Water Supply Hoses / Sink Faucet Connection 10 – 11
Disconnecting the Water Supply Hoses / Positioning the Drain Hose 11
Electrical Connection / Extension Cords 12
Control Panel / Functions Description 13
Operating Your Portable Washer 14
Preparation / Before Washing 14 – 15
Operating Instructions 16
Manual Function (Custom Washing Cycle) /Automatic Wash Program 16 – 17
Delayed Start (Preset) Setting / Auto-Locking Lid / Child-Proof Setting 18
Care and Maintenance 19
Problems with Your Portable Washer 20
Troubleshooting Guide / Service for Your Portable Washer 20
Your Avanti Products Warranty / What is not Covered 21
Registration Information and Registration Card 31
APPLIANCE SAFETY
Your safety and the safety of others are very important.
We have provided many important safety messages in this manual and on your appliance. Always read and obey all safety messages.

This is the Safety Alert Symbol. This symbol alerts you to potential hazards that can kill or injure you and others. All safety messages will follow the Safety Alert Symbol and either the words "DANGER", "WARNING" or "CAUTION".

DANGER

Danger means that failure to heed this safety statement may result in severe personal injury or death.

WARNING

Warning means that failure to heed this safety statement may result in extensive product damage, serious personal injury, or death.
CAUTION
Caution means that failure to heed this safety statement may result in minor or moderate personal injury, or property or equipment damage.
All safety messages will alert you do what the potential hazard is, tell you how to reduce the chance of injury, and let you know what can happen if the instructions are not followed.
IMPORTANT SAFEGUIDES

Before the appliance is used, it must be properly positioned and installed as described in this manual, so read the manual carefully. To reduce the risk of fire, electrical shock or injury when using the appliance, follow basic precaution, including the following:

DANGER

- Plug into a grounded 3-prong outlet, do not remove grounding prong, do not use an adapter, and do not use an extension cord.
- Replace all panels before operating.
- It is recommended that a separate circuit, serving only your appliance be provided. Use receptacles that cannot be turned off by a switch or pull chain.
- Never clean appliance parts with flammable fluids. These fumes can create a fire hazard or explosion. And do not store or use gasoline or other flammable vapors and liquids in the vicinity of this or any other appliance. The fumes can create a fire hazard or explosion.
- Before proceeding with cleaning and maintenance operations, make sure the power line of the unit is disconnected.
- Do not connect or disconnect the electric plug when your hands are wet.
- Unplug the appliance or disconnect power before cleaning or servicing. Failure to do so can result in electrical shock or death.
- Do not attempt to repair or replace any part of your appliance unless it is specifically recommended in this material. All other servicing should be referred to a qualified technician.

WARNING

FOLLOW WARNING CALL OUTS BELOW ONLY WHEN APPLICABLE TO YOUR MODEL
- Use two or more people to move and install appliance. Failure to do so can result in back or other injury.
- To ensure proper ventilation for your appliance, the front of the unit must be completely unobstructed. Choose a well-ventilated area with temperatures above 60^ F ( 16^ C) and below 90^ F ( 32^ C). This unit must be installed in an area protected from the element, such as wind, rain, water spray or drips.
- The appliance should not be located next to ovens, grills or other sources of high heat.
- The appliance must be installed with all electrical, water and drain connections in accordance with state and local codes. A standard electrical supply (115 V AC only, 60 Hz), properly grounded in accordance with the National Electrical Code and local codes and ordinances is required.
- Do not kink or pinch the power supply cord of appliance.
- The fuse (or circuit breaker) size should be 15 amperes.
- It is important for the appliance to be leveled in order to work properly. You may need to make several adjustments to level it.
- Never allow children to operate, play with or crawl inside the appliance.
- Do not use solvent-based cleaning agents of abrasives on the interior. These cleaners may damage or discolor the interior.
- Do not use this apparatus for other than its intended purpose.
HELP US HELP YOU...
Read this guide carefully.
It is intended to help you operate and maintain your new portable washer properly.
Keep it handy to answer your questions. If you don't understand something or you need more assistance, please call:
Avanti Customer Service 800-220-5570
Keep proof of original purchase date (such as your sales slip) with this guide to establish the warranty period.
Write down the model and serial numbers.
You'll find them on a plate located on the rear outside wall of the portable washer.
Please write these numbers here:
Date of Purchase
Model Number
Serial Number
Use these numbers in any correspondence or service calls concerning your portable washer.
If you received a damaged portable washer, immediately contact the dealer (or builder) that sold you the portable washer.
Save time and money. Before you call for service, check the Troubleshooting Guide. It lists causes of minor operating problems that you can correct yourself.
IF YOU NEED SERVICE
We're proud of our service and want you to be pleased. If for some reason you are not happy with the service you receive, here are some steps to follow for further assistance.
FIRST, contact the people who serviced your portable washer. Explain why you are not pleased. In most cases, this will solve the problem.
NEXT, if you are still not pleased, write all the details, including your telephone number, and send it to:
Customer
Service
Avanti Products
10880 NW 30 Street
Miami, FL 33172 USA
PARTS & FEATURES
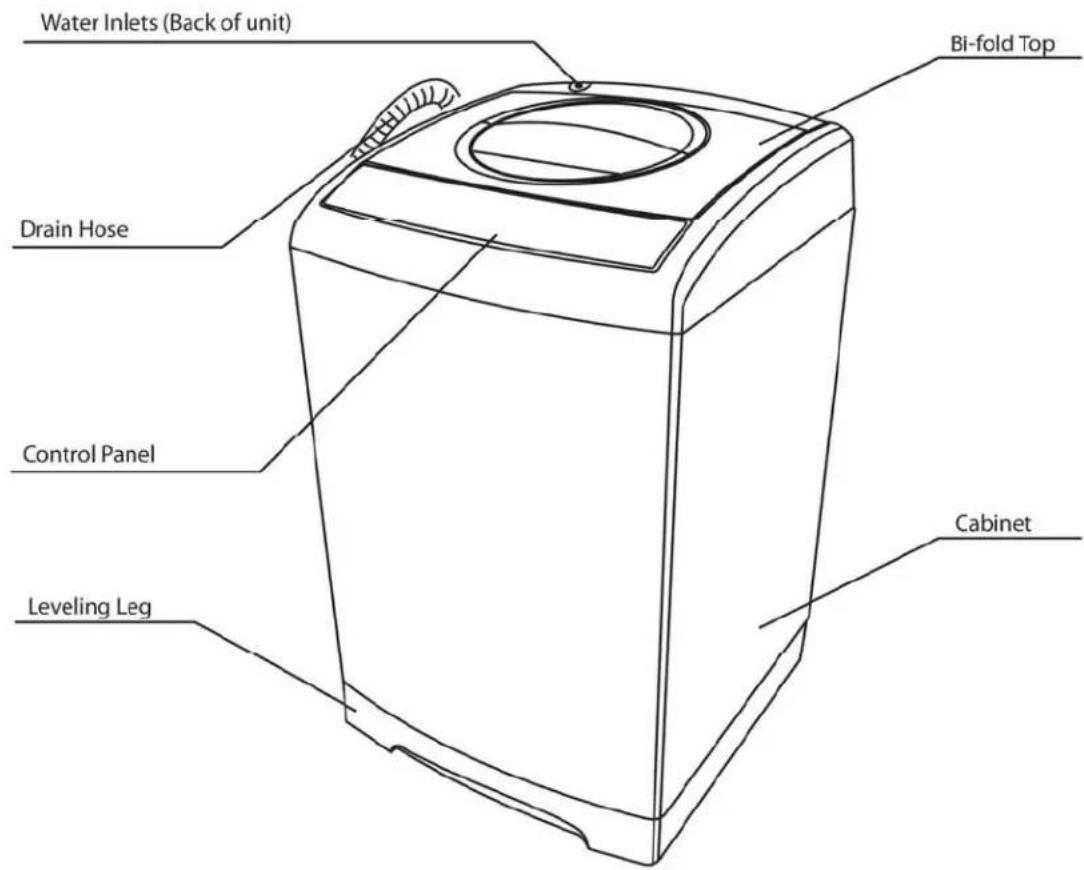
IMPORTANT SAFETY INSTRUCTIONS
| WARNING | To reduce the risk of fire, electrical shock, or injury when using your portable washer, follow these basic precautions: |
| Read all instructions before using the portable washer.Do not wash articles that have been previously cleaned in, washed in, soaked in, or spotted with gasoline, dry-cleaning solvents, or other flammable or explosive substances, as they give off vapors that could ignite or explode.Do not add gasoline, dry-cleaning solvents, or other flammable or explosive substances to the wash water. These substances give off vapours that could ignite or explode.Under certain conditions, hydrogen gas may be produced in a hot-water system that has not been used for 2 weeks or more. HYDROGEN GAS IS EXPLOSIVE. If the hot-water system has not been used for such a period, before using a washing machine, turn on all hot-water faucets and let water flow from each for several minutes. This will release any accumulated hydrogen gas. As the gas is flammable, do not smoke or use an open flame during this time.DANGER or WARNING: Risk of child entrapment.Child entrapment and suffocation are not problems of the past. Junked or abandoned appliances are still dangerous . . . even if they will “just sit in the garage a few days.”Before you throw away your old portable washer: Take off the lid.Never allow children to operate, play with, or crawl inside the portable washer. Close supervision of children is necessary when the washer is used near children.Do not reach into the washer if the agitator or inner tub is moving.Do not tamper with controls.Do not repair or replace any part of the washer or attempt any servicing unless specifically recommended in the user-maintenance instructions or in published user-repair instructions.Never clean portable washer parts with flammable fluids. The fumes can create a fire hazard or explosion.Do not place the washer in steamy rooms or where the washer is directly exposed to rain.Moisture may destroy the electrical insulation causing an electrical shock hazard.Do not store, use gasoline, or any other flammable vapors and liquids in the vicinity of this or any other portable washer. The fumes can create a fire hazard or explosion.If the power cord is damaged, it must be replaced by the manufacturer or its service agent or a similar qualified person in order to avoid a hazard.-Save these instructions- | |

WARNING

This appliance is not intended for use by persons (including children) with reduced physical, sensory, or mental capabilities.
This appliance should not be operated by those with a lack of experience or knowledge of its use or operation, unless they have been given instructions concerning and/or are supervised during the use of the appliance by a person responsible for their safety.
This appliance is not intended for use by children. To avoid any possible type of injury or damage to the unit and or personal property all children should be supervised to ensure they do not play with the appliance.
INSTALLATION INSTRUCTIONS
BEFORE USING YOUR PORTABLE WASHER
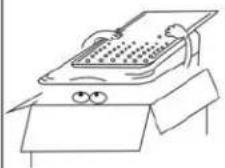
- Remove the exterior and interior packing.
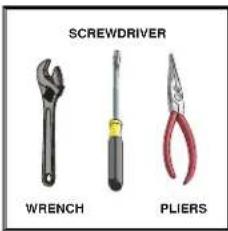
- You will need the following tools:
Wrench
- Pliers
- Screwdriver
- Check to be sure you have all of the following parts:
-
2 Inlet Hoses
• 1 Faucet Adapter
• 1 Noise Proof Plate With Screws
• 1 Drain Hose Assembly
• 1 Water Inlet Plug -
Remove shipping brace. Note - It should be saved and used (to prevent damage to washer components) whenever washer is moved or transported to a new location.
- Clean the interior surface with lukewarm water using a soft cloth.
- Allow 2 inches of space between the back and sides of the appliance.
- Put your laundry into the washer evenly. Uneven laundry may cause noise or vibration.
- DO NOT use excessively hot water (122°F / 50°C or more). Plastic parts may be deformed or damaged. Also, clothing may be deformed or bleached.
- Before washing, check all pockets. If nails or pins remain in pockets, they may damage the washer or clothes.
- Never splash water on the control panel.
- Plug the washer into an exclusive properly installed-grounded wall outlet. Do not under any circumstances cut or remove the third (ground) prong from the power cord. Any questions concerning power and/or grounding should be directed toward a certified electrician or an Authorized Avanti Products service center.
SELECTING A LOCATION
Before you install the portable washer, select a location with the following characteristics:
- A hard level surface (if the surface is uneven, see Adjusting The Adjustable Foot section on the next page).
- Away from direct sunlight. Direct sunlight may affect the acrylic coating, plastic and electrical components.
- Adequate ventilation.
- Away from sources of heat such as coal or gas. Make sure that the washing machine does not stand on its power cord.
- Ventilation openings must not be obstructed by carpeting when the portable washer is installed on a carpeted floor. It is recommended that you place your portable washer on a hard material floor such as tile, concrete, linoleum and to avoid if at all possible placement on wooden floors or carpeted areas.
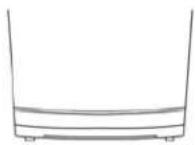
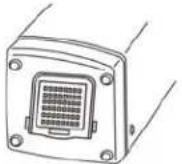
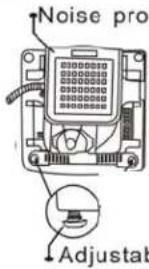
| Take the noise proof plate out of the package | The opening of the noise proof plate is at the bottom of the machine | Lay down the machine and insert the noise proof plate into the washing machine base | of plate |
 |  |  |  ple foot ple foot |
Affix the noise proof plate by using the two screws provided.
CONNECTING THE WATER SUPPLY HOSES
The water supply hose must be connected to the washing machine at one end and to the water faucet at the other. Do not stretch the water supply hose. If the hose is too short and you do not wish to move the water faucet, replace the hose with a longer, high-pressure hose.
Select appropriate faucet as shown in the figures below. If none of these faucets are available, use the faucet adapter provided.
The end of faucet spout should be longer than 10mm (0.4"), or the connector cannot be fixed properly. Water leakage could develop.
1. Connect the water inlet hose to the faucet by turning the connecting nut.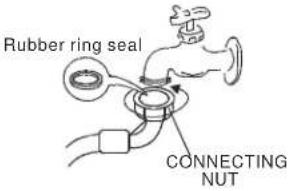 Be sure a rubber ring is inside the connecting nut. Be sure a rubber ring is inside the connecting nut. | 2. Then connect the other end of water inlet hose to the cold connector in water mixing valve by turning the connecting nut.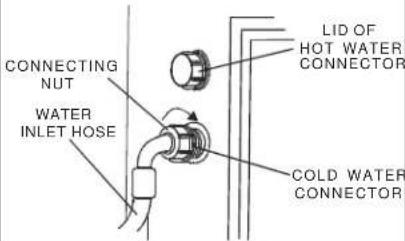 |
If you have both cold and hot water supplied, connect the inlet hoses by matching cold to cold and hot to hot.
| 1. Connect the water inlet hoses to the faucets by turning the connecting nuts. | |
| 2. Unscrew the lid of hot water connector in water mixing valve, and then connect the other end of water inlet hoses to the connectors in water mixing valve by turning the connecting nuts. | |
| Be sure the rubber rings are inside the connecting nuts. |
SINK FAUCET CONNECTION
For normal kitchen-sink tap only use the inlet hose with cold water inlet.
Connect the inlet hose to the male hose thread adapter by turning it clockwise to be fixed tightly.
Make sure to insert the rubber ring enclosed. Then connect tightly to your sink.
Note: Some faucets may require you to also use the female hose thread adapter between the male adapter and your sink faucet as shown below. Make sure the rubber ring is inserted and connect to your sink.
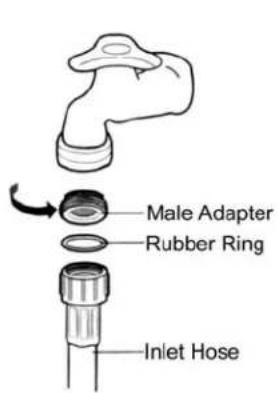
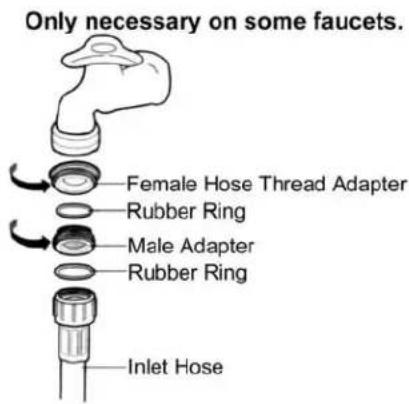
If water leaks from faucet connection or washer connection, turn off water and tighten fully using a wrench. Be careful not to over tighten and damage water connection. Turn on water supply and make sure no leaks are present.
DISCONNECTING THE WATER SUPPLY HOSES
Dismantling the hose directly may cause water to splash due to the possible high water pressure in the hose, even after the faucet has been turned off. Please take off the hose as per following steps, even if the faucet is closed:
- Turn off the faucet.
- Turn on the power and let the machine run for about 5 seconds then turn it off.
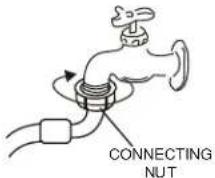
- Remove the connecting nuts from the faucet and washing machine.
Note: If the washing machine is frequently used, it is not necessary to dismantle the inlet hose to avoid possible damage to the screws.
POSITIONING THE DRAIN HOSE
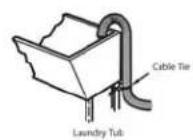
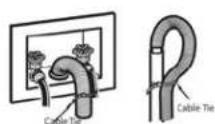
Connect the drain hose to the water outlet of the washing machine then fasten it with the included spring clamp. Since only up drainage is available, drain hose can be hung in the basin or bathtub.
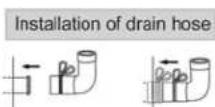
NOTE: The highest point of the drain hose must be in the height of 2.25 – 4 feet above floor level, otherwise, the washer cannot work normally.
Warning
Improper use of the grounded plug can result in the risk of electrical shock. If the power cord is damaged, have it replaced by an authorized Avanti Products service center.
This appliance should be properly grounded for your safety. The power cord of this appliance is equipped with a three-prong plug which mates with standard three prong wall outlets to minimize the possibility of electrical shock.
Do not under any circumstances cut or remove the third ground prong from the power cord supplied. For personal safety, this appliance must be properly grounded.
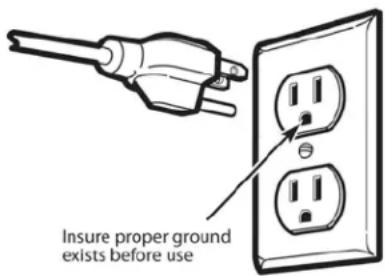
This appliance requires a standard 115/120 Volt AC \~/60Hz
electrical ground outlet with three-prong. Have the wall outlet and circuit checked by a qualified electrician to make sure the outlet is properly grounded. When a standard 2-prong wall outlet is encountered, it is your responsibility and obligation to have it replaced with a properly grounded 3-prong wall outlet.
The cord should be secured behind the appliance and not left exposed or dangling to prevent accidental injury.
The appliance should always be plugged into its own individual electrical outlet which has a voltage rating that matches the rating label on the appliance. This provides the best performance and also prevent overloading house wiring circuits that could cause a fire hazard from overheated. Never unplug the appliance by pulling the power cord. Always grip the plug firmly and pull straight out from the receptacle. Repair or replace immediately all power cords that have become frayed or otherwise damaged. Do not use a cord that shows cracks or abrasion damage along its length or at either end. When moving the appliance, be careful not to damage the power cord.
EXTENSION CORD
Because of potential safety hazards under certain conditions, it is strongly recommended that you do not use an extension cord with this appliance. However, if you must use an extension cord it is absolutely necessary that it be a UL/CUL-Listed, 3-wire grounding type appliance extension cord having a grounding type plug and outlet and that the electrical rating of the cord be 115 volts and at least 10 amperes.
SURGE PROTECTOR
Most electrical appliances use a series of electric control boards to operate. These boards are very susceptible to power surges and could be damaged or destroyed.
If the appliance is going to be used in an area or if your city / country is prone to power surges / outages; it is suggested that you use a power surge protector for all electrical devices / appliances you use. The surge protector that you select must have a surge block high enough to protect the appliance it is connected to. If you have any questions regarding the type and size of surge protector needed contact a licensed electrician in your area.
Damages due to power surges are not considered a manufacturer covered defect and will void your product warranty.
CONTROL PANEL
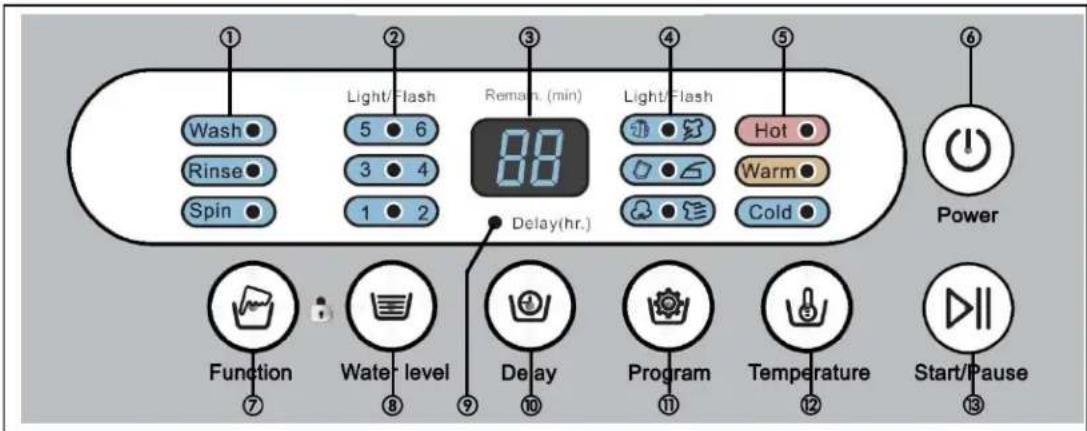
| 1 | CYCLE INDICATOR LIGHTS |
| 2 | WATER LEVEL SELECTION INDICATOR LIGHTS |
| 3 | ELECTRONIC DISPLAY |
| 4 | WASH PROGRAM SELECTION INDICATOR LIGHTS |
| 5 | WATER TEMPERATURE SELECTION INDICATOR LIGHTS |
| 6 | POWER ON / OFF BUTTON |
| 7 | FUNCTION SELECTOR BUTTON |
| 8 | WATER LEVEL SELECTOR BUTTON |
| 9 | DELAY WASH PROGRAM INDICATOR LIGHT |
| 10 | DELAY WASH PROGRAM SELECTOR BUTTON |
| 11 | WASH PROGRAM SELECTOR BUTTON |
| 12 | WATER TEMPERATURE SELECTOR BUTTON |
| 13 | START / PAUSE SELECTOR BUTTON |
| 1. Connect the water inlet hose to the water faucet. Don't switch on the power if the water pressure is lower than 0.05MPa and higher than 0.5MPa.2. Ensure the drain hose has been installed properly. | 3. Insert the plug into the socket. For safety the plug should have ground connection.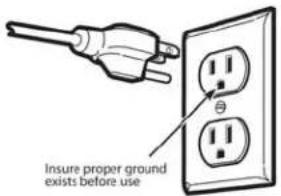 | 4. Insert the end of drain hose into the hook shelf, and hang the drain hose over a drain outlet.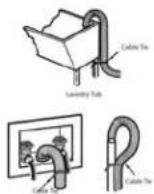 5. Open the water faucet. 5. Open the water faucet.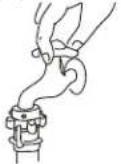 |
6. Put the wash load into the tub evenly.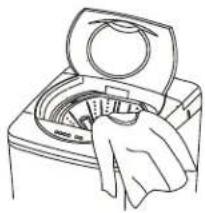 | 7. Add the suitable quantity detergent into the detergent case.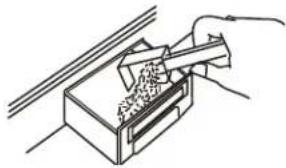 | 8. Close the lid. Otherwise the washer will not wash or spin, and alarm will sound.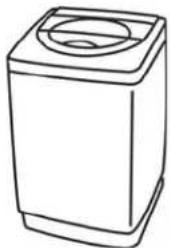 |
BEFORE WASHING
Prepare the wash load. Mix large and small articles in a load to get the best washing results. Drop articles loosely into the inner tub. Do not pack articles in or wrap them. Articles should move freely through the wash water for best cleaning results. Articles should rollover, sink and then reappear.
When washing very large articles, do not fill inner tub as full as with other loads. The water level in your washer should fit the size of your wash load. Small load will use lower water levels. There must be enough water in the inner tub to allow articles to move and turn over freely. Overloading the inner tub can result in poor washing and rinsing. Overloading may also cause wrinkling and tearing of articles.
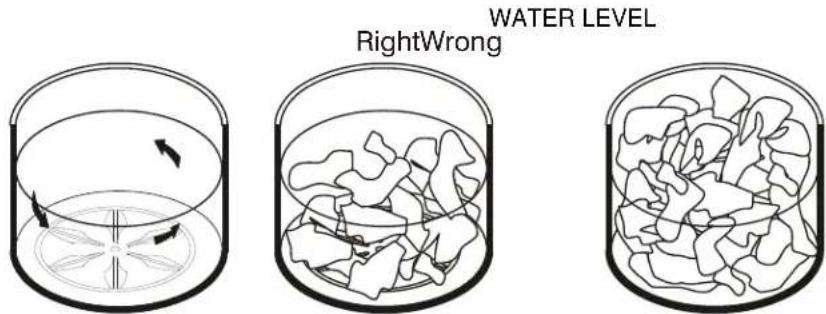
Make sure that you follow all manufacturer instructions for washing:
GUIDE TO APPAREL/TEXTILE CARE SYMBOLS
 Wash Wash | Machine Wash Cycles |  |  |  |  Hand Wash Hand Wash | Warning Symbols for Laundering | ||||
| Normal | Permanent Press | Delicate/Gentle |  Do Not Wash Do Not Wash | |||||||
| Water Temperatures | (Maximum) | (200F) | (160F) | (140F) | (120F) | (105F) | (65F-85F) |  Do Not Bleach Do Not Bleach | ||
| Symbol(s) | 95C | 70C | 60C | 50C | 40C | 30C | ||||
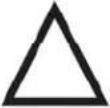 Bleach Bleach |  |  |  Do Not Dry (used with Do Not Wash) Do Not Dry (used with Do Not Wash) | |||||||
| Any Bleach When Needed | Only Non-Chlorine Bleach When Needed |  Do Not Iron Do Not Iron | ||||||||
 Dry Dry | Tumble Dry Cycles |  |  |  |  Line Dry/Hang to Dry Line Dry/Hang to Dry | Additional Instructions (in Symbols or Words) | ||||
| Normal | Permanent Press | Delicate/Gentle |  Do Not Wring Do Not Wring | |||||||
| Tumble Heat Settings |  |  | [TK05] |  | [DD0D] | Drip Dry |  Do Not Tumble Dry Do Not Tumble Dry | |||
| Any Heat | High | Medium | Low | No Heat/Air | [HBT3]Dry Flat |  In the shade (added to line dry, drip dry, or dry flat) In the shade (added to line dry, drip dry, or dry flat) | ||||
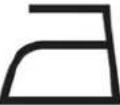 Iron Iron | Iron-Dry or Steam | [CK0X] |  | [DO8C] | [XXYE]No Steam (added to iron) | |||||
| Maximum Temperatures | 200C(390F)High | 150C(300F)Medium | 110C(230F)Low | |||||||
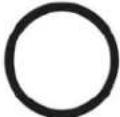 Dryclean Dryclean | Dryclean - Normal Cycle | Dryclean - Additional Instructions | ||||||||
 | [5048] |  |  |  |  |  | [DOT4] | |||
| Any Solvent Trichloroethylene | Any Solvent Except Petroleum Solvent Only | Do Not Dryclean | Short Cycle | Reduced Moisture | Low Heat | No Steam Finishing | ||||
OPERATING INSTRUCTIONS
PRESS THE POWER BUTTON.
PRESS THE WATER LEVEL BUTTON.
Choose appropriate water level according to wash load quantity.
WATER TEMPERATURE CHOICE.
Press the water temperature selection button, you can choose from cold, warm, and/or hot water.
NOTE: The washer will provide a cold rinse in all TEMPERATURE settings.
| Indicator Light Shown | Description |
| COLD | When the “COLD” indicator light is ON, it means the washing machine will only use water supplied by the cold water inlet. |
| HOT | When the “HOT” indicator light is ON, it means the washing machine will only use water supplied by the hot water inlet |
| WARM | When both the “WARM” indicator light is ON, it means the washing machine will use water supplied by both the cold and hot water inlets |
IMPORTANT: A single cold hose system does not allow the washing machine to automatically (select) regulate incoming water temperatures to match those listed on the control panel such as WARM or HOT.
PRESS THE FUNCTIONS SELECTION BUTTON.
Choose the desired function and then the corresponding indicator blink.
PRESS DOWN START/PAUSE BUTTON ONCE AND THE MACHINE WILL BEGIN OPERATION.
Please press this button to stop the normal operation, if it continues to work, press it again.
Water level can be reset during the normal operation. If the higher water level is selected, the machine will operate after refilling the water level selected.
MANUAL FUNCTIONS SELECTION (CUSTOM WASHING CYCLE)
WASH ONLY (Approximately 14 minutes)
- Press down the power button.
- Press the cycle button to until only the WASH indicator is ON.
- Press the water temp button to select the water temperature.
- Press the water level button to select the appropriate water level setting.
- Press the START/PAUSE to start the course. And the LED display will show the remaining time of the entire course.
WASH AND RINSE (Approximately 34 minutes)
- Press down the power button.
- Press the cycle button until the WASH & RINSE indicators are ON.
- Press the water temp button to select the water temperature.
- Press the water level button to select the appropriate water level setting.
- Press the START/PAUSE to start the course. And the LED display will show the remaining time of the entire course.
RINSE AND SPIN (Approximately 28 minutes)
- Press down the POWER button.
- Press the cycle button until the RINSE & SPIN indicators are ON.
- Press the water level button to select the appropriate water level setting.
- Press the START/PAUSE to start the course. And the LED display will show the remaining time of the entire course.
SPIN ONLY (Approximately 8 minutes)
- Press down the power button.
- Press the cycle button to select the SPIN function until only SPIN indicator is ON.
- Press the START/PAUSE to start the course. And the LED display will show the remaining time of the entire course.
AUTOMATIC WASH PROGRAMS
NORMAL – For normal laundry (Approximately 42 Minute cycle).
- Press the power button.
- Press the program button to select the NORMAL program until the NORMAL indicator is ON. (NORMAL is the default program)
- Press the water temp button to select the water temperature. (The default setting is cold water).
- Press the water level button to select the appropriate water level setting. (The default water level is 4 water level)
- Press the START/PAUSE to start the course. And the LED display will show the remaining time of the entire course.
QUICK – For light dirty laundry (Approximately 10 Minute cycle).
- Press down the power button.
- Press the program button to select the QICK program until the QUICK indicator is ON.
- Press the water temp button to select the water temperature.
- Press the water level button to select the appropriate water level setting.
- Press the START/PAUSE to start the course. And the LED display will show the remaining time of the entire course.
ANTI-WRINKLE – For delicate laundry (Approximately 34 Minute cycle).
- Press down the power button.
- Press the program button to select the ANTI-WRINKLE program until the ANTI-WRINKLE indicator is ON.
- Press the water temp button to select the water temperature.
- Press the water level button to select the appropriate water level setting.
- Press the START/PAUSE to start the course. And the LED display will show the remaining time of the entire course.
JEANS – For blue jeans / denim laundry (Approximately 42 Minute cycle).
- Press down the power button.
- Press the program button to select the JEANS program until the JEANS indicator is ON.
- Press the water temp button to select the water temperature.
- Press the water level button to select the appropriate water level setting.
- Press the START/PAUSE to start the course. And the LED display will show the remaining time of the entire course.
COTTON – For extremely dirty laundry (Approximately 39 Minute cycle).
- Press down the power button.
- Press the program button to select the COTTON program until the COTTON indicator is ON.
- Press the water temp button to select the water temperature.
- Press the water level button to select the appropriate water level setting.
- Press the START/PAUSE to start the course. And the LED display will show the remaining time of the entire course.
AIR DRY – Use to spin the laundry dry (Approximately 60 Minute cycle).
- Press down the power button.
- Press the program button to select the AIR DRY program until the AIR DRY indicator is ON.
- Press the START/PAUSE to start the course. And the LED display will show the remaining time of the entire course.
Close the lid, or the washing machine will buzz during wash and spin cycle.
In the event the clothing loaded becomes unbalanced, the safety switch will be triggered causing the washing machine to automatically refill with water to adjust the imbalance.
Note:
• Clothes easily discolored should be washed separately so as to prevent inter-dyeing.
- If you want to change a selected program, press the POWER button first to turn the unit off, then press the POWER button again to turn the unit back on, then press the Program button to select the new cycle before pushing START/PAUSE button.
- When the Rinse and Spin functions are ON, do not use detergent.
- If you want to drain the water during washing, press the POWER button first to turn the unit off, then press the POWER button again to turn the unit back on, then select the Rinse program. Press START/PAUSE button again to restart.
DELAY START (PRESET) SETTING
Select this option when you would like to load the washer but not run the wash cycle until a later time. Note:
As washing machines and other appliances are considered to present a potential child entrapment danger; you should never run a wash cycle when you are not present for either the entire or major portion of the cycle.
- Press down the power button.
- Load the washing machine and select the appropriate wash program.
- Press DELAY button continuously to select the delay start time. (From 1 hour to 48 hours)
- Close the lid completely.
- Press START/PAUSE button to start the course.
AUTO-LOCKING LID
Your washing machine is equipped with a safety setting that will lock the lid to prevent the lid from being opened during operation.
For your protection the lid will be automatically locked once you press the START/PAUSE button to start a wash cycle.
At the end of the selected wash program the lid will automatically unlock and allow access to the clothes being washed.
If at any time you need to add or remove an article from the washer after the lid lock has been engaged, you must turn the unit off or press and hold the START/PAUSE button until the door lock is released, wait for the lock to disengage, add or remove the item and then start the wash program from the beginning.
CHILD SAFETY LOCK
If you have small children, it is recommended that you activate this setting every time you use the washing machine as children can be attracted to and enticed to play with the washing machine.
- Select the desired washing program as described previously in this manual
- Select the appropriate program and press START/PAUSE button to start the washing machine.
- Press and hold both the FUNCTION and WATER LEVEL buttons until you heard a "BEEP" sound and "CL" is displayed on the electronic display.
- The "CL" indicator and remaining wash time will display intermittently.
- To de-activate the child lock function simply press and hold the FUNCTION and WATER LEVEL buttons again.
CARE AND MAINTENANCE
CLEANING YOUR PORTABLE WASHER
- Clean the surface of your portable washer regularly with soft fabric.
- Clean the inner tub regularly, especially immediately after starch or bleach operation.
- Clean the filter in the inlet valve or inlet hose regularly in order to prevent it from clogging.
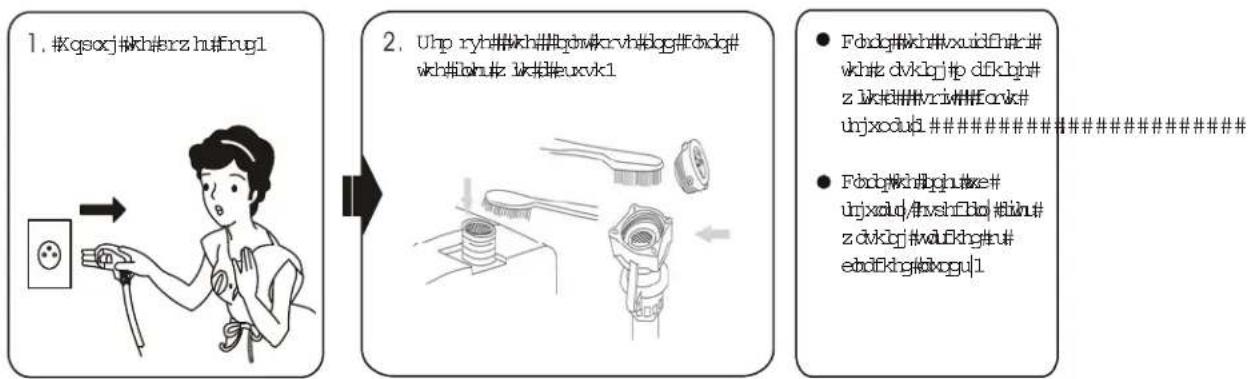
flowchart
graph LR
    A["1. #Kqsoj#kh#rz hufug1"] --> B["2. Uh# ryh##kh##bmv#rvh#dog#fodg#wkh#loh#zlk#eucvk1"]
    B --> C["3. Fndg#vh#vxuidflnk#whhz dvklqj#p dfkigh#zlk#l##vrM##ank#unjxoduj##########<br>4. Fndg#vh#ghn#ze#unjxadq/#vshfdoj#bin#zdvkgj#wuBdhgn#ebdfkhg#koguj1"]
- Clean the lint filter.
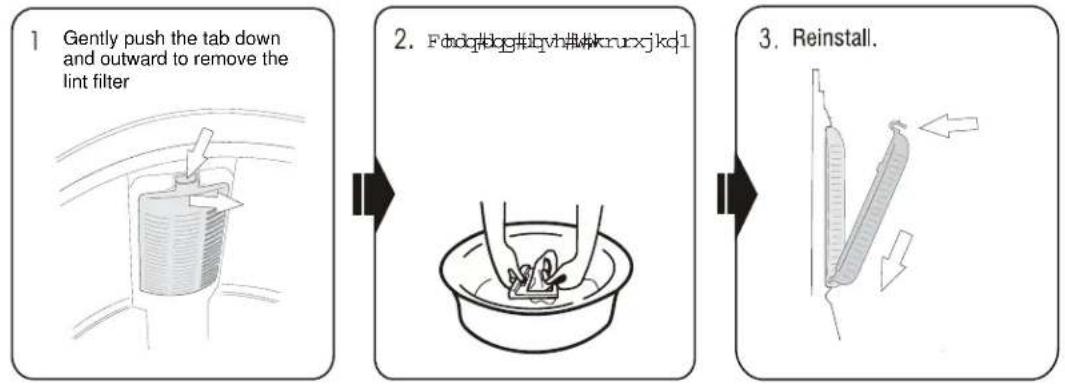
flowchart
graph LR
    A["1 Gently push the tab down and outward to remove the lint filter"] --> B["2. Fdodg#dog#lbyh#knruxjkcl"]
    B --> C["3. Reinstall."]
- Vacation time
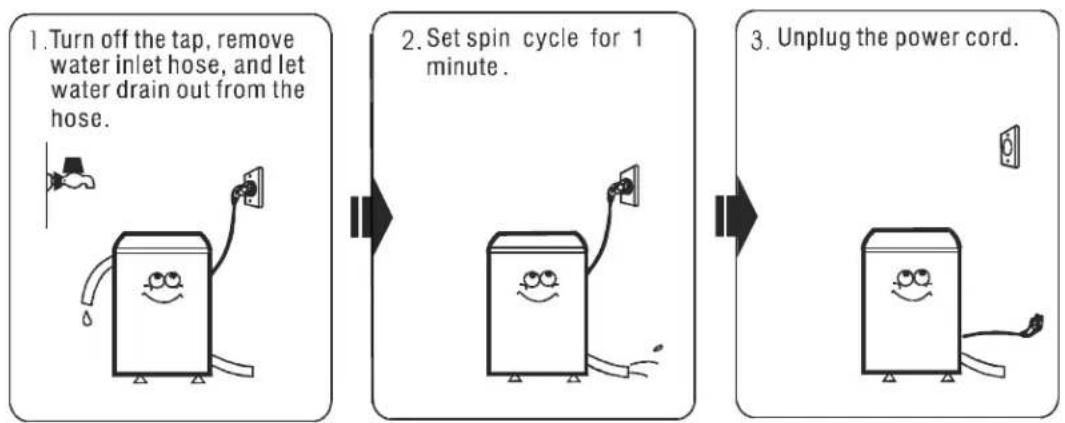
flowchart
graph LR
    A["1. Turn off the tap, remove water inlet hose, and let water drain out from the hose."] --> B["2. Set spin cycle for 1 minute."]
    B --> C["3. Unplug the power cord."]
PROBLEMS WITH YOUR PORTABLE WASHER?
You can solve many common portable washer problems easily, saving you the cost of a possible service call. Try the suggestions below to see if you can solve the problem before calling the servicer.
TROUBLESHOOTING GUIDE
| PROBLEM | POSSIBLE |
| Washer does not operate. | Not plugged in.The circuit breaker tripped or a blown fuse.The lid is not closed.Make sure the water source is turned on. |
| No water or insufficient water supply. The water source faucet is not turned on.The water source hose is frozen.The water intake hose is bent.The filter on the water intake hose is clogged. | |
| The washing machine does not drain. The drain hose is squashed or bent. | |
| Washing machine vibrates or is too noisy. | Check to assure that the washer is level.The washing machine is touching another object.The laundry load is not balanced. |
| Washing machine does not spin. The lid is not closed.The washer is not on a level surface. | |
| Display shows Error Code “E 1”Description: Malfunction in the Water Supply Valve | No water,Water supply valve time-out,Water valve is clogged. |
| Display shows Error Code “E 3”Description: Unit is unbalanced. | Unit becomes unbalanced during operation.Stop the unit, shift the load evenly, restart. |
| Display shows Error Code “E 4”Description: Malfunction of the Water Drain pump. | Water drain pump malfunctioned. |
| Display shows Error Code “E 6”Description: Top Cover is OpenDescription: Door Lock malfunction | During operation the top is open.Close the top.Door lock has malfunctioned. |
CAUSE
SERVICE FOR YOUR PORTABLE WASHER
We are proud of our customer service organization and the network of professional service technicians that provide service on your Avanti portable washers. With the purchase of your Avanti portable washer, you can be confident that if you ever need additional information or assistance, the Avanti Products Customer Service Team will be here for you. Just call us toll-free.
AVANTI PRODUCTS CUSTOMER SERVICES
| Product Information800-323-5029 | Whatever your questions are about our products, help is available. |
| Part Orders800-220-5570 | You may order parts and accessories that will be delivered directly to your home by personal check, money order, Master Card, or Visa. |
| In-Home Repair Service800-220-5570 | An Avanti Products authorized service center will provide expert repair service, scheduled at a time that is convenient for you. Our trained servicers know your portable washer inside and out. |
| YOUR AVANTI PRODUCTSWARRANTY | Staple your sales receipt here. Proof of original purchase date is needed to obtain service under warranty. |
| WHAT IS COVERED - LIMITED ONE-YEAR WARRANTYAvanti Products warrants that the product is free from defects in materials and/or workmanship for a period of twelve (12) months from the date of purchase by the original owner. The foregoing timeline begins to run upon the date of purchase, and shall not be stalled, tolled, extended, or suspended for any reason whatsoever unless described in detail in the warranty document. For one year from the date of purchase by the original owner, Avanti products will, at its option, repair or replace any part of the product which proves to be defective in material or workmanship under normal use. Avanti Products will provide you with a reasonably similar product that is either new or factory refurbished. During this period Avanti Products will provide all parts and labor necessary to correct such defects free of charge, so long as the product has been installed and operated in accordance with the written instructions in this manual. In rental or commercial use, the warranty period is 90 days. All Avanti appliances of 3.5 cubic feet capacity or less must be brought/sent to the appliance service center for repair. | |
| LIMITED FIVE YEAR WARRANTY ON PLASTIC TUBAfter one year and until five years from the date of purchase, Avanti Products will furnish a replacement plastic tub, for one which is defective in material or workmanship. All labor and transportation charges are the responsibility of the consumer.LIMITED SEVEN YEAR WARRANTY ON STAINLESS STEEL TUBAfter one year and until seven years from the date of purchase, Avanti Products will furnish a replacement plastic tub, for one which is defective in material or workmanship. All labor and transportation charges are the responsibility of the consumer. | |
| WARRANTY EXCLUSIONS / WHAT IS NOT COVERED:The warranty coverage described herein excludes all defects or damage that are not the direct fault of Avanti Products, including without limitation, one or more of the following: | |
| A failure to comply with any applicable state, local, city, or county electrical, plumbing and/or building codes, regulations, or laws, including failure to install the product in strict conformity with local fire and building codes and regulations.Any external, elemental and/or environmental forces and factors, including without limitation, rain, wind, sand, floods, fires, mud slides, freezing temperatures, excessive moisture or extended exposure to humidity, lightning, power surges, structural failures surrounding the appliance, and acts of God. | |
| Shipping and handling costs associated with the replacement of the unit.Repairs performed by unauthorized servicers.Service calls that are related to external problems, such as abuse, misuse, inadequate electrical power, accidents, fire, floods, or any other acts of God. | Failure of the product if it is used for other than it intended purpose.The warranty does not apply outside the Continental USA.Surcharges including but not limited to, any after hour, weekend, or holiday service calls, tolls, ferry trip charges, or mileage expense for service calls to remote areas. |
| In no event shall Avanti Products have any liability or responsibility whatsoever for damage to surrounding property, including cabinetry, floors, ceilings, and other structures and/or objects around the product. Also excluded from this warranty are scratches, nicks, minor dents, and other cosmetic damages on external surfaces and exposed parts; Products on which the serial numbers have been altered, defaced or removed; service visits for customer education, or visits where there is nothing wrong with the product; correction of installation problems (you are solely responsible for any structure and setting for the product, including all electrical, plumbing and/or other connecting facilities, for proper foundation/flooring, and for any alterations including without limitation cabinetry, walls, floors, shelving etc., as well as the resetting of breakers or fuses. | |
| OUT OF WARRANTY PRODUCTAvanti Products is under no obligation, at law or otherwise, to provide you with any concessions, including repairs, pro-rates, or product replacement, once this warranty has expired.Warranty - Washing Machines | |
Thank you for purchasing this fine Avanti product. Please fill out this form and return it to the following address within 100 days from the date of purchase and receive these important benefits:
Avanti Products, A Division of The Mackle Co., Inc.
P.O.Box 520604 - Miami, Florida 33152
Protect your product:
We will keep the model number and date of purchase of your new Avanti product on file to help you refer to this information in the event of an insurance claim such as fire or theft.
➢ Promote better products:
We value your input. Your responses will help us develop products designed to best meet your future needs.
-(detach here)
Avanti Registration Card
| Name Model # Serial # | |
| Address Date Purchased Store / Dealer Name | |
| City State Zip E-mail Address | |
| Area Code Phone Number Occupation | |
| Did You Purchase An Additional Warranty As your Primary Residence, Do You: | |
| □ Extended □ Own □ Rent□ None | |
| Reason for Choosing This Avanti Product: Please indicate the most important factors That influenced your decision to purchase this product: | |
| □ Price □ Product Features □ Avanti Reputation □ Product Quality □ Salesperson Recommendation □ Other: □ Friend / Relative Recommendation □ Warranty □ Other: | |
| □ Price □ Product Features □ Avanti Reputation □ Product Quality □ Salesperson Recommendation □ Other: □ Friend / Relative Recommendation □ Warranty □ Other: | |
| □ Price □ Product Features □ Avanti Reputation □ Product Quality □ Salesperson Recommendation □ Other: □ Friend / Relative Recommendation □ Warranty □ Other: | |
| □ Price □ Product Features □ Avanti Reputation ▢ Product Quality ▢ Salesperson Recommendation ▢ Other: ▢ Friend / Relative Recommendation ▢ Warranty ▢ Other: | |
| □ Price □ Product Features □ Avanti Reputation ▢ Product Quality ▢ Salesperson Recommendation ▢ Other: ▢ Friend / Relative Recommendation ▢ Warranty ▢ Other: |
W711 - VER3.0-10312011 PRINTED IN CHINA
- TABLE OF CONTENTS
- APPLIANCE SAFETY
- DANGER
- WARNING
- CAUTION
- IMPORTANT SAFEGUIDES
- HELP US HELP YOU...
- Read this guide carefully.
- Avanti Customer Service 800-220-5570
- Write down the model and serial numbers.
- IF YOU NEED SERVICE
- PARTS & FEATURES
- INSTALLATION INSTRUCTIONS
- BEFORE USING YOUR PORTABLE WASHER
- SELECTING A LOCATION
- CONNECTING THE WATER SUPPLY HOSES
- SINK FAUCET CONNECTION
- DISCONNECTING THE WATER SUPPLY HOSES
- POSITIONING THE DRAIN HOSE
- EXTENSION CORD
- SURGE PROTECTOR
- CONTROL PANEL
- BEFORE WASHING
- OPERATING INSTRUCTIONS
- PRESS THE WATER LEVEL BUTTON.
- WATER TEMPERATURE CHOICE.
- PRESS THE FUNCTIONS SELECTION BUTTON.
- PRESS DOWN START/PAUSE BUTTON ONCE AND THE MACHINE WILL BEGIN OPERATION.
- MANUAL FUNCTIONS SELECTION (CUSTOM WASHING CYCLE)
- WASH ONLY (Approximately 14 minutes)
- WASH AND RINSE (Approximately 34 minutes)
- RINSE AND SPIN (Approximately 28 minutes)
- AUTOMATIC WASH PROGRAMS
- Note:
- DELAY START (PRESET) SETTING
- AUTO-LOCKING LID
- CHILD SAFETY LOCK
- CARE AND MAINTENANCE
- CLEANING YOUR PORTABLE WASHER
- PROBLEMS WITH YOUR PORTABLE WASHER?
- SERVICE FOR YOUR PORTABLE WASHER
- Protect your product:
- ➢ Promote better products:
Brand : Avanti
Model : W711
Category : Washing machine