Pana 81T - Monitor Jupiter - Free user manual and instructions
Find the device manual for free Pana 81T Jupiter in PDF.

| Product Type | Monitor |
| Brand | Jupiter |
| Model | Pana 81T |
| Screen Size (Diagonal) | 27 inches |
| Panel Type | IPS |
| Resolution | 1920 x 1080 (Full HD) |
| Refresh Rate | 75 Hz |
| Response Time | 5 ms (GTG) |
| Brightness | 300 cd/m² |
| Contrast Ratio | 1000:1 (Static) |
| Viewing Angles | 178° / 178° |
| Color Support | 16.7 million colors |
| Connectivity | 1x HDMI 1.4, 1x VGA, 1x Audio Out |
| Built-in Speakers | No |
| VESA Mount Compatible | Yes, 100 x 100 mm |
| Tilt Adjustment | -5° to 20° |
| Dimensions (with Stand) | 622 x 452 x 200 mm |
| Weight (with Stand) | 5.2 kg |
| Power Supply | External AC/DC adapter (100-240V, 50/60Hz) |
| Power Consumption (Typical) | 30 W |
| Power Consumption (Standby) | 0.5 W |
| Certifications | CE, FCC, RoHS |
Frequently Asked Questions - Pana 81T Jupiter
User questions about Pana 81T Jupiter
0 question about this device. Answer the ones you know or ask your own.
Ask a new question about this device
Download the instructions for your Monitor in PDF format for free! Find your manual Pana 81T - Jupiter and take your electronic device back in hand. On this page are published all the documents necessary for the use of your device. Pana 81T by Jupiter.
USER MANUAL Pana 81T Jupiter
natural_image
Abstract digital artwork with swirling colorful swirls and a central pink core, no text or symbols presentFebruary 8, 2024
A-PAN-001-01, Rev. C
Copyright © 2024 Jupiter Systems Inc. ("Jupiter"). This document is copyrighted with all rights reserved.
Jupiter Systems owns the copyright for this manual.
Use or reproduction of this manual in parts or entirety without the authorization of Jupiter Systems is prohibited.
The contents of this manual are subject to change without notice to improve quality.
Acknowledgments
Jupiter Systems® and Jupiter logo® are registered trademarks of Jupiter Systems. New Jupiter logo, Canvas™, Catalyst™, Fusion Catalyst™, Catalyst XL™, Catalyst V™, Catalyst 4K™, CRS-5K™, CRS-4K™, J4™, J100™, J400™, J600™, Zavus™, and Pana™ are trademarks of Jupiter Systems.
Microsoft, Windows are registered trademarks of Microsoft Corporation.
All non-Jupiter brands and names are the property of their respective owners.
Conventions Used in this Manual
Labels from the user Interface (UI) are bolded to make it easier to follow instructions. If you see a bolded word or set of words, look for the label in the UI. Where possible tabs and dialog boxes are named in instructions as markers so you know you are in the right place.
Jupiter Systems
31015 Huntwood Avenue
Hayward, CA 94544-7007
510-675-1000 (v)
Support Contact
info@jupiter.com
support@jupiter.com
510-675-1007 (v)
Table of Contents
CHAPTER 1. READ ME FIRST 1
1.1 Read Me First .... 1
1.2 Contents of Packaging 1
1.3 Handling Precautions 1
1.4 Cleaning 2
1.5 Receiving and Inspecting Shipment 3
1.5.1 Shipment Monitors 3
1.5.2 What To Do If Either or Both Shipment Monitors Are Triggered 3
1.5.3 Inspection Procedure 3
1.6 Unpack the Pana 4
1.7 Storage Considerations 5
1.8 Modifications to Product 5
1.9 Disposal of Product 5
CHAPTER 2. PANA 81T PRODUCT OVERVIEW 7
2.1 Features 7
2.2 Views of Your Pana 81T 8
2.2.1 Buttons & Remote Control 8
2.2.1.1 Effective Use of Remote 8
2.2.1.2 Batteries for Remote Control 9
2.2.2 Connectors 10
2.2.3 Speakers 11
2.3 Specifications 12
2.3.1 Screen & Touch Specifications 12
2.3.2 Connector Specifications 14
2.3.3 Audio Output Specifications 15
2.3.4 Physical & Environmental Specifications 16
CHAPTER 3. PANA 81T OPERATION 19
3.1 Buttons on Pana and Remote 19
3.2 Menus/Settings 21
3.2.1 Input (Remote) 21
3.2.2 Input (Display) 21
3.2.3 Picture 22
3.2.4 Colour 24
3.2.5 Audio 25
3.2.6 Advanced 25
3.2.7 Other 27
3.3 Input Capabilities and Cabling Considerations 27
3.4 Touch and Touchback 28
3.5 Using the Touch Screen 28
3.6 Image Retention and Burn-In 29
3.6.1 Issue 29
3.6.2 Recommendations 29
3.6.3 Resolutions 29
3.7 Aspect Ratio 30
CHAPTER 4. PANA 81T INSTALLATION 35
4.1 Installation Location 35
4.2 Electrical Precautions 35
4.3 Mounting Considerations 35
4.4 Mounting Dimensions 36
4.5 Table Mounting Option 37
4.5.1 Warnings 37
4.5.2 Ventilation 37
4.5.3 Internal Weight Bearing Structure 38
4.6 Recommended Mounting Systems 38
CHAPTER 5. PANA 81T WARRANTY & SUPPORT 39
5.1 Customer Support 39
5.1.1 Hardware Faults 39
5.1.2 Technical Assistance 39
5.1.3 Contact Information 39
5.2 Warranty 40
5.2.1 Warranty Period 40
5.2.2 Limited Warranty 40
5.2.3 Warranty Limitations 41
5.2.4 How Service is Handled 42
5.2.5 Additional Information Concerning Warranty Service 42
5.2.6 Pixel Functionality 42
Index 43
Congratulations on your purchase of the Pana Collaborative display!
Pana's 21:9 7 plus-foot wide Pana 81T interactive touch collaborative display canvas is a true focal piece of collaboration and visualization technology.
1.1 Read Me First
This user manual was created to help you get the most out of your display.
In addition to detailed descriptions of the display and its features, this manual will guide you through the installation and setup processes and best practices on how best to utilize the display.
We make every effort to ensure that this manual is accurate as of the date is printed. However, it may require periodic updating due to ongoing product improvements and customer feedback. Find the latest version of our manuals at Jupiter.com
1.2 Contents of Packaging
- Pana Display
- Remote Control & Batteries
- Power Cable
1.3 Handling Precautions
Handle the Pana Display Properly!
- At least two people are required to transport or lift the display, whether it is in its shipping container or not
- Do not tilt the display at an angle greater than 10 degrees from upright
• DO NOT PLACE THE DISPLAY FACE DOWN
• DO NOT SHAKE THE DISPLAY - Avoid touching the screen when moving the Pana
- The Pana 81T has been tested for and may be deployed face up, however you still must follow the Handling Precautions when transporting or otherwise moving the display.
- Use the handles on either end of the shipping box to lift
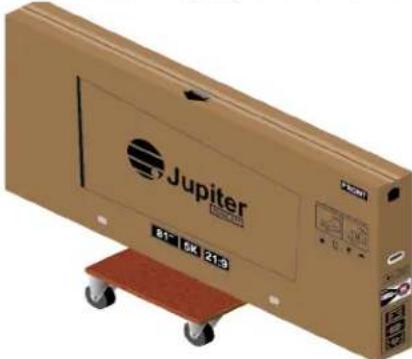
- When working with a Pana 105 D or T model, the consideration is not just size but weight. The eight foot long monitors weigh approximately 135 and 215 pounds (roughly 65 and 100Kg ) respectively. The nearly six and a half foot Pana 81T weighs about 115 pounds, and the 81D is nearly 80 pounds. The combination of length and weight means it is safer for at least two people to move them
Remember do not touch or put any pressure on the screen when moving the Pana!
• Always have the shipping container in an upright position. Do not tilt the shipping container more than 10 degrees from vertical
- When moving the Pana, it is recommended to keep the Pana within the shipping box and to use a padded furniture dolly. You will still need two people to maneuver the box and keep it upright
natural_image
Illustration of a Jupiter 81 SK (21:0) industrial cart with wheels and control panel (no text or symbols on the device itself)- Keep the Pana in the shipping container until ready to mount
- The shipping container has a tilt indicator and shock indicator which show whether the shipping container has been tilted or experience shock events during shipment. If either of the indicators have been triggered see the procedures in Section 1.5 Receiving and Inspecting Shipment for instructions how to proceed
1.4 Cleaning
- Do not clean the display with alcohol, solvents, or ammonia, as these could damage the display
- Never spray any liquid directly onto the screen
- Do not let any kind of liquid enter the display as it may cause electrical shock or damage
- Should the surface of the display become dirty, please wipe the surface lightly with a microfiber cloth
- If the surface requires additional cleaning, lightly moisten the cloth with deionized water as found in screen cleaning kits
- Should there be excess dirt and/or grease buildup, use a very diluted solution of water with less than 5% dish soap (roughly less than 1 part mild dish soap to 20 parts water)
1.5 Receiving and Inspecting Shipment
The first thing you should do upon receipt of the Pana shipment is to check the shipment monitors and follow the directions in this section.
1.5.1 Shipment Monitors
On either end of the shipping container are shipment monitors which are triggered by events which occur during shipment. The tilt monitor has an indicator which turns red when the container has been tilted. The shock monitor has an indicator which turns red when an impact exceeds an acceptable level.
1.5.2 What To Do If Either or Both Shipment Monitors Are Triggered
1 Accept the shipment (Do not refuse the shipment)
2 Add a notation to the shipping receipt
3 When you open the shipping container inspect the Pana monitor for damage. See Inspection Procedure below.
4 If any damage is discovered, request immediate inspection from the carrier
1.5.3 Inspection Procedure
1 Visually inspect the shipping container
If any damage is discovered, request immediate inspection from the carrier.
2 Unpack the Pana. See Section 1.6 Unpack the Pana
3 Look for any visible damage to the screen or other parts of the Pana
4 Look for and document any dents, scratches, or other visible signs of damage to the screen or the enclosure
5 While still in the lower shipping container, plug in power, turn on power, connect to a video source, such as a 128 gray and a full 255 white from a paint program and visually inspect the screen
1.6 Unpack the Pana
The Pana shipping container has a slide off top cover. The Pana is protectively wrapped in the bottom, base container. The safest way to store and move the Pana display before installing it is in the shipping container.
The procedure for mounting the display, includes moving the unit, so after visual inspection you should put the top cover back on and reattach the stabilizer snaps.
Figure 1.1: Pana packaging
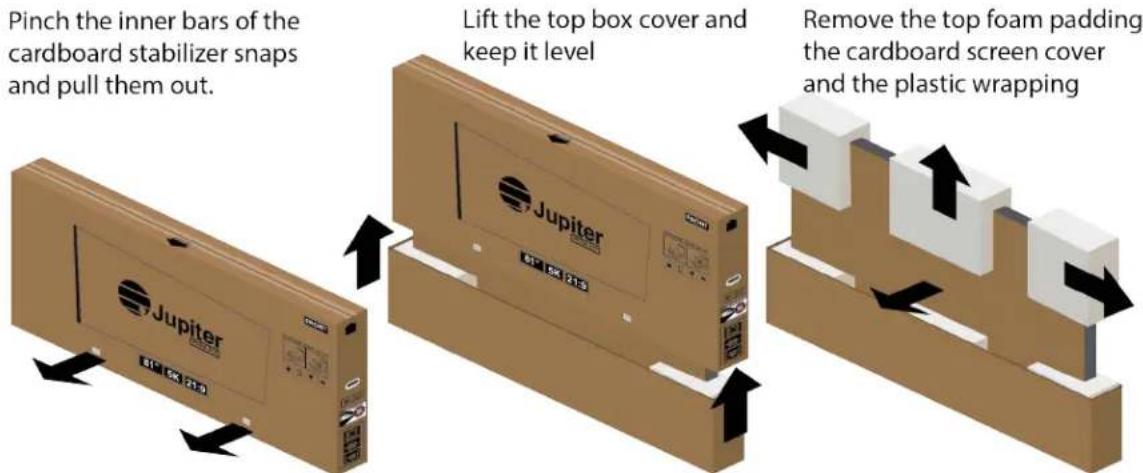
1 Remove the cardboard stabilizer snaps
There are two stabilizer snaps on the front and back of the shipping container which hold the outer shipping cover with the base unit. Remove them by pinching the inner bars together and pulling the stabilizer snaps out.
2 Slide the outer shipping cover off
Sliding the outer shipping cover off requires one person at either end of the shipping container.
Keeping the cover level as you lift it off. Do not tilt the shipping container so the shipment monitors will still be useful if you need to ship it again.
3 Remove the top foam padding
4 Remove the cardboard sheet which protects the screen
5 Remove the plastic wrapping
6 Fully removing the Pana from the base is only recommended when installing the Pana in its final mounted position.
Using at least two people lift and slide the Pana out of the bottom base foam padding.
See Chapter 4, Pana 81T Installation for guidance about mounting and installing the Pana.
1.7 Storage Considerations
- Ensure that Product storage remains within the range of 0^ to 50^ . (32°F - 122°F)
• Always have the shipping container in an upright position - Do not place the display face up or face down even if it is in the shipping container
1.8 Modifications to Product
CAUTION: Any changes or modifications, including but not limited to hardware and software modifications not expressly approved by Jupiter Systems could void the user's authority to operate the equipment.
1.9 Disposal of Product
The product contains small amounts of tin, lead and/or mercury. Disposal of these materials may be regulated due to environmental considerations.
DISPOSAL OF OLD ELECTRICAL AND ELECTRONIC EQUIPMENT (Applicable throughout the European Union and other European countries with separate collection programs).

natural_image
Symbol of a trash bin with crossed lines indicating no waste or discharge (no text or labels)This symbol found on your product or on its packaging, indicates that this product should not be treated as household waste when you wish to dispose of it. Instead, it should be handed over to an applicable collection point for the recycling of electrical and electronic equipment. By ensuring this product is disposed of correctly, you will help prevent potential negative consequences to the environment and human health, which could otherwise be caused by inappropriate disposal of this product.
The recycling of materials will help to conserve natural resources. This symbol is only valid in the European Union. If you wish to discard this product, please contact your local authorities or dealer, and ask for the correct method of disposal.
This page has been intentionally left blank

Jupiter
Optimize team productivity, provide improved interaction and workplace collaboration technology with Jupiter System's Pana 21:9 displays.
2.1 Features
The Pana 81T provides the following exciting features:
• 21:9 Panoramic
The extra wide form factor is inspired by our natural human ability to see wider than tall.
- 5K Resolution
Pana provides 33% more pixels with 5K resolution, giving the user more real estate in which to work.
- Touch Enabled
The Touch models enable the expectation for interactive autonomy, speed and ease-of-use. Pana interactive displays are touch driven by multiple, simultaneous collaborators.
2.2 Views of Your Pana 81T
2.2.1 Buttons & Remote Control
Figure 2.1: Pana 81T and remote control buttons
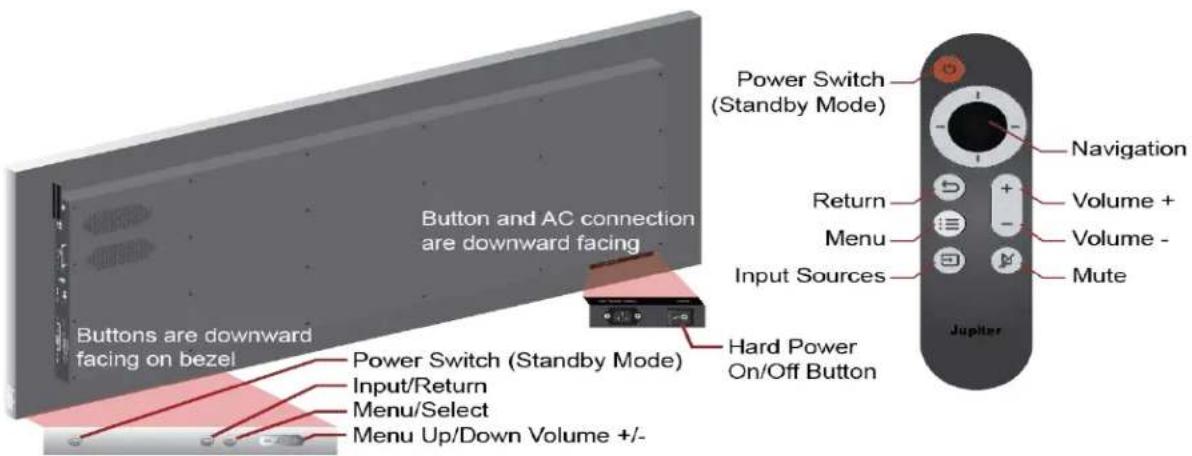
See Table 3.2, Menus/Settings on page 21 for button functions and Section 3.2, Menus/Settings on page 21 for information about settings.
2.2.1.1 Effective Use of Remote
Figure 2.2: Remote sensor window
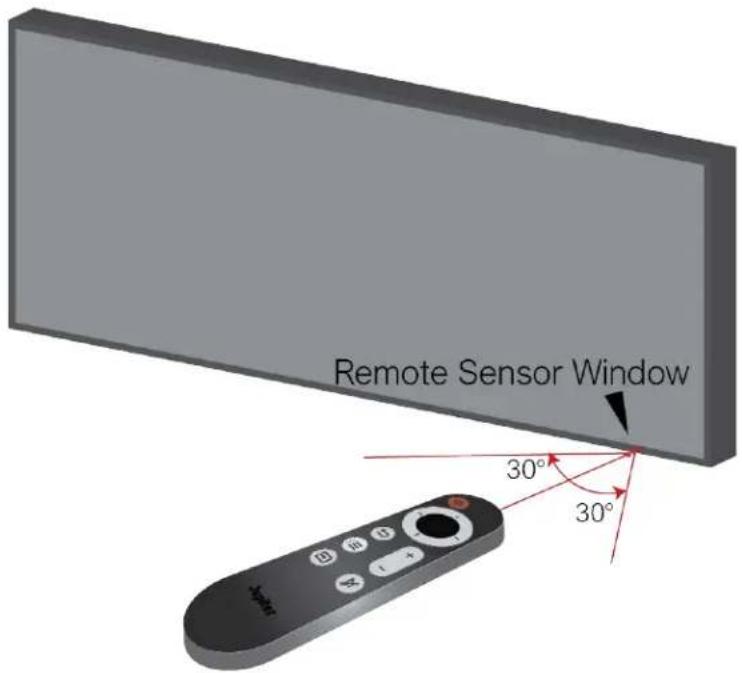
For effective use of the remote:
- Ensure there is a clear path between the remote control and the Remote Sensor window on the Pana display. The remote works within a 30^ angle from perpendicular to the screen
- If the effective range of the remote control decreases, or it stops working, replace the batteries with new batteries
- The remote control may fail to operate if the infrared remote sensor is exposed to bright sunlight or fluorescent lighting
Ambient light conditions may possibly impede the operation of the remote control. If the functioning of the remote control seems to not be working properly, point the remote control at the Remote Sensor window on the Pana display, and repeat the operation.
2.2.1.2 Batteries for Remote Control
The remote control uses two AAA batteries.
Battery Cautions!
- Please make sure the battery is disposed of properly or recycled after using
- Keep batteries away from children
- Do not throw batteries into fire
- Use only the correct battery type. There is a risk of fire or explosion if the batteries are replaced by an incorrect type
Install Batteries
Figure 2.3: Battery installation
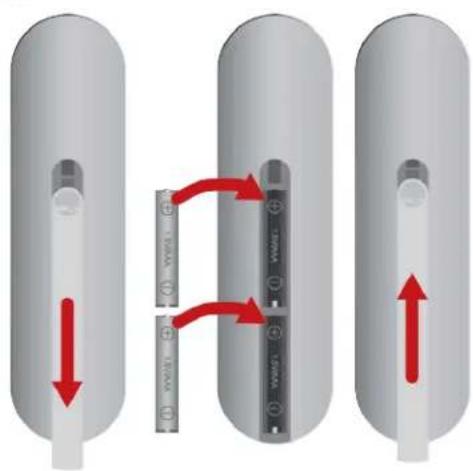
1 Open back battery cover of remote control
2 Install AAA type batteries according to the corresponding electrode, make sure battery positive and negative poles are correct (+ to +, - to -); please do not mix using old and new batteries
3 After batteries are installed, replace the battery cover and close it until it clicks shut
2.2.2 Connectors
Optional OPS devices (Open Pluggable Specification) are available to add computing capabilities to Pana displays. Please see the Jupiter Systems website or talk with your sales representative.
Figure 2.4: Pana 81T input, power and sound connections
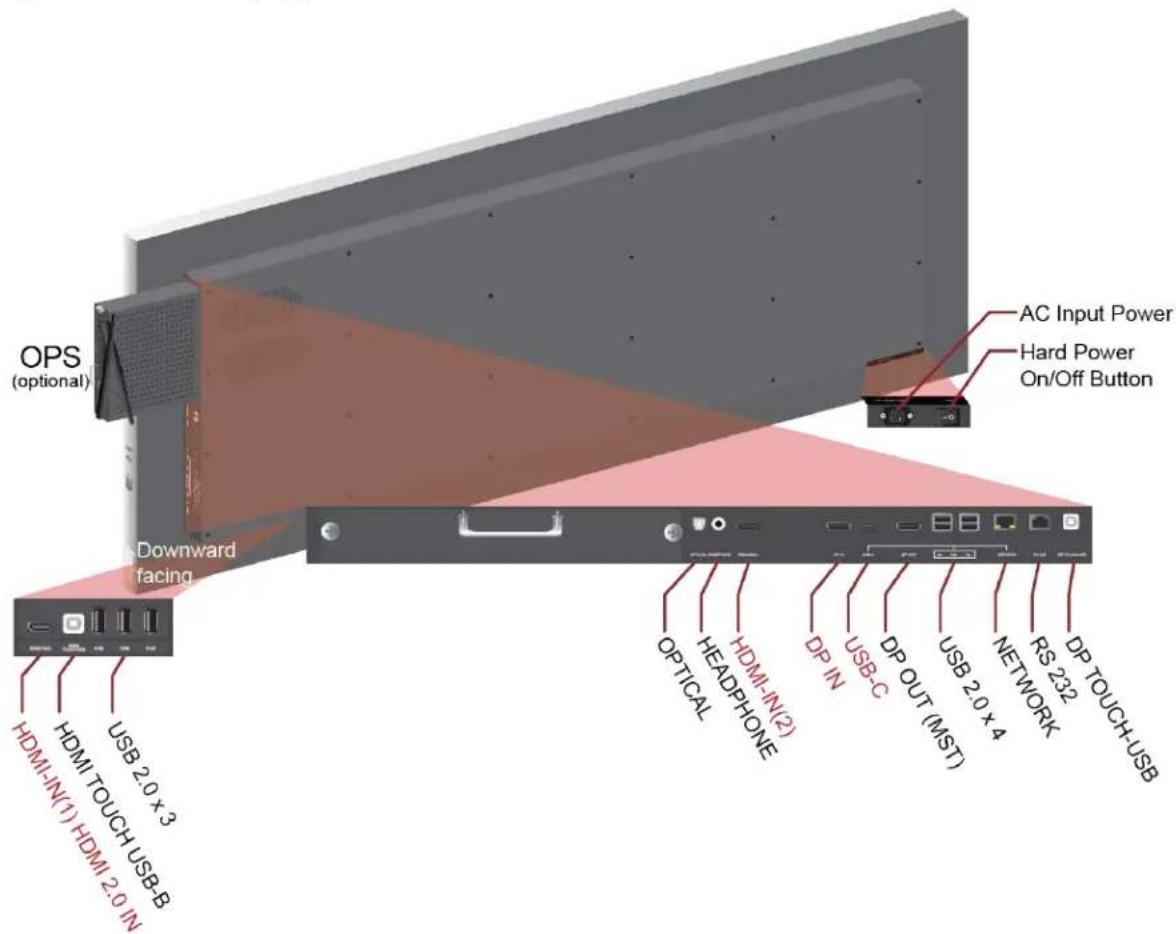
See Interface Specifications on page 14 for more information about the inputs.
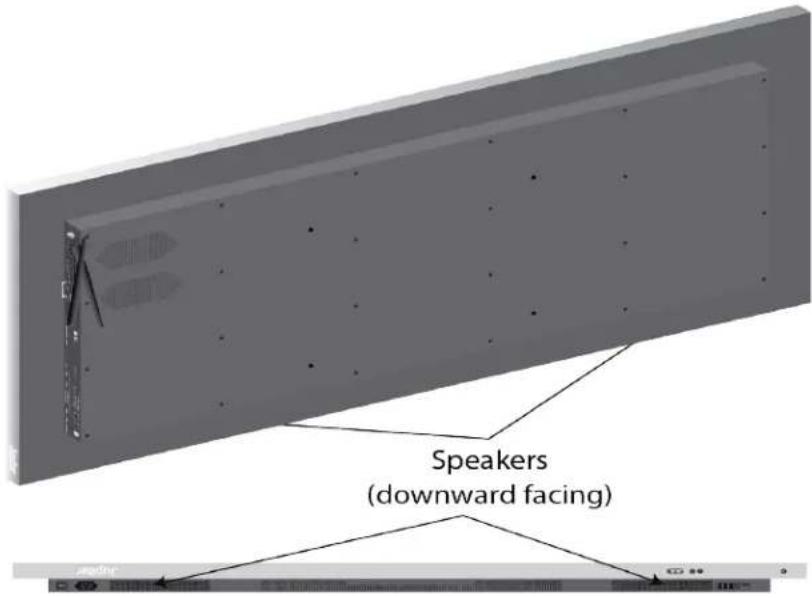
2.2.3 Speakers
There are no removable parts for the speakers. Use the Optical output or audio output for sound system accessories.
Figure 2.5: Speaker location
2.3 Specifications
2.3.1 Screen & Touch Specifications
Figure 2.6: Pana 81T diagonal screen size
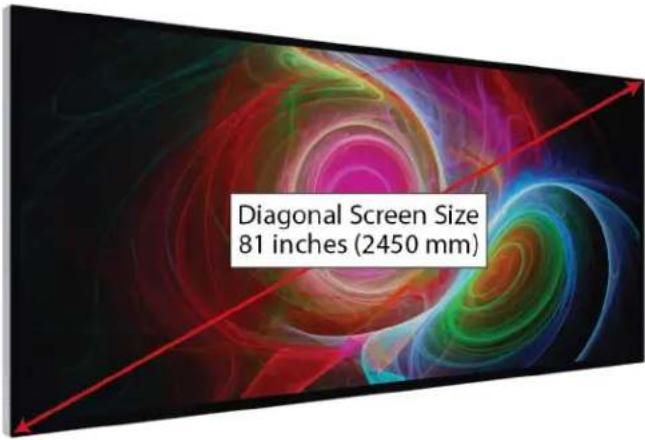
Table 2.1: Screen Specifications
| Item Description | |
| Display Dimension 81" Diagonal | |
| Aspect Ratio 21:9 | |
| Panel LCD | |
| Resolution 5120(Horizontal) ×2160(Vertical) | |
| Maximum Display Frequency (Resolution H*V/Fv) | 5120*2160 @60Hz |
| Horizontal Frequency 45.9762 to 61.2745 MHz | |
| Vertical Frequency 57 to 62 Hz | |
| Brightness (Typical) 600 nits | |
| Contrast (Typical) 1200:1 | |
| Color Gamut | DCI-P3 90% |
| Display Colors | 1.07G (8bits+FRC) |
| HDR | HDR400 |
| Back-light | DLED |
| Pixel Pitch | 0.3684(H) x 0.3684(V) mm |
Table 2.1: Screen Specifications
| Item Description | |
| Response Time (Typical) 8ms | |
| Viewing Angle H/V 178°/178° | |
| Panel Surface AG25/Clear(CF /TFT POL). Anti-Fingerprint | |
| On Screen Display Language English (Default), Chinese | |
| Color Settings 3200K, 5000K, 6500K, 9300K, 12000K, User Mode | |
| Preset Modes Standard, Game, Movie, Photo, Vivid, User | |
Table 2.2: Touch Specifications
| Item Description | |
| Touch Type Mutual Capacitance | |
| Touch Point 20 Point | |
| Touch Depth N/A | |
| Finger Separation 18mm | |
| Minimum Touch Diameter | 3mm |
| Positioning Accuracy | ±1.5mm within 90% working area |
| Touch Response Time | ≤ 10ms |
| Report Rate | ≥ 100Hz |
| OS Support | Windows/ Mac OS |
2.3.2 Connector Specifications
Table 2.3: Interface Specifications
| Interface Label Description | |
| OPS slot | Slot for optional Open Pluggable Specification device. Adds computing capability to displays. |
| Power Power cable appropriate for region. Power cord (ships with product) | |
| HDMI IN(1) HDMI 2.0 x1 | |
| HDMI IN(2) HDMI 2.0 x1 | |
| HDMI TOUCH-USB Provides connector for touch devices. | |
| DP IN | DisplayPort 1.4 x 1 (DP 1.4, 1.2, and 1.1) |
| DP OUT Display Port 1.4, Supports MST | |
| DP TOUCH-USB DP TOUCH-USB USB Type-B x 1 | |
| USB USB 3.2 Gen1 (A type) x5 | |
| USB-C | USB TYPE C 3.0 x 1 (also known as USB Type-C and USB-C), Provides 65W PD output. DP1.4 alt. mode, HDCP 2.2 |
| OPTICAL (Audio Output Interface) | S/PDIF Optical Fiber x 1 |
| HEADPHONE 3.5mm x1 | |
| NETWORK RJ45 Ethernet | |
| RJ45/RS 232 | RJ45 connector with RS 232 protocol for local serial control |
2.3.3 Audio Output Specifications
Table 2.4: Speaker Specifications
| Specification Description | |
| Rated Impedance 8 OHM ± 10 % | |
| F0 250Hz± 20 %Hz | |
| Effective Bandwidth F0-20K ± 20 % | |
| Voltage Sensitivity 83 SPL± 3dB | |
| Distortion 5 % MAX | |
| Handling Power 12 W / 96HR | |
| Maximum Power 15W / 30MIN | |
2.3.4 Physical & Environmental Specifications
Figure 2.7: Physical dimensions
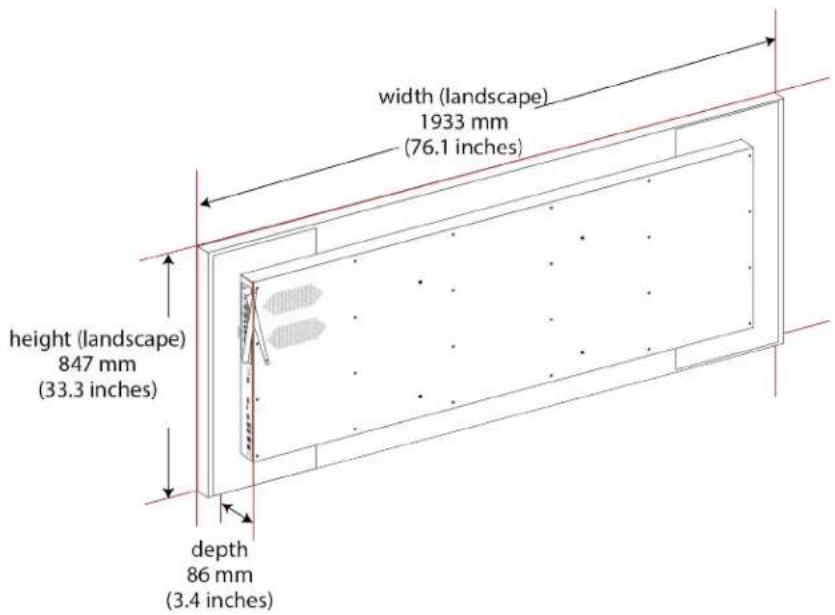
Table 2.5: Physical Specifications
| Item Description | |
| Dimensions - width x height x depth - mm (inches) | 1933w x 847h x 86d mm (76.1w x 33.3h x 3.4d inches) |
| Width (landscape) - mm (inches) 1933 (mm76.1 inches) | |
| Height (landscape) - mm (inches) 847 mm (33.3 inches) | |
| Depth - mm (inches) 86 mm (3.4 inches) | |
| Weight - kg (pounds) 53 kg (117 pounds) | |
| Mounting Characteristics | 800 x 400 mm |
| Power Cable 3m (9.8 ft) |
Table 2.6: Environmental Specifications
| Item Description | |
| Operating Temperature 0°C - 40°C (32°F to 104°F) | |
| Storage Temperature | -20°C to 60°C. (-4°F to 140°F) |
| Operating Humidity 10% ~ 80%, non-condensing | |
| Storage Humidity 10% ~ 90%, non-condensing | |
| Maximum Altitude Not above 5000 meters (~16,400 feet) | |
Table 2.7: Power Consumption
| Item Description | |
| Maximum Power Consumption 600 W | |
| Standby Power Consumption 0.5 W | |
| Typical Power Consumption 298 W |
Table 2.8: Shipping Dimensions
| Item Description | |
| Shipping Dimensions - mm (inches) | 2145w x 1015h x 262d mm(84.4w x 40h x 10.3d inches) |
| Shipping Weight - kg (pounds) 64 kg (141 pounds) | |
Table 2.9: Environmental Considerations and Certifications
| Item Description | |
| Environmental Considerations | |
| Packaging Brown corrugated carton + EPE | foam (100% recyclable) |
| Certifications | |
| cULus, FCC, RoHS, Energy Star, CEC, CA65, CE, ErP, REACH, WEEE, UKCA, IECEE, SAA, RCM, GEMS, PSE, VCCI, PSB, CCC, INMETRO, NOM, BIS | |
This page has been intentionally left blank

Jupiter
This chapter discusses setting up and using your Pana 81T monitor.
See Section 3.2, Menus/Settings on page 21 for information about the presets and other settings, including settings to enhance gaming and viewing using your Pana 81T.
See Section 3.5, Using the Touch Screen on page 28 for information about navigating the touch screen.
3.1 Buttons on Pana and Remote
Both the remote control and the Pana have buttons for many features. For greater detail about the usage of the menus and configuration options, please see Section 3.2, Menus/Settings on page 21.
Figure 3.1: Pana 81T and remote control buttons
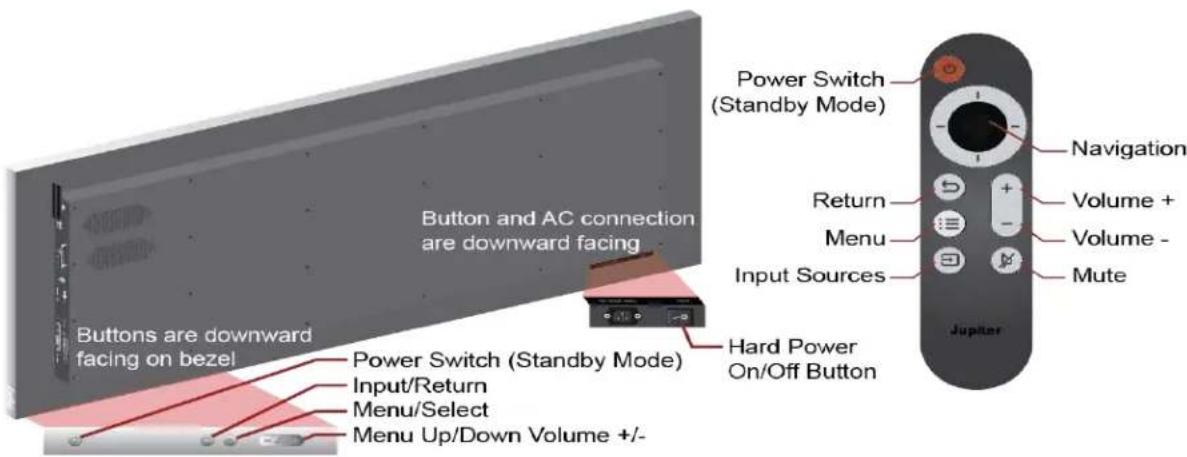
Table 3.1: Button Functions
| Button Located | Description | |
| Power Switch Pana | Hard Power Switch is an On/Off button which provides power to the Pana on the bottom of the Pana near the plug. A soft power button (Power Switch/Standby) is on the bottom of the screen bezel at the center when the Pana is in the landscape orientation. The remote has a power/standby button. The Power Switch/Standby requires the Pana to be ON |
Table 3.1: Button Functions
| Button Located | Description | |
| Volume +/- Both | Increase or decrease volume. Affects both speakers and volume to audio output | |
| Input Sources Both | Change the source input. Options are• USB-C• DP• OPS• HDMI-IN(2)• HDMI-IN(1)• Auto selectIn addition to Input functionality, the Input button on the Pana (but not on the remote) functions like the Return button on the remote | |
| Standby Mode | Both Enter/exit standby mode | |
| Navigation Both | Navigate screen menus. See Section 3.2, Menus/Settings on page 21. | |
| Menu Both | Displays menus to select. Note the graphic menu options are a visual menu. Also selects the menu option (mainly for Pana button control) | |
| Return Remote | Return to previous item | |
3.2 Menus/Settings
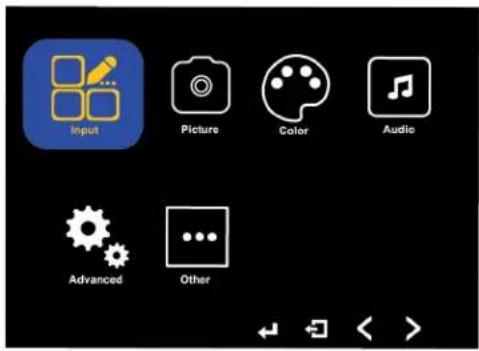
3.2.1 Input (Remote)
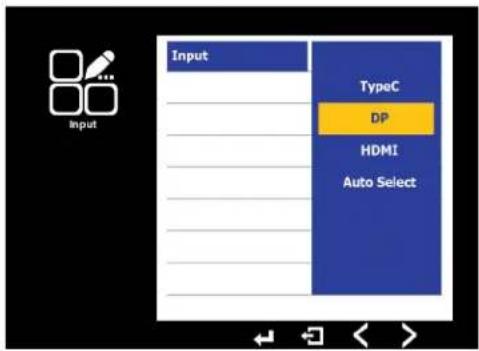
Select the input source for the display.
3.2.2 Input (Display)

Select the input source for the display.
3.2.3 Picture
| Aspect Ratio | Aspect ratio refers to the width to height ratio of an image. This relationship can be expressed as a ratio like 21:9 or 16:9 or the aspect ratio may also be expressed by resolution — the number of pixels wide by the number of pixels high — or both.The native resolution of the Pana is 5120x2160. The aspect ratio of the Pana is 21:9.The Aspect Ratio settings takes the resolution of the incoming signal from a source and puts it in the Pana's 21:9 5120x2160 framework in a variety of ways. SeeSection 3.7, Aspect Ratio on page 30for visual examples and a more complete discussion of aspect ratio, resolution and description of how the Pana adjusts incoming signal to use the 5120x2160 resolution 21:9 aspect ratio.1:1Displays the signal without scaling and centers it on the Pana screen. Lower resolution sources will be centered horizontally and vertically on the screen and be letter boxed (black bars on top and bottom, or both sides) or window boxed (black bars on all four sides). The size of the picture is determined by pixel to pixel from input source to display view, In other words UHD which is 3840x2160 will be centered horizontally on 5120x2160 (3840 on 5120 width), but the height (2160 pixels) is the same; there will be black boxes on the sides, but not on the top or bottom.H StretchStretches the input source horizontally until the image reaches the edge of the screen. Depending on incoming resolution, images will appear wider than the initial image, so round incoming shapes appear as ovals.H/V StretchStretches the incoming signal both horizontally and vertically until the image reaches the edge of the screen. With H/V Stretch none of the image is lost. It will either be stretched or scaled. If the incoming source is 21:9, the same aspect ratio as the Pana, there will be no distortion.For lower resolution 21:9 signals, such as 2560x1080, 3440 x1440 or 3840x1620, this setting will scale the image perfectly with no shape distortion.If the incoming source is not the 21:9 aspect ratio the image will be distorted.For 16:9 incoming signals there is a 33.33% horizontal stretch so circles will become ellipses.A special case is 21:9 movies playing in a 16:9 frame. In this case the original horizontal black bars will remain visible because the black bars are in the source video and none of the source video image is lost. For more information seeSection 3.7, Aspect Ratio on page 30. |
| Aspect Ratio(continued) | • 16:9Puts the incoming source into a UHD 16:9 frameScales incoming FHD and HD signals which are 16:9 ratio to UHD so the 16:9 aspect ratio is preserved. Incoming source providing 1920x1080 or 1280x720 to the Pana will be scaled to 3840x2160 so it is presented at full height with vertical black bars, just as a 3840x2160 in 1:1 mode.Note that with this aspect ratio mode even if the incoming signal is the native 5120x2160 the Pana electronics will squeeze the signal into a 3840x2160 16:9 frame with vertical black bars so circles will look like ellipses.SeeSection 3.7, Aspect Ratio on page 30for visual representation of common aspect ratios.NOTE: Aspect Ratiois associated with input source. If you change Aspect Ratiofor one input source, say HDMI, it will not change the Aspect Ratiofor other input sources such as DP. Aspect Ratiowill stay with that input source until changed. |
| Brightness | Adjusts the backlight intensity. Does not affect any video levelsRange from 0-100 |
| Contrast | Adjusts the video settings of the Pana decoders for white level details. Jupiter highly recommends to leave this setting at its factory default as increasing it may make white shirts lose all level of detail and appear flat.Range from 0-100 |
| Sharpness | Adds enhancement to edges by adding a thin white border on high contrast transitions which makes the image appear sharper.Range from 1-4 |
3.2.4 Colour
| Gamma | Adjusts the non linear response of the overall brightness to optimize the image based on how it was captured. 2.2 is typical.Options are Off, 1.8, 2.0, 2.2, 2.4. Off is the lowest setting, 2.4 is the highest setting. |
| Colour Temperature | Adjusts how warm (reddish) or how cool (bluish) the picture appears.Options are 12000, 9300, 6500, 5800, 3200, User, with 12000 for the coolest (bluish) and 3200, the reddest. User provides more options to set colour temperature. |
| Colour Temp User | Provides more options to set colour temperature. Adjusts 0-256 range for Red and Blue. |
| Colour Effect | Factory defined presets for optimized display settings based on usage mode. Standard is good for many types of usage. Others are best for the usage defined by the name. For example best defined setting for Games is Game, for Movies is Movie.For more user defined options, select User and modify the setting is User colour Effect. |
| User (Colour Effect User) | When the colour effect is in the custom mode, you can adjust the hue and saturation of R/Y/G. |
| Colour Space | Rarely used setting that is intended to resolve colour issues if a source does not correctly communicate the correct colour mode to the display. If the display has a significant purple or green cast to it, switching this setting would likely correct the issueDefines the colour encoding system used to describe colours. The options are RGB and YUV. These setting define the coding for the colour space. |
| Hue | Hue controls the application of colour as on a colour wheel. Shifting the hue from red to green means that you are also shifting green to blue and yellow to cyan. |
| Saturation | Intensity of the colour. The amount of white light mixed in with a hue. By decreasing the saturation, the intensity of the colour will decrease until you are left with a black and white image. by increasing, the colors will be more vibrant. |
3.2.5 Audio
Audio sets the volume of the speakers and the output on the audio (HEADPHONE) jack. Volume + and - raise and lower the volume.
3.2.6 Advanced
| DD/CCI | Display Data Channel (DDC) / Command Interface (CI) is a collection of protocols which facilitate display-related transmissions. DDC/CI can help control multiple monitors from different manufacturers. |
| DP Version | Limits the input from the maximum of the interface; for the Pana, the maximum the interface supports is DP 1.4. USB-C, DP, and OPS use DisplayPort standards.• 1.1Supports maximum resolution of 2560 x1080/25• 1.2Supports maximum resolution of 3840x2160/4K• 1.4Supports maximum resolution of 5120x2160+/5K+ |
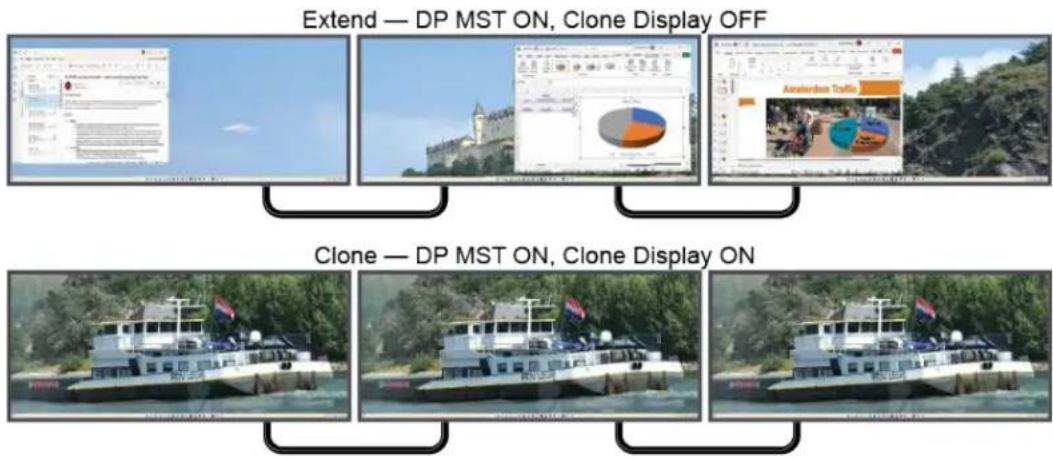
| DP MST | Provides for multiple monitors to be daisy chained via the DP OUT connector. Tested for two monitors.DP MST ON and Clone Display OFF extends the desktop across multiple screens. See Figure 3.2, DP MST and Clone Display Options.The DP MST Extend feature requires a DP or USB-C input to the main Pana and is limited to providing a maximum of 3840x2160@30Hz to the extended daisy chained Pana (or other display). For example, when the main Pana is driven with 5K60 from a laptop over USB-C, the daisy chained Pana will show up as an extended monitor in the Windows Display Settings of the source laptop. The maximum selectable resolution is 3840x2160@30Hz. With 3840x1620 resolution, the maximum refresh rate is 30 Hz. Only 3440x1440 provides a refresh rate of 60 Hz for the extended Pana |
| Clone Display | DP MST ON and Clone Display ON duplicates the image on the primary Pana to one or more monitors via the DP OUT connection. Retains the resolution for multiple monitors. Tested for two monitors connected to the primary monitor.Clones ANY input to the primary PANA, be it OPS, HDMI, DP or USB-C, to daisy chained Panas. See Figure 3.2, DP MST and Clone Display Options. |
| HDMI Version | Limits the input from the maximum of the interface; for the Pana, the maximum the interface supports is HDMI 2.0.1.4: Supports maximum resolution of 2560 x1080/252.0: Supports maximum resolution of 3840x2160/4K |
| Network Control | On: Enables serial RS232 and IP based network controlOff: Disables serial RS232 and IP based network control |
| OPS Signal | If OPS is not in use, this setting must be set to Off.On: Uses OPS. Connected to displayOff: Does not use OPS |
| Sleep Timer Minutes | Sets the number of minutes until the monitor “sleeps.” The screen will be turned off in sleep/ standby mode. Using the Power/Standby button on the remote will wake the screen. Range 0-120. Adjusts by minutes. 0 means the monitor will not go to sleep. |
Figure 3.2: DP MST and Clone Display Options
flowchart
graph TD
    A["Extend — DP MST ON, Clone Display OFF"] --> B["Clone — DP MST ON, Clone Display ON"]
    B --> C["Visual UI elements: 3D pie chart, 2D grid, 1D color palette, 3D camera, 2D terrain image"]
    C --> D["Image of cruise ship with flags"]
3.2.7 Other
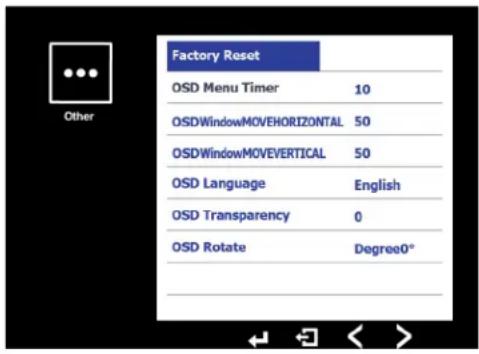
| Factory Reset Returns to | the factory settings. |
| OSD Menu Timer Amount | of time (in seconds) which the menu will stay open |
| OSDWindow MOVE HORIZONTAL | Adjusts the horizontal position of the On Screen Display (OSD) window. The OSD window is the window in which the menu items and configuration parameters reside. Using the + and - buttons for volume control moves the window back and forth. |
| OSDWindow MOVE HORIZONTAL | Adjusts the vertical position of the OSD window. Using the + and - buttons for volume control moves the window up and down. |
| OSD Language | Select Language from the list |
| OSD Transparency Adjusts the transparency of the On Screen Display (OSD) window | |
| OSD Rotate | Rotates the OSD window for orientation of the display 90, 180 or 270 degrees so the writing in the OSD window and menus can be read upright, depending on the orientation of the mounting of the display. |
3.3 Input Capabilities and Cabling Considerations
In order to support a 5K resolution of 5120x2160 @ 60Hz, cabling must be DisplayPort 1.4 or better. When possible look for DP8K certification on cables to ensure compatibility.

3.4 Touch and Touchback
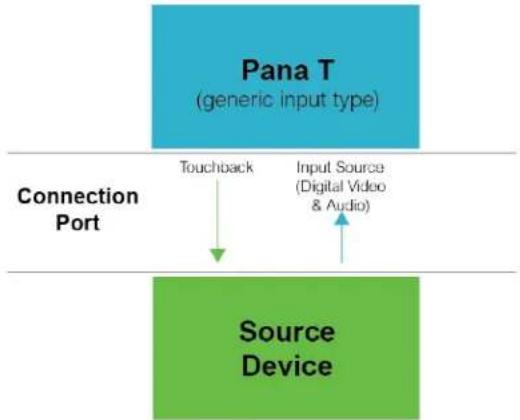
The touchback port is a port which carries touch information from the display itself including the touch information, along with any other data from the USB connections for the display. It is how the source computer mirrors the Pana display screen.
Figure 3.3: Generic View of Touchback for the Pana T models
flowchart
graph TD
    A["Pana T\n(generic input type)"] -->|Touchback| B["Source Device"]
    B -->|Input Source\n(Digital Video & Audio)| A
    style A fill:#4CAF50,stroke:#388E3C
    style B fill:#4CAF50,stroke:#388E3C
Touchback is related to the input type, which is why there is a touchback port for DP and HDMI. The touchback for USB-C is the USB-C port and will work with a USB-C hub.
Figure 3.4: View of Touchback by Input Type

flowchart
graph TD
    A["Pana T"] --> B["Connection Port"]
    B --> C1["Touchback (USB-B)"]
    B --> C2["Input Source (HDMI-In(1))"]
    B --> C3["Input Source (HDMI-In(2))"]
    B --> C4["Touchback (USB-B)"]
    B --> C5["Input Source (DP-IN)"]
    B --> C6["Input Source/Touchback (USB-C)"]
    C1 --> D1["HDMI"]
    C2 --> D1
    C3 --> D2["DisplayPort"]
    C4 --> D2
    C5 --> D3["USB-C"]
For the Pana 81T there are variations from the simple touchback loop shown in Figure 3.3:
• HDMI has two HDMI 2.0 ports. HDMI(1) and HDMI(2)
- DisplayPort follows the generic touchback back model as described above
- USB-C is bi-directional, so there is no separate touchback port
3.5 Using the Touch Screen
Touch screen interaction settings are provided by the computer operating system for Windows (Pen and Windows Ink in Device control panel) and 3rd party applications for Mac OS, Linux and even Android systems.
3.6 Image Retention and Burn-In
3.6.1 Issue
Image retention and image burn-in are well known issues associated with many display technologies. Image retention and eventually burn-in comes about when a static image is present on the screen for an extended period of time, i.e. days and/or weeks. Jupiter has made every effort to make its Pana product line resistant to these issues but if a static image/logo is left on a Pana 24/7 for weeks at a time there's bound to be some image retention of the displayed image.
Note that high contrast static images, such white text over black background, are the most prone in causing image retention. News channels which have a logo in the same place on the screen while the rest of the screen image changes often cause image retention from the logo.
Panas use LCD technology which is more resistant to image retention and burn in than some other display technologies.
The Jupiter warranty does not cover image burn-in.
3.6.2 Recommendations
Jupiter recommends the use of a screen saver during off hours and weekends if the Pana is left on 24/7 to prevent image retention.
In the special case of a Pana being used in a Microsoft Teams Rooms (MTR) deployment where no screen saver is available, Jupiter recommends following Microsoft's guidelines. Specifically, Microsoft recommends going into the Admin Windows account of the MTR PC and then changing the Power Plan settings under Control Panel to turn the Display off after 5 minutes of inactivity as detected by the room motion sensors on the Logitech/Lenovo Tap touch controller which comes with the MTR kit. Both of these steps will prevent image retention from occurring and are considered MTR best practices.
3.6.3 Resolutions
Running a video on a loop or engaging a screen saver overnight may resolve image retention in many cases. Repeating the process will help in more extreme cases. However when the image is really "burned-in" the burned-in image is not reversible.
3.7 Aspect Ratio
The most common broadcast aspect ratios currently are 16:9 with UHD and FHD resolutions. These 16:9 aspect ratios can be visualized as 16 squares wide and 9 squares tall.
For discussion's sake aspect ratio refers to the resolution of the incoming signal from a source. For example, Broadcast/TV signals are typically 3840x2160 (UHD), 1920x1080 (FHD) or 1280x720 (HD); the ratio of signal width over signal height reduces to 16:9 (for example 3840÷240=16, 2160÷240=9; 1280÷80=16, 720÷80=9).
Signals from a Windows or MacOS PC to a monitor can have a lot more options. Which resolutions appear on PC source (in Windows Display Setting or System Settings Display on MacOS) are drawn from what is declared in the Pana monitor EDID tables. Should the desired resolutions not show up in the display settings, contact Jupiter Support.
In addition to the most common aspect ratio of 16:9 there are also 640x480 (SD) 4:3 signals from the era of analog TV and the 2.37:1 aspect ratio cinematic standard for ultrawide/cinemascope movies. 2.37:1 is approximately 21.3:9, so very close to the Pana's 21:9 ratio.
The native resolution of the Pana is 5120x2160. The aspect ratio of the Pana is 21:9.
Figure 3.5. Resolutions/Aspect Ratios with Same Pixel Pitch shows a comparison of the resolutions described in this discussion with the Pixel Pitch (that is the Pixels are the same size and same distance between pixels) to give a sense of the difference among the resolutions.
Figure 3.5: Resolutions/Aspect Ratios with Same Pixel Pitch
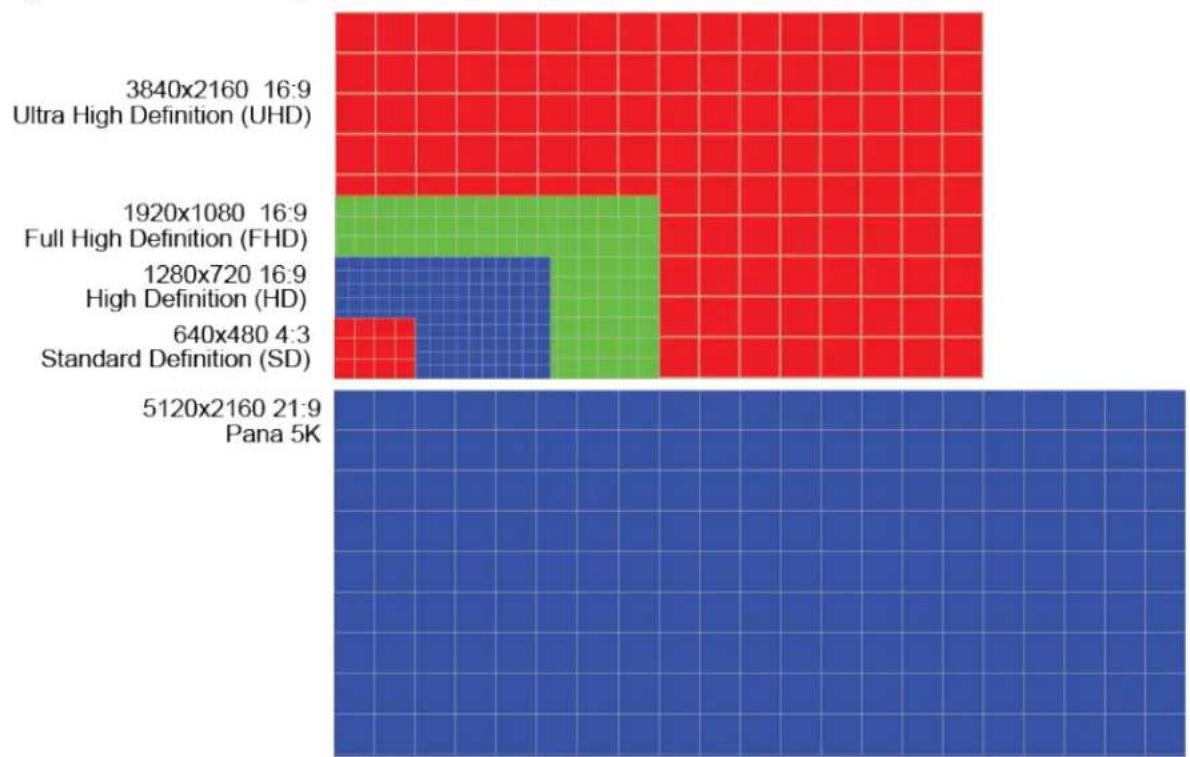
heatmap
| Category | Value | | -------- | ----- | | Ultra High Definition (UHD) | 3840x2160 16:9 | | Full High Definition (FHD) | 1920x1080 16:9 | | High Definition (HD) | 1280x720 16:9 | | Standard Definition (SD) | 640x480 4:3 | | Pana 5K | 5120x2160 21:9 |Please see Figure 3.7. Aspect Ratio options based on Source Content Aspect Ratio and Resolution on page 32 for a visual representation of the selections in Picture|Aspect Ratio.
Figure 3.6: Geometric Representation of 1:1, H Stretch and H/V Stretch Options
The aspect ratio options in the Picture menu item:
• 1:1
Uses the aspect ratio of the input source without modification. The image is centered vertically and horizontally on the screen.
• Lower resolution 21:9 (2K, 2560x1080)
A lower resolution 2560x1080 21:9 source will be centered horizontally and vertically on the screen. Because the Pana supports 5120x2160 resolution this lower resolution image will be window boxed (black boxing around the image).
• Higher resolution 16:9 (UHD, 3840x2160; Cinema 4K, 4096x2160)
3840x2160 or 4096x2160 16:9 images will be letter boxed on the sides on the Pana's 5120x2160 because the 16:9 images are the same height but narrower.
• H Stretch
Stretches the input source horizontally to the limits of the screen.
• Lower resolution 4:3 and 16:9
The horizontal only stretch on these lower resolution input source have quite dramatic affect on the source image.
• Higher resolution 16:9 (UHD, 3840x2160; Cinema 4K, 4096x2160)
Stretches the input source horizontally. Circles become ovals.
• Lower resolution 21:9 (not shown)
A 2560x1080 21:9 source will be letterboxed (black boxing at the top and bottom) because it is keeping the vertical size and only stretching the horizontal.
• H/V Stretch
Stretches the input source both horizontally and vertically until one coordinate is limited by the screen. In the 16:9 to 21:9 stretch, the horizontal limits the stretch, so there is letterboxing at the top and bottom. There is no cropping.
- Lower resolution 21:9 (2K, 2560x1080, not shown)
A lower resolution 2560x1080 21:9 source will fill the screen with no loss of image because it is a smaller image with the same aspect ratio scaled up. Lower resolution image may not be clear.
• Lower resolution 16:9 (2K, 2560x1440)
A 2560x1440 16:9 2K image will be scaled up (stretched both horizontally and vertically. In other words the 16:9 H/V Stretch will fill the screen, but with distortion. Circles will appear as ellipses. Lower resolution images may not be clear.
• Higher resolution 16:9 (UHD, 3840x2160; Cinema 4K, 4096x2160)
UHD and Cinema 4K will be stretched horizontally only since 2160 is already the same height as 5120x2160. The UHD image will be stretched a third horizontally and a Cinema 4K stretched a quarter horizontally to reach the edges of the 5120 Pana screen. There are no black bars at top and bottom.
Figure 3.7: Aspect Ratio options based on Source Content Aspect Ratio and Resolution
• 16:9
Puts the incoming source into a UHD 16:9 frame
• Higher resolution 16:9 (UHD, 3840x2160; Cinema 4K, 4096x2160)
UHD input is the same as frame so image is like 1:1 as the 16:9 frame is the same as the incoming source signal. 4K is usually synonymous with UHD, however in the cinematic market 4K refers to 4096x2160 so it is a wider image that will be reduced horizontally.
• Lower resolution 16:9 FHD and HD
Scales incoming FHD and HD signals which are 16:9 ratio to UHD so the 16:9 aspect ratio is preserved. Incoming source providing 1920x1080 or 1280x720 to the Pana will be scaled to 3840x2160 so it is presented at full height with vertical black bars, just as a 3840x2160 in 1:1 mode. Lower resolution image may not be clear.
• 21:9 aspect ratio source
Note that with this aspect ratio mode even if the incoming signal is the native 5120x2160 the Pana electronics will squeeze the signal into a 3840x2160 16:9 frame with vertical black bars so circles will look like ellipses. Lower resolution 21:9 input sources will be scaled and squished, so they fill the 16:9 frame just as the higher resolution 5K 21:9 source.
Figure 3.8: 16:9 UHD With FD, HD, and 5120x2160 Source Inputs
This page has been intentionally left blank

Jupiter
4.1 Installation Location
- Safe product operating range is from 0^ to 40^ . (32F - 104F)
- Do not install near heat sources such as radiators, heat registers, stoves, or other apparatus which produce heat
- This product is not rated for use at altitudes exceeding 5000 meters (roughly 16,400 feet or 3.1 miles)
4.2 Electrical Precautions
- Do not overload outlets or cables beyond electrical capacity
- Do not insert the power plug into an outlet other than 100-240V AC. Insertion into any other rated outlet my cause fire or electrical shock
- Use the appropriate grounded outlet for the supplied power cord. Using other outlets, power cords, or adapters may cause fire or electrical shock
4.3 Mounting Considerations
- Consult your preferred mount manufacturers for a solutions for a display with a 800 mm by 400 mm mount pattern that weighs 114 pounds (about 52Kg)
- Follow all local codes and regulations
- Ensure that the wall has the structural integrity to hold the display when the wall mount is properly attached
- Ensure that the wall anchors (bolts, screws, etc) are rated to hold at least twice the weight of the display (2x amount)
- Use UL approved mounting systems which are rated to hold at least the weight of the display.
- Follow the instruction manual from the manufacturer of the mount system
- If a custom mounting solution is necessary consult a professional engineer
4.4 Mounting Dimensions
The mounting holes on the back of the display are 800 mm by 400 mm.
4.5 Table Mounting Option
Jupiter Systems Pana 81T supports table mode to enhance your interaction with the content you view, the content you create, and your experience with others through the window which is your monitor.
4.5.1 Warnings
Figure 4.1: Warnings about items on the surface of the 81T touch screen
The Pana 81T is a touchscreen. Its best use is to provide a collaborative workspace with the ability to use a stylus or your finger to touch, tap, and draw.
The Pana 81T is not intended as a surface for other items:
- No sharp items
- No heavy items
- No liquids
- No hot or cold items
4.5.2 Ventilation
Heat dissipation is important for the proper cooling of the Pana 81T. The openings on the rear/bottom of the Pana 81T are for ventilation and speaker outputs.
Figure 4.2: Ventilation and speaker openings
CAUTION! Do not cover the ventilation holes or the speaker outputs.
4.5.3 Internal Weight Bearing Structure
Weight bearing support is provided by the internal structure of the Pana 81T via the mounting holes.
No other part of the back or the edge bezel of the Pana 81T is designed to bear the weight of the 81T.
Weight on the edges or back may cause the glass and electronics which make up the 81T's touch LCD to bend which can cause issues which will interfere with the touch capabilities and possibly damage the LCD screen.
Figure 4.3: Weight bearing only via mounting holes
- No weight bearing support other than via the four threaded mounting holes
- Use washers where screws attach table to Pana 81T
- No weight bearing along the edges of the display
- If using a table structure to encircle the 81T have at least 2mm gap between the 81T and the structure at all points
4.6 Recommended Mounting Systems
Please see the Jupiter Systems website or contact your Jupiter Systems dealer.
This chapter provides Customer Support and warranty information:
• See Customer Support for information about technical questions, guidance and contact information
• See Warranty on page 40 for information about the warranty for your Pana 81T
5.1 Customer Support
5.1.1 Hardware Faults
If you require assistance with any suspected hardware fault, please contact the vendor from whom you purchased the display while within the full warranty period for the display.
5.1.2 Technical Assistance
If you require technical assistance, please contact Jupiter Systems' technical support team. Please provide as much information to the support team about the fault and any steps you have taken in trying to resolve the issue.
5.1.3 Contact Information
Website
www.jupiter.com/support
Phone
1-510-675-1000
support@jupiter.com
Mail (physical)
ATTN: Technical Support
Jupiter Systems
31015 Huntwood Avenue
Hayward, CA 94544-7007
5.2 Warranty
5.2.1 Warranty Period
The Pana screens are a commercial grade LCD with an expected lifetime of 100K when their operating conditions are met and the panels are operated no more than 16 hours per day, 7 days a week.
Should your Jupiter Commercial LCD Monitor (“Product”) fail due to a defect in materials or workmanship under normal and proper use, during the warranty period set forth below, Jupiter Systems (“Jupiter”) will, at its option, repair or replace the Product. This limited warranty is valid only to the original retail purchaser of the Product.
5.2.2 Limited Warranty
Parts*:3 Years
Back Light: 3 Years
Labor: 3 Years
* Internal/functional parts only
Replacement products and parts are warranted for the remaining portion of the original warranty period or ninety (90) days, whichever is greater.
Replacement products and parts may be new, reconditioned, refurbished, or otherwise factory remanufactured.
Replaced product or part(s) will be the property of Jupiter.
EXCEPT TO THE EXTENT PROHIBTED BY APPLICABLE LAW, ANY IMPLIED WARRANTY OF MERCHANTABILITY OR FITNESS FOR A PARTICULAR PURPOSE ON THE PRODUCT IS LIMITED IN DURATION TO THE DURATION OF THE ABOVE LIMITED WARRANTY. UNDER NO CIRCUMSTANCES SHALL JUPITER OR ITS DISTRIBUTORS / DEALERS BE LIABLE FOR ANY INDIRECT, INCIDENTAL, CONSEQUENTIAL, SPECIAL, OR PUNITIVE DAMAGES, INCLUDING, WITHOUT LIMITATION, LOST GOODWILL, LOST REVENUES OR PROFITS, WORK STOPPAGE IMPAIRMENT OF OTHER GOODS, COST OF REMOVAL AND REINSTALLATION OF THE PRODUCT, LOSS OF USE, OR ANY OTHER DAMAGES WHETHER BASED IN CONTRACT, TORT, OR OTHERWISE.
JUPITER'S TOTAL LIABILITY, IF ANY, SHALL NOT EXCEED THE PURCHASE PRICE PAID BY YOU FOR THE PRODUCT.
Some regions do not allow the exclusion or limitation of incidental or consequential damages or limitations on how long an implied warranty lasts, so the above exclusions or limitations may not apply to you. This limited warranty gives you specific legal rights and you may also have other rights that vary from region to region.
5.2.3 Warranty Limitations
Product Warranty does not cover:
- Damage caused by natural disaster, fire, acts by third parties, accidents, owner's intentional misuse and fault, or use in other improper conditions
- Incidental damages (such as profit loss or interruption in business, modification, or erasure of record data, etc.) caused by use or inability to use this product
- Damage caused by inappropriate operation, or from not following the user manual.
- Damage caused by misuse or malfunction through simultaneous use of this product and the connected equipment or software
- Damage caused by neglect of the instructions described about installation.
- Damage caused by improper installation
- Damage caused by disassembly, modification or repair by non-authorized service center or people
This Limited Warranty does not cover:
- Service trips to deliver, pick up, install, educate how to operate, replace fuses, correct wiring, or correct unauthorized repairs and the removal and reinstallation of the Product for repair
- Damage or defects of the Product caused by transportation and/or handling, including scratches, dents, chips, and/or other damage to the finish of your Product, unless such damage results from defects in materials or workmanship and is reported within one (1) week of delivery
- Image burn-in
- Minor imperfections within design specifications that do not materially alter or affect functionality
- Damage or defects of the Product caused by installation or repair of antenna systems, cable converters, other equipment supplied by cable company, or other components in a video system
- Damage or defects of the Product caused by unauthorized alteration, modification or incorporation into any other product or system components, or if it is used for other than the intended purpose
- Damage or defects of the Product caused by improper set-up or adjustment on consumer controls
- Damage or defects of Product caused by incorrect electrical current or voltage, power failures, interruptions, or inadequate electrical service, including incorrect or insufficient AC supply
- Damage or defects of the Product resulting from operation of the Product contrary to the Product owner's manual and/or installation manual
- Damage or defects of the Product resulting from misuse, abuse, improper installation/repair/maintenance
- Damage or defects of the Product caused by accidents, pests and vermin, lightning, wind, fire, flood, or other acts of God
- Damage or defects of the Product caused by the use of accessories, parts, consumable cleaning products, or service not provided or approved by Jupiter. Damage or defects of the Product or missing items to any Product sold "As Is", "With all Faults" or similar disclaimer
- Products with original serial numbers that have been removed, altered, or cannot be readily determined
- Increases in utility cost and additional utility expenses
- Replacement of any consumable parts, including batteries on the remote control
The cost of repair or replacement under the above excluded circumstances shall be borne by the customer.
5.2.4 How Service is Handled
- The original sales receipt specifying the Product and date of purchase is required to obtain warranty service.
- Under some circumstances, you may be asked to provide credit card information for a non-warranty service fee, as a deposit for advanced shipment, or cost of unreturned loaner product.
- To ensure proper credit and avoid unnecessary charges, you must obtain a return authorization before returning any product to Jupiter.
- In the event a replacement product is received, please use the original carton / packaging from that replacement product in returning the defective unit to Jupiter.
- Jupiter shall bear the cost of out-bound shipping under this limited warranty.
5.2.5 Additional Information Concerning Warranty Service
To obtain warranty service and additional information:
- Phone:
North America: (510) 675-1000 and select the appropriate option from the menu. - Visit our website:
http://www.jupiter.com - Mail:
ATTN: Display Warranty
Jupiter Systems
31015 Huntwood Avenue
Hayward, CA 94544-7007
5.2.6 Pixel Functionality
Your Product's display contains many individual pixels, and typically a small number of pixels do not function normally. Your display has been inspected and is in compliance with Jupiter's specifications, and any pixel non-functionality does not affect the operation or use of your Product's display.
Index
Numerics
1 to 1 Aspect Ratio setting 31
A
Altitude, Maximum 17
Aspect Ratio 12, 22, 30
Audio Output Specifications 15
B
Back-light 12
Brightness 12, 23
Button Functions 19
Buttons 8, 19
C
Cabling Considerations 27
Certifications 17
Cleaning 2
Clone Display 26
Color Gamut 12
Colour Effect 24
Colour Effect User 24
Colour Space 24
Colour Temp User 24
Colour Temperature 24
Connector Specifications 14
Connectors 10
Contact Information 39
Contents of Packaging 1
Contrast 23
Customer Support 39
D
DD/CCI 25
Depth 16
Dimensions 16
Dimensions, Shipping 17
Display Colors 12
Display Dimension 12
Disposal of Product 5
DP IN 14
DP MST 26
DP Version 25
E
Electrical Precautions 35
Environmental Considerations 17
Environmental Specifications 17
F
Face Up 37
Face up orientation 2
Factory Reset 27
G
Gamma 24
H
H Stretch 31
H/V Stretch 32
Handling Precautions 1
Hardware Faults 39
HDMI Version 26
Height 16
Horizontal Frequency 12
Hue 24
Humidity, Operating 17
|
Input Capabilities 27
Input Sources 20
Inspecting Shipment 3
Inspection Procedure 3
Installation Location 35
IP based network control 26
M
Maximum Display Frequency 12
Modifications to Product 5
Mounting as a table 37
Mounting Characteristics 16
Mounting Considerations 35
Mounting Dimensions 36
Mounting Systems 38
N
Network Control 26
0
Operating Temperature 17
Operation 19
OPS Signal 26
OPTICAL 14
OSD Language 27
OSD Menu Timer 27
OSD Rotate 27
OSD Transparency 27
OSDWindow MOVE HORIZONTAL 27
P
Packaging 17
Panel Surface 13
Physical Specifications 16
Pixel Pitch 12
Power Switch 19
Preset Modes 13
R
Remote 19
Remote Control 8
bright sunlight 9
clear path between the remote control and the
Remote Sensor window 9
fluorescent lighting 9
Remote sensor window 8
Resolution 12
Response Time 13
RS 232 14
s
Saturation 24
Screen Specifications 12
serial RS232 26
Service 42
Sharpness 23
Shipment Monitors 3
Shipment Monitors Are Triggered 3
shock monitor 3
Sleep Timer Minutes 26
Speakers 11
Specifications 12
Storage Considerations 5
T
Table Mode 37
Technical Assistance 39
Temperature, Operating 17
Temperature, Storage 17
tilt monitor 3
Touch Screen 28
Touch Screen, Using 28
Touch Specifications 13
Touchback 28
Touchback by Input Type 28
U
Unpack the Pana 4
USB-C 14
V
Vertical Frequency 12
Viewing Angle 13
W
Warranty 40
Warranty Limitations 41
Weight 16
Weight, Shipping 17
Width 16