EWPh 9670 - Wine cellar LIEBHERR - Free user manual and instructions
Find the device manual for free EWPh 9670 LIEBHERR in PDF.

User questions about EWPh 9670 LIEBHERR
0 question about this device. Answer the ones you know or ask your own.
Ask a new question about this device
Download the instructions for your Wine cellar in PDF format for free! Find your manual EWPh 9670 - LIEBHERR and take your electronic device back in hand. On this page are published all the documents necessary for the use of your device. EWPh 9670 by LIEBHERR.
USER MANUAL EWPh 9670 LIEBHERR
natural_image
Technical line drawing of two open industrial storage cabinets with internal compartments and mounting feet (no text or symbols)7085 981-01
Priority of warnings....28
Safety instructions and warnings 28
Symbols on the appliance: 29
Description of the appliance....30
Climate rating ....31
Range of appliance use....31
Disposal notes....31
EPREL database: 31
Control panel....32
Fast access to information 32
Switching the appliance on 32
Changing language and temperature unit....32
Main menu....33
Setting the temperature....33
Fan 34
Presentation light....34
SabbathMode....35
Switching the appliance off 35
Maintenance message....36
Maintenance confirmation....36
Setup menu 37
SmartDeviceBox (not supplied in all countries)....39
Description of the SmartDevice display ....39
Alarm messages ....40
Storage diagram....42
Equipment 43
Cleaning 45
Removing and inserting the wooden shelves....45
Maintenance menu....47
Maintenance....48
Additional functions....49
Malfunctions....52
Shutting your appliance down....52
Priority of warnings
| DANGER! | identifies a situation involving direct danger which, if not obvi-ated, may result in death or severe bodily injury. |
| WARNING! | identifies a dangerous situation which, if not obviated, may result in death or severe bodily injury. |
| CAUTION! | identifies a dangerous situation which, if not obviated, may result in minor or medium bodily injury. |
| NOTICE | identifies a dangerous situa-tion which, if not obviated, may result in damage to property. |
| Note | identifies useful information and tips. |
Safety instructions and warnings
- WARNING: do not seal ventilation openings on the appliance housing or enclosure.
- WARNING: only use the mechanical devices or other aids recommended by the manufacturer to help speed up the defrosting process.
- WARNING: do not damage the refrigerant circuit.
- WARNING: do not use any electrical devices in the refrigerator compartment which do not comply with the design recommended by the manufacturer.
- WARNING: the mains cable must not be damaged while installing the appliance.
- WARNING: multi-sockets or distributor strips and other electronic devices (such as halogen transformers) must not be positioned and operated at the rear of appliances.
- WARNING: danger of injury through electric shock. There are live parts under the cover. Only have the interior LED light replaced or repaired by customer service staff or trained personnel.
- WARNING: risk of injury from the LED lamp. The light intensity of the LED light complies with laser class RG 2. If the cover is defective, do not look directly at the light through optical lenses from close distance. This may damage your eyes.
- WARNING: this appliance must be secured as described in the operating instructions (installation instructions) to rule out any potential risks due to its instability.
- Do not stand on the plinth, drawers or doors or use them to support anything else.
- This appliance may be used by children aged 8 and over and by people with reduced physical, sensory or mental abilities or a lack of experience and expertise if they are supervised or have been instructed on the safe use of the appliance and have understood the risks associated with it. Children must not be allowed to play with the appliance. Cleaning and user maintenance must not be carried out by children without supervision. Children aged between 3 and 8 are allowed to load and unload the appliance.
- Do not store any explosive substances, such as aerosol containers with flammable propellant gas, inside the appliance.
Symbols on the appliance:
- To prevent injury and damage to property, the appliance should only be installed by two people.
- After unpacking it, check the appliance for signs of damage. Contact the supplier if it is damaged. Do not connect the appliance to the mains power supply.
- Avoid prolonged skin contact with cold surfaces (e.g. chilled/frozen products). If necessary, take safety action (e.g. gloves).
- Do not consume food which has been stored for too long, as it could cause food poisoning.
- All repairs and work on the appliance may only be carried out by customer service personnel or other trained personnel. The same applies to changing the mains power cable.
- Only carry out repair and other work on the appliance when the mains plug has visibly been disconnected.
- Only install, connect and dispose of the appliance as described in these operating instructions.
- In the event of a fault, pull out the plug or switch off the fuse.
- When disconnecting the appliance from the mains, pull on the plug. Do not pull on the cable.
- If you have a lockable appliance, do not keep the key near the appliance or within reach of children.
- The appliance is designed for use in enclosed areas. Do not operate the appliance outdoors or in areas where it is exposed to splash water or damp conditions.
- Do not use the interior LED light to light the room. The interior LED light is only designed to illuminate the interior of the appliance.
- Do not allow naked flames or ignition sources to enter the appliance.
- Alcoholic drinks or other vessels containing alcohol should be sealed tightly for storage.
 | This symbol may be located on the compressor. It relates to the oil in the compressor and makes reference to the risk that: Swallowing or inhaling can be fatal. This advice is only relevant to recycling. There is no danger in normal operation. |
 | This symbol is located on the compressor and indicates the danger of flammable materials. Do not remove the sticker. |
 | This or a similar sticker may be located on the rear of the appliance. This sticker indicates that there are vacuum insulation panels (VIP) or perlite panels in the door and/or housing. This advice is only relevant to recycling. Do not remove the sticker. |
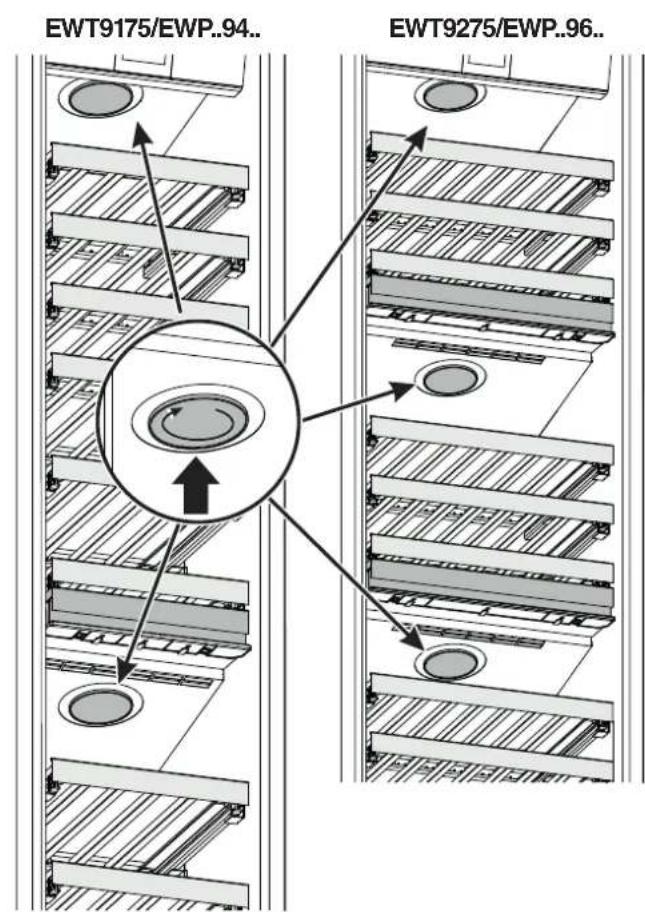
Description of the appliance
EWT9175/EWP..94..EWT 9275 / EWP.. 96..
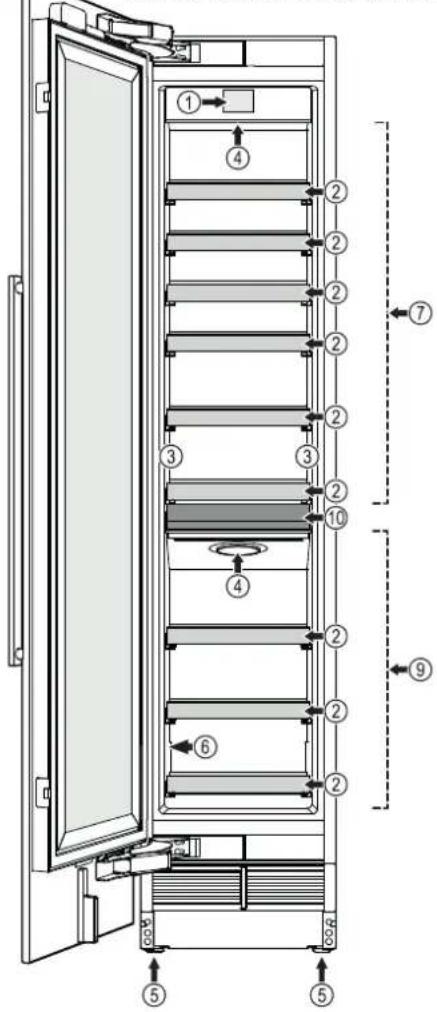
(1) Control panel
(2) Pull-out shelf
(3) Presentation light
(4) Air filter
(5) Adjustable-height feet
(6) Type plate
(7) Top zone
(8) Middle zone (EWT 9275 / EWP.. 96.. only)
(9) Bottom zone
(10) Serving shelf
Climate rating
The climate rating indicates the room temperature at which the appliance may be operated in order to achieve full refrigeration performance.
The climate rating is indicated on the type plate.
The position of the type plate is shown in the section entitled Description of the appliance.
Climate rating Room temperature
SN +10°C to +32°C
N +16°C to +32°C
ST +16°C to +38°C
T +16°C to +43°C
SN-ST +10°C to +38°C
SN-T +10°C to +43°C
Do not operate the appliance outside the specified room temperature range.
Range of appliance use
The appliance is suitable solely for storing wine in a domestic environment or similar. This includes, for example, use
- in staff kitchenettes, bed and breakfast establishments,
- by guests in cottages, hotels, motels and other forms of accommodation,
- in catering and similar services in the wholesale trade.
Use the appliance solely as is customary within a domestic environment. All other types of use are inadmissible.
The appliance is not suitable for storing and cooling medicines, blood plasma, laboratory preparations or similar substances and products covered by the 2007/47/EC Medical Devices Directive. Any misuse of the appliance may result in damage to or spoilage of stored goods.
Furthermore, the appliance is not suitable for operation in potentially explosive atmospheres.
Disposal notes
The appliance contains reusable materials and should be disposed of properly - not simply with unsorted household refuse. Appliances which are no longer needed must be disposed of in a professional and appropriate way, in accordance with the current local regulations and laws.
When disposing of the appliance, ensure that the refrigerant circuit is not damaged to prevent uncontrolled escape of the refrigerant it contains (data on type plate) and oil.
- Disable the appliance.
- Pull out the mains plug.
- Cut through the connection cable.
WARNING
Danger of suffocation due to packaging material and plastic film!
Do not allow children to play with packaging material.
Take the packaging material to an official collection point.
EPREL database:
As from 1 March 2021, information about energy labelling and ecodesign requirements will be available in the European product database (EPREL). You can access the product database using the following link: https://eprel.ec.europa.eu/. You will be asked to enter the model identifier. You will find the model identifier on the type plate.
| Lighting | |
| Class1 | Light source |
| This product contains a light source that meets energy efficiency rating G | LED |
| 1The appliance may contain light sources with different energy efficiency classes. The lowest energy efficiency class is indicated. | |
Control panel
Three different actions to operate the control panel.
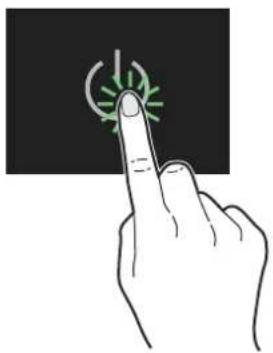
Touch
Touch to activate functions.
natural_image
Hand pointing at a green circular icon on a black background (no text or symbols)Press
Press for approx. 2 seconds to activate functions.

Slide
Slide to right or left to navigate in the menu or to search for values.
Fast access to information
(models EWP... ... only)
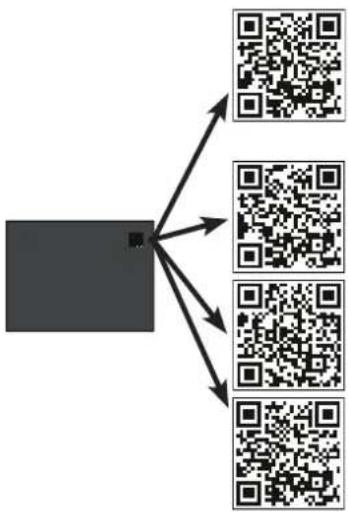
flowchart
graph TD
    A["Central Node"] --> B["Output 1"]
    A --> C["Output 2"]
    A --> D["Output 3"]
    A --> E["Output 4"]
Operating instructions
Service number is required, see type plate - section entitled Description of the appliance,
Customer service
Contact information
Storage recommendations
depending on appliance type
Accessory shop
Filter, SmartDeviceBox, etc.
Switching the appliance on
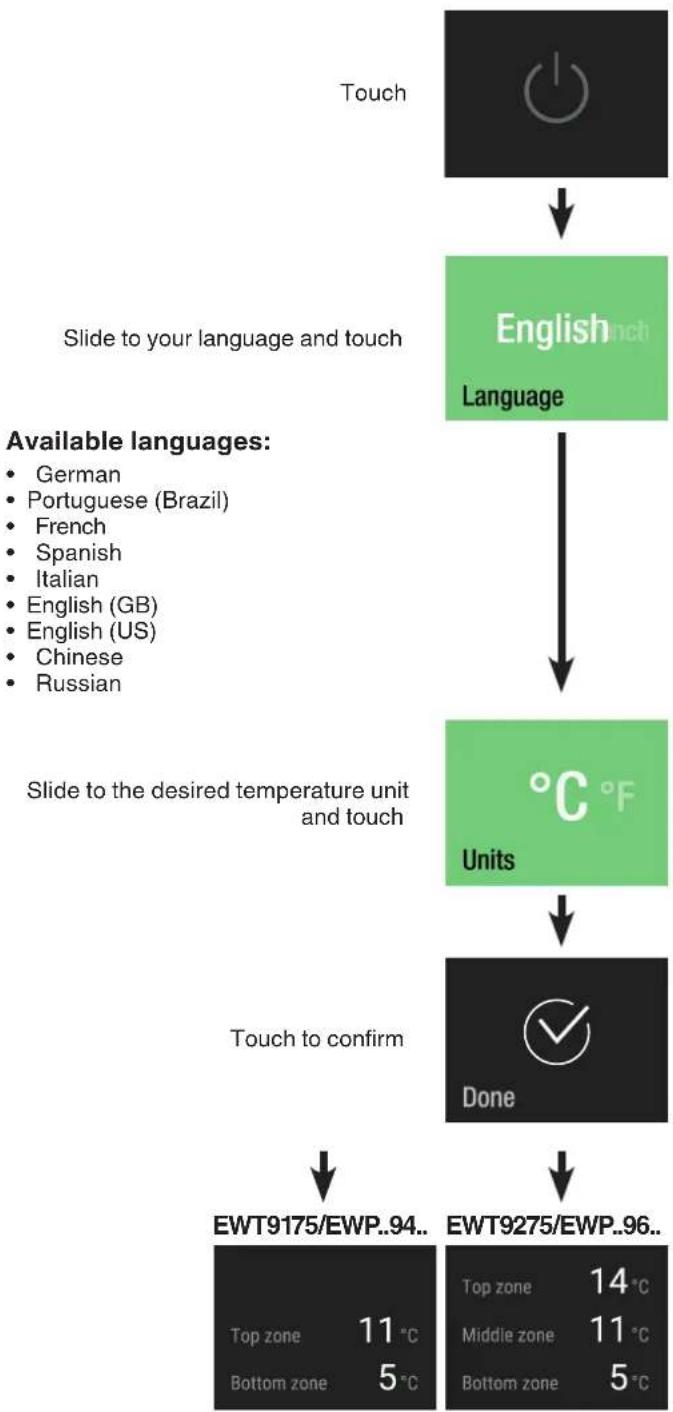
flowchart
graph TD
A["Touch"] --> B["English Language"]
B --> C["°C °F Units"]
C --> D["Done"]
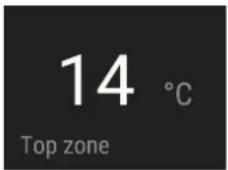
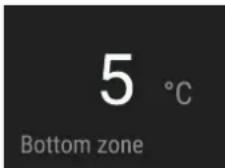
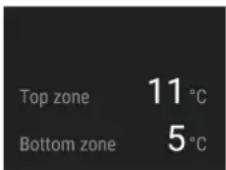
D --> E["EWT9175/EWP..94.. Top zone 11°C Bottom zone 5°C"]
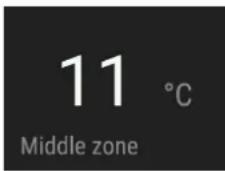
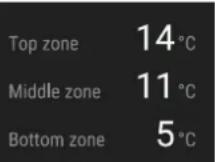
D --> F["EWT9275/EWP..96.. Top zone 14°C Middle zone 11°C Bottom zone 5°C"]
Changing language and temperature unit
For future changes of language and temperature unit, the appliance must be switched off and on again (customer settings will not be deleted).
Main menu
Navigation through the main menu. The following functions are available.
Temperature display for top zone and temperature setting.
Temperature display for middle zone and temperature setting (EWT 9275 / EWP.. 96.. only).
Temperature display for bottom zone and temperature setting.
Switching the fan on and off.
Adjusting the presentation light brightness.

Appliance operating mode for Sabbath and holidays. Complies with STAR-K Kosher Certification.

natural_image
Simple white circular icon with a vertical line, resembling a power button or activation symbol (no text or numbers)Switching the appliance on or off.
Describes how to replace the filters and clean the dust filter.

Allows the adjustment of display brightness and includes the appliance information (service number, model name, serial number).
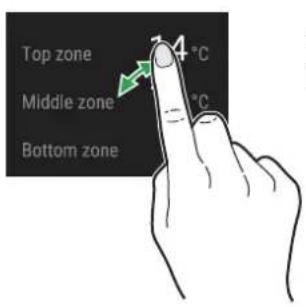
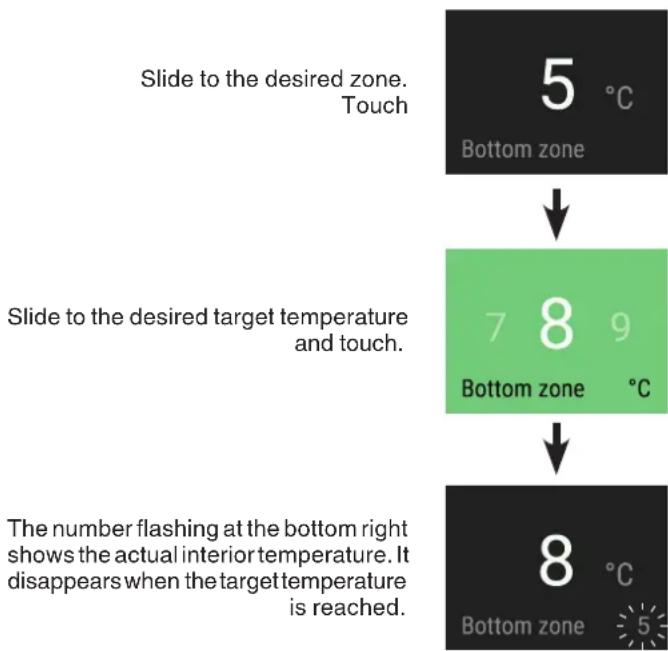
Setting the temperature
Standard setting is 12^ C (all zones).
The various zones can be adjusted independently of each other.
flowchart
graph TD
    A["Slide to the desired zone. Touch"] --> B["5 °C Bottom zone"]
    B --> C["7 8 9 Bottom zone °C"]
    C --> D["8 °C Bottom zone 5"]
    E["Slide to the desired target temperature and touch."] --> F["The number flashing at the bottom right shows the actual interior temperature. It disappears when the target temperature is reached."]
Slide to the desired zone. Touch
Slide to the desired target temperature and touch.
The number flashing at the bottom right shows the actual interior temperature. It disappears when the target temperature is reached.
Close the appliance door.
EWT9175/EWP..94..
Display when the door is opened again.
EWT9275/EWP..96..
The temperature display will flash if the actual interior temperature differs from the set temperature. It stops flashing when the target temperature is reached.
If you place a large quantity of unchilled wine in the appliance, the set temperature differential may be active for a lengthy period (up to 24 hours) before the set temperature is reached.
The temperature can be set between 5^ C and 20^ C.
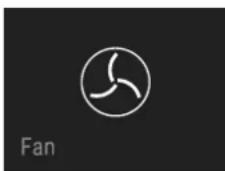
Fan
The interior fan ensures a constant and even interior temperature and a suitable climate for wine storage.
Switching on the fan (all zones) will further increase the humidity in the appliance, which has a particularly positive effect for long-term storage.
The increased level of humidity prevents the corks from drying out.
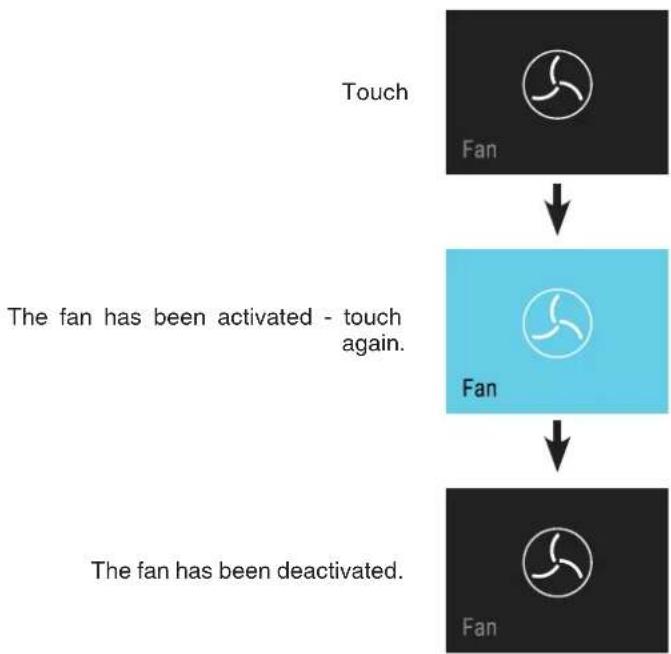
flowchart
graph TD
    A["Touch Fan"] --> B["The fan has been activated - touch again."]
    B --> C["The fan has been deactivated."]
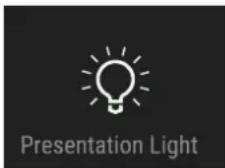
Presentation light
The presentation light is located on the left and right in the refrigerator compartment. The presentation light will be switched on when the door is closed.
Switching on the presentation light

flowchart
graph TD
    A["Touch"] --> B["Presentation Light"]
    B --> C["The presentation light has been switched on - touch again."]
Adjusting the brightness of the presentation light
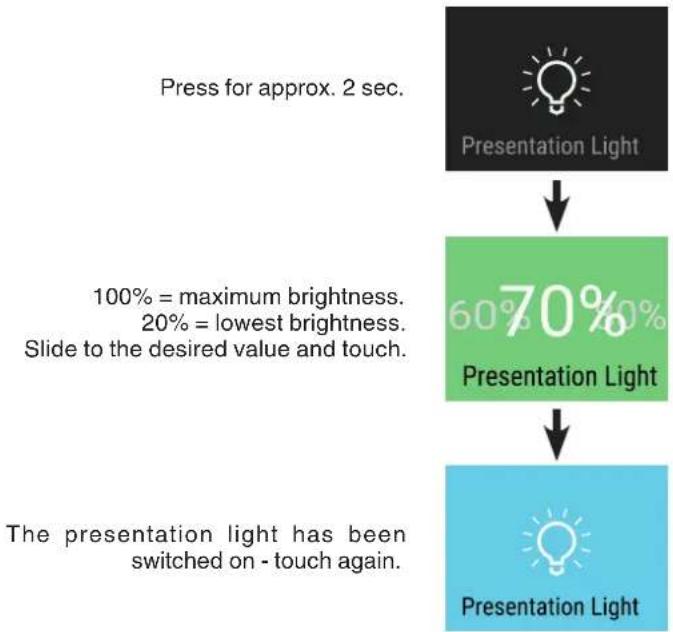
flowchart
graph TD
    A["Press for approx. 2 sec."] --> B["Presentation Light"]
    B --> C["60% = maximum brightness, 20% = lowest brightness. Slide to the desired value and touch."]
    C --> D["70% Presentation Light"]
    D --> E["Presentation Light"]
    E --> F["The presentation light has been switched on - touch again."]
SabbathMode
When SabbathMode is active, some electronic functions are switched off to comply with STAR-K Kosher Certification.
• The lighting remains off.
• There is no door alarm.
• There is no temperature alarm.
- The appliance will return to SabbathMode after a power failure.
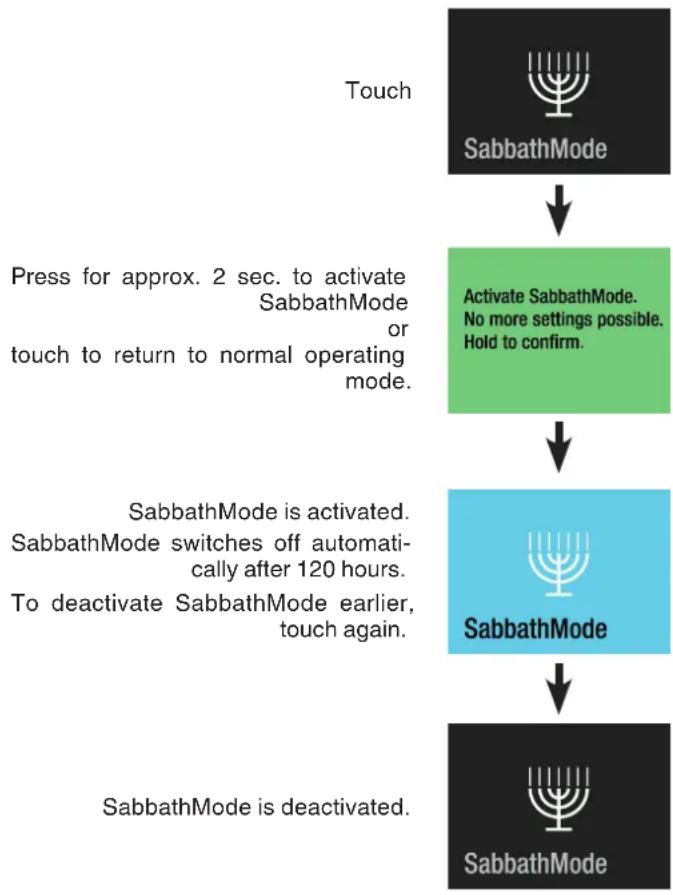
flowchart
graph TD
    A["Touch"] --> B["SabbathMode"]
    B --> C["Press for approx. 2 sec. to activate SabbathMode or touch to return to normal operating mode."]
    C --> D["Activate SabbathMode. No more settings possible. Hold to confirm."]
    D --> E["SabbathMode is activated. SabbathMode switches off automatically after 120 hours. To deactivate SabbathMode earlier, touch again."]
    E --> F["SabbathMode is deactivated."]
Switching the appliance off
Touch
Press for approx. 2 sec. to switch off the appliance or
touch to return to normal operating mode.
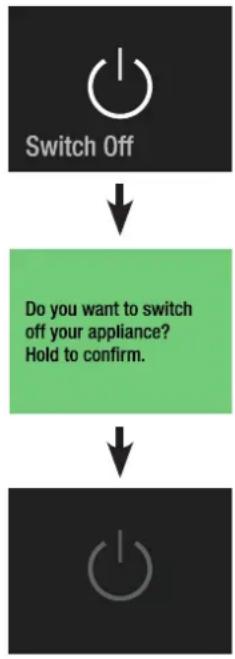
flowchart
graph TD
    A["Switch Off"] --> B["Do you want to switch off your appliance? Hold to confirm."]
    B --> C["Power Switch"]
The appliance is switched off.
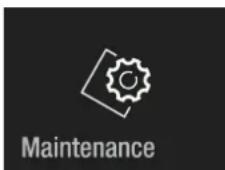
Maintenance message
In regular intervals of operation of the appliance, the maintenance message comes on (6 months). The dust filter needs to be cleaned.
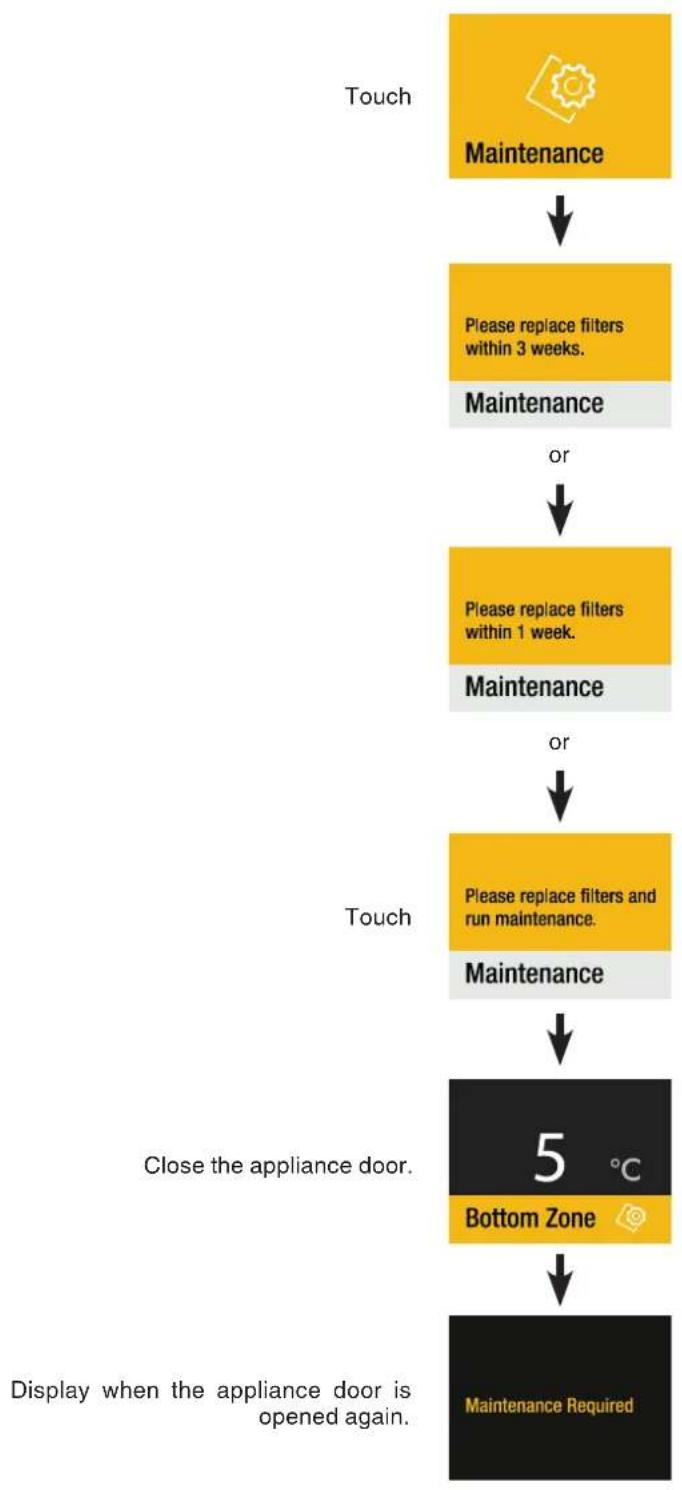
flowchart
graph TD
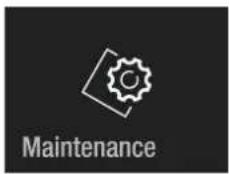
A["Touch"] --> B["Maintenance"]
B --> C["Please replace filters within 3 weeks."]
C --> D["Maintenance"]
D --> E["or"]
E --> F["Please replace filters within 1 week."]
F --> G["Maintenance"]
G --> H["or"]
H --> I["Please replace filters and run maintenance."]
I --> J["Maintenance"]
J --> K["Close the appliance door."]
K --> L["Bottom Zone"]
L --> M["Display when the appliance door is opened again."]
M --> N["Maintenance Required"]
Obtain the air filter from your dealer and complete the maintenance procedure.
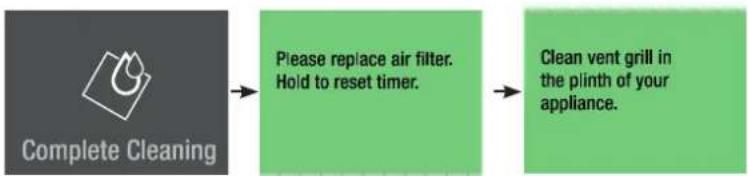
Maintenance confirmation
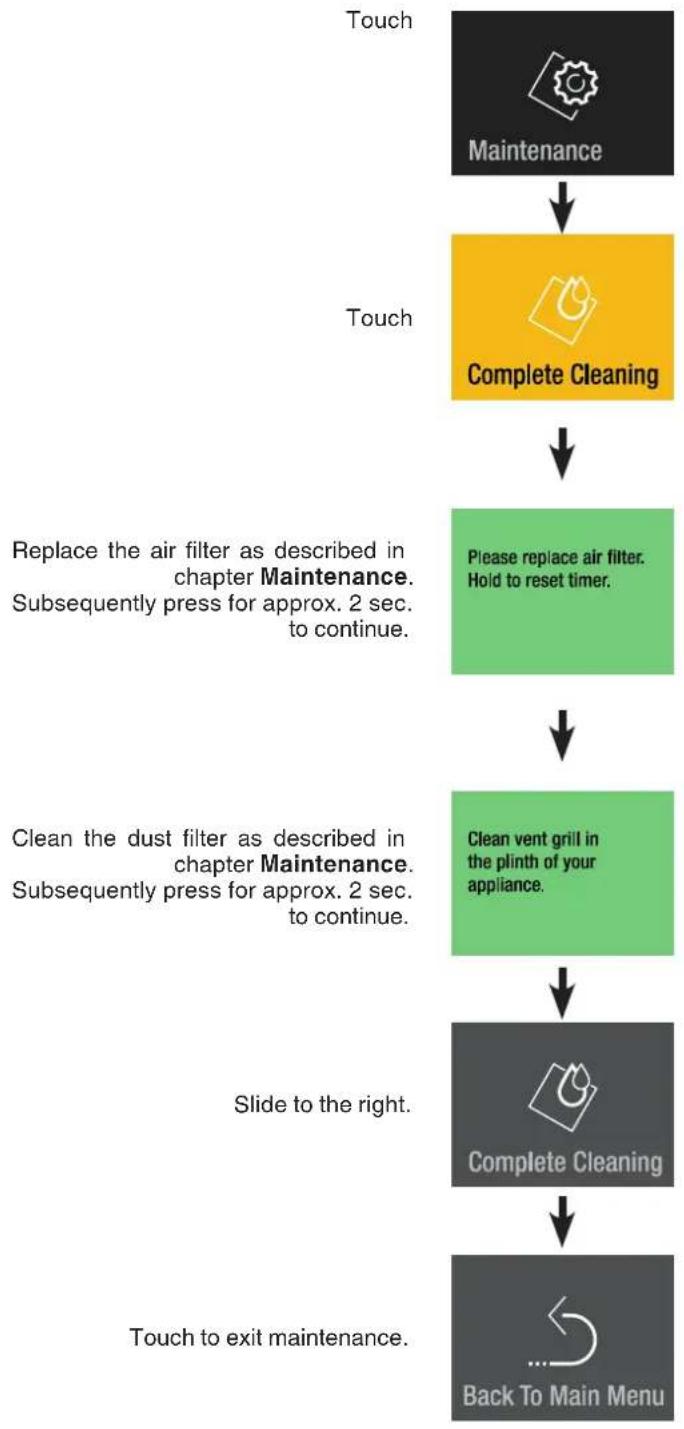
flowchart
graph TD
    A["Touch"] --> B["Maintenance"]
    B --> C["Complete Cleaning"]
    C --> D["Please replace air filter. Hold to reset timer."]
    D --> E["Clean vent grill in the plinth of your appliance."]
    E --> F["Complete Cleaning"]
    F --> G["Back To Main Menu"]
    H["Replace the air filter as described in chapter Maintenance. Subsequently press for approx. 2 sec. to continue."] --> D
    I["Clean the dust filter as described in chapter Maintenance. Subsequently press for approx. 2 sec. to continue."] --> E
    J["Slide to the right."] --> F
    K["Touch to exit maintenance."] --> G
Setup menu
Includes the adjustment for display brightness, language, units, activation of the SmartDeviceBox and the appliance information.
Display brightness
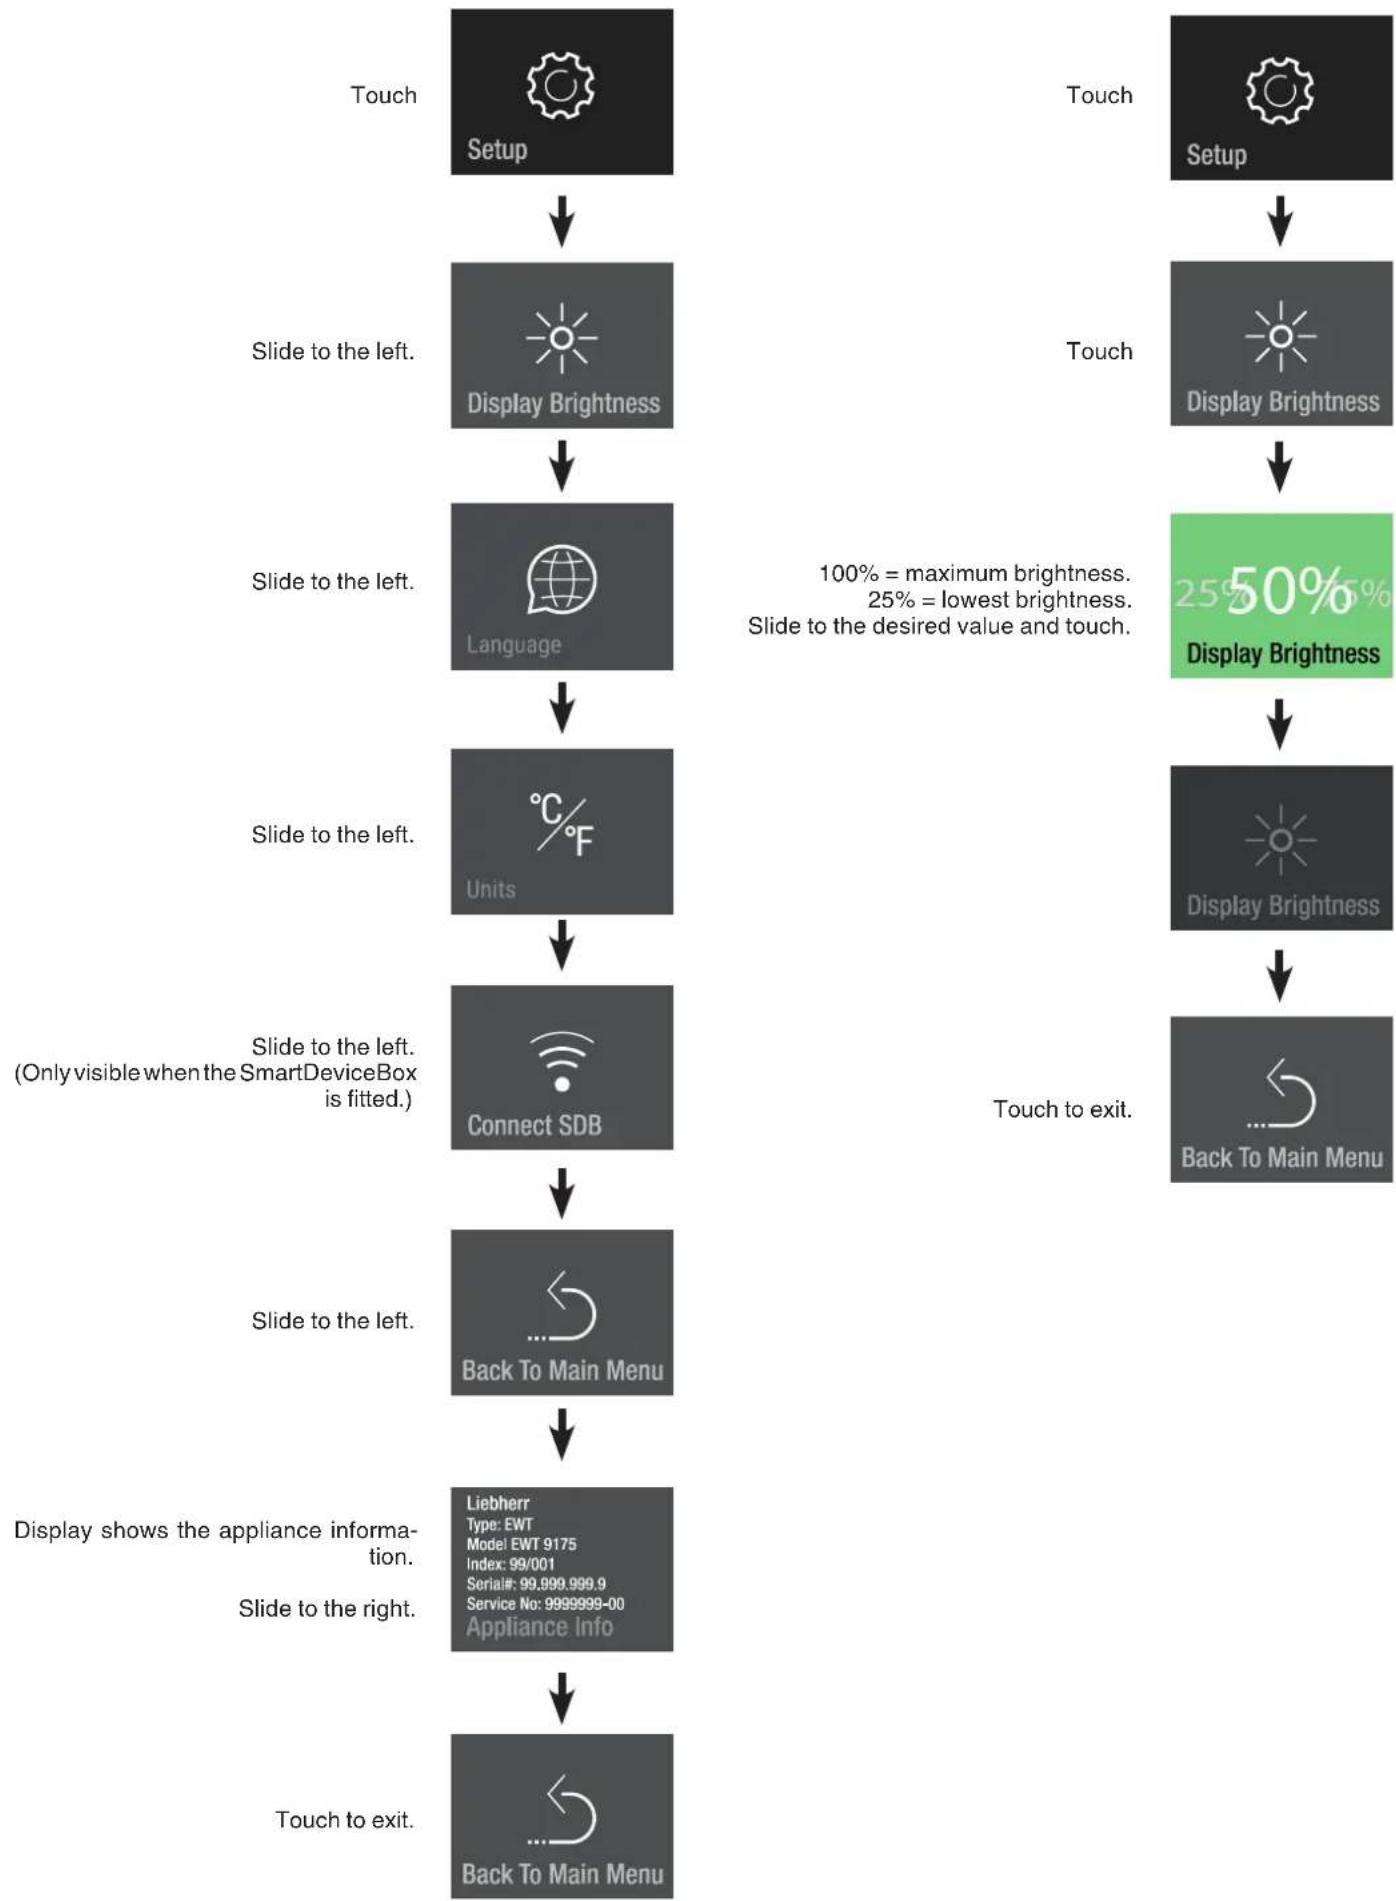
flowchart
graph TD
    A["Touch Setup"] --> B["Slide to the left. Display Brightness"]
    B --> C["Slide to the left. Language"]
    C --> D["Slide to the left. Units"]
    D --> E["Slide to the left. Connect SDB (Only visible when the SmartDeviceBox is fitted.)"]
    E --> F["Slide to the left. Back To Main Menu"]
    F --> G["Display shows the appliance information. Liebherr Type: EWT Model EWT 9175 Index: 99/001 Serial#: 99,999,999.9 Service No: 9999999-00 Appliance Info"]
    G --> H["Touch to exit. Back To Main Menu"]
    I["Touch Setup"] --> J["Slide to the right. Display Brightness"]
    J --> K["Slide to the left. Display Brightness"]
    K --> L["Display Brightness 25% = maximum brightness, 25% = lowest brightness. Slide to the desired value and touch. 50%"]
    L --> M["Touch to exit. Display Brightness"]
    M --> N["Back To Main Menu"]
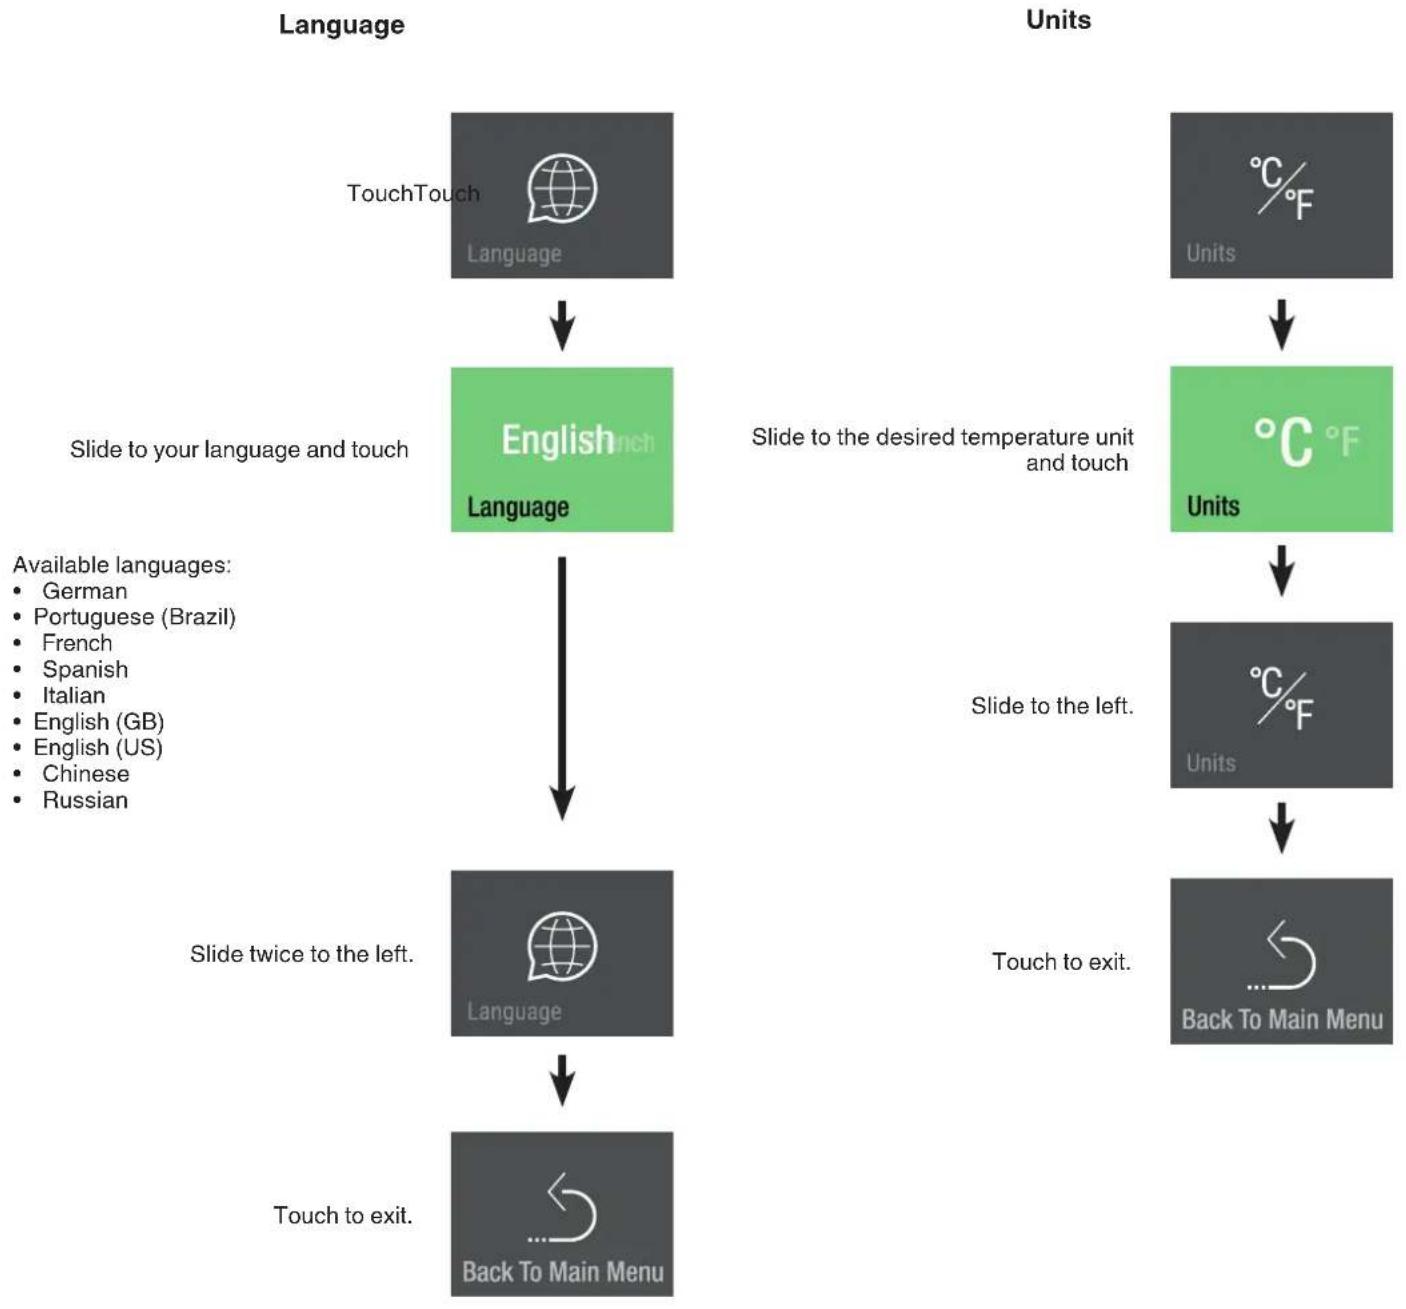
flowchart
graph TD
    A["TouchTouch Language"] --> B["English Language"]
    B --> C["Slide twice to the left."]
    C --> D["Back To Main Menu"]
    E["Units"] --> F["Slide to the desired temperature unit and touch"]
    F --> G["Units"]
    G --> H["Slide to the left."]
    H --> I["Back To Main Menu"]
    J["Available languages: German, Portuguese (Brazil), French, Spanish, Italian, English (GB), English (US), Chinese, Russian"] --> C
    K["Touch to exit."] --> D
SmartDeviceBox (not supplied in all countries)
The appliance is ready for integration into a smart home system and for extended services.
You will find more information about availability and prerequisites and the individual options on the website smartdevice.liebherr.com.
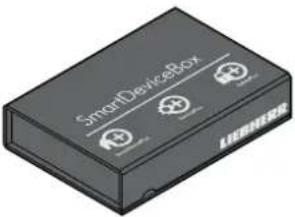
natural_image
3D rendering of a SmartDeviceBox device with two circular buttons and branding (no text or symbols on body)Download the "SmartDevice" app to your mobile device.
Start the app on your mobile device and follow the instructions.
SmartDevice functions are not available in all countries.
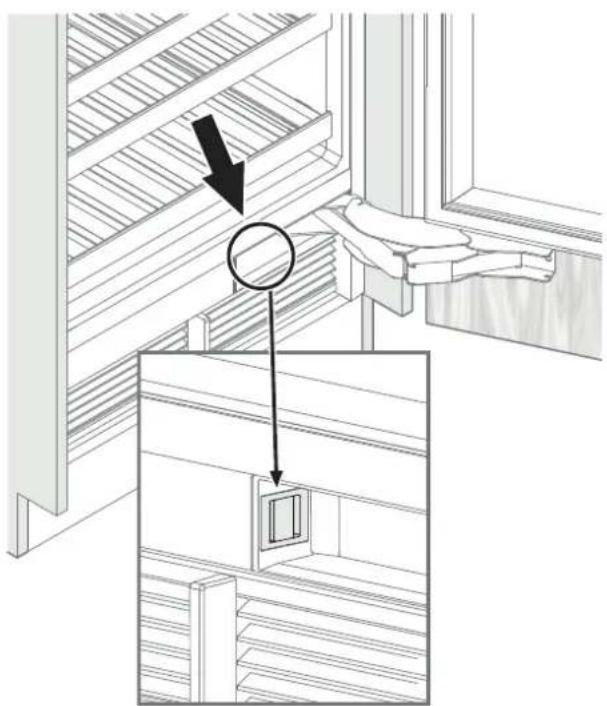
Description of the SmartDevice display
SmartDeviceBox is inserted.
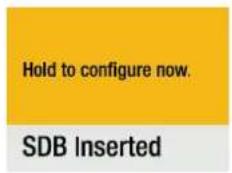
Display to start the WLAN connection.

The symbol flashes.
Connection to WLAN is in progress.

The router credentials are displayed.
Appliance is connected to WLAN.

Connection reset.
This message informs you of any router or Internet problems.

Alarm messages
Door open alarm

flowchart
graph TD
    A["Door has been left open for longer than 60 seconds."] --> B["Action: Close the appliance door."]
    B --> C["Please close door"]
    D["Temperature alarm"] --> E["Touch: Temperature Alarm"]
    E --> F["The interior temperature was too high."]
    F --> G["Touch: (Touch again if other alarms are active)"]
    G --> H["Temperature in Top zone had reached 20°C"]
    H --> I["Temperature Alarm"]
    I --> J["Touch"]
    J --> K["Action: Check the quality of the stored food."]
    K --> L["The alarm displays disappears as soon as the set temperature is reached."]
    L --> M["20 °C Top zone"]
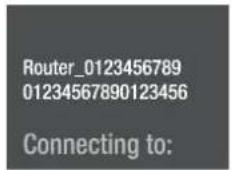
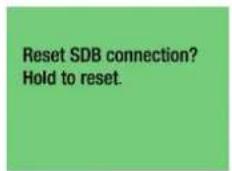
Power alarm
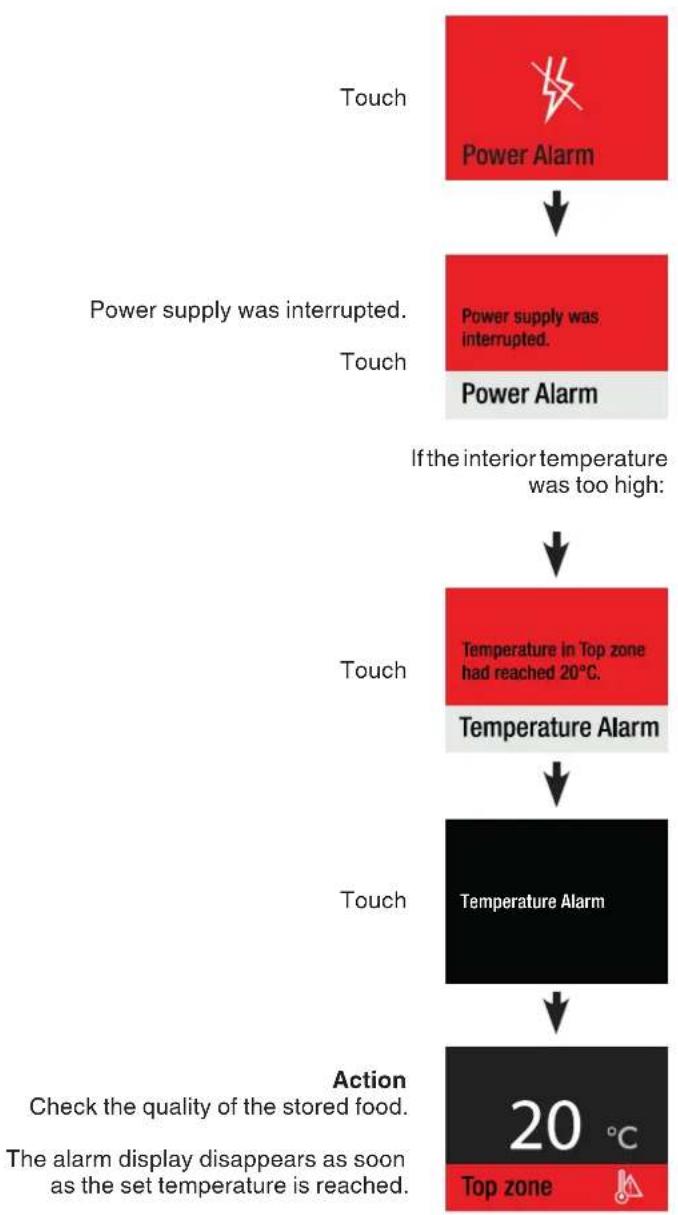
flowchart
graph TD
    A["Touch"] --> B["Power Alarm"]
    B --> C["Power supply was interrupted."]
    C --> D["Touch"]
    D --> E["Power supply was interrupted."]
    E --> F["If the interior temperature was too high:"]
    F --> G["Touch"]
    G --> H["Temperature in Top zone had reached 20°C."]
    H --> I["Temperature Alarm"]
    I --> J["Touch"]
    J --> K["Temperature Alarm"]
    K --> L["Action"]
    L --> M["Check the quality of the stored food."]
    M --> N["The alarm displays disappears as soon as the set temperature is reached."]
    N --> O["20 °C Top zone"]
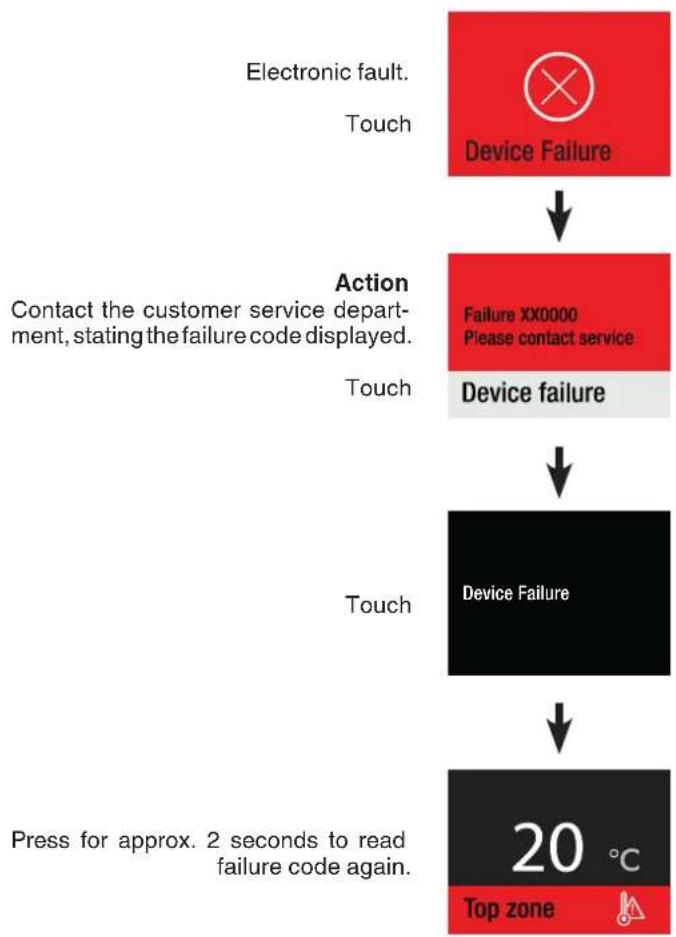
Electronic fault alarm
flowchart
graph TD
    A["Electronic fault. Touch"] --> B["Device Failure"]
    B --> C["Action Contact the customer service department, stating the failure code displayed."]
    C --> D["Device failure"]
    D --> E["Device Failure"]
    E --> F["Press for approx. 2 seconds to read failure code again."]
    F --> G["20 °C Top zone"]
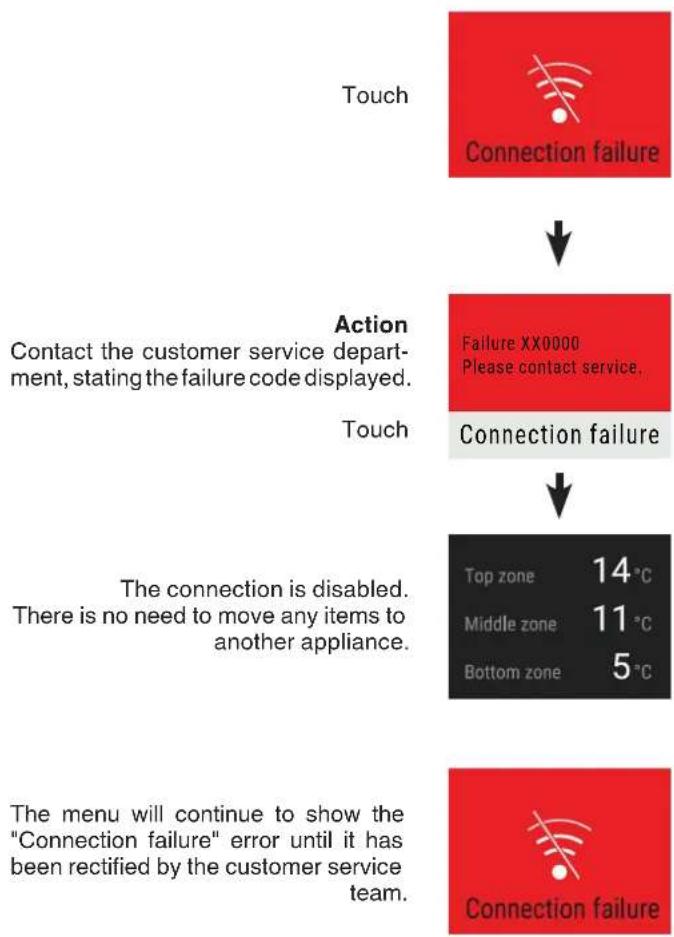
Connection failure
flowchart
graph TD
    A["Touch"] --> B["Action"]
    B --> C["Touch"]
    C --> D["The menu will continue to show the "Connection failure" error until it has been rectified by the customer service team."]
    D --> E["Failure XX0000 Please contact service."]
    E --> F["Top zone 14°C, Middle zone 11°C, Bottom zone 5°C"]
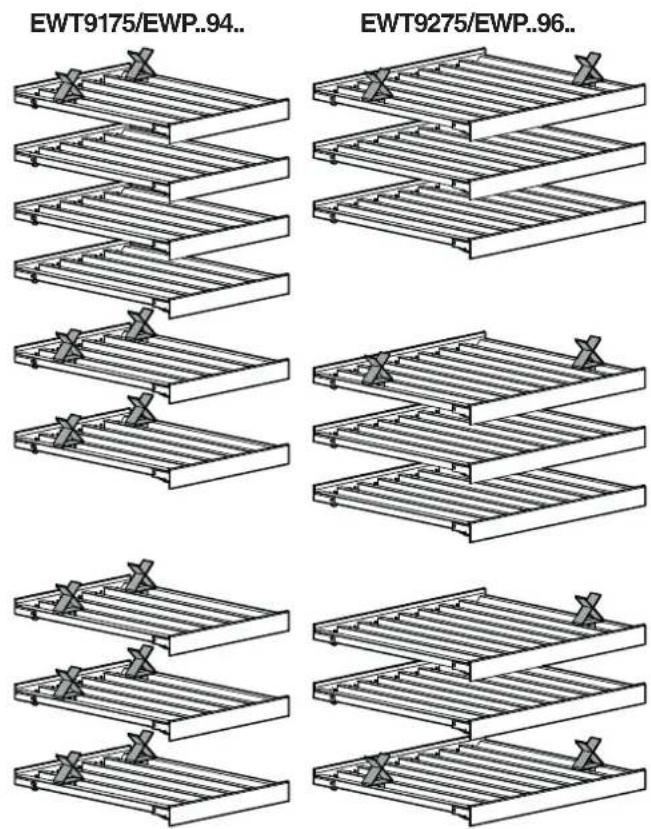
Storage diagram
for 0.75 | Bordeaux bottles to standard NF H 35-124
EWT9175/EWP..94..EWT9275/EWP..96..
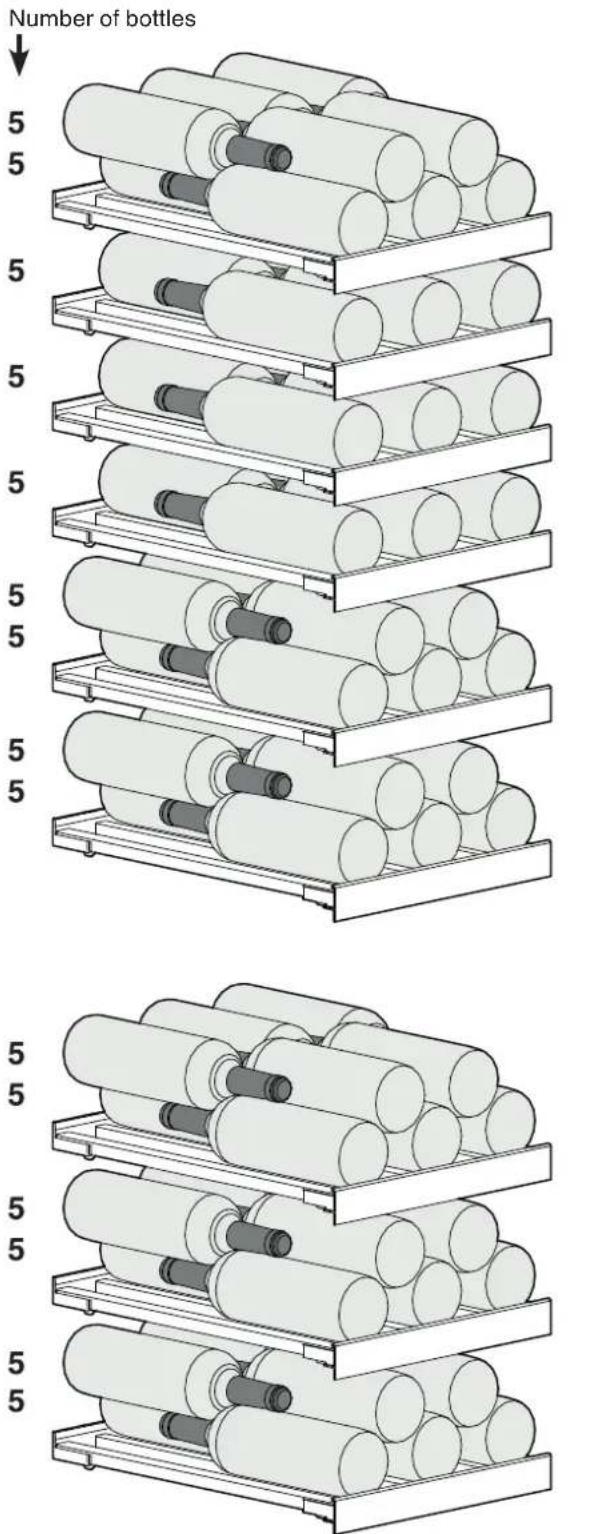
Total: 75 bottles Total: 100 bottles
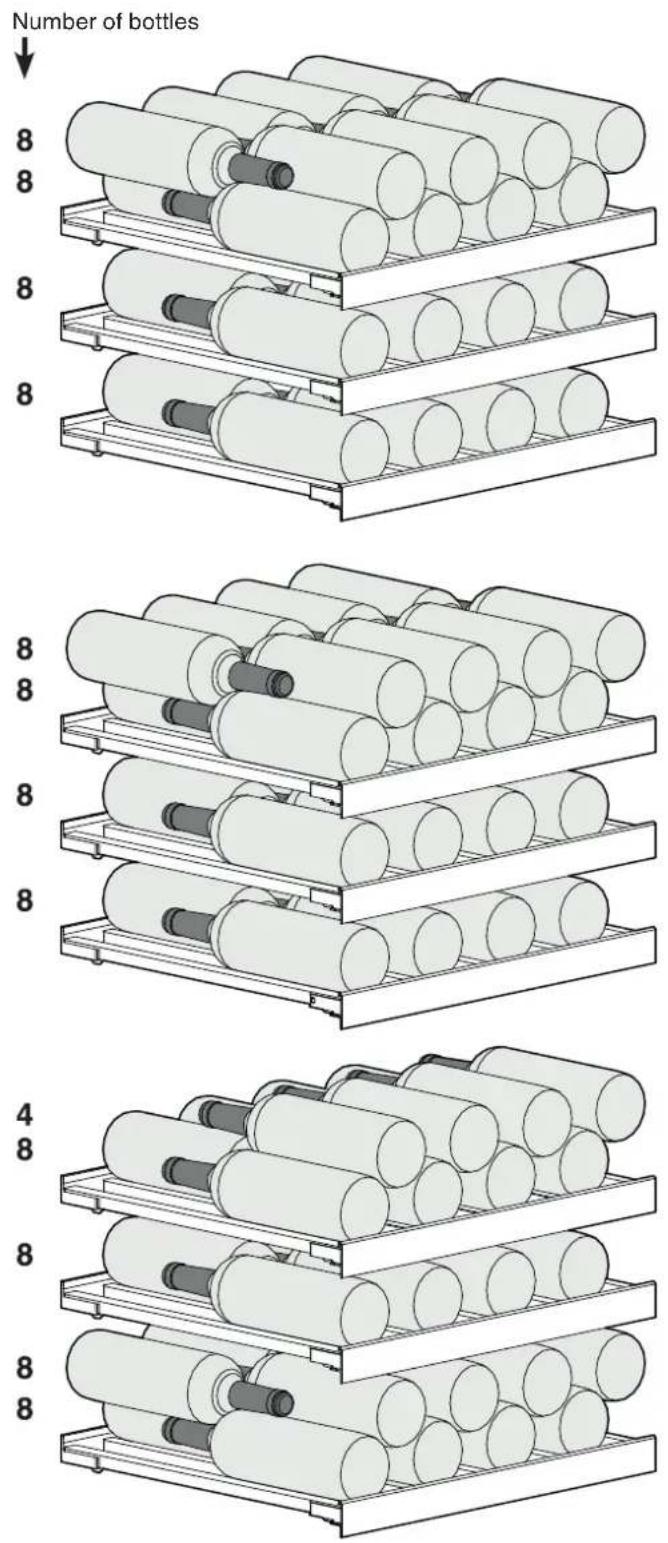
The maximum load per wooden shelf is 20 kg.
Equipment
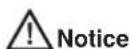
Pull-out shelf
The bars can be removed and repositioned to store larger or smaller bottles.
Raise the bar at the rear (1) and pull it out (2).
natural_image
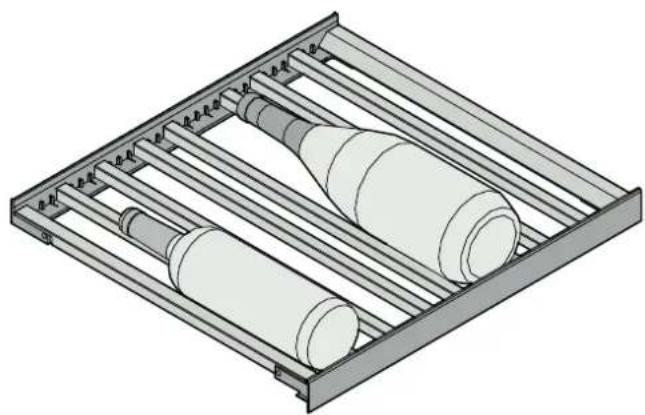
Isometric technical drawing of a mechanical assembly with cylindrical components and metal frame (no text or symbols)Bar configuration for maximum number of bottles
natural_image
Technical illustration of a metal grate structure with vertical slats and mounting brackets (no text or symbols)Serving shelf
The serving shelf can be pulled out to provide a surface to hold bottles and glasses.

natural_image
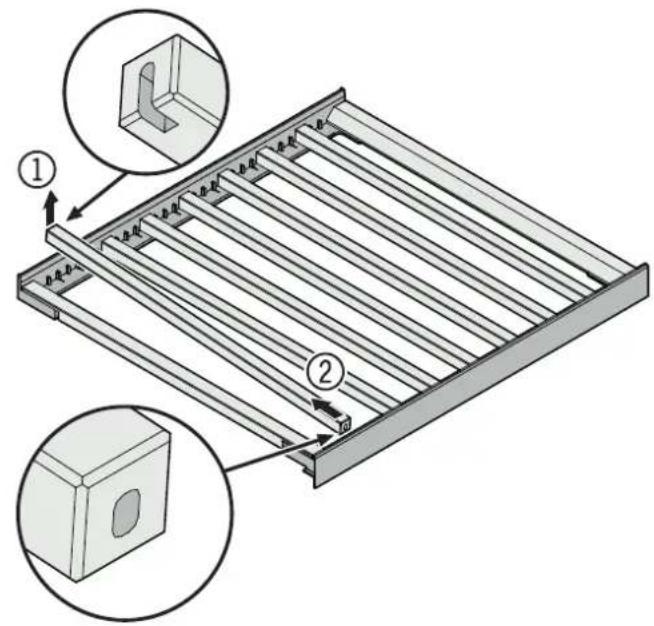
Illustration of wine bottles and two wine glasses on a shelf (no text or symbols)Bottle holder
Insert the supplied bottle holders to house the maximum number of bottles.
Insert the bottle holder between the bars (1), turn it (2) and slide it towards the outside (3).
Then slide the bottle holder to position X = \~80 mm as shown in the illustration.
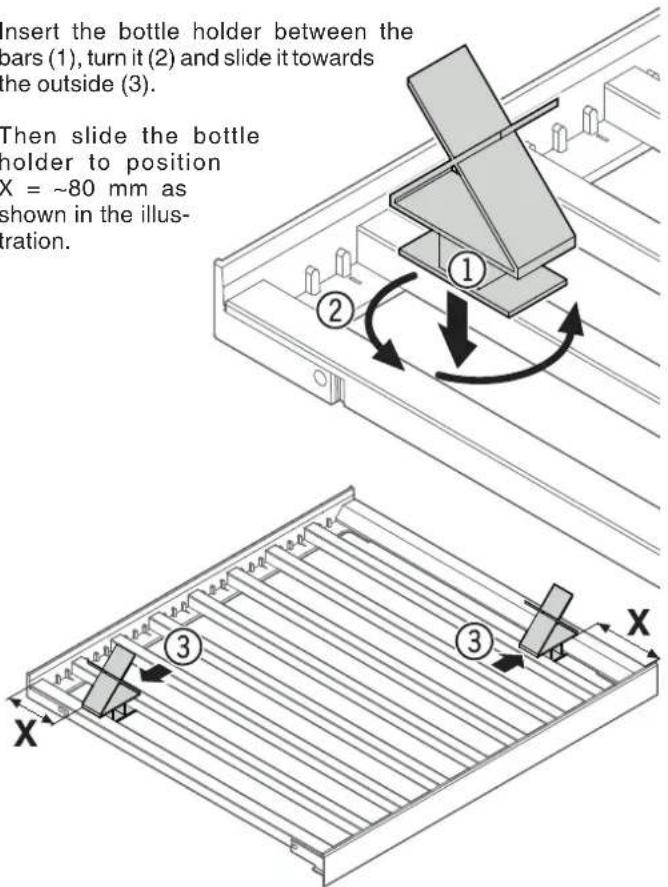
Positioning the bottle holder for the maximum number of bottles:
Cleaning
A failure to follow these instructions may result in the food being spoilt.

Before cleaning, always disconnect the appliance from the mains. Pull out the plug or switch off the fuse.
Surfaces which may come into contact with food and accessible drain systems must be cleaned at regular intervals.
If the door is left open for a lengthy period, the temperature in the appliance's compartments may rise dramatically.
- Clean the inside, equipment parts and outer walls with lukewarm water and a little detergent. Do not use chemical solvents or any cleaning agents containing sand or acid.
- Use a glass cleaner to clean the glass surfaces and a commercially available stainless-steel cleaning agent for the stainless-steel surfaces.

Risk of damage to the appliance components and risk of injury due to hot steam.
Do not use steam cleaning equipment to clean the appliance.
- Ensure that no cleaning water penetrates into the electrical components or ventilation grille.
• Dry all parts well with a cloth. - Do not damage or remove the type plate on the inside of the appliance. It is very important for servicing purposes.
If the appliance is left empty for a lengthy period, it must be switched off, defrosted, cleaned and dried and the door is to be left open to prevent mould formation.
Removing and inserting the wooden shelves
The wooden shelves can be removed for easier cleaning of the inside of the appliance.
Removing the wooden shelf
Pull out the wooden shelf, press the sides (1) gently, lift it upwards (2) and pull it out towards you (3).
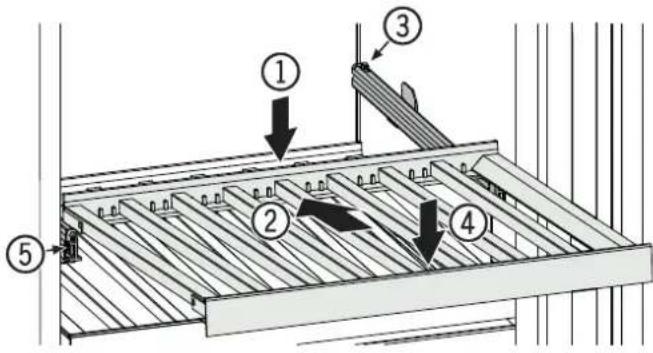
Inserting the wooden shelf
Position the wooden shelf at the rear (1), slide it backwards on the rails (2), attach it at the end (3), and then press it downwards (4) until the shelf engages in the rails (5).
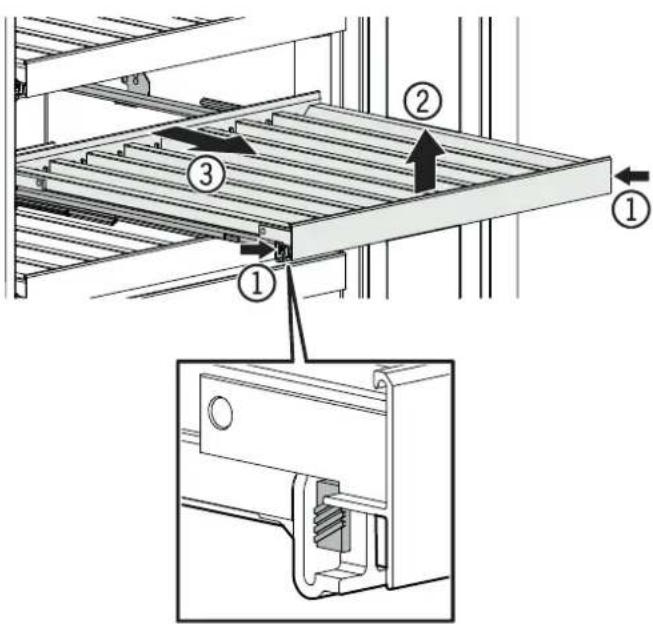
Removing the serving shelf
To remove the serving shelf, first remove the wooden shelf above the serving shelf.
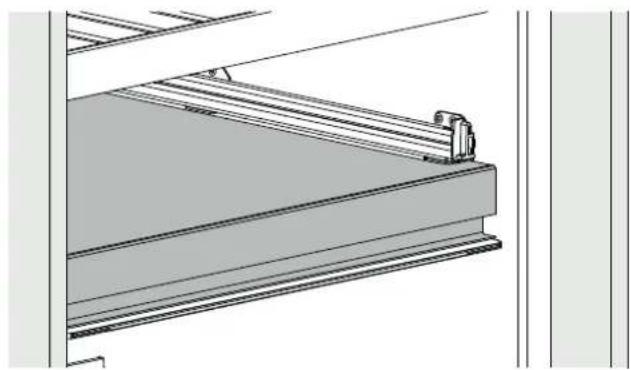
natural_image
Technical line drawing of a structural beam with support bracket and diagonal reinforcement (no text or symbols)Pull out the serving shelf a little (1), lift the front upwards (2) to release the magnetic connection and pull it out towards you (3).
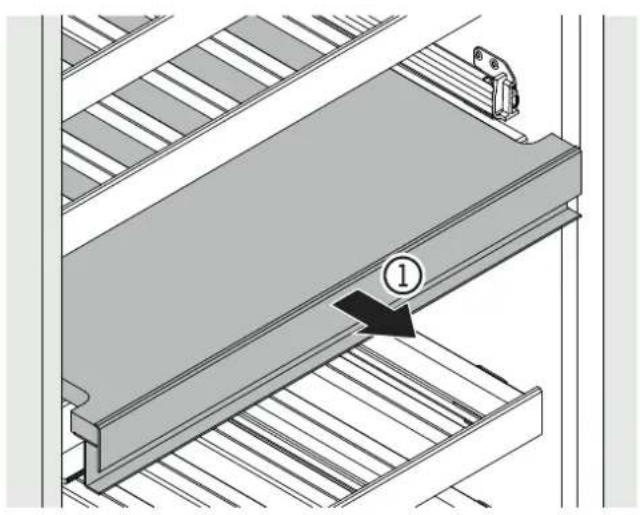
natural_image
Technical diagram of a mechanical assembly with layered components and a numbered component (no text or symbols)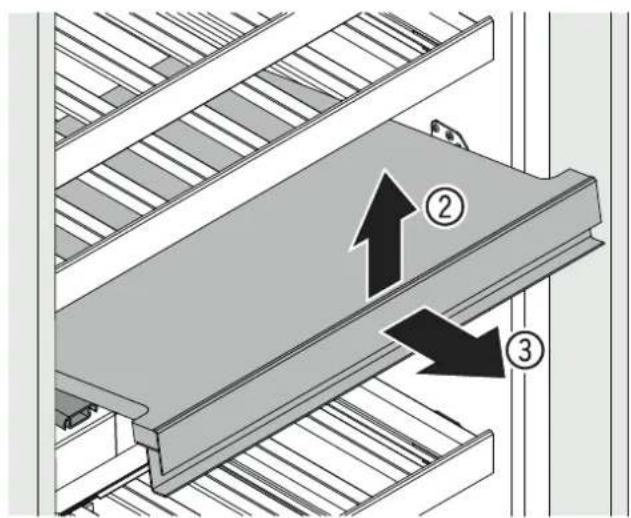
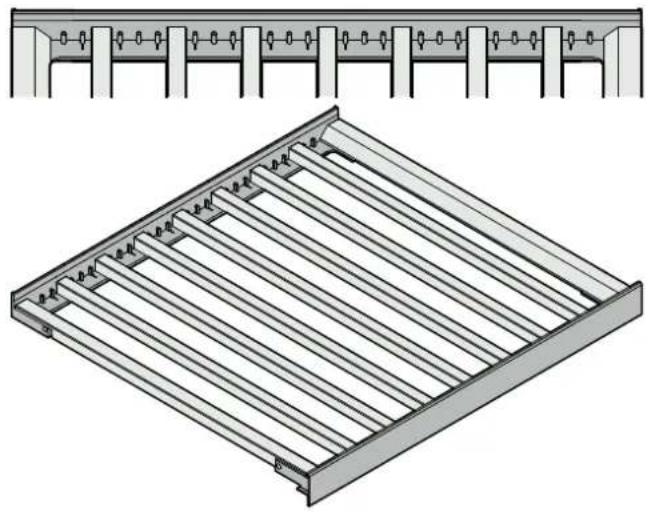
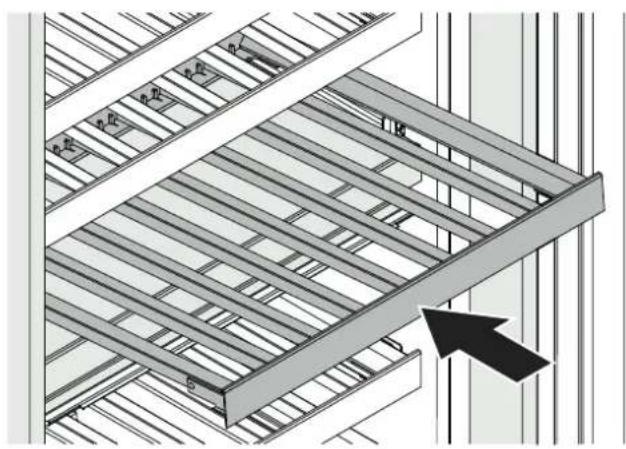
Inserting the serving shelf
Place the serving shelf on the rails. The bolts on the underside of the serving shelf must engage in the rails to be positioned precisely.
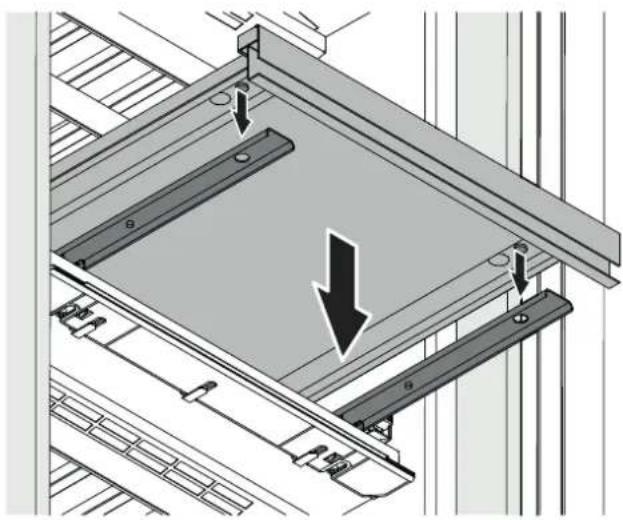
natural_image
Technical diagram of a structural frame assembly with arrows indicating direction (no text or symbols present)Insert the wooden shelf above the serving shelf.
natural_image
Architectural diagram of a multi-level metal shelving unit with diagonal bracing and an arrow pointing to one section (no text or symbols present)Maintenance menu
Maintenance can be carried out independently of the specified regular intervals. The maintenance menu includes the following steps.
Complete cleaning
For complete maintenance of the appliance.
flowchart
graph LR
    A["Complete Cleaning"] --> B["Please replace air filter. Hold to reset timer."]
    B --> C["Clean vent grill in the plinth of your appliance."]
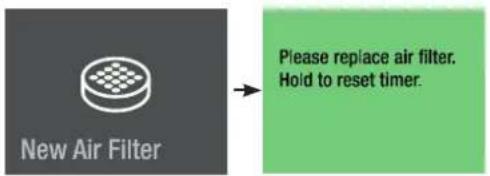
New air filter
To reset the maintenance timer.
To return to the main menu.
flowchart
graph LR
    A["... Back To Main Menu"] --> B["Maintenance"]
Maintenance
New air filter
The way in which wines continue to mature depends on the ambient conditions.
The quality of the air is therefore decisive for preserving the wine.
It should be changed at least at the indicated maintenance intervals.
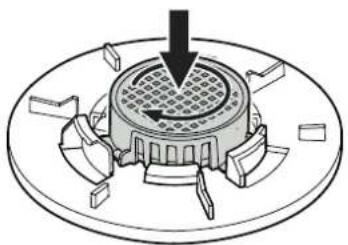
Insert the new air filter and turn clockwise until it snaps in.
natural_image
Diagram of a mechanical component with a downward arrow indicating force or direction (no text or symbols present)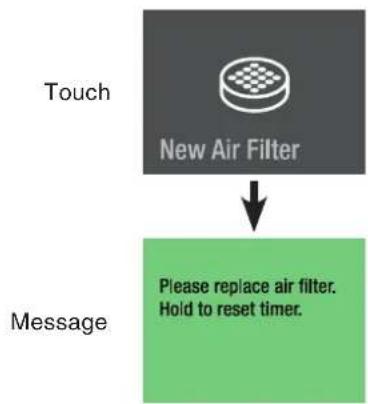
flowchart
Air filter touch signal flowchart showing 'New Air Filter' triggering message replacement to reset timer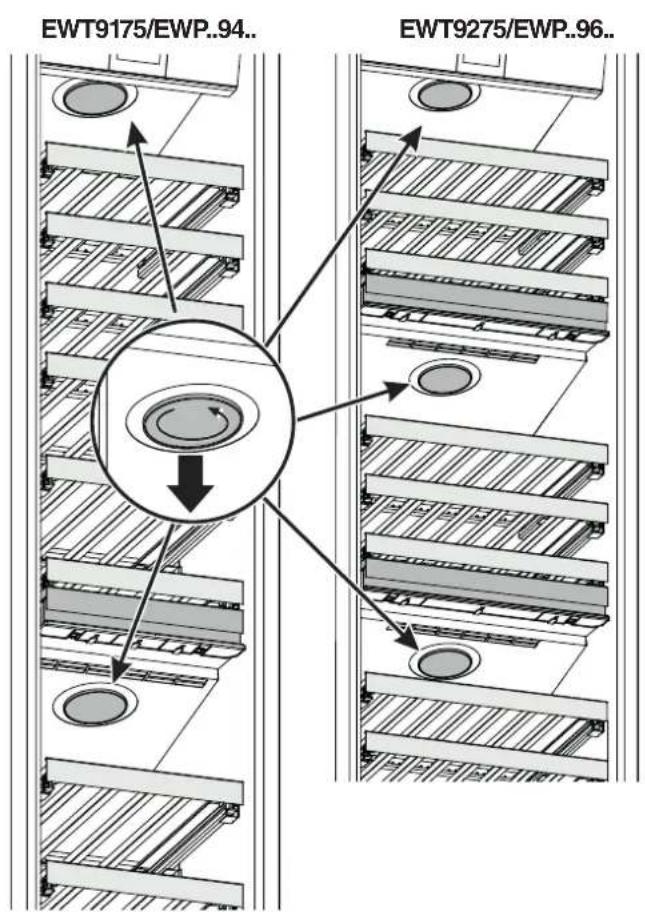
Turn the cover anticlockwise and remove it.
Insert the cover and turn clockwise until it snaps in.
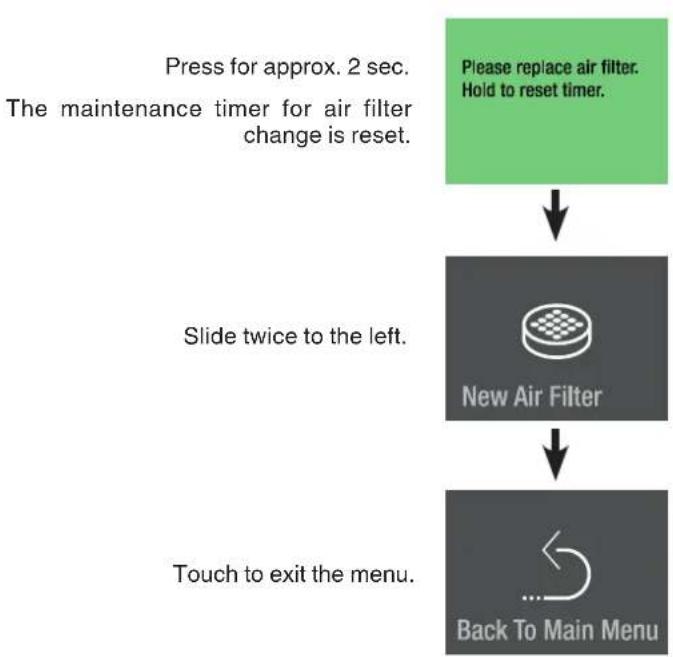
flowchart
graph TD
    A["Press for approx. 2 sec.<br>The maintenance timer for air filter change is reset."] --> B["Please replace air filter.<br>Hold to reset timer."]
    B --> C["Slide twice to the left."]
    C --> D["New Air Filter"]
    D --> E["Touch to exit the menu."]
    E --> F["Back To Main Menu"]
Turn the air filter anticlockwise and remove it.
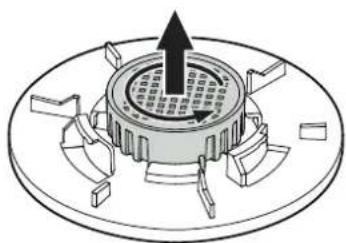
natural_image
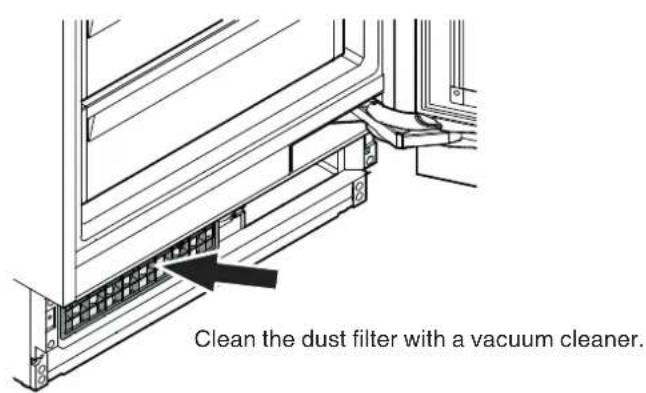
Technical line drawing of a mechanical component with a central hub and surrounding blades (no text or symbols)Cleaning the dust filter
Clean the dust filter in the plinth area at least at the indicated maintenance intervals.
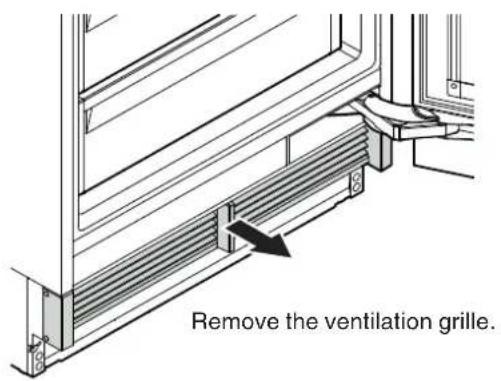
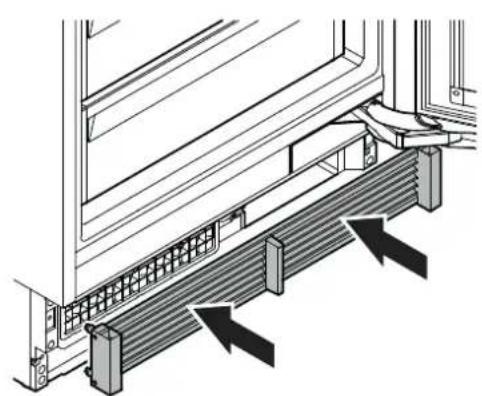
natural_image
Technical diagram of a window frame structure with directional arrows indicating movement or force (no text or symbols present)Mount the ventilation grille.
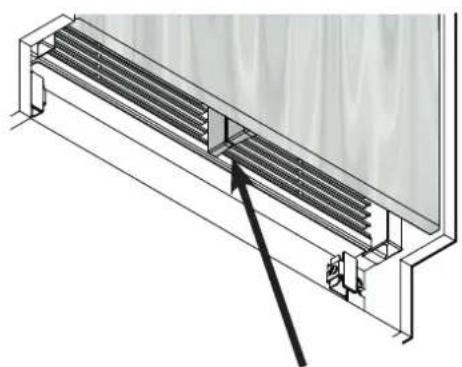
natural_image
Technical line drawing of a structural panel assembly with diagonal braces and a black arrow pointing to a component (no text or symbols)Check that there is no gap between the appliance air divider and the door air divider.
IMPORTANT
There will be a gap if the ventilation grille is fitted incorrectly.
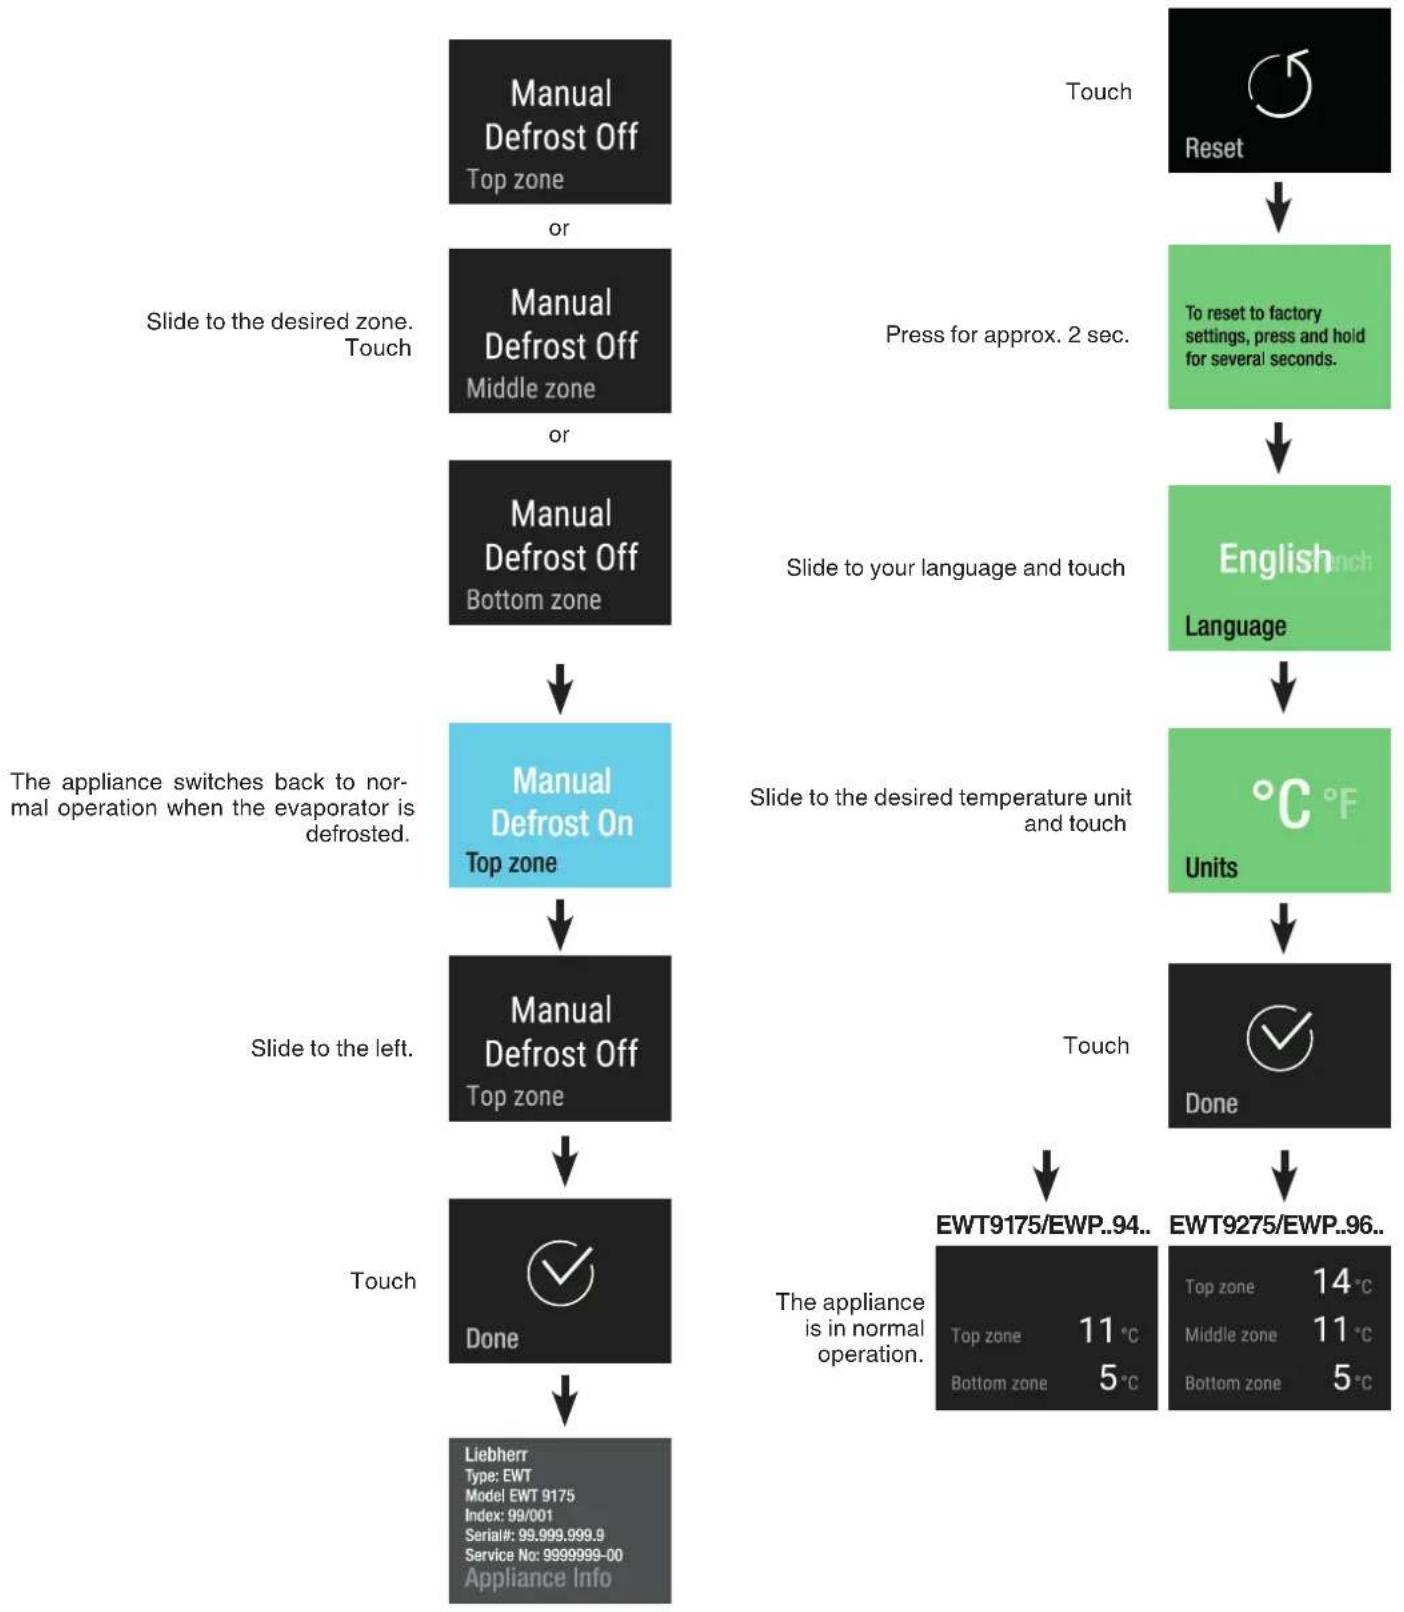
Additional functions
Activating the defrost function manually Reset to factory settings DemoMode
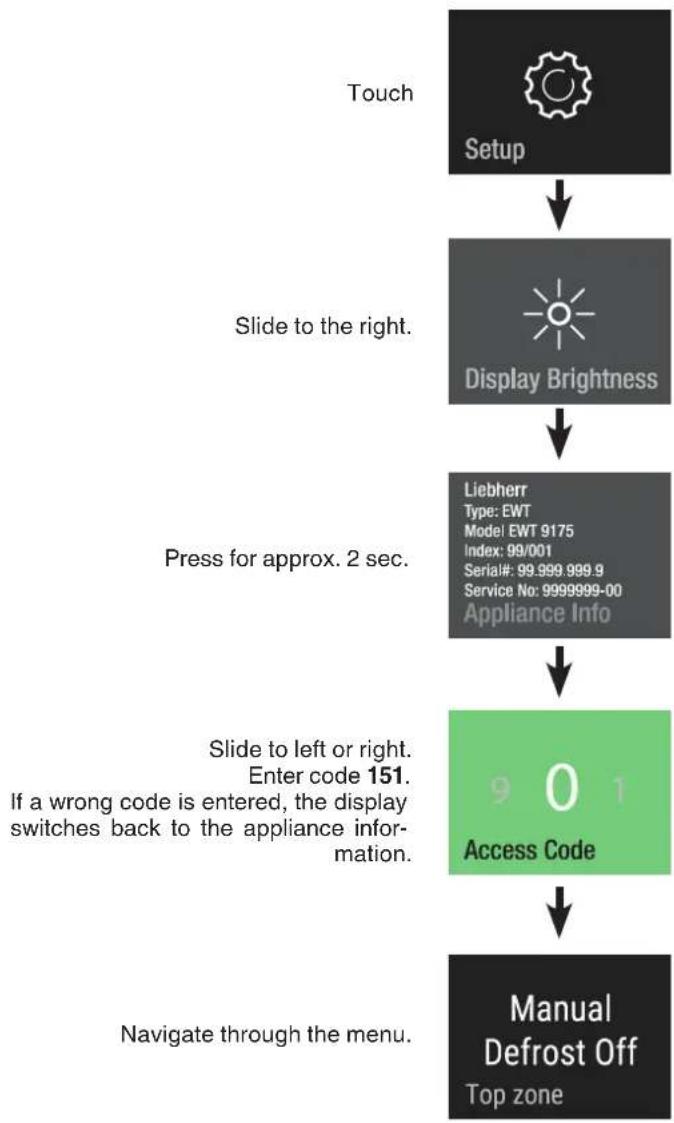
flowchart
graph TD
    A["Setup"] --> B["Display Brightness"]
    B --> C["Liebherr\nType: EWT\nModel EWT 9175\nIndex: 99/001\nSerial#: 99.999.999.9\nService No: 9999999-00\nAppliance Info"]
    C --> D["Access Code"]
    D --> E["Manual Defrost Off\nTop zone"]
    F["Touch"] --> A
    G["Slide to the right."] --> B
    H["Press for approx. 2 sec."] --> C
    I["Slide to left or right.\nEnter code 151.\nIf a wrong code is entered,\the display switches back to the appliance information."] --> D
    J["Navigate through the menu."] --> E
Manual defrost
The appliance defrosts automatically. The defrost function can be activated manually for service applications.
Reset
The electronic control system can be reset to factory settings using this function.
flowchart
graph TD
    A["Manual Defrost Off Top zone"] -->|or| B["Manual Defrost Off Middle zone"]
    B -->|or| C["Manual Defrost Off Bottom zone"]
    C --> D["Manual Defrost On Top zone"]
    D --> E["Manual Defrost Off Top zone"]
    E --> F["Done"]
    F --> G["Liebherr Type: EWT Model EWT 9175 Index: 99/001 Serial#: 99.999.999.9 Service No: 9999999-00 Appliance Info"]

    H["Touch"] --> I["Reset"]
    I --> J["To reset to factory settings, press and hold for several seconds."]
    J --> K["English Language"]
    K --> L["°C °F Units"]
    L --> M["Done"]

    N["Press for approx. 2 sec."] --> J
    O["Slide to your language and touch"] --> K
    P["Slide to the desired temperature unit and touch"] --> L
    Q["The appliance switches back to normal operation when the evaporator is defrosted."] --> D
    R["Slide to the left."] --> F
    S["The appliance is in normal operation."] --> T["EWT9175/EWP..94.. Top zone 11°C Bottom zone 5°C"]
    U["The appliance is in normal operation."] --> V["EWT9275/EWP..96.. Top zone 14°C Middle zone 11°C Bottom zone 5°C"]
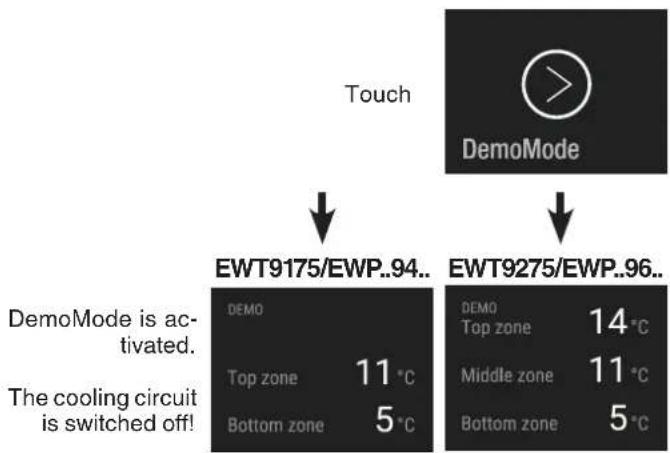
DemoMode
DemoMode can be activated for presenting the appliance at exhibitions or in salesrooms as if it were in normal operating mode.
Activating DemoMode
flowchart
graph TD
    A["Touch"] --> B["EWT9175/EWP..94.."]
    C["DemoMode"] --> D["EWT9275/EWP..96.."]
    B --> E["Demo Mode is activated."]
    B --> F["Top zone 11 °C"]
    B --> G["Bottom zone 5 °C"]
    D --> H["Demo Mode Top zone 14 °C"]
    D --> I["Middle zone 11 °C"]
    D --> J["Bottom zone 5 °C"]
    style A fill:#f9f,stroke:#333
    style C fill:#f9f,stroke:#333
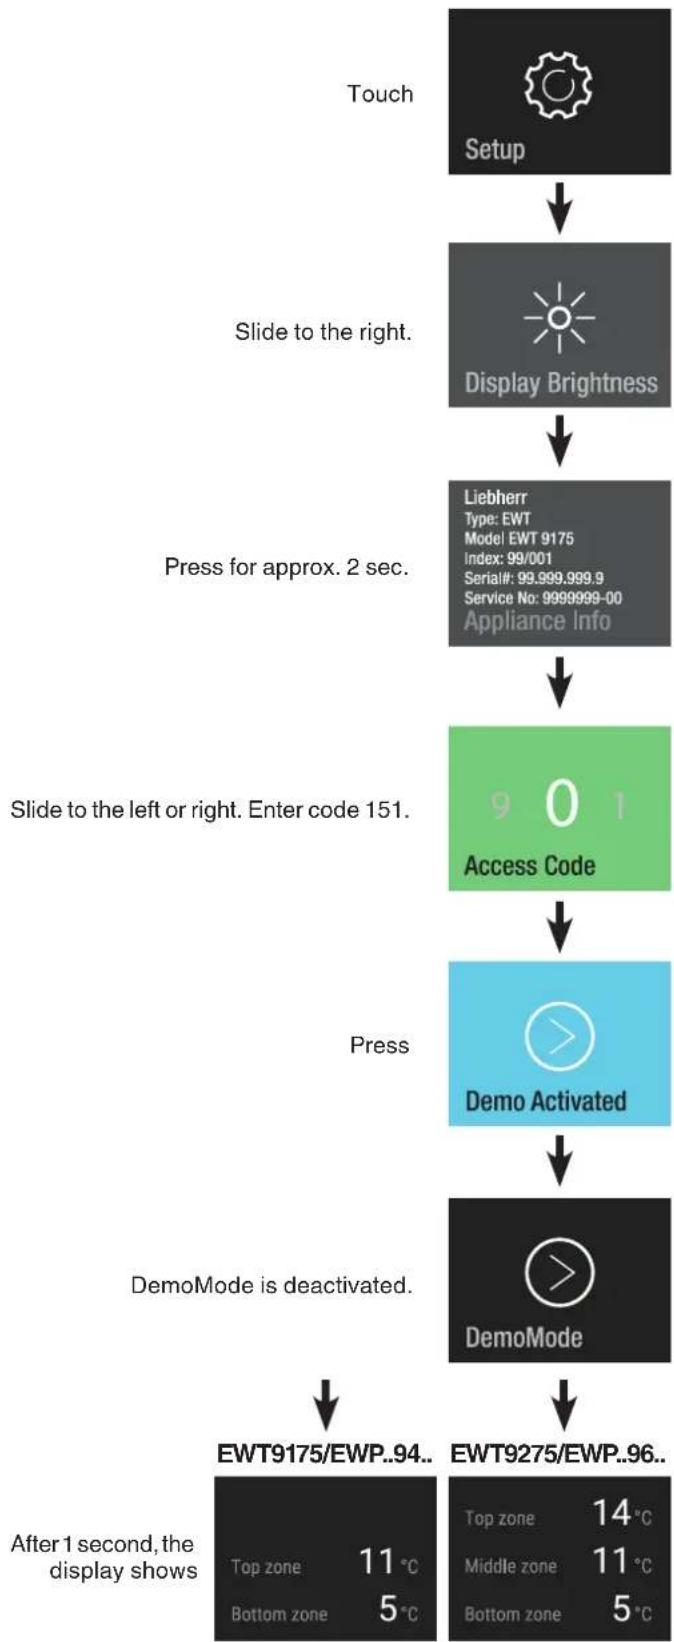
Deactivating DemoMode
flowchart
graph TD
    A["Touch"] --> B["Setup"]
    B --> C["Slide to the right."]
    C --> D["Display Brightness"]
    D --> E["Press for approx. 2 sec."]
    E --> F["9 0 1 Access Code"]
    F --> G["Slide to the left or right. Enter code 151."]
    G --> H["Press"]
    H --> I["Demo Activated"]
    I --> J["DemoMode"]
    J --> K["EWT9175/EWP..94..."]
    K --> L["After 1 second, the display shows"]
    L --> M["Top zone 11 °C\nBottom zone 5 °C"]
    L --> N["Top zone 14 °C\nMiddle zone 11 °C\nBottom zone 5 °C"]
Malfunctions
You may be able to rectify the following faults by checking the possible causes yourself.
Appliance does not function:
– Is the appliance switched on?
– Is the plug correctly fitted in the mains socket?
– Is the fuse intact?
Loud running noise:
– Is the appliance set up firmly on the floor?
- Does the appliance cause nearby items of furniture or objects to vibrate? Please note that noises caused by the refrigerant circuit cannot be avoided.
The temperature is not low enough:
- Is the temperature setting correct (see "Setting the temperature")?
- Does the separately installed thermometer show the correct reading?
– Is the ventilation system working properly? - Is the appliance set up too close to a heat source?
If none of the above causes apply and you cannot rectify the fault yourself, contact the nearest customer service department stating the type designation (1), service number (2) and appliance number (3) as indicated on the type plate.
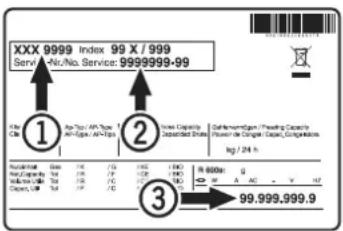
The position of the type plate is shown in the section entitled Description of the appliance.
Shutting your appliance down
If your appliance is to be shut down for any length of time, switch it off and disconnect the plug or switch off or unscrew the fuse.
Clean the appliance and leave the door open in order to prevent unpleasant smells.
The appliance complies with the relevant safety regulations and EU Directives 2014/35/EU, 2014/30/EU, 2009/125/EC and 2011/65/EU.