
TPS-6X-BTP - Rechargeable Battery Crestron - Free user manual and instructions
Find the device manual for free TPS-6X-BTP Crestron in PDF.


| Product Type | Touch Panel Control System |
| Brand | Crestron |
| Model | TPS-6X-BTP |
| Display Size | 6 inches diagonal |
| Display Type | Color LCD |
| Touch Technology | Resistive or capacitive touch |
| Resolution | 640 x 480 pixels (estimated) |
| Dimensions (H x W x D) | Approx. 7.2 x 4.6 x 2.1 inches |
| Weight | Approx. 2.1 lbs (0.95 kg) |
| Power Source | PoE (Power over Ethernet) or external power supply |
| Power Consumption | 10 W max |
| Connectivity | Ethernet (10/100), Cresnet (if applicable) |
| Mounting | Wall mount or tabletop |
| Operating Temperature | 32° to 104° F (0° to 40° C) |
| Humidity | 10% to 90% non-condensing |
| Functions | Control lighting, shades, audio, video, and HVAC |
| Programming | Crestron Simpl/Simpl+ or VT Pro-e |
| Battery | None (wired) |
| Cleaning Instructions | Wipe with a soft, dry cloth; avoid harsh chemicals |
| Safety Certifications | UL, CE, FCC |
| Spare Parts | Screen replacement, bezel, power supply (if external) |
| Repairability | Limited; service by Crestron or authorized dealers |
| Warranty | 3 years (typical) |
Frequently Asked Questions - TPS-6X-BTP Crestron
User questions about TPS-6X-BTP Crestron
0 question about this device. Answer the ones you know or ask your own.
Ask a new question about this device
Download the instructions for your Rechargeable Battery in PDF format for free! Find your manual TPS-6X-BTP - Crestron and take your electronic device back in hand. On this page are published all the documents necessary for the use of your device. TPS-6X-BTP by Crestron.
USER MANUAL TPS-6X-BTP Crestron
Battery Pack for TPS-6X
DO Remove the Old Battery Pack
NOTE: The TPS-6X Wireless Touch Screen contains ESD (electrostatic discharge) sensitive devices. To avoid damaging the unit, perform the following procedure on a grounded workstation or while wearing a grounding strap that is properly grounded.
NOTE: To prevent damage to the multipin connector and wiring, use care when handling the TPS-6X-BTP.
To remove the existing TPS-6X-BTP from a TPS-6X touch screen, perform the following procedure. A #1 Phillips screwdriver and a small flat head screwdriver are required.
- With the touch screen turned off, use the included T-pin to slide the battery switch on the rear to the OFF (down) position. Then, place the touch screen face down on a clean, padded work surface.

- Remove the four screws that secure the front bezel to the touch screen, and then return the unit to its normal, face-up position. (Use care and hold the bezel against the touch screen. If the bezel separates from the rest of the touch screen while rotating the unit to its normal position, the internal parts of the unit may spill out.)
- Lift the front bezel from the touch screen, and then place the touch screen assembly face down on the work surface.
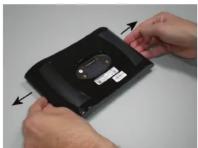
- Carefully remove the rear of the enclosure from the touch screen by grasping the support frame at the left and right edges, gently spreading them (as shown in the following illustration), and lifting the assembly. The touch screen will snap out of the enclosure.
- Remove the orange tape securing the battery pack wires to the circuit board and the two pieces of clear tape on each battery cell.

DO Check the Box
QUANTITY PRODUCT PART NUMBER
| 2 Tape, 1" x 1" 2023162 |
| 1 Tape, 1" x 2" 2023163 |
| 1 Tool, T-Pin 2020478 |
- Using the tip of a small flat head screwdriver, gently separate the multipin connector from the corresponding connector on the circuit board of the TPS-6X.

- From both sides of the assembly, remove the battery cells with the connecting wires attached.
DO Install the Battery Pack
NOTE: The TPS-6X Wireless Touch Screen contains ESD-sensitive devices. To avoid damaging the unit, perform the following procedure on a grounded workstation or while wearing a grounding strap that is properly grounded.
to install the TPS-6X-BTP, perform the following procedure. A #1 Phillips screwdriver is required.
- Orient the TPS-6X-BTP so the black and white wires are on the bottom left side, and the red and yellow wires are on the bottom right side.
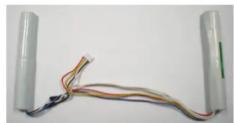
- Place the battery cells in their compartments on the left and right sides of the TPS-6X assembly. Ensure the ridge that runs along the length of each cell is facing inward, toward the center of the assembly, and the rounded side of each cell is facing outward.
- Carefully connect the miltipin connector of the TPS-6X-BTP with the corresponding connector on the circuit board of the TPS-6X.
- Dress the TPS-6X-BTP cables as shown in the illustration following step 5, and apply the 2" (50 mm) piece of orange tape (included with the TPS-6X-BTP) to hold the wires in place.
- Apply the 1" (25 mm) pieces of orange tape (included with the TPS-6X-BTP) to each battery cell, and extend the tape to the black tabs on each side of the battery housing support. Refer to the following illustration. These orange pieces replace the clear tape that held the original cells in place.
NOTE: Ensure the tape does not wrap around to the front of the touch screen where it could contact the light fibers on either side of the screen.
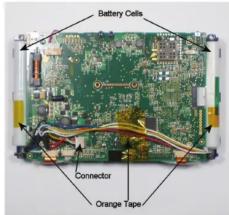
- Carefully turn the assembly over returning it to its normal, face-up position. Then, place the assembly into the rear half of the TPS-6X enclosure, and hinge it so the top of the assembly is in place first (as shown in the following illustration). With the top of the assembly in position, settle the bottom of the assembly into place. Then, with your thumbs on the black plastic at the left and right edges, press and snap the assembly into place. CAUTION: To avoid damage to the buttons at the top of the assembly, ensure they are clear of the enclosure when inserting the top of the assembly into the enclosure.

- Position the front bezel over the exposed touch screen. Ensure the ribbon cables remain tucked in place, and the fiber optic cables remain inboard of the posts located next to each of the bottom screw holes.
- Hold the bezel to the rest of the touch screen, and carefully rotate the entire panel onto its face.
- Reinstall the four screws to secure the bezel to the touch screen. Tighten the screws, being careful not to strip the threads.
DO Charge the Battery Pack
NOTE: A Nickel Metal Hydride (NiMH) battery typically provides 500 charge/discharge cycles.
To charge the TPS-6X-BTP, install the TPS-6X-BTP into a TPS-6X touch screen, and mount the touch screen on a powered TPS-6X-DS or TPS-6X-DS-C docking station (TPS-6X-DS-C sold separately).
NOTE: If the touch screen is in use during charging, the battery pack may take up to three hours to charge.
DO Store the Battery Pack
Over time, the capacity and voltage of rechargeable NiMH batteries will decrease if the batteries are not recharged at regular intervals. This is caused by a chemical reaction, commonly known as “self-discharge,” that takes place within the batteries.
When a battery is placed in storage, temperature is a major factor that affects the rate of self-discharge. Higher temperatures will increase the rate of self-discharge. The storage time table that follows shows how long it will take NiMH batteries to self-discharge at different storage temperatures. After the allotted time in storage, the batteries will need to be cycled (charged and discharged) to prevent permanent damage to the batteries.
NiMH batteries and packs can be stored at any state of charge. A fully discharged battery will last as long in storage as a fully charged battery.
- The energy storage capability of the battery negative electrode will decrease if the battery is allowed to completely self-discharge. Therefore, before using batteries that have been stored for extended periods, it is important to cycle NiMH batteries.
- If the batteries are cycled, after the second or third cycle, the storage capability will be restored up to 95% of its initial rated capacity.
To prolong the life and maintain the performance of your NiMH batteries, Crestron ^® recommends the following:
• Practice FIFO (First In and First Out) inventory rotation.
- Never store batteries under load.
- Store batteries in a temperature-controlled environment.
- Store batteries at 65% (± 20%) relative humidity, and keep them out of direct sunlight.
• Cycle batteries at least one charge/discharge cycle according to the following table.
NiMH Battery Storage Time
| TEMPERATURE RANGE BATTERY OR PACK MAXIMUM STORAGE PERIOD (CYCLE INTERVAL) | |
| 104° to 122° F (40° to 50° C) | Less than 30 days |
| 86° to 103° F (30° to 39° C) | 30 to 90 days |
| -4° to 85° F (-20° to 29° C) | 91 to 180 days |
DO Dispose of the Battery Pack
The TPS-6X-BTP contains NiMH battery cells. When the unit can no longer retain a charge, the battery pack must be recycled or disposed of properly. Follow local ordinances and regulations for disposal.
DO Learn More
Visit the website for additional information and the latest firmware updates.
Crestron Electronics
15 Volvo Drive, Rockleigh, NJ 07647
888.CRESTRON | www.crestron.com

CE As of the date of manufacture, the product has been tested and found to comply with specifications for CE marking.
The specific patents that cover Crestron products are listed at patents.crestron.com.
The product warranty can be found at www.crestron.com/warranty.
Crestron and the Crestron logo are either trademarks or registered trademarks of Crestron Electronics, Inc., in the United States and/or other countries. Other trademarks, registered trademarks, and trade names may be used in this document to refer to either the entities claiming the marks and names or their products. Crestron disclaims any proprietary interest in the marks and names of others. Crestron is not responsible for errors in typography or photography. This document was written by the Technical Publications department at Crestron. ©2015 Crestron Electronics, Inc.

CRESTRON.
DO GUIDE
DOC. 7804A (2044074) 06.15 Specifications subject to change without notice
Brand : Crestron
Model : TPS-6X-BTP
Category : Rechargeable Battery