
CBP-U - Battery Bolt - Free user manual and instructions
Find the device manual for free CBP-U Bolt in PDF.


| Product Type | Rechargeable Battery |
| Model | CBP-U |
| Brand | Bolt |
| Battery Chemistry | Lithium-Ion (Li-Ion) |
| Voltage | 7.2 V |
| Capacity | 2500 mAh |
| Energy | 18 Wh |
| Dimensions (L x W x H) | 67 x 38 x 22 mm |
| Weight | 85 g |
| Charging Input | DC 8.4 V, 1A |
| Charging Time | Approx. 3 hours |
| Operating Temperature | 0°C to 40°C |
| Storage Temperature | -20°C to 25°C |
| Cycle Life | 500 cycles (typical) |
| Protection Features | Overcharge, Overdischarge, Short Circuit |
| Compatible Devices | Camcorders, Professional Cameras |
| Maintenance | Keep terminals clean; store in cool, dry place |
| Safety Warnings | Do not disassemble, short, or expose to high temperatures |
| Spare Parts Availability | Contact Bolt support |
| Repairability | Not user-serviceable; replacement recommended |
Frequently Asked Questions - CBP-U Bolt
User questions about CBP-U Bolt
0 question about this device. Answer the ones you know or ask your own.
Ask a new question about this device
Download the instructions for your Battery in PDF format for free! Find your manual CBP-U - Bolt and take your electronic device back in hand. On this page are published all the documents necessary for the use of your device. CBP-U by Bolt.
USER MANUAL CBP-U Bolt
natural_image
Exterior view of a Bolt CBPU electric shaver with attached cable (no text or symbols on body)UNIVERSAL COMPACT BATTERY PACK
For Hot-Shoe Flashes
User Manual
Thank you for choosing Bolt.
The Bolt Universal Compact Battery Pack increases your flash count and boosts the recycle speed of your flash. It offers a compact design with universal attachment to the most popular flash brands and operates with a range of AA batteries, making it easy and convenient to use.
Precautions
△
- Please read and follow these instructions, and keep this manual in a safe place.
- Do not attempt to disassemble or repair this product. There are components inside that can produce a hazardous electric shock.
- Keep this product and AA batteries away from children.
- Clean the unit with only a soft, dry cloth.
-
If you detect smoke or a burning smell coming from the battery pack, immediately stop operation. Once smoking has subsided, remove the batteries to prevent the product from igniting or melting, and take the product to an authorized service center for repair.
-
Keep this unit away from water and any flammable gases or liquids.
- Remove all batteries from the battery pack before long-term storage. Do not store or use this product at temperatures above 104°F (40°C).
- To avoid overheating and damaging your flash unit, wait at least 10 minutes after 20 continuous flashes at full power. Refer to your flash unit's manual for information on its continuous full-power flash capacity and limitations.
• Images are for illustrative purposes only.
Battery Warnings
- Always follow the warnings and instructions printed on the batteries to avoid activities that could cause the batteries to leak corrosive liquid, generate heat, or explode.
- Use in environments with moderate temperatures. When some battery types get cold, they lose some of their ability to supply power. However, this does not mean that they have lost their charge, and they will regain the ability to supply power when their temperature returns to a more moderate level.
-
To conserve battery life, turn the flash unit off or disconnect the Compact Battery Pack from it during long standby periods. Very little power is consumed when the pack is in standby mode. The amount may vary according to working conditions and the specific flash model used with the pack.
-
High temperatures can cause some battery types to drain more quickly.
- Dispose of batteries properly. Never heat them or throw them into a fire, as this could cause the batteries to leak corrosive liquid, generate heat, or explode.
- Don't fire more than 20 full-power flashes in a row, as this can overheat and damage your flash. Refer to your flash unit's manual for information on its continuous full-power flash capacity and limitations.
Overview
Compact Battery Pack
1 Shoulder strap holes
2 Mounting screw passthrough
3 Flash connection cable
4 Flash cable connector
5 Status LED
6 Battery compartment
7 Battery compartment cover
8 1/4-20 mounting screw
9 Rubber washer

Soft Case
1 Cable strap
2 Bottom snap closure
3 Battery strap
4 Belt strap
5 Top touch-fastener support
Flash Power Cords
(Sold Separately)
6 CBP-UC: Canon
7 CBP-UN: Nikon
8 CBP-US: Sony

Battery Installation
The versatile Universal Compact Battery Pack can be used with three AA battery types:
- Alkaline (1.5 V)
- Lithium (1.5 V)
• Nickel-metal hydride (NiMH) (1.2 V)
Using eight batteries will enable faster flash recycle times.
To install batteries, unplug the battery pack from your flash unit and follow these steps:
- Press down on the battery compartment cover and slide the cover in the direction of the arrow.

natural_image
Diagram of a mobile phone casing with battery pack and cable connector (no text or symbols)- Insert four or eight batteries in the open battery bays, making sure the polarity is in the right orientation, and that each set of four batteries is installed as shown.
- Slide the cover back over the battery compartment until secure.
Important!
Replace all batteries at the same time. Do not mix battery types or brands, or new and used batteries together.

natural_image
Two battery charging modules with attached cables, showing internal battery compartments and terminal connectors (no text or symbols)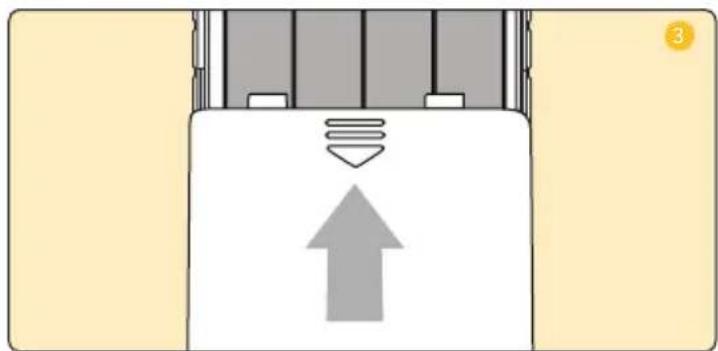
natural_image
Diagram of a device with an upward arrow and a screwdriver, no text or symbols presentConnecting to Your Flash
Align the flash cable connector with the separate flash power cord to connect them. Then plug the other end of the flash power cord into your flash.
Make sure the connector is correctly aligned with the pins and alignment grooves on the power port. Forcing a connector into a port upside down can damage both your flash and the Compact Battery Pack connector.

natural_image
Diagram of two connected electrical connectors with labeled ports (TOP) and arrows indicating connection direction (no text beyond labels)
natural_image
Diagram of a camera module with attached cable, showing no text or symbolsImportant!
- The connectors should easily attach. Forcing a connector can damage both your flash and the Compact Battery Pack connector.
- Batteries must be installed in the flash before you connect it to the Universal Compact Battery Pack. Most flash units require batteries to be installed in order to operate.
- You may need to configure the custom function on your flash unit to make it draw power from the battery pack. Refer to your flash unit's instructions for more information.
- Disconnect the Compact Battery Pack from your flash unit before storing it.
LED Status Indicator
Canon and Sony flashes: The indicator displays a solid light in both standby and recycle modes.
Nikon flashes: The indicator displays a solid light in recycle mode and turns off in standby mode.
Mounting and Carrying Your Compact Battery Pack
The Compact Battery Pack comes with a soft case and mounting screw that make it convenient and unobtrusive to use.
Using the soft case
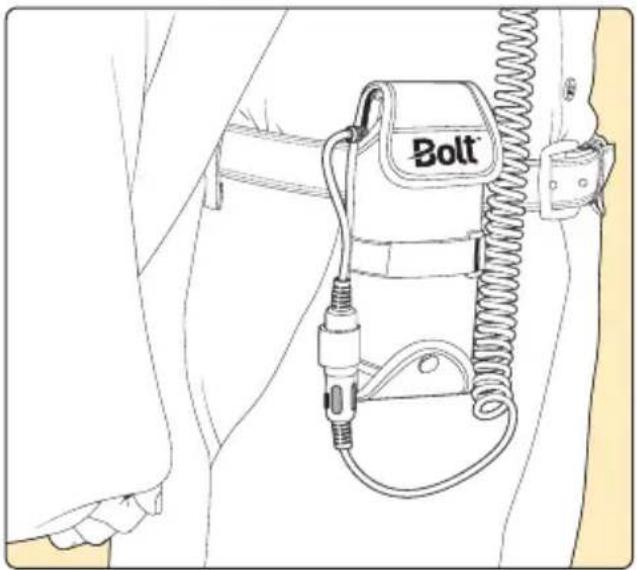
Wear the Compact Battery Pack on your belt for better distribution of weight. Make sure the pack is correctly oriented in the soft case, so the status LEDs are visible through the small openings at the top.
Using the mounting screw
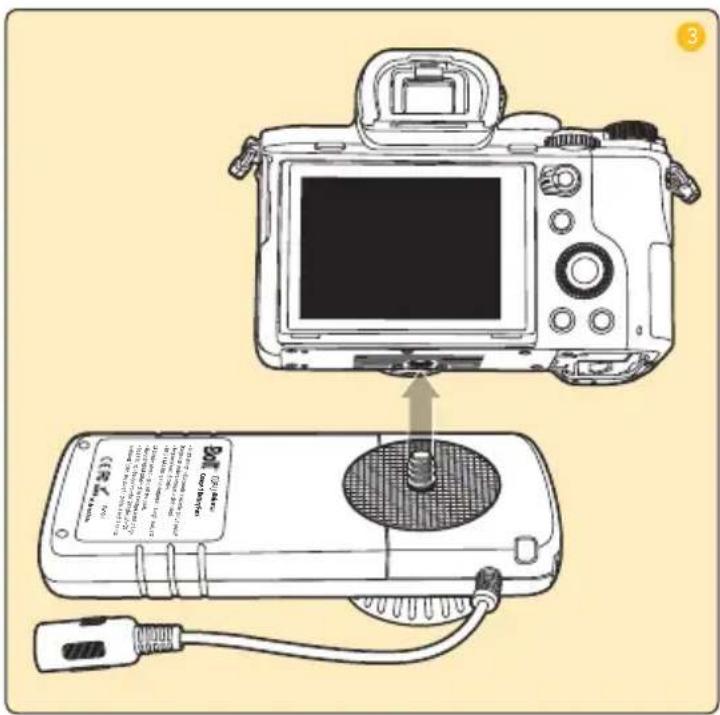
You can use the mounting screw to attach the Universal Compact Battery Pack to the bottom of your camera:
natural_image
Line drawing of a person's shoulder and arm with a Bolt-style strap and coiled cord (no text or symbols)- Insert the mounting screw into the passthrough of the battery pack. Rotate clockwise until it comes through the other side.
- Place the rubber washer over the mounting screw.
- Insert the mounting screw into your camera's tripod socket and rotate until the pack is firmly attached to the camera.
Important!
The mounting screw passthrough on the Compact Battery Pack is threaded. Do not push the mounting screw through without rotating it.
Mounting & Carrying Your Compact Battery Pack | 11
Troubleshooting
| Problem Solution | |
| The Compact Battery Pack has fresh batteries installed and is connected to a flash unit, but the indicator light does not turn on. | Most flash units require AA batteries for the display and functions to operate.Make sure you have AA batteries installed in the flash unit.The batteries are installed in the wrong orientation. Check each battery in the compartment to ensure that it is installed with the correct orientation.If you’re using only four batteries, ensure they are installed in the left four or right four bays of the battery compartment. |
| After a long series of continuous flashes, the indicator light is on, but the pack does not power the flash, or it charges slowly. | The battery pack and batteries may have become too hot due to a long series of continuous flashes. This is to protect the flash unit and battery pack from overheating. Allow the system to cool down before using the battery pack. |
| Recycle times have become slow. Change | all four or eight batteries.If you’re using rechargeable batteries, recharge them. |
Specifications
Operation temperature range: -4°F to 104°F (-20°C to 40°C)
Operation humidity: ≤85%
Chemistry: Alkaline, Nickel-Metal Hydride
Carrying Options: Belt Loop, Shoulder Strap (not included)
Battery Type: 8 x AA
Dimensions (W × H × D): 6.9 × 2.8 × 1.1 in. (17.7 × 7.1 × 2.8 cm)
Weight: 5.5 oz. (156 g) without batteries
Testing Information
| Power Cord CBP-UC CBP-UN | CBP-US | ||
| Flash Unit Tested Canon 600EX-RT Nikon SB-9 | 00 Sony HVL-F58AM | ||
| Fastest Recycle Time with 4 × AA Batteries | 1.0 sec. 1.2 sec. 1.2 sec. | ||
| Fastest Recycle Time with 8 × AA Batteries | 0.7 sec. 0.8 sec. 1.0 sec. |
One-Year Limited Warranty
This Bolt product is warranted to the original purchaser to be free from defects in materials and workmanship under normal consumer use for a period of one (1) year from the original purchase date or thirty (30) days after replacement, whichever occurs later. The warranty provider's responsibility with respect to this limited warranty shall be limited solely to repair or replacement, at the provider's discretion, of any product that fails during normal use of this product in its intended manner and in its intended environment. Inoperability of the product or part(s) shall be determined by the warranty provider. If the product has been discontinued, the warranty provider reserves the right to replace it with a model of equivalent quality and function.
This warranty does not cover damage or defect caused by misuse, neglect, accident, alteration, abuse, improper installation or maintenance. EXCEPT AS PROVIDED HEREIN, THE WARRANTY PROVIDER MAKES NEITHER ANY EXPRESS WARRANTIES NOR ANY IMPLIED WARRANTIES, INCLUDING BUT NOT LIMITED TO ANY IMPLIED WARRANTY OF MERCHANTABILITY OR FITNESS FOR A PARTICULAR PURPOSE. This warranty provides you with specific legal rights, and you may also have additional rights that vary from state to state.
To obtain warranty coverage, contact the Bolt Customer Service Department to obtain a return merchandise authorization (“RMA”) number, and return the defective product to Bolt along with the RMA number and proof of purchase. Shipment of the defective product is at the purchaser’s own risk and expense.
For more information or to arrange service, visit www.boltflashes.com or call Customer Service at 212-594-2353.
Product warranty provided by the Gradus Group.
www.gradusgroup.com
BOLT is a registered trademark of the Gradus Group. © 2021 Gradus Group LLC. All Rights Reserved.

natural_image
Solid black background with a horizontal yellow stripe at the bottom (no text or symbols)
BOLT®
A Gradus Group Brand


- UNIVERSAL COMPACT BATTERY PACK
- Thank you for choosing Bolt.
- Precautions
- △
- Battery Warnings
- Overview
- Compact Battery Pack
- Soft Case
- Flash Power Cords
- (Sold Separately)
- Battery Installation
- Important!
- Connecting to Your Flash
- LED Status Indicator
- Mounting and Carrying Your Compact Battery Pack
- Using the soft case
- Using the mounting screw
- Specifications
- One-Year Limited Warranty
Brand : Bolt
Model : CBP-U
Category : Battery