
BassLink T - Subwoofer INFINITY - Free user manual and instructions
Find the device manual for free BassLink T INFINITY in PDF.


| Product Type | Powered Subwoofer |
| Brand | Infinity |
| Model | BassLink T |
| Amplifier Power | 250W RMS |
| Frequency Response | 20Hz – 120Hz |
| Crossover Frequency | 50Hz – 120Hz (variable) |
| Crossover Slope | 12dB per octave |
| Bass Boost | -6dB to +3dB @ 40Hz |
| Phase Control | 0° / 180° switchable |
| Input Sensitivity (Line-Level) | 50mV – 4V |
| Input Sensitivity (Speaker-Level) | 1V – 16V |
| Auto Turn-On | Yes (senses speaker voltage) |
| Remote Level Control | Included (wired) |
| Power Supply | 12V DC (vehicle battery) |
| Fuse Rating | 30A (external, 25A recommended within 18" of battery) |
| Max Current Draw | 26A |
| Idle Current Draw | < 800mA |
| Dimensions (L x W x H) | 40-3/8" x 6-7/16" x 14-3/8" (1026mm x 164mm x 366mm) |
| Mounting Options | Flange screws or optional mounting feet |
| Wiring Channels | Horizontal and vertical channels on rear panel |
| PEAK LED Indicator | Red LED lights at maximum output |
| POWER LED Indicator | Blue LED when operational |
| Maintenance | Wipe with dry cloth; no liquid cleaners |
| Safety Warnings | Hearing damage risk; professional installation recommended |
Frequently Asked Questions - BassLink T INFINITY
User questions about BassLink T INFINITY
0 question about this device. Answer the ones you know or ask your own.
Ask a new question about this device
Download the instructions for your Subwoofer in PDF format for free! Find your manual BassLink T - INFINITY and take your electronic device back in hand. On this page are published all the documents necessary for the use of your device. BassLink T by INFINITY.
USER MANUAL BassLink T INFINITY
natural_image
3D rendering of a VR infinity-branded speaker with three circular speakers, shown against a geometric background (no text or symbols on the device itself)
Infinity
BassLink™ T
instructions
Thank you for choosing the Infinity BassLink T. BassLink T has been designed to provide the kind of high-performance low-frequency reproduction that used to require big, clumsy enclosures, large amplifiers and complicated installation. To ensure maximum performance, we strongly recommend that installation be entrusted to a qualified professional. Although these instructions explain how to install the BassLink T in a general sense, they do not show the specific installation methods for your particular vehicle. If you feel you do not have the necessary tools or experience, do not attempt the installation yourself; rather, ask your authorized Infinity car audio dealer about professional installation options.
Remember to keep this manual and your sales receipt in a safe place for future reference.
INTRODUCTION
HEARING WARNING!
Playing loud music in a vehicle can permanently damage your hearing, as well as hinder your ability to hear traffic. We recommend using low volume levels while driving. Infinity accepts no liability for hearing loss, bodily injury or property damage resulting from the use or misuse of this product.
YOUR CAR AND BASS REPRODUCTION
Depending on the interior volume of your vehicle and the dimensions of the passenger compartment and cargo area, reproduced frequencies below 80Hz may be boosted by nearly 12dB per octave as frequency decreases. This effect, known as the vehicle's "transfer function" or "cabin gain," plays an important part in shaping the overall in-car response of the BassLink T.
BassLink T is designed to work with your vehicle's other speakers to reproduce frequencies below 100Hz. Moreover, depending on orientation and mounting location, BassLink T may be "in phase" or "out of phase" with those speakers. The resulting conditions, known as constructive and destructive interference, also play a role in shaping the total frequency response of your system.
BassLink T includes controls to optimize both of these conditions and their adjustment is explained in sections "Controls & Functions" and "Tuning Basslink T".
CHOOSING A MOUNTING LOCATION
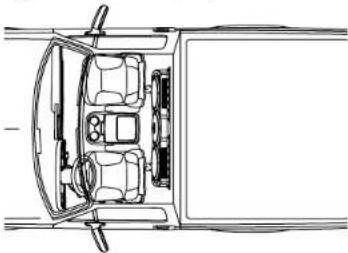
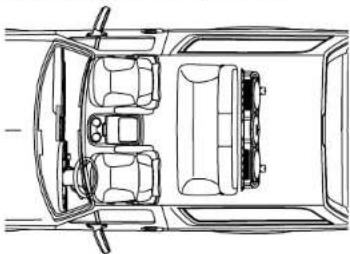
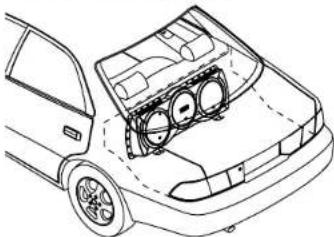
Choose a mounting location that does not interfere with the seats, seat mechanisms or cargo.
Figure 1. BassLink T in a pickup truck.
natural_image
Top-down line drawing of a vehicle rear view showing front, rear, and side views (no text or symbols)Figure 2. BassLink T in an SUV cargo area.
natural_image
Top-down line drawing of a car showing front, rear, side, and top views (no text or symbols)Figure 3. BassLink T in a car's trunk.
natural_image
Line drawing of a car's front bumper with visible engine cylinder (no text or symbols)MOUNTING BASSLINK T
CAUTION: Make sure mounting screws will not puncture wiring harnesses, brake or fuel lines, or the vehicle's fuel tank. Some or all of these may be located behind or under the mounting surface.
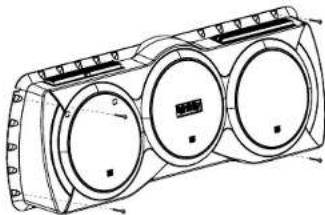
BassLink T has been designed for easy installation in many vehicle applications. BassLink T should be secured to a solid mounting surface using the supplied mounting hardware. There are multiple indentations along the mounting flange. These allow for different screw locations, depending on your vehicle. BassLink T should be secured using a minimum of four screws along the different edges. Please see Figures 4 and 6.
Figure 4. BassLink T screw installation.
natural_image
Technical line drawing of a three-c� air vent system (no text or symbols)MOUNTING BASSLINK T (CONTINUED)
ROUTING THE WIRES
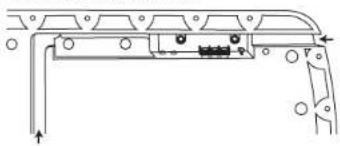
All signal and power wires should be routed through the opening provided at the rear of the connection panel. On the rear of Basslink T are two channels extending from the opening — one horizontal, and one vertical — that may be used for routing those wires to the vehicle.
Depending on installation requirements, all, or some, of the wires may be routed straight down along the vertical channel to the floor and hidden under the carpeting, and/or across the horizontal channel toward the side and hidden behind the vehicle's trim panels.
Figure 5. Channels for wiring.
natural_image
Pure mechanical assembly diagram without any text, numbers, or symbolsADDITIONAL MOUNTING FEET
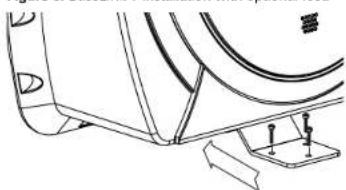
If your particular application inhibits the ability to secure the lower portion of BassLink T, please use the supplied mounting feet. They slide into the channels on the bottom of the unit and snap in place. This will give you the ability to secure BassLink T to the floor of your vehicle.
Figure 6. BassLink T installation with optional feet.
natural_image
Technical line drawing of a mechanical component with mounting bracket and mounting base (no text or symbols)POWER CONNECTIONS
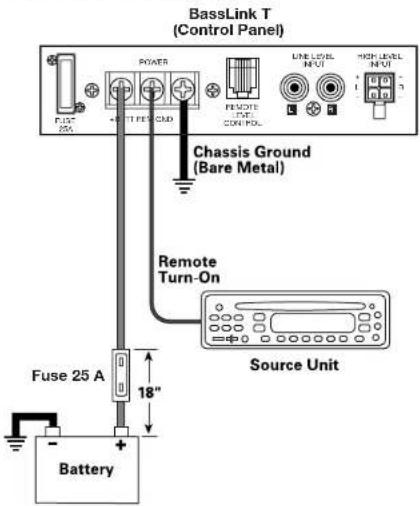
Connect power to BassLink T, as shown in Figure 7. Also observe these installation tips:
- Use at least #10 AWG wire for the +BATT (+12 Vdc) and GND (ground) connections. If needed, use at least a #20 AWG wire for the REM (remote) connection.
- Route all power wires through a grommet in the vehicle's firewall. If a factory grommet is unavailable, install one.
- Connect a short GND wire from BassLink T to the nearest bare metal surface. For a good connection, scrape away paint from the metal surface and use a screw with a lock (star) washer.
- Install a fuse holder with a 25 A fuse within 18" of the battery's positive (+) terminal (see Figure 7).
- The REM connection requires +5 to +12 Vdc signal to turn on BassLink T. Most head units with proamp outputs provide this remote voltage signal. For speaker-level applications, a remote connection is preferred but not required, since BassLink T's Auto Turn-On feature will sense voltage on the speaker wires to automatically turn on BassLink T.
IMPORTANT: To enable BassLink T's Auto Turn-On feature, set the AUTO TURN-ON switch to the AUTO position (see Figure 13 on page 7).
Figure 7. Power connections for BassLink T.
APPLICATIONS
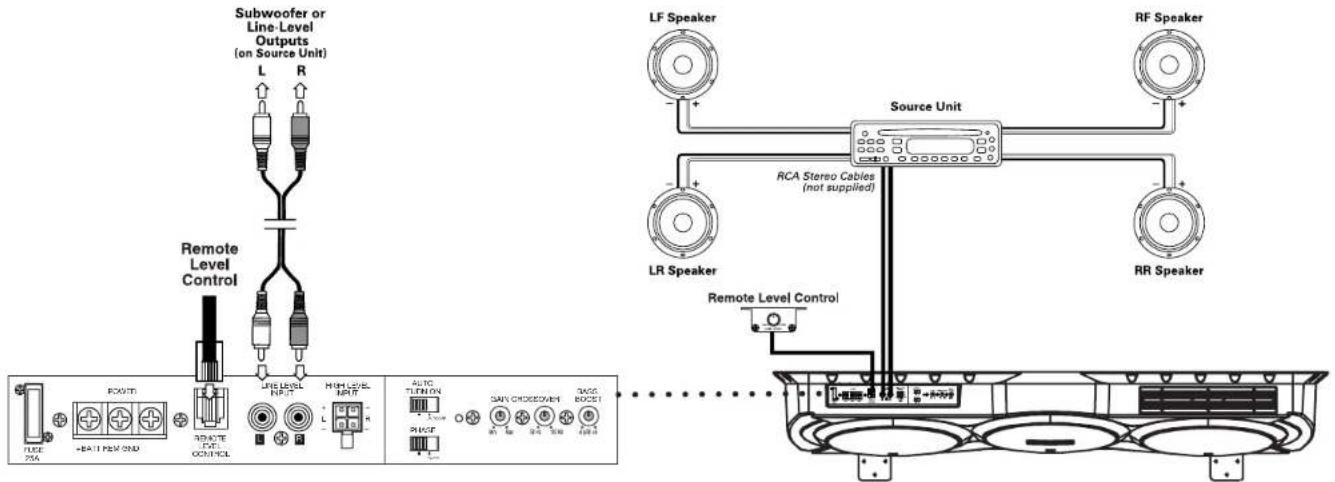
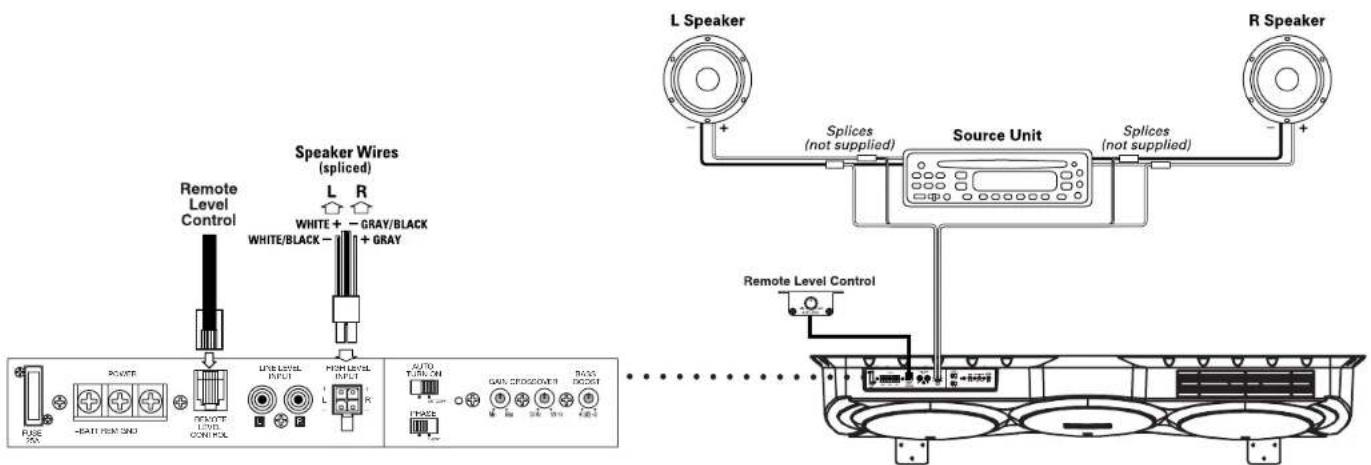
BassLink T is equipped with two line-level (RCA) inputs and two speaker-level inputs.
To help you plan your installation, we have included two system applications in Figures 8 and 9 on pages 4 and 5. For more system ideas, see your authorized Infinity car audio dealer.
Figure 8. BassLink T audio connections for a head unit with two line-level or subwoofer (RCA) outputs.
APPLICATIONS (CONTINUED)
Figure 9. BassLink T audio connections for a head unit equipped with two speaker-level outputs.
INSTALLATION
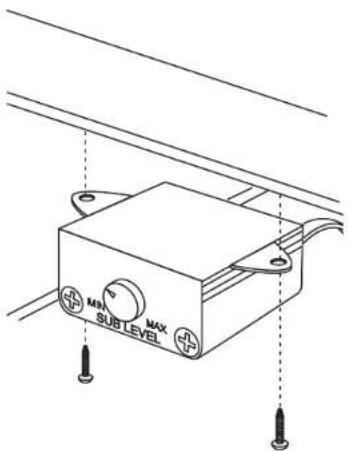
The Remote Level Control may be mounted under the dash or may be dismantled and mounted in the dash for a factory appearance.
UNDER-DASH MOUNTING
Select a mounting location that allows easy access to the control while driving. Using the Remote Level Control as a template, mark and drill holes in the mounting surface. Attach the Remote Level Control using the mounting screws provided (Figure 10).
Figure 10. Under-dash mounting of the Remote Level Control.
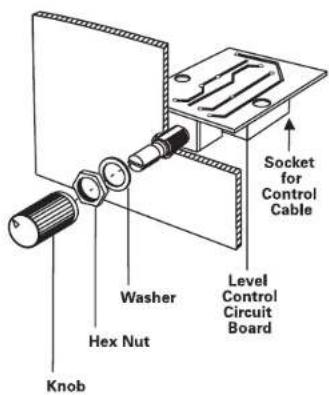
IN-DASH MOUNTING
Disassemble the Remote Level Control by removing the two Phillips-head screws on the front panel, rear panel and on top. Remove the Remote Level Control's bottom and side panels. Slide the Remote Level Control's PC board forward to release the RJ11 connector from the back panel and remove the board along with the potentiometer, knob and connector as a single assembly.
Choose a mounting location that allows easy access to the control, and provides 1-3/4" clearance behind the mounting surface. Drill a 9/32" hole in the mounting surface. Feed the Remote Level Control's potentiometer (with the knob removed) through the hole and use the nut provided to hold the control in place (Figure 11).
Figure 11. In-dash mounting of the Remote Level Control.
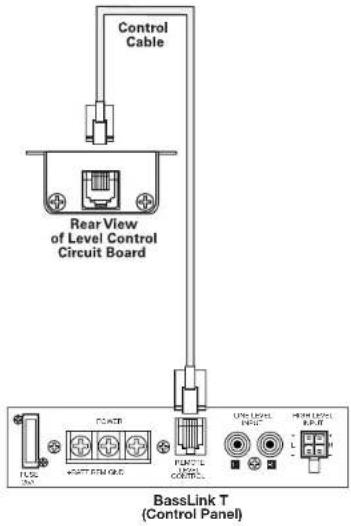
CONNECTING THE REMOTE LEVEL CONTROL To BASSLINK T
Route the cable behind the dash or other interior panels and under the carpet. Do not route the cable outside the vehicle. Connect the RJ11 cable between the RJ11 receptacle on the BassLink T and the receptacle on the Remote Level Control (Figure 12).
Figure 12. Remote Level Control electrical connection.
Infinity
CONTROLS AND FUNCTIONS
BassLink T provides several controls and indicators that simplify sonic integration with virtually any vehicle's unique acoustic properties. They are located on the top control panel, as shown in Figure 13.
GAIN Control: Use this control to adjust the relative volume (loudness) of BassLink T with respect to the other speakers in the vehicle.
CROSSOVER: Use this control to adjust the amount of high-frequency information present in BassLink T's output. A lower value means more of the high frequencies are filtered out.
BASS BOOST: Use this control to correct any perceived peak or dip in the bass response (typically around 40Hz in most vehicles). Set the control to any value between -6dB and +3dB, according to your preference.
PHASE Control: Use this switch to reverse the phase of BassLink T's output with respect to its input. Choose the position (0° or 180°) that sounds the best.
NOTE: Depending on BassLink T's orientation and location in a vehicle, reversing the phase may (or may not) increase or decrease the amount of perceived upper bass being reproduced.
AUTO TURN-ON: For speaker-level connections, use this switch to activate (or deactivate) BassLink T's automatic turn-on circuit.
REMOTE LEVEL CONTROL: Use this RJ11 jack to connect the Remote Level Control (see page 6).
PEAK LED: This indicator glows red when the subwoofer is at maximum output. Be sure to monitor this indicator during BassLink T setup (see Tuning BassLink T). When properly tuned, the PEAK LED should light momentarily during high-level bass transients. Avoid adjustments that cause the PEAK LED to remain lit for extended periods.
POWER LED: This indicator will glow blue when BassLink T is operational.
Figure 13. BassLink T control panel.

TUNING BASSLINK T
- Unplug the RJ11 cable that connects the Remote Level Control to BassLink T.
- Make sure the head unit is off and its volume control is set to minimum.
- On BassLink T's top panel, initially set all controls to their midpoint positions, as shown in Figure 13. On BassLink T's top panel, initially set PHASE to 0°.
- Turn on the head unit and play a favorite music track that has substantial bass. Set the head unit's volume control to 75 percent of the total output (approximately 3 o'clock on rotary controls).
- Adjust the GAIN control clockwise until the PEAK LED (on BassLink T's top panel) begins to flash with each bass note but doesn't stay lit continuously.
- Listen to your system, making a mental note of the amount of upper bass being reproduced.
-
Switch the PHASE control to 180° and listen again for upper bass content. There may be more upper bass, less upper bass, or no change at all. The position that provides the most upper bass is correct, but choose either setting according to your taste.
-
Adjust the CROSSOVER control clockwise or counterclockwise until you hear only low-frequency information. For example, you should NOT hear any vocals coming from BassLink T when seated in the normal listening position.
- Adjust the BASS-BOOST control clockwise or counterclockwise to suit your taste.
- Recheck the PEAK LED to make sure it's flashing in time with the bass but is not lit continuously. If it is lit continuously, adjust the GAIN control counterclockwise until the PEAK LED only flashes.
- Reconnect the RJ11 cable between the Remote Level Control and BassLink T. You may then use the Remote Level Control to adjust the level of the bass to suit your taste and/or different program material.
NOTE: In most cases, the above steps will provide satisfactory tuning. However, the actual process may require several readjustments of each control, since the settings will interact with each other. If necessary, consult your authorized Infinity car audio dealer for help in tuning your system.
TROUBLESHOOTING
• PROBLEM:
POWER LED is not lit.
CAUSES and SOLUTIONS:
-
Fuse is blown and needs replacement.
-
Head unit is not functioning properly. Check remote voltage, and power, ground or remote connections.
- PROBLEM:
POWER LED is lit but there is no bass.
CAUSES and SOLUTIONS:
- Inputs are not connected. Check connections.
- Head-unit fader control is not set properly. Adjust head-unit fader control to feed audio signals to BassLink T.
• PROBLEM:
BassLink T sounds muddy or distorted.
CAUSES and SOLUTIONS:
-
Gain is set too high and PEAK LED is lit constantly. Readjust GAIN control (see Tuning BassLink Ton page 7).
-
Bass is set too high. Readjust BASS BOOST control (see Tuning BassLink Ton page 7).
-
Head-unit output is distorted or blown. See your authorized Infinity car audio dealer.
• PROBLEM:
No output from BassLink T when head-unit fader control is set to front or rear.
CAUSE and SOLUTION:
Input connections are improperly wired. Verify all connections (see Applications, starting on page 4).
- PROBLEM:
BassLink T turns on before head unit is completely on and produces a "thump" sound.
CAUSE and SOLUTION:
For speaker-level connections, BassLink T is receiving a false turn-on signal. On BassLink T's top panel, slide AUTO TURN-ON to OFF and use the Remote (REM) connection.
• PROBLEM:
BassLink T's POWER LED remains on after head unit is turned off.
CAUSE and SOLUTION:
For speaker-level connections, this is normal operation when AUTO TURN-ON is set to ON. BassLink T will remain on another 5 to 10 minutes after sensing that audio signals are not present before shutting down.
• PROBLEM:
BassLink T produces a loud humming noise with the system OFF when using speaker-level inputs.
CAUSE and SOLUTIONS:
This problem is caused by a feedback loop between your speakers and the high-level inputs of BassLink T.
Choose one of the following solutions:
-
Connect a wire from the REMOTE terminal on BassLink T to the remote turn-on of your head unit or to the vehicle's accessory circuit. On the control panel, slide the AUTO-ON switch to the OFF position.
-
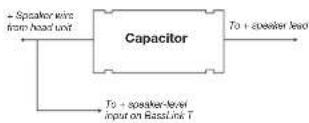
Connect the supplied capacitors between each of the speaker outputs of the head unit and the speaker's positive lead as shown in Figure 14. Connect each positive lead of BassLink T's high-level inputs to the head-unit side of the capacitors. Use one capacitor per speaker input channel.
Figure 14. Connecting supplied capacitors.
SPECIFICATIONS
Amplifier Power: 250W rms
Frequency Response: 20Hz to 120Hz
Fuse: 30A
Max. Current Draw: 26A
Idle Current Draw: < 800mA
Input Sensitivity: 50mV to 4V
Line-level input
1V to 16V
High-level input
Crossover Frequency: 50Hz to 120Hz
Crossover Slope: 12dB per octave
Bass Boost: -6dB to +3dB @ 40Hz
Dimensions:
(L x W x H) 40-3/8" x 6-7/16" x 14-3/8"
(1026mm x 164mm x 366mm)
Declaration of Conformity

We, Harman Consumer International
- route de Tours
72500 Chaleau-Go-Low Ecoer
declare in own responsibility that the product described in this
owner's manual is in compliance with technical standards
EN 55013.2001 EN 55000.0007

Emmanuel Miloc
Harman Consumer International Chatescu-du-Loir, France 1004

TECHNOLOGY - PERFORMANCE - DESIGN
Infinity Systems, 250 Crossways Park Drive, Woodbury, NY 11797 USA
516.674.4INF (4463) • FAX 516.682.3556 • www.infinitysystems.com
© 2004 Harman International Industries, Incorporated
Part No. BASSLINKTOM • 10/04
H A Harman International Company
- BassLink™ T
- INTRODUCTION
- HEARING WARNING!
- YOUR CAR AND BASS REPRODUCTION
- CHOOSING A MOUNTING LOCATION
- MOUNTING BASSLINK T
- MOUNTING BASSLINK T (CONTINUED)
- ROUTING THE WIRES
- ADDITIONAL MOUNTING FEET
- POWER CONNECTIONS
- APPLICATIONS
- APPLICATIONS (CONTINUED)
- INSTALLATION
- UNDER-DASH MOUNTING
- IN-DASH MOUNTING
- CONNECTING THE REMOTE LEVEL CONTROL To BASSLINK T
- Infinity
- CONTROLS AND FUNCTIONS
- TUNING BASSLINK T
- TROUBLESHOOTING
- • PROBLEM:
- - PROBLEM:
- SPECIFICATIONS
Brand : INFINITY
Model : BassLink T
Category : Subwoofer