
VC6NW - Pregnant YAMAHA - Free user manual and instructions
Find the device manual for free VC6NW YAMAHA in PDF.

| Product Type | Bookshelf Speaker |
| Brand | Yamaha |
| Model | VC6NW |
| Dimensions (W x H x D) | 200 x 350 x 250 mm |
| Weight | 5.2 kg |
| Impedance | 8 ohms |
| Recommended Amplifier Power | 30-100 W |
| Frequency Response | 55 Hz - 22 kHz |
| Sensitivity | 88 dB |
| Driver Configuration | 2-way: 1" tweeter, 6.5" woofer |
| Enclosure Type | Bass-reflex |
| Connectivity | Binding post terminals |
| Main Functions | High-fidelity audio reproduction |
| Usage | Stereo or home theater system |
| Placement | Bookshelf or speaker stand |
| Grille | Removable cloth grille |
| Finish | Black wood grain vinyl |
| Care and Cleaning | Wipe with a soft, dry cloth |
| Safety | Keep away from moisture and extreme temperatures |
| Spare Parts and Repairability | Contact authorized Yamaha service center |
| General Information | Designed for accurate sound reproduction |
Frequently Asked Questions - VC6NW YAMAHA
User questions about VC6NW YAMAHA
0 question about this device. Answer the ones you know or ask your own.
Ask a new question about this device
Download the instructions for your Pregnant in PDF format for free! Find your manual VC6NW - YAMAHA and take your electronic device back in hand. On this page are published all the documents necessary for the use of your device. VC6NW by YAMAHA.
USER MANUAL VC6NW YAMAHA
Please keep this manual in a safe place for future reference.
This product is a speaker system designed for background music and public address applications in places such as stores, restaurants and other commercial spaces. Do not use for any purposes other than the one intended. Those who are unfamiliar with handling or those who can not handle according to this manual, should be supervised by responsible persons to ensure safety.
Always consult a professional installer if the product installation requires construction work.

WARNING
Always follow the basic precautions listed below to avoid the possibility of serious injury or even death from electrical shock, short-circuiting, damages, fire or other hazards. These precautions include, but are not limited to, the following:
If you notice any abnormality
• If any of the following problems occur
immediately turn of the power of the amplifier.
- Unueva smells or smoke are emitted.
- Some object, or water has been dropped into the ground.
There is a sudden loss of course during use.
- There is a minimum data of scale during the use of one product.
Cracks or other visible damage appear on
the product
Then have the product inspected or repaired
by qualified Yamaha service personnel.
Do not open
• This product contains no user-serviceable.
parts. Do not attempt to disassemble the
internal parts or mostly intent in any way.
Water warning
- Do not expose the product to rain, are it near
water or in clamp or wet conditions.
Fire warning
- Do not place any burning terms or open flames.
near the product, since they may cause a fire.
Hearing loss
- Before turning the power of all devices on or off, make sure that all volume levels are set to the minimum. Hailing to do so may result in heating loss, electric shock, or device damage.
- When turning on the AC power in your audio
system, always turn on the power amplifier
LAST, to avoid hearing loss and speaker
damage. When turning the power of, the
PAXA is much would be called the FAS for the same reason.
Location and connection
• Always consult a professional retailer if the
product insulator requires construction work and
make sure to observe the following precautions.
Choose mounting hardware and an installation location, or on the
Installation location that can support the weight of the product.
- Avoid locations that are exposed to constant
vibration.
- Use the required able to install the product
- Inspect the product periodically.
- Do not place the product in an unstable position as a lesion with aggressive vibration where it
a. A lack of a risk-excess, no need, and a might occidentally fall down and cause injury.

CAUTION
Always follow the basic precautions listed below to avoid the possibility of physical injury to you or others. These precautions include, but are not limited to, the following:
Location and connection
- Keep this product out of reach of children. This product is not suitable for use in locations where children are likely to be present.
• Do not place the product in a case on where it
may come into contact with corrective gases or
sell air. Doing so may result in malfunction.
- Do not place the product in a case on where it may be exposed to make equivalence as
It may be repeated to strike or all vulpers, if
where any of the banks might deal or use and purchase profferencio
• Before moving the product, remove all
connected cables.
• Use only speaker cables for correcting
speakers to the speaker jacks. Use of other
type of cables may result in line.
Handling caution
• Do not insert your fingers in any paps or
openings or the product (clamps or moving
parts on the rate).
- Do not rest your weight on the product or place
Heavy objects or it
- 10% is being a real impulse to the world this product, however, and the cultural process.
of the amplifier meets the following conditions:
- When using a low-impedance connection.
make sure that the current power of the
amplifier is lower than the power capacity of
This product.
Wash using a high insurance cooperation
- When being a high-risk balance connection, we sure that the total rating of the transformer
ops of the speakers does not exceed the
circuit power of the amplifier.
If the output power is not appropriate,
malfunction or fire may occur.
- Do not put, excessively low signals that may result
in dropping in the another or cause the following:
- Feedback, when using a microphone
Contribute SRO extremely bad scheme from a
- Continuous and excessive level plate top
sound
- Noise caused by pugging/unplugging the
cable while the amplifier is turned on
Even if the output power of the amplifier is
lower than the power capacity of this product (program), damage to the product.
(1) a. (2) b. (3) c. (4) d. (5) e. (6) f. (7) g. (8) h. (9) i. (10) j. (11) k. (12) l. (13) m. (14) n. (15) o. (16) p. (17) q. (18) r. (19) s. (20) t. (21) u. (22) v. (23) w. (24) x. (25) y. (26) z. (27) a. (28) b. (29) c. (30) d. (31) e. (32) f. (33) g. (34) h. (35) i. (36) j. (37) k. (38) l. (39) m. (40) n. (41) o. (42) p. (43) q. (44) r. (45) s. (46) t. (47) u. (48) v. (49) w. (50) x. (51) y. (52) z. (53) a. (54) b. (55) c. (56) d. (57) e. (58) f. (59) g. (60) h. (61) i. (62) j. (63) k. (64) l. (65) m. (66) n. (67) o. (68) p. (69) q. (70) r. (71) s. (72) t. (73) u. (74) v. (75) w. (76) x. (77) y. (78) z. (79) a. (80) b. (81) c. (82) d. (83) e. (84) f. (85) g. (86) h. (87) i. (88) j. (89) k. (90) l. (91) m. (92) n. (93) o. (94) p. (95) q. (96) r. (97) s. (98) t. (99) u. (100) v.
P###
Unpacking
Unpack the contents and confirm that all the following items are included.
• Speaker x 1
• Grillo x 1
• Safety wire x 1
- Cutout template × 1
- Owner's Manual (this manual)
* Speaker cable is not included.
The following Reinforcing Bracket Kit is included only with VC6NB,
VCENW, VCENS, VCENW.
• Tile rails x 2
• C-1ng × 1
- Screws (S-TITE M4, 8 mm) × 2
(四)本说明仅供参考
[Non-Text]
Optional Items (sold separately: VC4NB and VC4NW only)
Reinforcing Bracket Kit (AB-C2)
Bundled Items
- Tile rate × 2
- C-ring × 1
• Scholos (S-117E M4, d m6) x 2
* In this manual, the installation method using the AB C2 Rainfolding Bracket Kit is also explained.
Material and weight of the Remorcing Bracks, Kn (AD-C2): steel 1.0 kg
General Specifications
| VC4NB VC4NW VC6NB VC6NW | VC8NS VC8NW | |||
| System Type 2-way coastal type (without back can) | ||||
| Components | HF | 0.6" lin dome | 0.6" soil dome | 1" soil dome |
| LF | 4" (10 cm) cone | 6.5 (16 cm) cone | 8" (20 cm) cone | |
| Nominal Impedance | 16 Ω | |||
| Frequency Range*1 | (-10 dB) | 85 Hz - 20 kHz | 63 Hz - 20 kHz | 52 Hz - 20 kHz |
| Coverage Angle*1 | 185° conical | 120° conical | 110° conical | |
| Power Rating | NOISE | 15 W | 25 W | 25 W |
| PWM | 30 W | 50 W | 50 W | |
| MAX | 60 W | 105 W | 105 W | |
| Sensitivity*1 | (1 W, 1 m) | 88 dB SPL | 89 dB SPL | 91 dB SPL |
| Miodinum SPL-2 | (Calculated, 1 m, Peak) | 106 dB SPL | 109 dB SPL | 111 dB SPL |
| Transformer Taps | 100 V | 1.5/36 W | 3/4/12 W | 3/6/12 W |
| 70 V | 0.3/1.5/36 W | 1.5/3/9/12 W | 1.5/3/9/12 W | |
| Overload Protection | Full-range power limiting to protect network and transducers | |||
| Connector | Push terminal (WAGO 294 /2 pin) x 1Wire size: Solid conductor min. AWG18 (0.75 sq), max. AWG12 (3.5 sq)Standard conductor min. AWG18 (0.75 sq), max. AWG14 (2 sq) | |||
| Baffle | PP, black | |||
| Grille | Metal Grille | Punching metal, Powder coatingblack (Munsall N3) : white (Munsall N9.3) | ||
| Trim Ring | ABS, black (Munsall N3) : white (N9.3) | |||
| Dual-proof bag | Artificial fiber, black | |||
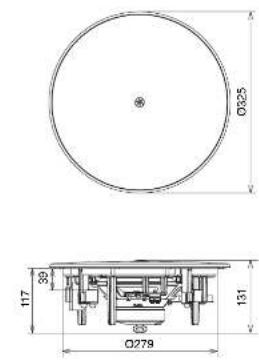
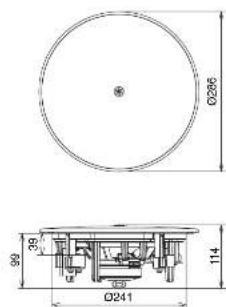
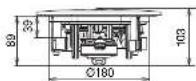
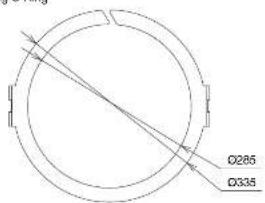
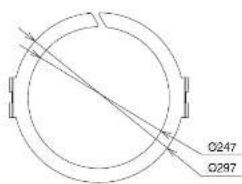
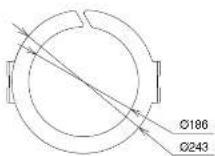
| Dimensions (including grille) | ∅225 x D103 mm | ∅266 x D114 mm | ∅325 x D131 mm | |
| Weight (including grille) | 1.4 kg | 2.3 kg | 2.8 kg | |
| Cutout size | ∅186 mm | ∅247 mm | ∅295 mm | |
| Required ceiling brand thickness | 2 mm - 37 mm | |||
| Conduit tube | ∅15.4 mm - ∅21.3 mm | |||
| Packaging | 1 pc | |||
| Included in the package | Grille, Safety wire, Cutout template, Owners Manual | |||
| Reinforcing Bracket Kit | C-Ring, Tile Balls x 2 | C-Ring, Tile Balls x 2 | ||
| Optional accessories | AB-C2 | - | - | |
1: Hill space (2π)
2: Calculated based on power rating and sensitivity
The contents of this manual apply to the latest specifications as of the publishing date. To obtain the latest manual, access the Yamaha website then download the manual file.
The dimensions are shown in "Dimensions" on the back side of the manual.
NOTE
The example illustrations in this manual are of the VC4NB.
Installing the Speaker
Before installing the speaker onto the ceiling, ensure that the strength of the ceiling rail is sufficient.

CAUTION
Be careful not to hurt your hands when handling this product.
NOTICE
When installing the speakers, turn off the power amplifier.
Pre-installation (Preparation of the Cable)
- For cables attached to the spring type connector, slip the insulation as shown in the figure and connect them.


Compatible cable:
MR. AWG19 [0.75 sq] Max. AWG19 [7.5 sq] hrs solid pole w/pc
MAX: AWG12 (3.5 sq) far solid 50 L wire; AWG14 (2 sq) far stranded wire
NOTE
Do not plate core wires by soldering if the cable uses stranded wire. Doing so will cause the wire to break.
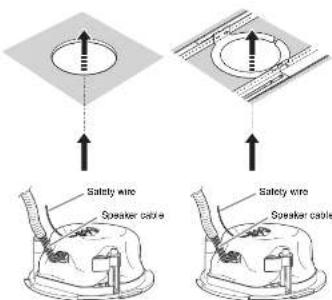
1 Cut Out a Hole in the Ceiling
- Put the supplied cutout template to the ceiling and draw a circle by tracing it. Make sure to use the cutout template so that hole is the correct diameter. If you use a circular cutter, set the diameter using the cutout template.
2.Cut the hole by tracing the circle.

CAUTION
Wear goggles to prevent chips or powder entering your eyes while cutting the hola.
When the included Reinforcing Bracket Kit or AB-C2 (sold separately) is used
For the VC6NB, VC6NW, VC6NB, and VC6NW, the included
Reinforcing Bracket Kit must be used.
For the VC4NB and VC4NW, follow the instructions when using the AB-C2.
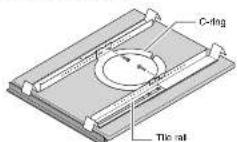
Insert the two tile rails through the cut hole and place them on the ceiling surface within your reach. Adjust their length and be sure that each of the tile rails are oriented as shown below.
- Use the opening in the C-ring to slide one section of the C-Ring into the cut hole, continuing to slide it around until the C-ring is completely inside the ceiling.
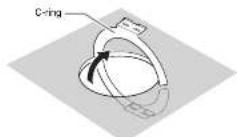
- Secure the C-ring and tie rails with the supplied two screws through either slot of both C-ring brackets.
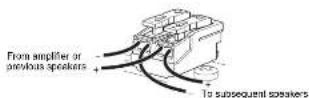
2 Connect the Wiring to the Connector
- Pull the wiring from the power amplifier through the cut hole of the ceiling.
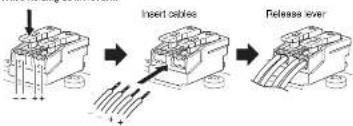
- Insert the cable into each terminal.
Insert the cable while holding the lever, and when fully inserted, release your linger from the lever in securely carried.
4 ever operation is not required (or solid core wire)
Make sure that the cables cannot be pulled out.
Spring type terminal
While holding down lever..
flowchart
graph LR
    A["Insert cables"] --> B["Releases lever"]
    B --> C["Final assembly"]
3 Fix the Speaker onto the Ceiling
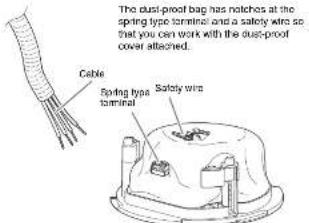
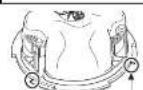
- From the hole on the top of the dust-proof cover, attach the safety wire to the safety wire ring, and connect the wire to an independent support point, such as a joint.


CAUTION
Always take measures to prevent the speaker from falling
down.
In the safety wire is too short, prepare another wire up ate for the speaker weight and installation conditions.
- Push the speaker slowly up into the ceiling, taking care not to trap the speaker cable or safety wire.
(VC4NB, VC4NW)
When the AB-C2 Reinforcing Bracket Kit (sold separately) is not used.
(VC4NB, VC4NW, VC6NB
VC6NW, VC8NB, VC8NW)
When the Included Reinforcing
Bracket Kit or AB-C2 (sold
Separately, VCANB and VCANY( only) is used.
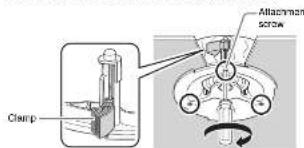
- While lifting up the speaker, turn the screwdriver clockwise to tighten the attachment screw.
The first turn of the attachment screw opens the clamp. Further turns move the clamp down the channel to pull the speaker up into the ceiling. When the clamp is difficult to open, turning the screwdriver halfway counterclockwise once will make it easier to open the clamp.
NOTICE
Do not over-lighten the attachment screws. Otherwise, the attachment screws and clamps will break.
Removing from the Ceiling
- While pressing the speaker against the calling, loosen the
attachment screws by turning them counterclockwise. Loosen the screw and the clamp goes up, and as it reaches the top, the clamp closes as shown in figure below.
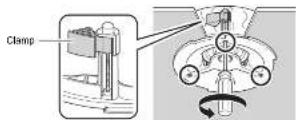
- Remove the safety wire from the speaker that is detached from the ceiling.
4 Set the Line Voltage/Impedance and Power
Select the line voltage/impedance (100 V, 70 V, 18 O) and power tap for a 100 V, 70 V line distributed system, by rotating the tap selector switch on the front side of the speaker with a flat-blade screwdriver.
When using the speaker with high-Impedance connection, select the position where wattage is indicated by the line (100 V, 70 V). Do not select the ^* x ^- selling when connecting to a 100 V line.
When using it with low impedance connection, select the 16 Ω position.
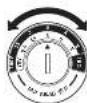
The illustration indicates the setting at 6 W for a 100 V line and 3 W for a 70 V line.
NOTICE
- Make sure the amplifier is switched off before operating the tap selector switch.
- If the selling is incorrect, it may cause malfunction of the speaker and amplifier.
5 Attach the Grille
- Align the grille with the cabinet's face and fit them together.

Turn clockwise (approx. 30") to secure the grille.

- If the grille is not sufficiently turned, it may fall off. Sufficiently turn the grille, until the fastening sections of the grille and speaker are securely engaged.
- If the ceiling material is soft, the bottle surface may sink into the ceiling material due to overtightening of the attachment screws, and the grill may not fit properly.
ADDRESS LIST
NORTH AMERICA
CANADA
Yamahn Canada Music Ltd
135 Milnar Avenue, Toronto, Ontario
MIS 3RL Canada
Tel: +1 416 298 1311
L.S.A.
Yamaha Corporation of America
4600 Umgethope Avenue, Buena Park, CA 50620.
USA
Tel: +1-714-522-5011
CENTRAL & SOUTH AMERICA
MEXICO
Modero Line-CHOC/CLK
Buenos Aires, Argentina
PANAMA AND OTHER LATIN
AMERICAN/CARIBBEAN REGIONS
Yamaha Music Latin America, S.A.
Yamaha Music Europe GmbH, Branch Switzerland
in Thsleil
Seestrasse 183, \$20
Tel: (01-65-3878050)
AUSTRIA/BULGARIA
CZECH REPUBLIC/HUNGARY
ROMANIA/SLOVAKIA/SLOVENIA
Yamaha Music Europe GmbH
Branch Austria
Schiengasse 20, 1100 Wien, Austria
Tel: -43-1-60203900
POLAND
Yamaha Music Europe GmbH
Spz 4.0. Oddzial w Police
al. Wielzka 52, 40-657 Wierawca, Poland
Tel: +48 22 890 08 88
MALTA
(Он Cirс)
Valhaza Road, Medis MST9010, Maine
Tel:1550-2123-2093
NETHERLANDS/BELGIUM
LUXEMBOURG
Yamaha Music Europe Branch Reachy
Christensen of 50, 4131 AB Vunes. The Netherlands
Tel: (3)247-558040
FRANCE
Yamaha Music Europe
Yamala Music Europe GmbH, Branch Italy
Via Tinelli N. 8749 21655 Gema di Lesma (MO), Italy
T.1: 130-030-9065-1
SPAIN/PORTUGAL
Yamaha Music Europe GmbH Ibérica, Sucursal en
España
Cira de la Comilla km. 17,200, 2823
Las Rosas de Madrid, Spain
Tel: +34-91 639-88 88
GREECE
Philippines Nakos S.A. The Music House
19th kln. Lauf. Laverin 190 02 Pemia - Amiki
G
Tel: +30 210-686165
SWEDEN/FINLAND/ICELAND
Yamaha Music Europe GmbH Germany fillal
Scandinavia
JA Wettergrensgara 1, 400 45 Goisborg, Sweden
Tel: +46 31 89 34 00
DENMARK
Yamaha Music Denmark,
Fillal of Yamaha Music Europe GmbH, Tyskland
GenerInv 8C, ST. TH., 2890 Soesorg, Denmark
Tel: +15-41-92-18-00
NORWAY
Yamalina Music Europe GmbH Germany -
Norwegian Brau
Gini Naringspitz 1, 1332 Usterås, Norway
Tel: (43-6716-7800)
CYPRUS
Yamaha Music Europe GmbH
Schaussinssse 22-34, 25462 Rellingen, Germany
Tel: +48-4101-303-0
RUSSIA
Yamahn Music (Russia) LLC
Roum 37, entrance 7, bil. 7, Kiesokaya street, Museum,
121059, Russia 7th 17:05:626
注:本说明仅供参考。
OTHER EUROPEAN REGIONS
Yamaha Music Europe GmbH
Sternostinose 22-34, 25462 Rellingen, Germany
Tel: +18-4101-3030
AFRICA
Yaisha Music Golf FZE
JAFTA 16, Office 512, P.O.Box 17128.
Jebel Ali FZE, Dubai, UAE
Tel: 1971-4-80-1500
DDBLE FAST
TURKEY
Yamaha Music Europe GmbH
Bari Assehir Istanbul, Turkey
Tel: +90-216-275-7950
OTHER REGIONS
Yamahn Music Golf FZE
JAFZA-16, Office 512, P.O.Box 17328.
Jebel Ali TZL, Dubai, U
Tel: 1971-1-801-500
ASIA
THE PEOPLE'S REPUBLIC OF CHINA
Yamaha Music & Electronics (China) Co., Ltd.
2F, Yanhakshu, 1818 Xinela-lu, Jinan-au.
Shanghai, China.
Tel: +86 400 051 7700
INDIA
Yamaha Music India Private Limited
P 401, JMD Memphis, Sector 45, Solan Road.
Gorugman-122018, Haryana, India
电话:+91-124-485-5160
INDONESIA
PT Yamaha Musik Indonesia Distributor
Yamahn Music Center Bldg. Jilair, Jend. Gaze Subcoo
Kov. 4, Jakarta 12930, Indonesia
Tel: 162-21-520-2573
KOREA
Yamaha Music Korea Ltd.
11F, Pradential Tower, 298. Gangnum-Jahre,
Gargnam, Sci., 05251, Korea
Tel: 182-2-3467-3300
MALAYSIA
Yamaha Music (Malaysia) Sdn. Bhd.
No.8.Jilani Perbaudaran,Keiman Joyt,47501
Pezeling Jaya, Selangor, Malaysia
Tel: 16043-78030900
SINGAPORE
Yamaha Music (Asia) Private Limited
Block 202 Hougang Street 21
Singapore 53090, Singapore
Tel: 165-5710-9200
TAIWAN
Yamaha Music & Electronics Taiwan Co., Ltd.
2F., No.1, Yuandong Rd., Banqizo Dist.,
New Taipei City 22063, Taiwan (R.O.C.)
Tel: (080-2-7511-8888)
THAIAND
Semi Music Yamaha Co., Ltd.
3, 4, 15, 10th Fl., Siam Motors Building
Sel'd Rama | Road, Wangmu,
Fulhamwan, Bangkok 10330, Thailand
VIETNAM
Yamaha Music Vietnam Company Limited
15th Flies, Nam A Bank Tuerer, 201-203 Cash Many
Tiang Tan St., Ward 4, Di
Ho Chi Minh City, Vietnam
Tel: +84 8 5818 1122
OTHER ASIAN REGIONS
http://asia.yamaha.com
OCEANIA
AUSTRALIA
Yamaha Music Australia Pty. Ltd.
Level 1, 80 Market Street, South Melbourne.
VIC 3205, Australia
Tel: +61 3-985-5111
REGIONS AND TRUST TERRITORIES
N PACIFIC OCEAN
http://asia.yamaha.com/
PA57
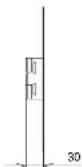
Dimensions
VC6NB VC6NW VC6NB VC6NW
VC4NB VC4NW

Reinforcing Bracket Kit
VC6NB VC6NW VC6NB VC6NW
C-Ring C-Ring

AB-C2
VC4NB VC4NW
C-Ring

Tile Rail Tile Rail Tile Rail


Yamaha Pre Audio global website
http://www.yamaheprosudio.com/
Kuruba Downloads
https://download.yamaha.com/
Manual Development Group
© 2021 Yamaha Corporation
Published 08/2021
CHOC-A2
- WARNING
- If you notice any abnormality
- Do not open
- Water warning
- Fire warning
- Hearing loss
- Location and connection
- CAUTION
- Handling caution
- Unpacking
- Optional Items (sold separately: VC4NB and VC4NW only)
- NOTE
- Installing the Speaker
- NOTICE
- Pre-installation (Preparation of the Cable)
- Cut Out a Hole in the Ceiling
- When the included Reinforcing Bracket Kit or AB-C2 (sold separately) is used
- Connect the Wiring to the Connector
- Spring type terminal
- Fix the Speaker onto the Ceiling
- Removing from the Ceiling
- Set the Line Voltage/Impedance and Power
- Attach the Grille
- ADDRESS LIST
- NORTH AMERICA
- CANADA
- L.S.A.
- CENTRAL & SOUTH AMERICA
- MEXICO
- PANAMA AND OTHER LATIN
- AUSTRIA/BULGARIA
- POLAND
- MALTA
- NETHERLANDS/BELGIUM
- LUXEMBOURG
- FRANCE
- SPAIN/PORTUGAL
- GREECE
- SWEDEN/FINLAND/ICELAND
- DENMARK
- NORWAY
- CYPRUS
- RUSSIA
- OTHER EUROPEAN REGIONS
- AFRICA
- DDBLE FAST
- TURKEY
- OTHER REGIONS
- ASIA
- THE PEOPLE'S REPUBLIC OF CHINA
- INDIA
- INDONESIA
- KOREA
- MALAYSIA
- SINGAPORE
- TAIWAN
- THAIAND
- VIETNAM
- OTHER ASIAN REGIONS
- OCEANIA
- AUSTRALIA
- Dimensions
- VC4NB VC4NW
- Reinforcing Bracket Kit
- AB-C2
Brand : YAMAHA
Model : VC6NW
Category : Pregnant