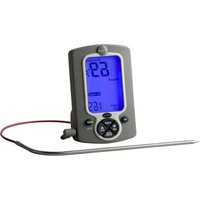
1471N - Food thermometer Taylor - Free user manual and instructions
Find the device manual for free 1471N Taylor in PDF.


| Product Type | Food Thermometer with Timer |
| Brand | Taylor |
| Model | 1471N |
| Temperature Range | 32°F to 392°F (0°C to 200°C) |
| Timer Range | 99 minutes 30 seconds |
| Response Time | 1 second |
| Power Source | Batteries (alkaline recommended) |
| Probe Type | Stainless steel, oven-safe cable |
| Display | Digital LCD showing temperature and timer |
| Functions | Temperature measurement, countdown timer, alarm |
| Alarm | Audible alarm, sounds for up to 10 minutes |
| Button Controls | ON, START/STOP, CLEAR, MODE |
| Dimensions | Approx. 2.5 x 1.5 x 1 inches (estimated) |
| Weight | Approx. 3 oz (estimated) |
| Material | Plastic body, metal probe |
| Safety Features | Auto-off, low battery indicator, probe max temp 392°F |
| Cleaning & Care | Wipe with damp cloth; do not immerse in water |
| Battery Compatibility | Do not mix old/new or different battery types |
| Certifications | FCC Class B compliant |
| Included Accessories | Probe, user manual |
Frequently Asked Questions - 1471N Taylor
User questions about 1471N Taylor
0 question about this device. Answer the ones you know or ask your own.
Ask a new question about this device
Download the instructions for your Food thermometer in PDF format for free! Find your manual 1471N - Taylor and take your electronic device back in hand. On this page are published all the documents necessary for the use of your device. 1471N by Taylor.
USER MANUAL 1471N Taylor
| 5. To pause the timer, press "START/STOP."To resume countdown, press "START/STOP" again. To add extra time, press "START/STOP" to pause, "▼ MIN" or "▲ SEC" to increase and decrease time, and "START/STOP" to resume.To reset timer to zero, first pause the timer, then press "CLEAR."6. At "00:00," the alarm will beep. The timer will begin to count up. Press "START/STOP" to stop the alarm and pause the count up timer.Press "CLEAR" to reset the timer, press "START/STOP" to zero.7. The timer will time up to 99 minutes and 59 seconds.The alarm will sound for 10 minutes before automatically turning off.8. To switch to the temperature display, press the "MODE" button. Press "MODE" again to return to the timer display.9. Press the "ON" button to turn the unit off when finished.CARE AND PRECAUTIONS:When running the probe cable into an oven, be sure to close the door gently to avoid crimping or severing the cable.1. Always use a heat-resistant glove when touching the metal probe or cord during or just after cooking. DO NOT TOUCH HOT PROBE OR CORD WITH RARE HANDS! | 2. Keep the metal probe and cord away from children.3. Sterilize metal probe each time before use.4. Do not expose the thermometer to water, direct heat, a hot surface, or direct sunlight for an extended period of time. This may cause damage to the plastic casing or the electric circuits and components inside.5. Do not expose the probe directly to flames. Do not put the probe in foods intended to exceed cooking temperatures of 392^ F( 200^ C) as this may reduce the life and accuracy of the thermometer sensor.6. Do not use this thermometer in a microwave oven.7. Moisture inside the plug-in opening of the thermometer will result in an incorrect temperature reading. Always dry the sensor plug with a cloth before plugging it into the thermometer.8. DO NOT USE THE CORD AND PROBE FOR OVEN TEMPERATURES HIGHER THAN 392^ F( 000^ C) .9. Do not mix old and new batteries. Do not mix alkaline, carbon-zinc (standard), or nickel-cadmium (rechargeable) batteries. | Remove the batteries if the thermometer will not be used for a long period of time.SPECIFICATIONS:» Thermometer Range: 392^ F up to 392^ F (0°C up to 200°C)» Timer Range: 99 minute 59 seconds» Response Time: 1 secondWARNING:Changes or modifications to this unit not expressly approved by the party responsible for compliance could void the user's authority to operate the equipment.NOTE: This equipment has been tested and found to comply with the limits for a Class B digital device, pursuant to Part 15 of the FCC Rules. These limits are designed to provide reasonable protection against harmful interference in a residential installation. This equipment generates uses and can radiate radio frequency energy and, if not installed and used in accordance with the instructions, may cause harmful interference to radio communications. However, there is no guarantees that interference will not occur in a particular installation. If this equipment | does cause harmful interference to radio or television reception, which can be determined by turning the equipment off and on, the user is encouraged to try to correct the interference by one or more of the following measures:» Reorient or relocate the receiving antenna.» Increase the separation between the equipment and receiver.» Connect the equipment into an outlet on a circuit different from that to which the receiver is connected.» Consult the dealer or an experienced radio/TV technician for help. | MINIMUM INTERNAL COOKING TEMPERATURES AS RECOMMENDED BY THE USDA.This chart shows the minimum INTERNAL temperatures that food must reach to be considered safe to eat, no matter how you prepare them.Personal taste temperatures may be different from the recommended guidelines below:Fresh Ground Beef, Veal, Pork 160^ F/72^ C Beef, Veal, Lamb - roast, steaks, chops"Rare...... 140^ F/60^ C ......Medium.... 140^ F/163^ C ......Well Done...... 140^ F/77^ C ......Fresh Pork - roast, steaks, chopsMedium...... 140^ F/75^ C ......Well Done...... 140^ F/77^ C ......HamFresh (Raw)...... 160^ F/78^ C Precooked (or reheat)...... 140^ F/60^ C PoultryGround Chicken, Turkey...... 165^ F/74^ C Whole Chicken, Turkey...... 165^ F/74^ C Breast, Roasts...... 165^ F/74^ C Thighs and Wings...... 165^ F/74^ C Fish - cook until opaque and flakes easily with fork ...... 145^ F/63^ C Stuffing - cooked alone or in bird ...... 165^ F/74^ C Egg Dishes...... 160^ F/75^ C Leftovers, Casseroles...... 165^ F/74^ C "The USDA does NOT recommend RARE 140^ F as a safe eating temperature. | [DHW]COLLECTIONPROBETHERMOMETERHelpful tips for use and care |
PROBE THERMOMETER
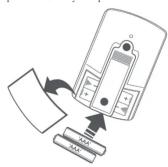
BATTERY INSTALLATION:
The Digital Cooking Thermometer/Timer operates on two (2) AAA batteries, not included. If readings grow dim or irregular the batteries may need to be replaced. (For longer life use alkaline batteries.) To insert the batteries:
- Remove the battery compartment door located on the back of the unit.
- Insert the batteries as indicated by the polarity symbols (+ and -) marked on the inside of the battery compartment.
- Replace the battery compartment door,
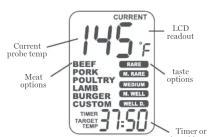
DESCRIPTION OF PARTS: DISPLAY INFORMATION:

to meat types and
“▲SEG” BUTTON:
- SEC BUTTON: »In Timer mode, press to
set seconds. »In Thermometer mode.
press to scroll to meat types and dopeness levels.
and does not be
START/STOP BUTTON:
» In Timer mode, press to start, pause, resume, or
stop timer. » In Thermometer mode
- In Thermometer mode, press to confirm
meat/doneness selection.
"CLEAR" BUTTON: » In Timer mode, press
when paused to clear timer. » In Thermometer mode
- In Thermometer mode, press to stop the thermomete
before cooking alarm sounds. BACKLIGHT BUTTON
BACKLIGHT BUTTON: (Located on back on the
thermometer) »Press button and in 5
- Less button and in 6 seconds a backlight will
activate for easy viewing. »Backlight will automatically
turn off after 5 seconds.
COOKING OPERATION:
(See following sections for directions on
- Preheat the oven to desired cooking
temperature.
- Sterilize the metal probe by inserting it into
an appropriate solution such as boiling water for several minutes.
-
Insert the metal probe into the thickest part
-
Insert the metal probe into the thickest part of the food to be cooked. Do not come in
contact with bone, fat or gristle as these areas will not have'd to correct temperature.
will not provide accurate temperature readings. Make sure the sensor plug on the
other end of the cord is plugged into the
thermometer display unit.
- Place the food into the preheated oven. The thermometer display unit must be placed
thermometer display unit must be placed outside the oven. (Do not put the plastic display
unit in the oven.) The probe cord will be held in
place by the oven door. Be careful not to crimp the probe cord with the oven door.
- The internal food
temperature will
display at the top of the LCD screen.
- An alarm will sound
when either the internal
temperature of the food reaches the target
teaches the target temperature or the tim
has reached zero. (See nex
sections for directions on programming the unit.) The unit will automatically switch to the
(1) The time will automatically switch to the function which is sounding the alarm
(Thermometer or Timer)
- Press the "START/STOP" button to stop the alarm
the alarm.
- Remove the metal probe from the food with a heat-resistant glove. DO NOT TOUCH
THE PROBE OR CORD WITH YOUR
BARE HANDS!
TO PROGRAM THE THERMOMETER:
-
Press the "ON" button to turn the unit on.
-
Your thermometer is preset to read temperatures in Eukwelt, Tewittlal, Caihui
in Fahrenheit. To switch to Celsius, press and hold the "MODE" button for 3 seconds.
- Press the "MODE" button to select
Thermometer mode. The "TARGET" is
appears at the bottom left of the LCD.
- Press the "MIN" or "SEC" button until the correct meat type flashes on the LCD. Press
the "START/STOP" button to select.
- Press the "▼ MIN" or "▲ SEC" button until
correct doneness level flashes on the LCD. Press the "START/STOP" button to select
-
A preset target temperature will flash at the
-
A present target temperature will remain at the bottom right of the LCD. The temperature can be
manually changed if desired. Press ▼ MIN to
increase or "▲ SEC" to decrease the temperature by 1 degree. (Note: The temperature change is not
1 degree (Note): The temperature change is not permanent; the unit will automatically reset after
each programming.)
- Press the "START/STOP" button to confirm
the displayed temperature. The thermometer is set and ready for use.
- An alarm will sound when the internal
temperature of the food reaches the target
temperature. Press the "START/STOP" button
to stop the alarm. Otherwise the alarm will
sound for 10 minutes and automatically turn off.
- To stop and reset the thermometer before the alarm sounds press the "START/STOP"
the alarm sounds, press the START/STOP and then the "CLEAR" button.
- To switch to the timer disp
the"MODE" button. Press "MODE" again
to return to the temperature display. 11. Press the "ON" button to turn the unit off
- Press the "ON" button to turn the unit on when finished.
TO PROGRAM THE TIMER:
This thermometer is also equipped with a
convenient timer. It can operate as an independent timer or work along with the
thermometer function
- If necessary, press the "ON" button to turn the unit on
a. p
- Press the MODE button to select Timer mode. The "TIMER" icon will display at the
bottom left of the LCD.
- Press the "▼ MIN" button to set the
minutes. Press the "▲ SEC" button to set the seconds. Press and hold the buttons to
seconds. Press and hold an advance the digits quickly.
- Press the "START/STOP" button to start
timer countdown.
Brand : Taylor
Model : 1471N
Category : Food thermometer