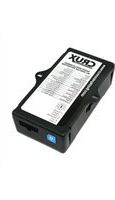
SOOGM-16B - Car audio interface CRUX - Free user manual and instructions
Find the device manual for free SOOGM-16B CRUX in PDF.


| Product Type | Vehicle Integration Interface |
| Brand | CRUX |
| Model | SOOGM-16B |
| Compatible Vehicles | Select GM vehicles (2006-2013) |
| Input Voltage | 12V DC |
| Power Consumption | 0.5A max |
| Dimensions (L x W x H) | 2.5 x 1.5 x 0.75 in (63 x 38 x 19 mm) |
| Weight | 2.5 oz (70 g) |
| Cable Length | 18 in (45 cm) |
| Connectors | 16-pin vehicle harness, 12-pin aftermarket radio |
| Supported Features | Retained accessories, chime retention, data bus integration |
| Installation Type | Plug-and-play, no cutting |
| Operating Temperature | -40°F to 185°F (-40°C to 85°C) |
| Certifications | CE, RoHS |
| Warranty | 1 year limited |
| Package Contents | Interface module, wiring harness, instruction manual |
Frequently Asked Questions - SOOGM-16B CRUX
User questions about SOOGM-16B CRUX
0 question about this device. Answer the ones you know or ask your own.
Ask a new question about this device
Download the instructions for your Car audio interface in PDF format for free! Find your manual SOOGM-16B - CRUX and take your electronic device back in hand. On this page are published all the documents necessary for the use of your device. SOOGM-16B by CRUX.
USER MANUAL SOOGM-16B CRUX
- Retains factory features in select GM LAN 11 Bit vehicles while functioning with an aftermarket radio.
- Pre-programmed to retain factory Steering Wheel Controls.
- Supports Non-Bose and Bose amplified systems.
- Provides Vehicle Speed Sensor (VSS), Parking Brake and Reverse Outputs.
- Retains factory OnStar®
- Retains chime functions.
- EIA color coded wiring for easy installation.
PARTS INCLUDED:

SOOGM-16B MODULE

SOOGM-16B 14 & 16 PIN HARNESS

SOOGM-16B 24 PIN HARNESS

SWC CABLES

ANTENNA ADAPTER
INSTALLATION DIAGRAM:

flowchart
graph TD
    A["24-Pin Connector Harness"] --> B["Select Appropriate Harness"]
    B --> C["16 & 14-Pin Connector Harness"]
    C --> D["To Factory Harness"]
    D --> E["Reverse Gear"]
    D --> F["Parking Brake"]
    D --> G["Illumination (+)"]
    D --> H["Amplifier Turn-on"]
    D --> I["Vehicle Speed Output +12V Constant"]
    D --> J["Ground"]
    D --> K["Right Front (-)"]
    D --> L["Left Front (+)"]
    D --> M["Right Rear (+)"]
    D --> N["Right Rear (-)"]
    D --> O["Left Rear (+)"]
    D --> P["Green"]
    D --> Q["Green/Black"]
    C --> R["24-Pin Connector"]
    R --> S["10-Pin Connector"]
    S --> T["SWC DIP"]
    S --> U["SWC"]
    T --> V["Chime Volume Adjustment"]
    U --> V
    V --> W["4-Pin Connector"]
    W --> X["JVC/Kenwood (Blue / Yellow)"]
    X --> Y["Cap or insulate if not being used"]
    Y --> Z["3.5MM SWC Cable Plug in the 3.5MM SWC cable to the 4-pin port on the module. See "DIP SWITCH SETTINGS" section."]
DIP SWITCH SETTINGS:
AFTERMARKET RADIO DIP SWITCH SETTINGS:
NOTE: For Atoto, Blaupunkt, Dual, Farenheit, Power Acoustik, Soundstream, and most off-brand radios, check the aftermarket radio's manual to see if the SWC buttons need to be programmed.
4-PIN SWC CABLE
Use the proper 3.5MM to 4-Pin SWC cable for the aftermarket radio you are using.
OPTION A is used for ALPINE, CLARION, JVC, and KENWOOD units (Blue/Yellow wire is attached) OPTION B is used for BLAUPUNKT, BOSS, DUAL, FARENHEIT, JENSEN, POWER ACOUSTIK, PIONEER, SONY, SOUNDSTREAM and Most Off-Brand Radios.
NOTE: Cap or insulate the 3.5mm plug or Blue/Yellow wire if not being used.
Plug the SWC cable to the SOOGM-16B module and the 3.5mm plug to the aftermarket radio SWC port or use the Blue/Yellow wire for JVC and Kenwood radios.
SELECTING THE AUDIO SYSTEM:
If the vehicle is equipped with an amplified audio system, the SOOGM-16B has a built-in audio level adaptor that outputs the proper audio level from the aftermarket radio to the factory amplifier. To use this feature, plug in the male 8-pin connector on the ONST-11B harness to the GRAY female 8-pin connector on the ONST-11B module. The module is also labeled "Bose" and "Non Bose" to avoid confusion. (see picture below)
If the vehicle is NOT equipped with a factory amplified system, plug in the male 8-pin connector to the BLACK female 8-pin on the ONST-11B module.

natural_image
Close-up of a black electronic device rear panel showing internal components and red arrows pointing to ports (no readable text or symbols)NON BOSE (Non-Amplified) Connection
BOSE
(Amplified)
Connection
CHIME VOLUME ADJUSTMENT:
The SOOGM-16B has a potentiometer to adjust the chime volume. It is set at half way by default. To adjust the volume, simply use a suitable screw driver and turn the potentiometer clockwise to increase the volume and counter-clockwise to decrease the volume.

ONSTAR VOLUME ADJUSTMENT:
To adjust the OnStar volume, turn on OnStar and adjust the volume using the Steering Wheel Control volume adjustment. Once it is set, the SOOGM-16 will memorize this level.
VEHICLE APPLICATIONS:
16 and 14 PIN CONNECTORS
| CHEVROLET | |
| 2007-2010 | Cobalt |
| 2006-2011 | HHR |
| 2008-2012 | Malibu |
| PONTIAC | |
| 2007-2009 | G5 |
| 2010 | G6 |
| 2006-2009 | Solstice |
| SATURN | |
| 2007-2009 | Aura |
| 2007 | Ion |
| 2007-2010 | Sky |
24 PIN CONNECTOR
| CHEVROLET | |
| 2005-2006 | Cobalt |
| 2004-2007 | Malibu |
| PONTIAC | |
| 2005-2009 | G6 |
Compatible Radios

2009 Pontiac G6 2009 Chevrolet Malibu


natural_image
Interior view of a car dashboard with air filters and control knobs (no visible text or symbols)
natural_image
Interior view of a car dashboard with air conditioners and control knobs (no visible text or labels)2006 Pontiac G6 2005 Chevrolet Malibu

Brand : CRUX
Model : SOOGM-16B
Category : Car audio interface