
MNCD50 - Dash cam MINOLTA - Free user manual and instructions
Find the device manual for free MNCD50 MINOLTA in PDF.


| Product Type | Dash Cam |
| Brand | Minolta |
| Model | MNCD50 |
| Display | 3.0 inch 230k LCD Screen |
| Video Resolution | 1080FHD (1920x1080) at 30fps, 720P (1280x720) at 30fps |
| Photo Resolution | Up to 12 Mega Pixels |
| Field of View | Super wide angle 150 degrees |
| External Storage | MicroSDHC card up to 32GB (Class 10 recommended) |
| Built-in Battery | 300mAh backup battery |
| Power Source | USB car charger (included) |
| Interface | USB, HDMI, MicroSD slot |
| Key Features | Loop recording, G-sensor, Motion detection, WDR, Date stamp, Parking mode, Car plate imprint |
| File Format | Video: MOV, Photo: JPEG |
| Languages | English, French, Spanish, Portuguese, German, Italian, Russian, Japanese, Korean, Arabic, Cantonese, Mandarin (12 languages) |
| Safety | Do not disassemble; avoid moisture; do not expose to extreme temperatures |
| Cleaning | Wipe with slightly damp soft cloth; no abrasive chemicals |
| Accessories Included | USB cable, car charger, mounting bracket, user manual |
| Reset | Press Reset button with pointed object |
| Technical Support | Toll-free: 1-800-441-1100 |
Frequently Asked Questions - MNCD50 MINOLTA
User questions about MNCD50 MINOLTA
0 question about this device. Answer the ones you know or ask your own.
Ask a new question about this device
Download the instructions for your Dash cam in PDF format for free! Find your manual MNCD50 - MINOLTA and take your electronic device back in hand. On this page are published all the documents necessary for the use of your device. MNCD50 by MINOLTA.
USER MANUAL MNCD50 MINOLTA
natural_image
Black FHD mini camera with red lens and 'MINO' branding (no visible text beyond branding)MNCD50 QUICK GUIDE


FAQ
Q: My camera will not respond to any buttons presses. Why is this happening?
A: Your dash-cam is designed to prioritize the recording of video and will not allow any interruptions. The menu and other modes can only be operated while the dash-cam is in standby (not recording).
Q: How can I access the menu or change modes while my camera is recording (blinking red dot ● at top of screen)?
A: If Motion Detection is enabled (if this icon displays on the left side of the screen), please follow one of these steps:
1) Set your dash-cam on a flat surface. Press the RECORD button to ensure that the red dot on the screen is no longer blinking. Now press the menu button.
OR
2) Remove the MicroSD memory card by pushing it in. It will bounce back out. You can now press the MENU or MODE button to access the menu and other modes. If you select PLAYBACK mode, be sure to reinsert your MicroSD card so you can play back your files.
Q: How can I disable Motion Detection ?

A: With the MicroSD removed, make sure you are in VIDEO mode and press the MENU button.
- Navigate to Motion Detection with the UP and DOWN buttons.
- Press the RECORD button.
- Select OFF and press the RECORD button again to confirm the setting.
- Press the MENU button twice to save and exit the menu.

MINOLTA
Division of Elite Brands Inc., 40 Wall Street, 61st Floor
New York, NY 10005 • Tel: 1-800-441-1100
Minolta is a registered trademark of JMM Lee Properties, LLC
and is Used in the United States by Elite Brands under license
Getting Started
Simply insert the MicroSD card into the MicroSD card slot, and insert the auxiliary power adaptor into the camera's USB port and your car's power port. The camcorder will automatically power on and begin recording video. Remove the auxiliary power adaptor to automatically save a recording and power the camcorder off. To start or stop recording at any time, press the RECORD button. Press the power button for 5 seconds to manually power off.
Video Capture
To manually capture video, enter VIDEO Mode and press the RECORD button to begin recording video.
Photo Capture
To capture a photo, enter PHOTO Mode and the RECORD button to instantly capture a photo.
Modes
To switch between video, photo and playback modes, simply press the MODE button. MODE icons are displayed in the upper left corner of the screen.

VIDEO Mode

PHOTO Mode

PLAYBACK Mode
Safety and Handling Precautions
- Do not take apart or attempt to service the camera yourself.
- Do not expose the camera to moisture, or extreme temperatures.
- Allow the camera to warm up when moving from cold to warm temperatures.
- Do not touch and put pressure on the camera lens.
- Do not expose the lens to direct sunlight for extended periods.
- Do not use abrasive chemicals, cleaning solvents or strong detergents to clean the product. Wipe the product with a slightly damp soft cloth.
- When the camera is used for an extended period of time, it is normal for the camera body to feel warm.
- Do not subject the LCD monitor to impact.
• To prevent the risk of fire or electric shock, do not expose this appliance to rain or moisture.

Division of Elite Brands Inc., 40 Wall Street, 61st Floor
New York, NY 10005 · Tel: 1-800-441-1100
Minolta is a registered trademark of JMM Lee Properties, LLC
and is Used in the United States by Elite Brands under license
INTRODUCTION
The Minolta MNCD50 Car Camcorder integrates multiple functions of 1080p HD video capture, sound recording and external memory storage. It adopts video decoding technology of high performance and compression ratios, and contains an HDMI interface capable of transferring HD videos and audio data with several sound channels uncompressed. This camcorder is intended for in-vehicle shooting, which effectively enables the collection of evidence for driving accidents, daily life, traveling and outdoor activities.
The Minolta MNCD50 allows you to record video when mounted to your car's windshield in a wide, large angle.
This quick guide explains how to use your camcorder and provides additional information, including precautions and technical specifications. Please read through it carefully and understand this quick guide before use. Keep it properly stored away for reference.
OVERVIEW
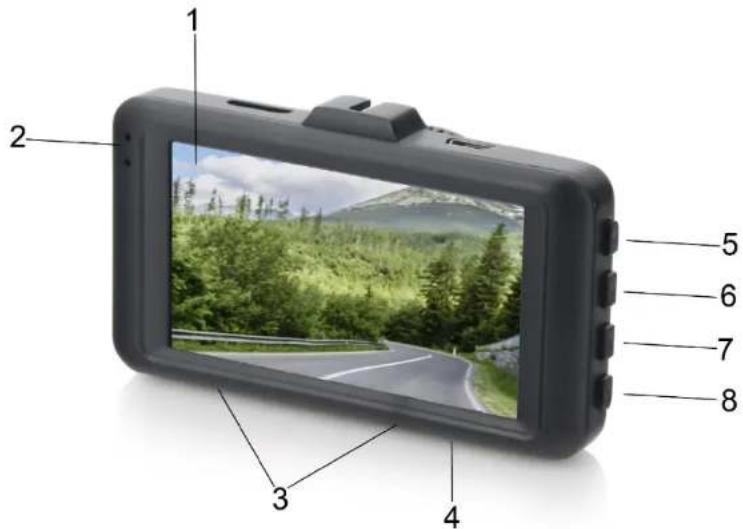
| 1 | Display |
| 2 | Status LED Indicator |
| 3 | Speaker & Microphone |
| 4 | Reset |
| 5 | OK/Record |
| 6 | Lock File/Parking Monitor |
| 7 | Mode |
| 8 | Power |
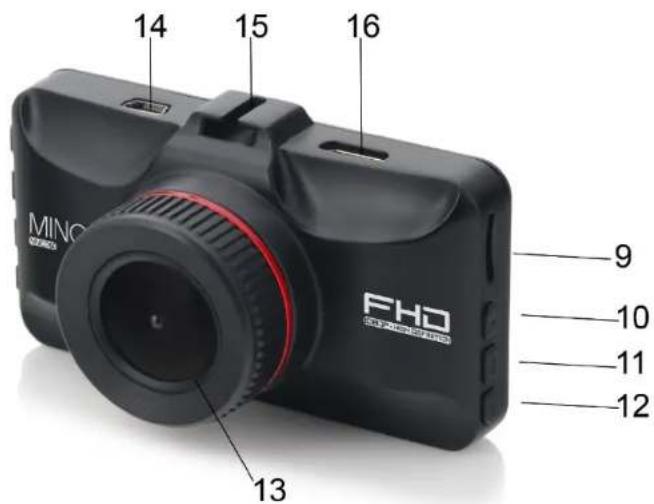
| 9 | MicroSD Card Slot |
| 10 | Up |
| 11 | Menu |
| 12 | Down |
| 13 | Front Lens |
| 14 | USB Port |
| 15 | Mount Port |
| 16 | HDMI Port |
GETTING STARTED
MicroSD Card Insertion and Removal
- Ensure the camera is powered off.
- Insert a MicroSD card into the MicroSD card slot with the gold pins facing the direction of the display screen. The MicroSD card can only be inserted in one direction. Do not force it through. Once successfully inserted, it will click in.
- To remove the MicroSD card, simply push the MicroSD card in and it will bounce back out.
Power
In-Car Use
Connect the included Auxiliary USB Power Adaptor to your car. Plug the USB plug into the camcorder's USB interface. Charging will begin immediately. Please note that the internal battery has a very limited capacity and is only intended for use in emergency use situations.
USB Cord Use
Connect the included USB cable to a free USB port on your computer, and connect the other end into the camcorder's USB interface. The battery may be charged while the camcorder is powered on or off.
While charging, the red indicator LED will illuminate. When charging is complete, the indicator LED will automatically turn off.
Quick Use
Simply insert a MicroSD card into the MicroSD card slot, and insert the auxiliary power adaptor into the camera's USB port and your car's power port. The camcorder will automatically power on. Remove the auxiliary power adaptor to automatically save a recording and power the camcorder off. To start or stop recording at any time, press the RECORD button.
CAMCORDER OPERATION
Press the POWER button to power the camcorder on. The camcorder will automatically begin recording video if a MicroSD card is inserted in the card slot and motion detection has been enabled, or the G-sensor sensitivity is enabled. Press the power button for 5 seconds to manually power off.
To switch between video, photo and playback modes, simply press the MODE button.
MODE icons are displayed in the upper left corner of the screen. Press the RECORD button to begin recording video or to capture a photo.

VIDEO Mode
Mode
VIDEO MODE
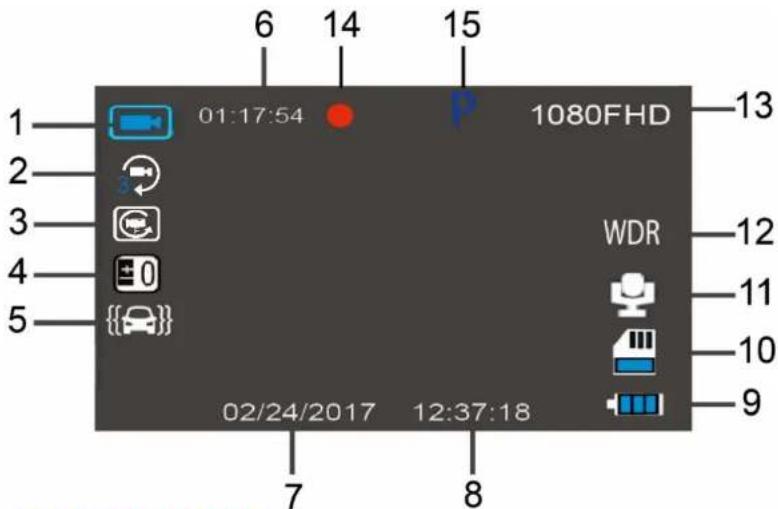
PHOTO MODE
- VIDEO Mode
- Loop Recording Enabled
- Motion Detection Recording Enabled
- Exposure Value
- G-Sensor Enabled
- Recording Time Remaining
- Current Date
- Current Time
- Current Battery Power Level
- MicroSD Card Inserted
- Microphone Enabled
- Wide Dynamic Range Enabled
- Current Video Resolution
- Recording Active
-
Park Mode Enabled
-
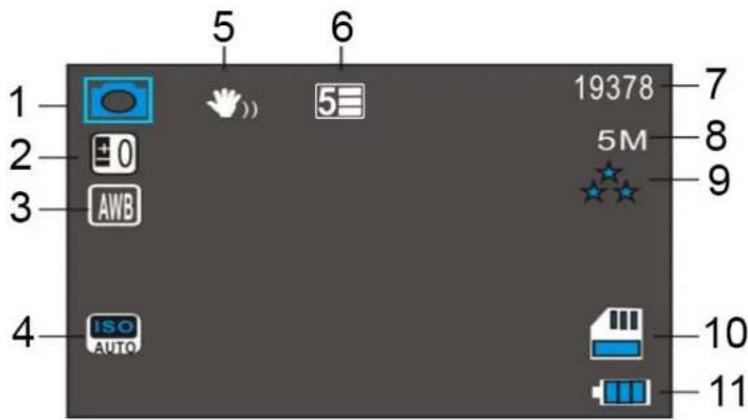
PHOTO Mode
- Exposure Value
- Automatic White Balance Enabled
- Automatic ISO Enabled
- Digital Image Stabilization Enabled
- Sequence Photos Mode
- Number of Pictures Remaining
- Current Photo Resolution
- Current Image Quality
- MicroSD Card Inserted
- Current Battery Power Level
PLAYBACK MODE
- Press the MODE button until you enter PLAYBACK mode. It is the third mode. PLAYBACK mode allows you to browse through your photos and videos, and allows you to playback files recorded by your camcorder.
- Press the UP and DOWN buttons to cycle through available playback files.
- Press the MODE button again to exit PLAYBACK mode.
Playing Back Video Clips
- Press the RECORD button to play or stop a video clip in PLAYBACK mode.
- To fast forward, press the DOWN button while video is playing back.
- To rewind, press the UP button while video is playing back.
- Press the MENU button to delete a file or to protect a file from deletion.
MENU & SETTINGS INTERFACE
The menu interface is available in all 3 modes and the options settings differ depending on the current mode enabled.
To access VIDEO and PHOTO mode settings:
- Press the MODE until you are in either VIDEO or PHOTO mode. While in VIDEO mode, you will notice a camcorder icon in the top left corner. In PHOTO mode, you will notice a camera icon in the top left corner.
- Press the MENU button to access the current mode's settings.
- Press the UP and DOWN buttons to navigate through the various settings within the menu.
- Press the RECORD button to access a highlighted setting, or to access any of the submenus.
- Press the RECORD button again to confirm a highlighted setting.
- Press the MENU button twice at any time to save your settings and exit the menu.
To access SETUP/MAIN settings:
- While in any mode, press the MENU button twice to access the SETUP/MAIN settings.
- Press the UP and DOWN buttons to navigate through the various settings within the menu.
- Press the RECORD button to access a highlighted setting, or to access any of the submenus.
- Press the RECORD button again to confirm a highlighted setting.
- Press the MENU button again at any time to save your settings and exit the menu.
Video Mode Menu
While in VIDEO mode, press the MENU button to enter the recording menu interface.
Resolution: Sets the size of the video recording. 1080FHD is the highest and clearest setting.
Loop Recording: Allows you to set a maximum duration for each video clip recorded.
WDR: Balances lighting when one part of a scene is very dark, while another part is bright.
Exposure: Determines how light or dark an image will appear when capturing an image.
Motion Detection: Automatically records if movement is detected in front of the camera lens. If no further movement is detected within A 10-second period, the camera will stop recording.
Record Audio: Allows you to enable or disable recording audio on a video clip.
Date Stamp: Allows you to add a date and time stamp on a video clip.
G-Sensor: Allows you to set the sensitivity level for automatic recording upon collision. A recording will be stored with the icon and the video file will be locked and protected from deletion.
Photo Mode Menu
While in PHOTO mode, press the MENU button to enter the photo menu interface.
Resolution: Sets the size of the photo being captured. 12M is the highest and clearest setting.
Sequence: Enables a sequence of 5 consecutive images to be captured. Each image is automatically captured 2 seconds apart until all 5 images are successfully captured.
Quality: Determines the quality level for captured photos. Fine is the highest and clearest setting.
Sharpness: Determines the image brilliance level inherent in the lens
White Balance: Determines the correct white color for captured photos.
ISO: Image sensor sensitivity in relation to captured photos.
Exposure: Determines how light or dark an image will appear when capturing an image.
Anti-Shaking: Enables digital image stabilization for capturing photos.
Date Stamp: Allows you to add a date and time stamp on a captured photo.
Setup / Main Menu
While in any mode, press the MENU button twice to enter the main menu interface.
Park Mode: Will automatically power the camcorder on and record a video clip, if the camcorder detects a collision while parked and powered off. You can set the sensitivity level in this menu.
Date/Time: Allows you to set a date and time for display on videos and photos.
Auto Power Off: Allows you to set the delay time of automatically powering off the camcorder once power is disconnected.
Screen Saver: Allows to set the duration for powering the screen off while recording. Selecting OFF will disable the screen saver, and the display will always show what is being viewed.
Beep Sound: Enables or disables the audible sound when pressing a button.
Language: Allows to set the menu and interface language.
Frequency: Allows you to set 50Hz or 60Hz (depending on your region).
Car Plate: Allows you to add a license plate number or other car identification number. See below for further instructions. ***
Format: Allows to delete the entire contents of your inserted MicroSD card. This cannot be undone.
Default Setting: Allows to reset all of the settings to factory defaults.
Version: Displays the current firmware version.
***To imprint your CAR NUMBER or LICENSE PLATE NUMBER on recorded media:
- While in either PHOTO or VIDEO mode, press the MENU button twice to access the SETUP/MAIN settings.
- Press the UP and DOWN buttons to navigate through the various settings within the menu.
- Once highlighted on "Car Plate", press the RECORD button to access the submenu.
- You are presented with 8 spaces for entering a character. The first space is automatically selected. To change characters within a space, press the UP and DOWN buttons to cycle through the available characters. You may select from letters, numbers and a blank space.
- Press the RECORD button to confirm a highlighted character. The submenu will automatically proceed to the next character entry space.
- Repeat the above steps until you have completed your desired character entry.
- Press the MENU button again at any time to save your settings and exit the menu.
MEDIA TRANSFER
Connecting to a Computer
- Connect your camcorder to a computer with the included USB cable. When the camcorder automatically powers on, the following prompts will display.
- Select "Mass Storage" and press the RECORD key to continue.
- Go to Start → My Computers → and find the removable disk. Your digital camera acts like a card-reader when connected and can be easily accessed this way. Your media will be stored in a folder on this removable disk.
Connecting to a TV
Connect your camcorder to a TV with an HDMI cable (not included) for playing and browsing HD videos and photos.
Reset
If your camcorder freezes or becomes unresponsive, press the RESET button to reset and power cycle the camcorder. Insert a pointy object into the reset hole to fully reset the camcorder.
TECHNICAL SPECIFICATIONS
| LCD Display Screen | 3.0 inch 230k LCD Screen |
| Anti-Shake Technology | Electronic Image Stabilization |
| Field of View | Super wide angle; 150 Degrees |
| Video Resolution | 1080FHD 1920X1080 30fps720P 1280X720 30fps |
| Photo Resolutions | 12 Mega Pixels; 10 Mega Pixels; 8 Mega Pixels; 5 Mega Pixels; 3 Mega Pixels; 2 Mega Pixels; 1.3 Mega Pixels; VGA |
| File Format | Picture: JPEG Video: MOV |
| Wide Dynamic Range (WDR) | Support |
| Seamless Record | Support |
| G-Sensor Auto Recording | Support |
| Motion Detecting Recording | Support |
| Time/Date | Support |
| External Storage | MicroSDHC Card (32GB max.) |
| Languages | English, French, Spanish, Portuguese, German, Italian, Cantonese, Mandarin, Russian, Japanese, Korean, Arabic |
| HDMI Interface | Built-in |
| USB function | Built-in |
| Microphone and Speaker | Built-in |
| Built-in Battery | 300mAh - for use as a backup power source during power outage |
If you're having difficulties with your camera, or would like further assistance, please call our toll-free technical support hotline at 800-441-1100. Please be sure to have your camera handy when calling.

Minolta is a registered trademark of JMM Lee Properties, LLC and is used in the United States by Elite Brands under license.
© August 2017, Elite Brands Inc.

MINOLTA®
Division of Elite Brands Inc., 40 Wall Street, 61st Floor
New York, NY 10005 • Tel: 1-800-441-1100
Minolta is a registered trademark of JMM Lee Properties, LLC
and is Used in the United States by Elite Brands under license
- FAQ
- OR
- Getting Started
- Video Capture
- Photo Capture
- Modes
- Safety and Handling Precautions
- INTRODUCTION
- MicroSD Card Insertion and Removal
- Power
- In-Car Use
- USB Cord Use
- Quick Use
- CAMCORDER OPERATION
- PLAYBACK MODE
- Playing Back Video Clips
- MENU & SETTINGS INTERFACE
- Video Mode Menu
- Photo Mode Menu
- Setup / Main Menu
- MEDIA TRANSFER
- Connecting to a Computer
- Connecting to a TV
- Reset
- If you're having difficulties with your camera, or would like further assistance, please call our toll-free technical support hotline at 800-441-1100. Please be sure to have your camera handy when calling.
- MINOLTA®
Brand : MINOLTA
Model : MNCD50
Category : Dash cam