
86B4E30T - Monitor HISENSE - Free user manual and instructions
Find the device manual for free 86B4E30T HISENSE in PDF.

| Product Type | Monitor |
| Brand | Hisense |
| Model | 86B4E30T |
| Screen Size | 86 inches |
| Display Technology | LED |
| Resolution | 3840 x 2160 (4K UHD) |
| Refresh Rate | 60 Hz |
| Brightness | 350 cd/m² (typical) |
| Contrast Ratio | 5000:1 (static) |
| Viewing Angle | 178° / 178° |
| HDMI Ports | 2 x HDMI 2.0 |
| USB Ports | 1 x USB 2.0 |
| VESA Mount | 400 x 400 mm |
| Dimensions (W x H x D) | 1930 x 1120 x 80 mm (without stand) |
| Weight | 40 kg (without stand) |
| Power Consumption | 250 W (typical) |
| Standby Power Consumption | <0.5 W |
| Energy Efficiency Class | G |
| Built-in Speakers | 2 x 10 W |
| Operating Temperature | 0°C to 40°C |
| Accessories Included | Remote control, power cable, stand, user manual |
Frequently Asked Questions - 86B4E30T HISENSE
User questions about 86B4E30T HISENSE
0 question about this device. Answer the ones you know or ask your own.
Ask a new question about this device
Download the instructions for your Monitor in PDF format for free! Find your manual 86B4E30T - HISENSE and take your electronic device back in hand. On this page are published all the documents necessary for the use of your device. 86B4E30T by HISENSE.
USER MANUAL 86B4E30T HISENSE
Read the manual carefully and ensure you have fully understood its contents before operating this device for the first time.

Declaration
Any content and service accessed through this device, while only intended for individual non-commercial use, shall be the property of the applicable third party and subject to protection by regulations and laws on copyright, patent, trademark and other intellectual property rights. No part of such content and service may be modified, duplicated, published, uploaded, distributed, translated, marketed, or used to make and distribute products derived from it without the prior permission of the content owner or service provider.
You acknowledge and agree explicitly that you will solely bear the risk associated with the use of this device, and further you will solely bear any risk related to satisfactory quality, performance and accuracy for any content and service accessed through this device. To the maximum extent permitted by applicable law, this device and any third party's content and service is provided as it is without any guarantee, express or implied.
Manufacturer hereby declare explicitly that Manufacturer shall not be held liable for any guarantee and conditions, express or implied, related to this device and any content and service, including but not limited to warranty on marketability, satisfactory quality, fitness for a particular purpose, accuracy, quiet use and non-violation of any third party's rights; to the maximum extent permitted by applicable law, Manufacturer gives no guarantee on the accuracy, validity, timeliness, legitimacy and completeness of any content or service provided through this device, or the fitness of such device, content or service for your particular requirement, or the protection from interruption and error during operation of such device, content or service; to the maximum extent permitted by applicable law, in any case, including fault or neglect, Manufacturer shall not be held liable for legal actions or indemnity obligation arising from any consequence as a result of or related to any information loaded in this device or use of such device, content or service by you or any third party.
Any content and service provided as it is together with this device shall be the property of the applicable third party, therefore Manufacturer gives no declaration or warranty on modification, suspension, cancellation, termination or abortion thereof, and shall not be held liable for legal actions or indemnity obligation arising thereof.
Manufacturer reserves the rights to restrict the use or access of certain content or service. As the content and service are transmitted through third party's network and transmission facilities, Manufacturer undertakes no customer service thereof or the obligation for such customer service.
[Statement]
- The pictures and instructions in this user manual are for reference only, and may be different from the actual product. Please subject to the actual product. (This statement is throughout this User Manual)
- Quality upgrades, product design and specifications are subject to change without notice.
- The software content service applicable to this product depends on the third party provider, and some software may not be used due to network, region, service cycle and other problems, which has nothing to do with the product quality. Please contact the third party provider for relevant details.
![HISENSE 86B4E30T - [Statement] - 1](/content/2026/05/1044340/images/37f48361412432e4992ba4ece9c505a02cdde8ce1113c8b3ed59aa95b7c4157b.jpg)
This symbol indicates high voltage is present inside. It is dangerous to make any kind of contact with any inside part of this product.
![HISENSE 86B4E30T - [Statement] - 2](/content/2026/05/1044340/images/5ec647236040071dfb1a5dbdca93f67409a4b58d33cd79854706c901006f2004.jpg)
This symbol alerts you that important literature concerning operation and maintenance has been included with this product.
![HISENSE 86B4E30T - [Statement] - 3](/content/2026/05/1044340/images/68f33038bd55bd8bcb3f164197a3743f3e5578c9fb4b07c8367fd6e4c8765b95.jpg)
CAUTION
RISK OF SHOCK ELECTRIC

CAUTION: To reduce the risk of electric shock, do not remove cover (or back). No user serviceable parts inside. Refer servicing to qualified service personnel.
\~ AC voltage: This symbol indicates that the rated voltage marked with the symbol is AC voltage.
- - - DC voltage: This symbol indicates that the rated voltage marked with the symbol is DC voltage.

Class I product: This symbol indicates that it requires a safety connection of
protective earthing (ground).
Disposal of Used Electrical & Electronic Equipment

natural_image
Symbol of a trash bin crossed out by two diagonal lines (no text or numbers present)
Packaging and electrical goods should be recycled appropriately, and not treated as household waste. Please dispose of this equipment at your applicable collection point for the recycling of electrical & electronic equipment waste. By ensuring the correct disposal of this product, you will help prevent potentially hazardous to the environment and to human health, which could otherwise be caused by unsuitable waste handling of this product. The recycling of materials will help conserve natural resources. Please do not therefore dispose of your old electrical and electronic equipment with your household waste. For more detailed information about recycling of this product, please contact your local city office, your household waste disposal service or the shop where you purchased the product.
Safeguards
Please read the following safeguards for your device and retain for future reference. Always follow all warnings and instructions marked on the device.
- A note about safety and operating instructions
Read and follow all safety and operating instructions, and retain them safely for future reference.
- Heed Warnings
Adhere to all warnings on the appliance and in the operating instructions.
- Cleaning
Unplug the device from the wall outlet before cleaning. Do not use liquid, abrasive, or aerosol cleaners. Cleaners can permanently damage the cabinet and screen. Use a lightly dampened cloth for cleaning.
- Water and Moisture
Avoid dripping or splashing of liquids onto the product. Objects filled with liquids, such as vases, should not be placed on the product.
- Ventilation
Slots and openings in the cabinet are provided for ventilation, to ensure reliable operation of the device and to protect it from overheating. Do not cover the ventilation openings in the cabinet and never place the set in a confined space such as built-in cabinet unless proper ventilation is provided. Leave a minimum 10cm gap all around the unit.
- Power Source
This device should be operated only from the type of power source indicated on the marking label. If you are not sure of the type of power supplied to your home, consult your appliance dealer or local power company.
- Power-Cord Protection
Power- supply cords should be routed so that they are not likely to be walked on or pinched by items placed upon or against them, paying particular attention to cords at plug, wall outlets, and the point where they exit from the device. MAIN plug is used as the disconnect device, the disconnect device shall remain readily operable.
- Lightning
For added protection for this device during a lightning storm, or when it is left unattended and unused for long periods of time, unplug it from the wall outlet and disconnect the cable system. This will prevent damage to the device due to lightning or power-line surge.
- Overloading
Do not overload wall outlets and extension cords as this can result in a risk of fire or electric shock.
10. Object and Liquid Entry
Never push objects of any kind into this device through openings as they may touch dangerous voltage points or short-out parts that could result in fire or electric shock. Never spill liquid of any kind on or into the device.
11. Servicing
Do not attempt to service this device yourself as opening or removing covers may expose you to dangerous voltage or other hazards. Refer all servicing to qualified service personnel.
12. Damage Requiring Service
Unplug the device from the wall outlet and refer servicing to qualified service personnel under the following conditions:
(a) When the power - supply cord or plug is damaged.
(b) If liquid has been spilled. or objects have fallen into the device.
(c) If the device has been exposed to rain or water
(d) If the device does not operate normally by following the operating instructions. Adjust only those controls that are covered by the operating instructions as an improper adjustment of other controls may result in damage and will often require extensive work by a qualified technician to restore the device to its normal operation.
(e) If the device has been dropped or the cabinet has been damaged.
(f) When the device exhibits a distinct change in performance- this indicates a need for service.
13. Replacement Parts
When replacement parts are required, be sure the service technician has used replacement parts specified by the manufacturer or have the same characteristics as the original part. Unauthorized substitutions may result in fire, electric shock or other hazards.
14. Safety Check
Upon completion of any service or repair to the device, ask the service technician to perform safety checks to determine that the device is in safe operating condition.
15. Heat
The product should be situated away from heat sources such as radiators, heat registers, stoves, or other products (including amplifiers) that produce heat.
16. Fire
The product should be situated away from naked flame sources such as lighted candle.
17. Off-gassing
The device smells of plastic is normal and will dissipate over time.
18. Stability Hazard.
The device may fall, causing serious personal injury or death. To prevent injury, this device must be securely attached to the floor/wall in accordance with the installation instructions.
Incorrect replacement of the battery may lead to the risk, including the replacement of another similar or the same type. Do not expose batteries to heat such as sun or fire or something like that.
The device should not be exposed to dripping and spraying and it cannot be placed under objects filled with liquids.
Main plug is used as the disconnect device, the disconnect device shall remain ready for operating.
Apparatus with CLASS I construction shall be connected to a MAINS socket outlet with a protective earthing connection.
Recycling/Licenses
WEEE (Waste Electronic Electric Equipment)
European Directive 2012/19/EU

This symbol on the product or on its packaging indicates that this product must not be disposed of with your household waste. Instead, it is your responsibility to dispose of your waste equipment by handing it over to a designated collection point for the recycling of waste electrical and electronic equipment. The separate collection and recycling of your waste equipment at the time of disposal will help to conserve natural resources and ensure that it is recycled in a manner that protects human health and the environment. For more information about where you can drop off your waste equipment for recycling, please contact your local city office, your household waste disposal service or the shop where you purchased the product.
Batteries
In accordance with the Battery Directive, used batteries should not be disposed of in the domestic waste. Dispose your batteries in the collection containers specific for this purpose in retail stores.
ROHS (Restriction of Hazardous Substance)
European Directive 2011/65/EU

This European directive limits the use of dangerous and hazardous substances which are difficult to recycle.
This allows recycling easily the EEE and contributes to the safeguard of the environment.
Substances included in this product match to the RoHS directive.
EU Declaration of conformity (DoC)
Unique identification of this DoC: hisense-02
We, Declare under our sole responsibility that the product:
Product Name: Digital Signage
Trade Name: Hisense
Model: 75B4E30T/86B4E30T
To which this declaration relates is in conformity with the essential requirements and other relevant requirements of the radio equipment directive (2014/53/EU), ErP Directive 642/2009(Lot 5), 1062/2010, 801/2013, RoHS directive (2011/65/EU).
The product is in conformity with the following standards and /or other normative documents:
Health & Safety (Art. 3(1)(a)): EN62311:2008
EN 60065:2014+A11
EMC (Art. 3(1)(b)): EN55035:2017
EN61000-3-2:2014
EN61000-3-3:2013
EN55032:2015+AC 2016(Class A)
EN 301 489-1 V2.1.1(2017-02)
EN 301 489-17 V3.1.1(2017-02)
Spectrum (Art. 3(2)): EN300328 V2.1.1:2016
EN301893 V2.1.1:2017
Software*: 75B4E30T_FBV00.02 / 86B4E30T_FBV00.02
ErP Directive EN 62087-1, -2 &-3:2016
EN 50564:2011
RoHS Directive EN 50581:2012
*The company reserves the right to install updated Software versions to improve the performance of the appliance.
Place and date of issue (of this DoC): QingDao 2020/7/21
Signed by or for the manufacturer: Hisense Commercial Display Co., Ltd.
Address: No. 218 Qianwangang Road, Economy & Technology Development Zone, Qingdao, China
Title: Product manager
Name (in print): Yangli
Yangli
This manual is for reference only, please refer to the actual machine.
- Unpacking and Installation .... 1
1.1. Unpacking....1
1.2. Package Contents....1
1.3. Installation Notes....2
1.4. Mounting on a Wall 2
- Parts and Functions ...... 4
2.1. Control Panel 4
2.2. Input/Output Terminals 5
2.3. Remote Control....6
- Connecting External Equipment....9
3.1. Connecting External Equipment (DVD/VCR/VCD) 9
3.2. Connecting a PC....9
3.3. Connecting USB....10
- Operation....11
4.1. Media Player Instructions....11
4.2. PDF Reader Play 13
4.3. U disk Files Playback and Copy Instructions 15
4.4. Using CMS 3.1....16
- OSD Menu....17
- Compatibility of the USB device 22
- Input Mode 25
- Cleaning and Troubleshooting....27
8.1. Cleaning....27
8.2. Troubleshooting 28
- Technical Specifications ....30
1. Unpacking and Installation
1.1. Unpacking
- This product is packed in a carton, together with the standard accessories.
- Any other optional accessories will be packed separately.
- Move the display by at least two (2) adults.
- After opening the carton, ensure that the contents are complete and in good condition.
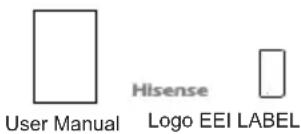
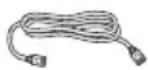
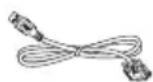
1.2. Package Contents
Please verify that you received the following items with your package content:
- LCD Display
- Remote Control
- Batteries
- User Manual
- Logo
- EEI Label
- Power Cord x4
- HDMI Cable
- LAN Cable
• USB Convert to RS232 Cable - RJ45 / RS232 Convert
natural_image
Empty white rectangle with black border (no text or symbols)* The supplied power cord varies depending on destination.
Remote Control Batteries

Power Cord

HDMI Cable
LAN Cable USB Convert
to RS232 Cable

Convert
* Items may differ in different locations
* Display design and accessories may differ from the images shown.
NOTES:
- For all other regions, apply a power cord that conforms to the AC voltage of the power socket and has been approved by and complies with the safety regulations of the particular country.
- Keep the packaging materials appropriately after unpacking the product.
1.3. Installation Notes
- Only use the power cable provided with this product. If an extension cord is required, please consult your service agent.
- The product should be installed on a flat surface, or the product may tip over. Leave a space between the rear of the product and the wall for proper ventilation. Do not install the product in a kitchen, bathroom or a place exposed to moisture, failure to do so may shorten the life of the internal parts.
- Do not install the product where it is 5000m or higher in altitude. Failure to do so may result in malfunctions.
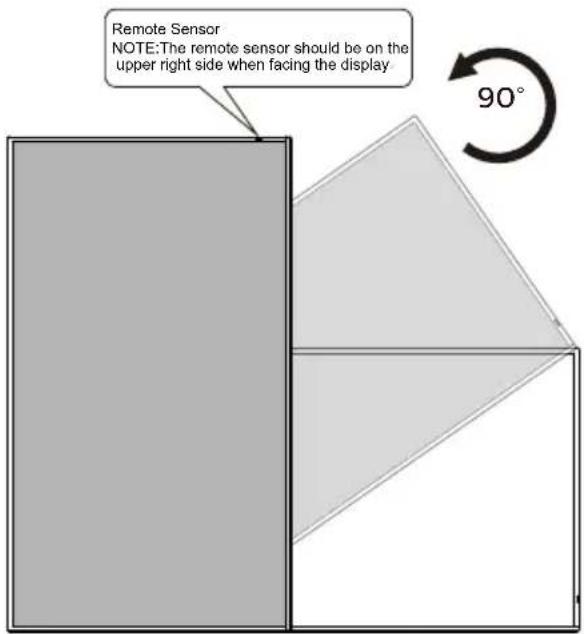
1.4. Mounting on a Wall
To mount this display onto a wall, you will have to obtain a standard wall-mounting kit (commercially available). We recommend using a mounting interface that complies with TUV-GS and/or UL1678 standard in North America.

Please rotate 90 degrees counterclockwise if need portrait use and set screen orientation as 90°(press MENU, select Common Setting and then select Desktop to set screen orientation), and you can stick the spare logo to the front bottom.
(Please use the vertical hanging function under the guidance of professionals.)
1.4.1. VESA Grid
75B4E30T/86B4E30T 600(H) x 400(V) mm
NOTE:
The appearance and color of the product are subject to the material object. The picture is for reference only.
- Lay a protective sheet on a table, which was wrapped around the display when it was packaged, beneath the screen surface so as not to scratch the screen face.
- Ensure you have all accessories for mounting this display (wall mount, ceiling mount, table stand, etc).
- Follow the instructions that come with the base mounting kit. Failure to follow correct mounting procedures could result in damage to the equipment or injury to the user or installer. Product warranty does not cover damage caused by improper installation.
- For the wall-mounting kit, use M8 mounting screws (having a length 10-20 mm longer than the thickness of the mounting bracket) and tighten them securely.
To prevent the display from falling:
- For wall or ceiling installation, we recommend installing the display with metal brackets which are commercially available. For detailed installation instructions, refer to the guide received with the respective bracket.
- To lessen the probability of injury and damage resulting from fall of the display in case of earthquake or other natural disasters, be sure to consult the bracket manufacturer for installation location.
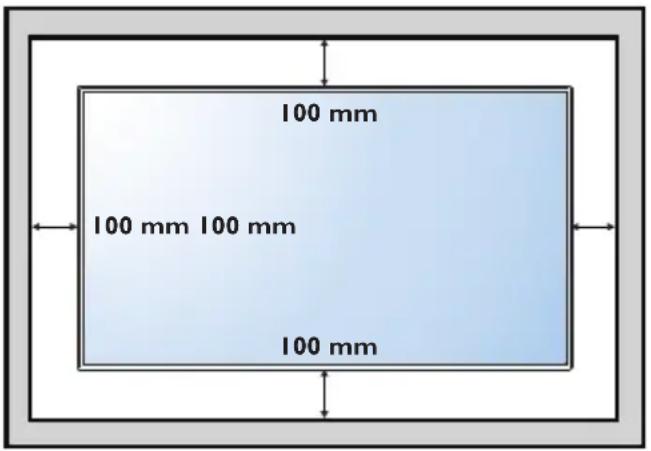
Ventilation Requirements for enclosure locating
To allow heat to disperse, leave space between surrounding objects as shown in the diagram below.
2. Parts and Functions
2.1. Control Panel
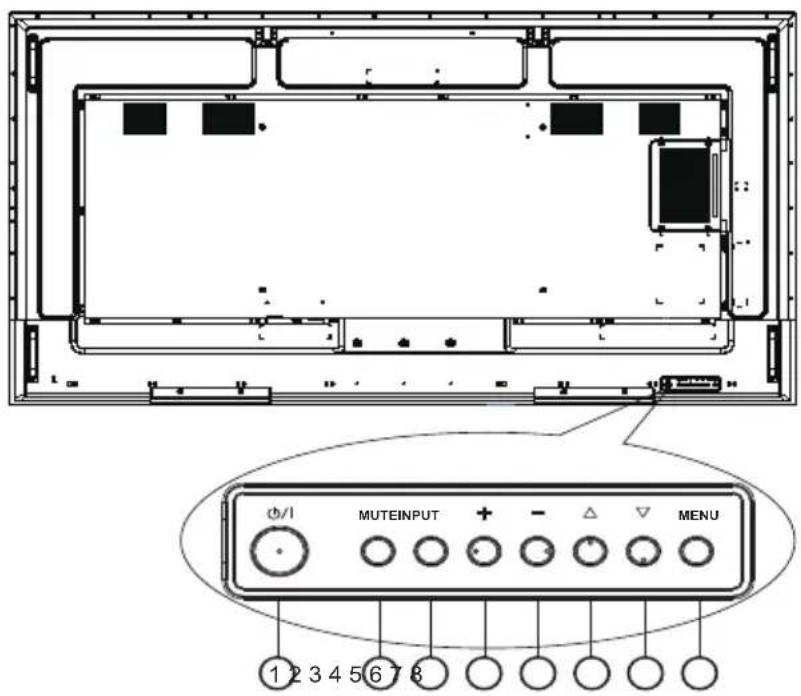
NOTE:
The appearance and color of the product are subject to the material object. The picture is for reference only.
① [button]
Turn the display on or put the display to standby.
② [MUTE] button
Mute or reactivate the audio.
③ [INPUT] button
- Select an input source when OSD menu is off.
④ [+]button
- Increase the volume of the audio when OSD menu is off.
- Move to the right item or Increase the adjustment while OSD menu is on.
⑤ [+]button
• Decrease the volume of the audio when OSD menu is off.
- Move to the left item or decrease the adjustment while OSD menu is on.
⑥ [▲button
Move the highlight bar up to adjust the selected item while OSD menu is on.
⑦ [▼button
Move the highlight bar down to adjust the selected item while OSD menu is on.
⑧ [MENU] button
Enter next submenu when OSD menu is on, or to activate the OSD menu when OSD menu is off.
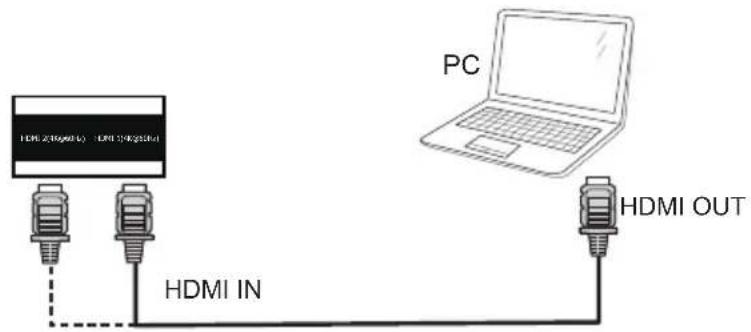
2.2. Input/Output Terminals
NOTE:
The appearance and color of the product are subject to the material object. The picture is for reference only.
① MAIN POWER SWITCH
Switch the main power on/off.
② AC IN
AC power input from the wall outlet.
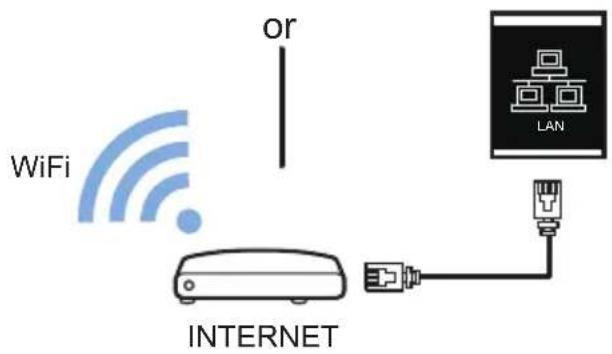
③ LAN
Internet function.
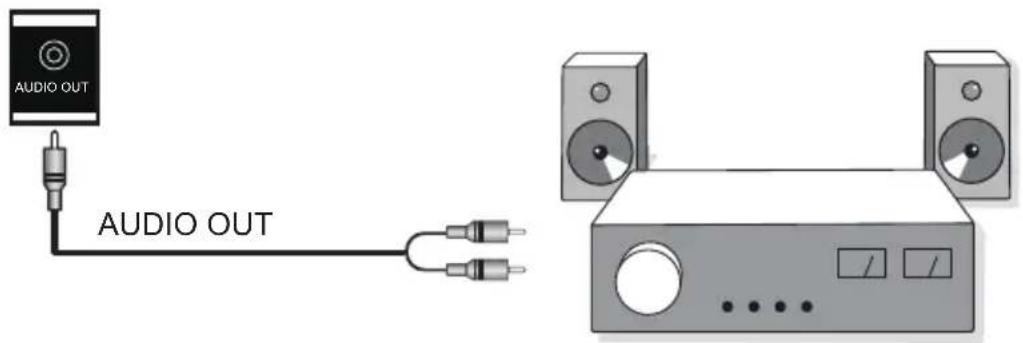
④ AUDIO OUT
Audio output for external AV device.
⑤ AUDIO IN
Audio input for HDMI (external audio).
⑥ HDMI2 IN / ⑦ HDMI1 IN
Connect to a source device via an HDMI cable.
⑧ RS232
Receive command signals from the external RS232 device.
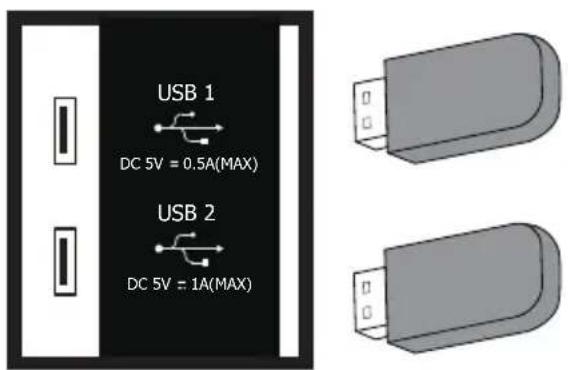
⑨ USB2 PORT
Connect to a USB3.0 storage device.
⑩ USB1 PORT
Connect to a USB2.0 storage device.
⑪ MICRO SD
Connect your MICRO SD card.
2.3. Remote Control
2.3.1. General functions

① [ ] POWER button
Turn OFF the display until power is off.
② [Source] Button
Choose input source.
③ [CMS] button
Go to CMS app.
④ [USB] button
Go to USB source.
⑤ [HDMI/PC] button
Go to HDMI1 source.
⑥ [Time button
Go to Time Setup OSD.
⑦ [PLAY] button
Control playback of media files.
⑧ [MENU] SETTINGS button
Access the OSD menu.
⑨ [INFO] button
Show Information OSD.
⑩ [■]MUTE button
Mute or restore volume.
⑪ [ ] BACK button
Return to the previous page or exit from the previous function.
⑫ [ ]VOLUME button
Turn up the volume.
⑬ [HOME button
Go to Android Launcher first widgets.
⑭[]][ ][ ] [ ]NAVIGATION buttons
Up, down, left and right operation key.
15 [OK] button
Confirm an entry or selection.
⑯ [Volume button
Turn Down the volume.
⑰ [Option] button
Access currently available options, for Media Input/PDF Player/CMS Console.
⑱ [Number] buttons
Input figures or text.
19 [Multi-View] button
Open multiple windows (background).
20 [Help] button
Reserved.
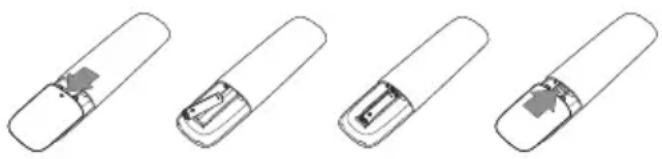
2.3.2. Inserting the Batteries in the Remote Control
The remote control is powered by two 1.5V AAA batteries.
To install or replace the batteries:
- Press and then slide the cover to open it.
- Insert the batteries with the correct polarity (+) and (−).
- Replace the cover.
natural_image
Four technical line drawings of a mechanical component or connector, showing internal components and assembly (no text or symbols)CAUTIONS:
Incorrect use of batteries may cause leakage or explosion. Be sure to follow the instructions below:
- Replacement of a battery with an incorrect type that can defeat a safeguard
- Disposal of a battery into fire or a hot oven, or mechanically crushing or cutting of a battery, that can result in an explosion
• Leaving a battery in an extremely high temperature surrounding environment that can result in an explosion or the leakage of flammable liquid or gas - A battery subjected to extremely low air pressure that may result in an explosion or the leakage of flammable liquid or gas
- Risk of fire or explosion if the battery is replaced by an incorrect type
NOTE:
Remove the batteries from the battery compartment when not using for an extended period of time.
2.3.3. Handling the remote control
- Do not drop or apply shock to the remote control.
- Do not allow any liquid to get inside the remote control. If water has entered the remote control, wipe the remote control with a dry cloth immediately.
- Do not place the remote control near heat and steam sources.
- Do not attempt to disassemble the remote control, unless you need to place batteries in the remote control.
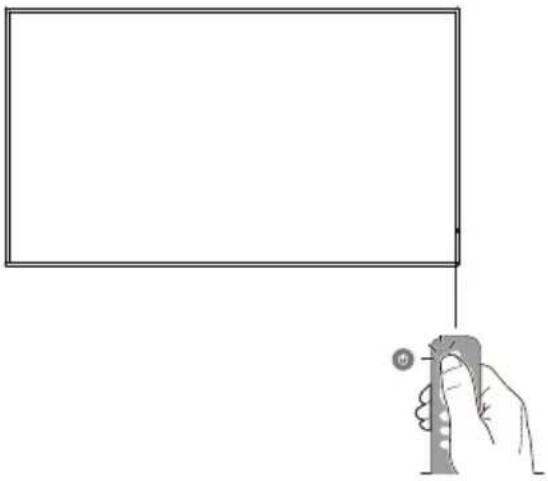
2.3.4. Operating range of the remote control
Point the top front of the remote control to the remote sensor on the display when you press the buttons.
NOTE:
The remote control may not function properly when the remote control sensor on the display is under direct sunlight or strong illumination, or when there is an object between the remote control and the remote sensor of the display.
natural_image
Illustration of a hand holding a tool near a blank rectangular frame (no text or symbols)3. Connecting External Equipment
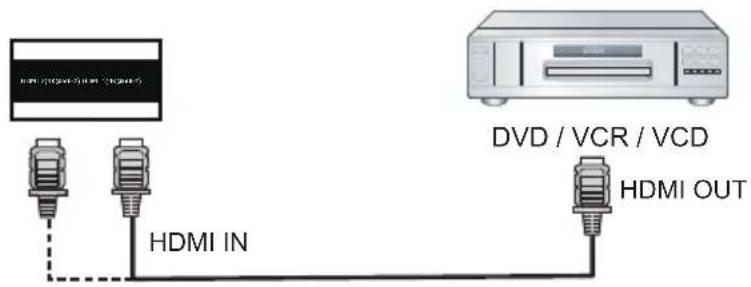
3.1. Connecting External Equipment (DVD/VCR/VCD)
3.1.1. Using HDMI video input
3.2. Connecting a PC
3.2.1. Using HDMI input
3.2.2. Display control connection
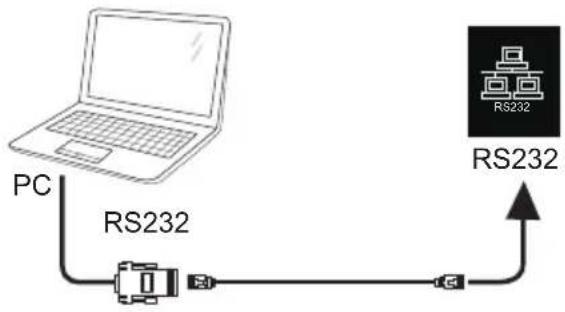
flowchart
graph TD
    A["PC"] --> B["RS232"]
    B --> C["RS232"]
    C --> D["Server Icon"]
3.2.3. Using network interface
3.2.4. Connecting an external audio device
3.3. Connecting USB
4. Operation
4.1. Media Player Instructions
- The front page of the media player, this page contains three items: "Play", "Compose" and "Settings". Play: Choose to play the playlist. Compose: Edit playlists. Settings: Set the playback content.

- Select the "Play" on the home page, and you should first select a playlist to play from File 1 to File 7. The pencil icon represents the play list is not empty.

- Select the "Compose" on the home page, and you should first select a playlist to edit from File 1 to File 7. The pencil icon represents the play list is not empty.

- If you select the empty playlist, the application will guide you to choose media sources.
All media files should be located in the root directory. For example:
- Video at /root/movies/
- Photos /root/pictures/
- Music /root/music/

- You can edit or delete non-empty playlists, just select the required playlist with pencil icons.
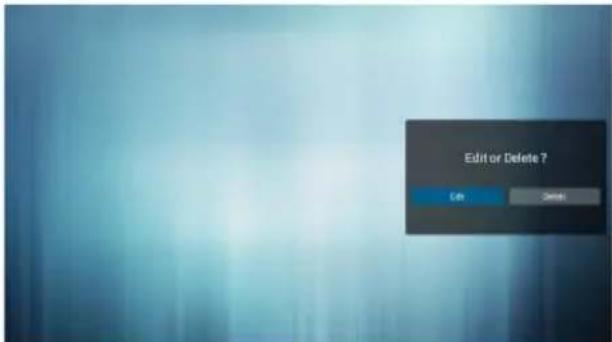
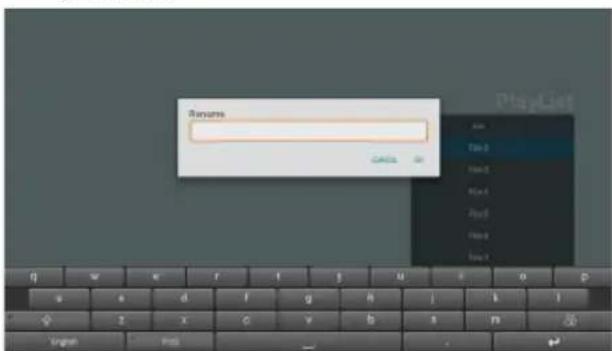
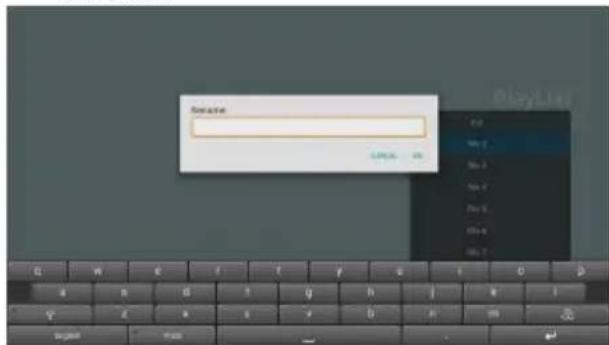
- You could rename the playlist, just input new name after pressing the "OPTIONS" key on the remote control.
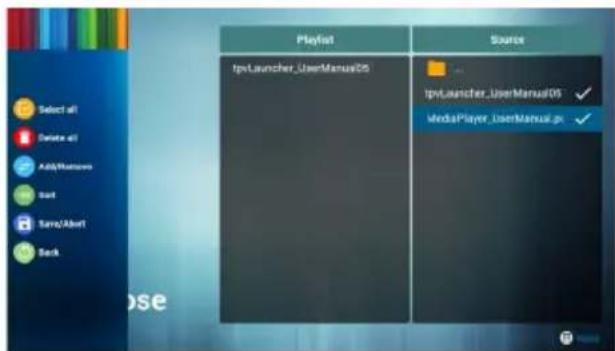
- After you start editing the playlist, you will see the following screen. Source - storage device files. Playlist - playlist files.
7-1 in a scroll bar can help you to perform the following items:
- Select all: Select all the storage files.
- Delete all: Delete all the playlist files.
- Add/Remove: Update from the playlist.
- Sort: Sort playlists.
- Save/Abort: Save or abort the playlist.
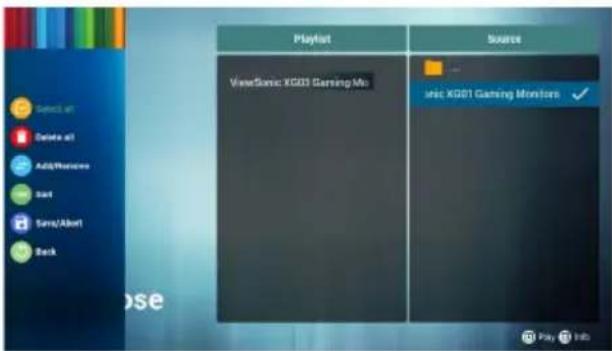
- If you are in a scroll bar and select "Sort", you can change the order of files one by one.

- Choose the desired file information in play list and press [INFO button, you can get information detail.

- Choose the desired file and press the play button, you can directly play media files.

natural_image
Orange tabby cat standing on a chain-link fence, no visible text or symbols- If you make a playlist containing all of the image files, the application will ask you if you want to play background music while play the pictures.

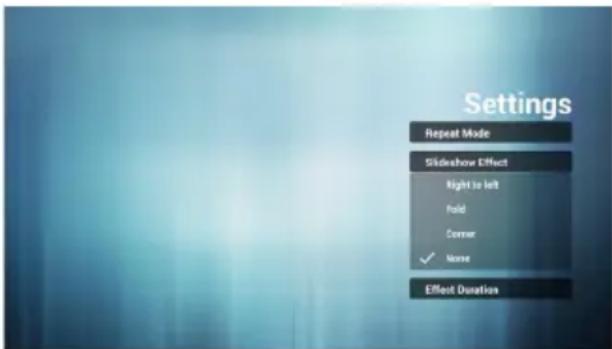
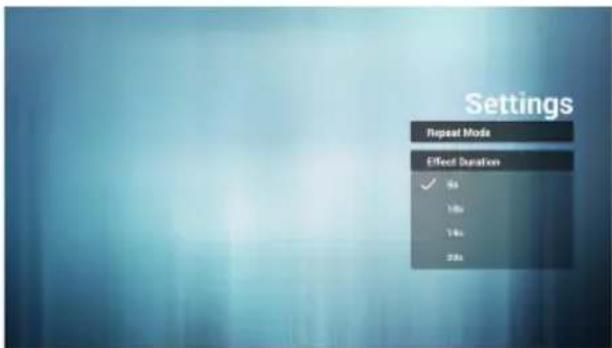
- On the first page of "Settings", this page contains three parts:
"Repeat Mode", "Slideshow Effect" and "Effect Duration".
Repeat Mode: playback mode.
Slideshow Effect: photo slide effect.
Effect Duration: photo effect duration.
4.2. PDF Reader Play
- Home page of Pdf app, this page has three items: "Play", "Compose" and "Settings".
Play : Select playlist to play.
Compose: Edit playlist.
Settings: Set play properties.

- Select "Play" on home page, first you should choose one playlist to play from File 1 to File 7.
The pencil icon means the playlist is non-empty.

- Select "Compose" on home page, first you should choose one playlist to edit from File 1 to File 7.
The pencil icon means the playlist is non-empty.

- If an empty playlist is chosen, the app will guide you to select the media source.
All media files should be placed in root directory.
For example,
- pdfs in /root/pdf/

- You could edit or delete a non-empty playlist, just choose the desired playlist with pencil icon.

- You could rename the playlist, just input new name after pressing the "OPTIONS" key on the remote control.
-
In the slide bar, it helps you to do the followings:
-
Select all : Select all storage files.
- Delete all : Delete all playlist files.
- Add/remove : Update playlist from source.
- Sort : Sort playlist.
- Save/abort : Save or abort playlist.
- If you choose "Sort" in the slider, you can change the order of files one by one.

- Select "Settings" on home page, this page has two parts, "Repeat Mode" and "Effect Duration".
Repeat Mode : play mode.
Effect Duration : photo effect duration.
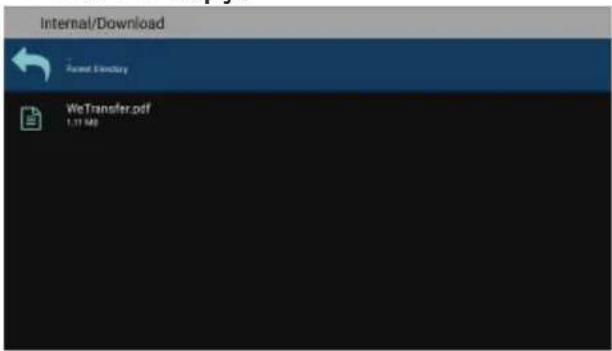
4.3. U disk Files Playback and Copy Instructions
- U disk can only have one partition. The format must be FAT32 and the capacity can not exceed 32G.
- Connect your USB device to the USB port on the display.
- Select the USB flash drive icon and press OK to enter the file browser.
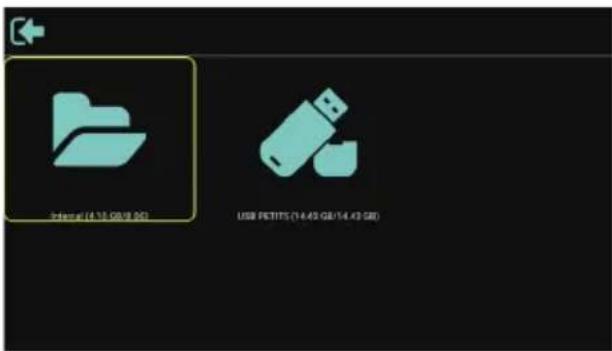
- Press [↑]up/down button to select video or picture you want to play.
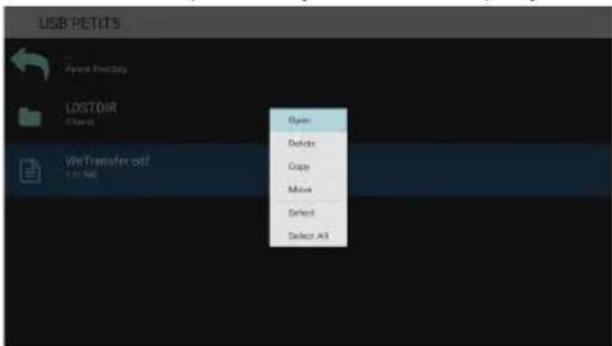
- Press the [OK] button to open directly. Press [OPTIONS] button to pop up the option menu.
- Users can choose to play, copy, or move, etc., for example, if you want to copy a file to the internal storage movies folder, select copy, it will pop up "Destination".
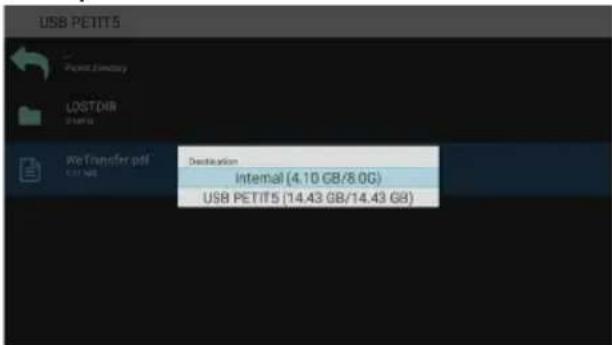
- After selecting the directory to copy to, press the [ / ] left / right buttons on the remote control to select Paste or Cancel, as shown below.
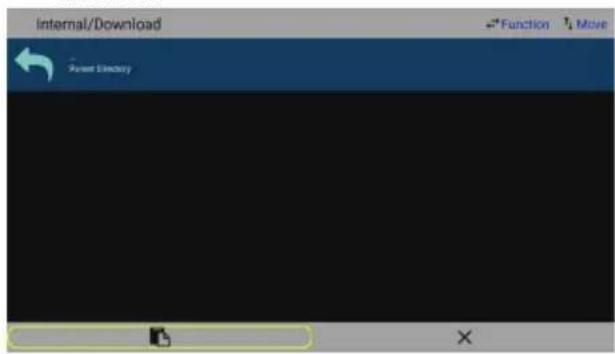
- Press the [OK] button to complete the file copy.
4.4. Using CMS 3.1
1. System Requirement
| System Requirement | |
| Operating Systems | Windows 7,8,10 (32/64 bit) |
| CPU 2.5GHz | CPU or faster |
| RAM 4GB | |
| Hard Disk 100 | GB |
| Network card | 10/100/1000 Ethernet card |
2. Application
-Installation wizard
-Auto detect system language
-32/64 bit auto detection
-Install with PC Administrator
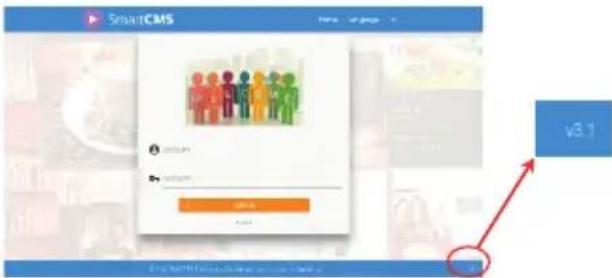
3. Login
Login with account/password
Account: admin
Password (Default): admin

4. Account
- Admin can create new normal users.
- Admin or a normal user can change his ownpassword
- If a normal user forgot his password, admin can help to reset password to Ab123456

Account MGMT.
Account Info
----Functions
Change Password
Setting
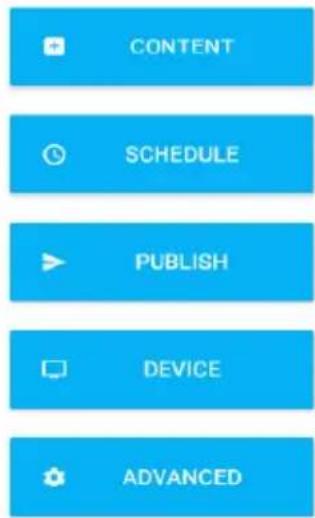
• CONTENT: design your layout of advertisement (AD)
- SCHEDULE: give your AD with schedule
• PUBLISH: publish AD with schedule to devices
• DEVICE: device management
• ADVANCED: instant message backup/restore
5. OSD Menu
Operation on the OSD Menu
| Column 1 Column 2 Column 1, 3 | Column 2, 3 or Column 2, 2 | Remarks | ||
| Network | ||||
| Ethernet | Switch | |||
| MAC address | ||||
| Connection type | [DHCP / Static IP] | |||
| IP address | ||||
| Netmask | ||||
| DNS address | ||||
| Gateway | ||||
| WiFi | MAC address | |||
| Switch | Add network | |||
| Refresh | ||||
| ap list | ||||
| SSID | ||||
| IP Address | ||||
| Hotspot | Switch | |||
| Hotspot Name | ||||
| Password | ||||
| Common | ||||
| Volume & Picture | Picture Mode | Airport and train station | Airport and train station | |
| Hotel and convenient store | Hotel and convenient store | |||
| Dining and clothing | Dining and clothing | |||
| Security control and monitoring | Security control and monitoring | |||
| Office Office | ||||
| Outdoor Outdoor | ||||
| Customize Customize | ||||
| Brightness [0 ... 100] | ||||
| Black Level [0 ... 100] | ||||
| Contrast [0 ... 100] | ||||
| Sharpness [0 ... 100] | ||||
| Dynamic Brightness | [0 ... 100] | |||
| Volume & Picture | Picture Mode | Color Temperature | [ Standard (9300K), Cool (12000K), Warm (6500K), User ( R/G/B) ] | |
| Aspect ratio | Full/ Real/4:3/14:9 | |||
| Eye Protect Mode | [ON/OFF] | |||
| Audio | Volume 0~100 | |||
| Audio Source [HD MI / Line in] | ||||
| Sound Mode | [ Standard, News, Music, Movie,User ] | |||
| Balance -50 ~ +50 | ||||
| Treble -8 ~ +8 | ||||
| Bass | -8 ~ +8 | |||
| Desktop | Home Default Home | |||
| Wallpaper | ||||
| Screen Orientation | [ 0, 90, 180, 270] | |||
| Device Management | Key Lock | Default password: 0000 Super password: 6098 Switch Key Lock On: Step 1: Lock the remote control, button and mouse operation functions after 5s if there is no operation. Step 2: After the functions are locked, press the “Set” button on the remote control for 5 seconds to unlock temporarily. The mouse and keyboard are still locked at this point, and only work if the Key Lock is set to Off. Step 3: Repeat step 1 after operation. | ||
| change password | Current Password | |||
| New Password | ||||
| Confirm Password | ||||
| Cancel | ||||
| OK | ||||
| Device Managemen | HDMI Version | 2.0/1.4 | ||
| HDMI Failure of backup | [ON/OFF] | 1. Set to ON, HDMI 1/HDMI 2/OPS automatically cuts to another source when no signal is received. This feature is available when the current source is HDMI after the machine is started. 2. This feature is mutually exclusive with the “Screensaver of no signal” feature, which is automatically set to OFF when the Screensaver of no signal is ON. Pop up the corresponding message) | ||
| Quick Boot [ON/OFF] | ||||
| Boot Wake | VGA/HDMI | |||
| UART/LAN | ||||
| Boot on source | HOME | |||
| HDMI1 | ||||
| HDMI2 | ||||
| CMS | ||||
| Media | ||||
| CUSTOMER | ||||
| USB | ||||
| Last Source | ||||
| Play list [1 ... 7] | ||||
| Custom | Custom App [ON/OFF] | |||
| Select App | ||||
| Custom Bootanimation | [ON/OFF] | |||
| Custom Bootlogo | [ON/OFF] | |||
| Uplayer setting | [Switch] | |||
| Interval Time | 8S/ 16S/ 24S/ 32S | |||
| Custom Uplayer Repeat Time | ||||
| Sleep Mode | Sleep Time | 10 Minutes | ||
| 20 Minutes | ||||
| 30 Minutes | ||||
| 1 Hour | ||||
| 1.5 Hour | ||||
| 2 Hours | ||||
| Off | ||||
| Auto Sleep | 1 Second | |||
| 5 Seconds | ||||
| 10 Seconds | ||||
| 30 Seconds | ||||
| 60 Seconds | ||||
| Off | ||||
| Screensaver | ||||
| Screensaver Source | Supported file type:1. Photo: “.png”, “.jpg”, “.jpeg”, “.bmp”2. Video: “.dat”, “.vob”, “.ts”, “.mkv”, “.mov”, “.3gp”, “.flv”, “.webm”, “.wmv”, “.asf”, “.mp4”, “.avi”, “.mpg”. | |||
| Regular boot | ||||
| System | RS232 Control | ON/OFF | ||
| Language | English | |||
| 中文(中国) | ||||
| Date & time | Automatic date & time | |||
| Set date | 1970/1/1 ~ 2037/12/31 | |||
| Set time 00:00 ~ 23:59 | ||||
| Date & time | Time zone | [Beijing/ Calcutta/ Harare/Karachi /Brazzaville/ Beirut/ Jerusalem/ Tehran / Baghdad/ Ulaanbaatar/ Damascus/ Sydney /Paris/ Rome/London/ Dubai/Tokyo] | ||
| NTP Server | ||||
| System update | Local Update | |||
| Online Update | [Switch] | From OFF to ON, a pop-up prompts: “This function is valid, the system needs to be restarted.” | ||
| Factory reset | RESET [Button] | |||
| About | GPU | |||
| Memory | ||||
| Storage | ||||
| Serial Number | ||||
| Android Version | ||||
| Software Version | ||||
| OTA Package Status | Not get/ Downloaded | |||
NOTES:
To wake up PD in the HDMI source, you can set HDMI wakeup "On".
This product supports timed shutdown and timed startup functions. Refer to the “Shutdown time/Startup time” in the upper table for details.
Some options may vary for different signals, please subject to the actual machine.
6. Compatibility of the USB device
Format of the USB multi-media coder-decoder
| Video decoding | ||||||
| Type | Video coder-decoder | Container | Decoding | Coding | Channel | Remarks |
| MPEG1/2 | MPEG1/2 | File format: VOB | V | Supported size in a range from 48x48 pixels to 1920X1080 pixelsMax. frame rate:30fpsMax. bit rate: 80MbpsAudio coder-decoder: MP2, MP3 | ||
| MPEG-4 | MPEG4 | File format: MKV, MP4, 3GP | V | Supported picture size in a rangeFrom 48x48 pixels 1920x1080 pixelsMax. frame rate:30fpsMax. bit rate: 38.4MbpsAudio coder-decoder: MP2, MP3, AAC,(1) MS MPEG4 v1/v2/v3 is not supported.(2) GMC (global movement compensation) is not supported. | ||
| H.263 H.263 | File format: 3GP, MP4 | V | Supported picture size: SQCIF(128x96), QCIF(176x144), CIF(352x288), 4CIF(704x576)Max. frame rate: 30fpsMax. bit rate: 38.4MbpsAudio coder-decoder: MP3(1) Not support H.263+ | |||
| H.264 H.264 | File format: MKV, MP4, 3GP | V | Supported picture size: from 48x48 pixels to 1920x1080 pixelsMax. frame rate:30fpsMax. bit rate: 57.2MbpsAudio coder-decoder: MP2, MP3, AAC,(1) Not support MBAFF | |||
| VC-1 VC1 | File format: MKV | V | Supported picture size: frame 48x48 pixels to 1920x1080 pixelsMax. frame rate:30fpsMax. bit rate: 45MbpsAudio coder-decoder: MP2, MP3, AAC, WMA | |||
Audio decoding
| Type | Audio coder-decoder | Container | Decoding | Coding Channel | Remarks |
| MPEG audio | MPEG1/2/2.5 Audio Layer1/2/3 | Decode: MP1, MP2, MP3 | V | 2 Bit rate: 8Kbps~320Kbps, CBR and VBR Sampling rate: 8KHz~48KHz | |
| Windows Media Audio | WMA version 4,4.1, 7, 8, 9, wmapro | Decode: WMA | V | 2 Bit rate: 8Kbps~320Kbps Sampling rate: 8KHz~48KHz Do not support WMA Pro non-destructive and MBR | |
| AAC audio | MAIN, ADIF, ATDS Header AAC-LC and AAC-HE | File format: AAC、M4A | V 5.1 |
Picture decoding
| Type | Picture coder-decoder | Picture Decoding Coding Channel Remarks | |||
| JPEG | JFIF file format 1.02 | File format: JPG, JPEG | V | Decode: Resolution ratio 48X48 to 8176X8176(1) Row-by-row scanning is not supported.(2) Software supports SRGB JPEG.(3) Software supports Adobe RGB JPEG. | |
| BMP | BMP | File format: BMP | V | Supported max. picture size: 4096x4096 pixels | |
| GIF GIF | File format: GIF | No limit in resolution ratio | |||
| PNG PNG | File format: PNG | V | No limit in resolution ratio | ||
NOTES
- If the standard bite rate/frame rate of the contents is higher than the compatible frames/second listed in the above table, audio or video may not work.
- Video contents with a bit rate or frame rate higher than the designated rate in the above table may result in discontinuation of video during display.
7. Input Mode
HDMI computer mode (75B4E30T/86B4E30T)
| Standard Resolution | Available Resolution | Refresh Rate | Pixel Rate Aspect | Ratio | |
| H pixel V line | |||||
| VGA 640 | 480 | 60 Hz 25.1 | 75 MHz | 4:3 | |
| 75 Hz 31.5 | MHz | ||||
| WVGA 720 | 400 70 Hz | 28.32 MHz 4:3 | |||
| SVGA 800 | 600 60 Hz | 40 MHz 4:3 | |||
| XGA 1024 | 768 60 Hz | 65 MHz 4:3 | |||
| WXGA | 1280 | 720 | 60 Hz 74.5 | MHz | 5:3 |
| SXGA 1280 | 1024 | 60 Hz 108 MHz | 5:4 | ||
| UXGA | 1680 | 1050 | 60 Hz | 146.25 MHz | 16:10 |
| HD1080 | 1920 | 1080 | 60 Hz 148.5 | MHz 16:9 | |
HDMI video mode (75B4E30T/86B4E30T)
| Standard Resolution | Available Resolution | Refresh Rate | Pixel Rate | Aspect Ratio | |
| H pixel | V line | ||||
| 3840 x 2160 P 60 Hz | 3840 | 2160 | 60 Hz | 594 MHz | 16:9 |
| 3840 x 2160 P 30 Hz | 3840 | 2160 | 30 Hz | 297 MHz | 16:9 |
| 3840 x 2160 P 25 Hz | 3840 | 2160 | 25 Hz | 297 MHz | 16:9 |
| 3840 x 2160 P 24 Hz | 3840 | 2160 | 24 Hz | 297 MHz | 16:9 |
| 1080 P 59.94/60 Hz | 1920 | 1080 | 60 Hz | 148.5 MHz | 16:9 |
| 1080 P 50 Hz | 1920 | 1080 | 50 Hz | 148.5 MHz | 16:9 |
| 1080 P 29.97/30 Hz | 1920 | 1080 | 30 Hz | 74.25 MHz | 16:9 |
| 1080 P 25 Hz | 1920 | 1080 | 25 Hz | 74.25 MHz | 16:9 |
| 1080 P 23.97/24 Hz | 1920 | 1080 | 24 Hz | 74.25 MHz | 16:9 |
| 1080 I 59.94/60 Hz | 1920 | 1080 | 60 Hz | 74.25 MHz | 16:9 |
| 1080 I 50 Hz 16:9 | 1920 | 1080 | 50 Hz | 74.25 MHz | 16:9 |
| 720 P 50 Hz 16:9 | 1280 | 720 | 50 Hz | 74.25 MHz | 16:9 |
| 720 P 59.94/60 Hz | 1280 | 720 | 60 Hz | 74.25 MHz | 16:9 |
| 576 I 50 Hz 4:3 | 720 | 576 | 50 Hz | 13.5 MHz | 4:3 |
| 576 I 50 Hz 16:9 | 720 | 576 | 50 Hz | 13.5 MHz | 16:9 |
| 480 I 59.94/60 Hz | 720 | 480 | 60 Hz | 13.5 MHz | 4:3 |
| 576 P 50 Hz 4:3 | 720 | 576 | 50 Hz | 27 MHz | 4:3 |
| 576 P 50 Hz 16:9 | 720 | 576 | 50 Hz | 27 MHz | 16:9 |
| 480 P 59.94/60 Hz | 720 | 480 | 60 Hz | 27 MHz | 16:9 |
| 480 P 59.94/60 Hz | 720 | 480 | 60 Hz | 27 MHz | 4:3 |
Computer mode (75B4E30T/86B4E30T)
| Standard Resolution | Available Resolution | Refresh Rate | Pixel Rate Aspect | Ratio | |
| H pixel V line | |||||
| VGA 640 | 480 | 60 Hz 25.1 | 175 MHz | 4:3 | |
| 75 Hz 31.5 | MHz | ||||
| WVGA 720 | 400 70 Hz 2 | 8.32 MHz 4:3 | |||
| SVGA 800 | 600 60 Hz 4 | 0 MHz 4:3 | |||
| XGA 1024 | 768 60 Hz 6 | 5 MHz 4:3 | |||
| WXGA 128 | 0 720 60 Hz | 74.5 MHz 5:3 | |||
| SXGA | 1280 102 | 24 60 Hz 108 | MHz 5:4 | ||
| UXGA | 1680 | 1050 60 | Hz | 146.25 MHz | 16:10 |
| HD1080 | 1920 108 | 0 60 Hz 148 | 5 MHz 16:9 | ||
| WXGA 136 | 6 768 60 Hz | 85.75 MHz 1 | 6:9 | ||
8. Cleaning and Troubleshooting
8.1. Cleaning
Caution When Using the Display
- Do not bring your hands, face or objects close to the ventilation holes of the display. The top of the display is usually very hot due to the high temperature of exhaust air being released through the ventilation holes. Burns or personal injuries may occur if any body parts are brought too close. Placing any object near the top of the display could also result in heat related damage to the object as well as the display itself.
- Be sure to disconnect all cables before moving the display. Moving the display with its cables attached may damage the cables and thus cause fire or electric shock.
- Disconnect the power plug from the wall outlet as a safety precaution before carrying out any type of cleaning or maintenance procedure.
Front Panel Cleaning Instructions
- The front of the display has been specially treated. Wipe the surface gently using only a cleaning cloth or a soft, lint-free cloth.
- If the surface becomes dirty, soak a soft, lint-free cloth in a mild detergent solution. Wring the cloth to remove excess liquid. Wipe the surface of the display to remove dirt. Then use a dry cloth of the same type to dry.
- Do not scratch or hit the surface of the panel with fingers or hard objects of any kind.
- Do not use volatile substances such as insert sprays, solvents and thinners.
Cabinet Cleaning Instructions
- If the cabinet becomes dirty, wipe the cabinet with a soft, dry cloth.
- If the cabinet is extremely dirty, soak a lint-free cloth in a mild detergent solution. Wring the cloth to remove as much moisture as possible. Wipe the cabinet. Use another dry cloth to wipe over until the surface is dry.
- Do not allow any water or detergent to come into contact with the surface of the display. If water or moisture gets inside the unit, operating problems, electrical and shock hazards may result.
- Do not scratch or hit the cabinet with fingers or hard objects of any kind.
- Do not use volatile substances such as insert sprays, solvents and thinners on the cabinet.
- Do not place anything made from rubber or PVC near the cabinet for any extended periods of time.
8.2. Troubleshooting
| Symptom Possible Cause Remedy | ||
| No picture is displayed | 1. The power cord is disconnected.2. The main power switch on the back of the display is not switched on.3. The selected input has no connection.4. The display is in the standby mode. | 1. Plug in the power cord.2. Make sure that the power switch is switched on.3. Connect a signal connection to the display. |
| Interference displayed on the display or an audible noise is heard | Caused by surrounding electrical appliances or fluorescent lights. | Move the display to another location to see if the interference is reduced. |
| Color is abnormal The signal cable is not connected properly. | Make sure that the signal cable is attached firmly to the back of the display. | |
| Picture is distorted with abnormal patterns | 1. The signal cable is not connected properly.2. The input signal is beyond the capabilities of the display. | 1. Make sure that the signal cable is attached firmly.2. Check the video signal source to see if it is beyond the range of the display. Please verify its specifications with this display's specification section. |
| Can hear sound, but no picture | Source signal cable is connected improperly. | Make sure that both video inputs and sound inputs are correctly connected. |
| Can see picture but no sound is heard | 1. Source signal cable is connected improperly.2. Volume is turned all the way down.3. [+] turned on.4. No external speaker is connected. | 1. Make sure that both video inputs and sound inputs are connected correctly.2. Press [+] of [+] button to hear sound.3. Switch MUTE off by using the [+] button.4. Connect external speakers and adjust the volume to a suitable level. |
| Some picture elements do not light up | Some pixels of the display are off. | This display is designed using an extremely high level of precision technology: however, sometimes some pixels of the display may not display. This is not a malfunction. |
| After-Images can still be seen on the display after the display is powered off. (Examples of still pictures include logos, video games, computer images, and images displayed in 4:3 normal mode) | A still picture is displayed for an over extended period of time. | Do not allow a still image to be displayed for an extended period of time as this can cause a permanent after-image to remain on the display. |
9. Technical Specifications
Display:
| Item | Specifications | |
| 75B4E30T 86B4E30T | ||
| Screen Size (Active Area) 75 inches(189 cm) 86 inches(217 cm) | ||
| Aspect Ratio 16:9 16:9 | ||
| Number of pixels 3840 (H) x 2160 (V) 3840 (H) x 2160 (V) | ||
| Pixel pitch 0.4296 (H) x 0.4296 (V)[mm] | 0.4935 (H) x 0.4935 (V)[mm] | |
| Displayable colors 1.07B (8bits+FRC) | 1.07B (8bits+FRC) | |
| Brightness (typical) 500 cd/m ^2 500 cd/m | ^2 | |
| Contrast ratio (typical) 1200:1 1200:1 | ||
| Viewing angle | 178 degrees | 178 degrees |
General:
| Item | Specifications | |
| 75B4E30T | 86B4E30T | |
| Internal memory | 16GB eMMC | 16GB eMMC |
| Power | 100 - 240V~, 50/60Hz, 5A | 100 - 240V~, 50/60Hz, 7A |
| Power Consumption (typ.) | 230 W | 440 W |
| Power Consumption (Max) | 270 W | 500 W |
| Power Consumption(Standby & Off) | <0.5 W | <0.5 W |
| Dimensions (Without Stand)[W x H x D] | 1683.5 x 961.7 x 69.5mm | 1929.0 x 1100.0 x 69.5mm |
Environmental Condition:
| Item | Specifications | |
| Temperature | Operational 0 ~ 40°C | |
| Storage | -20 ~ 60°C | |
| Humidity | Operational 20 ~ 80% | RH (No condensation) |
| Storage | 10 ~ 90% RH (No condensation) | |
| Altitude | Operational 0 ~ 5,000 m | |
| Storage / Shipment | 0 ~ 9,000 m | |
Internal Speaker:
| Item Specifications | |
| Number of Speakers 2 | |
| Input | 10 W X 2 |
| Impedance 8 Ω |
Wifi:
| Item Specifications | ||
| Wireless LAN module Specifications | Model WCT0SR2311 | |
| Frequency Range | 2.4 ~ 2.4835 GHz5.15 ~ 5.825 GHz | |
| Output power (max) | 2.4 ~ 2.4835 GHz 17 dbm5.15 ~ 5.25 GHz 14 dbm5.25 ~ 5.35 GHz (DFS bad) 14 dbm5.47 ~ 5.725 GHz (DFS/TPC band) 14 dbm5.725 ~ 5.825 GHz (for Non EU) 14 dbm | |
| Model 75B4E30T 86B4E30T | ||
| Scale(A++ -> E or A+++ -> D) | A+++ -> D A+++ -> D | |
| Energy efficiency class A B | ||
| Screen diagonal (cm) 189 217 | ||
| Screen diagonal (inches) 75 86 | ||
| On-mode power consumption(W) | 181 | 351 |
| Annual Energy Consumption(kWh/annual) | 264 | 513 |
| Standby Power consumption(W) | 0.5 | 0.5 |
| Off-mode power consumption(W) | 0 | 0 |
| Screen resolution (Horizontal)(pixel) | 3840 | 3840 |
| Screen resolution (Vertical)(pixel) | 2160 | 2160 |
| Visible Switch | Yes | Yes |
European Energy Efficiency QR Code 75B4E30T 86B4E30T


2020 © All rights reserved.
Specifications are subject to change without notice.

Q41G75M166101C
- Declaration
- [Statement]
- CAUTION
- Disposal of Used Electrical & Electronic Equipment
- Safeguards
- Object and Liquid Entry
- Servicing
- Damage Requiring Service
- Replacement Parts
- Safety Check
- Heat
- Fire
- Off-gassing
- Stability Hazard.
- Recycling/Licenses
- Batteries
- EU Declaration of conformity (DoC)
- Unpacking and Installation
- Unpacking
- Package Contents
- NOTES:
- Installation Notes
- Mounting on a Wall
- VESA Grid
- NOTE:
- To prevent the display from falling:
- Ventilation Requirements for enclosure locating
- Parts and Functions
- Control Panel
- Input/Output Terminals
- ① MAIN POWER SWITCH
- ② AC IN
- ③ LAN
- ④ AUDIO OUT
- ⑤ AUDIO IN
- ⑥ HDMI2 IN / ⑦ HDMI1 IN
- ⑧ RS232
- ⑨ USB2 PORT
- ⑩ USB1 PORT
- ⑪ MICRO SD
- Remote Control
- General functions
- ① [ ] POWER button
- ② [Source] Button
- ③ [CMS] button
- ④ [USB] button
- ⑤ [HDMI/PC] button
- ⑥ [Time button
- ⑦ [PLAY] button
- ⑧ [MENU] SETTINGS button
- ⑨ [INFO] button
- ⑩ [■]MUTE button
- ⑪ [ ] BACK button
- ⑫ [ ]VOLUME button
- ⑬ [HOME button
- ⑭[]][ ][ ] [ ]NAVIGATION buttons
- [OK] button
- ⑯ [Volume button
- ⑰ [Option] button
- ⑱ [Number] buttons
- [Multi-View] button
- [Help] button
- Inserting the Batteries in the Remote Control
- CAUTIONS:
- Handling the remote control
- Operating range of the remote control
- Connecting External Equipment
- Connecting External Equipment (DVD/VCR/VCD)
- Using HDMI video input
- Connecting a PC
- Using HDMI input
- Display control connection
- Using network interface
- Connecting an external audio device
- Connecting USB
- Operation
- Media Player Instructions
- PDF Reader Play
- U disk Files Playback and Copy Instructions
- Using CMS 3.1
- System Requirement
- Application
- Login
- Account
- Setting
- OSD Menu
- Compatibility of the USB device
- NOTES
- Input Mode
- Cleaning and Troubleshooting
- Cleaning
- Caution When Using the Display
- Front Panel Cleaning Instructions
- Cabinet Cleaning Instructions
- Technical Specifications
Brand : HISENSE
Model : 86B4E30T
Category : Monitor