MS9801 - Uncategorized MISTRAL - Free user manual and instructions
Find the device manual for free MS9801 MISTRAL in PDF.

| Brand | Mistral |
| Model | MS9801 |
| Product Category | Uncategorized |
| Document Type | User Manual |
| Manual Format | |
| Number of Pages | 8 |
| Language | English |
| User Rating | 8.0 out of 10 |
| Download Capability | Yes |
| AI Question Support | Yes |
| Translation Service | Available (multiple languages) |
| Email Notification | Available |
| Question Submission | Yes, users can ask questions |
| Number of Questions | 0 |
| Manual Accessibility | Free |
| Customer Support | Via AI and community questions |
| File Type | |
| Rating Count | Not specified |
| Release Date | Not specified |
| Device Status | Not specified |
Frequently Asked Questions - MS9801 MISTRAL
User questions about MS9801 MISTRAL
0 question about this device. Answer the ones you know or ask your own.
Ask a new question about this device
Download the instructions for your Uncategorized in PDF format for free! Find your manual MS9801 - MISTRAL and take your electronic device back in hand. On this page are published all the documents necessary for the use of your device. MS9801 by MISTRAL.
USER MANUAL MS9801 MISTRAL
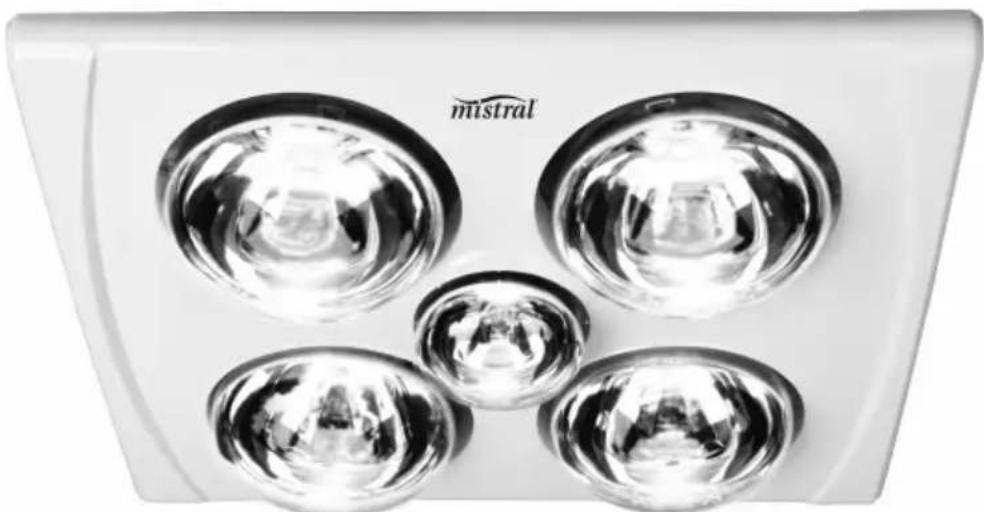
3-In-1 Bathroom Heater
natural_image
Black and white photo of four illuminated ceiling lights with 'mistral' branding on top (no other text or symbols visible)Important Safeguards
- This bathroom heater is not intended for use by persons (including children) with reduced physical, sensory or mental capabilities, or lack of experience and knowledge, unless they have been given supervision or instruction concerning use of the appliance by a person responsible for their safety.
- Children should be supervised to ensure that they do not play with the appliance.(i.e. wall switch)
- Ensure that the switch is in the off position when changing the heat lamp (globe) or light globe.
- Ensure that the wattage of the centre replacement light globe is the same as the globe supplied with the unit.
• E27 275W heat globes can be used in this unit. - Ensure the grille is free of objects, dust build up, etc. Make sure that the airflow through the grille is not inhibited.
- Means for disconnection must be incorporated in the fixed wiring, in accordance with the wiring rules.
- Precautions must be taken to avoid the backflow of gases into the room from the open flue of gas or other fuel burning appliances.
- When cutting the ceiling material, care must be taken to ensure you do not damage electrical wiring and other hidden utilities.
- This bathroom heater is to be installed so that switches or other controls can not be touched by a person in the bath or shower.
- The lamps are extremely hot when in use. Do not touch to the lamps with any part of your body when in use. Allow all lamps cool down sufficiently before touching or replacement.
- The appliance shall, under no circumstances, be covered with insulating material or similar material.
Cleaning
- Ensure the bathroom heater is switched off and cool down sufficiently before cleaning.
- Remove globes when they are at room temperature. Wipe with a damp cloth, never immerse.
- Unclip lamp surround and wash in warm soapy water. Always use a soft cloth, never abrasives.
- Clean away any excess fluff from the inside of the body, motor blade brackets.
- The exhaust fan requires regular cleaning to ensure optimum performance. With the power off, regularly wipe the fan clear of dust and dirt.
- Clean the exhaust ducting kit, ensuring there are no obstructions at the exit.
Warning
If the power cord is damaged, the power cord must be replaced by either the service agent or similarly qualified persons in order to avoid a hazard.
This product has not been designed for any uses other than those specified in this booklet.
Save These Instructions
Fitting Instructions
Thank you for purchasing bathroom heater. This product combines heat globes an exhaust fan and light, to provide gentle radiant heat, clean air and a bright light from one compact, stylish unit. This model allows for exhausting of steam and odours right out of your home. All functions are separately controlled from a supplied switch plate for convenient fingertip control.
You can be assured trouble free operation by getting your Bathroom heater carefully installed by a qualified electrician, according to the instructions. Please read all instructions before commencing installation.
Bathroom heater can be mounted in any room that requires instant, direct, and radiant heat to ward off winter chills. The light has separate switching, making it suitable for bathrooms, ensuites, toilets, dressing & change rooms.
Suitability
The Bathroom Heater has been designed especially for cavity type ceilings. Flat roof installation is NOT recommended.
This product must not be mounted in areas subject to direct splashing, and must be mounted in the horizontal position only. Unsuitable for ‘cathedral’ or ‘raked’ ceilings.
This model comes with 4 Infrared Heat Globes which emit harmless radiant heat. It is best positioned directly above the area requiring warmth. Before you start, make sure your ceiling has at least 280mm clearance from the roof (see to the 'Mounting' diagram).
Where to Locate
Radiant globe heaters are not designed to heat entire rooms. They provide instant, concentrated heat to persons standing directly below the heat lamps. Therefore, Bathroom heater should be located over the area where drying off takes place, not directly over a shower or bath.
This Heater is not designed to be left on for extended periods of time, as this could cause overheating and premature failure. Bathroom Heater, should not be covered or installed in situations which restrict the natural ventilation of the units for cooling purposes.
Ceiling insulation should be kept well clear of the units (at least 100mm). For optimum performance, models with exhaust fans should be installed in areas with good ventilation, to enable fresh air to flow into the room. Any restrictions on return air entering the room will impair effectiveness and may contribute to premature failure.
Radiant Heat
The Bathroom Heater requires no warm up period because of its efficient, radiant heat globes. Heat is directed at you for an instant warmth you can feel, rather than gradually warming the entire room. Because of this, Bathroom Heater only needs to be turned ON when you are in the room.
General Illumination
A 6 watt light is designed to provide general illumination only. Additional lighting may be required for duties.
Mounting
For the purpose of obtaining best heating effect, from the lamps there should be about 2.4m overall height from ground.
- Mark the ceiling with a pencil outline 320mm x 320 mm. BE SURE TO CHECK ABOVE THE CEILING FOR MINIMUM SPACE OF 280mm (for optimum performance allow 500mm or more clearance) AND THE LOCATION OF CEILING JOISTS. Ensure there is a minimum of 100mm clear space between the Bathroom Heater unit and any ceiling insulation. Make sure distance between edges to the wall is not less than 40mm.
Note: Before commencing cutting ensure that the area behind the intended location is clear of all cables, pipes and joists.
-
Use a saw to cut the section along the drawn lines.
-
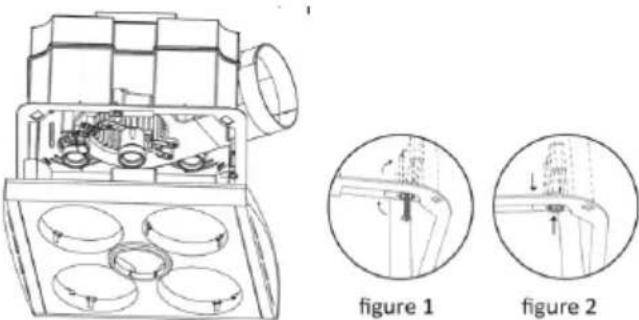
Carefully remove the heater and accessories from the plastic bag and carton. Please assemble the air outlet before mounting the unit into the hole.
Connect the ducting if required to the outer grille of the unit. Insert the unit into the square hole being sure to pull the side clips inward so that the body can pass through the hole without damaging the plaster Rotate the swing clips to hold motor body in place (figure 1) then tighten screw to let the clip clamp onto the ceiling board (figure 2).
-
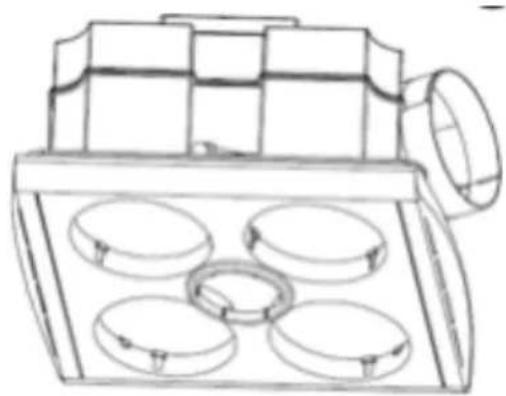
Hold the fascia against the body of the heater and the ceiling and attach the securing spring clips to hold the fascia in place.
-
Now screw the four large heat lamps into the lamp holder through the holes provided in the fascia. The globes should be screwed up firmly to ensure a good electrical contact but don't over tighten. Next fit the small centre globe in the same way ensuring that it is positioned centrally.
natural_image
Line drawing of a mechanical device with four circular components and a cylindrical housing (no text or symbols)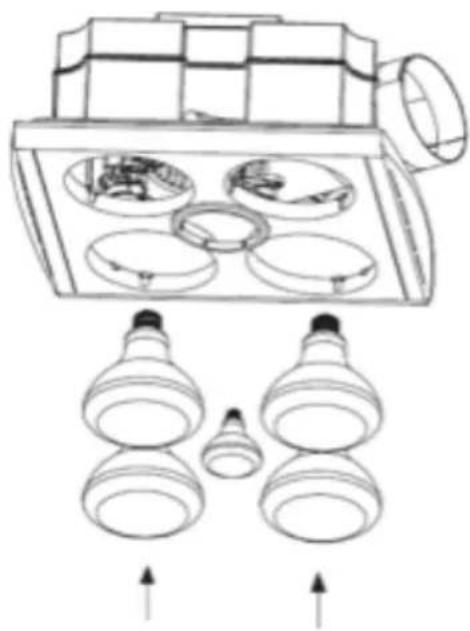
natural_image
Technical line drawing of a mechanical device with multiple circular components and two light bulbs below (no text or symbols)Installing The Duct
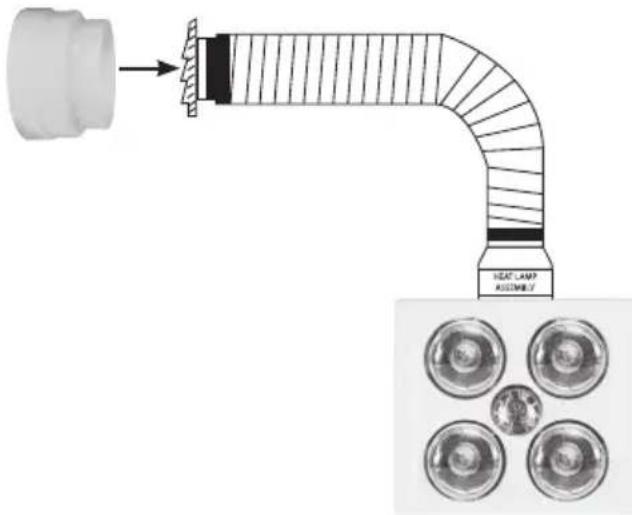
- Outlet Louvre: A 130mm diameter hole is required for the outlet louvre (see template below). Use 4 screws appropriate for the mounting surface to secure it in place.
NOTE: The vent louvres should be facing downwards, preventing water from running into the duct.

- Duct Connection: Fully extend 3m duct to minimise airflow restrictions then cut to fit components. To cut duct use a sharp knife for the silver walls and wire cutters for the wire support coil. Plan the duct-run to be as straight as possible. The fewer obstacles that the duct has to weave around, the better! Do not squash or force duct through tight bends. in house end of the duct fix to the outlet of fan motor housing, and fix another end of duct to vent louvres with metal clip.
Electrician's Wiring Instructions
Your Bathroom Heater requires a 220-240 Volt, 50Hz electrical supply. All electrical work must be carried out by a qualified electrician and installed in accordance with relevant Electrical Wiring Regulations.
Your new Bathroom Heater comes with all required switches and mounting plates.
How
-
Decide the best position for the switch set and mount it. Be sure to click the switches into the backing plate in the desired order before hand.
-
Connect wiring to switches as shown in the appropriate electrical diagram.
-
Remove screws from terminal cover on the Bathroom Heater and put aside. Wire according to the label beside the terminal strip. Once the wires are connected incoming cable must not be fouled by cover. Use appropriate knockouts in terminal cover to accommodate cable before replacing. Screw down firmly.
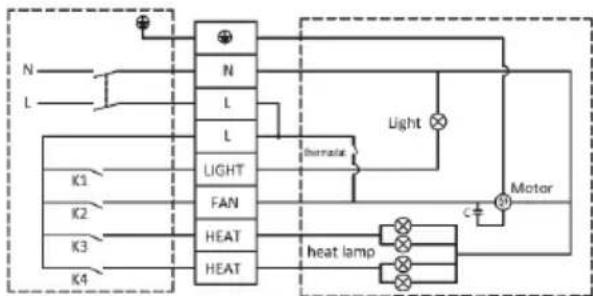
flowchart
graph TD
    A["N"] --> B["Switch"]
    C["L"] --> B
    B --> D["Light"]
    D --> E["FAN"]
    E --> F["HEAT"]
    F --> G["HEAT"]
    G --> H["heat lamp"]
    I["K1"] --> J["Switch"]
    K["K2"] --> J
    L["K3"] --> J
    M["K4"] --> N["Switch"]
    O["N"] --> P["Switch"]
    Q["L"] --> P
    R["L"] --> P
    S["Thermal"] --> T["Light"]
    U["Motor"] --> V["C"]
    W["+"] --> X["Switch"]
    Y["+"] --> Z["Switch"]
Test
Clean surround and globes with a soft, dry cloth.
Check power is switched on and all switches activate properly, according to their marked function.
This product is equipped with thermostat for overheat protection, when temperature exceeds 80°C the exhaust fan will be turned on automatically. When cool down the fan will close accordingly.
Replacement of Lamp
- Check and tighten lamp regularly.
- Shut off power before replacement.
- Use E27 6W LED for lighting.
- Use E27 275W infrared lamp for heating.
Technical Specifications
Power Supply: AC 220-240V\~50Hz
Power Consumption: 1131W
4 X 275W Heat lamps
6W LED Light
NOTE: As a result of continual improvements, the design and specifications of the product within may differ slightly to the unit illustrated on the packaging.
Warranty
This product is guaranteed to be free from defects in workmanship and materials, including parts for a period of 12 months from the date of purchase.
Defects that occur within the warranty period, under normal use and care, will be repaired, replaced or refunded at our discretion.
The benefits conferred by this warranty are in addition to all rights and remedies in respect of the product that the consumer has under the Competition and Consumer Act 2010 and similar state and territory laws.
Our goods come with guarantees that cannot be excluded under the Australian Consumer Law. You are entitled to are replacement or refund for a major failure and for compensation for any other reasonably foreseeable loss or damage. You are also entitled to have the goods repaired or replaced if the goods fail to be of acceptable quality and the failure does not amount to a major failure.
Proof of Purchase
This warranty is valid for the original purchase and is not transferable. Please keep your purchase docket, tax invoice or receipt as the best proof of purchase, and as proof of date on which the purchase was made.
Extent of Warranty
This warranty is limited to defects in workmanship and materials, including parts. All defective products or parts will be repaired, replaced or refunded. This warranty does not cover batteries or any other consumable items.
Normal wear and tear
This warranty does not cover normal wear to the products or parts.
Exclusions
This warranty does not cover:
- Any defects caused by an accident, misuse, abuse, improper installation or operation, lack of reasonable care, unauthorised modification, loss of parts, tampering or attempted repair by a person not authorised by the distributor.
- Any product that has not been installed, operated or maintained in accordance with the manufacturer's operating instructions provided with the product.
- Any product that has been used for purposes other than domestic use.
- Any damage caused by improper power input or improper cable connection.
To make a claim
This warranty against defects is given by : GSM Electrical(Australia) Pty Ltd
Address: Level 2, 142–144 Fullarton Road, Rose Park, South Australia 5067
Email: service@gsme.com.au
Telephone: 1300 301 838
If a defect in the product appears within the nominated warranty period (The identified period on the packaging/Instructions), cease using the product, and return the product to the place of purchase. If we agree that a defect covered by this warranty has occurred, you are entitled for replacement or refund of the product.
When making a return, please ensure the product is properly packaged to ensure that no damage occurs to the product during transit.
Where a claim for warranty extends beyond place of purchase replacement /refund (Installed products requiring service repair) please contact: Telephone: 1300 941 901 (For warranty repairs and technical support)
Supplier Name: GSM Retail Australia Pty Ltd
Supplier Address: 142-144 Fullarton Road, Rose Park, SA 5067
Email: admin@gsmretailgroup.com

Gerard Sourcing & Manufacturing
GSM Retail Group
Consumer Service Centre : 1300 941 901
GSM Retail Group has a policy of continual improvement throughout the product range. As such the unit contained within may differ slightly from the unit illustrated on the pack.
MADE IN CHINA for GSM Retail Group Mistral is a registered trademark of GSM Retail Group

Cat. No. MS9801
August 2021