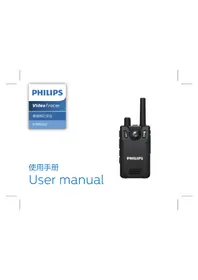
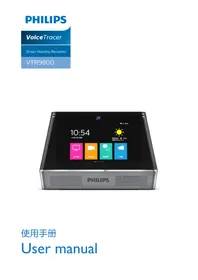
Voice Tracer VTR8300 - Dictaphone PHILIPS - Free user manual and instructions
Find the device manual for free Voice Tracer VTR8300 PHILIPS in PDF.


| Product Type | Audio & Video Recorder (Dictaphone) with Interphone |
| Brand | Philips |
| Model | Voice Tracer VTR8300 |
| Dimensions | 58 × 100 × 26 mm |
| Weight | 203 g (without shoulder clip) |
| Power Source | Built-in rechargeable lithium battery |
| Charging Method | USB data cable (approx. 3 hours in off mode, 5 hours in on mode) |
| Memory | External TF card (up to 128 GB, not included) |
| Audio Recording Format | WAV: HQ (1536 kbps) or SLP (384 kbps) |
| Video Recording Resolution | Up to 2304×1296 30p (multiple options available) |
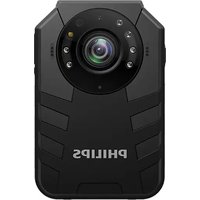
| Lens | 145° super wide-angle lens with dual filter (day/night) |
| Key Features | One-click voice/video recording, interphone, playback, night vision, motion detection, watermark, ID number |
| Connectivity | USB 2.0, 3.5mm headphone jack |
| System Requirements | Windows 7/8/10/Vista/XP/2000, Mac OS X, Linux |
| Safety | Hearing protection warning, legal recording restrictions apply |
| Maintenance | Clean lens with soft dry cloth; avoid extreme temperatures and humidity |
| Repairability | Contact Philips support for spare parts and service |
| Operating Temperature | -30°C to 55°C |
| Humidity | 10% - 90% (non-condensing) |
| Included Accessories | Shoulder clip, USB cable, interphone antenna, user manual |
Frequently Asked Questions - Voice Tracer VTR8300 PHILIPS
User questions about Voice Tracer VTR8300 PHILIPS
0 question about this device. Answer the ones you know or ask your own.
Ask a new question about this device
Download the instructions for your Dictaphone in PDF format for free! Find your manual Voice Tracer VTR8300 - PHILIPS and take your electronic device back in hand. On this page are published all the documents necessary for the use of your device. Voice Tracer VTR8300 by PHILIPS.
USER MANUAL Voice Tracer VTR8300 PHILIPS
[Non-Text]
—
[Non-Text]
[Non-Text]
[Non-Text]
[Non-Text]
[Non-Text]
[Non-Text]
[Non-Text]
[Non-Text]
[Non-Text]
[Non-Text]
[Non-Text]
[Non-Text]
[Non-Text]
[Non-Text]
| |
|
____ ____
[Non-Text]
[Non-Text]
[Non-Text]
[Non-Text]
[Non-Text]
[Non-Text]
[Non-Text]
[Non-Text]
[Non-Text]
[Non-Text]
[Non-Text]
[Non-Text]
[Non-Text]
[Non-Text]
[Non-Text]
[Non-Text]
[Non-Text]
[Non-Text]
[Non-Text]
____ ____
| |
|
| |
[Non-Text]
[Non-Text]
[Non-Text]
[Non-Text]
[Non-Text]
[Non-Text]
[Non-Text]
[Non-Text]
[Non-Text]
[Non-Text]
[Non-Text]
[Non-Text]
目录
1 欢迎 5
1.1 产品特点 5
2 重要须知 6

提示
录像界面说明
文件的删除需通过连接电脑才可以进行。
16 ZH
录像文件播放界面说明:
①当前时长
③ 进度条
⑤ 文件名
② 播放状态
④ 文件总时长
⑥ ID水印
9.1 视频播放
语音文件播放界面说明:
12.2 对讲机设置
14.2 取下背夹
16 常见问题
I.1 Product features 36
2 Important Notice 37
2.1 Safety 37
2.2 Hearing protection 37
2.3 Legal restriction on recording 37
2.4 Install antenna 38
3 Your Audio/Video Recorder 39
- I What's in the box: 39
3.2 Overview of your audio recorder: 39
4 Start to Use 41
4.1 Turn on/off 41
4.2 Charging methods 42
4.3 Connecting to computer 42
5 Video Recording 43
6 Camera 44
34 EN
7 Voice Recording 45
8 One-click Playback Mode 46
9 Video Mode 47
9.1 Video playing 47
10 Photo Mode 49
II Audio Mode 50
11.1 Voice play 51
12 Interphone 52
12.1 Interphone function switch 52
12.2 Interphone setting 52
12.3 Interphone volume adjustment 52
13 Setting Mode 54
13.1 Interphone setting 54
13.2 Audio recording setting 55
13.3 Video recording setting 56
13.4 Camera setting 57
13.5 System setting 59
14 Mounting of Shoulder Clip 64
15 Wearing Shoulder Clip 65
16 Frequently Asked Questions (FAQ) 66
16.1 Failure to start the recorder 66
16.2 Incorrect time/date 66
16.3 Unclear image 66
16.4 Failure to record audio/video 66
16.5 Recorder is unable to play audio or video files 66
16.6 Failure to record audio/video 66
17 Technical Parameter 67
17.1 Memory 67
17.2 Size & weight 67
17.3 System requirements 67
17.4 System requirements 67
17.5 Memory 67
I Welcome
Welcome to the world of Philips! We are honored by your choice and purchase of Philips' products. You can have Philips' comprehensive technical supports from our website, e.g. user's manuals, software downloading and warranty information etc.
www.philips.com
1.1 Product features
- One-click Voice Recording: Simply press the Voice Recording button for the first time to record, and the second time to save recorded clips.
- One-click Video Recording: Simply press the Video Recording button for the first time to record, and the second time to save recorded clips.
- One-click playback function: After audio or video recording, press the right button to enter file play directly.
• Professional audio codec to achieve high quality recording. - The independent interphone function realizes the true integration of an audio/video recorder and an interphone.
- 145° super-wide-angle lens to get a fuller picture.
-
Use the dual filter switch to prevent color cast during daytime and ensure more clarity during nighttime.
-
3.5mm standard headphones ensure clearer sound under noisy environment during replay.
- On-Screen Display function ensures that all videos and photos contain un-editable timing, product serial number and user serial number that ensure the legal validity of such evidence.
- Super long file name: All recorded video files contain information such as product serial number, recording time and user serial number, which ensure convenient data storage and retrieval.
- All recorded video files are automatically cut and saved to prevent data loss due to incorrect operation.
- The external VTR8300 memory card supports up to 128G.
- High-definition speaker: A high-quality vibration speaker is used, and plays audio or video files vividly.
• Record in a common WAV format. - Access to the audio file and data by using high-speed USB 2.0.
- It is able to be used as a large capacity USB storage device to ensure maximum compatibility.
2 Important Notice
2.1 Safety

Notice
- This icon means that users have to exercise caution when handling or operating the device.

Warning
Special Announcement: Before using the product, please read the Manual carefully. The Company shall not be held liable for any data loss due to incorrect manual operation or force majeure. We specially recommend that users make additional copies of the files in the device.
2.2 Hearing protection
Observe the following guidelines when using your headphones:
- Adjust to a suitable volume; do not use the headphones for a long time.
- Please do not turn the volume up beyond your tolerance.
- Do not turn up the volume so high that you cannot hear what's around you.
- Be careful or suspend the use of headphones in hazardous situations.
- Do not use the earphone when driving, cycling or skateboarding. Otherwise, you will get into a traffic accident or be violating traffic laws and other related laws.
2.3 Legal restriction on recording
- The use of the recording function of this device is subject to the restrictions imposed by national laws. When recording the conversations or courses of others, users should respect the privacy and other rights of such persons.
- Please note that in some countries, the user must notify the other party when he/she is recording his/her conversations with such other party. Otherwise, such a recording activity might be considered illegal. Please ensure the lawfulness of the recording activity in any applicable jurisdiction.
2.4 Install antenna
To order to facilitate packaging and transportation, the interphone antenna of the audio recorder is placed separately. The customer needs to install the antenna to use the interphone. The specific operation is as follows:


Notice
• Under the condition that the antenna is tight and not loose, it does no need to be twisted all the time to avoid damage.
- Do not move the antenna to one side to avoid breaking and affecting the signal.

3 Your Audio/Video Recorder
3.1 What's in the box:

3.2 Overview of your audio recorder:
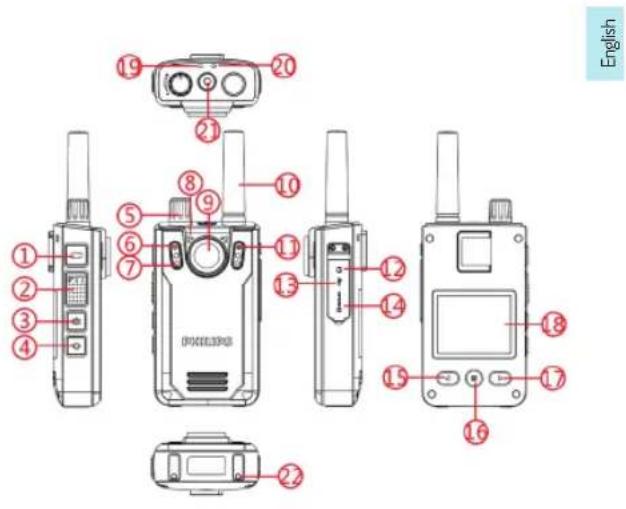
① Video recording button
② PPT group chat button
③ Camera button
④ Power on/off button
⑤ Interphone switch / Interphone volume adjustment button
⑥ Photoresistor
⑦ Infrared light
⑧ Microphone
⑨ Camera
⑩ Interphone antenna
⑪ White light
⑫ Headphone socket
⑬ USB port
⑭ TF card socket
⑮ Previous track/Fast reverse/Zoom-out /Menu selection button
⑯ Menu/Enter/Play/Pause/Return button
⑰ Next track/Fast forward/Zoom-in/Menu selection button
18 Display screen
⑲ Recorder status indicator
20 Interphone status indicator
② Recording button
②2 Desktop charging contact
4 Start to Use
4.1 Turn on/off

Notice
- Please charge the device in the shutdown mode for three hours before using it for the first time!
During shutdown mode, hold down Turn ON button for 3 seconds, and the device will be turned on immediately, showing the Philips logo, as shown below:

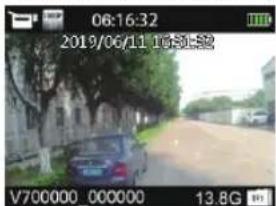
The device then enters the preview screen, as shown below; in the preview mode, the operating status indicator will be illuminated in green. Press the “≡” button on this screen, and the device will return to the setting screen. In the preview
screen, hold down the “◀” or “▶” button to enter the zoom-in/zoom-out and realize the digital zooming function.
English

Reminder
- The device is powered by the built-in lithium battery; if the device is not to be used for a long time, hold down the Turn On/Off button for 3s to shut down the device.
- If the recorder does not work properly, please check if the device is out of power.
- During operation please do not pull out the external memory card. Otherwise, damage might be caused to the files or the device.
- When the battery indicator “■” is displayed, please charge the device promptly.
4.2 Charging methods
(1) During shutdown mode, use USB data cable and the connector to charge the device. The device indicator will show green light first during charging, which will be extinguished after the device is fully charged.
(2) If the USB data cable is used to connect the device to the provided charger for charging with the device powered on, the battery icon on the screen will be changing during charging. When the device is fully charged, the battery icon will no longer change.

Reminder
- The device can be charged either during ON or OFF mode. Normally, during OFF mode charging, it takes around 3 hours for full charging. During ON mode charging, it takes around 5 hours for full charging (we recommend that users use OFF mode charging).
4.3 Connecting to computer
The recorder can be used as a large-volume USB storage device, which can be connected to the computer. No software needs to be installed for VTR8400. The recorder can
automatically be recognized as a portable device. The icon when the device is connecting to the computer is as shown below.


Reminder
- When a file moves into or out from the device, do not disconnect the device from the computer.
- Connect the device to the computer using the USB data cable after starting the device, or hold down the Power button for 3s after connecting the device to the computer using the USB data cable.
- If a 16-64GB TF card is to be formatted, select the file system option of FAT32 for formatting. If the card capacity is 128GB, select the file system option of exFAT for formatting. Do not use the NTFS format, otherwise, the device cannot perform audio/video recording.
5 Video Recording
When you use the recorder for the first time, please pay attention to the requirements in this section!
(I)In the camera preview mode, press the "Video Recording" button to start video recording, and the status indicator will flash in red.
(2) Hold down the “◀” or “▶” button to enter the zoom-in/zoom-out preview screen and realize the digital zooming function.
(3) During video recording at night or in a dark environment, if infrared switching is manual, hold down the "Audio Recording" button, the infrared lamp will turn on, the device will enter the night vision video recording mode, and the screen color will be monochrome.
(4) During video recording at night or in a dark environment, hold down the "Video Recording" button. The illumination lamp will turn on as a supplementary light source.
(5)Press the "Camera" button to capture the current video recording screen.
(6) Hold down the "Camera" button to mark the file as an important file; when the cyclic video recording is turned on, this file will not be deleted.
(7) Press the "Audio Recording" button, the device will switch to the audio recording mode for audio recording.
(8) Press the "Video Recording" button again to end video
recording. The device will vibrate briefly, the red indicator will go out, the device will return to the camera preview mode screen, and the status indicator will be illuminated in green.

English
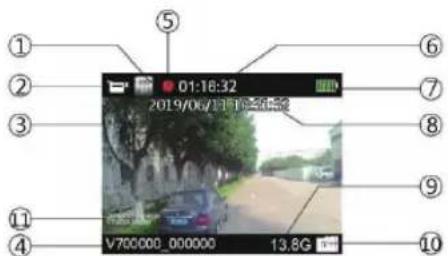
Recording Interface Illustration:

① Battery indicator
③ Residual card capacity
⑤ Watermark
⑦ Recording resolution
⑨ Current date of system
⑪ Recording mode
② Card icon
④ Video recording icon
⑥ ID No. watermark
⑧ Video recording duration
⑩ Current time of system
6 Camera
When you use the device for photo taking for the first time, please read the instructions in this section! In the camera preview state, directly press the camera button to take a photo. In the state of photo taking, the red indicator lights on, and the device makes a sound of 'beep'. In the video recording state, press the camera button to capture the picture at the time. The interface of which is shown as Figure 1.

Figure 1

Notice
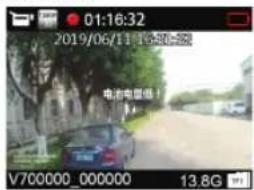
- When the battery icon is showing empty, it means low on battery. The system will shut down automatically at low power. If users are recording, the system will automatically save the recorded files and then shut down. In case of a low battery, please charge the device timely. During low battery, the device gives the "Low Battery" notice as shown below:

Reminder
- Before recording, please adjust the recording parameters first.
- Please delete some unnecessary files before recording.
- The device has a photosensitive element; if infrared switching is set as automatic switching, the infrared lamp will turn on automatically when ambient light drops to a certain value.
7 Voice Recording
When users use the device for audio recording for the first time, please read the instructions in this section!
(I)Press the "Audio Recording" button in the camera preview mode to start audio recording; the operating status indicator will flash in yellow; please align the built-in microphone with the sound source.
(2) Hold down the "Camera" button to mark the file as an important file; when the cyclic video recording is turned on, this file will not be deleted.
(3) Press the "Video Recording" button. The device will switch to the video recording mode for video recording.
(4) Press the "Audio Recording" button to end audio recording, and return to the preview screen.
The reference audio recording interface is shown below:
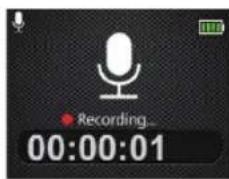
Audio Recording Illustration:

I Recording state
② Current recording duration
③ Battery indicator

Reminder
- Before audio recording, set the required audio recording sensitivity.
- Please delete some unnecessary files before recording.
- Please first test audio recording to see if the device is set properly.
- Do not pull out the memory card during the audio/video recording mode. Otherwise, damage might be caused to the files.
- Do not cut off power during audio/video recording mode. Otherwise, the damage might be caused to the recorder and the files might be lost or damaged.
- If users intend to use the device for a long period of time, please charge the device before recording.
8 One-click Playback Mode
In the camera preview mode, press the “▶” button after the video record is saved, and the device will play the video file that users have just recorded directly. Press the “▶” button after the audio record is saved, and the device will play the audio file that users have just recorded directly. When the device is just turned on, the one-click playback function will play the most recently recorded video file by default.
9 Video Mode
In the camera preview mode screen, users can use the "◀" button to enter the search and playback screen, press the "◀" or "▶" button to select a video option, and then press the Menu button to enter the video fi le list screen. The reference video fi le list screen is as shown below:
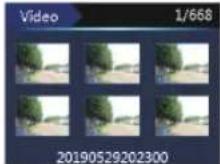
Press the "◀" or " "▶" button to select the video file to be played, and press the Menu button to enter the video play screen. The reference video play screen is as shown below:

This file can be deleted only when the computer is connected.
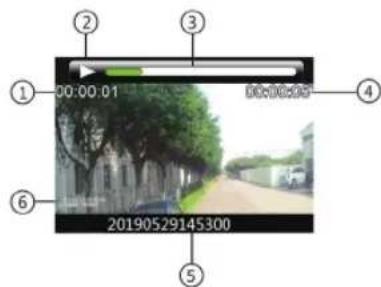
Interface illustration of recorded file playing:

English
① Current duration
③ Progress bar
⑤ File name
② Current play status
④ Overall duration of file
⑥ ID watermark
9.1 Video playing
(I)Press"◀"or "▶" select the fi le you need to play.
(2)Press the "Menu" button to start playback, and the working indicator will light on in green.
(3) Hold down the Menu button to end playing, and return to the video file list screen.
(4)During play, press the Menu button to pause, and press it
EN 47
again to resume play from the previous position.
(5)Press“◀”or “▶” button during play to fast reverse or fast forward the file being played at 2X, 4X, 8X, 16X, 32X or 64X.
(6)Hold down the "Camera" button to mark the currently selected file as an important file; when the cyclic video recording is turned on, this file will not be overridden. This file can be deleted only when the computer is connected.
10 Photo Mode
In the camera preview mode screen, users can use the "◀" button to enter the search and playback screen, press the "◀" or "▶" button to select a camera option, and then press the Menu button to enter. Then press the Menu button to enter the photo fi le list screen. The reference photo fi le list screen is as shown below:
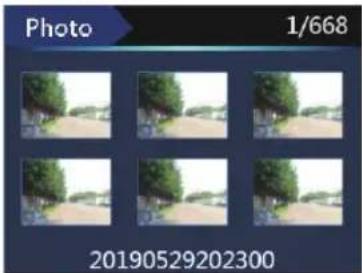
Press the "◀" or " "button to select the photo fi le to be played, press the Menu button to enter the photo browse mode and press the "◀" or "▶" the button to select the photo to be viewed. In the photo playback screen, hold down the "Camera" button to mark the currently selected fi le as an important
fi le; when the cyclic video recording is turned on, this fi le will not be overridden. This fi le can be deleted only when the computer is connected.
II Audio Mode
In the camera preview mode screen, users can use the Menu button to enter the search and playback screen, press the “◀” or “▶” button to select an audio recording play-back option, and then press the Menu button to enter the audio fi le list screen. The reference audio fi le list screen is as shown below:

Press the “◀” or “▶” button to select the audio fi le to be played, press the Menu button to enter the audio play stop screen, and press the Menu button again to enter the audio play screen. The reference audio play screen is as shown below:
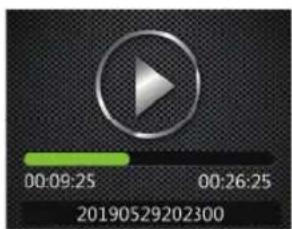
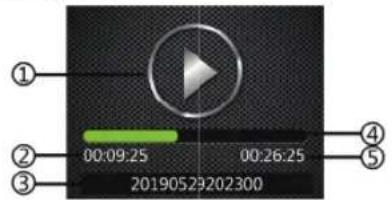
Interface illustration of audio fi le playing:
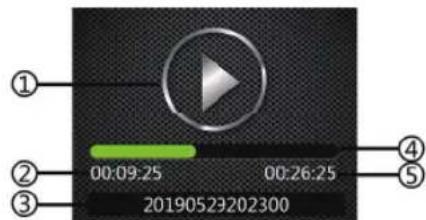
① Play status
③ Name of time file
⑤ Overall duration of file
② Current play time
④ Play progress bar
11.1 Voice play
(I)Press'◀ or ' ▶ button to select the file you want to play.
(2) Press the Menu button to start play, and the operating status indicator will be illuminated in green.
(3) Hold down the Menu button to end playing. And return to the audio file list screen.
(4) During play, press the Menu button to pause, and press it again to resume play from the previous position.
(5)Hold down the "Camera" button to mark the currently selected file as an important file; when the cyclic video recording is turned on, this file will not be overridden. This file can be deleted only when the computer is connected.
12 Interphone
The device has an independent interphone function. The channel, subsonic code, etc. of the interphone are set in the device; when the device is turned off, voice intercommunication is still possible.
12.1 Interphone function switch
Turn the interphone switch toward the antenna, and the interphone will give a prompt tone, indicating that the interphone has been turned on. At this point, press the PTT button, and the interphone indicator will be illuminated in red, indicating that the interphone is transmitting audio. If the PTT button is not pressed and interphone indicator lights up in red, it means the interphone has received an audio, and the speaker will play the received audio. Turning in the reverse direction will turn off the interphone. The reference preview screen of the device after the interphone is turned on is as shown below:
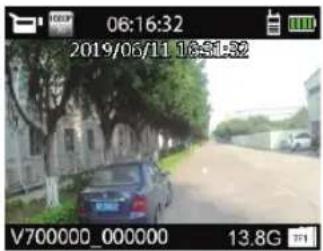
12.2 Interphone setting
When both the interphone and the recorder are turned on, users can set the interphone in the interphone setting bar of the menu. Setting in the interphone setting bar of the menu is possible only when the interphone is turned on; when the interphone is turned off, the options in the interphone setting bar of the menu will become gray and cannot be selected.
12.3 Interphone volume adjustment
After the interphone is turned on, turn it toward the interphone antenna to increase its volume, and in the reverse direction to reduce its volume. Intercommunicate with a proper volume for a clearer voice.

Reminder
- When the red indicator of the interphone is flashing, it means that the interphone has low power. Please charge it in time. If you want to continue to use the device for recording under low power condition, please turn off the interphone first.
- When the interphone is in low power state, it will automatically shut down after the red indicator keeps flashing for seconds. When you continue to use the interphone function after being fully charged, please turn the interphone switch off and then reopen it to start the interphone function.
13 Setting Mode
13.1 Interphone setting
The device has an independent interphone function. When the interphone is turned off, the options in the interphone setting bar will become gray and cannot be set; they can be set only if the interphone is turned on.
The interphone setting menu bar includes public channel, long-distance channel, subsonic code, timeout timer and squelch level. Select the interphone setting menu, press the Menu button to enter, press the “◀” or “▶” button to select the option to be set, and then press the Menu button to enter.
13.1.1 Public channel
The public channel is used mainly for short-distance inter-communication. The frequency range of the public channel of the device is 409.7500\~409.9875MHz. Press the left or right button to select an appropriate frequency, then press the Menu button for confirmation, and hold down the Menu button to return to the previous menu.
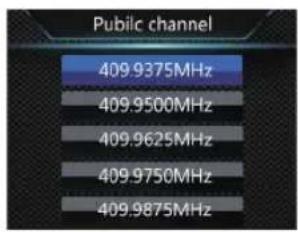
13.1.2 Far distance
The long-distance channel is used mainly for long-distance intercommunication. The frequency range of the long-distance channel of the device is 430.1375\~439.4375 MHz.
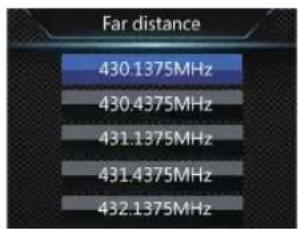
13.1.3 Subsonic code
Subsonic is used mainly to turn on squelch to both improve sensitivity, and avoid interference and noise. After the subsonic code is turned on, only if the sender and the receiver have the same subsonic code value can they receive intercommunication audios from each other. The subsonic code menu has three options: off, analog subsonic and digital subsonic.
13.1.4 Time limited
The timeout timer function of the interphone is used to prevent the user from transmission timeout on a single channel, and also to protect user experience from the prolonged transmission of the interphone.

13.1.5 Squelch level
Although squelch is intended to inhibit noise strictly, over-inhibition may prevent weak communication signals from being received. The squelch function has different squelch levels and may be adjusted as necessary.
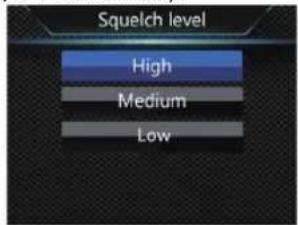
13.2 Audio recording setting
The audio recording setting menu bar includes audio recording type and microphone sensitivity. Select the setting menu, press the Menu button to enter, press the "◀"or"▶" button to select the option to be set, and then press the Menu button to enter.
13.2.1 Audio recording type
The audio recording type has two options: HQ and SLP. When audio recording has reached one hour, the device will save the audio fi le automatically, and then begin to record the next audio. The reference screen is as shown below:
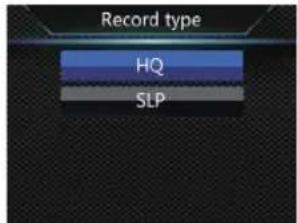
HQ: WAV format, high sound quality, with a bit rate of 1536kbps. SLP: WAV format, ordinary sound quality, with a bit rate of 385kbps
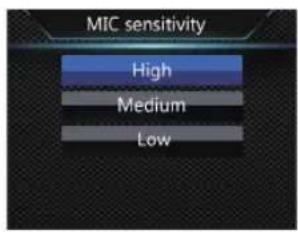
13.2.2 Microphone sensitivity
The microphone sensitivity menu has three gain options: high, medium and low. Selecting a different microphone sensitivity will realize a different audio recording effect.
13.3 Video recording setting
The video recording setting menu bar includes resolution, video quality, video pre-recording and video delayed recording. Select the icon of the video recording setting menu, press the Menu button to enter, press the “◀” or “▶” button to select the option to be set, and then press the Menu button to enter.
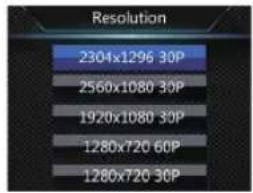
13.3.1 Resolution
Five video recording resolutions are available: 2304×1296 30P, 2560×1080 30P, 1920×1080 30P, 1280×720 60P, 1280×720 30P, 848×480 60P, and 848×480 30P, which can suit most applications. Press the “◀ or “▶” button to select an
appropriate resolution, then press the Menu button for confirmation, and hold down the Menu button to return to the previous menu.
The reference screen is as shown below:

13.3.2 Video quality
The video quality menu has three picture quality options: ultra-fi ne, fi ne and normal. Please select a picture quality option based on your needs. The better picture quality is, the more memory will be occupied in the same video recording time.
13.3.3 Video pre-recording
With the video pre-recording function, users can record a video from over ten to tens of seconds before an event is triggered. Two video pre-recording options are available: off and on. Press the “◀” or “▶” button for selection, then press the Menu button for confirmation and hold down the Menu button to return to the previous menu.
13.3.4 Delayed video recording
With the video delayed recording function, users can press a button to save the set time of continued shooting after video recording. Six video delayed recording options are available: off, 5s, 10s, 15s, 30s, and 60s. Press the "◀" or "▶" button for selection, then press the Menu button for confirmation and hold down the Menu button to return to the previous menu.
13.4 Camera setting
The camera setting menu bar includes photo size, photo quality, continuous shooting, and automatic shooting. Select the camera setting menu icon, press the “◀” or “▶” button to select the option to be set, and then press the Menu button to enter.
13.4.1 Photo size
10 photo sizes are available: 32M, 23M, 20M, 18M, 16M, 14M, 12M, 8M, 5M and 3M. Press the “◀” or “▶” button to select an appropriate resolution, then press the Menu button for confirmation and hold down the Menu button to return to the previous menu. The reference screen is as shown below:


13.4.2 Photo quality
In the camera setting menu, select the "photo quality" menu, and then press the Menu button to enter the photo quality menu. The video quality menu has three picture quality options: ultra-fine, fine and normal. Please select a picture quality option based on your needs. The better picture quality is, the more memory will be occupied in the same video recording time.
13.4.3 Continuous shooting
Continuous shooting means that the device can take photos continuously when the Camera button is pressed once in the preview mode or during video recording.
In the camera setting menu, select the "continuous shooting" menu, and then press the Menu button to enter the continuous shooting menu. Five continuous shooting options are available: off, 3 photos, 5 photos, 10 photos, and 20 photos.
Press the “◀ or “▶” button to select an appropriate number of photos, then press the Menu button for confirmation and hold down the Menu button to return to the previous menu.
13.4.4 Automatic shooting
Automatic shooting means that the device can take a photo at a certain interval when the Camera button is pressed once in the preview mode or during video recording until the Camera button is pressed again for cancellation, the card is full or the battery runs out.
Five automatic shooting options are available: off, 3s, 5s, 10s, 30s and 60s. Press the “◀” or “▶” button to select an appropriate number of seconds, then press the Menu button for confirmation and hold down the Menu button to return
to the previous menu.
13.5 System setting
The system setting menu bar includes language, system format, default settings, screen brightness, system time, automatic shutdown, automatic screen off, volume, onboard mode, cyclic video recording, onboard audio recording, segmented video recording, button tone, indicator, infrared switching, motion detection, exposure compensation, ID No., and system information. Select the icon of the system setting menu, press the “◀” or “▶” button to select the option to be set, and then press the Menu button to enter.
13.5.1 Language
In the language selection menu, users can select a language as the system language. The reference interface of language selection is as follow:

13.5.2 System format
The system format, also known as the television broadcasting format, can be either NTSC or PAL. When the device outputs as television, the right option should be selected based on the format of the television set.
13.5.3 Default settings
Users can use this function to reset the settings of the device.
13.5.4 Screen brightness
When this function is to be used, the brightness of the screen can be adjusted. Three screen brightness levels are available: high, medium and low. Press the “◀” or “▶” button to select an appropriate option, then press the Menu button for confirmation and hold down the Menu button to return to the previous menu.
13.5.5 System time
The reference system time setting screen is as shown below:
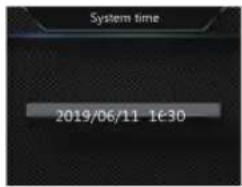
In this screen, hold down “≡” to return to the previous menu, and press the “◀” or “▶” button to adjust the value of the corresponding position.
Press “≡” to select the year, month, date, hour and minute; after reaching the minute option through consecutive pressing “≡”, press “≡” again to confirm the change and return to the previous menu.
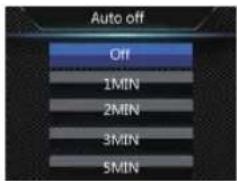
13.5.6 Automatic shutdown
If no operation to the device within the set time, the system will shut down. The reference interface is as follow:
13.5.7 Automatic screen off
Four options of automatic screen off are available: off, 1min, 3min, and 5min. If no operation is done to the device within the given time, the screen will black out. If "off" is selected, the screen will remain illuminated.
13.5.8 Volume
When this function is to be used, the volume of the device can be adjusted.
The volume can be selected from the 17 integers of 0\~16.
Press the “◀” or “▶” button to select an appropriate volume, and then press the Menu button for confirmation.
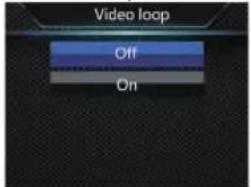
13.5.9 Cyclic video recording
In the video recording setting menu, select the "Cyclic Video Recording" menu, and then press the Menu button to enter the cyclic video recording menu. Two options are available: off and on. Press the "◀" or "▶" button for selection, then press the Menu button for confirmation and hold down the Menu button to return to the previous menu.
13.5.10 Onboard audio recording
Users can use this function to select if the interior sound is to be recorded.
13.5.11 Segmented video recording
Five options are available: 5min, 10min, 15min, 20min, and
30min. During video recording, a segmented video fi le will be saved for the set time, and the recording of the next video fi le will begin seamlessly. The reference segmented video recording screen is as shown below:

13.5.12 Keypad tone
With this function, every keypad operation has a prompt tone.
13.5.13 Indicator
Users can use this function to turn on or off the status indicator as necessary.
13.5.14 Infrared switching
In the system setting menu, press the “◀” or “▶” button to select the “Infrared” menu, and then press the Menu button to enter the infrared switching menu. Two options are available: manual and automatic. Finish the selection, then press the Menu button, and hold down the Menu button to return to the previous menu.
13.5.15 Motion detection
When the device is in the standby mode, the video recording function will start automatically when an object enters the shooting range; when the object leaves the shooting range, this function will be ended, and the video fi le saved. Two options are available: off and on.
13.5.16 Exposure compensation
Exposure compensation is an exposure control mode that makes photos brighter or darker. Users can adjust photo brightness based on the idea to create unique visual effects. Users can set exposure compensation from 13 values within -2.0\~+2.0. Press the “◀” or “▶” button to select an appro-
priate value, and then press the Menu button for confirmation.
13.5.17 ID No.
The reference ID No. setting screen is as shown below:

In this screen, hold down the Menu button to return to the previous menu, press the “◀” or “▶” button to adjust the value of the corresponding position, and press the Menu button to select the corresponding digit. When the Menu button is pressed consecutively to the last digit, press the Menu button again to confirm the change and return to the previous menu.
13.5.18 System info
The system info menu includes gross storage capacity, usable space, usable video recording time, usable audio recording time, battery power and version number.
Gross storage capacity: View the memory information.
Usable space: View the remaining space information.
Usable video recording time: View the video recording time for the current video recording resolution.
Usable audio recording time: View the audio recording time for the current audio recording type.
Battery power: View the current battery power information.
Version number: View the firmware version information.
14 Mounting of Shoulder Clip
To mount the jacket, insert the R position of the jacket insert into the slot of the device, and push the jacket slowly until the insert reaches the bottom of the slot.
As shown below:
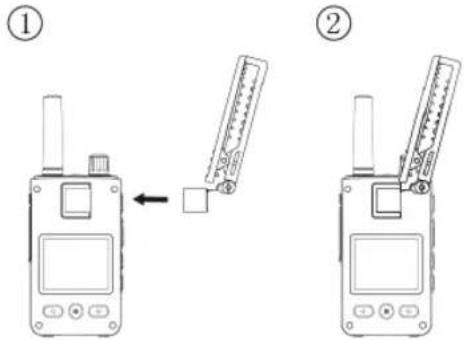
14.2 Dismounting of clip
To remove the jacket, hold the jacket and the device while supporting the insert, and pull it gently.
64 EN
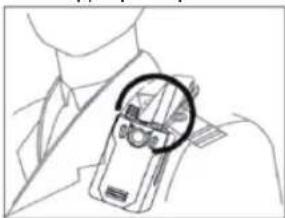
15 Wearing Shoulder Clip
(I)Press the hand clip to open the clip, and then clamp toward the shoulder strap so that the hook catches the root of the shoulder strap.

(2) Unleash the hand clamp to clip the shoulder clamp and adjust the device to an appropriate position.
16 Frequently Asked Questions (FAQ)
This section has listed all the frequently asked questions to help you address the simple issues during use of the voice/video recorder. If such issues persist, please consult our dealersorvisitourofficialwebsite:www.philips.com/support
16.1 Failure to start the recorder
The battery is empty, please recharge promptly.
16.2 Incorrect time/date
The time of the device is inaccurate. Please reset the time on the menu.
16.3 Unclear image
Unclean lens has caused it. Please use clean cloth to clean it.
16.4 Failure to record audio/video
The memory of the device is full, and the cyclic video record-
ing is not started. Please delete some of the files or transfer such files to external storage devices.
16.5 Recorder is unable to play audio or video files
Please recharge the battery as it has run out of power.
16.6 Failure to record audio/video
If the device fails, such as starting failure, blackout or operation failure, the common treatment is to reset it. Turn off the interphone before resetting. Open the rubber plug of the headphone/USB/micro SD card, and press the small hole above the midpoint between the USB port and the micro SD card with the tip of a sign pen, etc.
17 Technical Parameter
17.1 Memory
External Memory Space
Reference audio recording time (16GB): ca. 86 hours
Type of Internal Memory: C10 TF card
Mobile memory (PC): Yes
17.2 Size & weight
Width* Height*Depth: 58×100×26 (mm)
Weight (including battery): 203g (excluding shoulder clip)
17.3 System requirements
Operating System: Windows 7/8/10/Vista/XP/2000, Mac OS
X, Linux
Port: USB
17.4 System requirements
HQ: bit rate 1536kbps; WAV format
SLP: bit rate 384kbps; WAV format
17.5 Memory
Temperature: -30°C \~ 55°C
Air Humidity: 10%-90%, uncondensed
[Non-Text]
—
[Non-Text]
[Non-Text]
[Non-Text]
[Non-Text]
[Non-Text]
[Non-Text]
[Non-Text]
[Non-Text]
[Non-Text]
[Non-Text]
[Non-Text]
[Non-Text]
[Non-Text]
[Non-Text]
[Non-Text]
[Non-Text]
[Non-Text]
[Non-Text]
[Non-Text]
[Non-Text]
[Non-Text]
[Non-Text]
[Non-Text]
[Non-Text]
[Non-Text]
(No text)
[Non-Text]
[Non-Text]
[Non-Text]
[Non-Text]
[Non-Text]
[Non-Text]
[Non-Text]
[Non-Text]
[Non-Text]
[Non-Text]
[Non-Text]
[Non-Text]
[Non-Text]
[Non-Text]
[Non-Text]
[Non-Text]
[Non-Text]
[Non-Text]
[Non-Text]
[Non-Text]
Warranty card
质保书

year warranty
一年质保
Type: VTR8300
Serial nr:
Date of purchase
购买日期
Dealer's name, address and signature
销售商名称、地址及签字
www.philips.com/welcome
This document is printed on chlorine free produced paper
Data subject to change without notice
This product was brought to the market by Speech Processing Solutions GmbH or one of its affiliates, further referred to in this document as SPS, which is the manufacturer of the product. SPS is the warrantor in relation to the product with which this booklet was packaged.
For China only
只限中国地区
Printed in China

[Non-Text]
—
[Non-Text]
[Non-Text]
[Non-Text]
[Non-Text]
[Non-Text]
[Non-Text]
[Non-Text]
[Non-Text]
[Non-Text]
[Non-Text]
[Non-Text]
[Non-Text]
[Non-Text]
[Non-Text]
[Non-Text]
[Non-Text]
[Non-Text]
[Non-Text]
[Non-Text]
[Non-Text]
[Non-Text]
[Non-Text]
[Non-Text]
[Non-Text]
[Non-Text]
(No text)
[Non-Text]
[Non-Text]
[Non-Text]
[Non-Text]
[Non-Text]
[Non-Text]
[Non-Text]
[EMPTY]
[Non-Text]
[Non-Text]
[Non-Text]
[Non-Text]
[Non-Text]
[Non-Text]
[Non-Text]
[Non-Text]
[Non-Text]
[Non-Text]
[EMPTY]
[Non-Text]
[Non-Text]
[Non-Text]
[Non-Text]
[Non-Text]
[Non-Text]
[Non-Text]
[Non-Text]
[EMPTY]
[Non-Text]
广力云智慧零售收银系统
[Non-Text]
[Non-Text]
[Non-Text]
[Non-Text]
[Non-Text]
[Non-Text]
[Non-Text]
[Non-Text]
—
[Non-Text]
[Non-Text]
____
[Non-Text]
[Non-Text]
[Non-Text]
[Non-Text]
[Non-Text]
[Non-Text]
[Non-Text]
[Non-Text]
—
[Non-Text]
[Non-Text]
____
[Non-Text]
[Non-Text]
[Non-Text]
[Non-Text]
—
[Non-Text]
[Non-Text]
[Non-Text]
[Non-Text]
[Non-Text]
广力云智慧零售收银系统
[Non-Text]
[Non-Text]
[Non-Text]
[Non-Text]
[Non-Text]
[Non-Text]
[Non-Text]
[Non-Text]
—
[Non-Text]
[Non-Text]
[Non-Text]
[Non-Text]
[Non-Text]
[Non-Text]
[Non-Text]
[Non-Text]
[Non-Text]
[Non-Text]
[Non-Text]
____ ____
[Non-Text]
[Non-Text]
[Non-Text]
[Non-Text]
[Non-Text]
[Non-Text]
[Non-Text]
[Non-Text]
[Non-Text]
—
[Non-Text]
[Non-Text]
[Non-Text]
[Non-Text]
[Non-Text]
[Non-Text]
[Non-Text]
—
____ ____
[Non-Text]
[Non-Text]
[Non-Text]
[Non-Text]
[Non-Text]
[Non-Text]
[Non-Text]
[Non-Text]
[Non-Text]
—
[Non-Text]
[Non-Text]
[Non-Text]
[Non-Text]
[Non-Text]
[Non-Text]
—
____ ____
[Non-Text]
[Non-Text]
[Non-Text]
[Non-Text]
[Non-Text]
[Non-Text]
[Non-Text]
[Non-Text]
—
[Non-Text]
[Non-Text]
[Non-Text]
[Non-Text]
[Non-Text]
[Non-Text]
[Non-Text]
[Non-Text]
[Non-Text]
—
[Non-Text]
[Non-Text]
[Non-Text]
[Non-Text]
[Non-Text]
[Non-Text]
[Non-Text]
—
[Non-Text]
[Non-Text]
[Non-Text]
[Non-Text]
[Non-Text]
[Non-Text]
[Non-Text]
[Non-Text]
[Non-Text]
(No text)
[Non-Text]
[Non-Text]
—
[Non-Text]
[Non-Text]
[Non-Text]
[Non-Text]
[Non-Text]
[Non-Text]
[Non-Text]
(No text)
[Non-Text]
[Non-Text]
—
[Non-Text]
[Non-Text]
[Non-Text]
[Non-Text]
[Non-Text]
[Non-Text]
[Non-Text]
(No text)
[Non-Text]
[Non-Text]
[Non-Text]
[Non-Text]
[Non-Text]
[Non-Text]
[Non-Text]
[Non-Text]
[Non-Text]
(No text)
[Non-Text]
[Non-Text]
—
[Non-Text]
[Non-Text]
[Non-Text]
[Non-Text]
[Non-Text]
(No text)
[Non-Text]
[Non-Text]
—
[Non-Text]
[Non-Text]
[Non-Text]
[Non-Text]
[Non-Text]
(No text)
[Non-Text]
[Non-Text]
[Non-Text]
[Non-Text]
[Non-Text]
[Non-Text]
广力云智慧零售收银系统
[Non-Text]
[Non-Text]
[Non-Text]
[Non-Text]
—
[Non-Text]
[Non-Text]
—
[Non-Text]
[Non-Text]
—
[Non-Text]
[Non-Text]
[Non-Text]
[Non-Text]
[Non-Text]
[Non-Text]
—
(No text)
[Non-Text]
[Non-Text]
—
—
[Non-Text]
—
[Non-Text]
[Non-Text]
[Non-Text]
[Non-Text]
[Non-Text]
[Non-Text]
[Non-Text]
[Non-Text]
[Non-Text]
[Non-Text]
[Non-Text]
—
[Non-Text]
[Non-Text]
[Non-Text]
[Non-Text]
[Non-Text]
[Non-Text]
[Non-Text]
[Non-Text]
[Non-Text]
[Non-Text]
[Non-Text]
[Non-Text]
[Non-Text]
[Non-Text]
[Non-Text]
[Non-Text]
[Non-Text]
[Non-Text]
[Non-Text]
[Non-Text]
[Non-Text]
[Non-Text]
[Non-Text]
[Non-Text]
[Non-Text]
(No text)
[Non-Text]
[Non-Text]
[Non-Text]
[Non-Text]
[Non-Text]
[Non-Text]
[Non-Text]
[Non-Text]
[Non-Text]
[Non-Text]
[Non-Text]
[Non-Text]
[Non-Text]
[Non-Text]
[Non-Text]
[Non-Text]
[Non-Text]
[Non-Text]
[Non-Text]
[Non-Text]

Register your product and get support at www.philips.com/welcome

- 目录
- 1 欢迎 5
- 2 重要须知 6
- 提示
- 9.1 视频播放
- 12.2 对讲机设置
- 14.2 取下背夹
- 16 常见问题
- I WELCOME
- 1.1 PRODUCT FEATURES
- 2 IMPORTANT NOTICE
- 2.1 SAFETY
- NOTICE
- WARNING
- 2.2 HEARING PROTECTION
- 2.3 LEGAL RESTRICTION ON RECORDING
- 2.4 INSTALL ANTENNA
- 3 YOUR AUDIO/VIDEO RECORDER
- 3.1 WHAT'S IN THE BOX
- 3.2 OVERVIEW OF YOUR AUDIO RECORDER
- 4 START TO USE
- 4.1 TURN ON/OFF
- REMINDER
- 4.2 CHARGING METHODS
- 4.3 CONNECTING TO COMPUTER
- 5 VIDEO RECORDING
- 6 CAMERA
- 7 VOICE RECORDING
- 8 ONE-CLICK PLAYBACK MODE
- 9 VIDEO MODE
- 9.1 VIDEO PLAYING
- 10 PHOTO MODE
- II AUDIO MODE
- 11.1 VOICE PLAY
- 12 INTERPHONE
- 12.1 INTERPHONE FUNCTION SWITCH
- 12.2 INTERPHONE SETTING
- 12.3 INTERPHONE VOLUME ADJUSTMENT
- 13 SETTING MODE
- 13.1 INTERPHONE SETTING
- 13.1.1 PUBLIC CHANNEL
- 13.1.2 FAR DISTANCE
- 13.1.3 SUBSONIC CODE
- 13.1.4 TIME LIMITED
- 13.1.5 SQUELCH LEVEL
- 13.2 AUDIO RECORDING SETTING
- 13.2.1 AUDIO RECORDING TYPE
- 13.2.2 MICROPHONE SENSITIVITY
- 13.3 VIDEO RECORDING SETTING
- 13.3.1 RESOLUTION
- 13.3.2 VIDEO QUALITY
- 13.3.3 VIDEO PRE-RECORDING
- 13.3.4 DELAYED VIDEO RECORDING
- 13.4 CAMERA SETTING
- 13.4.1 PHOTO SIZE
- 13.4.2 PHOTO QUALITY
- 13.4.3 CONTINUOUS SHOOTING
- 13.4.4 AUTOMATIC SHOOTING
- 13.5 SYSTEM SETTING
- 13.5.1 LANGUAGE
- 13.5.2 SYSTEM FORMAT
- 13.5.3 DEFAULT SETTINGS
- 13.5.4 SCREEN BRIGHTNESS
- 13.5.5 SYSTEM TIME
- 13.5.6 AUTOMATIC SHUTDOWN
- 13.5.7 AUTOMATIC SCREEN OFF
- 13.5.8 VOLUME
- 13.5.9 CYCLIC VIDEO RECORDING
- 13.5.10 ONBOARD AUDIO RECORDING
- 13.5.11 SEGMENTED VIDEO RECORDING
- 13.5.12 KEYPAD TONE
- 13.5.13 INDICATOR
- 13.5.14 INFRARED SWITCHING
- 13.5.15 MOTION DETECTION
- 13.5.16 EXPOSURE COMPENSATION
- 13.5.17 ID NO
- 13.5.18 SYSTEM INFO
- 14 MOUNTING OF SHOULDER CLIP
- 14.2 DISMOUNTING OF CLIP
- 15 WEARING SHOULDER CLIP
- 16 FREQUENTLY ASKED QUESTIONS (FAQ)
- 16.1 FAILURE TO START THE RECORDER
- 16.2 INCORRECT TIME/DATE
- 16.3 UNCLEAR IMAGE
- 16.4 FAILURE TO RECORD AUDIO/VIDEO
- 16.5 RECORDER IS UNABLE TO PLAY AUDIO OR VIDEO FILES
- 16.6 FAILURE TO RECORD AUDIO/VIDEO
- 17 TECHNICAL PARAMETER
- 17.1 MEMORY
- 17.2 SIZE & WEIGHT
- 17.3 SYSTEM REQUIREMENTS
- 17.4 SYSTEM REQUIREMENTS
- 17.5 MEMORY
- WARRANTY CARD
- 质保书
Brand : PHILIPS
Model : Voice Tracer VTR8300
Category : Dictaphone