Space Controller - Audio software Sound Particles - Free user manual and instructions
Find the device manual for free Space Controller Sound Particles in PDF.

| Product Type | Audio Software |
| Brand | Sound Particles |
| Model | Space Controller |
| Category | Spatial Audio Control |
| Platform | Windows, macOS |
| License Type | Commercial (perpetual or subscription) |
| Supported Plug-in Formats | VST2, VST3, AU, AAX |
| Sample Rate Support | Up to 192 kHz |
| Bit Depth Support | 32-bit float, 64-bit float |
| Channel Configurations | Mono, Stereo, 5.1, 7.1, 9.1.6, Ambisonics |
| Head Tracking | Optional via third-party sensors (e.g., AVID, TomTec) |
| DAW Integration | Seamless with Pro Tools, Logic Pro, Cubase, Ableton Live, Reaper |
| Main Functions | 3D auto-panner, orbit, spiral, random, trajectory editor, spatial effects |
| User Interface | 3D OpenGL view, customizable control panel |
| System Requirements (Minimum) | Intel Core i5, 8 GB RAM, GPU with OpenGL 3.3 |
| System Requirements (Recommended) | Intel Core i7, 16 GB RAM, dedicated GPU |
| Installation Method | Download installer from official website |
| Updates | Free updates for version 1.x, paid for major upgrades |
| Maintenance | No physical maintenance; keep software updated |
| Safety | Back up presets and session files regularly |
| Customer Support | Online manual, email support, community forum |
| Repairability | Not applicable (software); reinstallation resolves most issues |
| Warranty | 30-day money-back guarantee (check website) |
Frequently Asked Questions - Space Controller Sound Particles
User questions about Space Controller Sound Particles
0 question about this device. Answer the ones you know or ask your own.
Ask a new question about this device
Download the instructions for your Audio software in PDF format for free! Find your manual Space Controller - Sound Particles and take your electronic device back in hand. On this page are published all the documents necessary for the use of your device. Space Controller by Sound Particles.
USER MANUAL Space Controller Sound Particles
natural_image
Circular portrait photo of a man with short hair and beard, wearing a dark scarf (no text or symbols visible)Welcome Note
Welcome to "Space Controller"
Over the years, it become clear for us that using knobs, joysticks or even the mouse was not the best way to pan sounds. Knobs can work with stereo, joysticks may work for surround, but as you move to 3D audio, all these approaches present severe problems in terms of usability.
Panning in 3D should be fun!
As such, we searched for alternatives. I still recall one of the first talks on the subject with Michael Novitch (Technicolor / Paramount) a few years ago.
With Space Controller, I really believe that we found a much better solution for panning: easy, fast, precise, intuitive and fun... because 3D panning should be fun.
Enjoy! And if you have any question or suggestion, don't hesitate to contact us. We REALLY love to receive feedback from our users.
Nuno Fonseca, PhD
CEO
nuno.fonseca@soundparticles.com
Table of Contents
Space Controller 1
Space Controller Signal Flow 2
Space Controller overview 3
App controls 6
Plugin main controls 8
Input and Output section 14
Advanced mode parameters 17
Space Controller Toolbars 21
Plugin Installation 24
Copy/Paste automation into Dolby Atmos objects 24
Tips 31
Additional Notes 32
EULA 34
Space Controller
Thank you very much for downloading Space Controller plugin from Sound Particles.
Space Controller is committed to change the way you use sound in space, enriching your mixes by spreading sound around you. By combining the movement of the mobile device through a dedicated application and a 3D audio plugin prepared to receive this information and use it creatively with a set of panning modes, this unique audio plugin makes panning easier than ever using real-life motion. Designed to be simple and quick to use, Space Controller has four different modes of operation — Mono, Channel, Rotation and Symmetric Side — enabling sound designers and music producers to use this new approach to panning in several different ways. Whether to add motion to sound effects or to creatively mix instruments, this audio plugin will change the way you think about the sound around you.
Space Controller brings the easiest panning solution to your workflow. Allows you to move your sound around intuitively in all reproduction formats — from stereo to 5.1, immersive formats up to 22.2, also Ambisonics up to 6th order, and Binaural.
Go through this manual and get the best out of Space Controller!
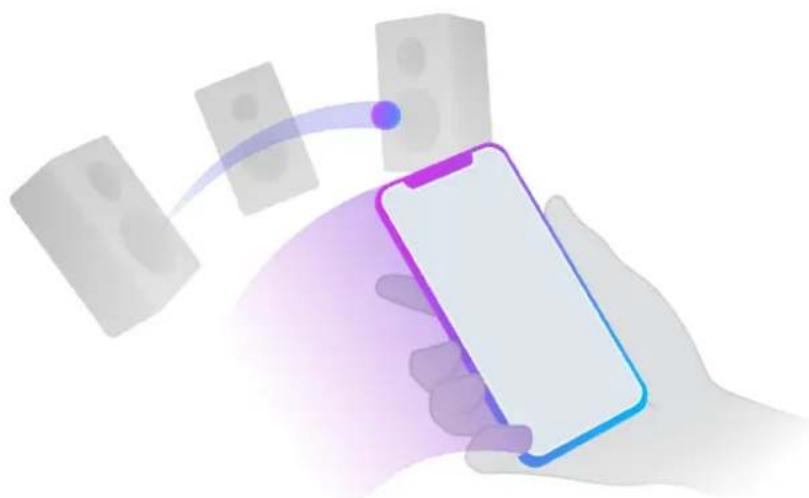
natural_image
Illustration of a hand holding a smartphone with connected devices (no text or symbols)Space Controller Signal Flow
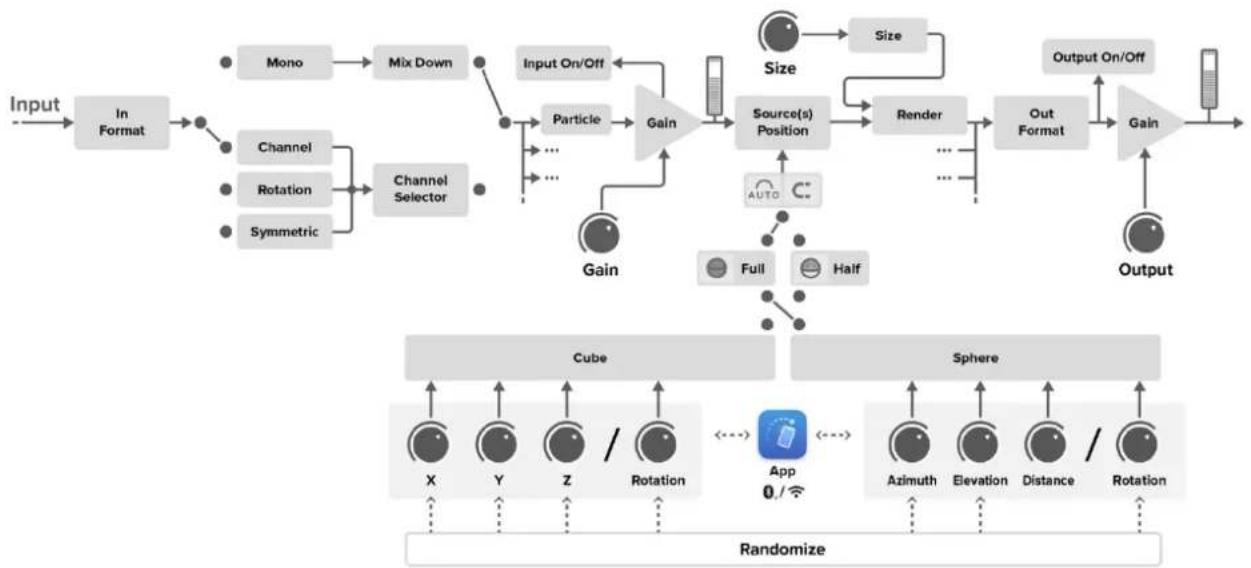
flowchart
graph TD
    A["Input"] --> B["In Format"]
    B --> C["Mono"]
    C --> D["Mix Down"]
    D --> E["Particle"]
    E --> F["Gain"]
    F --> G["Source(s) Position"]
    G --> H["Render"]
    H --> I["Out Format"]
    I --> J["Gain"]
    J --> K["Output"]

    subgraph "Randomize"
        L["Cube"] --> M["X"]
        L --> N["Y"]
        L --> O["Z"]
        L --> P["Rotation"]
        Q["Sphere"] --> R["Azimuth"]
        Q --> S["Elevation"]
        Q --> T["Distance"]
        Q --> U["Rotation"]
    end

    C --> V["Channel Selector"]
    D --> W["Channel"]
    E --> X["Rotation"]
    E --> Y["Symmetric"]
    F --> Z["Gain"]
    G --> AA["Size"]
    H --> AB["Full"]
    H --> AC["Half"]
    I --> AD["Output On/Off"]
    J --> AE["Output On/Off"]
    style L fill:#f9f,stroke:#333
    style Q fill:#f9f,stroke:#333
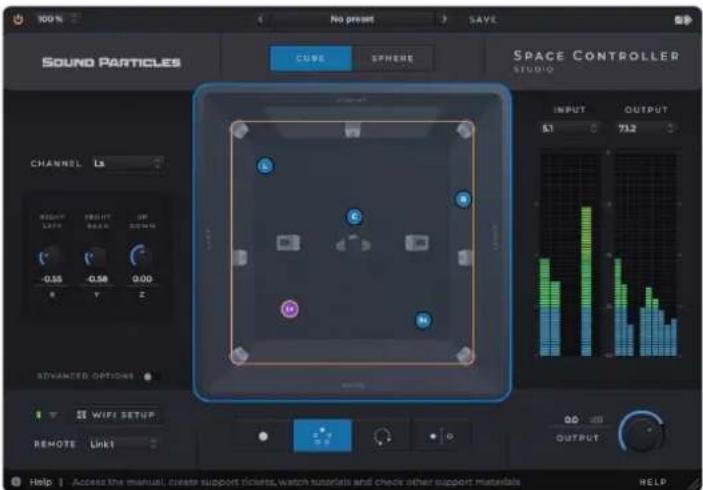
Space Controller overview
Space Controller plugin interface is designed to be easy-to-use while providing all information and controls you need to achieve the best out of the plugin.
Space Controller has its key element at the center on the interface, the Space View. Here the plugin provides visual feedback of the location of the sounds you're positioning or moving using a mobile device.
Moreover you can also use this area to place and move sound sources, by mouse dragging them, like in a common panner plugin.
Around the Space View, there are a whole set of parameters that will help you produce the sound motions you want.
Above the Space View it is possible to select from two different ways of display: Cube and Sphere. Switching between these two will change both the view and the control parameters to position sound sources.
Under the Space View are the plugin's four modes of panning – Mono, Channel, Rotation and Symmetric Side. These will affect the overall behavior of the plugin as they allow you to control all sound sources simultaneously or each independently.
At the left side you can also control parameters related to each source position, and below is the setup and information regarding the connection between the plugin and the mobile app.
At the right side there's the selection of the input and output formats, VU meters and the global output control.
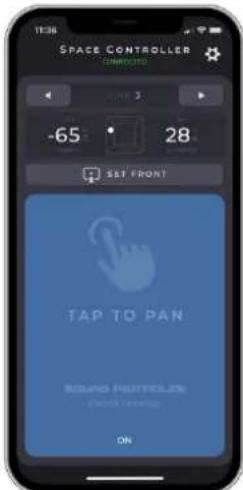
The Space Controller app for iOS and Android enables the user to move and positioning sounds by pointing a mobile device to any virtual position.
The app is included with the plugin and it can be downloaded in App Store and Play Store.
The Space Controller mobile app has a connection status label and a section of communication links to set which instances of the plugin are being controlled. Below there's a section with information of the direction the mobile device is pointing at, including angles and a preview of the sound source position in a Cubic Room.
The Tap/Hold button is used to set the smartphone ON/OFF panning control state.
Quick start and connection setup
This is a short description with the required steps to install and connect the Space Controller app with the plugin. Follow the steps below according to your mobile device platform — iOS or Android.
Please be sure to first install the plugin on your computer.
Mobile setup — iOS and Android
SpaceController App installation
-
Go to the App Store or PlayStore.
-
Search for the SpaceController App.
-
Download & Install the SpaceController application.
Before opening the SpaceController app on your mobile phone, please insert the Space Controller plugin in a desired track of a DAW. Additionally, to avoid connection errors, make sure that one of the network services below on your computer is switched on — Bluetooth or Wi-Fi (or both).
Bluetooth
- On your mobile device, switch the Bluetooth on.
- Launch the SpaceController app.
- Click on the settings wheel, in the top-right corner of the app, and select Bluetooth as the Connection service.
-
Return to the Main View.
-
Under "SpaceController" the connection status label should get from Scanning to Connected. Depending on various factors, the connecting time should be about 5 seconds.
-
The app and the plugin should be now connected, simply tap the "Tap to Pan" button to start panning sounds with your mobile device.
Wi-Fi (only available for Space Controller Studio version)
- Turn on the mobile phone Wi-Fi and connect it to the available network. Note that the network should be the same network used by your computer.
- Launch the SpaceController app.
- Click on the settings wheel, in the top right corner of the app, and select Wi-Fi as the Connection service
- Click on "Scan QR code". The SpaceController app will open your mobile camera and permission to use your camera will be requested.
- In the plugin, click on "Wi-Fi Setup". A QR will appear on the plugin's interface.
- Point your camera to the QR code. Make sure that the QR code image fits inside the square of the QR scanner.
- The app and the plugin should connect in a few seconds, simply tap the "Tap to Pan" button to start panning sounds with your mobile device.
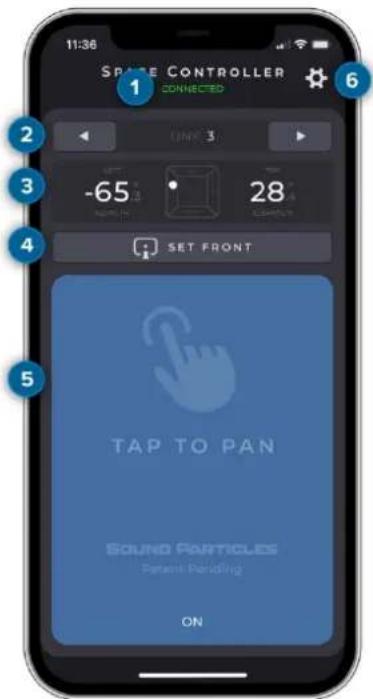
App controls
Main window
1) Connection label – Shows the connection status between the plugin and the app
2) Communication links – Select the link to be controlled by the app. Link number can be changed with the side arrows or by clicking in link label, which will show a numeric pad that allow the user to type the link to be controlled by the app. Press and hold on side arrows to continually increase/decrease link number
3) Pointing display section – Shows the current direction the phone is pointing
4) Set Front – Button to calibrate the front direction to be considered by the app
5) Tap/Hold to Pan – Button that activates/deactivates the remote panning control
6) Settings Wheel – Button to open the app's settings window
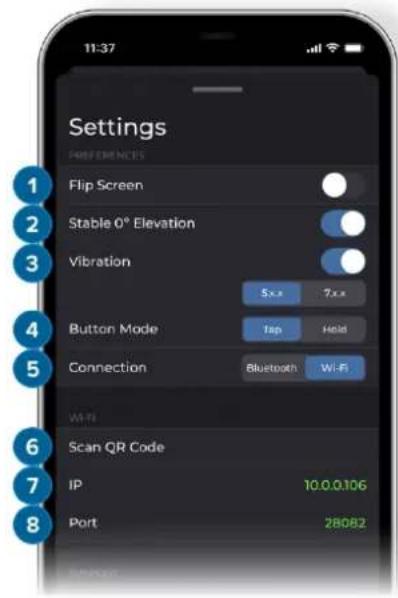
Settings window
Preferences and Wi-Fi sections
1) Flip Screen toggle – Allow the user to flip the app upside-down
2) Stable 0° Elevation – Helps the user to have a steadier control of the vertical plane. Tilting the mobile device between -25° and 25° will not affect the elevation of the sound source, keeping it at 0°
3) Vibration – When Vibration mode is on, the phone will vibrate every time it points to the speaker position of a 5.x.x or a 7.x.x related speaker layouts
4) Button Mode toggle – User can choose between Hold and Tap gestures to enable/disable the Tap/Hold to Pan button in the app
5) Connection type – Allows the user to choose between Wi-Fi and Bluetooth connection protocols (Wi-Fi only available for Space Controller Studio version)
6) IP Address popup – Displays the selected network and allows the user to choose other available network interfaces
7) Port – Shows the Wi-Fi connection port number
Support section
1) Read Manual – Opens the online version of user manual
2) Forum – Opens the Sound Particles' Facebook group, in case the user wants to ask a question, send suggestions or search for plugin related posts or comments.
3) Report bug – Opens a webpage where the user can report issues experienced with the app or plugin
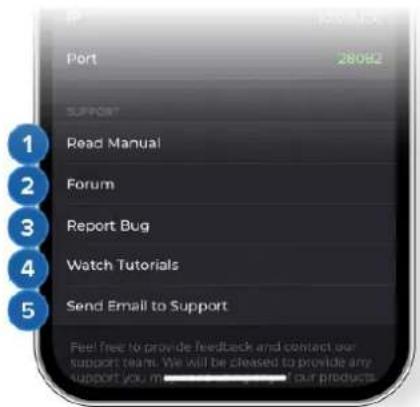
4) Watch Tutorials – Opens Sound Particles' YouTube channel with plugin related tutorials
5) Send email to Support – Opens a webpage where the user can contact our support team with any plugin related feedback
6) Acknowledgements – Opens a PDF with acknowledgements of third-party rights, licenses as well as the terms and conditions
Plugin main controls
Connection section
The connection section provides users with the setup of the Space Controller APP with the Space Controller plugin. It also informs about the current connection status; how many devices are connected, and which instance of the plugin is being controlled.

1) Wi-Fi led – displays the ON/OFF status of the plugin-app Wi-Fi connection
2) Bluetooth led - displays the ON/OFF status of the plugin-app Bluetooth connection
3) Wi-Fi Setup – Pressing this button will show on the plugin window a few instructions to setup the Wi-Fi connection, as well as a QR code to use with the Space Controller app
4) Communication Link – Popup that enables to choose which Link of the Space Controller app is controlling the plugin instance. For projects with multiple Space Controller instances, each plugin instance should be linked to a different communication Link. Space Controller enables you to control up to 128 plugin instances independently.
Views
The Space View is the central element on the interface and fundamental to help user checking or controlling where the sounds are being placed and how they're moving.
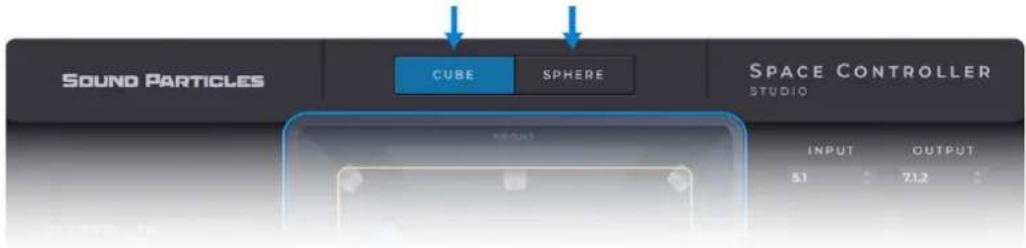
Space Controller has two main view modes — Cube and Sphere — that will allow you to choose your preferred workflow. You get to work with cartesian coordinates system in the Cube Mode that may be preferred in cinema and music projects. If you're working with Ambisonics, VR or other sphere-related workflows, Sphere Mode, which uses spherical coordinates system, can be a more suitable alternative.
Cube
In Cube Mode you can choose to view the cubic room either from Top or Back perspectives.

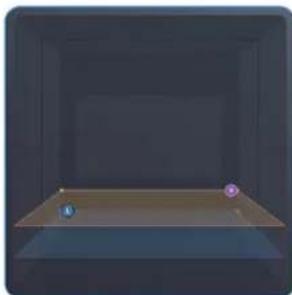
natural_image
3D-rendered scene with a wooden platform and two small colored markers (no text or symbols)The perspective can be switched in the context menu accessible by right-clicking with the cursor over the Cube view.
When the Cube View is selected the plugin uses the X, Y, Z coordinates as parameters, which respectively controls the Left/Right, Front/Back and Up/Down position of the input source(s).
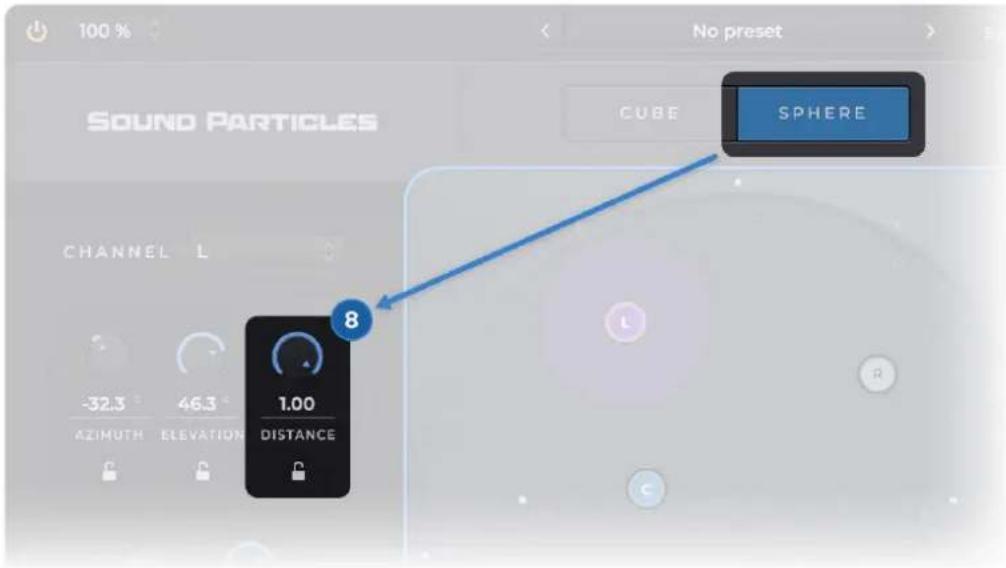
Sphere
When the Sphere View is selected the plugin uses Azimuth and Elevation parameters, which respectively control the position of the input source(s) in the horizontal and vertical planes.
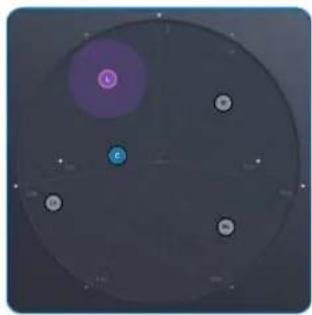
natural_image
Circular object with a purple circle containing a letter 'C' and a blue circle labeled 'e', surrounded by smaller gray circles (no text or symbols)View main controls
There is a set of elements within the central region of the dome that are common to both views, Cubic and Spherical. These assists and streamline users to check and control how the sound sources are being panned.
flowchart
graph TD
    A["1"] --> B["L"]
    B --> C["3"]
    C --> D["P"]
    D --> E["2"]
    E --> F["2"]
    style A fill:#f9f,stroke:#333
    style B fill:#bbf,stroke:#333
    style C fill:#dfd,stroke:#333
    style D fill:#fdd,stroke:#333
    style E fill:#fff,stroke:#333
    style F fill:#fff,stroke:#333
The view main controls are:
1) Input source(s) handle(s) – displays the position of each input source and which input channel it corresponds to
2) Output channel format (speakers) - displays the speaker layout of the selected output format. These speakers are represented by real-speaker icons in cube mode, while in sphere mode they are represented by the abbreviation of the speaker they represent
3) Listener position – displays a dummy head at the center to indicate the reference position. In the spherical mode, the listener is positioned in the center of the dome
4) Height line – Indicates the current elevation of the sound source in the room. This line is available only in the cube mode
Panning modes
Space Controller plugin has four Panning modes — Mono, Channel, Rotation and Symmetric — allowing the user to experiment different approaches to panning through a greater variety of trajectories.
These four modes will use your mobile device movement data to creatively distribute the input sound sources around you.
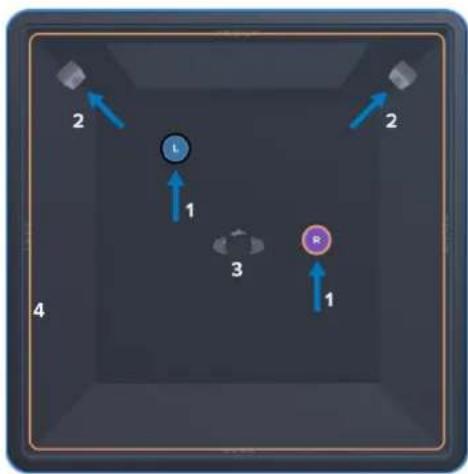
Mono

natural_image
Four-panel diagram showing a blue circle, four black circular shapes with dashed arrows, and one solid circle (no text or symbols)The Mono Mode is the most basic and straightforward of all. In this mode, any non-mono signal is downmixed to be used as a single source in the dome (if the input signal is mono no downmixing will occur). The source is pointed in respect to where the mobile device is pointing.
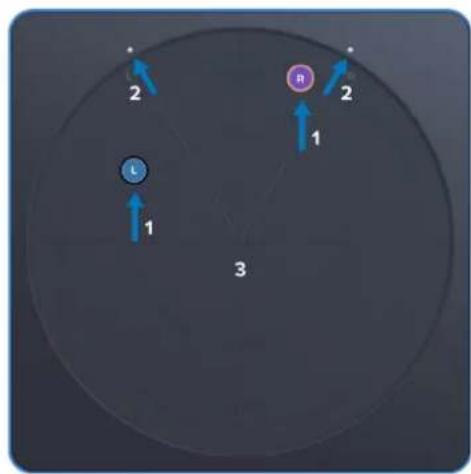
Channel

natural_image
Four-panel interface showing a white circle, blue square with circular patterns, a white circular arrow, and a black dot (no text or symbols)The Channel Mode is very similar to the Mono Mode with the difference that you can pan any of the input channels. A specific channel of the input signal will be spatialized according to where the mobile device is pointing at. There is a dropdown on the left-side of the interface that allows users to select which channel of the input format they want to control. Note that this operating mode is disable when the plugin detects a mono input.
Rotation

natural_image
Pure graphical icons showing a white circle, six white circles, a blue circular arrow, and a dot (no text or symbols)The Rotation Mode allows users to rotate the input image according to the angle of the mobile device. In this mode, only the azimuth of the source is manipulated, and the elevation of the sound source will always be 0^ .
Symmetric Side

natural_image
Four-panel interface showing circular and curved icons on dark backgrounds, one with dashed lines (no text or symbols)The Symmetric Side Mode mirror the X axis behavior to all sources based on a selected channel. For example, when using 5.1 input and selecting the left channel to be controlled by the mobile device, all the other sources will mirror the left channel in relation to the X axis. Like the Channel Mode, the Symmetric Side Mode is disabled when the plugin detects a mono input signal.
Left section parameters
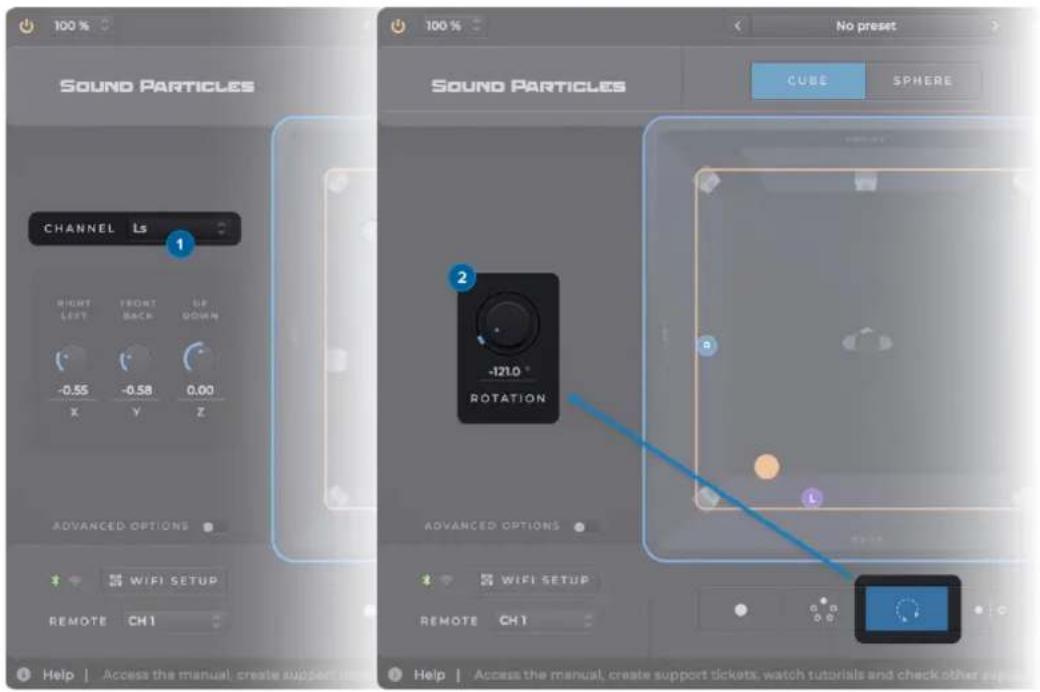
1) Channel selector – Allows the user to check and select which channel is being controlled by the app or plugin. Each input channel has a dedicated set of position parameters
2) Rotation -Rotation parameter is displayed in the plugin when Rotation Mode is selected, the user can set or check the amount of horizontal rotation applied to the input sound
In Cube view:
3) X coordinate – Controls the position of the selected source in the x-axis
4) Y coordinate – Controls the position of the selected source in the y-axis
5) Z coordinate – Controls the position of the selected source in the z-axis
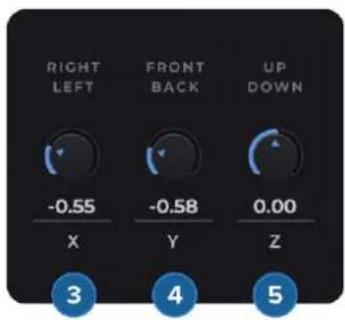
In Sphere view:
7) Azimuth – Controls the azimuth position of the selected source
8) Elevation - Controls the elevation position of the selected source
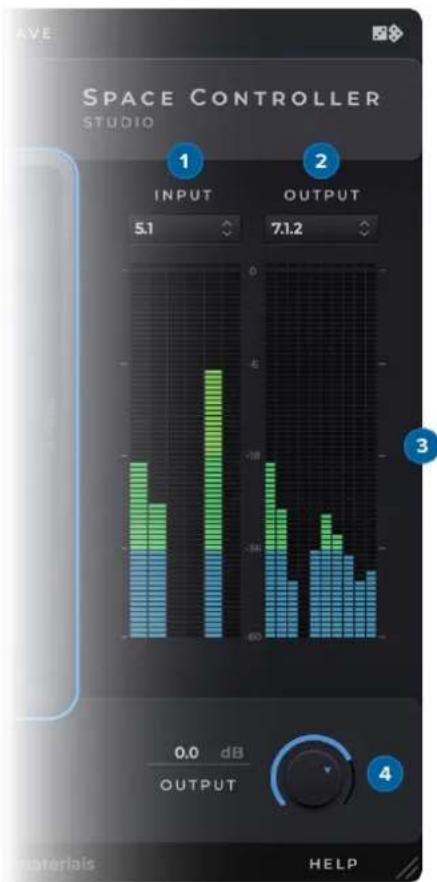
Input and Output section
Space Controller has an input and output section dedicated to the parameters that change the already processed audio. These parameters are the input source popup and output popup to select its render format.
1) Input format – A popup menu where it is possible to choose the plugin input format according to the number of input channels of the track
2) Output format – A popup menu where it is possible to choose the output format of the plugin according to the number of output channels of the track
3) VU's – Dedicated Input and Output VU meters to monitor the signal levels for each channel
4) Output – Knob that controls the plugin's overall output signal
bar
SPACE CONTROLLER | Level | INPUT (dB) | OUTPUT (dB) | |---|---|---| | 1 | 5.1 | 7.12 | | 2 | 0.0 | 0.0 | | 3 | 0.0 | 0.0 | | 4 | 0.0 | 0.0 |The signal levels are visible in the VU meters available on the right-side of the interface. Users can access a popup menu by right clicking on the VU's. This essentially allows users to reset the VU's animation (e.g.: if they already clipped), as well as viewing the render format in use.
Input Source and Output Render Formats
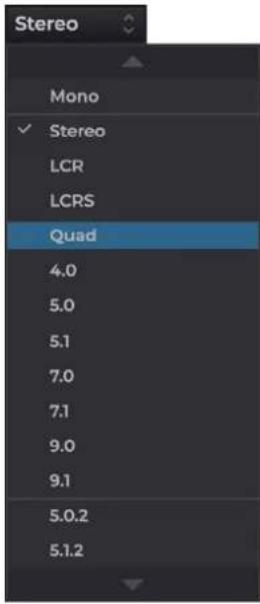
Stereo - A stereo render made of gains based on VBAP.
Stereo (XY) - A stereo render made with a virtual XY microphone. Only available as Output format.
Stereo (MS) - A stereo render made with a virtual MS microphone. Only available as Output format.
Stereo (Blumlein) - A stereo render made with a virtual Blumlein microphone. Only available as Output format.
Binaural - A binaural render based on the SADIE MINP KU100 dataset. Only available as Output format.
LCR - An LCR VBAP multichannel render.
LCRS - An LCRS VBAP multichannel render.
Quad - A Quad VBAP multichannel render.
4.0 - A 4.0 VBAP multichannel render.
5.0 - A 5.0 VBAP multichannel render
5.1 - A 5.1 VBAP multichannel render.
7.0 - A 7.0 VBAP multichannel render.
7.1 - A 7.1 VBAP multichannel render.
9.0 - A 9.0 VBAP multichannel render.
9.1 - A 9.1 VBAP multichannel render.
5.0.2 - A 5.0.2 VBAP multichannel render.
5.1.2 - A 5.1.2 VBAP multichannel render.
5.0.4 - A 5.0.4 VBAP multichannel render.
5.1.4 - A 5.1.4 VBAP multichannel render.
7.0.2 - A 7.0.2 VBAP multichannel render.
7.1.2 - A 7.1.2 VBAP multichannel render.
7.0.4 - A 7.0.4 VBAP multichannel render.
7.1.4 - A 7.1.4 VBAP multichannel render.
7.0.6 - A 7.0.6 VBAP multichannel render.
7.1.6 - A 7.1.6 VBAP multichannel render.
9.1.4 - A 9.1.4 VBAP multichannel render.
9.1.6 - A 9.1.6 VBAP multichannel render.
9.0.8 - A 9.0.8 VBAP multichannel render.
9.1.8 - A 9.1.8 VBAP multichannel render.
11.1.8 - A 11.1.8 VBAP multichannel render.
11.1 - A 11.1 Auro-3D VBAP multichannel render.
12.0 - A 12.0 IMAX VBAP multichannel render.
13.1 - A 13.1 Auro-3D VBAP multichannel render.
22.2 - A 22.2 NHK VBAP multichannel render.
Ambisonics (ACN/SN3D) - An Ambisonics render up to 6^th order based on the Ambisonics input.
Advanced mode parameters
1) Locks - It is possible to individually hold each position-related parameter, either as coordinates in Cube (XYZ) mode or angles in Sphere (Az./El.)
2) Size - Space Controller allows changing the size of sources, which will control the width of each sound. Higher sizes will make a sound reach for more speakers, whereas sounds with smaller sizes will reach less speakers. The current size will be represented by a colored shade around the corresponding source
3) Gain – Changes the gain of the input signal channel. To change the selected channel, users must change the settings on the channel dropdown, or simply select the correspondent source in the dome
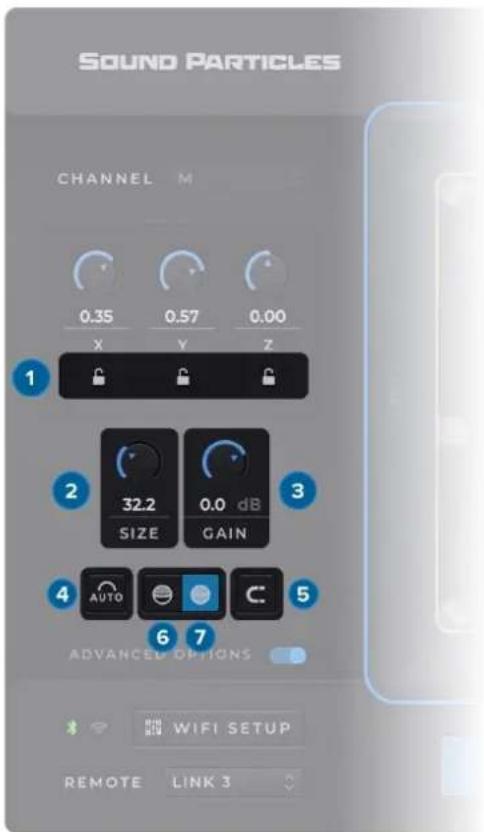
Auto-modifiers
4) Auto-Z – Automatically sets the Z/Elevation coordinate according to the distance to center
5) Magnet – The Magnet feature will snap every controlled source playing to the nearest output speaker position
Dome modifiers
6) Full Dome – The full dome mode enables users to pan the sound sources in a full sphere-like space, with the listener positioned in the middle of the sphere. This allows you to give negative elevation/Z values to the sound sources
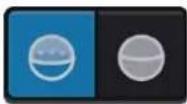
7) Half Dome – The half-dome uses a cupula-like space (half-sphere). Sound sources may be spatialized only within positive elevation/Z values
Sphere
8) Distance – The panning position distance according to the center of the dome
Input and Output section
9) Input channels tab – Allows users to see the input channels and their current states
10) Input Channel buttons – Enable users to deactivate or activate any input channel. This means that individual channels can be muted. When deactivating channels, the correspondent source in the dome becomes gray
11) Changes LED – A blue circle appears when the plugin detects gain changes on the input or output channels. Bear in mind, that this blue circle will only appear when the advanced options are visible
12) Channel gain indicator – Indicates the channel gain based on the Gain parameter mentioned above. By default, all input channels are set to 0 dB
13) Selected channel marker - Indicates what input channel is selected in the channel dropdown and dome. In practice, this indicates which channel is controlled by the mobile device or used as reference. It also indicates which channel the gain parameter will affect
14) Output channels tab - Allows users to see the output channels and their current states
15) Output channel buttons - Enable user to deactivate or activate any output format speaker. This means that sources travelling through deactivated speakers won't have any effect in the output since that speaker will be considered as silent in the render.
16) LFE - Enables the user to control the gain of the Low Frequency Effects channel with a low pass 8 ^th order Butterworth filter at 120 Hz. The following table shows what the LFE knob controls depending on the input/output format.
| Input Format | Output Format | Controls |
| With LFE Channel | No LFE Channel | The amount of the input LFE summed into all output channels |
| No LFE Channel | With LFE Channel | The input signals are also mixed to the LFE channel |
| With LFE Channel | With LFE Channel | The gain of the input LFE signal going to the output LFE channel |
| No LFE Channel | No LFE Channel | LFE disabled |
Space Controller Toolbars
The Space Controller toolbar incorporates a set of features that assist you while using the plugin. The upper tab allows you to save and manage presets very quickly and intuitively.
Additionally, the Smooth Bypass, Scaling and Randomize features will help you improve the experience with the plugin.
The bottom tab gives you access to all the help you need, with dynamic tooltips.

1) Smooth Bypass — noiseless plug-in activation/deactivation. Using this feature the Space Controller is bypassed without any clipping, even if it's processing audio.
2) GUI Zoom — the Space Controller GUI can be resized. The popup available in the upper-left part of the interface let users choose a scaling value, from 25% to 400%. This action affects only the currently selected Space Controller instance. New instances of the plugin will open with the default size factor (100%).
3) Internal Preset Saving System — The internal system for saving presets is a feature that allows the management of presets, enabling users to: create snapshots, alter presets, and access all of them (factory and custom) across all DAWs. The plugin also supports a tree structure for better organisation of presets, allowing users to save presets within specific folders.
A. Preset Navigator — allows users to navigate through the previous and next preset using the arrows placed on the left and right of the Preset popup menu.
B. Preset Popup Menu — the preset popup displays the current preset in use. It initially appears with a preset called Default, used whenever the plugin is inserted into a track. Clicking the name of the preset brings up a menu with the options: Delete preset, Set as default preset, and Refresh preset list — followed by the complete list of presets (factory and custom).
B1. Set as default preset — defines the current plugin settings as the default settings when the plugin is inserted into a new track. This action determines the default on all hosts and architectures.
B2. Refresh preset list — updates the presets list. If there is a new preset file in the presets folder, or a new preset has been created from a different Space Controller instance, this option updates the preset list.
B3. Delete preset — deletes the current preset. This action is permanent and deletes the preset on all hosts.
C. Save — Clicking the "Save" button saves the current state of Space Controller parameters. An Operating System window will automatically appear in the required directory. Presets saved in different paths won't be recognised in the preset menu of the plugin.
4) Update — If the plug-in is running on a computer with Internet access, it can detect if a newer update is available, informing the user of the existence of a new update, by showing a blinking phrase on the top of the display.
5) Randomize — This button will set new random positions for the sound sources
6) Tooltips' section — Shows the definition for an element of the plugin when the parameter is hovered.
7) Resize button — Users are allowed to use a custom scaling factor by dragging the cursor in the bottom-right of the plugin's interface. Performing this makes the zoom popup display the custom value of the scaling. *Bear in mind that hosts may deal differently with plugin resizes.
8) Help button — displays the Help menu that gives access to our Website, User Manual, Tutorials, Support Requests, Forum and Check for Updates.
A. Visit our Website – Link to soundparticles.com
B. Watch Tutorials – Link to Space Controller tutorials
C. Read Manual – Web version of this Manual.
D. Request Support – This button will redirect users to the requested support page. This will automatically retrieve some data about your setup (OS, CPU, RAM, plugin version and host). Note that this request support is particular for Space Controller topics.
E. Forum – Link to our main Facebook group, Sound Particles Forum.
F. Check for Updates - Pressing this button will access soundparticles.com to check if there are available updates.
Plugin Installation
The Space Controller Plugin installation copies the plugin into appropriate plugin folders, and the hosts will automatically recognize them. It also allows Space Controller users to choose a custom folder for the installation, in both operating systems — macOS and Windows.
On macOS, the default paths for Space Controller plugin architectures are the following:
• /Library/Audio/Plug-Ins/VST3
• /Library/Audio/Plug-Ins/Components
• /Library/Application Support/Sound Particles/SpaceController
• /Library/Application Support/Avid/Audio/Plug-Ins
On Windows, the default paths for SpaceController plugin architectures are the following:
• C:\Program Files\Common Files\VST3
• C:\Program Files\Common Files\Avid\Audio\Plug-Ins
In the case of VSTs on Windows, we set the paths in accordance with Steinberg recommendation regarding plugin locations.
Presets locations
User presets should be stored in a .spp file in the following locations:
On macOS, the path for Space Controller User presets is the following:
- /Users/USERNAME*/Library/Application Support/Sound Particles/Space Controller/Presets
On Windows, the path for Space Controller User presets is the following:
C:\Users\USERNAME**\AppData\Roaming\Sound Particles\Space Controller\Presets
*USERNAME is your login name. Your user Library folder may be hidden, in which case you can select the "Go to Folder" option in the Go menu of the Finder, enter "\~/Library", and click OK.
**USERNAME is your login name. AppData may be hidden; use the explorer view options to show system files.
Copy/Paste automation into Dolby Atmos objects
Space Controller works with Dolby Atmos Beds. Since plugin architectures do not support object metadata, Space Controller is currently not compatible with objects. However, Space Controller has dedicated automation parameters to copy directly into the Dolby Atmos Music Panner or Pro Tools, Nuendo and Logic Pro native panners that send objects position metadata to the Dolby Atmos Render.
Attention: Space Controller cannot be inserted directly into the same track as the Dolby Atmos Music Panner, both need to have dedicated tracks. The Space Controller automation is copied from the channel-bases/ Beds track to the object-based track as follows.
Beyond Space Controller automation parameters, the user has now more automation parameters that are "read-only". These are not meant to be changed as their function is only to be copied to the Dolby Atmos Music Panner or the DAW native panner. Any changes made to the automation should be done in the Space Controller automation parameters as they will then be reproduced in the remaining read-only parameters.
The following Space Controller parameters must always be enabled in order to write automation:
Space Controller:
- X Coordinate Ch #
- Y Coordinate Ch #
• Z Coordinate Ch #
The next parameters are read only which means their function is only to be copied to the respective panner.
Parameters for Dolby Atmos Music Panner:
- Ch # -> Pan X
- Ch # -> Pan Y
- Ch # -> Pan Z
Parameters for Pro Tools | Ultimate panner:
• Ch # -> Front Pos, Rear Pos
- Ch # -> F/R Pos
- Ch # -> Height
Parameters for Nuendo VST MultiPanner enable parameters:
• Ch # -> Left-Right Pan (X)
• Ch # -> Front-Rear Pan (Y)
• Ch # -> Bottom-Top Pan (Z)
Parameters for Logic Pro 3D Object Panner:
- Ch # -> Left/Right
- Ch # -> Back/Front
- Ch # -> Elevation
Pro Tools instructions:
- Right click the plug-in insert and select Automation Dialog...
- Select the parameters you want to automate, considering the desired number of channels, and add them to the Automation enabled list. Also select the required Copy/Paste parameters according to the panner you're using to control the object.
- Then make the Copy/Paste parameters visible by selecting the "Show/hide automation lanes" on the bottom left of the track.
- Write the desired automation with Space Controller plugin/app.
- Make the automation lanes of the Dolby Atmos Music Panner / Pro Tools panner visible.
- Copy the automation lane from Space Controller respective to the panner you want to automate as shown in the bale below. Paste the previously copied automation lane by right clicking the destination automation lane: Paste Special > To Current Automation Type.
If you are using a Dolby Atmos Music Panner, use these parameters:
| Space Controller(Copy) | Dolby Atmos Music Panner(Paste) |
| Ch # -> Pan X | Pan X |
| Ch # -> Pan Y | Pan Y |
| Ch # -> Pan Z | Pan Z |
If you are using the native Pro Tools Ultimate panner, use these parameters:
| Space Controller(Copy) | Pro Tools | Ultimate Panner(Paste) |
| Ch # -> Front Pos, Rear Pos | front pos |
| Ch # -> Front Pos, Rear Pos | rear pos |
| Ch # -> F/R Pos | f/r pos |
| Ch # -> Height | height |
Nuendo instructions:
-
Set Space Controller plugin as the surround panner of the track.
-
In plugin window, click in the Write Automation button to activate it.
-
Start playback and perform the desired movements with Space Controller app.
-
Show the automation tracks to be copied by right clicking the track with space controller and select Show Used Automation (selected track).
-
Select the automation tracks that corresponds to the same parameters of the panner being used on the object track – don't forget to have automation tracks with the same order on both tracks
-
Copy the automation from the track with the Space Controller. Paste the previously copied automation into the object track as shown in the table below.
If you are using a Dolby Atmos Music Panner, use these parameters:
| Space Controller(Copy) | Dolby Atmos Music Panner(Paste) |
| Ch # -> Pan X | Pan X |
| Ch # -> Pan Y | Pan Y |
| Ch # -> Pan Z | Pan Z |
If you are using Nuendo VST MultiPanner, use these parameters:
| Space Controller(Copy) | Nuendo VST MultiPanner(Paste) |
| Ch # -> Left-Right Pan (X) | Left-Right Pan (X) |
| Ch # -> Front-Rear Pan (Y) | Front-Rear Pan (Y) |
| Ch # -> Bottom-Top Pan (Z) | Bottom-Top Pan (Z) |
Logic Pro X instructions:
-
Create a track and insert Space Controller plugin as an Audio FX
-
Activate the "Show Automation" button and set the automation mode to create new automation
-
Click on show automation subtracks arrow to show plugin used parameters
-
Choose the automation parameters that need to be copied to the track with 3D Object Panner
-
With Marquee Tool select the automated region and copy it. Select the track with the with 3D Object Panner or Dolby Atmos Music Panner and paste the automation from Space Controller as shown in the table below.
If you are using a Dolby Atmos Music Panner, use these parameters:
| Space Controller(Copy) | Dolby Atmos Music Panner(Paste) |
| Ch # -> Pan X | Pan X |
| Ch # -> Pan Y | Pan Y |
| Ch # -> Pan Z | Pan Z |
If you are using Logic Pro 3D Object Panner, use these parameters:
| Space Controller(Copy) | Logic Pro 3D Object Panner(Paste) |
| Ch # -> Left/Right | Left/Right |
| Ch # -> Back/Front | Back/Front |
| Ch # -> Elevation | Elevation |
- On the "Orphaned Automation!" alert that appears click in the "Keep Data" button
- New unused Automation Parameters were added to the object track
- Select one of the unused Automation Parameter from the Automation parameter pop-up menu
- With Command key pressed, open Automation parameter pop-up menu and select to the correspondent Object parameter of the 3D Object Panner/Dolby Atmos Music Panner
- On the alert that appears click in the "Convert" button
- Repeat the steps from 5 to 10 for the remaining unused parameters.
Tips
Knobs:
• Double click or Alt-click resets to the default value;
• Command, Ctrl or Shift while dragging enables fine-tune.
VU meter:
- Click on one channel clears its clipping led;
• Double click and press reset clears all clipping LEDs; - In multichannel scenarios it is possible to choose the VU's channel order (SMPTE/Film) with a mouse right-click inside the VU's area.
Dome:
- Shift while dragging a handle to apply negative elevations.
- Use Ctrl or Command while dragging a handle to give it rounded values (snaps to a 5° grid).
Tooltip's bar:
- This version of Space Controller has a bar at the bottom of the interface that shows short definitions of each element of the plugin.
Additional Notes
Avid S6 Support
Space Controller (AAX) can have its parameters controlled through various control surfaces, including AVID S6.
Check for updates
If the plugin is running on a computer with internet access, it can detect if a newer update is available, informing the user of the existence of a new update, by showing a blinking phrase on the top of the display.
To achieve that, Sound Particles Space Controller plugin tries to access a simple XML file located at https://www.soundparticles.com.
SOUND PARTICLES SPACE CONTROLLER DOES NOT SEND ANY INFORMATION FROM THE USER OVER THE INTERNET.
Support
If you detect a bug, if you got a crash, if you believe something is not perfect, or even if you have ideas for future versions, don't hesitate, and email us at support@soundparticles.com. We REALLY want to hear from you. Sometimes a bug lives on for too much time, simply because we haven't detected ourselves and we didn't receive any feedback from the affected users. Besides that, your feedback is very important for us.
"Help us help you"
EULA
END USER LICENSE AGREEMENT OF SOUND PARTICLES – JANUARY 2020
I. GENERAL
The following End User License Agreement ("EULA") represents an agreement between you ("Licensee") and "Sound Particles, S.A.", with head office at IDD, Rua da Carvalha, 570, 2400-441 Leiria, Portugal (hereinafter "Sound Particles") for the use of software including related media documentation (for example, program descriptions and manuals) and other documents and materials manufactured by Sound Particles (the "Product(s)").
By installing the software on your computer, you declare yourself in agreement with these conditions. If you do not agree with these conditions, you must not install the software or use it.
II. SCOPE OF USE
The Products are intellectual property of Sound Particles and are protected by law. Licensee, as purchaser of the Products, acquires only a limited, non-exclusive and non-transferable license to use, personally or professionally, the Products. Any other use or exploitation not explicitly granted to Licensee in this EULA shall not be allowed without prior written consent from Sound Particles. Specifically, Licensee is not entitled to copy, decompile, reverse engineer the Product or parts thereof, create derivative works from the Products or sublicense or provide the Products as “software as a service”.
Licensee must ensure by appropriate and reasonable steps that third parties, including its own employees, cannot make unauthorized use of the Product. Licensee shall be liable to Sound Particles for any loss or damage in this context.
The Software is being licensed to you and you hereby acknowledge that no title or ownership in the Software is being transferred or assigned and this EULA is not to be construed as a sale of any rights in the Software. Sound Particles retains all right, title and interest in the Products, including, but not limited to, all copyrights, trademarks, trade secrets, trade names, proprietary rights, patents, titles, computer codes, audiovisual effects, themes, settings, artwork, sound effects, musical works, and moral rights whether registered or not and all applications thereof.
-
Sound Particles grants Licensee the non-exclusive right without restrictions in time or place to use the Products. Sound Particles is not obliged to disclose the Products' software underlying source code, including the associated development documentation.
-
Licensee may either:
a) Install and use the licensed Products' software on several devices (e.g. one laptop, one desktop), provided that the said software is used only by the same single person - Per user licensing. Simultaneous use on more than one hardware device is not permitted.
b) Install the licensed Products' software on a single device, allowing its use by several users on the device (e.g. studio computer) - Per seat licensing.
-
Licensee may copy the licensed Products' software, only if such reproduction is necessary for the contractually agreed use. Licensee is authorized to create a backup, only if this is necessary to secure the future use.
-
Licensee is not authorized to modify the Products' software.
-
Licensee shall not attempt to develop any software that contains the "look and feel" of any of the Products' or is otherwise derivative of its software.
-
Third Parties
a) Renting or lending the licensed Products' software to a third party is expressly forbidden. Apart from that and if not provided otherwise within this EULA, Licensee may leave the software to a third party for a certain amount of time, if the third party agrees to the terms of this EULA and Licensee does not use the software during this period.
b) Except if otherwise stated within this EULA, Licensee may resell the software to a third party or transfer the software permanently free of charge, provided the third party agrees in writing with this EULA and Licensee ceases all use of the software, completely removes all installed copies of the software from its computer and – if the software was not purchased via download – deletes or transfers the original data storage to the third party (if Licensee is not obliged to a longer storage by law). In addition, Licensee is required to de-register the purchased software with Sound Particles. Following respective request from Licensee via its email address registered with Sound Particles, the serial number of the Product will be transferred by Sound Particles to the third party, and at the same time the registration of Licensee for the Product purchased will be deleted.
c) Licensee may not (i) distribute, lease, license, sell, rent, lend, convey or otherwise transfer or assign the Products or any copies thereof, (ii) make publicly available or available on a network for use or download by multiple users, (iii) remove, obscure or modify any copyright, trademark or other proprietary rights notices, marks or labels contained on or within the Products, falsify or delete any author attributions, legal notices or other labels of the origin or source of the material
- In addition, for certain Products from Sound Particles the following shall apply:
a) Bundles (product bundles consisting of hardware and software or software-only bundles) can only be resold / transferred as a whole. The individual components of a bundle must not be resold / transferred separately.
b) Any Products from Sound Particles labeled or otherwise provided to you as "NFR" (Not For Resale) shall only be used for demonstration, testing and evaluation purposes. NFR Products must not be used for commercial purposes, and must not be resold or transferred. NFR Products are exempt from update, upgrade or crossgrade offers and cannot be purchased with or exchanged for vouchers or coupons.
c) Any Products from Sound Particles labeled or otherwise provided to you as an EDU (Educational) version shall only be used by students or those working in educational institutions. This definition includes students, faculty, staff and administration attending and / or working at an educational institutional facility: private / public schools, training facilities, colleges, universities and similar. EDU Products must not be used for commercial purposes, and must not be resold or transferred. EDU Products are exempt from update, upgrade or crossgrade offers, and cannot be purchased with or exchanged for vouchers or coupons.
d) Any Products from Sound Particles labeled or otherwise provided to you as "Demo Versions" or similar, shall only be used for demonstration, testing and evaluation purposes. Demo Versions must not be used for commercial or public purposes, and must not be resold or transferred.
If you are not sure which license type you own – (FULL / NFR / EDU) – please contact our Support Team.
III. THIRD PARTY RIGHTS
Some content included in Space Controller software, as well as any associated intellectual property rights and titles, belongs to third parties. This content may be protected by copyright or other intellectual property laws and treaties and may be subject to terms and conditions from the third party providing the content.
QR-Code-generator library
Copyright © 2021 Project Nayuki. (MIT License) https://www.nayuki.io/page/qr-code-generator-library
Permission is hereby granted, free of charge, to any person obtaining a copy of this software and associated documentation files (the "Software"), to deal in the Software without restriction, including without limitation the rights to use, copy, modify, merge, publish, distribute, sublicense, and/or sell copies of the Software, and to permit persons to whom the Software is furnished to do so, subject to the following conditions:
The above copyright notice and this permission notice shall be included in all copies or substantial portions of the Software.
The Software is provided "as is", without warranty of any kind, express or implied, including but not limited to the warranties of merchantability, fitness for a particular purpose and noninfringement. In no event shall the authors or copyright holders be liable for any claim, damages or other liability, whether in an action of contract, tort or otherwise, arising from, out of or in connection with the Software or the use or other dealings in the Software.
IV. DUTIES TO PROTECT
Copyright notices, serial numbers and other identification features of the program may not be removed from the software or altered in any way.
V. WARRANTY, LEGAL LIABILITY, DAMAGES
DISCLAIMER OF WARRANTIES: YOU EXPRESSLY ACKNOWLEDGE AND AGREE THAT USE OF THE SOFTWARE IS AT YOUR SOLE RISK AND THAT THE ENTIRE RISK AS TO SATISFACTORY QUALITY, PERFORMANCE, AND ACCURACY IS WITH YOU. TO THE MAXIMUM EXTENT PERMITTED BY APPLICABLE LAW, THE SOFTWARE IS PROVIDED "AS IS," WITH ALL FAULTS AND WITHOUT WARRANTY OF ANY KIND, AND SOUND PARTICLES HEREBY DISCLAIMS ALL WARRANTIES AND CONDITIONS WITH RESPECT TO THE SOFTWARE PRODUCT,
EITHER EXPRESS, IMPLIED OR STATUTORY, INCLUDING, BUT NOT LIMITED TO, THE IMPLIED WARRANTIES AND/OR CONDITIONS OF MERCHANTABILITY, OF SATISFACTORY QUALITY, OF FITNESS FOR A PARTICULAR PURPOSE, OF ACCURACY, OF QUIET ENJOYMENT, AND NON-INFRINGEMENT OF THIRD PARTY RIGHTS. SOUND PARTICLES DOES NOT WARRANT AGAINST INTERFERENCE WITH YOUR ENJOYMENT OF THE SOFTWARE, THAT THE FUNCTIONS CONTAINED IN THE SOFTWARE WILL MEET YOUR REQUIREMENTS, THAT THE OPERATION OF THE SOFTWARE WILL BE UNINTERRUPTED OR ERROR-FREE, OR THAT DEFECTS IN THE SOFTWARE WILL BE CORRECTED. NO ORAL OR WRITTEN INFORMATION OR ADVICE GIVEN BY SOUND PARTICLES OR A SOUND PARTICLES AUTHORIZED REPRESENTATIVE SHALL CREATE A WARRANTY. SHOULD THE SOFTWARE PROVE DEFECTIVE, SOUND PARTICLES MAY CHOOSE TO REPLACE THE LICENSEE'S COPY OF THE SOFTWARE. SOME JURISDICTIONS DO NOT ALLOW THE EXCLUSION OF IMPLIED WARRANTIES OR LIMITATION ON APPLICABLE STATUTORY RIGHTS OF A CONSUMER, SO THE ABOVE EXCLUSION AND LIMITATIONS MAY NOT APPLY TO YOU. THIS LIMITATION OF WARRANTY SHALL NOT BE APPLICABLE SOLELY TO THE EXTENT THAT ANY SPECIFIC PROVISION OF THIS LIMITATION OF LIABILITY IS PROHIBITED BY ANY LAW, WHICH CANNOT BE PRE-EMPTED.
LIMITATION OF LIABILITY: TO THE MAXIMUM EXTENT PERMITTED BY APPLICABLE LAW, IN NO EVENT SHALL SOUND PARTICLES OR ITS AFFILIATES BE LIABLE FOR ANY SPECIAL, INCIDENTAL, INDIRECT OR CONSEQUENTIAL DAMAGES WHATSOEVER (INCLUDING, WITHOUT LIMITATION, DAMAGES FOR LOSS OF BUSINESS PROFITS, BUSINESS INTERRUPTION, LOSS OF BUSINESS INFORMATION, OR ANY OTHER PECUNIARY LOSS) ARISING OUT OF THE USE OF OR INABILITY TO USE THE SOFTWARE OR DEFECT IN OR CAUSED BY THE SOFTWARE, INCLUDING BUT NOT LIMITED TO COMPROMISING THE SECURITY OF YOUR COMPUTER, OPERATING SYSTEM OR FILES, OR THE PROVISION OF OR FAILURE TO PROVIDE SUPPORT SERVICES, EVEN IF SOUND PARTICLES HAS BEEN ADVISED OF THE POSSIBILITY OF SUCH DAMAGES. IN ANY CASE, SOUND PARTICLES ENTIRE LIABILITY UNDER ANY PROVISION OF THIS EULA SHALL BE LIMITED TO THE AMOUNT ACTUALLY PAID BY YOU FOR THE SOFTWARE OR REPLACEMENT OF THE SOFTWARE WITH PRODUCT OF COMPARABLE RETAIL VALUE, AS SOUND PARTICLES MAY ELECT IN ITS SOLE DISCRETION. IF SOME JURISDICTIONS DO NOT ALLOW THE EXCLUSION OR LIMITATION OF LIABILITY, THE ABOVE LIMITATION MAY NOT APPLY TO YOU IN PART OR WHOLE. THIS LIMITATION OF LIABILITY SHALL NOT BE APPLICABLE SOLELY TO THE EXTENT THAT ANY SPECIFIC PROVISION OF THIS LIMITATION OF LIABILITY IS PROHIBITED BY ANY LAW, WHICH CANNOT BE PRE-EMPTED.
Licensee agrees to indemnify, defend and hold harmless Sound Particles and its affiliates and their respective officers, employees, directors, agents, licensees (excluding you), sublicensees (excluding you), successors and assigns from and against any and all liability, costs, losses, damages, and expenses (including reasonable attorneys' fees and expenses) arising out of any
claim, suit, or cause of action relating to and/or arising from (a) your breach of any term of this EULA; (b) your violation of any rights of any third party; or (c) your use or misuse of the Software. Your indemnification obligations set forth in the immediately preceding sentence shall survive the termination of this EULA.
VI. CLOSING PROVISIONS
- If any stipulation of this EULA should be or become invalid, either completely or in part, this shall not affect the validity of the remaining stipulations. The parties undertake instead to replace the invalid stipulation with a valid regulation which comes as close as possible to the purpose originally intended.
- TERMINATION: This EULA will terminate automatically if you fail to comply with its terms and conditions. In such event, you must destroy all copies of the Product and all of its component parts (including the software) and cease and desist from accessing any Products.
- This Agreement shall be governed and construed by the laws of Portugal. The United Nations Convention for the International Sale of Goods shall not apply.
The exclusive place of jurisdiction with respect to all disputes based on or in connection with this Agreement shall be Leiria, Portugal. However, Sound Particles reserves the right to sue Licensee at Licensee's place of residence or place of business.
Should you have any queries concerning this EULA, please write to this address:
Sound Particles S.A.

SOUND
PARTICLES
- Welcome Note
- Table of Contents
- Space Controller 1
- Additional Notes 32
- Space Controller
- Space Controller overview
- Quick start and connection setup
- Mobile setup — iOS and Android
- SpaceController App installation
- Bluetooth
- Wi-Fi (only available for Space Controller Studio version)
- App controls
- Main window
- Settings window
- Preferences and Wi-Fi sections
- Support section
- Plugin main controls
- Connection section
- Views
- Cube
- Sphere
- View main controls
- Panning modes
- Mono
- Channel
- Rotation
- Symmetric Side
- Left section parameters
- In Cube view:
- In Sphere view:
- Input and Output section
- Input Source and Output Render Formats
- Advanced mode parameters
- Auto-modifiers
- Dome modifiers
- Space Controller Toolbars
- Plugin Installation
- Presets locations
- Copy/Paste automation into Dolby Atmos objects
- Space Controller:
- Parameters for Dolby Atmos Music Panner:
- Parameters for Pro Tools | Ultimate panner:
- Parameters for Nuendo VST MultiPanner enable parameters:
- Parameters for Logic Pro 3D Object Panner:
- Pro Tools instructions:
- Nuendo instructions:
- Logic Pro X instructions:
- Tips
- Knobs:
- VU meter:
- Dome:
- Tooltip's bar:
- Additional Notes
- Avid S6 Support
- Check for updates
- Support
- EULA
- GENERAL
- SCOPE OF USE
- THIRD PARTY RIGHTS
- QR-Code-generator library
- DUTIES TO PROTECT
- WARRANTY, LEGAL LIABILITY, DAMAGES
- CLOSING PROVISIONS
Brand : Sound Particles
Model : Space Controller
Category : Audio software