
AFG915BKP - Cooker Artusi - Free user manual and instructions
Find the device manual for free AFG915BKP Artusi in PDF.


| Product Type | Freestanding Cooker |
| Brand | Artusi |
| Model | AFG915BKP |
| Width | 90 cm |
| Height | 85-90 cm (adjustable feet) |
| Depth | 60 cm |
| Weight | Approximately 65 kg |
| Hob Fuel Type | Gas (Natural or LPG convertible) |
| Number of Gas Burners | 5 |
| Oven Fuel Type | Electric |
| Oven Capacity | 120 liters |
| Oven Functions | Fan forced, grill, conventional bake |
| Power Supply | 230 V / 50 Hz / 16 A (oven), gas hob 220-240 V |
| Energy Rating | Gas hob: A, Electric oven: A |
| Safety Features | Flame failure device on gas burners, automatic oven thermostat |
| Cleaning | Easy-clean enamel oven, removable oven door, removable hob trivets |
| Spare Parts Availability | Available through Artusi distributors and online |
| Warranty | 2 years parts and labor |
| User Manual | Free download from notice-facile.com |
Frequently Asked Questions - AFG915BKP Artusi
User questions about AFG915BKP Artusi
0 question about this device. Answer the ones you know or ask your own.
Ask a new question about this device
Download the instructions for your Cooker in PDF format for free! Find your manual AFG915BKP - Artusi and take your electronic device back in hand. On this page are published all the documents necessary for the use of your device. AFG915BKP by Artusi.
USER MANUAL AFG915BKP Artusi
Installation & Servicing
natural_image
Close-up of a kitchen appliance with green and white panels, no visible text or symbolsNOTE TO INSTALLER: LEAVE THE OWNER'S GUIDE MANUAL WITH THE APPLIANCE. (Keep For Future Reference)
RECORD HERE FOR EASY REFERENCE
Model Colour
Serial Number Installation Date
Dealer's Name and Address.
GENERAL INFORMATION
ENVIRONMENTAL WARNING
Waste packaging

Do not throw the packaging of your appliance into the dustbin, but pick out the different materials (for instance foil, paperboard, polystyrene) according to the local rules for rubbish elimination.
This appliance must only be used for the purpose of domestic cooking.
Getting to know your new cooker
Thank you for choosing one of our products.
Our cookers are of simple, rational design. They are constructed to the best standards to ensure good service and outstanding safety.
Please read this manual carefully; it will provide all the advice needed to allow you to obtain the best results from the very first day.
ATTENTION:
- Before using the appliance, do not forget to remove the protecting parts of the appliance.
- WARNING -Accessible parts will become hot when in use. To avoid burns and scalds children should be kept away.
- WARNING -
In order to prevent accidental tipping of the appliance, for example by a child climbing onto the open oven door, the stabilizing means must be installed.
- WARNING
This appliance is not intended for use by persons (including children) with reduced physical, sensory or mental capabilities, or lack of experience and knowledge, unless they have been given supervision or instruction concerning use of the appliance by a person responsible for their safety.
Children should be supervised to ensure that they do not play with the appliance.
Young children and infirm persons should not be left unsupervised in the vicinity.
- WARNING
Before you use the appliance for the first time, check that the plastic films protecting some parts (fascia panel, parts in stainless steel, etc.) have been removed.
- WARNING:
A steam cleaner is not to be used cleaning this appliances.
- WARMING
DO NOT place inflammable materials or plastic utensils in the warming drawer.
DO NOT SPRAY AEROSOLS IN THE VICINITY OF THIS APPLIANCE WHILE IT IS IN OPERATION.
Not for use in marine craft, caravans or mobile homes unless each burner is fitted with a flame safeguard.
WHERE THIS APPLIANCE IS INSTALLED IN MARINE CRAFT OR IN CARAVANS, IT SHALL NOT BE USED AS A SPACE HEATER
DO NOT MODIFY THIS APPLIANCE.
WHEN YOU CALL FOR SERVICE
When you call for service or order parts for your unit, be sure to give:
- MODEL
- SERIAL NUMBER
- COLOUR
- PART NAME and/or description of problem
- YOUR FULL NAME, ADDRESS, and HOME TELEPHONE NUMBER and BUSINESS TELEPHONE NUMBER IF APPROPRIATE.
Servicing shall be carried out only by authorised personnel. SECTION FOR THE QUALIFIED TECHNICIAN
OVERALL DIMENSIONS
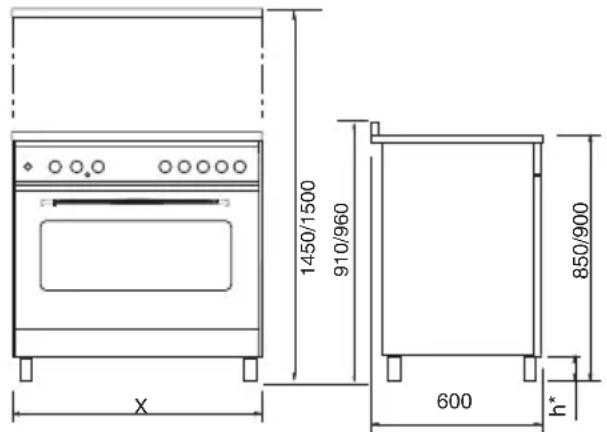
h^*= Adjustment 110 / 160
X mod. 296 = 895 mm
x mod. 290 = 895 mm
X mod. 206 = 1000 mm
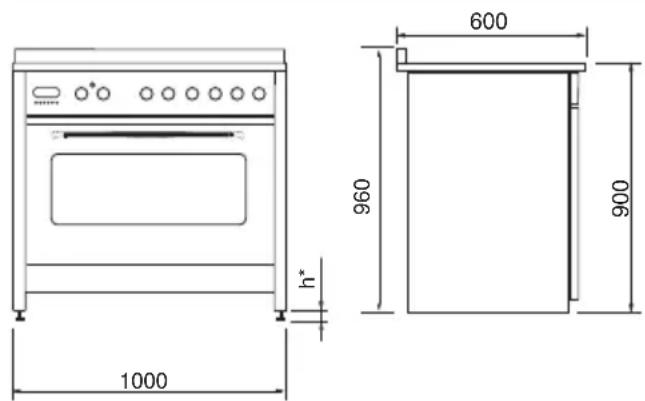
h^* = Adjustmentmax 15 mm
INSTALLATION
PROVISION FOR VENTILATION
The room where the Cooker is installed should have permanent ventilation as follows:
"Ventilation must be in accordance with AS/NZS 5601 - Gas Installations. In general, the appliance should have adequate ventilation for complete combustion of gas, proper flueing and to maintain temperature of immediate surroundings within safe limits."
Do not install in a bed-sitting room, a bathroom or shower room. If there is another fuel burning appliance in the same room, a higher level of ventilation will be required, you should consults "the safety requirements".
In addition to the above, during prolonged use, opening a window in the same room is recommended. This will avoid the build up of excessive moisture and condensation.
POSITIONING
Important: Fix the chain located next to the gas connection on both sides of the cooker to the wall to prevent the cooker from tilting. Both chains must be securely fixed.
Make sure that the wall surface behind the Cooker is non-combustable (will not catch fire).
Where a painted surface is adjacent, a fire retardant paint surface is recommended. Wallpaper, wood, or fabric should not be used behind or next to the cooker.
Clearances to combustible materials
"Any adjoining wall surface (side or rear) situated within 200mm of any hob burner must be a suitable non-combustible material from the edge for a height of 150mm for the entire length of the cooker.
Any combustible construction above the cooker must be at least 650mm above the maintop." Ensure that a power and gas supply are nearby. The Cooker should be located carefully so that the heat produced by it has plenty of space to escape. The diagram below shows an ideal configuration.
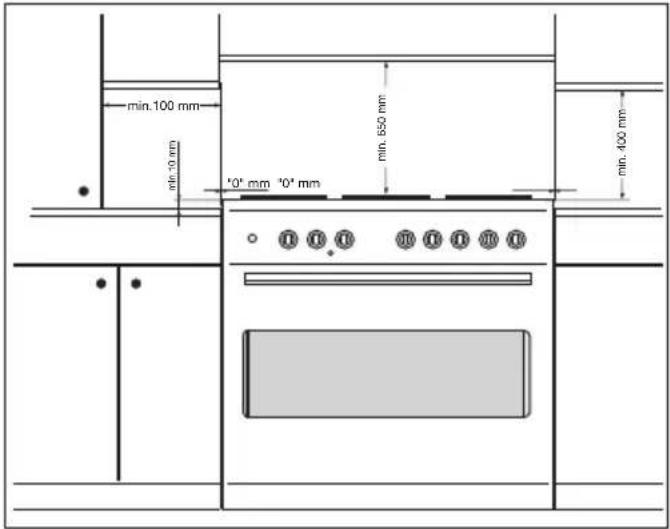
No part of any adjoining wall surface can be made of combustible materials. The protection of combustible materials required by Clause 5.12.1.1 of AS/NZS 5601 is the fixing of 5 mm thick ceramic tiles to the surface or attaching fire resistant material to the surface and covering with sheet metal with a minimum thickness of 0.4 mm.
Clearances to non- combustible materials
"If the cooker is being fitted next to cupboards or adjoining wall surfaces, which are within 200mm from the edge of the hob burner and of a suitable non-combustible material as specified in AS/NZS 5601, then ensure that a distance of at least 6cm is left between the edge of the cooker and the non-combustible material. This gap is to allow plenty of space for the heat produced by the cooker to escape on each side of the cooker.
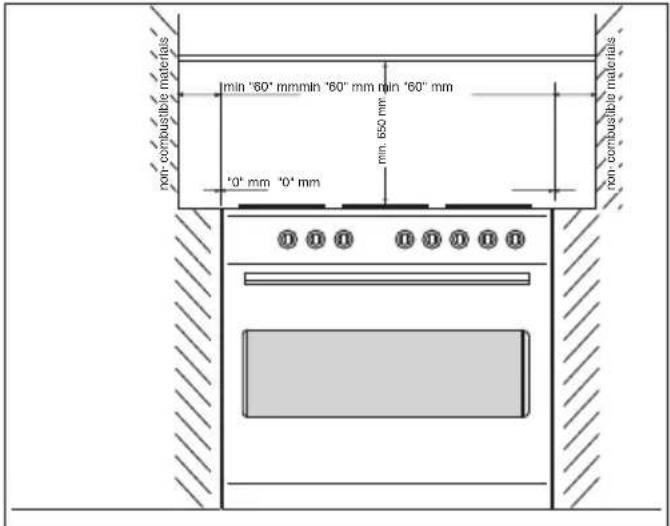
Note:
The cooker is fitted with 4 legs for an eventual alignment in height with the furniture (fig. 1 A or 1 B according to the models).
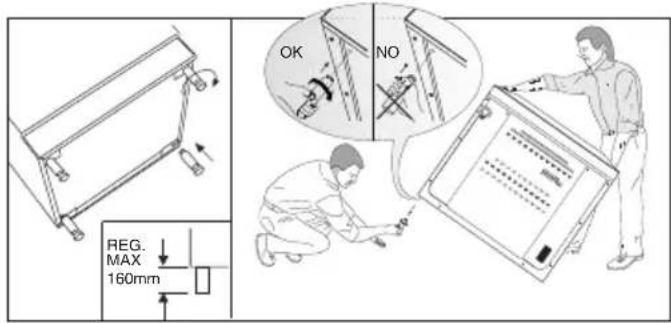
Fig. 1 A
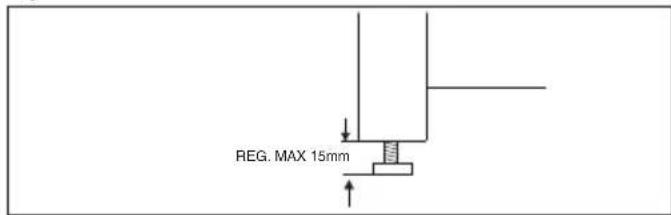
Fig. 1 B
If the cooker is placed on a base, measures have to be taken to prevent it from slipping off the base.
TO FIX THE COOKER TO THE REAR WALL
WARNING - For safety reasons and to prevent tipping of the appliance, these stabilizing means must be installed.
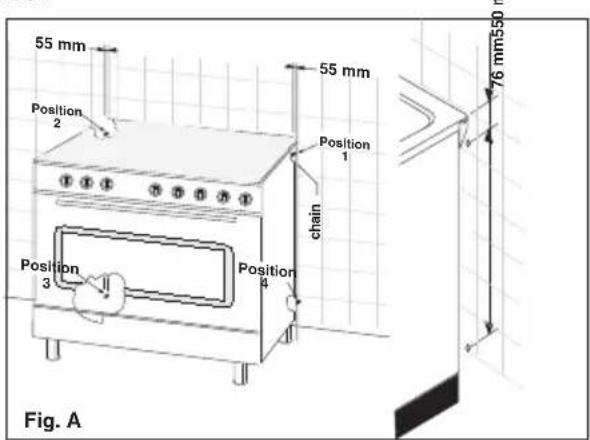
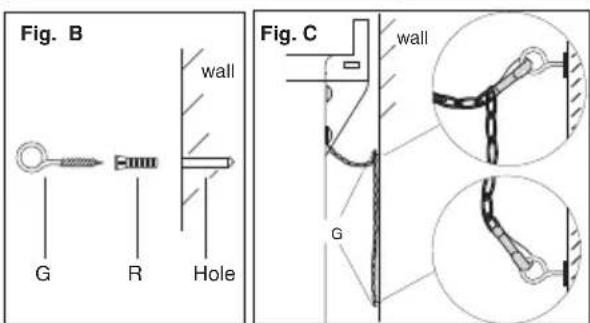
The cooker is equipped with 2 chains fixed on each side at the rear of the cooker near the top (see Fig. A). The chains are fitted with "spring clips" which must be clipped to the "screw eyes" provided with the cooker. Install the "screw eyes" as follows:
- Drill four 6mm holes (position 1 - 2 - 3 - 4) in the wall as in Fig. A.
- Insert part "R" into the holes then screw in the "screw eyes" part "G" see Fig. B.
Note: If the part provided is not suitable for the wall material please use an appropriate device to ensure secure holding of the "screw eyes" to the wall.
- Bring the cooker near the wall and clip the chains on the "screw eyes" as in Fig. C.
IMPORTANT: If the cooker is moved for any reason (e.g. maintenance) resulting in the cooker being unclipped from the wall, the cooker must be re-clipped to the wall at the completion of the task.
GAS CONNECTION
Should conform to gas utility regulations e.g. AS/NZS 5601 Gas installations; also refer to rangehood manufacturers recommendations.
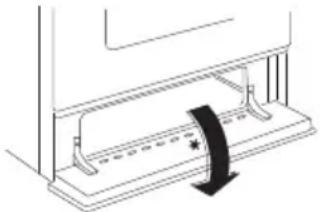
Check gas pressure, note the correct setting from the data plate sealed inside the front appliance drawer *.
This appliance can be connected with rigid pipe as specified in AS/NZS 5601 table 3.1 or with an AGA approved, Class B or D flexible hose with 10mm I.D. and 1.2m max. length in accordance with AS/NZS 5601 for a 'high level connection'. The hose should not be subjected to abrasion, kinking or permanent deformation and should be able to be inspected along its entire length. Unions compatible with the hose fittings must be used and connections tested for gas leaks. The fixed consumer piping outlet should be at approximately the same height as the cooker connection point, pointing downwards and approximately 150mm to the side of the cooker.
The hose should be clear of the floor when the cooker is in the installed position.
Ensure that the chain prevents stress on the hose assembly when the cooker is moved out of its normal operating position.
natural_image
Pure mechanical diagram showing a sliding mechanism with a curved arrow indicating motion (no text or symbols)This appliance from the factory suitable for NATURAL gas but, if necessary, can be adjusted for U-LPG by authorised person.
For the adjustments to U-LPG please operate as specified in the paragraph GAS CONVERSION AND ADJUSTMENT (pag 4).
The Gas Connection is male 1/2" BSP and is situated at the right hand rear of the appliance, approximately 40mm from the side and 695mm from the floor (depends on adjustment of feet).
The appliance shall be installed by an authorized person in accordance with the manufacturer's installation instructions, relevant local fitting regulations, municipal building regulations, the AS/NZS 5601 code for gas burning appliances and equipment and other relevant statutory code band regulations. If you have some doubts, please contact the authorities for confirmation concerning the characteristics of the gas and electricity output.
The appliance is generally preset for natural gas (so no other adjustment is necessary) ensure regulator is fitted for N.G.
Ensure that all foreign matter has been cleared from the gas supply line and also purge all air from the gas system. Connect to regulator, tighten and check the installation to ensure no gas leaks occur.
IT IS RECOMMENDED THAT A SERVICETAP AND UNION BE FITTED ADJACENTTOTHE APPLIANCE INLET TO FACILITATE FUTURE SERVICING.
5 burner models: set the burner pressure to 1kPa for Natural Gas and 2.75kPa for U-LPG with the wok burner operating a full rate'. For commissioning of the appliance with the Oara 97 regulator for Natural Gas, the test point pressure should be 1.00kPa with all burners operating on HIGH.
Apply a manometer to the test nipple and reset the regulator if necessary. Do not forget to replace the test nipple screw and to leave the instructions book with the user.
VERY IMPORTANT FOR THE INSTALLER
Do not attempt to turn or stress threaded elbow of the manifold: you risk damage to this part of the gas appliance which may void the manufacturers warranty.
Before Leaving - Check all connections for gas leaks with soap and water. DO NOT use a naked flame for detecting leaks. Ignite all burners to ensure correct operation of gas valves, burners and ignition. Turn gas taps to low flame position and observe stability of the flame.
When satisfied with the cooker, please instruct the user on the correct method of operation.
In case the appliance fails to operate correctly after all checks have been carried out, refer to the authorised service provider in your area. ^1
GAS CONVERSION AND ADJUSTMENT
When used with natural gas all burners have been preset at our factory and further adjustment should not be necessary. Conversion kits to other gases are available from the place of purchase. Do not attempt to fit the conversion kit yourself. Conversion to U-LPG gas should only be carried out by an authorized technician.
GAS ADJUSTEMENTS
- change the injectors
- adjust the minimum flow
When converting from Natural Gas to U-LPG ensure that the NG regulator is removed and replaced with the Test Point Assembly. A gas regulator suitable for a supply pressure of 2.75kPa should be part of the gas tank supply and should be adjusted with the wok burner operating at maximum.
REPLACEMENT OF THE INJECTORS
When required to operate on other gas replace the injectors in accordance with information referred to in chart below.
TAB.1
| Natural Gas 1.00 kPa | Jet mm ∅ | Burners | Power MJ/h |
| with GC & GE & GP & GL & YP & GU pan supports | 0.90 Auxiliary 4.0 | ||
| 1.20 | Semi-rapid | 7.1 | |
| with GC & GE & GP & GL & GU pan supports | 1.50 | Rapid | 11.0 |
| with YP pan supports | 1.35 | Rapid | 9.1 |
| - | |||
| - | |||
| with GC & GE & GP & GL & YP & GU pan supports | 1.63 | TC1 | 12.7 |
| U - LPG 2.75 kPa | Jet mm ∅ | Burners | Power MJ/h |
| with GC & GE & GP & GL & YP & GU pan supports | 0.53 | Auxiliary | 3.7 |
| 0.73 | Semi-rapid | 7.0 | |
| with GC & GE & GP & GL & GU pan supports | 0.95 | Rapid | 11.7 |
| with YP pan supports | 0.87 | Rapid | 10.2 |
| - | |||
| - | |||
| - | |||
| - | |||
| with GC & GE & GP & GL & YP & GU pan supports | 1.00 | TC 1 | 12.7 |
| Regulator | NG Regulator | LP Test point adaptor | |
NOTE: GE = Enameled Steel pan supports
GL = Light Cast Iron pan supports
YP = Light Cast Iron pan supports (evolution)
GP = Heavy Cast Iron pan supports
GC = Flat heavy cast iron pan supports
GU = Flat heavy cast iron pan supports
SPECIAL NOTE
After installation or any servicing operation, always ensure that the appliance is gas sound and that the components are now operating correctly. Items removed during servicing should be replaced in the reverse order to their removal.
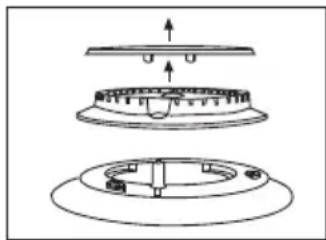
In order to change the work-top injectors, it is necessary to act as follows:
- remove the grids
- remove burners
and flame-spreaders.
natural_image
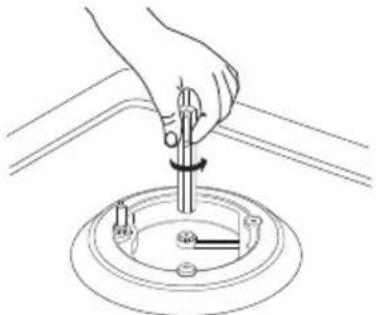
Technical diagram showing three views of a mechanical component with no visible text or symbols- change the injector (see Fig. C) and replace it with another one suitable for the new type of gas (see tab. 1)
natural_image
Line drawing of a hand using a tool to press or install a mechanical component on a circular base (no text or symbols)Fig. C
MINIMUM FLOW ADJUSTMENT FOR HOB-TOP TAPS
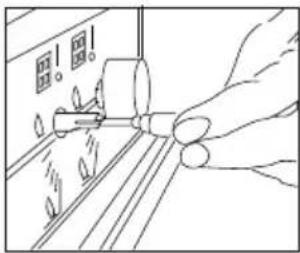
In order to adjust the minimum flame setting proceed as follows: switch the burner on, and set the knob at the minimum position ▲. Remove the knob from the tap, place a small bladed screwdriver down the centre of the tap shaft (fig. 2A).
Attention: on taps with a security valve, the minimum adjusting screw «Z» is on the body of the gas tap (fig. 2B).
natural_image
Line drawing of a hand using a tool to press down a surface, with no visible text or symbols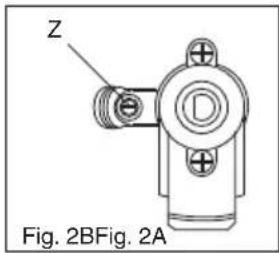
Unscrew the adjusting screw in order to increase the flow or screw it to decrease the flow.
The correct adjustment is obtained when the flame has a length of about 3 or 4 mm.
For butane/propane gas, the adjusting screw must be screwed in thigt.
Make sure that the flame does not go out turning quickly from the max. flow to the minimum flow .
Refit the knob again.
ELECTRICAL CONNECTION
The appliance must be installed by a suitably qualified person in accordance with these instructions and with the requirements of the Australian Wiring Rules AS/NZS 3000.
Fixed wired installations are to be provided with suitable isolation means in accordance with the said rules.
Any plug socket installed for the purpose of connecting the appliance to supply must be readily accessible when the appliance is installed. Before making the connection, make sure that:
1) the safety circuit-breaker and the electrical system are able to withstand the load of the appliance (see nameplate).
2) the power supply system has an earth connection in good working order in accordance with the regulations in force;
IMPORTANT
The wires in the mains lead are coloured in accordance with the following code:
Electric power...1,5 mm ^2 3 core cable (15 amp. Fuse required). Should conform to local authority requirements.
Also refer to rangehood manufacturers recommendations.
This appliance is supplied with a plug & cord, simply plug into a 3 pin household socket outlet witch is properly earthed.
WARNING: THIS APPLIANCE MUST BE EARTHED.
The flexible mains lead and plug must not be in contact with hot surfaces.
2nd SECTION FOR THE USER
WARNING:
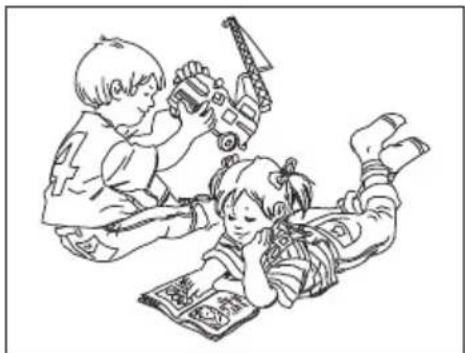
Children should be kept away while the oven or grill is in use since accessible parts become hot.
natural_image
Illustration of two children playing with toys, one holding a hammer and the other lying on the floor (no text or symbols)- Do not use oven base panel as a shelf, make use of the oven shelves.
- To avoid splattering and smoke, position collecting tray under the grill with some water in it.
- Always turn pan handles to the side or to the back of the hob. If they are left out into the room they can easily be hit or reached by children, this knocking the pan off the hob.
- Don't let children sit down or play with the oven door. Do not use the drop down door as a stool to reach above cabinets.
- Once your cooking is over make sure to close the main gas supply.
WARNING
* This appliance is not intended for use by young children or infirm persons without supervision.
* Young children should be supervised to ensure that they do not play with the appliance.
* If the supply cord is damaged, it must be replaced by the manufacturer, its service agent or similarly qualified persons in order to avoid a hazard.
- WARNING -
In order to prevent accidental tipping of the appliance, for example by a child climbing onto the open oven door, the stabilizing means must be installed.
- 1 Minute Tour -
Be safe
Please read the rest of the instruction book which contains important information to help you use the appliance safely and efficiently.
Gas and Electricity on
Make sure that the gas supply is turned on and that the appliance is plugged in and switched on. The ignitor needs electricity. In case there is no electric current, the burner can also be lighted using a match.
It is recommended that pans suitable to the size of the burner should be used as follows:
| SNAPSRENRUB | ||
| fl min. fl max | ||
| AUXILIARY 80 mm 160 mmSEMI-RAPID 120 mmRAPIDETRIPLE CROWN | 200 mm200 mm230 mm | 230 mm260 mm |
Always use pans with a flat base diameter, which are well balanced and stable in use, a pan which overhangs the hotplate should not be used. Avoid using old, misshapen pans, or pans which are unstable when placed on a flat surface. Do not use "split pans" as they are inherently unstable.
To save gas, always position pans centrally over the burners and adjust the flames so that they do not lick up the sides of the pan and only the base is heated. Always put lids on saucepans and boil only the amount of liquid you use. When the liquid has boiled adjust the setting to maintain a simmer. Do not light the burner until the pan is in position and turn off the burner before removing the pan. In hard water areas, descale kettles regularly. For safety keep saucepan handles turned to a safe position so they are out of reach of small children and cannot be accidentally knocked.
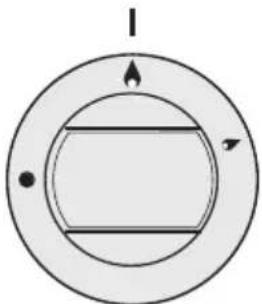
To tunr the burner OFF, turn the control knob clockwise to the OFF setting (marked with a dot ●)
Automatic electric ignition
1 The drawing above each knob indicates which burner that knob controls. Push in and turn a knob anticlockwise to the large flame symbol.
natural_image
Simple diagram of concentric circles with arrows and a central rectangular shape, no text or symbols present.2 At the same time press the IGNITION (spark) button.
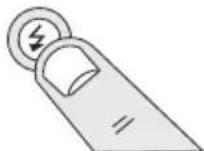
Automatic electric ignition
To turn on a burner, press the knob corresponding to the selected burner and turn it anticlockwise to the maximum position. Keeping the knob pressed, the electric automatic ignition of the burner will be started up. In case there is not electric current, the burner can also be lighted using a match.
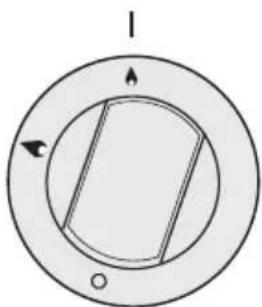
natural_image
Simple circular diagram with a rectangular slot and directional arrows, no text or symbols present.The small flame indicates the 'low position'.
Turn the knob to it after the contents of a pan have boiled.
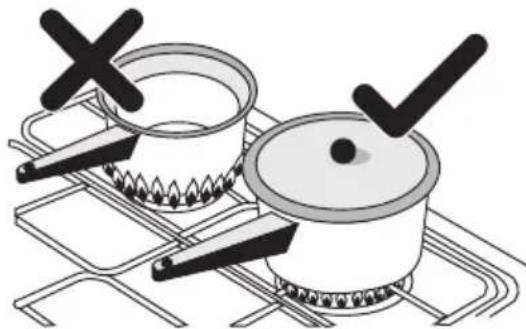
natural_image
Illustration of a cooking setup with a pot and stove on a grater, no text or symbols presentThe smaller burners are for smaller pans and simmering. Make sure flames are under the pans. Using a lid will help the contents boil more quickly.
WARNING
It is not recommended to press push button for ignition if all the burners are not located in the proper positions. The burner heads, burner skirts and pan supports are removable for better cleaning: Always ensure that the burner skirts and heads are replaced correctly so that the burners function safely and correctly. During the use of the appliance pay attention that water or any liquid does not enter into the appliance through the holes of the burners or around the rods of the valves or the push button electronic lighter.
Water or juice will produce dangerous short-circuits and can seriously damage the working of the Hotplate.
HOW TO USE YOUR ELECTRIC OVEN
- Before cooking in the first time we recommend that the oven should be operated at 200°C for 30 minutes to remove any manufacturing greases and odours.
- Do not place items or pan directly on to the oven bottom.
- Foil should only be used to cover food and not oven shelves or party of the oven. When used improperly will obstruct the air circulation causing problems in cooking and/or harmful accidents.
MULTIFUNCTIONAL OVEN
The oven is fitted with:
- a lower heating element;
- an upper heating element;
- a circular heating element surrounding the fan.
N.B.: Always set the temperature on the thermostat knob before selecting any of the functions.
Oven thermostat knob
To obtain an oven temperature between 60^ C and MAX ^ C, turn the knob clockwise.
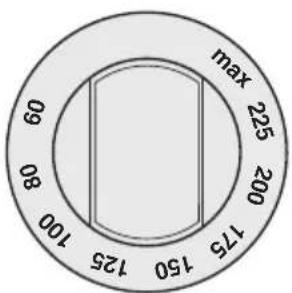
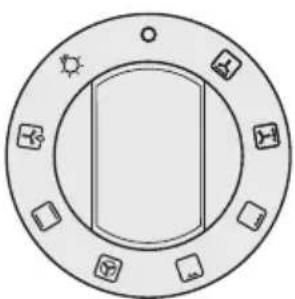
Oven commutator knob
Depending on the type of oven, it is possible to select one of the following functions turning the commutator knob clockwise.
natural_image
Circular diagram with a hexagonal frame and surrounding symbols (no text or labels)Note:
All the functions mentioned above switch the oven internal light on. A warning light on the control panel will stay lit until the temperature is reached; after it will light up intermittently.
Always use the oven with the oven door closed.
Use of the oven
Note: ovens with separate thermostat and commutator. When the functions 📄 are used, place the thermostat knob between 180 ÷ 200°C as maximum temperature.
ATTENTION:
The temperature shown on the control panel corresponds to the temperature in the oven centre only when the functions selected are □ or ☒.

When you turn the control knob to this position, the light will be on for all the following operations.

Defrosting with fan
The air at ambient temperature is distributed inside the oven for defrosting food very quickly and without proteins adulterations.

Natural convection
Both the lower and upper heating elements operate together. This is the traditional cooking, very good for roasting joints, ideal for biscuits, baked apples and crisping food. You obtain very good results when cooking on a shelf adjusting the temperature between 60 and MAX°C.

Fan oven
Both the fan and the circular heating element operate together. The hot air adjustable between 60 and MAX°C is evenly distributed inside the oven. This is ideal for cooking several types of food (meat, fish) at the same time without affecting taste and smell. It is indicated for delicate pastries.

Medium grill
It is indicated for grilling and gratinating small quantities of traditional food. The thermostat knob must be placed on the maximum position.

Total grill
It is indicated for grilling and gratinating traditional food. Turn the thermostat control knob to the 200°C position.

Fan assisted total grill
The air which is heated by the grill heating element is circulated by the fan which distributes the heat on the food. The fan assisted grill replaces perfectly the turnspit. You can obtain very good results also with large quantities of poultry, sausage, red meat. Turn the thermostat control knob to the 200°C position.

Air forced lower heating element
The air which is heated by the lower heating element is circulated by the fan which distributes the heat on the food. This function can be used to sterilize food. This function can be used between 60 and MAX°C
GENERAL INSTRUCTION
Warning: remember ovens get hot; some parts naturally become very hot, notably the glass oven door and the protective strip. Keep children away from oven at all times and warn them about the danger.
GUIDE FOR CONVENTIONAL COOKING

(Outer ring of upper electric element and lower electric element ON) The following Cooking Guides give the recommended shelf positions (counted from the bottom), thermostat settings and approximate cooking times for a range of baked items, using the
conventional oven, using one tray only. Cooking results are a matter of personal preference and may easily be adjusted to suit individual requirements by slight adjustment of the temperature and or cooking time. Preheating of the oven is recommended for 10-15 minutes or until the oven thermostat indicator light switches off to show the selected temperature has been reached.
When using a baking tray it should be placed centrally on the oven shelf with the short sides of the tray parallel to the sides of the oven. Do not use trays, tins or dishes larger than 380 mm (15") long, 356 mm (14") wide, as cooking results may be impaired.
| Food | Thermostat setting °C | Shelf | Position |
| (Counted from Bottom) | |||
| Small cakes (12 on tray) 195 3 20 - 30 mins. | |||
| Victoria sandwich 190 3 25 - 35 mins.(2x7"/180mm) | |||
| Swiss roll or whisked sponge 200 3 20 - 25 mins. | |||
| Fruit cake (8"/205mm) 155 2 2 | 3 hours. | ||
| Scones | 260 3 10 - 20 mins. | ||
| Meringues | 95 | 2 2 - 3 hours | |
| Shortcrust Pastry 210 3 25 - 45 mins. depending | |||
| Puff or Flaky Pastry | 220 2 20 - 35 mins. upon | ||
| Choux Pastry | 220 3 25 - 35 mins. dish | ||
| Biscuits | 200/220 | 3 | 15 - 25 mins. depending upon type |
| Bread | 250 2 30 - 40 mins. | ||
| Milk pudding | 165 2 1 H - 2 hours. | ||
| Pizza | 270 3 25 mins. | ||
| Lasagne | 170 3 75 mins. | ||
| Oven noodles | 160 3 75 mins. | ||
| BEEF on bone & crusty(rare)(medium)(well done) | 270 rare | 3 | 12 mins. per 1/b (500 g) plus 12 mins. |
| 220 °C | 3 | 15 mins. per 1/b (500 g) plus 15 mins. | |
| 220 °C | 3 | 20 mins. per 1/b (500 g) plus 20 mins. | |
| 180 °C | 3 | 25 mins. per 1/b (500 g) plus 15 mins. | |
| LAMB on bone | 220 °C | 3 | 20 mins. per 1/b (500 g) plus 20 mins. |
| 170 °C | 3 | 27 mins. per 1/b (500 g) plus 27 mins. | |
| Boned and rolled | 220 °C | 3 | 25 mins. per 1/b (500 g) plus 25 mins. |
| 170 °C | 3 | 35 mins. per 1/b (500 g) plus 20 mins. | |
| PORK on bone | 220 °C | 3 | 25 mins. per 1/b (500 g) plus 25 mins. |
| Boned and roller | 180 °C | 3 | 30-35 mins. per 1/b (500 g) plus 35 mins. |
| VEAL on bone | 220 °C | 3 | 25 mins. per 1/b (500 g) plus 25 mins. |
| Boned and roller | 220 °C | 3 | 30 mins. per 1/b (500 g) plus 30 mins. |
| CHICKEN | 220 °C | 3 | 20 mins. per 1/b (500 g) plus 20 mins. |
| 170 °C | 3 | 25 mins. per 1/b (500 g) plus 25 mins. | |
| TURKEY | 220 °C | 3 | 20 mins. per 1/b (500 g) |
| 170 °C | 3 | 25 mins. per 1/b (500 g) | |
| DUCK | 220 °C | 3 | 20 mins. per 1/b (500 g) |
| 170 °C | 3 | 25 mins. per 1/b (500 g) | |
| GOOSE | 220 °C | 3 | 20 mins. per 1/b (500 g) plus 20 |
PLATE WARMING
Ovenproof plates and dishes may be warmed in the oven on a low temperature setting. Remember do not place items directly into the oven base.
Warning: do not use foil to cover the oven shelves, or any part of the oven interior including the oven base. Foil should only be used to cover food and cooking dishes. Always place items which may boil over (e.g. fruit pies) on a baking tray to prevent spillage burning onto the oven base. Foil used improperly is frequent cause of oven problems and painful accidents. Avoid letting grease deposit collect around the upper heating element: it will cause smoking and may start a fire.
Remember do not place pan or items directly onto the oven base. Never leave unit unattended at hight heat settings. Boil over causes smoking and greasy spill over that may start a fire. If a grease fire should occur in a pan put out the flame by placing a lid on the pan. Do not throw water on a grease fire.
GUIDE FOR FORCED CONVECTION COOKING

(Back rolled electric element with fan)
The accessories provided with the oven can be slotted in at 5 positions: the following guide concerns cooking times and thermostat settings using N. 2 shelves on the same time (in position N. 2 and N. 4). Cooked results are a matter of personal preference and may easily be adjusted to suit individual requirements by slight adjustment of the temperature and/or cooking time, or when using more or less shelves in the same time. Preheating of the oven is recommended for 10-15 minutes or until the oven thermostat indicator light switches off to show the selected temperature has been reached.
When using a baking tray it should be placed centrally on the oven shelf with the short sides of the tray parallel to the sides of the oven. Do not use trays, tins or dishes larger than 380mm (15") long, 356 mm (14") wide, as cooking results may be impaired.
| Food | Thermostat setting °C | Cooking Time |
| Small cakes (12 on tray) | 175 | 15-25 mins. |
| Victoria sandwich(2x7"/180mm) | 170 20-30 mins. | |
| Swiss roll or whisked sponge | 180 | 15-20 mins. |
| Fruit cake (8"/205mm) | 135 | 1 H - 2 H hours. |
| Scones | 210 | 8-15 mins. |
| Meringues | 80 | 1 H - 2 H hours. |
| Shortcrust Pastry | 190 | 20-40 mins. depending |
| Puff or Flaky Pastry | 200 | 15-30 mins. upon |
| Choux Pastry | 200 | 20-30 mins. dish |
| Biscuits | 170/180 | 10-20 mins. depending upon type |
| Bread | 200/220 | 25-35 mins. |
| Milk pudding | 150 | 1 H - 2 hours. |
| Pizza | 250 | 20 mins. |
| Lasagne | 165 | 60 mins. |
| Oven noodles | 150 60 mins. | |
| BEEF on bone | 230 rare & crusty | 9 mins. per 1/b (500 g) plus 9 mins. |
| BEEF on bone | 190 °C (rare) | 15 mins. per 1/b (500 g) plus 8 mins. |
| 190 °C (medium) | 20 mins. per 1/b (500 g) plus 10 mins. | |
| 160 °C (well done) 25 mins. per 1/b (500 g) plus 8 mins. | ||
| Boned and rolled | 190 °C (rare) | 20 mins. per 1/b (500 g) plus 10 mins. |
| 190 °C (medium) | 25 mins. per 1/b (500 g) plus 15 mins. | |
| 160 °C (well done) 30 mins. per 1/b (500 g) plus 8 mins. | ||
| LAMB on bone | 190 °C | 20 mins. per 1/b (500 g) plus 10 mins. |
| 155 °C | 27 mins. per 1/b (500 g) plus 14 mins. | |
| Boned and rolled | 190 °C | 25 mins. per 1/b (500 g) plus 14 mins. |
| 155 °C | 25 mins. per 1/b (500 g) plus 14 mins. | |
| PORK on bone | 200 °C | 25 mins. per 1/b (500 g) plus 14 mins. |
| Boned and roller | 160 °C | 30-35 mins. per 1/b (500 g) plus 18 mins |
| VEAL on bone | 200 °C | 25 mins. per 1/b (500 g) plus 14 mins. |
| Boned and roller | 200 °C | 30 mins. per 1/b (500 g) plus 14 mins. |
| CHICKEN | 200 °C | 20 mins. per 1/b (500 g) plus 10 mins. |
| 155 °C | 25 mins. per 1/b (500 g) plus 13 mins. | |
| TURKEY | 200 °C | 18 mins. per 1/b (500 g) plus 14 mins. |
| 155 °C | 23 mins. per 1/b (500 g) | |
| DUCK | 200 °C | 18 mins. per 1/b (500 g) |
| 155 °C | 23 mins. per 1/b (500 g) | |
| GOOSE | 180 °C | 18 mins. per 1/b (500 g) plus 20 mins. |
USING THE GRILL
The grill is situated in the top of the oven compartment.
The grill pan should be located on the top oven shelf position.
Warning:
Do not place fatty foods too close to the grill and never leave the grill unattended. If fatty foods are grilled, or roasting has been cooked in the oven at a high temperature the grill element may smoke. This is not dangerous and the smoke is caused by the fat burning off when the grill element is hot. Leave the grill element on until the smoking has stopped t-hen use as normal. If a grease fire should occur in a pan put out the flame by placing a lid on the pan. Do not throw water on a grease fire.
INSTRUCTIONS FOR USE OF CONTROL DEVICES (ACCORDING TO THE MODELS)
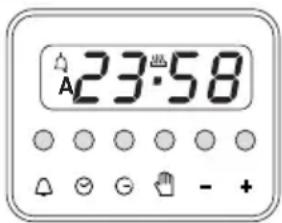
| Minute timer | |
| Cooking time | |
| Cooking end | |
| Manual | |
| - | Subtract time |
| + | Add time |
Programmer with electronic clock - LED display
Functions
Cooking time, cooking end time, manual position, clock, minutes counter, times to be set up to 23 hours 59 minutes.
Display
Fluorescent display with 4 figures of 7 segments to indicate time and cooking times.
Cooking time and manual function = pan symbol
Automatic function = AUTO
Minutes counter = bell symbol
The symbols light up when the corresponding functions are selected.
Setting
To set, press and release the desired function, and within 5 seconds set the time with + and - buttons.
+ and - buttons.
The + and - buttons increase or decrease the time at a speed depending on how long the button is pressed.
Setting the time
Press any two buttons manual at the same time, and + or - button to set the desired time. This deletes any previously set programme. The contacts are switched off and the AUTO symbol flashes.
Manual use
By pressing the manual button the relay contacts switch on, the AUTO symbol switches off and the saucepan symbol lights up. Manual operation can only be enabled after the automatic programme is over or it has been cancelled.
Automatic use
Press the cooking time or end time button to switch automatically from the manual to the automatic function.
Semi-automatic use with cooking time setting
Press the cooking time button and set the desired time with + or -. The AUTO and cooking time symbols light up continuously. The relay switches on immediately. When the cooking end time corresponds to the time of day, the relay and cooking time symbol switch off, the sound signal rings and the AUTO symbol flashes.
Semi-automatic use with end time setting
Press the end time button. The time of day appears on the display. Set the cooking end time with + button. The AUTO and cooking time symbols light up continuously. The relay contacts switch on. When the cooking end time corresponds to the time of day, the relay and the cooking time symbol switch off. When the cooking time is up, the AUTO symbol flashes, the sound signal rings and both the relay and the cooking time button switch off.
Automatic use with cooking time and end time setting
Press the cooking time button and select the length of the cooking time with + or - button. The AUTO and cooking time symbols light up continuously. The relay switches on. By pressing the cooking end time button the next cooking end time appears on the display. Set the cooking end time with + button. The relay and the cooking time symbol switch off.
The symbol lights up again when the time of day corresponds to the cooking start time. When the cooking time is up, the AUTO symbol flashes, the sound signal rings, the cooking time symbol and the relay switch off.
Minutes counter
Press the minutes counter button and set the cooking time with + or - button. The bell symbol lights up when the minutes counter is operating. When the set time is up, the sound signal rings and the bell symbol switches off.
Sound signal
The sound signal starts at the end of a programme or of the minutes counter function and it lasts for 15 minutes.
To stop it, push any one of the functions buttons.
Start programme and check
The programme starts 4 seconds after it has been set. The programme can be checked at any time by pressing the corresponding button.
Setting error
A setting error is made if the time of day on the clock falls within the cooking start and end times. To correct the setting error, change the cooking time or cooking end time. The relays switch off when a setting error is made.
Cancelling a setting
To cancel a setting, press the cooking time button and then press the - button until 00 00 appears on the display. A set programme will automatically cancel on completion.
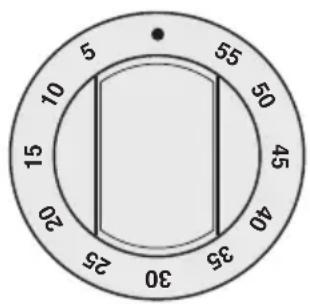
MINUTES COUNTERS
Turn the knob clockwise to set the desired cooking time. The minutes minder can be adjusted from 1 to 60 minutes. A sound signal will inform you that the chosen time is up.
PROGRAMMER WITH COOKING END TIME
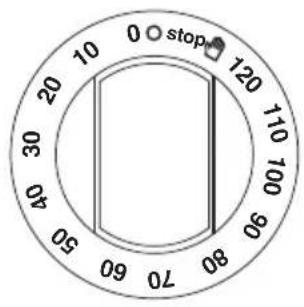
For a manual operation of the programmer, turn the knob anticlockwise to 📋.
Adjust the cooking time by turning the knob clockwise.
Select the cooking time with the relevant knob (max.120 min.).
The oven will switch off automatically when the cooking is up.
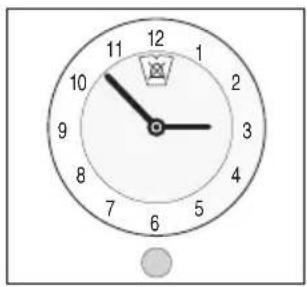
PCI "Campanil"TR 259 Analogic
Setting the clock
Press the control knob and turn clockwise.
Alarm programme adjustment
Turn the knob clockwise without pressing it in. At the end of the programmed time an alarm will sound.
To cancel it, turn the knob to the bell.
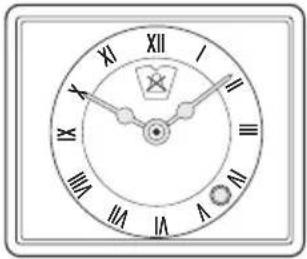
Instructions and operation PCI TR 331.
To set the clock press the knob and turn anti-clockwise.
To adjust cooking time, turn the knob clockwise without pressing it in. The end of cooking time is announced by an alarm bell, which is cancelled by turning the knob to position ☒.
For manual connection, turn the knob to position 🔊.
natural_image
Analog clock face showing 10:30 (no text or symbols beyond hour and minute hands)ELECTRONIC TIMER FOR COOKER
Functions
On
The display flashes.
Time setting
Press the left button.
Set the time with buttons "+" and "-"
This function remains activated 7 seconds after the last +/- operation.
Timer setting
This function is permanently activated and it will be immediately set with +/- buttons. During setting the units are 10 seconds.
During count down the timer takes priority on the display.
The units are seconds. The maximum time is 99 minutes.
The relay contact (when available) is closed during the count down only.
Reset timer
Press "+" and "-" buttons together and release "+" button first.
Signal
The signal after time out will stay 7 minutes if it has not been reset with the "+" button (one touch only).
Signal frequency
When the display shows the time of day, the signal frequency can be selected by pressing the "-" button.
Three different frequencies are selectable.
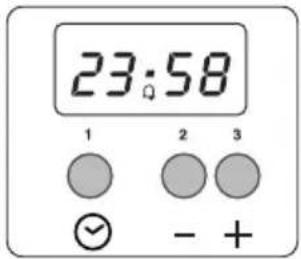
1 Time of the day
2 Timing and insertion
3 Signal timing and insertion
MECHANICAL PROGRAMMER WITH COOKING START/END TIME
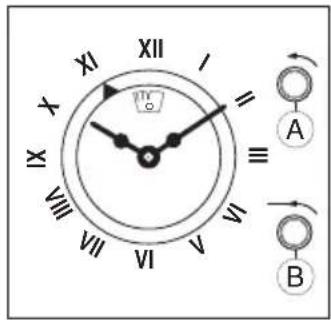
Setting the clock: press knob B and turn it anti-clockwise.
Adjustment of starting time: press knob A and turn it anti-clockwise. Adjustment of connection time: turn knob B anti-clockwise without pressing it in.
The end of the connection is announced by an alarm bell, which can be stopped by turning knob B to position 0 without pressing it in. Manual connection: turn knob B to position I a without pressing it in.
USE OF THE ELECTRIC GRILL
USING THE GRILL
Turn the oven knob to the right and place it on the grill position ☐.
The grill pan should be located on the top oven shelf position and is provided with two detachable grill pan handles which are engaged over the front edge of the pan between the indentations provided. A wire grid is supplied. The grill pan handle should be removed from the grill pan during the grilling operation and only fitted for removal or insertion of the grill pan particularly when hot. Always preheat the grill on full for 3-5 minutes before inserting the food.
natural_image
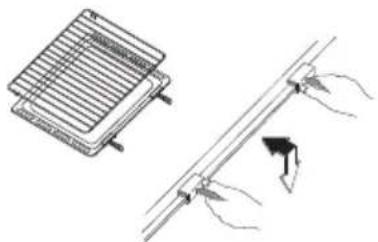
Diagram showing a grid device and a hand holding a rod with arrows indicating motion (no text or symbols)The user can change the shelves, depending on his personal whishes and on the different food.
Geat the oven 5 minutes before introducing the food.
To remove the shelves from the oven, pull them forward you, tilt front end upward and pull them out.
To replace, ct in the opposite manner as before.
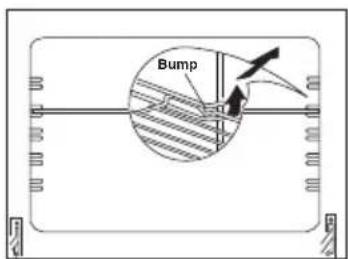
Install shelves by locating them in the horizontal guide rails on the oven walls. The raised portion of the shelf is to be facing the rear wall of the oven.
TURNSPIT multilpe (optional)
For utilization of the turnspit follow the instructions described.
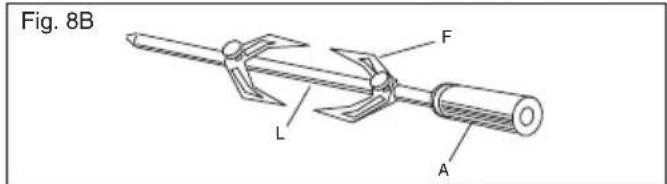
- Thread the chicken or the cubes of meat for roasting on the spit L, ensuring that it is gripped safely between the two forks F and balancing it properly to avoid unnecessary strain on the transmission R (fig 8).
- Put the spit on the support G, after having introduced its opposite end in the socket P of the transmission R (fig 8)
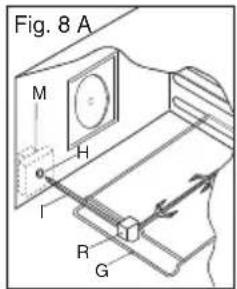
- Put the support G completely into the oven so that the bar I goes into the socket H of the turnspit motor M (fig 8A).
- Place the drip-tray with some water under the turnspit, on the lowest level
- when removing the spit, wear oven mitts, pull out support G and use the handgrip A operating in the contrary way (fig 8B). The turnspit can be operated turning thr knob clockwise on position ☐.
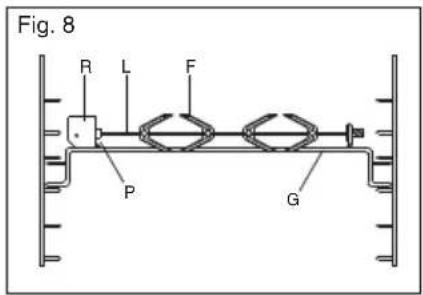
TURNSPIT single (optional)
For utilization of the turnspit follow the instructions described.
- Put the food in spit L (see fig. 8C), paying attention to block it within the two forks F and to balance it, in order to avoid any unnecessary effort in motor R.
- Put the spit on support G, after having put its opposite end into hole P of motor R.
- Place the drip-tray with a little water under the spit.
- Start up motor R and turn the grill on.
- To remote the spit, operate in the opposite direction using knob S and protecting glove in isolating wool (fig.8C).
The turnspit can be operated turning thr knob clockwise on position ☐.
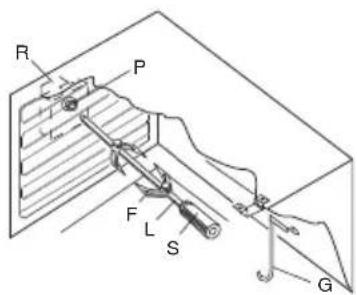
Fig. 8C
CLEANING
Before cleaning the appliance, close the gas stopcock and unplug appliance or disconnect power at the main circuit breaker of the electrical system.
Do not clean the appliance surfaces when still hot. Always clean off spillage as quickly as possible to prevent burning on which will make removal more difficult. Wash with a clean cloth soaked in hot soapy water, rinse and dry with a soft cloth.
DO NOT USE ABRASIVES. CAUSTIC PASTES OR SPRAYS. COARSE CLEANING PADS OR POWDERS. DO NOT USE EXCESSIVE WATER WHEN CLEANING YOUR OVEN IN ORDER TO AVOID WATER PRESSING THROUGH CLEFTS INTO THE BACK OF CONTROLS PANEL OR OF THE UNIT.
NOTE: A steam cleaner is not to be used for cleaning this appliance.
Pan supports and burners
The burner heads can be removed for cleaning.
NB Do not drop hot burner caps in cold water.
Because of the rapid cooling they might get damaged.
Lift off and soak for about 10 minutes in hot water with a little detergent. After having cleaned and washed them, dry them carefully.
Make sure that no burner holes are clogged.
Clean the burners once a week or more frequently if necessary.
Make sure you have reassembled the burners correctly.
Pan supports can be washed by hand or in a dishwasher.
Remember to remove rubber feet (if fitted) prior to washing.
Refit them afterwards.
Do not use harsh abrasive cleaners or sharp metal scrapers to clean the oven door glass since they can scratch the surface, which may result in shattering of the glass.
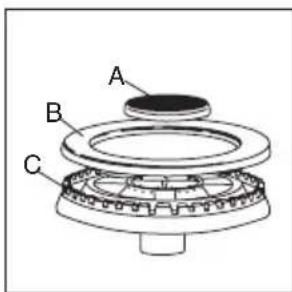
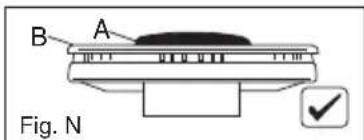
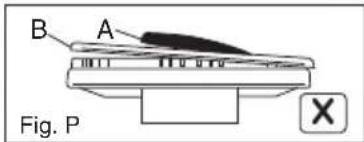
For a triple crown burner, make sure head "C" and covers "A" and "B" are properly placed on their seats as figure N and not off-centered as in figure P.
Daily
Regular wiping down directly after use prevents dirt from burning on. Clean the appliance with water and a detergent or all purpose cleaner.
Avoid using too much water to prevent it entering the burner or ventilation openings.
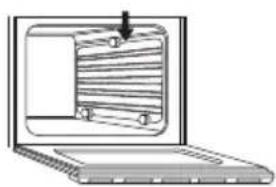
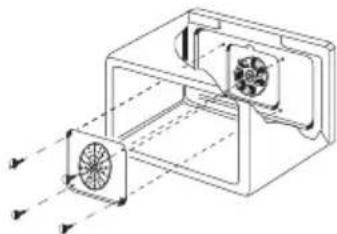
Interior: the oven shelf carriers and the back fan cover can be removed for easier cleaning. To do this, remove all the shelves and spring off the side carriers by applying pressure downwards to unhook the top. The back can now be removed by unscrewing the screw at each side. Replace in a similar manner. (Fig. Q-R)
Oven accessories (shelves, trays etc) should be washed in mild detergent solution and should not be treated with abrasives. The oven interior panels should be cleaned with mild detergent solution, mild cream cleaners or a moist soap pad.
Install shelves by locating them in the horizontal guide rails on the oven walls.
The raised portion of the shelf is to be facing the rear wall of the oven.
IMPORTANT
Do not use excessive water when cleaning the oven and avoid water passing through the fan grill or ducts in the oven back.
Avoid letting grease deposit collect around the upper heating element: it will cause smoking and may start a fire.
natural_image
Diagram of a laptop with a wooden panel and a downward arrow pointing to it (no text or symbols)Fig. Q Fig. R
natural_image
Technical line drawing of a mechanical housing with fan and fan blades, showing airflow direction (no text or symbols)OVEN DOOR REMOVAL AND REFITTING
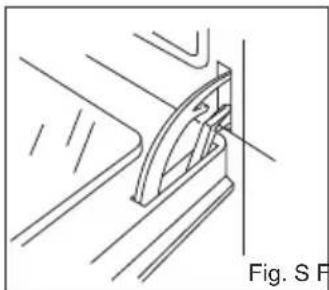
Open the door fully and turn the two hinge disks clockwise (fig.S). Reclose to about 45° and pull gently (fig. T).
To reassemble, keep the door at 45° and insert the arms of the hinge in the slots on the front of the oven, then turn the two hinge disks anticlockwise.
natural_image
Technical line drawing of a mechanical bracket assembly (no text or symbols)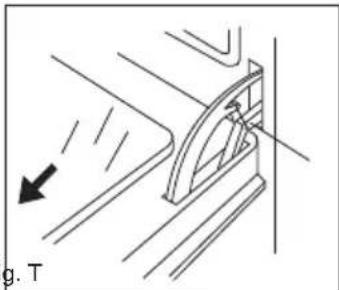
natural_image
Technical line drawing of a mechanical component with motion arrows, no visible text or symbolsWARNINGS
Before performing any repair or operation, switch the appliance off and close the gas tap.
The manufacturer declines all responsibility for any damage to persons, animals or things caused by failure to observe the rules indicated above. In case it is necessary to repair or replace the inside components, act as follows:
WARNINGS
Isolate the cooker from the electricity supply before attempting to replace the oven lamp.
The oven lamp used is of a special type withstanding high temperatures. To replace it, act as follows: disassemble the protecting glass (A) and replace the burnt lamp with one of the same type. Reassemble the protecting glass.
DISASSEMBLE OF WORK-TOP
In case it is necessary to repair or replace the inside components, act as follows:
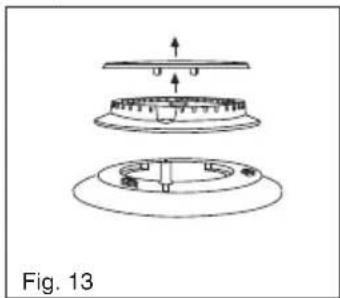
Remove the grids, remove burners and flame-spreaders (see fig. 13), unscrew the visible screws "V" placed on the work-top (see fig. 14). Disassemble the work-top by unscrewing the rear screws "A" (see fig. 15A or 15 B according to the models). In this way it is possible to lift the work-top and to reach the inside components.
natural_image
Exploded view diagram of a mechanical assembly (no text or labels)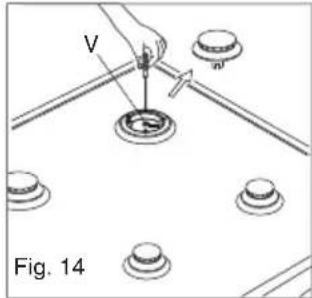
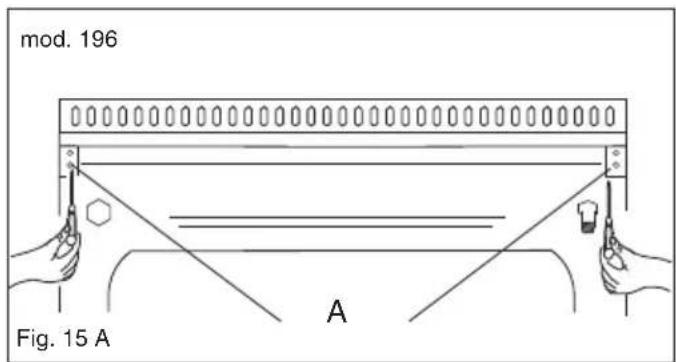
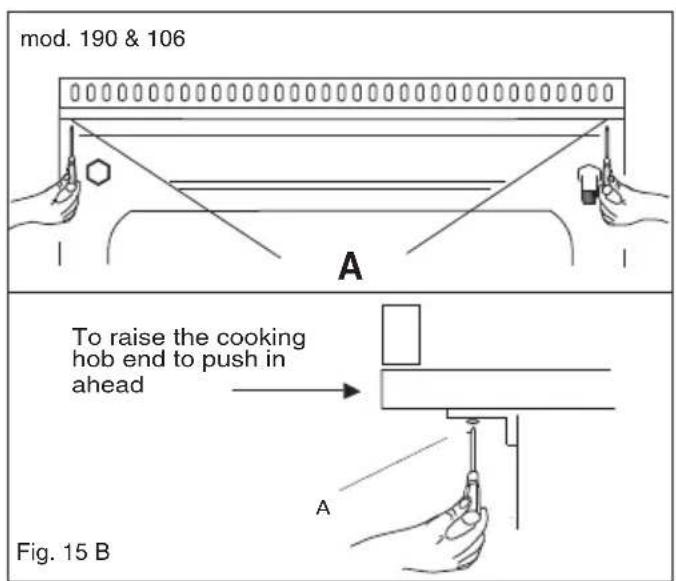
OVEN LIGHTS
Always ensure the oven unit is switched off at the mains before replacing the oven light bulb. To remove the light bulb, unscrew the glass cover anticlockwise and remove. Turn the bulb anticlockwise and remove. Replace with the same type of bulb (Type E14 threaded clear lamp 230/240 V. 25 watt T 300°C). Replace the light carefully and turn it clockwise.
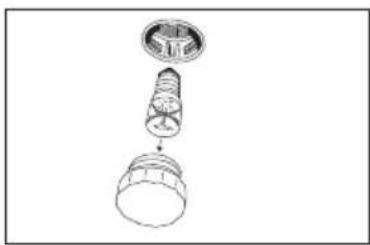
GREASING OF TAPS
If a tap becomes hard to be turned, grease it using a specific grease withstanding high temperatures. Act as follows: open the work-top and disassemble also the control panel as described on the previous paragraph. Unscrew the two fixing screws from the burner body (see picture) and remove the cone.
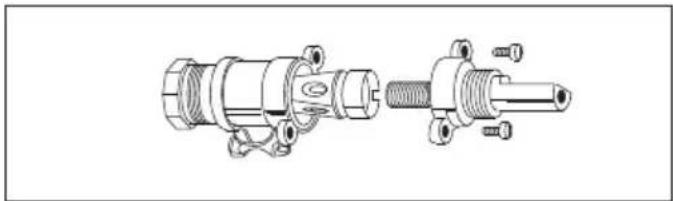
natural_image
Technical line drawing of a mechanical assembly showing two views of a cylindrical component with bolts and housing (no text or labels)TAPS REPLACEMENT
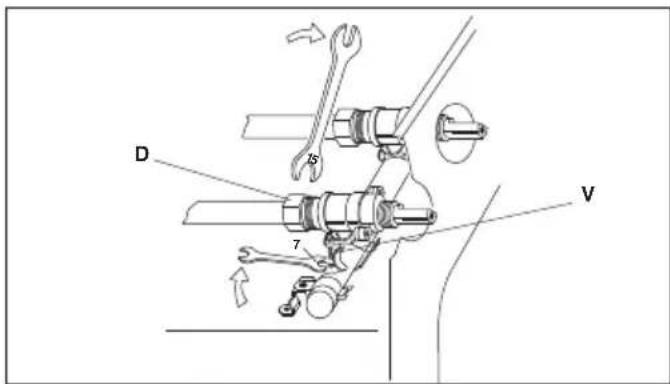
Act as follows: open the work-top and disassemble also the control panel as described on the previous paragraph. Unscrew screw nut D of the gas tube supplying the burner. Unscrew screw V fixing the tap to the bridle and remove it (see picture).
Note: Every time the tap is replaced, it is necessary to replace the seal gasket too check the connection seal by means of soapy water.
Clean the cone and its slot by means of a cloth soaked with diluent. Slightly grease the cone with the relevant grease, put it in its slot, and turn it some times. Remove the cone again, remove the exceeding grease making sure the gas entries are not obstructed by grease residuals. Assemble everything carefully in the opposite direction check the connection seal by means of soapy water.
SOME SAFETY POINT
Do not use the appliance as a space heater.
If you smell gas
Open a window. Do not use any electrical switches. Immediately extinguish naked flames. Isolate appliance from gas mains supplies via the isolation stopcock. Contact local gas authority or emergency services as appropriate. In the event of food fire. Isolate appliance from electric / gas mains supplies if safe to do so. Try to extinguish flames with the appropriate equipment (fire blanket or extinguishing foam). Do not use water on cooking fat / oil fires.
If in difficulty call emergency services.
- Do not store or use flammable products or aerosol containers near the hotplate or burners.
- Never flambe, under an extractor - even if the ventilator is switched off.
The high flames can cause fire.
For your safety and that of your children
- Do not store items that are attractive to children above or near the appliance.
- Keep children well away from the appliance: do not forget that some parts of the appliance or of the pans become very hot and dangerous during use, and will take time to cool down.
- When cooking, do not use clothes that could catch fire and cause serious injury.
- Some "Wok" cooking pots are unstable. Check with the manufacturer before purchasing.
- Avoid using unstable and misshapen pans which may tilt easily and pans with a very small base diameter, e.g. milk pans, single egg poachers. The minimum pan diameter recommended is 125mm (5"). Smaller pans will be unstable.
Very large pans may cause walls or knobs to overheat. Using pans which are too big may deform the control knobs or discolour the walls. This is not covered by the guarantee. - Carefully place all pans centrally over the burners.
• Always position pan handles safely away from the front of the hotplate and out of danger, particularly from small children. - Never leave a chip pan unattended.
- Pans and kettles with down turned base rims should not be used.
- Simmering aids such as asbestos or mesh mats are NOT recommended. They will reduce burner performance and could damage the pan supports.
- Commercially available foil spillage aids are unnecessary on this hotplate.
PROBLEM SOLVER
Any of the following are considered to be abnormal operation and may require servicing: Yellow tipping of the hob burner flame. Sooting up of cooking utensils. Burners not igniting properly. Burners failing to remain alight. Burners extinguished by oven door. Gas valves, which are difficult to turn.
Your Installer should be contacted if you have any problems with the installation.
Before you call a service engineer please check if the problem is something you could fix yourself. The cause of the problem is often a simple one.
THINGS TO TRY BEFORE CALLING FOR AN ENGINEER
Burner does not burn well
Is the burner dirty or damp? Try cleaning and/or drying the burner. Appliance not suitable for your gas type? Check the identification plate on the hotplate base.
Burner does not ignite
Do the burners spark when you press the ignition button? If not is the power on? See 'Checking the power supply' section further on. If the power supply is OK then there is probably something wrong with the ignition system.
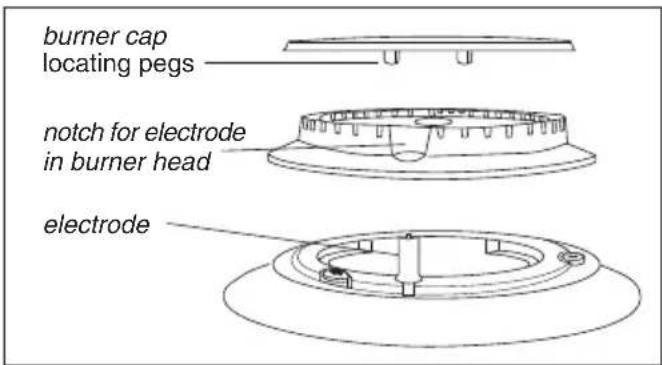
Are the electrode or burner slots blocked by debris?
Is the burner dirty or damp? Try cleaning and/or drying the burner. Is the burner trim correctly located?
Are the burner caps correctly located?
Check that there is not a problem with your gas supply. You can do this by making sure that other gas appliances you may have are working.
Pan supports
Aluminium pans may cause a metallic marking on the pan supports which does not affect the durability of the enamel and may be cleaned off with a metal cleaner such as 'Brasso'.
Checking the power supply
First check the socket by trying out another piece of electrical equipment in it.
If that works, renew the fuse in the hotplate plug. Use a 10 amp fuse. If the fuse 'blows' again there is a fault on the hotplate. Do not use a fuse with a higher rating. Do not carry out other electrical work. Unplug the hotplate and tell your installer.
Power Failure
In the event of a failure in the electrical supply the hotplate burners may be lit using a match.
Ventilation
The use of a gas cooking appliance results in the production of heat and moisture in the room in which it is installed. Ensure that the kitchen is well ventilated: keep natural ventilation holes open or install a mechanical ventilation device, (mechanical extractor hood). Prolonged intensive use of the appliance may call for additional ventilation, for example opening a window, or more effective ventilation, for example increasing the level of mechanical ventilation where present. For more detail see the Installation Instructions.
OVEN DOES NOT WORK AT ALL
First, when the oven is equipped with timer, check appliance is not programmed to turn on later. If it is, turn to manual setting (i.e. hand symbol). If the button or scale on the timer remains in the automatic position after use, the power supply to the oven will be interrupted. Also, check your appliance is switched on at the mains. Next check for an unexpected power strike by switching on adjacent lights etc. Finally, check fuses and plug wiring. If all these prove satisfactory, call engineer.
LIGHT BULB DOESN'T COME ON
Check bulb for looseness or burned out bulb.
Note: bulb replacement is not covered by your guarantee.
SMOKE COMING FROM OVEN
If oven is still relatively new, this problem is invariably due to protective oil on elements. Otherwise, the answer may be oil or fat which has become deposited on the elements during cooking. In either event, continued use should burn away the residues. On future occasions, try to shield food with foil or keep it further away from element, particularly when grilling.
CLOCK/TIMER DOES NOT WORK
Check to be sure range cord is plugged into outlet completely. Check for a blown fuse or tripped circuit breaker. Check for power outage. Check step by step operating Instructions on previous pages.
If, after checking through this section, you cannot resolve your problem please call the number on the data plate fixed to the front cover of these instructions for service and spare parts.
When ordering please quote the appliance name, the colour variant and serial number.
This information can be found on the data plate sealed inside the front appliance drawer.
Maintenance schedule:
To ensure the appliance continues to operate at peak performance, we recommend a routine service call every 2 years for the life of the appliance.
- Installation & Servicing
- RECORD HERE FOR EASY REFERENCE
- GENERAL INFORMATION
- ENVIRONMENTAL WARNING
- Waste packaging
- Getting to know your new cooker
- Thank you for choosing one of our products.
- ATTENTION:
- - WARNING -
- - WARNING
- - WARNING:
- - WARMING
- DO NOT SPRAY AEROSOLS IN THE VICINITY OF THIS APPLIANCE WHILE IT IS IN OPERATION.
- WHEN YOU CALL FOR SERVICE
- OVERALL DIMENSIONS
- INSTALLATION
- PROVISION FOR VENTILATION
- POSITIONING
- Clearances to combustible materials
- Clearances to non- combustible materials
- Note:
- TO FIX THE COOKER TO THE REAR WALL
- GAS CONNECTION
- IT IS RECOMMENDED THAT A SERVICETAP AND UNION BE FITTED ADJACENTTOTHE APPLIANCE INLET TO FACILITATE FUTURE SERVICING.
- VERY IMPORTANT FOR THE INSTALLER
- GAS CONVERSION AND ADJUSTMENT
- GAS ADJUSTEMENTS
- REPLACEMENT OF THE INJECTORS
- SPECIAL NOTE
- MINIMUM FLOW ADJUSTMENT FOR HOB-TOP TAPS
- ELECTRICAL CONNECTION
- IMPORTANT
- WARNING: THIS APPLIANCE MUST BE EARTHED.
- 2nd SECTION FOR THE USER
- WARNING:
- WARNING
- - 1 Minute Tour -
- Be safe
- Gas and Electricity on
- Automatic electric ignition
- HOW TO USE YOUR ELECTRIC OVEN
- MULTIFUNCTIONAL OVEN
- The oven is fitted with:
- Oven thermostat knob
- Oven commutator knob
- Use of the oven
- Defrosting with fan
- Natural convection
- Fan oven
- Medium grill
- Total grill
- Fan assisted total grill
- Air forced lower heating element
- GENERAL INSTRUCTION
- GUIDE FOR CONVENTIONAL COOKING
- PLATE WARMING
- GUIDE FOR FORCED CONVECTION COOKING
- (Back rolled electric element with fan)
- USING THE GRILL
- Programmer with electronic clock - LED display
- Functions
- Display
- Setting
- + and - buttons.
- Setting the time
- Manual use
- Automatic use
- Semi-automatic use with cooking time setting
- Semi-automatic use with end time setting
- Automatic use with cooking time and end time setting
- Minutes counter
- Sound signal
- Start programme and check
- Setting error
- Cancelling a setting
- MINUTES COUNTERS
- PROGRAMMER WITH COOKING END TIME
- PCI "Campanil"TR 259 Analogic
- Setting the clock
- Alarm programme adjustment
- Instructions and operation PCI TR 331.
- ELECTRONIC TIMER FOR COOKER
- On
- Time setting
- Timer setting
- Reset timer
- Signal
- Signal frequency
- MECHANICAL PROGRAMMER WITH COOKING START/END TIME
- USE OF THE ELECTRIC GRILL
- TURNSPIT multilpe (optional)
- TURNSPIT single (optional)
- CLEANING
- Pan supports and burners
- Daily
- OVEN DOOR REMOVAL AND REFITTING
- WARNINGS
- DISASSEMBLE OF WORK-TOP
- OVEN LIGHTS
- GREASING OF TAPS
- TAPS REPLACEMENT
- SOME SAFETY POINT
- If you smell gas
- If in difficulty call emergency services.
- For your safety and that of your children
- PROBLEM SOLVER
- THINGS TO TRY BEFORE CALLING FOR AN ENGINEER
- Burner does not burn well
- Burner does not ignite
- Pan supports
- Checking the power supply
- Power Failure
- Ventilation
- OVEN DOES NOT WORK AT ALL
- LIGHT BULB DOESN'T COME ON
- SMOKE COMING FROM OVEN
- CLOCK/TIMER DOES NOT WORK
Brand : Artusi
Model : AFG915BKP
Category : Cooker