RingX - Audio software Xils Lab - Free user manual and instructions
Find the device manual for free RingX Xils Lab in PDF.

| Product type | Audio software (virtual synthesizer) |
| Brand | Xils Lab |
| Model | RingX |
| Category | Audio software |
| Platform | VST2, VST3, AU, AAX (64-bit) |
| Operating system | Windows 7 or later, macOS 10.12 or later |
| Sample rate support | Up to 192 kHz |
| Main functions | Ring modulation, amplitude modulation, frequency shifting, waveform synthesis |
| Preset management | Built-in preset browser with factory and user presets |
| Modulation | Multiple LFOs, envelopes, and modulation matrix |
| Effects section | Built-in reverb, delay, distortion, and filter |
| License type | Single-user perpetual license |
| Activation method | Serial number via online download |
| Manual format | PDF (23 pages, English) |
| Software updates | Free updates within major version |
| Technical support | Email support from Xils Lab |
| Installation method | Download installer from vendor website |
| System requirements (RAM) | 4 GB minimum, 8 GB recommended |
| System requirements (storage) | 200 MB free disk space |
| Sound card | ASIO or Core Audio compatible |
Frequently Asked Questions - RingX Xils Lab
User questions about RingX Xils Lab
0 question about this device. Answer the ones you know or ask your own.
Ask a new question about this device
Download the instructions for your Audio software in PDF format for free! Find your manual RingX - Xils Lab and take your electronic device back in hand. On this page are published all the documents necessary for the use of your device. RingX by Xils Lab.
USER MANUAL RingX Xils Lab
text_image
Back TestFactory Author XILS-lab PRESET Stop Res Filter A > B ? INPUT TRANSIENT S-DETECTION GATE ENV. F STEREO SPACE FAST TIME REDUCTION QUALITY LEVEL HYST. ATTACK WIDTH FAB SPEED SENSIB. RELEASE SOLO FREQ ATTACK RELEASE MONO Y HORZ VERT MODIFICATION PARAMETRIC EQ B1 B2 B3 DATA INPUT SEQ 1 8.00 8.00 RAW SEQ 2 120.00 LOC 3 5 TEMPO SET 4 4 ATTACK RELEASE EDIT VIEW ON DISP SEND ON DISP SEND ON DISP SEND ON DISP SEND ON DISP SEND ON DISP SEND ON DISP SEND ON DISP SEND ON DISP SEND ON DISP SEND ON DISP SEND ON DISP SEND ON DISP SEND ON DISP SEND ON DISP SEND ON DISP SEND ON DISP SEND ON DISP SEND ON DISP SEND ON DISP SEND ON DISP SEND ON DISP SEND ON DISP SEND ON DISP SEND ON DISP SEND ON DISP SEND ON DISP SEND ON DISP SEND ON DISP SEND ON DISP SEND ON DISP SEND ON DISP SEND ON DISP SEND ON DISP SEND OR DRY/WET Par EQ None None None None None None MODULATION AMOUNT SOURCE AMOUNT SOURCE AMOUNT SOURCE AMOUNT SOURCE AMOUNT SOURCE AMOUNT SOURCE AMOUNT SOURCE AMOUNT SOURCE AMOUNT SOURCE AMOUNT SOURCE AMOUNT SOURCE AMOUNT SOURCE AMOUNT SOURCE AMOUNT SOURCE AMOUNT SOURCE AMOUNT SOURCE AMOUNT SOURCE AMOUNT SOURCE AMOUNT SOURCE AMOUNT SOURCE AMOUNT SOURCE AMOUNT SOURCE AMOUNT SOURCE AMOUNT SOURCE AMOUNT SOURCE AMOUNT SOURCE AMOUNT SOURCE AMOUNT SOURCE AMOUNT SOURCE AMOUNT SOURCE AMOUNT SOURCE AMOUNT SOURCE AMOUNT SOURCE AMOUNT SOURCE A DRY/WET DRY FREQ RES. GAIN DRY FREQ RES. GAIN DRY FREQ RES. GAIN DRY FREQ RES. GAIN DRY WET LP Bd LP Bd LP Bd LP Bd LP Bd LP Bd LP Bd LP Bd LP Bd LP Bd LP Bd LP Bd LP Bd LP Bd LP Bd LP Bd LP Bd LP Bd LP Bd LP Bd LP Bd LP Bd LP Bd LP Bd LP Bd LP Bd LP Bd LP Bd LP Bd LP Bd LP Bd LP Bd LP Bd LP Bd LP Bd LP Bd LP Bd LP Bd LP Bd LP Bd LP Bd LP Bd LP Bd LP Bd LP Bd LP Bd LP Bd LP Bd LP Bd LP Bd LP Dbd xils lab Ring'xUser Manual
www.xils-lab.com
Table of contents
1 INTRODUCTION....4
2 FEATURES....5
3 INSTALLATION....6
3.1 ILOK DRIVERS 6
3.2 WINDOWS (WINDOWS 7,8,10 AND LATER)....6
3.3 MAC (OSX 10.9.0 AND LATER)....6
4 GETTING STARTED....7
4.1 INSERT OR BUS 7
4.1.1 Ring'X as insert ....7
4.1.2 Ring'X on a Bus....7
4.2 TOOLBAR....7
4.3 ADJUSTING THE RING'X PARAMETERS....8
5 PRESET MANAGEMENT....8
5.1 MAIN TOOLBAR....8
5.2 PRESET MENU....9
5.3 SORT MENUS....9
5.3.1 Sorting Menu: Additional Functions .... 10
5.4 ADVANCED PRESET MANAGER....11
5.5 A/B COMPARISON....12
6 THE MAIN PANEL....12
6.1 INPUT TRACKERS, STEREO SPACE AND LEVELS....12
6.1.1 Transient Tracker....13
6.1.2 S-Detection....13
6.1.3 Input Gate....14
6.1.4 Dynamic True Stereo Space....14
6.2 SEQUENCERS....15
6.2.1 The Locator Sequencer....15
6.2.2 The Step Sequencer....16
6.3 THE EFFECTS SLOTS....17
6.4 RING'X EFFECTS....17
6.4.1 Modulations....17
6.4.2 MultiMode Self-oscillating Filter....18
6.4.3 Self-oscillating 18db Filter....18
6.4.4 Chorus (Bucket Brigade Delay based)....18
6.4.5 Delay....19
6.4.6 Phaser....19
6.4.7 Reverb....19
6.4.8 Parametric Equalization....20
6.4.9 Distortion....20
7 OPTION MENU....21
7.1 MAIN....21
7.2 DISPLAY....21
7.3 Misc....21
8 CREDITS....22
1 Introduction
Thank you for choosing Ring'X!
Ring'X is an inspiring and musical multi-effects plug-in for all your needs.
With Accurate input followers, Step and Locator sequencers, and a True Stereo Dynamic Engine...you'll find everything you'll need for a smooth or deep modulation, adding more life to your sound or for simply just widening your music.
Ring'X has 6 slots available in which to place your choice from our selection of deeply modifiable classic analog effect emulations including;
Chorus, Delay, Phaser, Reverb, 24 and 18db self-oscillating Filters, Equalisation, Distortion.
2 Features
Ring'X offers:
•Chorus
•Analog Filter
- Phaser
•Reverb
•Delay
- Parametric EQ
•Distortion
•True Stereo Dynamic Engine
•Transient detection
•Envelope follower
•Sibilant detection
•Gate
- Step Sequencer
- Locators Sequencer
All parameters are MIDI controllable
Ring'X is available in the following formats:
• Mac OSX 10.9 and later (64 bits, Intel & Apple Silicone), VST, VST3, Audio Unit, AAX. • Windows 7, 8, 10 and later (64 bits): VST, VST3, AAX

Universal


Audio Units

Minimum system requirements: 1 Gigabyte of RAM and a 1 GHz processor.
3 Installation
Ring'X is protected with iLok (PACE anti-Piracy) only.
3.1 iLok drivers
With the iLok version of Ring'X, you'll need to plug an iLok 2 or 3 USB key into your computer or use the iLok "soft-location", authorizing your computer.
After downloading and installing the latest PACE drivers, please launch it and login with you ilok.com account.
Select "License->Redeem Activation Code" and submit your iLok code. Drag and drop the created license onto a destination icon (either your computer or an iLok device).
To download the latest PACE drivers, please go to:
http://www.ilok.com/download-ilok-software.html
3.2 Windows (Windows 7,8,10 and later)
To install Ring'X on Windows, launch the installer file Ringx_win_setup_xxx.exe. Please download the latest version from the XILS-lab website.
Once you have accepted the license agreement, you will be asked to select the installation directory and be provided with a default one. Presets and various files, like this manual, used by the Ring'X will be stored in this directory. Please note that this location is different from the VST install directory, which you will need to specify in the next step of the installer.
Once the installation directory is specified, you will be asked to select the VST plug-in directory, with a suggested default location. Keep this default directory if you do not use the VST version.
Important notice: be sure to use a folder owned by the user (do not use "c:/program files" for instance, or any subfolder of a system folder). By default, the preset folder is c:/users/documents/public/XILS-lab/RingX
3.3 Mac (OSX 10.9.0 and later)
To install Ring'X on a computer equipped with Mac OSX 10.9.0 or later, double-click the file ringx_osx_setup_xxx.dmg.
Please download the latest version from the XILS-lab website.
Then launch the install program, RingX.pkg, and follow the instructions. Warning: the install program will ask you for your system password.
The various files of the Ring'X will be copied into the following directories:
Library/Application Support/Avid/Audio/Plug-Ins Library/Audio/Plug-Ins/Components Library/Audio/Plug-Ins/VST/ Library/Application Support/Documentation/XILS-lab/RingX Library/Application Support/XILS-lab/RingX users/username/Library/Preferences/XILS-lab/RingX
Getting Started
3.4 Insert or Bus
Like any other effect, Ring'X can be inserted in the instrument channel of your mixer or DAW, or be used on an auxiliary bus. Let's take a look at the pros and cons of each method.
3.4.1 Ring'X as insert
When inserted on the instrument channel, you can adjust the dry/wet signal between the incoming dry signal and the delay signal (wet) using the DRY/WET knob located in the middle of the unit.
This can result in a loss of global volume; therefore you should use the Output Gain knob to compensate for this.
The main advantage of this method is that you can use the Ring'X advanced stereo processing to put your track in the stereo field in a real, easy and intuitive way.
3.4.2 Ring'X on a Bus
When placed in an auxiliary bus, Ring'X provides you total control of the processed signal: You can EQ it, compress it, choose to add reverb on it, or a different reverb than on the dry signal... in short you can perform all the processing you want. You can also render the signal of Ring'X on an audio track then cut/paste/slice/edit it.
In an auxiliary track, Ring'X can also receive data from SEVERAL separate audio channels.
You can experiment with this and create stunning effects that would be different if Ring'X received only a single channel signal.
In that method, you must turn the Dry/Wet parameter fully to the right to remove the dry signal. To mix between dry and wet, you will use the global level of each of the individual tracks, and/or the global level of the Ring'X.
3.5 Toolbar

flowchart
graph TD
    A["Bank"] --> B["Click on this button to select a category (Bank, Author, Type ...)"]
    C["Factory"] --> D["Click on this menu to browse this category"]
    E["Author"] --> F["Click on this button to select a category (Bank, Author, Type ...)"]
    G["XILS-lab"] --> H["Click on this menu to browse this category"]
    I["Sy Large"] --> J["Click on these arrows to load the next or the previous preset of these categories"]
    K["A"] --> L["Click on this icon to open the preset manager to duplicate the current preset"]
    M["B"] --> N["Click on this icon to open the preset manager in the Browser Mode"]
Note: The toolbar at the top of the interface allows you to load or save presets, make a comparison between settings A and B, or modify the options. These functions are described in detail later in this manual.
Click on the PRESET menu to show the available presets in the current sorted group. Please note that selecting a new preset without saving your current settings will erase any changes you have made to those settings.
Click on the sort arrow button to display the current sorted group and to choose the preset within it.
You can sort presets by: Author, Feeling, Type, Style, Bank or Projects.
Please note that Ring'X will display presets by Author categories by default.
Click on the sorting label over the sorted group name, to sort your presets according to your preferences. Please note that Ring'X's powerful Preset management is fully explained in chapter 5 of this manual.
3.6 Adjusting the Ring'X parameters
On Ring'X, the sound parameters are controlled using knobs, switches or Pad 2D.
To use a mouse to adjust the parameters of Ring'X which are controlled by knobs, click inside the knob and move the mouse up or right to increase the value, down or left to decrease it.
If you right-click on a parameter, or if you hold-shift while clicking, you can adjust the parameter with fine precision.
To use a mouse to adjust the parameters of Ring'X which are controlled by a switch, just click inside it.
To use a mouse to adjust the parameters of Ring'X which are controlled by Pad 2D, locate the dot you want to move, click on it and drag it around the PAD. By right-clicking, you can move several dots at the same time.
Keyboard shortcuts:
In addition, we have provided some soft key combinations to perform several very useful tasks:
Windows:
- CTRL+left click: resets parameter to its default value.
- CTRL+right click or CTRL+Shift+left click: initializes the default value of the parameter.
- Win+Alt+CTRL + click: opens the MIDI Control panel, with the parameter already selected.
OSX:
- Apple+left click: resets parameter to its default value.
- Apple+Shift+left click: initialises the default value of the parameter
- Apple+Alt+CTRL + click: opens the MIDI Control panel, with the parameter already selected.
When a parameter is chosen via a drop-down menu, just click on the button or label and select the item.
The help button (?) on the toolbar displays a panel summarizing these shortcuts.
4 Preset Management
4.1 Main Toolbar

text_image
Bank Factory Author XILS-lab Sy LargeIn the toolbar you can find two buttons, displaying the category name (Bank, Author, Type, Style, Feeling or Project), which open the sort management menus.
The first two text fields show the current sorting group and the third shows the current preset.
Clicking the arrow on the left of the category or preset names opens the corresponding menus.
Note: When a parameter is modified, the name of the preset is followed by a *, indicating that the current settings of Ring'X no longer match the stored preset.
When you want to save a modified preset, click on the Save or Save As button.
In order to prevent you from erasing them, the Factory presets cannot be modified. When you edit a Factory preset, the Save button will be grayed out, and you will have to use the Save As function to save it in another
bank.
If you edit any preset, other than a Factory one, the Save and Save As function will both be available.
The main difference is that the Save function will save the preset under its current name, and with its current tags, overwriting the previous incarnation of the preset, while the Save As function will open a dialog box where you can modify the name of the preset, the bank in which it will be stored, and all its tags.
The settings of Ring'X are then saved in the currently displayed preset, and the * disappears. Click on the Save As button to save this preset with another name and/or to other sorting groups.
4.2 Preset Menu
Click the Preset arrow button to open the preset menu. Here you can choose and load another preset from the current sort group into Ring'X.

text_image
JUNO-I ✓ JUNO-I Preset1 Preset2 Preset3 Export Preset Delete Preset : JUNO-IIn this menu, other actions are also available:
Delete Preset: Use this to delete the current preset (a pop-up confirmation window appears). This option is only available if the current preset is not a factory one.
Export Preset: Use this function to export the current preset in an external file (.chx format). This file can be imported later as a new bank. It always makes sense to back-up your presets on external media.
4.3 Sort Menus
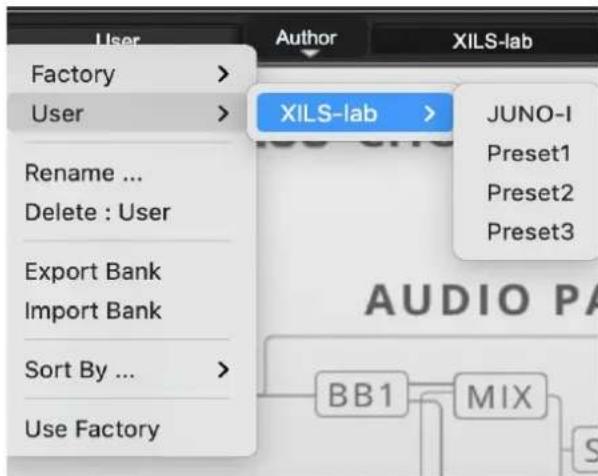
text_image
User Factory > User > Rename ... Delete : User Export Bank Import Bank Sort By ... Use Factory Author XILS-lab > JUNO-I Preset1 Preset2 Preset3 BB1 MIXThe sorting menus are a unique and powerful tool allowing you to perform sophisticated tasks, such as displaying the preset list organized in a variety of different ways:
- All presets tagged with a given type
- All presets tagged with a given musical genre
- All presets made by a given Sound Designer
- All presets for a musical genre like Electronica, or Funk
- All presets that were recently imported in a bank
There are many possibilities available to you, and we're confident that you'll find the best way to customize it to your personal needs.
In order to perform such selections, all you have to do is select an item in the first sort menu. This represents the first and main criteria for the search engine.
• Author (Your name, or a Sound Designer name for factory presets),
- Type (Category of the instrument like Keys, Leads, Basses, etc.)
•Style (Musical Genre),
•Feeling (Cold, warm, soft)
•Project (My Song, My Live Project).
- ALL (this item is not used for sorting the preset)
These primary results can then also be filtered according to a second criteria which can be chosen from a similar list in the secondary sort menu.
Sometimes a picture is better than a bunch of text, so below you'll find an example of where you can find how to select a specific sound.

text_image
Bank Factory Author XILS-lab PRESET -Init- Click on this button to select a category (Bank Author, Type, ...) Click on this menu to browse this category Click on this button to select a category (Bank Author, Type, ...) Click on this menu to browse this category Click on these arrows to load the next of the previous preset in these categories Click on this menu to browse the preset in these categories Click on this button to open the advanced preset manager panelPlease note that, once you are familiar with this system, you can also perform some operations with a single click, by using the Sub Groups to choose a preset:
In the picture below, the primary sort menu is used to browse the different banks. Then in a factory bank, the author, Xils-Lab, is selected, and finally the Preset -Init-. In this example the preset is selected in a single click operation, and the presets available in the preset list will be all the Xils-Lab presets available in the entire Factory Sound Library.
Click on the row of the sorting button to open the menu used to manage this sorting group (or subgroup). Here you can directly select and load any preset from any group or subgroup.
4.3.1 Sorting Menu: Additional Functions
In this menu, other actions are also available:
Delete: Deletes all of the presets of the current group that are not factory ones. IMPORTANT: Use this function with care: If the bank does not contain any factory presets, ALL PRESETS IN THIS BANK WILL BE PERMANENTLY DELETED.

text_image
✓ Factory User Rename ... Delete : User Export Bank Import Bank Sort By ... Use Factory
Use Factory: enables or disables the display of factory presets.
Sort By: This function sorts the presets according to bank, author, project, or shows all presets (Bank Name, Author Name, Project Name, All Presets). The preset menu will show presets of the same category (same author, same project or same bank).
Export Bank: This function exports a bank in Ring'X's proprietary cross platform format, (Mac and PC). The selected bank (i.e., the bank which contains the currently active preset) will be exported to a user specified location on your hard drive.
Import Bank: This Function allows you to browse your hard drives to select a file and import a Ring'X bank.
These two choices are not available from the second sort menu.
This menu also provides the possibility to change the size of the interface. This feature is the same as the one provided in the Option menu.
4.4 Advanced Preset Manager
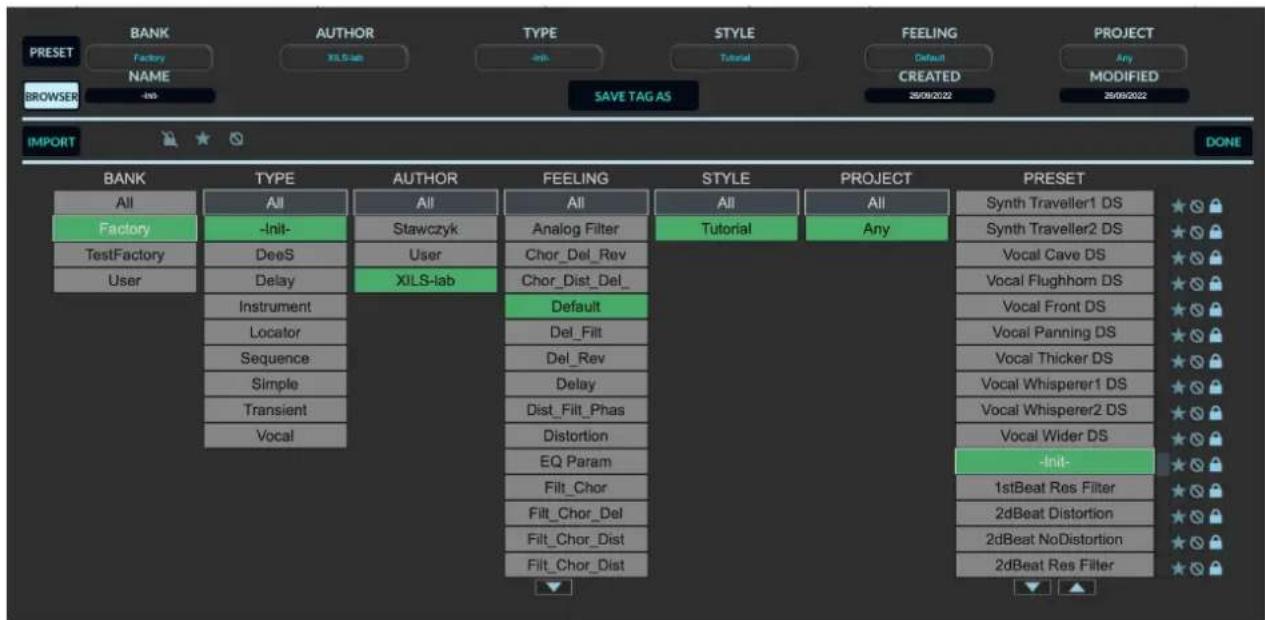
text_image
BANK AUTHOR TYPE STYLE FEELING PROJECT PRESET Factory NAME BROWSER -Info XILS-lab with Tutorial Default CREATED Any MODIFIED SAVE TAG AS 25/08/2022 25/09/2022 IMPORT DONE BANK TYPE AUTHOR FEELING STYLE PROJECT PRESET All All All All All All Synth Traveller1 DS Factory -Init- Stawczyk Analog Filter Tutorial Any Synth Traveller2 DS TestFactory DeeS User Chor_Del_Rev Vocal Cave DS User Delay Chor_Dist_Del_ Instrument Default Vocal Flughhorn DS Locator Del_Filt Vocal Front DS Sequence Del_Rev Vocal Panning DS Simple Delay Vocal Thicker DS Transient Dist_Filt_Phas Vocal Whisperer1 DS Vocal Whisperer2 DS Vocal Wider DS Vocal Chor_Del Dist_Filt_Dist EQ Param -Vinit- Filt_Chor Filt_Chor_Del Filt_Chor_Dist Filt_Chor_Dist 1stBeat Res Filter 2dBeat Distortion 2dBeat NoDistortion 2dBeat Res FilterThe preset manager provides two modes: Current Preset Mode and Browser (or Tag) Mode.
Current Preset Mode: This mode allows you to change any of the criteria of the current preset and save them as well as the current settings.
Click on a criteria and choose a new one in the menu. If you need a new criteria choose "New criteria" and submit the new name in the edit box. Click on the preset name to change it.
When done, click on SAVE CURRENT (to replace your preset) or SAVE AS CURRENT (to duplicate it)
Notice: When creating a new preset, this is the mode you need to go to for saving your settings.
Preset Browser Mode: This mode allows you to easily sort your preset among multiple criteria for a fast selection.
Double click or hit Enter on a preset to launch it. Be careful, this will erase any changes you could have made to the current preset.
Use the Arrow (up and down) for browsing the presets.
Click on a criteria for displaying only the corresponding presets.
A grayed-out criteria means that, according to the currently selected criteria, there is no preset that matches that criteria.
The current preset and its associated criteria are highlighted in green.
Clicking on the Browser icon will open the Preset manager in Browser mode.
Clicking on the Save As icon will open the Preset manager in Current Preset mode.
On each criteria, right-clicking will open a contextual menu. You can then rename, delete, export a criteria. In these two later cases, all the presets which are not in the "Factory" bank, corresponding to that criteria will be deleted or exported.
Favorite: You can add each preset in your "Favorite" or "Hidden" selection. In that case, when clicking on the "Favorite" icon, only the preset in your favorite selection will be displayed. When clicking on the "Hidden" icon, all the presets in your "Hidden" selection will be removed from the list.
Factory: The preset in the factory bank can't be changed or removed (shown by a lock at the right of the preset). When clicking on the "Lock" icon, all the "Factory" presets will be removed from the list.
Import: By clicking on the IMPORT button, you can import banks of presets created for Ring'X.
Click on DONE to close the preset manager panel.
4.5 A/B comparison
You can store two different settings at the same time and instantly switch from one to the other to compare their settings. These two settings are stored in the A and B memories.
When you launch Ring'X, the default-activated memory is A. When you load or modify a preset, this memory -A- is also modified in real time according to your edits. You can switch to B memory by clicking on the B button.
To copy the current active memory content to the other memory slot, just press the button labeled -> or <-, according to the current active memory.
With this A/B comparison system, you can easily have two settings and compare them in a convenient way.
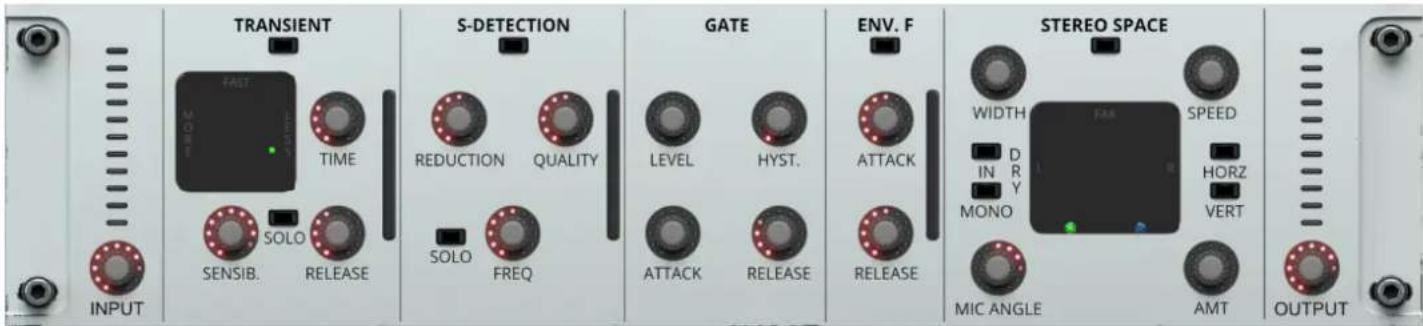
5 The Main Panel
Ring'X main panel is divided in four sections:
- Input trackers, Stereo Space and Level
- Sequencers
- Effect slots
- Effect Interface
5.1 Input trackers, Stereo Space and levels
text_image
TRANSIENT S-DETECTION GATE ENV. F STEREO SPACE INPUT FAST MOR TIME REDUCTION QUALITY LEVEL HYST. ATTACK RELEASE RELEASE WIDTH D R Y MONO MINIC ANGLE AMT OUTPUTIn this part, you can first adjust the input and output level of RingX. Each effect has its own level and dry/wet settings, so the OUTPUT knob allows you to adjust the final level of the processed sound.
Almost all of the Ring'X analog like effects are not linear, featuring internal limitation or level related processing. This means that the sound would change depending on the input level (more or less distortion or harmonics generated by the effects). Adapting this level with the INPUT knob allows you to control these behaviors.
This part also allows you to control the four input trackers and the Dynamic Stereo Space.
5.1.1 Transient Tracker

text_image
TRANSIENT PASS TIME SOLO SENSIB. RELEASEThis module detects the transients present in the input sound. Each transient will trig an simple envelope without attack and with a release controlled by the RELEASE knob.
Two parameters control the sensibility of the detection, one, TIME, controlling the minimum time between two adjacent transients to be detected, the other, SENSIB. controlling the minimum relative level of the transient.
These two parameters can be adjusted either by turning the corresponding knobs or by moving the green dot in the 2-D pad. While moving this dot, you will hear the detected transients. But you can, also hear this result by engaging the SOLO switch.
The switch below the Transient label allows you to enable/disable this module (if the Transient Tracker is not used, it's better to disable it for saving CPU).
At the right of this module, a small vu-meter shows the level of the transient envelope.
5.1.2 S-Detection
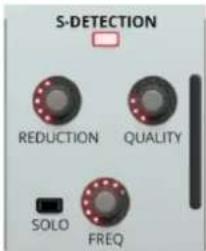
text_image
S-DETECTION REDUCTION QUALITY SOLO FREQThis module detects the sibilance present in the input sound. If the input is not a voice, it can also to be used to separate the parts with high frequencies from the part with more middle and bass frequencies (hit-hat from drum basses for instance).
Three parameters control the sensibility of the detection:
FREQ, controlling the frequency threshold which separates the audio spectrum. REDUCTION, controlling the sensibility of the sibilant detection. QUALITY, controlling the smoothness of the detection.
Engaging the SOLO switch, you will hear the detected sibilant.
The switch below the S-DETECTION label allows you to enable/disable this module (if the sibilant Tracker is not used, it's better to disable it for saving CPU).
At the right of this module, a small vu-meter shows the level of the sibilant envelope.
5.1.3 Input Gate

text_image
GATE LEVEL HYST. ATTACK RELEASEThis module allows to remove from the input sound, all the parts which are bellow a threshold.
Four parameters control the sensibility of this gate:
LEVEL, controlling the level of the threshold.
HYST., controlling the hysteresis of the threshold (for closing the gate, the level must be lower than the threshold minus the hysteresis, for opening the gate, the level must be higher than the threshold plus the hysteresis).
ATTACK, controlling the attack of the gate (the smoothness of the opening).
RELEASE, controlling the release of the gate (the smoothness of the closing).
This module is always activated (so make sure the threshold is below the sound level you want to process).
5.1.4 Dynamic True Stereo Space
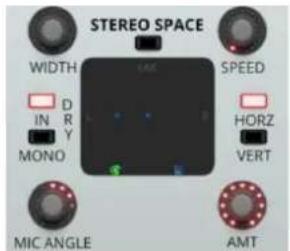
text_image
STEREO SPACE WIDTH IMT SPEED D IN R Y HORZ MONO VERT MIC ANGLE AMTRing'X offers powerful stereo processing allowing you to put your audio signal in a true stereo space. This is done in an easy and intuitive way as well as giving you an authentic stereo feeling.
You can only process the wet signal (the blurred lights) or, by clicking on the DRY button, also process the dry signal. You can also process a stereo input signal as a mono source by engaging the DRY MONO switch.
Important: As in reality, putting your audio sources far from the microphones will reduce the level. You will need to compensate for this, using the general output level, which offers a wide range. If you are processing the dry signal, the relative position between them directly affects the mix of the dry and wet signal. You may need to compensate with the global Dry/Wet level.
MIC ANGLE sets the position of the microphones and WIDTH, makes the space more or less wide. Moving the lights around the area gives you ability to position your sound as required.
Right click allows you to keep the left/right balance identical.
Clicking and moving the microphones allows you to open your stereo effect.
As with the bucket-brigade settings, you can add chaotic movement to the stereo position of your wet signal, with AMOUNT and SPEED, HORZ and VERT allowing the animation to be horizontal or vertical only.
Blue and Green lights are for the right and left dry channels.
Blurred Circled Blue and Circled Green lights are for the right and left wet channels.
5.2 Sequencers
In this area, you can setup either a standard step sequencer or a more specific locator sequencer.
In the step sequencer, the loop goes through a defined number of steps and each time the internal clock is fired, the next step is triggered. The internal clock can be synced to the DAW and be tweaked to match the current DAW tempo.
On the other hand, the locator sequencer is designed to be synced to the DAW, the loop being synced to the DAW bar (or a multiple of the bar). In this sequencer, you can add up to 16 locators, which can be moved anywhere inside the bar (or several bars) for adding an effect specific beat (or any part of the bar(s))
By clicking on the SEQ/LOC switches, the interface of the corresponding sequencer is displayed. Note that even hidden, the sequencer which is not displayed, will keep running if enabled.
Tips: To finely set a level, either in the Sequencer or in the Locator, start the application playing, stop the sequencer/locator by clicking on the START button, click on the SET button. Select the step or locator you want to change. You can now hear the effect of this current modulation on your audio material. Do the same on each step/locator you want to adapt.
Then switch off the SET button and start the sequencer/locator again (or stop and start your application again).
5.2.1 The Locator Sequencer

text_image
SEQ LOC 1 BAR 1/4 GRID SNAP DAW 120.00 TEMPO SET ATTACK RELEASEThe locator sequencer output will be generated only when the current time, relative to the DAW's bar is entering a Locator. There are two outputs for this sequencer. One is named "gate", the other "Level". In the first case, the output level will be 1.0 inside a locator, 0.0 otherwise, processed by the simple Attack-Release envelope. In the other case, the output will be set according to the position of the line inside the Locator, also processed by the simple Attack-Release envelope.
In other words the Locator Sequencer lets you specify, in a very accurate way, which part of the bar will be processed by any of the Ring'X effects.
Creating a Locator: To create a new locator, just Left click in any black part of the grid, or in other words, somewhere else other than in another locator.
If you only left click in the grid a new locator with a standard length will be created. You can always change the length of the locator later. If you want to specify the length of a locator immediately while creating it, you'll have to click and drag: Just left click to define the place of the left locator, and while keeping the left click on, drag the mouse until you reach the desired end of the Locator.
You can create up to 16 different Locators.
Deleting a Locator: Just Right Click in a Locator area, i.e. between its two limits, to delete it.
Editing Locators: Just click and drag the left or right limit of a Locator to change its position in the Grid. Locators can also be quantized. (See Below)
The Locator Level Parameter: Within each Locator you can see a small horizontal line (A freshly created Locator will inherit a default one located at mid height) this is the Level Parameter. This is not a standard level parameter, but merely a modulation source, which can be used to further modulate Ring'X effects.
At the right of the grid, you can find two envelope parameters, Attack and Release.
Please note that these two parameters are global, and will therefore affect all the Locators of the Grid.
You can see the Attack parameter as a Fade-In for each locator The Attack parameter is based on each Locator's left limit.
The Release parameter is identical to fade out. You can use this parameter to prevent eventual sharp or brutal transitions (clicks and pops at the end of the modulated effect). Each Locator's right limit triggers this fade-out.
Number of bars: Specifies the length of the Grid loop in bars. The choices are 1/2/3/4 bars. Please note that the existing Locators will be preserved if you change the number of bars on the fly.
Use the SNAP Mode to quantize locators and align them according to the GRID PRECISION settings. To quantize a locator, just click on it in the Grid, while the Snap mode is active.
Please note that the quantized position of the Grid is set according to the GRID precision setting. If the GRID precision is set to 16^th notes, then the locator will be quantized on the nearest 16^th note position.
The grid displays green vertical bars based on a musical division of the bar and beat. These vertical bars are just indicators, which help you, define, create and edit the Locators with the best possible precision.
However, please note that, when the SNAP function is enabled, the quantized locators will be positioned according to the Grid Precision settings.
The rate of the Locator Sequencer is based on the Tempo, either the Tempo of the current DAW project, or a free one, submitted in the edit box (when the Locator sequencer is linked to the DAW tempo, then this edit box displays this tempo and cannot be changed).
To start the Locator Sequencer, just click on the PLAY button.
5.2.2 The Step Sequencer

text_image
SEQ LOC EDIT VIEW 1 2 3 4 +50% 0% -50% 8.00 8.00 DAW STEP 120.00 TEMPO SET ATTACK RELEASEThis step sequencer has four independent tracks which can be used as a source for modulating any of the Ring'X effects.
STEPS: Increase or decrease the number of the sequencer steps (up to 128)
To activate a step, click on the EDIT button of the track you want to change, left click in the corresponding slot and move the line to the desired level. For removing a step, right click on the corresponding slot.
Click on the DISPLAY button of each track you want to show.
At the right of the grid, you can find two envelope parameters Attack and Release.
You can see the Attack parameter as a Fade-In for each step. The Attack parameter is based on each Locator left limit.
The Step Sequencer is linked to the DAW and DAW tempo in the same way as the Locator Sequencer (see above).
The rate of the Step Sequencer is based on the Tempo, either the Tempo of the current DAW project, or a free one, submitted in the edit box (when the Locator sequencer is linked to the DAW tempo, then this edit box displays this tempo and cannot be changed).
To start the Locator Sequencer, just click on the PLAY button.
Please note that these two parameters are global, and will therefore affect all the sequencer tracks.
5.3 The Effects Slots

flowchart
graph LR
    A["ParE/Q"] --> B["None"]
    B --> C["None"]
    C --> D["None"]
    D --> E["None"]
    E --> F["None"]
    F --> G["DRY/WET"]
Ring'X has seven effects ready for you to use. These are all analog like effects, with plenty of modulations, ready to be inserted into one of the six available slots:
-
Chorus.
•Delay. -
Phaser.
•Reverb.
•Multimode Self oscillating Filter. - Parametric EQ.
- Distortion.
To add an effect in Ring'X, click on the slot menu, select the effect from the drop down menu. To display its parameter, click on the DISP button. To send the wet processed signal to the Stereo Space, click on the SEND button and, to enable it, click on the ON button.
If you want to change the order of the effects, click on the arrows, left or right. This will move the effect (with all its settings) one slot to the right or the left, exchanging it with the previous effect.
The Ring'X global DRY/WET knob allows you to mix the input with the final output of Ring'X.
5.4 Ring'X effects
5.4.1 Modulations

text_image
MODULATION Name SOURCE AMOUNT NAME DESTINATION Source AMOUNT NAME DESTINATION Source AMOUNT NAME DESTINATION Source AMOUNT NAME DESTINATIONEach Ring'X effects provides 4 modulation points, with a SOURCE and a DESTINATION menu, associated with an AMOUNT knob.
Destinations depend on the effects, but sources are selected from the three input trackers and two sequencer outputs. The AMOUNT helps you to finely tweak how the modulation will change the effect's parameter destination.
5.4.2 MultiMode Self-oscillating Filter

text_image
ANALOG FILTER LP24 LP12 HP12 BP12 BP6 FREQ. RES. DRIVE DRY/WETThis filter has been modeled from the CMS 3320 chip, used in the Synthex synthesizer and provides five self-oscillating filter type.
At the right of the modulation area, you will find the Filter's parameters.
Click on the LP24, LP12, HP12, BP12 or BP6 switch to choose the corresponding filter type, 24db Low-Pass, 12db Low-Pass, 12db High-Pass, 12db Band-Pass or 6db Band-Pass.
Select the cutoff with the FREQ Knob, the resonance with the RES Knob (over 3.9 the filter will oscillate around the cutoff frequency) and the internal current limitation emulation with the DRIVE knob.(the more you turn it clockwise, the more saturation you will get).
The DRY/WET knob mixes the input and the output of this effect (independently on the global Ring'X DRY/WET settings.
5.4.3 Self-oscillating 18db Filter

text_image
ANALOG 18db FILTER FREQ. RES. DRY/WETThis filter has been modeled from the VSC3 18db self-oscillating filter, lesser slope than the well known 24db ladder filter, it has a specific sound and behavior.
At the right of the modulation area, you will find the Filter's parameters.
Select the cutoff with the FREQ Knob and the resonance with the RES Knob (over 3.9 the filter will oscillate around the cutoff frequency).
The DRY/WET knob mixes the input and the output of this effect (independently on the global Ring'X DRY/WET settings).
5.4.4 Chorus (Bucket Brigade Delay based)
The DRY/WET knob mixes the input and the output of this effect (independently on the global Ring'X DRY/WET settings).
Set the rate of the internal low frequency oscillator of the chorus with the SPEED knob. Increase the differences between the internal audio paths with the SPREAD knob AMOUNT sets the amount of the chorus effect and, STEREO increases the stereo width of the effect.

text_image
CHORUS (BUCKET BRIGADE DELAY) SPEED SPREAD AMOUNT STEREO DRY/WET INCREASEAnother type of chorus with a deeper treatment can be selected by clicking on the INCREASE switch.
5.4.5 Delay

text_image
DELAY TEMPO SYNC. TIME LEFT FEEDBACK LINK TIME RIGHT FEEDBACK DRY/WETThe DRY/WET knob mixes the input and the output of this effect (independently on the global Ring'X DRY/WET settings).
This delay is a stereo delay which copies the input signal to the left and a right channel. This copy is done with a delay adjusted with the TIME knob and a level adjusted with the FEEDBACK knob.
Left and right settings can be linked by engaging the LINK switch. In that case, each modification of a channel parameter will be applied in a relative way to the other.
The delay can be set to a multiple or submultiple of the current DAW tempo by engaging the TEMPO SYNC switch.
5.4.6 Phaser

text_image
PHASER SWEEP EMPHASIS WIDTH AMOUNT SPEED DRY/WETThe DRY/WET knob mixes the input and the output of this effect (independently on the global Ring'X DRY/WET settings).
SPEED: Adjusts the speed of the modulation.
AMOUNT: Adjusts the amount of the modulation (the width of the frequency sweep)
WIDTH: Sets the differences between the left and the right channel.
EMPHASIS: Adjusts the level of the internal feedback, allowing an increase or decrease in the level of the harmonics swept by the phaser.
SWEEP: Adjusts the frequency around which the modulation is to be set.
5.4.7 Reverb

text_image
L TYPE M S REVERB LEVEL TIME DELAY DAMP FILTERThe reverb has three algorithms, "L", "M" and "S" for Large, Medium and Small, which can be chosen with the three-position selector TYPE.
TIME: Adjusts the reverb time.
LEVEL: Adjusts the level of the reverb.
DAMP: Adjusts a high frequency's release.
DELAY: Adjusts the pre-delay before the effect.
5.4.8 Parametric Equalization

text_image
PARAMETRIC EQ B1 DRY/WET DRY ON FREQ. RES. GAIN LP 64b B2 DRY ON FREQ. RES. GAIN LP 64b B3 DRY ON FREQ. RES. GAIN LP 64bThe DRY/WET knob mixes the input and the output of this effect (independently on the global Ring'X DRY/WET settings).
This effect is a 3 band equalization. The type of each band can be selected by the TYPE menu from 6 standard filter types (Low-Pass, High-Pass, Low-Shelf, High-Shelf, Bell, ...). The cutoff frequency is adjusted with the FREQ knob, the resonance with the RES knob and the level with the GAIN knob.
Each band can be switched ON and the spectrum of the resulting equalization is shown in the display screen.
5.4.9 Distortion

text_image
DISTORTION ON TONE BASS MIDDLE TREBLE LEVEL DRIVE DRY/WET VALVE TRANS.The DRY/WET knob mixes the input and the output of this effect (independently on the global Ring'X DRY/WET settings).
This distortion features a simple equalization by engaging the TONE switch, with the BASS, MIDDLE and TREBLE level knobs setting the level of the three filters: Bass shelf, Middle boost and Treble shelf.
The DRIVE knob increases the effect and the LEVEL knob adjust the output level of this distortion.
6 Option menu
This menu allows you to choose the global settings. These settings are defined for all the instances of the Chor'X. Each time an option is changed, the related option file is saved.
6.1 Main
In the toolbar, the Options button opens a menu for selecting various options for the Ring'X. This menu shows the following options settings:
Ring'X About: displays information about the Ring'X (version, build date and credits).
Open MIDI settings panel: Opens a pop-up where you can assign MIDI controllers for each of the Ring'X's parameters. Click on the parameter label to select the parameter you want to assign, then enter the MIDI controller number (from 0 to 127), or switch on the learning switch and send a MIDI command with the correct MIDI controller number. The Ring'X will memorize it. This setting pop-up can also be opened by CTRL+ALT+Apple+Left-click (Mac) or CTRL+Win+ALT+Left-click (Win) on the desired Ring'X parameter.
In that panel, you can also import or export your MIDI settings.
6.2 Display
Display low frequency as BPM: Allows displaying the low frequency in BPM instead of Hz.
Output level follows presets: When checked, this option allows the output level to follow the presets. That means that the output level is programmed with the value saved in the preset. Otherwise, it keeps its value.
GUI follows presets: When checked, this option allows the GUI to follow the presets. That means that the Advanced Settings Panel will or will not be opened depending on the loaded preset.
Popup On: shows a pop-up window while modifying the value of a knob. Popup Over On: shows a pop-up window when the mouse is over a switch. Popup Name On: the name of the current modified parameter is displayed.
Display: In this sub-menu, you can select the size of the GUI. You will need to relaunch Ring'X for the new size to be taken into account.
6.3 Misc
Init settings from current settings: initializes the default values of the Ring'X from the current settings. All the new presets will be created from these settings, when the init settings choice is selected. These parameters will also be used when setting a control to its default value. (Win: CTRL+Click, OSX: ALT+Apple+Click).
Disable Downsize at Launch: When engaged, this setting disables the downsize at launch and processes it when it is redrawn. This takes a bit more CPU, but with better rendering with some screens and computers.
Wheel Incr: 0.01: parameter increment of 0.01 when using the mouse wheel.
Wheel Incr: 0.05: parameter increment of 0.05 when using the mouse wheel.
Wheel Incr: 0.1: parameter increment of 0.1 when using the mouse wheel.
7 Credits
Concept of Ring'X and original UI design was done by:
Xavier Oudin
Digital Signal Processing and plug-in coding was done by:
Xavier Oudin
The graphical user interface was created by:
Xavier Oudin
The graphics created by:
Yannick Bonnefoy
This manual was written by:
Xavier Oudin
And proofread and corrected by:
Peter Binskin
The presets were done by:
XILS-lab, Status (Daniel Stawczyk)