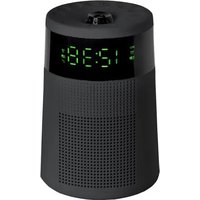
CR72 - Alarm Clock Lenoxx - Free user manual and instructions
Find the device manual for free CR72 Lenoxx in PDF.


| Product Type | Alarm Clock Radio |
| Brand | Lenoxx |
| Model | CR72 |
| Power Source | AC 230V ~ 50Hz, 3W |
| Battery Backup | CR2032 coin cell (not included) |
| Frequency Range | AM 540-1600 KHz, FM 88-108 MHz |
| Power Output | 400 mW |
| Alarm Modes | Radio or Buzzer |
| Number of Alarms | 2 (Alarm 1 and Alarm 2) |
| Sleep Timer | 10 to 90 minutes (adjustable) |
| Snooze Duration | 9 minutes |
| Projector | Time projection onto ceiling, focus adjustable |
| Radio Bands | AM and FM |
| Preset Stations | Multiple memory presets |
| Display | LED clock display with PM indicator |
| Antenna | Wire antenna for FM/AM |
| Safety Features | Indoor use only, unplug when not in use, keep away from water |
| Maintenance | Clean with soft dry cloth; do not use liquids |
| Repair | No user-serviceable parts; contact qualified technician |
Frequently Asked Questions - CR72 Lenoxx
User questions about CR72 Lenoxx
0 question about this device. Answer the ones you know or ask your own.
Ask a new question about this device
Download the instructions for your Alarm Clock in PDF format for free! Find your manual CR72 - Lenoxx and take your electronic device back in hand. On this page are published all the documents necessary for the use of your device. CR72 by Lenoxx.
USER MANUAL CR72 Lenoxx
The illustrations used in the manual are to illustrate the operation method and product structure of the product. Where there is a small difference between the physical item and the illustrations, please take the physical as the standard.
IMPORTANT SAFEGUARDS:
Please read and retain these instructions for future reference.
Remove the appliance from its packaging and check that it is in good condition before use.
Do not let children play with any parts of the packaging (such as plastic bags, etc.).
Check the household voltage matches the appliances rated specification.
The appliance is designed for indoor household use only. Do not use it outdoors.
Never immerse the appliance or plug in water or other liquid. Do not expose the appliance to dripping or splashing and that no objects filled with liquids, such as vases, shall be placed on appliance
Always unplug the appliance when not in use. Never unplug the appliance by pulling on the power cord. Unplug it by holding the plug.
Do not touch the appliance, the power cord or power plug with wet hands.
The appliance does not contain any serviceable parts inside. Do not attempt to open and repair the unit yourself. All components should only be serviced by a qualified technician.
Do not use the appliance if the plug, power cable or unit itself are damaged.
If the power cord is damaged, you must have it replaced at a service centre with qualified persons in order to avoid a hazard.
Plug the cord directly into an appropriate power point. To provide continued protection against risk of electric shock, connect it to properly grounded power points only.
The mains plug is used as the disconnect device. The mains plug should not be obstructed and needs to remain readily accessible during intended use. To completely disconnect the power input, the mains plug needs to be unplugged from the mains power.
Do not place any objects inserted into vents and exhaust ports, as it may cause an electric shock, fire and damage the product.
Warning:
This model features a battery backup system using a CR2032 coin type battery (not included).
Do not expose the battery to excessive heat such as sunshine, fire or the like.
Please ensure that this compartment remains screwed closed.
Ensure that children do not access any coin type batteries as they are hazardous to children.
LOCATION OF CONTROLS:

- Sleep Button
- TU- HOUR BUTTON: Hour Button/Tuning - Button
- TU+ MINUTE BUTTON: Minute Button/Tuning + Button
- Pre/M+/TIME Set
- Projector and focus dial
- AM/FM
- VOL - AL1 BUTTON: Alarm 1 Set / Volume Decrease
- VOL + AL2 BUTTON: Alarm 2 Set / Volume Increase
- ON/OFF
- Snooze button / Projection ON/OFF
OPERATING INSTRUCTIONS:
Setting the clock:
- You must switch off the radio before you set the clock time.
- Press and hold the "Pre/M+/TIME Set" button until the display begins to flash.
- Press the Hour and Minute buttons to adjust the time.
If the hour is in PM, press the Hour button until the PM indicator is shown on the display. - Press the "Pre/M+/TIME Set" button again to finish setting the time.
Setting the Alarm:
-
You must switch off the radio before you set the alarm time.
-
Press and hold the "VOL + AL 1" or "VOL - AL 2" button until the Hour display begins to flash.
-
Use the "TU-HOUR BUTTON" to change the hour
-
Use the "TU+ MINUTE BUTTON" to change the minute.
-
When your chosen alarm time is shown on the screen, do not touch anything. The time will blink on the screen for 5 seconds. When the time display shows the current time, the alarm has been saved.
-
Press the "VOL + AL 1" or "VOL - AL 2" button again to select a wake mode (wake by radio or by buzzer). The display will show an icon of a bell to indicate wake by buzzer; the radio icon indicates wake by radio.\
To turn off an alarm – once it has sounded – press the ON/OFF button.
The alarm will sound again the next day.
Canceling the Daily Alarm:
If you do not want the alarm to sound, press the “VOL + AL 1” or “VOL - AL 2” until there is no buzzer or radio icon shown on the screen.
Setting the Sleep Time:
-
You must switch off the radio before you set the alarm time.
-
Press the Sleep button repeatedly to set the sleep time (90, 80, 70, 60, 50, 40, 30, 20, 10 min or OFF). The radio will turn itself off after the set amount of time has elapse
Snooze:
Press the SNOOZE button when the alarm is sounding to stop the alarm, and have it sound again automatically after 9 minutes.
To use the projector:
The projector time is synchronized with the main clock.
You just need to press the "Projection ON/OFF" button (also the SNOOZE button) to turn on the projector.
Then turn the focus dial to focus the image.
The angle of the projector cannot be adjusted. It can only point directly up to the ceiling.
Radio:
To increase radio reception, use the wire antenna.
Ensure the wire antenna is un-wound, hold it upwards and tape it to a wall.
- Press the "ON/OFF" button to turn the clock radio on or off.
- Press the "AM/FM" button to select radio band.
- Press the "TU+" or "TU-" button to tune to the desired station.
- Press the "VOL+" or "VOL-" button to adjust the volume.
Setting Preset memory stations:
- Press and hold the "Pre/M+/TIME Set" button for 2 seconds to save the current station to preset memory. The position number will blink on the screen. While it blinks on the screen within 2 seconds press the "Pre/M+/TIME Set" button once to save that station to the preset memories. If the display shows "P01", the station is saved as Preset 1. If the display shows "P02", the station is saved as Preset 2.
- Press the "TU+" or "TU-" button to tune to another radio station.
Repeat the instruction above to save another radio station.
Continue saving desired radio stations.
- If you wish to save a particular radio station as a certain preset number, that can be done.
When the chosen radio station is shown in the screen,
Press and hold the "Pre/M+/TIME Set" button for 2 seconds to save the current station to preset memory.
The position number will blink on the screen.
While it blinks on the screen within 2 seconds press the "TU+" or "TU-" button to change the position number to a different one. Then press the "Pre/M+/TIME Set" button once to save that station to the preset memories.
SPECIFICATIONS:
Frequency Range: AM 540-1600KHz
FM 88-108 MHz
Power Source: AC 230V \~ 50 Hz, 3W
CR2032 Battery for back up only
Power Output: 400 mW
LENOXX
www.lenoxx.com.au

1300 666 848

LenoxxElectronics

LenoxxElectronics

@LenoxxAustralia


Brand : Lenoxx
Model : CR72
Category : Alarm Clock