Nu-Vista PAM - Receiver Musical Fidelity - Free user manual and instructions
Find the device manual for free Nu-Vista PAM Musical Fidelity in PDF.

| Product Type | Stereo Receiver |
| Brand | Musical Fidelity |
| Model | Nu-Vista PAM |
| Dimensions (W x H x D) | 440 x 100 x 390 mm |
| Weight | 12 kg |
| Power Supply | 230V AC, 50 Hz |
| Power Consumption (Standby) | 20 W |
| Power Consumption (Max) | 150 W |
| Inputs | 2x Phono (MM/MC), 4x Line RCA, 1x Balanced XLR |
| Outputs | 2x Speaker, 1x Pre-out, 1x Headphone |
| Frequency Response | 10 Hz - 40 kHz ±0.5 dB |
| Signal-to-Noise Ratio | > 90 dB |
| Total Harmonic Distortion | < 0.01% |
| Remote Control | Included |
| Finish | Black anodised aluminium |
| Warranty | 2 years |
| Accessories Included | Power cord, remote control, user manual |
| Maintenance | Clean with a soft dry cloth; do not use solvents or abrasives. |
| Safety | Do not expose to rain or moisture. Disconnect power before cleaning or servicing. |
| Repair and Spare Parts | Contact an authorised service centre. Use only original spare parts. |
| General Information | Class A/AB operation with toroidal transformer; Nu-Vista tube technology. |
Frequently Asked Questions - Nu-Vista PAM Musical Fidelity
User questions about Nu-Vista PAM Musical Fidelity
0 question about this device. Answer the ones you know or ask your own.
Ask a new question about this device
Download the instructions for your Receiver in PDF format for free! Find your manual Nu-Vista PAM - Musical Fidelity and take your electronic device back in hand. On this page are published all the documents necessary for the use of your device. Nu-Vista PAM by Musical Fidelity.
USER MANUAL Nu-Vista PAM Musical Fidelity
text_image
MT4 METAL SHELL BASE JEDEC NEES-65 .100" MIN. .130" MAX. .435" MAX. DIA. (NOTE 1) .425" MAX. .800" MAX. ZONE A' (NOTE 2) .190" .016" ± .001" DIA. CERAMIC WAFER SMALL LUGNU-VISTA
SERIES
by
MUSICAL FIDELITY
DESIGNED IN ENGLAND
Installation Guide
NU-VISTA

text_image
NU - VISTA PAM POWER STEY INPUT DISPLAY
text_image
NU - VISTA PAM PSU POWER STBYInstructions for use
Thank you for purchasing the Musical Fidelity Nu-Vista PAM.
Based on our excellent Nu-Vista 800 circuit we decided to go all out "fully balanced" on the Nu-Vista range.
The Nu-Vista PAM features the tried and tested Nu-Vista stage featuring 6S51N nuvistors in a discrete class A amplifier buffer. This is followed by a balanced configuration circuit and balanced input high power, low distortion “bridged” output amplifier stage. The power stages have 2x 5 pairs of high power thermally compensated output devices for reliable and stable operation. Based on Titan 1000W stage, it has separate capacitors for bulk supply, and one each for output devices considerably reducing output impedance and improving dynamics. Chokes are added for further improved supply ripple and pulse current spike reduction. Bias is set for over 5W of initial class A operation thereafter the stage slides into class B operation at a point where the now much lower discontinuity is easier dealt with than “standard” crossover distortion.
The Nu-Vista PAM comes with its own dedicated external power supply, the Nu-Vista PAM PSU. To achieve better noise performance, we removed the AC mains power supply from the main unit and built it into another matching box. In this box we took advantage the extra space to set up inbuilt mains and output filtering. This quietens up the supplies and results in almost no mains-borne artefacts getting into the sensitive audio circuitry.
Used properly and carefully, it should give many years of outstanding musical reproduction.
Dust regularly with a soft duster or soft brush, but be careful when using cleaning or polishing agents - they may harm the surface finish.
The new Nu-Vista PAM and its PSU were a continued labour of love for Musical Fidelity. We are passionate about what we do and passionate about Nuvistor tubes as we have always been. We hope that you derive as much pleasure listening to the Nu-Vista PAM as we had creating it.
If there are any questions about the audio system, please consult the dealer, who is there to help and advise.
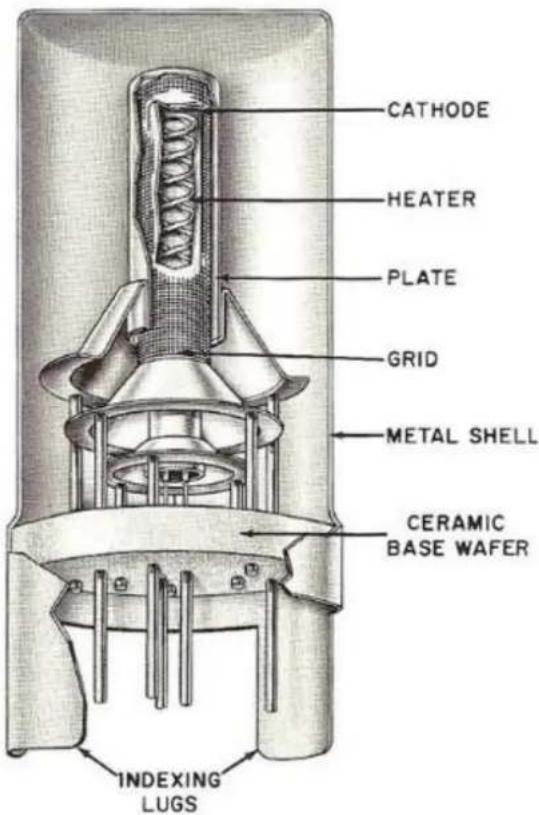
CUTAWAY VIEWS
Showing Cylindrical Electrodes and Tripod-Like Supports
text_image
CATHODE HEATER PLATE GRID METAL SHELL CERAMIC BASE WAFER INDEXING LUGSTypical
Single-Ended
Nuvistor Triode
Section
Page
| Safety Information | - Mains plug (UK only), modification warning | 4 |
| General advice | - Installation precautions | 5 |
| Installation | - Introduction, cleaning, installation, power connections, audio connections, spike feet | 6 |
| Facilities and connections | - Illustrations, front & rear panels | 8 |
| Operation | - Starting | 10 |
| - Switching Inputs | ||
| - Display Controls | ||
| - Power Off | ||
| - Wiring | 11 | |
| Problems? | - Basic fault finding | 12 |
| Specifications | - Product specifications | 13 |
| Manual history | 14 | |
| Item disposal information |
IMPORTANT! (U.K. only)
This unit is supplied in the U.K. with mains lead fitted with a moulded 16 amp plug. If, for any reason, it is necessary to remove the plug, please remove the fuse holder and dispose of the plug safely, out of reach of children.
It must not be plugged into a mains outlet.
The wires in the mains lead supplied with this appliance are coloured in accordance with the following code:

text_image
...... Earth ...... Neutral ...... LiveWARNING – This appliance MUST be earthed
As the colours of the wires of the mains lead of this appliance may not correspond with the coloured markings identifying the terminals in the plug, proceed as follows:
- The wire which is coloured green-and-yellow must be connected to the terminal in the plug which is marked with the letter E or coloured green or green-and-yellow, or by the earth symbol:
- The wire which is coloured brown must be connected to the terminal which is marked with the letter L or coloured red.
- The wire which is coloured blue must be connected to the terminal which is marked with the letter N or coloured black.
- If connecting to a BS1363 plug, a 13 amp fuse must be used.
WARNING:
ANY MODIFICATIONS TO THIS PRODUCT NOT EXPRESSLY APPROVED BY MUSICAL FIDELITY WHO IS THE PARTY RESPONSIBLE FOR STANDARDS COMPLIANCE COULD VOID THE USER'S AUTHORITY TO OPERATE THIS EQUIPMENT.
Installation, Precautions & User Information
This new Nu-Vista PAM is designed and built to provide trouble-free performance, but as with all electronic devices it is necessary to observe a few precautions:
- Heed all warnings shown on the back of the product.
- Only connect the Nu-Vista PAM to a mains outlet having the same voltage as marked at the back of the unit.
- Always ensure that when disconnecting and reconnecting your audio equipment the mains supply is switched off.
- Position the mains lead and signal interconnects where they are not likely to be walked on or trapped by items placed on them.
- Do not use near water, or place water-filled containers on the Nu-Vista PAM & PAM PSU, for example, a flower vase or potted plants. If water does spill inside, immediately pull out the mains plug from the wall socket and inform your dealer, who should then check the unit before further use. Entry of liquid into the Nu-Vista PAM and PAM PSU is dangerous, and may cause electric shock or fire hazard.
- This unit features a BRIDGED speaker output and should NOT be grounded on either speaker output terminal as both terminals are effectively "hot", i.e. carry signal. Please check if using any active "sub", electrostatic, or other non standard potentially grounded speaker types directly connected to the outputs of the Nu-Vista PAM. Consult speaker manual or supplier if in doubt.
- Do not place the unit near direct heat sources such as radiators, direct sunlight or other equipment.
- Do not remove any covers or try to gain access to the inside. There are no internal adjustments or fuses you can replace yourself. Refer all service work to an authorised Musical Fidelity agent. * Note: Unauthorised opening of the equipment will invalidate any warranty claim.
- Dust regularly with a soft cloth or soft brush but be careful when using cleaning or polishing agents - they may harm the surface finish.
The electronics in modern hi-fi equipment is complex and may, therefore, be adversely affected or damaged by lightning. For protection of the audio system during electrical storms, remove the mains plugs.
If after-sales service is required, to help the dealer identify the Nu-Vista PAM & PAM PSU please quote the serial number located on the rear panel of the unit.
Introduction
Congratulations on the purchase of the new Nu-Vista PAM mono block power amplifier. Great attention has been paid to internal layout, isolating each circuit section to prevent possible interaction. The unit features a finely tuned and tweaked Nu-Vista valve design, for smooth sound coupled with low noise and virtually no distortion.
The power amplifier consists of two top quality power amplifiers for the absolute best in separation and imaging. Generously rated, they are enough to drive even the most demanding loudspeakers with ease. Low distortion and very quiet they will deliver all music types exactly as the artist originally intended.
The resultant performance achieved by this unit is among the best in the world. It has excellent signal to noise ratio, low distortion, wide bandwidth and dynamic range, with extraordinary resolution and fine detail.
Cleaning
Before cleaning the unit, switch off power at the mains switch and remove the mains plug from the wall socket. Clean the cabinets using a moist cloth. Using solvents, white spirit or thinners is not advised, as they could damage the surface finish.
Setting up
Position the Nu-Vista PAM and its PSU on a stable, horizontal surface where there is no risk of it being knocked.
Make sure ALL units involved are switched off and unplugged from mains supply before making or removing any connections. We recommend to place the Nu-Vista PAM PSU next to the PAM unit itself, with as much space between them, so that all power cables can be connected comfortably and there is no extra strain on the cables.
Important note:
During normal operation, the unit dissipates an appreciable quantity of power at all times, and it is important that it is well ventilated. The top and bottom are perforated to allow the smooth flow of heat through the unit. However, the unit must not be enclosed in a cabinet or placed where the ventilation holes are impeded as this could result in excessive heat build-up.
The Nu-Vista PAM must be protected from humidity – if the unit is moved from a cold place to a warm room, leave the unit for an hour or so to allow sufficient time for the moisture to evaporate.
Audio Connections
Inputs: The Nu-Vista PAM has single ended (RCA) line level and balanced (XLR) line level inputs. Choose the desired input to be used:
Unbalanced RCA Line Level Inputs:
Connect all RCA single-ended sources to relevant analogue inputs (see page 8 for more information). Use good quality fully connected (signal and ground) coaxial phono cables for all RCA signal connections. Take care with positioning all input leads, try to ensure that they are well shielded and kept as far away from mains and speaker leads as possible.
Balanced XLR Line Level Inputs:
Connect source balanced outputs to the Nu-Vista PAM balanced inputs using good quality XLR balanced leads. Recommended lead wiring is shown on P.8. Note some products simply connect "cold" input pin 3 to ground. This does no harm to unit, but may result in an audible reduction in signal level from this input and a slightly worse signal to noise ratio.
Note: in both input cases it is assumed that the driving preamplifier has a VOLUME CONTROL to allow setting of listening level. This is important as the Nu-Vista PAM has no control of its own.
Outputs: The Nu-Vista PAM has a single ended (RCA) line level and balanced (XLR) line level output. The output sockets allow loop through of the input signal, for example to pass on to a recorder, monitor, additional amplifier or active subwoofer.
Speaker Outputs: Connect a loudspeaker to the terminals on the back panel. See "WIRING" P.11 for more details.
NU - VISTA PAM
Mains Power Input on Nu-Vista PAM PSU
Check the Nu-Vista PAM PSU back panel mains switch is set to "OFF". Connect the supplied mains lead to the 16A IEC socket on the back panel. Connect the other end to a mains power socket. Be sure to leave the mains switch in the "OFF" position.
CONTROL, Nuvistor PRE and PA Interconnects from Nu-Vista PAM PSU to Nu-Vista PAM amplifier unit
Connect the 4-pin XLR cable between the CONTROL output on the Nu-Vista PAM PSU and the CONTROL input on the Nu-Vista PAM amplifier.
Connect the 5-pin XLR cable between the Nuvistor Power output on the Nu-Vista PAM PSU and the Nuvistor Power input on the Nu-Vista PAM amplifier. This is powering the Nuvistor stage.
Connect both “Neutrik” cables between the POWER 1 and POWER 2 outputs on the Nu-Vista PAM PSU and the POWER 1 and POWER 2 inputs on the Nu-Vista PAM amplifier. This is powering the bridged power amplifier stages.
Important notes:
- Only switch the Nu-Vista PAM PSU on once ALL connections are made.
- Only connect or disconnect power cables when the ON/OFF switch on the Nu-Vista PAM PSU is set to OFF!
- If the Nuvistor Power cable is wrongly or not connected, the Nu-Vista PAS display will show "Output DC present" and mute the unit. Turn the Nu-Vista PAS and then the PSU off and check the cables again.
Trigger Input and Output
Triggering input and outputs are available to allow the amplifier to be turned on automatically by other equipment or turn on other equipment automatically when the Nu-Vista PAM is turned on. This is a 2-way 3.5mm jack on the back of the unit labelled "TRIGGER". It requires 5 to 12V (either polarity) to switch the amplifier on.
CAUTION!
This amplifier features a BRIDGED output and should NOT be grounded on either output terminal as both are effectively "hot". Please check if using any active "sub", electrostatic, or other non standard speaker types directly connected to the speaker outputs of the Nu-Vista PAM. Consult speaker manual or supplier/dealer if in doubt.
Most high quality speakers will comfortably cope with large power transients. By their nature, these are very quick and will present no thermal problems for a good commercial quality loudspeaker.
However please note that most loudspeakers are not designed for very high sustained listening levels. The Nu-Vista PAM is a very powerful amplifier and will faithfully deliver what is asked of it. If listening levels are set significantly higher than normal, it is possible that the loudspeakers could get into thermal problems and be damaged. Musical Fidelity will not be responsible for any loss or damage to loudspeakers.
Please take care with listening levels, which can damage hearing, and consider the noise suffered by others, such as neighbours.
Additional note-
If bi-amping, please ensure that all speaker shorting links linking treble and bass units are removed. Failure to do so may result in damage to connected amplifier(s). See loudspeaker instructions for more information.
Mounting optional Spike Feet
The Nu-Vista PAM and PAM PSU can optionally be used with spike feet. We recommend to ask a second person to help you lift the amplifier and PSU units for mounting the feet or felt pads.
If you want to use the standard mounted feet, you can attach the big felt pads to those feet (remove the small rubber feet first if necessary).
To mount the spike feet, screw the threaded rods into the spike feet so that the allen key side is inside the foot (this way, when you want to remove the foot from the amplifier again, you can unscrew the foot and then unscrew the threaded rod from the amplifier with an allen key, should it be too tight to unscrew by hand). Then screw the feet into the amplifier (remove the small rubber feet first if necessary). Attach the small felt pads to the bottom of the spike feet cups and place these cups under the spike feet.

text_image
2 3 4 NU - VISTA PAM POWER STBY INPUT DISPLAT 11 POWER/STANDBY Button
3 SOURCE selector
2 DISPLAY
4 DISPLAY control
text_image
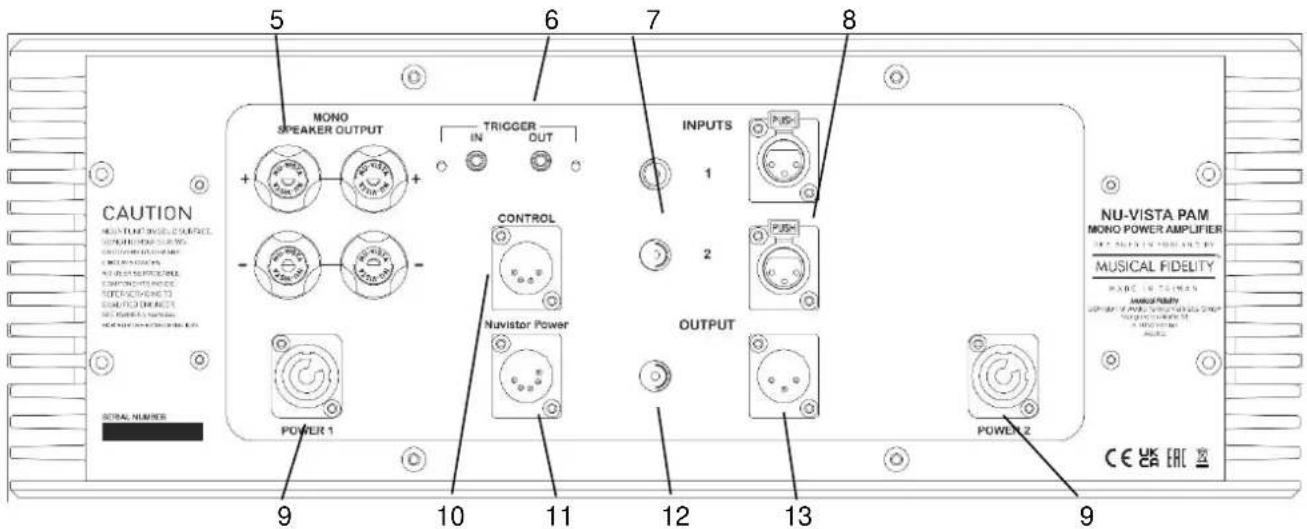
CAUTION MONO TURB DRUGS, SURFACE INTUATION INSURANCE MINISSIONS IN CHAPES INJALAWAUS MINISSIONS IN CHAPES MINISSIONS IN CHAPES MINISSIONS IN CHAPES MINISSIONS IN CHAPES MINISSIONS IN CHAPES MINISSIONS IN CHAPES MINISSIONS IN CHAPES MINISSIONS IN CHAPES MINISSIONS IN CHAPES MINISSIONS IN CHAPES MINISSIONS IN CHAPES MINISSIONS IN CHAPES POWER 1 CONTROL Nuvistor Power OUTPUT POWER 2 5 6 7 8 9 10 11 12 13 9 NU-VISTA PAM MONO POWER AMPLIFIER MUSICAL FIDELITY MAX. MAX. MAX. MAX. MAX. MAX. MAX. MAX. MAX. MAX. MAX. MAX. MAX. MAX. MAX. MAX. MAX. MAX. MAX. MAX. MAX. MAX. MAX. MAX. MAX. MAX. MAX. MAX. MAX. MAX. MAX. MAX. MAX. MAX. MAX. MAX. MAX. MAX. MAX. MAX. MAX. MAX. MAX. MAX. MAX. MAX. MAX. MAX. MAX. MAX. MAX. Max. MAX. Max. Max. Max. Max. Max. Max. Max. Max. Max. Max. Max. Max. Max. Max. Max. Max. Max. Max. Max. Max. Max. Max. Max. Max. Max. Max. Max. Max. Max. Max. Max. Max. Max. Max. Max. Max. Max. Max. Max. Max. Max. Max. Max. Max. Max. Max. Max. Max. Max. Max. Min: 9 POWER 1 CONTROL Nuvistor Power OUTPUT POWER 2 CE EAC5 LOUDSPEAKER OUTPUT
10 CONTROL 4-pin XLR power input
6 TRIGGER input and output
11 Nuvistor Power 5-pin XLR power inputs
7 RCA SINGLE ENDED inputs 1 & 2
12 RCA SINGLE ENDED line output
8 XLR BALANCED inputs 1 & 2
13 XLR BALANCED line output
9 POWER 1 / 2 "Neutrik" power inputs
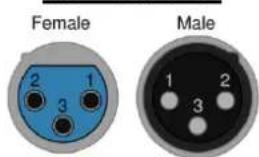
XLR Balanced input and output lead connections:
text_image
Female Male 1 2 3(for reference, no XLR signal leads supplied)
Pin functions:
1 Ground (cable shield)
2 Normal polarity ("hot" or "+"
3 Inverted polarity ("cold" or "-"

text_image
NU - VISTA PAM PSU POWER STBY 1 POWER/STANDBY LED'S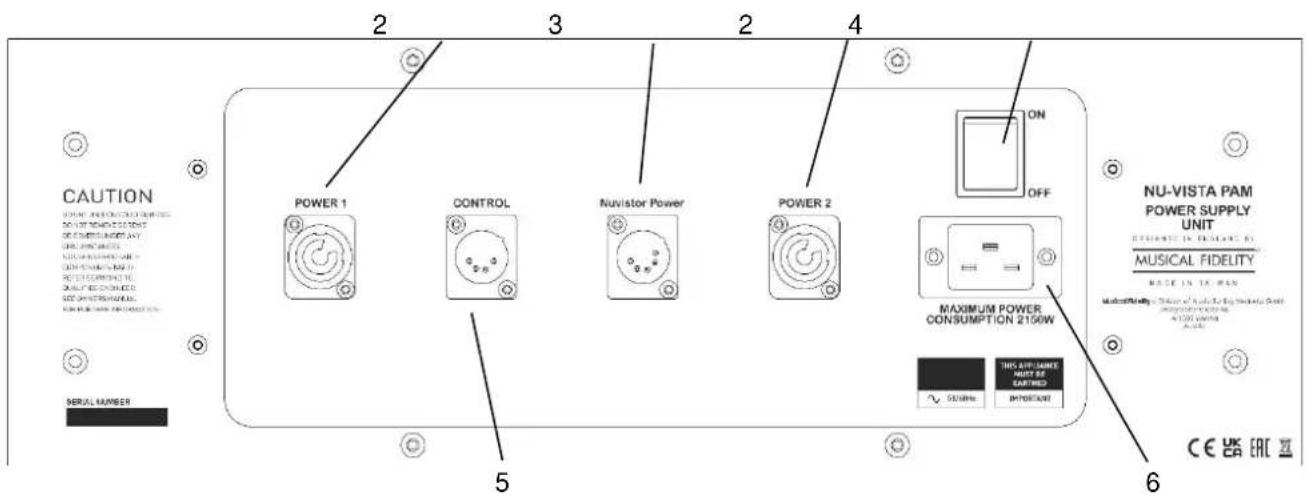
text_image
CAUTION POWER 1 CONTROL Nuvistor Power POWER 2 ON OFF MAXIMUM POWER CONSUMPTION 2150W NU-VISTA PAM POWER SUPPLY UNIT ESTIMATE IN INSTANT B MUSICAL FIDELITY MADE IN TA-REN MINISSIONAL "Slightly" to be the best reliable brand in 1300 units A##. SERIAL NUMBER 5 6 THIS AIR FORCE RIGHT OF EARTHED IMPORTANT CE UK EAC2 POWER 1 / 2 "Neutrik" power outputs
3 Nuvistor Power 5-pin XLR power output
4 ON/OFF switch
5 CONTROL 4-pin XLR power outputs
6 IEC 16A mains socket
Starting
Once all connections are made, switch on the Nu-Vista PAM PSU unit, using the POWER switch on the back panel. The Standby LEDs on both the Nu-Vista PAM and PSU will light up. The Nu-Vista PAM amplifier unit may now be switched fully on using the POWER/STANDBY button on the front of the amplifier. The display will now light up and the POWER LEDs on both units will light up. The LEDs illuminating the Nuvistor valves will light up RED. This means the speaker outputs are muted, and will remain in this state for about 12 seconds, so no sound will be heard from the speakers. Once the delay is up, these LEDs go ORANGE, indicating the unit is ready for use, and any source material selected and playing will be heard through the speakers. For the first 15 mins or so, the Nu-Vista valves are still warming up, and their LEDs stay ORANGE. After approx. 20 mins the valves will have reached full thermal equilibrium and are at their best performance, which is indicated by their LEDs turning BLUE.
Switching Inputs
Switch through the inputs by pressing the INPUT button.
Display Controls
Access the display controls by pressing the DISPLAY button once and then:
Change the theme between black/white, VU meters on/off by pressing the DISPLAY button.
Change the brightness by pressing the POWER (brightness down) and INPUT (brightness up) buttons.
Display controls will automatically exit after not pressing any buttons for a few seconds.
Pressing and holding the DISPLAY button for a few seconds will turn off the Nuvistor LEDs. This only works after the valves have fully warmed up and their LEDs changed from orange to BLUE.
If the valve LEDs are turned on, you can recognize this by a thin blue line that is shown at the top of the display screen.
If the valve LEDs are turned off, this thin blue line is not shown.
POWER OFF CAUTION:
The correct power off procedure should be followed in order to prevent unnecessary power surges on the mains line and to protect the Nu-Vistas. The Nu-Vista PAM amplifier itself should be switched OFF first by the POWER/STANDBY button on its own front panel. Only then turn off the Nu-Vista PAM PSU on its back panel. For day-to-day operation both the Nu-Vista PAM and PAM PSU can simply be switched to ON or into STANDBY using the POWER/STANDBY button on the Nu-Vista PAM front panel.
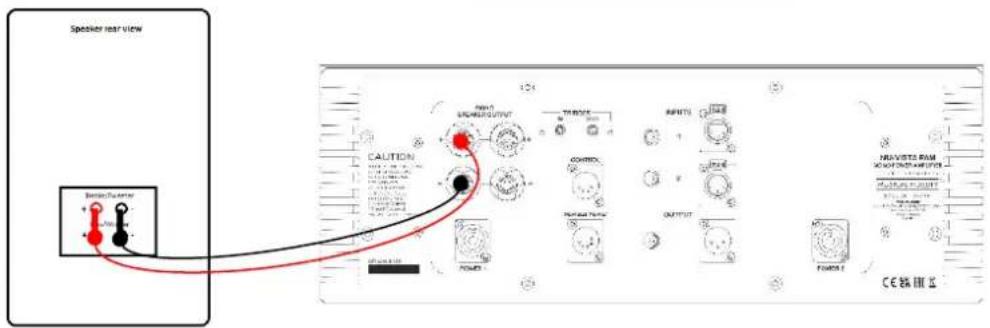
Simple speaker lead wiring
text_image
Speaker rear view Speaker/Server CAUTION OUTPUT CONTROL OUTPUT OUTPUT OUTPUT OUTPUT OUTPUT OUTPUT OUTPUT OUTPUT OUTPUT OUTPUT OUTPUT OUTPUT OUTPUT OUTPUT OUTPUT OUTPUT OUTPUT OUTPUT OUTPUT OUTPUT OUTPUT OUTPUT OUTPUT OUTPUT OUTPUT OUTPUT OUTPUT OUTPUT OUTPUT OUTPUT OUTPUT OUTPUT OUTPUT OUTPUT OUTPUT OUTPUT OUTPUT OUTPUT OUTPUT OUTPUT OUTPUT OUTPUT OUTPUT OUTPUT OUTPUT OUTPUT OUTPUT OUTPUT OUTPUT OUTPUT OutputBass/treble terminal links in
(source and mains leads omitted for clarity)
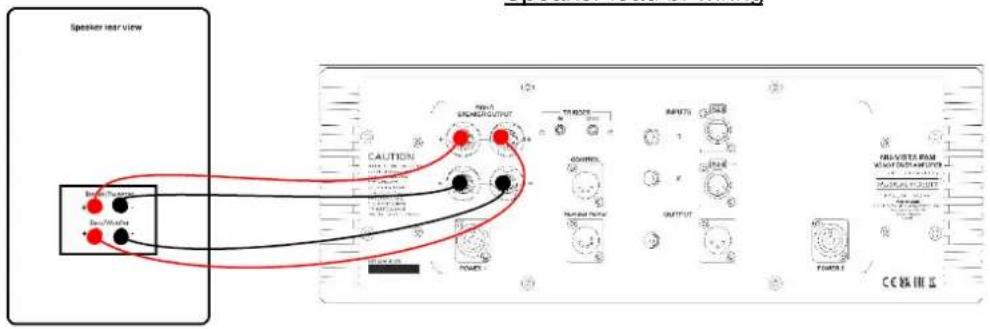
Speaker lead bi-wiring
text_image
Speaker rear view CAUTION RANGE OUTPUT OUTPUT POWER CAPS POWER CAPS POWER CAPS POWER CAPS POWER CAPS POWER CAPS POWER CAPS POWER CAPS POWER CAPS POWER CAPS POWER CAPS POWER CAPS POWER CAPS POWER CAPS POWER CAPS POWER CAPS POWER CAPS POWER CAPS POWER CAPS POWER CAPS POWER CAPs POWER CAPs POWER CAPs POWER CAPs POWER CAPs POWER CAPs POWER CAPs POWER CAPs POWER CAPs POWER CAPs POWER CAPs POWER CAPs POWER CAPs POWER CAPs POWER CAPs POWER CAPs POWER CAPs POWER CAPs POWER CAPs POWER CAPs POWER CAPpBass/treble terminal links removed
(source and mains leads omitted for clarity)
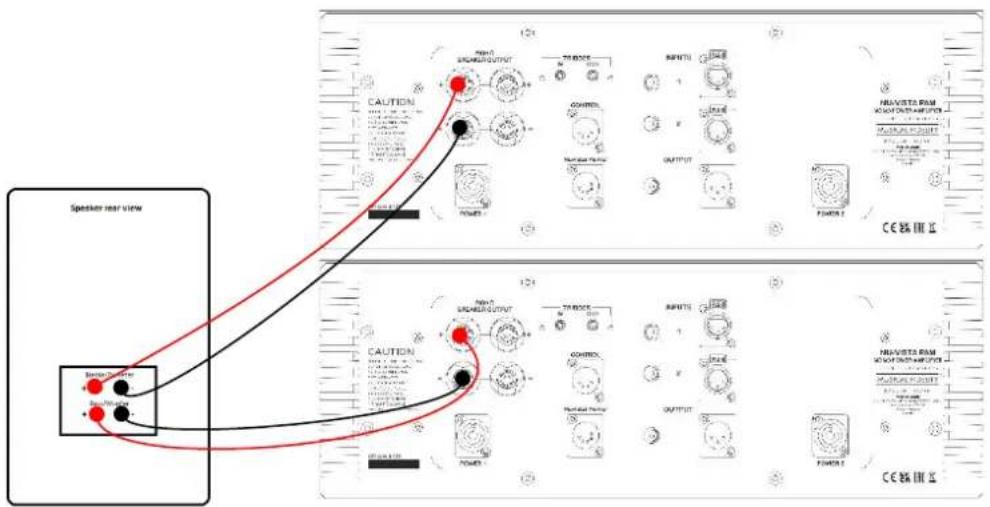
Speaker bi-amping (requires additional power amplifier)
text_image
Speaker rear view CAUTION OUTPUT POWER MAUTURE MAUTURE POWER MAUTURE MAUTURE POWER MAUTURE MAUTURE POWER MAUTURE MAUTURE POWER MAUTURE MAUTURE POWER MAUTURE MAUTURE POWER MAUTURE MAUTURE POWER MAUTURE MAUTURE POWER MAUTURE MAUTURE POWER MAUTURE MAUTURE POWER MAUTURE MAUTTURE MAUTTURE MAUTTURE MAUTTURE MAUTTURE MAUTTURE MAUTTURE MAUTTURE MAUTTURE MAUTTURE MAUTTURE MAUTTURE MAUTTURE MAUTTURE MAUTTURE MAUTTURE MAUTTURE MAUTTURE MAUTTURE MAUTTURE MAUTTURE MAUTTURE MAUTTURE MAUTTURE MAUTTURE MAUTURREN MAUTURREN MAUTURREN MAUTURREN MAUTURREN MAUTURREN MAUTURREN MAUTURREN MAUTURREN MAUTURREN MAUTURREN MAUTURREN MAUTURREN MAUTURREN MAUTURREN MAUTURREN MAUTURREN MAUTURREN MAUTURREN MAUTURREN MAUTURREIN MAUTURREIN MAUTURREIN MAUTURREIN MAUTURREIN MAUTURREIN MAUTURREIN MAUTURREIN MAUTURREIN MAUTURREIN MAUTURREIN MAUTURREIN MAUTURREIN MAUTURREIN MAUTURREIN MAUTURREIN MAUTURREIN MAUTURREIN MAUTURREIN MAUTURREIN MAUTURREOUTBass/treble terminal links removed
(source and mains leads omitted for clarity)
Basic problem-solving with an amplifier is similar to troubleshooting other electrical or electronic equipment.
Always check the most obvious possible causes first, such as the following examples:
| Problem | Probable Cause | Remedy |
| No power when POWER button is pressed. | Mains power plug is not fully inserted into rear socket. Power cables between amp and PSU not correctly connected. | Plug in securely. Connect PA, Control and Nuvistor PRE power cables. |
| No sound | Unit is starting up, valves are still heating up.Wrong connections between input sources and the unitSpeakers not connected, or incorrectly wired | Wait until unit is started up correctly, see page 10.Check audio input lead connections.Check speaker cables. |
| Sound cut | Loose connectionOutput overload or short circuit | Check speaker and input connections.Switch unit off. Check speaker connections for shorting strands or wires. When all has been double-checked reduce volume and switch unit back on.N.B. Take great care when bi-wiring or bi-amping that speaker bass and treble linking straps are removed; see speaker manual for more information. |
| Sound is not precise, lacking in bass and stereo image. | Speakers are connected out of phase, i.e., connections to one speaker(+ and -) are reversed. | Ensure speakers are connected with same polarity at amplifier and speaker ends. |
| Hum. | Audio connector plug not fully pushed inCable FaultUnsuitable cable(e.g. cable grounds not connected) | Insert plug securely.Check cable is connected at both ends.N.B. Some esoteric cables have internal wiring intentionally disconnected/modified. For best results on all inputs analogue AND digital, please use good quality screened coax; signal and screens both separately connected at both ends. |
| No audio output, or too low level output. | Incorrect or missing connections | Check connections and make sure they are secure. |
| LEDs are not lighting up. | LEDs can be turned off, in case they are too bright for dark rooms.Power switch on Nu-Vista PSU is OFF | See page 10 for display controls.See page 10 for starting up. |
If none of these actions affect a cure, please contact the dealer, or an authorised Musical Fidelity service agent. Remember; never open the case of the Nu-Vista PAM and Nu-Vista PAM PSU, as this will invalidate the guarantee.
Output power >600W per channel into 8 Ohms
Output voltage 69 Volts RMS, 20Hz to 20 kHz; onset of clipping
Output current 150 Amps peak to peak
Damping factor 180
Output devices 5+5 pairs per channel
Gain 16x (23.5dB)
THD+N < 0.003 % typical, 20Hz to 20 kHz
Signal / noise ratio > 108dB 'A'-weighted
Channel separation N/A (mono)
Input impedance 100 k Ohms
Input sensitivity for full output 4.3 Volts RMS
Frequency response + 0, -1dB, 5Hz to 50 kHz
Connections
| Line level inputs | 2 line level single ended RCA connectors2 line level balanced XLR connectors |
| Line level outputs | 1 line level single ended RCA connectors1 line level balanced XLR connectors |
| Speaker outputs | 2 pairs 4mm banana plug/binding posts |
| Trigger input and output | 3.5mm mono jack socket |
| Trigger level | ± 5V to ± 12V |
Power requirement
| Mains voltages 115/230VAC 50/60Hz (factory pre-set) | |
| 100VAC 50/60Hz (alternative) | |
| Consumption | <0.5W in standby mode |
| 130W on and idle | |
| 2150W maximum | |
Weight
| Nu-Vista PAM unit only, unboxed | 27 kg |
| Nu-Vista PAM in shipping carton | 35 kg |
| Nu-Vista PAM PSU unit only, unboxed | 40 kg |
| Nu-Vista PAM PSU in shipping carton | 50 kg |
Maximum Dimensions
| Nu-Vista PAM (WxHxD) | 483 x 187,5 x 475 (494 with connectors) mm |
| Nu-Vista PAM PSU (WxHxD) | 483 x 187,5 x 475 (478 with connectors) mm |
Standard accessories
| 1x IEC type mains lead | 16-Amp type |
| 2x POWER power cable (1 m length) | “Neutrik” type |
| 1x Nuvistor PRE power cable (1m length) | 5-pin XLR |
| 1x Control power cable (1m length) | 4-pin XLR |
| 8x Spike Foot | |
| 8x Spike Foot Cup | |
| 8x Spike Foot Screw | |
| 8x Felt pad for Spike Foot Cup | |
| 8x Felt pad for Standard Foot |
Musical Fidelity reserves the right to make improvements which may result in specification or feature changes without notice.

RELEASE
Nu-Vista PAM & PAM PSU
DATE
25 ^th November 2022
CHANGES
1^st issue

DISPOSAL
The crossed out wheeled bin label that appears on the back panel of the product indicates that the product must not be disposed of as normal household waste. To prevent possible harm to the environment please separate the product from other waste to ensure that it can be recycled in an environmentally safe manner. Please contact local government office or retailer for available collection facilities.

DISPOSITION
A-1050, Vienna, Austria
www.musicalfidelity.com
Specifications and details are correct as we go to
press, but in the interests of product improvement they
may be subject to change during manufacture.