LTV-27HBG - Television Astar - Free user manual and instructions
Find the device manual for free LTV-27HBG Astar in PDF.


| Product Type | LED Television |
| Brand | Astar |
| Model | LTV-27HBG |
| Screen Size | 27 inches (68.6 cm) |
| Display Resolution | 1920 x 1080 (Full HD) |
| Aspect Ratio | 16:9 |
| Panel Type | LED |
| Refresh Rate | 60 Hz |
| Dimensions (with stand) | 61.5 x 40.2 x 18.5 cm |
| Weight (with stand) | 4.8 kg |
| Power Consumption (typical) | 35 W |
| Standby Power | <0.5 W |
| Input Voltage | 100-240 V, 50/60 Hz |
| HDMI Ports | 2 |
| USB Ports | 1 |
| Composite Video Input | 1 |
| Audio Output | 3.5 mm headphone jack |
| Speakers | 2 x 5 W |
| Wall Mount Compatible | VESA 100 x 100 mm |
| Remote Control | Included (AAA batteries not included) |
| Cleaning Instructions | Use a soft, dry cloth. Do not use liquid cleaners. |
| Safety Warning | Place on a stable surface; avoid exposure to rain or moisture. |
| Spare Parts Available | Remote control, stand, power cord (contact support) |
| Repairability | Limited; contact authorized service center |
Frequently Asked Questions - LTV-27HBG Astar
User questions about LTV-27HBG Astar
0 question about this device. Answer the ones you know or ask your own.
Ask a new question about this device
Download the instructions for your Television in PDF format for free! Find your manual LTV-27HBG - Astar and take your electronic device back in hand. On this page are published all the documents necessary for the use of your device. LTV-27HBG by Astar.
USER MANUAL LTV-27HBG Astar
Dear ASTAR Customer,
Congratulations on your new ASTAR 27"HDTV High Definition LCD Television purchase.
Thank you for your support. For maximum benefit of your set, please read these instructions before making any adjustments, and retain them for future reference. We hope you will experience years of enjoyment from your new ASTAR 27"HDTV High Definition Television.
For assistance, please call 1-877-851-2528.
To purchase or inquire about accessories and installation services for your ASTAR LCD TV, please visit our website at
1-877-851-2528.www.astarelectronics.com or call
We recommend you register your ASTAR 27" HDTV either at our website www.astarelectronics.com or fill in your registration card and mail it in. For peace of mind and to protect your investment beyond the standard warranty, ASTAR offers on-site extended warranty service plans. These plans give you additional coverage during the standard warranty period. Visit our website or call us to purchase a plan.
Write down your Serial Number located on the back of your 27"HDTV.
S/N:
Purchase Date
This product is designed and manufactured to operate within defined design limits, and misuse may result in electric shock or fire. To prevent the product from being damaged, the following rules should be observed for the installation, use and maintenance of the product. Read the following safety instructions before operating the display. Keep these instructions in a safe place for future reference.
* To avoid the risk of electric shock or component damage, switch off the power before connecting other components to the LCD TV.
*Unplug the power cord before cleaning the LCD TV. A damp cloth is sufficient for cleaning the LCD TV. Do not use a liquid or a spray cleaner for cleaning the product. Do not use abrasive cleaner.
*Always use the accessories recommended by ASTAR to insure compatibility.
*When moving the LCD TV from an area of low temperature to an area of high temperature, condensation may form on the housing. Do not turn on the LCD TV immediately after this to avoid causing fire, electric shock or component damage
*Do not place the LCD TV on an unstable cart, stand, ortable. If the LCD TV falls, it can injure a person and cause serious damage to the appliance.
* A distance of at least 3 feet should be maintained between the LCD TV and any heat source, i.e. radiator, heater, oven, amplifier etc. Do not install the product close to smoke. Operating the product close to smoke or moisture may cause fire or electric shock.
*Slots and openings in the back and bottom of the cabinet are provided for ventilation. To ensure reliable operation of the LCD TV and to protect it from overheating, be sure the opening are not blocked or covered. Do no place the LCD TV in a bookcase or cabinet unless proper ventilation is provided.
*Never push any object into the slot on the LCD TV cabinet. Do not place any objects on the top of the product. It could short circuit parts causing a fire or electric shock. Never spill liquids on the LCD TV.
*The LCD TV should be operated only from the type of power source indicated on the label. If you are not sure of the type of power supplied to your home, consult your local power company.
*The power cable must be replaced when using different voltage from that specified in the User Manual. For more information, contact ASTAR.
*The LCD TV is equipped with a three-pronged grounded plug, a plug with a third (grounding) pin. This plug will fit only into a grounded power outlet as a safety feature. If your outlet does not accommodate the three-wire plug, have an electrician install the correct outlet, or use an adapter to ground the appliance safely. Do not defeat the safety purpose of the grounded plug.
*Do not overload power strips and extension cords. Overloading can result in fore or electric shock.
*The wall socket should be installed near the equipment and should be easily accessible.
*Do not touch the power cord during lightning. To avoid electric shock, avoid handling the power cord during electrical storms.
*Unplug the unit during a lightening storm or when it will not be used for long period of time. This will protect the LCD TV from damage due to power surges.
*Do not attempt to repair or service the product yourself. Opening or removing the back cover may expose you to high voltages, the risk of electric shock, and other hazards. If repair is required, please contact ASTAR and refer all servicing to qualified service personnel.
*Keep the product away from moisture. Do not expose this appliance to rain or moisture. If water penetrates into the product, unplug the power cord and contact ASTAR. Continuous use in this case may result in fire or electric shock.
*Do not use the product if any abnormality occurs. IF any smoke or odor becomes apparent, unplug the power cord and contact ASTAR immediately. Do not try to repair the product yourself.
*Avoid using dropped or damaged appliances. If the product is dropped and the housing is damaged, the internal components may function abnormally. Unplug the power cord immediately and contact ASTAR for repair. Continued use of the product may cause fire or electric shock.
*Do not install the product in an area with heavy dust or high humidity. Operating the product in environments with heavy dust or high humidity may cause fire or electric shock.
*Hold the power connector when removing the power cable. Pulling the power cable itself may damage the wires inside the cable and cause fire or electric shock. When the product will not be used for an extended period of time, unplug the power connector.
*To avoid risk of electric shock, do not touch the connector with wet hands.
*Insert batteries in accordance with instructions while using the remote control. Incorrect polarities may cause damage and leakage of the batteries, operator injury and contamination of the remote control.
*If any of the following occurs, please contact ASTAR:
*The power connector fails or fray.
*Liquid sprays or any object drops into the LCD TV.
*The Display is exposed to rain or other moisture.
*The Display is dropped or damaged in any way.
*The performance of the Display changes substantially.
*Operating environment: Temperature: 40°F\~95°F, Humidity: 10% to 90% non-condensing, Altitude: 0\~10.000ft.
Note: In some countries or regions, the shape of the power plug and power outlet may sometimes differ from that shown in the explanatory drawings. However, the method of connecting and operating the unit is the same.
Television Antenna Connection Protection
External Television Antenna Grounding
If an outside antenna/satellite or cable system is to be connected to the LCD TV, make sure that the antenna/satellite or cable system is electrically grounded to provide some protection against voltage surges and static charges.
Article 810 of the National Electrical Code, ANSI/NFPSA 70, provides information with regard to proper grounding of the mast and supporting structure, grounding of the lead-in wire to an antenna discharge unit, size of the grounding conductors, location of antenna discharge unit, connection to grounding electrodes, and requirements of the grounding electrode.

Lightning Protection
For added protection of your LCD TV during a lightning storm or when it is left unattended or unused for long periods of time, unplug the LCD TV from the wall outlet and disconnect the antenna/satellite or cable system.
Power Lines
Do not locate the antenna near overhead light or power circuits, or where it could fall into such power lines or circuits.
Opening the package
Your ASTAR 27"HDTV is packaged in a carton together with other standard accessories. Any optional accessories would be packed separately in another carton.
The weight of the LCD display is approximately 53 lbs. Due to the size and weight of the product, it is suggested that it be handled by a minimum of 2 persons.
Since the glass can be easily scratched or broken, please handle the product gently. Never place the unit on a surface with the glass facing downwards unless it is on protective padding.
When opening the carton, check that the product is in good condition and that all standard accessories and items are included.
IMPORTANT: Save the original box and all the packing material for future shipping needs.
Package Contents
ASTAR 27"HDTV
ASTAR Remote Control by Universal Electronics
Power Cord
User's Guide
Quick Setup Guide
Warranty Card

natural_image
Front view of a flat-screen television displaying on a circular base (no visible text or symbols)Note: Optional components sold separately.
Installation Preparation
Please read the user manual carefully before performing the installation.
The power consumption of the display is approximately 200 W, please use the power cord designated for the product. When an extension cord is required, use one with the correct power rating. The cord must be the grounded and the grounding feature must not be defeated.
The product should be installed on a flat surface to avoid tipping. Space should be maintained between the back of the product and the wall for proper ventilation. If you would like to mount the TV to the wall, please see "Preparing the LCD for Wall Mounting" below for additional informationAvoid installing the product in the kitchen, bathroom or other places with high humidity, dust or smoke, to not shorten the service life of the electronic components.
Please ensure the product is installed with the screen in landscape orientation. Any 90° clockwise or counter clockwise installation may induce poor ventilation and excessive component damage.
ASTAR offers professional installation services. Please contact ASTAR for more information on these services at 1-877-851-2528 or www.astarelectronics.com.
Preparing Your LCD TV FOR Wall Mounting
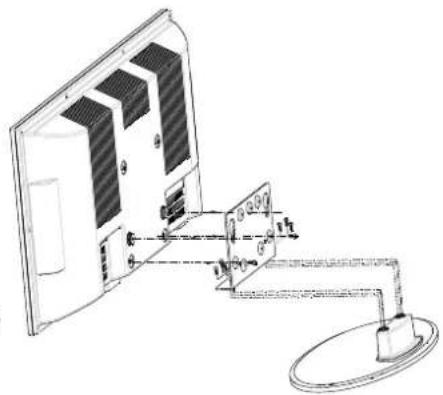
The ASTAR 27"HDTV can either be kept on the stand base or mounted to the wall for viewing. If you choose to mount the 27"HDTV to the wall, please follow the instructions below for removing the stand/base.
Removing the stand/base:
- Unplug all the cables and cords from your LCD TV.
- Place the LCD TV face down on a soft and flat surface (blanket, foam, cloth, etc) to prevent any damage to the display.
- Remove the 2 screws on the back panel of the TV located near the bottom so that the base stand can be removed.
- Gently pull the stand away from the display by grasping firmly to the base.
- Now the display can fit securely to a mount(sold separately) by utilizing the mounting holes on the center or the back panel of the display. Please make sure to read the directions of your specific wall mount to properly hang the 27"HDTV. Make sure the wall mount is rated to support at least 65 lbs.
To find the perfect wall mount for the ASTAR 27"HDTV, browse ASTAR's certified mount selection at www.astarelectronics.com or call directly at 1-877-851-2528.
natural_image
Technical line drawing of a mounted device with internal components and a base mount (no text or symbols)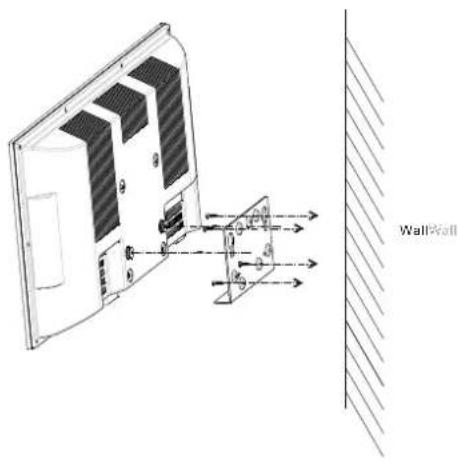
Table of Contents
Chapter 1- Basic Controls and Connections
1.1-Front Panel Controls....8
1.2-Rear Panel Connections....9
1.3-ASTAR Remote Control Button Description.... 10
1.3.1-Insertion of Batteries in the Remote Control.... 12
1.3.2-Remote Control Range.... 12
1.3.3-Precautions for the ASTAR Remote Control....12
Chapter 2- Connecting Equipment
2.1-Which Video Connection Should I Use? 13
2.2-Connecting your DVD Player....14
2.2.1-Using HDMI(Digital HD)....14
2.2.2-Using Component(Analog HD)Video.... 16
2.2.3-Using S-Video....17
2.2.4-Using Composite(AV)Video.... 18
2.3-Connecting Your HDTV Set-Top Box....19
2.3.1-Using HDMI (DigitalHD).... 19
2.3.2-Using VGA Video....21
2.4-Connecting Your VCR or Video Camera....22
2.5-Connecting Coaxial(RF).... 23
2.5.1-Using Your Antenna or Cable for DTV 23
2.5.2-Using Your Antenna or Cable for TV....23
2.5.3-Using the Antenna or Cable through Your VCR.... 24
2.6-Connecting an Amplifier or Speakers....25
2.6-Connecting an Amplifier or Speakers....25
2.7-Connecting a Computer....26
Chapter 3-Setting Up to Watch TV and DTV
3.1-Basic LCD TV Start Up....27
3.2-Watching a TV Program....28
3.3-Adjusting Basic LCD TV Settings....28
3.4-General 29
3.4.1-Parental Controls for DTV 34
3.4.2-DTV Channel Information....36
3.4.3-Program Information....37
3.4.4-Setting a Password.... 38
3.5-Using the OnScreen Display(OSD).... 39
3.5.1-OSD Menu Operations....39
3.5.2-Video....40
3.5.3-Setup 40
3.5.4-V-Chip for TV 41
3.5.5-TV....41
3.5.6-Audio 41
3.5.7-Geometric 42
3.5.8-Temperature....42
3.5.9-Understanding Viewing Features....43
3.5.10-Viewing Modes....43
3.5.11-Picture-in-Picture(PIP)/Picture-by-Picture(POP) Mode....44
3.5.12-Adjusting Basic PIP/POP Settings....44
3.5.13-Using the V-Chip 45
3.5.14-Setting the Sleep Timer....46
Chapter 4-Maintenance and Troubleshooting
4.1-Maintenance 47
4.2-Troubleshooting Guide....47
4.3-Telephone and Technical Support....49
4.4-Compliance....50
4.5-FCC Class B Radio Frequency Interference Statement....50
Specifications....51
Glossary-Standard Definitions....52
Chapter 1 -Basic Controls and Connections
1.1 - Front Panel Controls

natural_image
Modern flat-screen TV with black screen and circular base (no visible text or symbols)
- CH(+/-)-The button to Selecting channel uptands downed
to select OSD options.
-
VOL(+/-)- These buttons increase or decrease volume. When the OSD is active, these buttons adjust the OSD options.
-
MENU - This button opens the TV OSD menu.
-
INPUT-This button switches between the available input sources in the sequence: AV, S-Video YPbPr1, YPbPr2, VGA, HDMI, ATV and DTV, Press the button repeatedly to cycle through the available options.
5.Power Button(⏻)-Switch the LCD TV on by pressing the button once. Press the button again to turn the LCD TV off.
-
Remote Control Sensor-This is the window that passes all of the remote control signals to the TV. Point the remote control directly at this window for the best response to the remote signal.
-
Power Indicator Light - If the light is solid red, then your LCD TV is turned off. If the light is solid green, then your LCD TV is turned on. If the light is not lit, there is no AC power detected and the power cord may not be connected properly. When turning the LCD TV on or off, wait three seconds before pressing the power button again.
1.2 - Rear Panel Connections
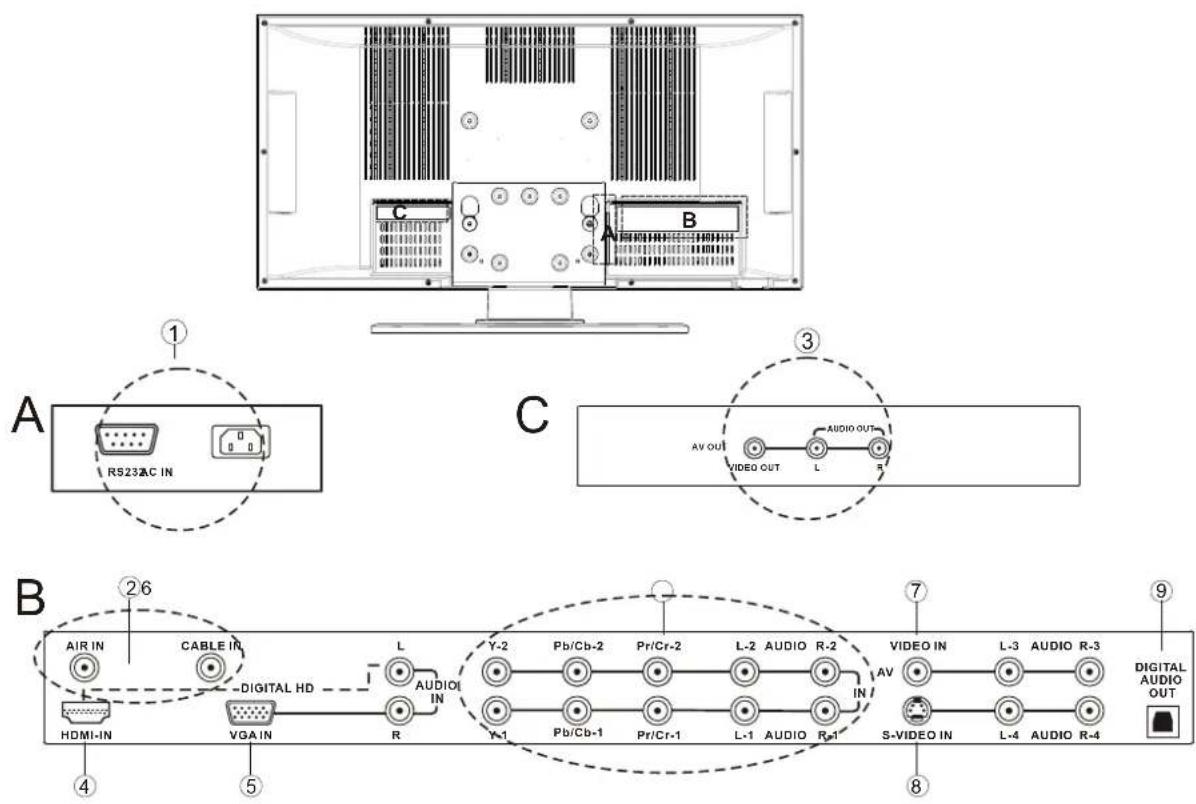
1.RS232 - This custom communication port is for factory service only. AC IN - Power Input.
- CABLE /AIR IN - Connect to an antenna, or cable service.
3.VIDEO OUT - Connect the Video and Audio from the LCD TV to an extra service, such as PVR, DVR or TV.
4.HDMI IN - Connect a DVD multimedia player, or set-top box and the audio through this connection.
For users who want to connect a DVI enabled device, use an HDMI-DVI cable (available for purchase
from www.aslarelectronics.com 1-877-851-2528) and use the Analog Audio output of the device connected to the L+R Audio here.
5.VGA IN - Connect the video and the audio from a computer or set-top box here.
-
Y-Pb/Cb-Pr/Cr-with Audio L/R - Connect the primary source for component video, such as a DVD player or set-top box here, From left to right, use the green for Y, blue for Pb(or Cb), red for Pr(or Cr), white for left audio and red for right audio inputs.
-
VIDEO IN -Connect the primary source for composite devices, such as a VCR or video game console. Use the white and red connectors to connect the external audio from the same source.
8.S-VIDEO IN - Connect the primary source for S-Video devices, such as a VCR or video game console. Use the white and red connectors to connect the external audio from the same source.
- DIGITAL AUDIO OUT - When the DTV input is selected for viewing, the digital audio associated with Digital programming will be available on this output for connection to your home theater system.
1.3-ASTAR Remote Control Button Description
- POWER- Press this key to turn the TV on from standby mode. Press it again to return to the standby mode.
•MUTE-This button turns the sound on and off. - SLEEP-This button allows the user to select the sleep options by adjusting the timer in 15 minute increments up to 120 minutes.
- MTS-This button will select the MTS options in the ATV mode. Options include: Stereo, SAP or Mono;
Additionally changing the audio language in DTV mode.
- DTV/ATV-This button is used to select the input source DTV or ATV.
- Number Button Pad-Use these buttons to select a channel or enter a password.
- INPUT-This button allows the user to cycle through the input sources.
- EXIT-This button exits the OSD menus.
- MENU-This button is used to turn the OSD on.
- INFO-This button displays the image and system information display.
- ENTER-This button works to select your chosen option in On-Screen Display(OSD) menu.
- ▲▼◀▶ These buttons navigate the On-Screen Display(OSD) menu.
- RED/GREEN/YELLOW/BLUE button-These are short-cut buttons, using them with the hint OSD menu.
- FREEZE-Press this key to "Freeze-Frame" the current screen, Users may press this key again to continue playing. Note: normal viewing will resume automatically after one minute.
•V-CHIP- Press to popup a pin-code dialog box to set the viewing rating. - CC-This button will select the Closed Caption menu in the TV mode.
•VOL(+or-)-These buttons turn volume up or down.
•GUIDE-This button displays program information. Note: this button is only functional for DTV. - SYSTEM-Press repeatedly to select tuner mode: Air/Cable.
- CH(+or-)These buttons change the channels up or down.

- SOUND-Press repeatedly to select sound mode: Normal, News, Cinema, Concert, User.
- PICTURE-Press repeatedly for different picture modes select user/cinema/normal/vivid/Hi-bright.
- RETURN-Press it to return to the previous channel in TV mode.
- MODE- User this button to activate the PIP mode and select the mode by pressing repeatedly.
- SWAP/SCREEN-Used to swap the inputs from the main screen and the sub-screen while in the PIP mode, Additionally press repeatedly to select the viewing mode:4:3/full/panoramic.
- SIZE/ZOOM-Press this button to select the size of the PIP screen from one of the following: small, medium or large in PIP mode. Additionally press it to zoom the image from max 8 times to 1/8 times.
- POS/FAV.LIST-Press this button to change the PIP window position in PIP mode. Additionally press it to show the favourite program list.
- ADD/DEL-Press this button to add/delete current channel to/from the list of favorite programs.
- SELECT- Press it to select the program directly from the list of favorite channel you preset.
- AV-Repeated pressing of this button will cycle through AV, and S-Video inputs.
- HD-Repeated pressing of this button will switch between the YPbPr1/YPbPr2 input and HDMI mode.
•VGA-This button selects a connected VGA input.

1.3.1-Insertion of Batteries in the Remote Control
Insert two AAA batteries into the remote control. Make sure that you match the (+) and (-) symbols on the batteries with the (+)and (-) symbols inside the battery compartment. Re-attach the battery cover.
Precaution Tips for inserting the batteries
- Only use the specified AAA batteries.
- Do not mix new and old batteries. This may result in cracking or leakage that may pose a fire risk or lead to personal injury.
- Inserting the batteries incorrectly may also result in cracking or leakage that may pose a fire risk or lead to personal injury.
- Dispose of the batteries in accordance with local laws and regulations.
- Keep the batteries away from children and pets.

natural_image
Interior view of a mobile phone showing external casing, battery pack, and rear panel (no text or symbols visible)1.3.2-Remote Control Range
- Point the remote control at the remote control sensor to transmit the commands.
- Do not place any obstacles between the remote control and the receiver window.
•The effective range of the remote control is approximately 32 feet(10 meters) from the front of the receiver window, 30^ to the left and right, 20^ up and down.
1.3.3-Precautions for the ASTAR Remote Control
•The remote control should be kept dry and away from heat sources. Avoid humidity.
- If the display responds erratically to the remote control or does not respond at all, check the batteries. If the batteries are low or exhausted, replace them with fresh batteries.
- When not using the remote control for a long period of time, remove the batteries.
- Do not take apart the batteries, heat them, or throw them into a fire.
- Do not subject the remote control to undue physical stress, such as striking or dropping it.
- Do not attempt to clean the remote control with a volatile solvent. Wipe it with a clean, damp cloth.
Chapter 2 - Connecting Equipment
2.1- Which Video Connection Should I Use?
The ASTAR 27" HDTV has six different ways to connect your video equipment from a basic connection to the most advanced for digital displays.
| Connection Quality (type) | Connector | Description |
| Best (digital) |  | Digital HD(HDMI-High-Definition Multime-dia Interface)- It is the first and only industry-supported, uncompressed, all-digital audio/video interface. HDMI provides an interface between any audio/video source, such as a set-top box, DVD player, or A/V receiver and an audio and/or video monitor, such as a digital television(DTV), over a single cable. |
| Best (digital) | [x56c] | DTV RF comes from AIR or CABLE. When used for MPEG2 encoded bit streams from ATSC broadcast programming, this input takes advantage of the High Definition content. |
| Better (analog) |  | Analog VGA(RGB)-This video input has separate red, green and blue color components. The signal carries horizontal and vertical sync information on the green signal. This is most commonly used for PC input. |
| Better (analog) |  | Analog HD1/HD2(Component)-The video signal is separated into three signals, one containing the black-and-white information and the other two containing the color information. This enhancement over S-Video takes advantage of the superior picture provided by progressive scan DVD players and HDTV formats. |
| Good (analog) |  | S-Video-The video signal is separated into two signals one containing the black-and -white information and the other containing the color information. Separating the color in this way avoid "cross color" effects where closely spaced black and white lines are erroneously displayed in color. It also enables text to be displayed more sharply. |
| Good (analog) |  | AV- The complete video signal is carried through this single pin connector. This is the most commonly used video connection. |
| Good (analog) |  | TV coaxial (RF) comes from AIR or CABLE. This is the connection for standard NTSC TV using antenna or cable. If you have a VCR, you can connect your antenna/cable to the VCR RF Output to this connector. |
2.2 - Connecting Your DVD Player
You have several connections for the DVD players to be connected to your new 27"HDTV-HDMI(Digital HD), Component (Analog HD), S-Video, and Composite (AV) inputs. Based on your home theater configuration, you decide which option is the right one for you.
2.2 .1- Using HDMI (Digital HD)
DVD players that have a digital interface such as HDMI (High-Definition Multimedia Interface) should be connected to the HDMI input of the ASTAR 27"HDTV for optimal results.
Note: To maintain the display, use a ASTAR certified HDMI cable available up to 10 meters or less. See www.astarelectronics.com or call 1-877-851-2528
Connecting DVD Player(Best):
- Turn off the power to the LCD TV and DVD player.
- Connect a HDMI cable to the HDMI output of your DVD player and the other end to the HDMI input in the rear of your LCD TV.
- Turn on the power to the LCD TV and your DVD player.
- Select HDMI using the INPUT button on the front of the LCD TV or directly by pressing the HD button on the Remote Control.

flowchart
graph LR
    A["AIR IN CABLE IN"] --> B["HD/INVGA IN"]
    B --> C["DIGITAL HD"]
    C --> D["L AUDIO IN"]
    D --> E["R"]
    E --> F["Y-2 Pb/Cb-2Pr/Cr-2"]
    F --> G["L-2R AUDIO IN"]
    G --> H["VIDEO IN AV"]
    H --> I["L-3 RAUDIO S-VIDEO IN"]
    I --> J["L-4 RAUDIO L-4 RAUDIO"]
    J --> K["DIGITAL AUDIO OUT"]
Note: Refer to your DVD player user manual for more information about the video output requirements of the product.
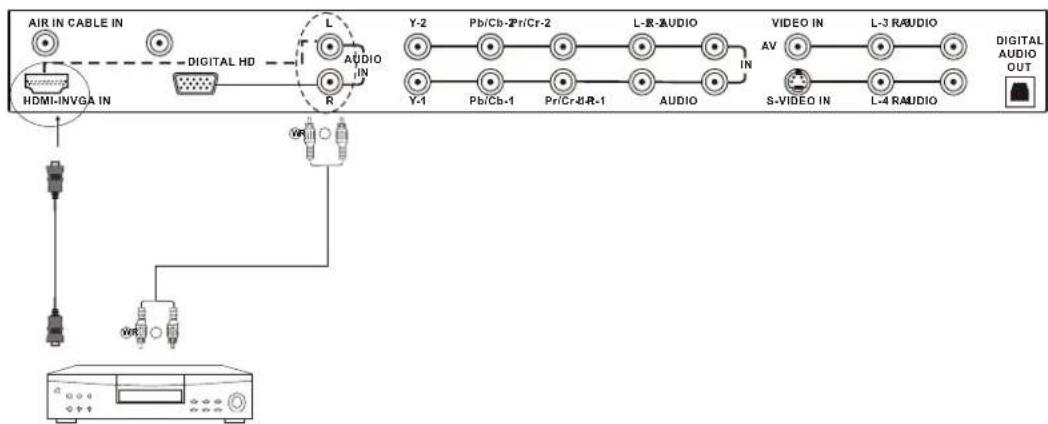
For DVD Players with DVI:
flowchart
graph TD
    A["AIR IN CABLE IN"] --> B["HD/MI-INVGA IN"]
    B --> C["DIGITAL HD"]
    C --> D["L AUDIO IN R"]
    D --> E["Y-2"]
    E --> F["Pb/Cb-2 PriCr-2"]
    F --> G["L-R AUDIO IN"]
    G --> H["VIDEO IN AV"]
    H --> I["L-3 RAUDIO S-VIDEO IN"]
    I --> J["L-4 RAUDIO L-4 RAUDIO"]
    J --> K["DIGITAL AUDIO OUT"]
- Turn off the power to the LCD TV and DVD player.
- Using a HDMI-DVI cable, connect the DVI end to your DVD Player and the HDMI end to the HDMI input in the rear of your LCD TV.
- Using an audio cable(white and red connectors), connect cable to the audio output connectors associated with the DVI output on the rear of your DVD Player, and connect the other end to the audio connectors associated with the HDMI input in the rear of your LCD TV.
- Turn on the power to the LCD TV and your DVD Player.
- Select HDMI using the INPUT button on the remote control or the front of the LCD TV, or directly by pressing the HD button on the remote control.
2.2.2 - Using Component (Analog HD) Video
Connecting DVD Player(Better):

flowchart
graph TD
    A["VIDEO EQUIPMENT with terminal"] --> B["To video inputs"]
    A --> C["To audio inputs"]
    D["AIR IN"] --> E["HDMI-IN"]
    F["CABLE IN"] --> G["VGA IN"]
    H["L"] --> I["AUDIO IN"]
    J["Y-2"] --> K["Pb/Cb-2"]
    L["Y-1"] --> M["Pb/Cb-1"]
    N["L-2"] --> O["AUDIO R-2"]
    P["VIDEO IN"] --> Q["S-VIDEO IN"]
    R["L-3"] --> S["AUDIO R-3"]
    T["DIGITAL AUDIO OUT"] --> U["Power Supply"]
- Turn off the power to the LCD TV and DVD player.
- Connect the Y (green color) connector on the rear of your DVD player to the corresponding Y-1 (green color) connect or in the rear of your LCD TV.
- Connect the Pb(blue color) connector on the rear of your DVD player to the corresponding Pb/Cb-1 (blue color) connector in the rear of your LCD TV.
- Connect the Pr(red color) connector on the rear of your DVD player to the corresponding Pr/Cr-1 (red color) connector in rear of your LCD TV.
- Connect the R(red color) and L(white color) audio connectors on the rear of your DVD player to the R-1 (red color) and L-1(White color) audio input connectors in the rear of your LCD TV.
- Turn on the Power Button of the LCD TV and the DVD player.
- Select YPbPr1 using the INPUT button on the remote control or front of the LCD TV or directly by pressing the HD button on the Remote Control.
Note:
a) If you are already using the YPbPr1input for another component, or you do not want to use the Component Analog YPbPr1 input for the DVD player, you can connect the DVD player to the YPbPr2 connections.
b) Refer to your DVD player user manual for more information about the video output requirements of the product.
2.2.3 - Using S-Video
Connecting DVD Player (Good):

flowchart
graph LR
    A[" Air IN CABLE IN "] --> B[" HDMI-INVGA IN "]
    B --> C[" DIGITAL HD "]
    C --> D[" R "]
    D --> E[" AUDIO IN "]
    E --> F[" Y-2 "]
    F --> G[" Pb/Cb-2Pr/Cr-2 "]
    G --> H[" L-2R AUDIO "]
    H --> I[" AV "]
    I --> J[" S-VIDEO IN "]
    J --> K[" L-3 RAUDIO "]
    K --> L[" S-VIDEO "]
    L --> M[" To S-VIDEO Inputs "]
    M --> N[" Video EQUIPMENT with terminal "]
    N --> O[" To audio Inputs "]
    O --> P[" S-VIDEO "]
    P --> Q[" V-RAUDIO "]
    Q --> R[" Digital AUDIO OUT "]
- Turn off the power button of the LCD TV and the DVD player
- Connect the S-Video jack on the rear of your DVD player to the S-Video jack in the rear of your LCD TV.
- Connect the R(red color) and L(white color) audio connectors on the rear of your DVD player to the R-4 (red color) and L-4(White color) audio input connectors in the rear of your LCD TV.
- Turn on the power to the LCD TV and DVD player.
- Select S-Video using the INPUT button on the remote control or front of the LCD TV or directly by pressing the AV button on the Remote Control.
Note: Refer to your DVD player user manual for more information about the video output requirements of the product.
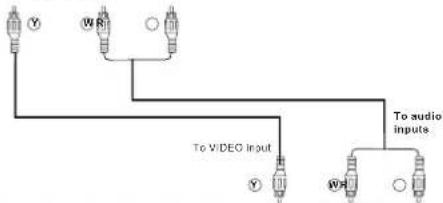
2.2.4 - Using Composite (AV) Video
Connecting DVD Player (Good):

VIDEO EQUIPMENT with terminal

flowchart
graph LR
    A["AIR IN CABLE IN"] --> B["HDMI-INVGA IN"]
    B --> C["DIGITAL HD"]
    C --> D["L AUDIO IN"]
    D --> E["R"]
    E --> F["Y-2"]
    F --> G["Pb/Cb-2/Pr/Cr-2"]
    G --> H["L-2R-AUDIO"]
    H --> I["IN"]
    I --> J["VIDEO IN"]
    J --> K["L-3 RAUDIO"]
    K --> L["S-VIDEO IN"]
    L --> M["L-4 RAUDIO"]
    M --> N["DIGITAL AUDIO OUT"]
- Turn off the power to the LCD TV and DVD player.
- Connect the Video(yellow color) connector on the rear of your DVD player to the Video connector in the AV (yellow color) in the rear of your LCD TV.
- Connect the R(red color) and L(white color) audio connectors on the rear of your DVD player to the R-3 (red color) and L-3(White color) audio input connectors in the rear of your LCD TV.
- Turn on the power to the LCD TV and DVD player.
- Select AV using the INPUT button on the Remote Control or the front of your LCD TV, or directly by pressing the AV button on the Remote Control.
Note:
Refer to your DVD player user manual for more information about the video output requirements of the product.
2.3 - Connecting Your HDTV Set-Top Box
You have several options for connecting your HDTV Set-Top Box to your new 27"HDTV:HDMI(Digital HD) and VGA inputs. Based on your home theater configuration, you can decide which option is the right one for you.
2.3.1 - Using HDMI (Digital HD)
HDTV Set-Top Boxes that have a digital interface such as HDMI (High-Definition Multimedia Interface) should be connected to the HDMI input of the ASTAR 27"HDTV for optimal results.
Note: To maintain the display quality, use a ASTAR certified HDMI cable that is 10 meters or less. See www.astarelectronics.com or call 1-877-851-2528 for details.
Connecting Set-Top Box (Best):

flowchart
graph LR
    A["AIR IN CABLE IN"] --> B["DIGITAL HD"]
    B --> C["L AUDIO IN"]
    C --> D["R"]
    D --> E["Y-2 Pb/Cb-2Pr/Cr-2"]
    E --> F["L-2R/AUDIO"]
    F --> G["VIDEO IN AV"]
    G --> H["L-3 RAUDIO"]
    H --> I["S-VIDEO IN L-4 RAUDIO"]
    I --> J["DIGITAL AUDIO OUT"]
    K["HDMI-INVGA IN"] --> L["DIGITAL HD"]
    L --> M["R"]
    M --> N["Y-1 Pb/Cb-1 Pr/Cr-L-R-1"]
    N --> O["AUDIO"]
    P["HDTV Set-Top Box"] --> Q["Power Supply"]
- Turn off the power to the LCD TV and HDTV Set -Top Box.
- Connect a HDMI cable to the HDMI output of your HDTV Set-Top Box and the other end to the HDMI input in the rear of your LCD TV.
- Turn on the power to the LCD TV and your HDTV Set-Top Box.
- Select HDMI using the INPUT button on the front of the LCD TV or directly by pressing the HD button on the Remote Control.
Note:
a) The HDMI input on your LCD TV supports High-banwidth Digital Content Protection(HDCP).
HDCP encrypts the transmission between the video source and the digital display for added security and protection.
b) Refer to your HDTV Set-Top Box user manual for more information about the video output requirements of the product or consult your satellite or cable operator.
For HDTV Set- Top Boxes with DVI:
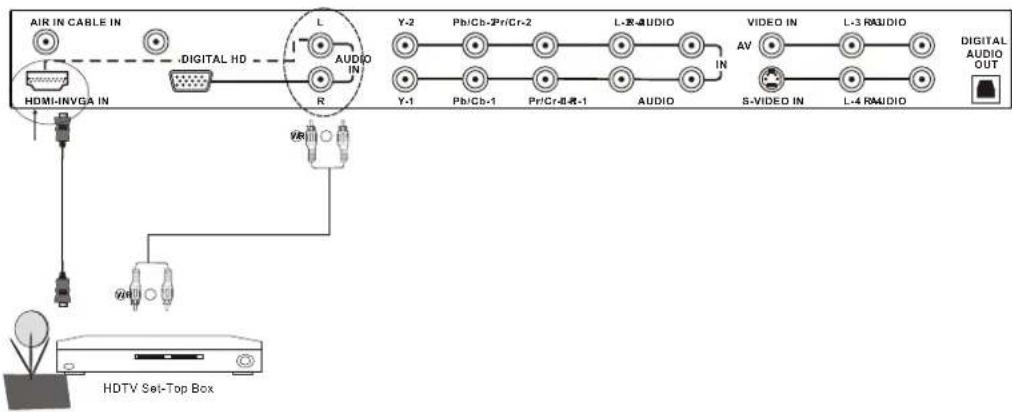
- Turn off the power to the LCD TV and HDTV Set -Top Box.
- Using a HDMI-DVI cable, connect the DVI end to your HDTV Set- Top Box and the HDMI end to the HDMI input in the rear of your LCD TV.
- Using an audio cable (white and red connectors), connect cable to the audio output connectors associated with the DVI output on the rear of your HDTV Set-Top Box, and connect the other end to the audio connectors associated with the HDMI input in the rear of your LCD TV.
- Turn on the power to the LCD TV and your HDTV Set-Top Box.
- Select HDMI using the INPUT button on the Remote control or front of the LCD TV or directly by pressing the HD button on the Remote Control.
2.3.2 - Using VGA Video
Connecting Set-Top Box (Better):

flowchart
graph TD
    A["AIR IN CABLE IN"] --> B["DIGITAL HD"]
    B --> C["+"]
    C --> D["L AUDIO IN R"]
    D --> E["Y-2 Pb/Cb-2Pr/Cr-2"]
    E --> F["L-3R AUDIO IN"]
    F --> G["VIDEO IN AV"]
    G --> H["L-3 RAUDIO S-VIDEO IN"]
    H --> I["L-4 RAUDIO L-4 RAUDIO"]
    I --> J["DIGITAL AUDIO OUT"]
    K["HDMI-INVGA IN"] --> L["+"]
    L --> M["+"]
    M --> N["+"]
    N --> O["+"]
    O --> P["+"]
    P --> Q["+"]
    Q --> R["+"]
    R --> S["+"]
    S --> T["+"]
    T --> U["+"]
    U --> V["+"]
    V --> W["+"]
    W --> X["+"]
    X --> Y["+"]
    Y --> Z["+"]
    Z --> AA["+"]
    AA --> AB["+"]
    AB --> AC["+"]
    AC --> AD["+"]
    AD --> AE["+"]
    AE --> AF["+"]
    AF --> AG["+"]
    AG --> AH["+"]
    AH --> AI["+"]
    AI --> AJ["+"]
    AJ --> AK["+"]
    AK --> AL["+"]
    AL --> AM["+"]
    AM --> AN["+"]
    AN --> AO["+"]
    AO --> AP["+"]
    AP --> AQ["+"]
    AQ --> AR["+"]
- Turn off the power to the LCD TV and HDTV Set -Top Box.
- Connect a 15-pin D-Sub VGA cable to the RGB output of your HDTV Set-Top Box and the other end to the VGA input in the rear of your LCD TV.
- Connect the Audio Out on your HDTV Set-Top Box to the Audio within the VGA group in the rear of your LCD TV.
- Turn on the power to the LCD TV and HDTV Set-Top Box.
- Select VGA using the INPUT button on the Remote control or front of the LCD TV or directly by pressing the VGA button on the Remote Control.
Note: Refer to your HDTV Set-Top Box user manual for more information about the video output requirements of the product or consult your satellite or cable operator.
2.4 - Connecting Your VCR or Video Camera
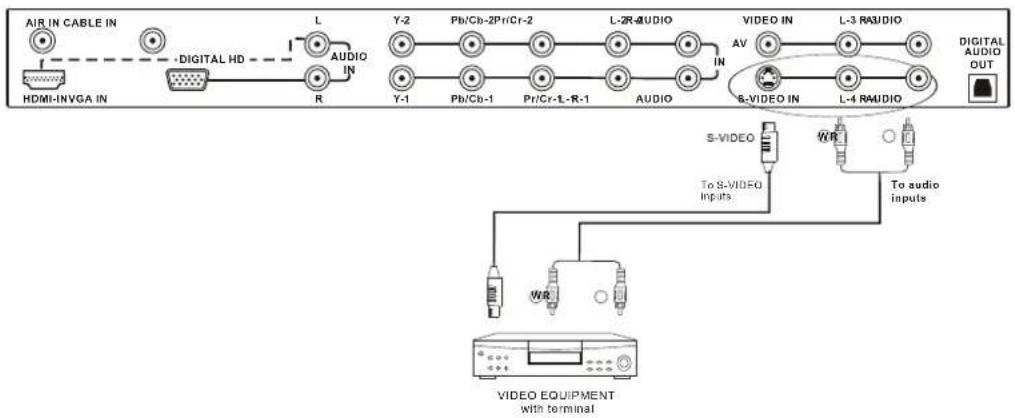
flowchart
graph LR
    A["HDMI-INVGA IN"] --> B["DIGITAL HD"]
    B --> C["+"]
    C --> D["L AUDIO IN R"]
    D --> E["Y-2"]
    E --> F["Pb/Cb-2PriCr-2"]
    F --> G["L-2R AUDIO IN"]
    G --> H["VIDEO IN AV"]
    H --> I["L-3 RAUDIO"]
    I --> J["S-VIDEO IN"]
    J --> K["L-4 RAUDIO"]
    K --> L["VIDEO EQUIPMENT with terminal"]
    M["S-VIDEO Inputs"] --> N["W/R"]
    O["To audio inputs"] --> P["Video Equipment"]
- Turn off the power to the LCD TV and VCR or video camera.
- Connect the S-Video jack on your VCR or video camera to the S-Video jack in the rear of your LCD TV.
- Connect the R(red color) and L(white color) connectors on your VCR or video camera to the R-4(red color) and L-4 (white color) audio input connectors in the rear of your LCD TV.
- Turn on the power to the LCD TV and VCR or video camera.
- Select S-Video using the INPUT button on the Remote control or front of the LCD TV or directly by pressing the AV button on the Remote Control.
Note: Refer to your VCR or Video Camera user manual for more information about the video output requirements of the product or consult your satellite or cable operator.
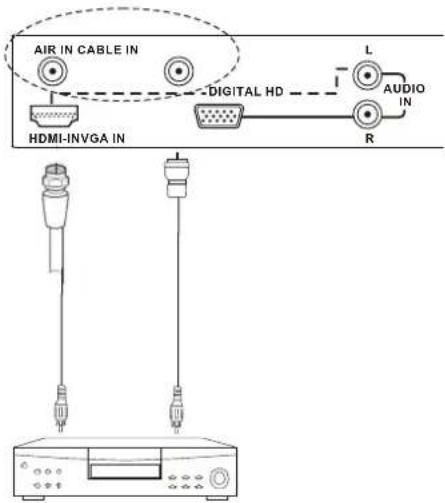
2.5 -Connecting Coaxial (RF)
There are several options for connecting your antenna(or cable for TV) to your new 27"HDTV-directly to the DTV, NTSC TV or through your VCR. Based on your home theater configuration, you can decide which option is the right one for you.
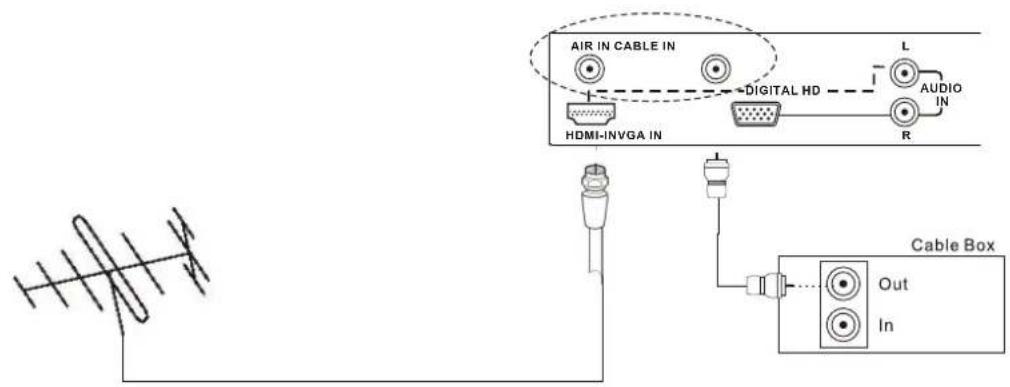
2.5.1-Using Your Antenna or Cable for DTV
- Turn off the power to your LCD TV.
- Connect the coaxial (RF) connector from your Antenna or Digital Cable to the AIR IN or CABLE IN connector in the rear of your LCD TV.
- Turn on the power to your LCD TV.
- Select DTV using the INPUT button on the front of the LCD TV or directly by pressing the DTV/ATV button on the Remote Control.
Note:
a) Digital broadcasts are not available in all areas.
b) Make sure the antenna is correctly grounded.
c) For professional antenna installation, please contact ASTAR Electronics at 1-877-851-2528 or visit our website at www.astarelectronics.com.
2.5.2 - Using Your Antenna or Cable for TV
- Turn off the power to your LCD TV.
- Connect the cocoaxial (RF) connector from your antenna, cable or cable box to the TV connector in the rear of your LCD TV.
- Turn on the power to your LCD TV.
- Select TV using the INPUT button on the Remote control or front of your LCD TV or directly by pressing the DTV/ATV button on the Remote Control.
2.5.3 - Using the Antenna or Cable through Your VCR
- Turn off the power to your LCD TV and VCR.
- Connect the "Output to TV" (RF Out or Antenna Out) connector on the rear of your VCR to the TV
CABLE/AIR connector in the rear of your LCD TV. - Turn on the power to your LCD TV and VCR.
- Select TV using the INPUT button on the remote control or front of your LCD TV or directly by pressing the DTV/ATV button on the Remote Control.
VIDEO EQUIPMENT with terminal
Note: If you have an off-air antenna or cable TV, connect the off-air antenna or TV cable to the RF connector on the rear of your VCR.
2.6-Connecting an Amplifier or Speakers
Note:
If you are connecting the DTV input, you can connect the DIGITAL AUDIO OUT to your sound system using a digital optical audio cable.
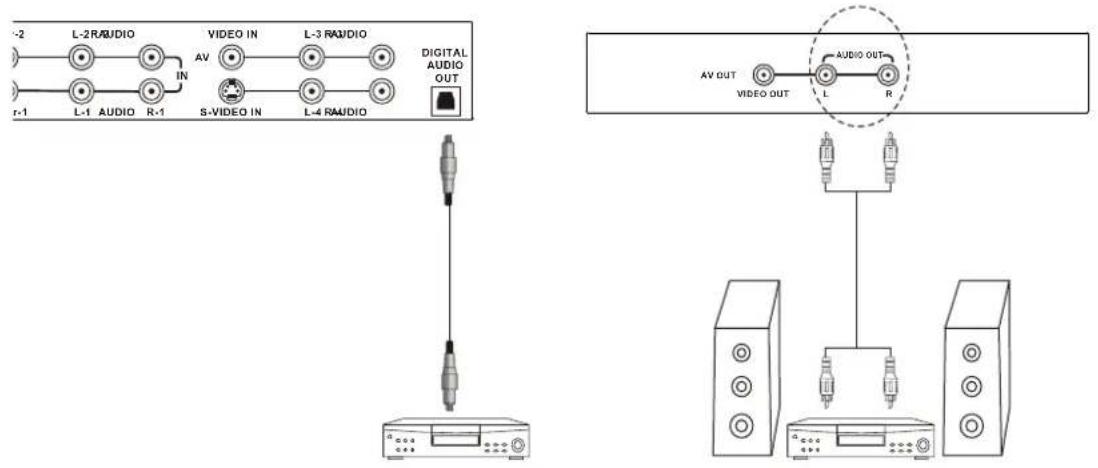
- Turn off the power to the LCD TV and Receiver /AMP.
- Connect the R (red color) and L (white color) audio connectors on the Receiver/Amp to the R (red color) and L (white color) audio output connectors in the rear of your LCD TV.
- Turn on the power to the LCD TV and Receiver/AMP.
- Refer to your Receiver/Amp system manual to select the corresponding audio input.
Note: This audio output is not amplified and cannot be connected directly to external speakers.
2.7 - Connecting a Computer


flowchart
graph LR
    A["AIR IN CABLE IN"] --> B["HDMI-INVGA IN"]
    B --> C["Digital HD"]
    C --> D["L AUDIO IN"]
    C --> E["R AUDIO IN"]
    D --> F["Y-2 Pb/Cb-Pr/Cr-2"]
    E --> G["Y-1 Pb/Cb-1"]
    F --> H["L-R AUDIO"]
    G --> I["L-R AUDIO"]
    H --> J["VIDEO IN AV"]
    I --> K["L-3 RAUDIO"]
    J --> L["S-VIDEO IN"]
    K --> M["L-4 RAUDIO"]
    L --> N["DIGITAL AUDIO OUT"]
    M --> N
- Turn off the power to the LCD TV and Computer.
- Connect a 15-pin D-sub VGA cable to the VGA output of your computer and the other end to the VGA input in the rear of your LCD TV.
- Connect the Audio Out on your computer to the VGA Audio IN in the rear of your LCD TV.
- Turn on the power to your LCD TV and computer.
- Select VGA using the INPUT button on the front of the LCD TV or directly by pressing the VGA button on the Remote Control.
Note:
a) For the best picture quality when computer through VGA, set your computer timing mode to VESA 1366x768 at 60 Hz or 1024x768 at 60Hz. Please refer to the graphic card's user guide for additional information on how to set the timing mode.
b) Refer to your Computer's user manual for more information about the video output requirements of the product.
Chapter 3- Setting Up to Watch TV and DTV
3.1 - Basic LCD TV Start Up
- Connecting the Power Cable
Connect the power cord to the power cord connector on the back of your LCD TV, and then plug the power cord into an AC wall socket.
-
Connect Audio and Video Cables to the LCD TV
-
Turning Power On
Once all the components are connected, press the Power button on the front of the TV, or press the Power (Red) button on the remote control.
- Select Input Source
Select the Input Source for your LCD TV by pressing the INPUT button on the front of the LCD TV or using the INPUT button on the remote control. Pressing this button will cycle you through the following options: AV, S-Video, YPbPr1, YPbPr2, VGA, HDMI, ATV and DTV.
- Using regular TV with an Air or Cable
If connecting to Air or cable source for the TV input, you will need to select the appropriate source within the On -Screen Display(OSD) menu and Auto Scan for the available TV channels.
Please follow the instructions below:
a. Select the TV input by pressing the INPUT button on the front of the TV or using the INPUT button on the remote control, or directly by pressing the DTV/ATV button on the remote control.
b. Press the MENU button on the remote control to show the OSD menu.
c. Press the ▶ button on the remote control to highlight the TV menu.
Note: If you do not see this option within the OSD, you might have selected the wrong input in the previous steps and you will need to repeat step 4(above) to select another Input Source.
d. Press ▼ button to highlight Tuner mode. Use the ◀ o▶ button to select either Air or Cable.
e. Once selected, press the▼ button once more to highlight Searching to scan the available channels.
Use the ENTER button to start the search.
Note: This will take a few minutes to complete.
f. Press the EXIT button to exit the OSD.
g. To add or delete a channel press ▼ to select TV, Use the ◀ or ▶ buttons to rotate to the desired channel number and change to On or Off under channel skip setting.
h. Press ▼ to highlight channel name to edit the channel name(refer to 3.5.5).

- Using DTV with an Air or Cable
When connecting to an antenna for the DTV input, you will need to select the DTV source by press INPUT or DTV/ATV button and Auto Search for the available TV channels.
Note: DTV digital broadcast is not available in all areas. Refer to www.astarelectronics.com to get information about availability in your area, type of antenna.
- Using a PC
If connecting to a PC through VGA Analog input, set the TV timing mode to ASTAR 1024x768,1366x768 at 60Hz for best picture quality(refer to the graphic card's user guide for questions on how to set this timing mode).
3.2 - Watching a TV Program
Before you start watching TV, please make sure that any cable, satellite or off-air antenna connections are secure. Also, verify that the power cord is plugged into a correctly grounded electrical outlet or surge protector.
- Press the power button on the remote control or on the front of your LCD TV. The status LED on the front will turn solid green.
- There are 4 options for selecting your programming:
a. If you are using Air or Cable connected through the DTV input, you can select DTV using the INPUT button on the front of your LCD TV.
b. If you are using a cable set -top box, satellite dish, or off-air antenna connected through the TV(Cable/Air) input, you can select TV using the INPUT button on the front of your LCD TV.
c. If you are watching broadcasts through a cable set-top box or satellite dish connected by HDMI, select HDMI using the INPUT button on the front of your TV.
d. If you are watching a cable set-top box or satellite dish connected through the component inputs (YPbPr), select YPbPr1 or YPbPr2 using the INPUT button on the front of your LCD TV.
Note: You should be able to see a picture. If you do not, make sure that all connections are secure and you have selected the correct video input source.
- Press the CH+/- buttons on the remote control or the CH+/- buttons on the front of your LCD TV to change the channel. Note: The CH+/- buttons will not work if you are watching a program using HDMI, YPbPr1, YPbPr2, AV, S-Video and VGA inputs.
3.3 - Adjusting Basic LCD TV Settings
Volume
To increase the volume, press and hold the VOL+ button on the front panel or remote control until the desired level is reached.
To decrease the volume, press and hold the VOL- button on the front panel or remote control until the desired level is reached.
TV Channels
To step up through the available TV channels, press the CH+ button on the front panel or remote control once for the next channel or hold it depressed until the desired channel is reached.
To step down through the available TV channels, press the CH-button on the front panel or remote control once for the previous channel or hold it depressed until the desired channel is reached.
Note: CH+/- will only operate on TV and DTV modes.
3.4 General
Press the DTV/ATV button on the remote control until "DTV" appears on the top right of the screen. When the MENU button is pressed, the On-Screen Display (OSD) appears on the Video page. Press the RIGHT arrow button ▶ to highlight the General selection.
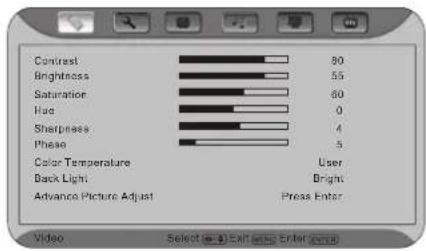
This will display the General OSD.
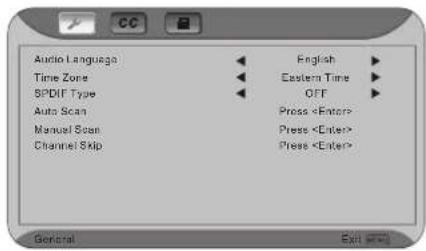
Audio language - Setting the audio language to English/French or Spanish.

Time Zone-Setting the correct Time Zone for your area will ensure that the correct program times are shown after pressing the Guide button on the remote control.
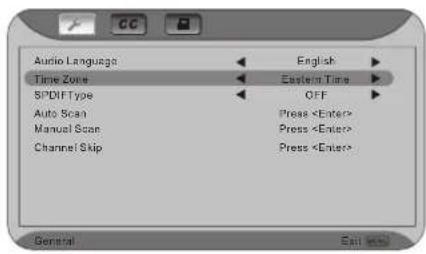
Press the DOWN arrow button ▼ and the TIME ZONE category is highlighted. Select using the ◀ or ▶ arrow buttons. If finished, use the EXIT button to remove the OSD.
SPDIF Type-Setting the coaxial type to PCM off or Dolby digital.

Auto Scan - Automatically scans for all of the digital TV channels available and stores the information in memory.
Press the DOWN arrow button▼ to highlight AUTO SCAN.
Press the ENTER button to activate. Note: This will take several minutes to complete.

Once Auto Scan has finished, press the MENU button to return to the previous menu. NOTE: If you press ENTER, the Auto Scan process will start again.

Note: You will not get as many Digital cable channels as your Setup Box will have. The channels you will receive are clear QAM through your local cable provider.
Manual Scan - If you feel that not all of the available digital TV channels were found with Auto Scan, then selecting this option makes the TV try again to find any missing channels.
Press the DOWN arrow▼ to highlight MANUAL SCAN and then press the ENTER button.
NOTE: A channel will be missed if it is not transmitting at the time of the scan and so you should try again at a time when you know the station is transmitting programs.
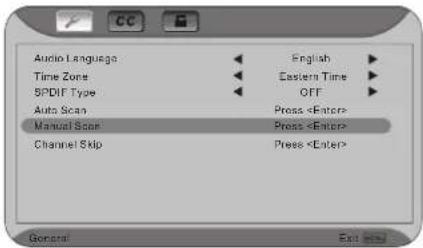
A channel will also be missed if it is too weak to be received. Re-orientation of the antenna or changing to a higher gain antenna may help, but note that any changes to the antenna may affect the other channels.
The MANUAL SCAN screen now appears and this can be used in two ways. The screen defaults to ADD-ON MODE and pressing the ENTER button at this stage makes the TV scan the whole channel range again. Press MENU to navigate away from this screen.
NOTE: If the ENTER button is pressed, then the automatic scanning will start again.

If the ◀ or ▶ button is pressed first, then RANGE MODE is activated so that the user can specify a smaller range of channels they want scanned again. Press MENU to navigate away from this screen.
NOTE: If the ENTER button is pressed, then the automatic scanning will start again.
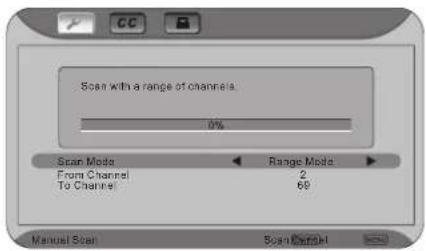
Channel Skip-Gives you the option to skip channels when using the CH+ or CH- buttons.
If you did not EXIT from the MANUAL SCAN, press the DOWN arrow button ▼ again to highlight CHANNEL SKIP. Press the ENTER button.

The list of channels available and stored in memory is shown on the screen. If the list is longer than 9 channels, you will be able to scroll through the channel by pressing red button, blue button and ▲▼ button repeatedly. The boxes to the right of the channel names are empty by default.

As you scroll down the channels with the DOWN arrow▼, each one is highlighted in turn. When a channel you want to skip is highlighted, press the Enter button and a check mark (√) will appear in the box opposite that channel. This means that when surfing with the CH+or CH- buttons, this channel will be skipped and not displayed. press MENU to navigate away from this screen when finished.
CAPTION-Allows you to read the voice content of television programs. When at the DTV screen, press the ▶ button repeatedly until the Caption screen will be shown.

Press the DOWN arrow ▼ once to highlight the ANALOG CLOSED CAPTION option.

Use the ◀ and ▶ arrow buttons to select the Analog Closed Caption, usually CC1. Press MENU to navigate away from this screen when finished.

If you did not EXIT from the CAPTION page, press the arrow to highlight Digital Closed Caption. Use the ◀ and ▶ arrow buttons to select the Digital Closed Caption, usually SERVICE1, Press MENU to navigate away from this screen when finished.
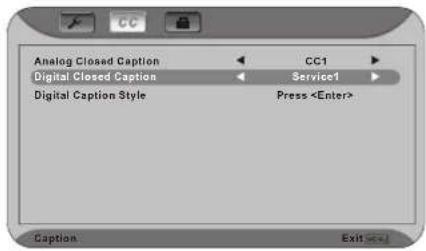
If you did not EXIT from the CAPTION page, press the arrow to highlight DIGITAL CAPTION STYLE. Press Enter.

The default style, AS BROADCASTER, is shown as selected. This means that the style of the closed caption is as received from the TV channel.

Use the◀ or▶ arrow button to select CUSTOM. The Custom page allows you change the font size color, the background color, and the transparency of the closed caption. Press MENU to navigate away from this screen when finished.

3.4.1-Parental Controls for DTV
When at the first DTV screen, press the RIGHT arrow button ▶ repeatedly.
![Context Brightness Saturation Hue Sharpness Phase Color Temperature Back Light Advance Picture Adjust 90 55 80 0 4 5 User Bright Press Enter Video Select (a) [b]Ext (c)Enter (d)](/content/2026/05/1043032/images/a12f549677afd0bbd5931db14cc415f2006fca08d8a5a208b04fe77097f21d0f.jpg)
The PARENTAL screen will be shown. Press the ENTER button to highlight the bar.
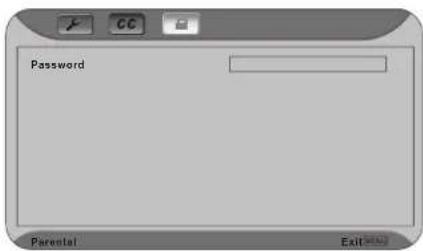
Enter the four-digit password. The factory default password is 0000. If you change the password, please make a note of it in a safe place.
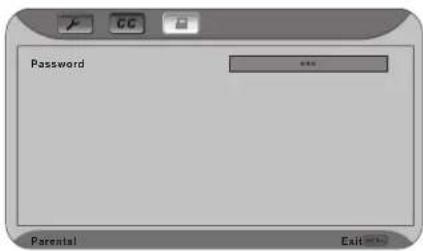
Once the correct password has been entered, the option for blocking channels becomes available. Press ENTER.

The list of channels available and stored in memory is shown on the screen. If the list is longer than 9 channels you will be able to scroll through the channel by pressing red button, blue button and ▲▼ button repeatedly. The boxes to the right of the channel names are empty by default.

As you scroll down the channels with the DOWN arrow, each one is highlighted in turn. When a channel you want to block is highlighted, press the ENTER button and a check mark (☐) will appear in the box. This means that when this channel is selected a password request bar will appear on the screen and you will not be able to view the channel without first entering the correct password. Press EXIT to navigate away from this screen when finished.

3.4.2-DTV Channel Information
When a channel is selected, an information header is shown over the picture for a few seconds. This information consists of the channel number and name, the format in which the program is broadcast (480i SD, 480P SD, 720P HD, 1080i HD), audio channel 1/2 or 2/2(omitted if alternate channel is not broadcast), language, program title, program start and end time, program rating and if CC is available.

When you press the INFO button on the remote control, you not only get the information header display, but also a short summary of the program content when available from the broadcast. If you do nothing else with the INFO button, these panels will remain on the screen, even when changing channels.
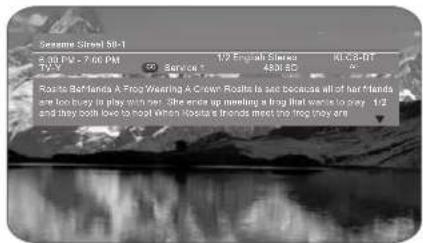
Press the INFO button and the program summary will disappear, but the information header will remain.

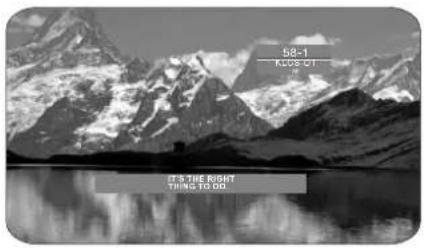
Press the INFO button again and only the channel number and name will remain. Press the INFO button one more time and this will disappear.
3.4.3 Program Information
Press the GUIDE button on the remote control and program information for the channel you are watching will be displayed on the screen with the live program content in a small window in the lower left corner of the panel.
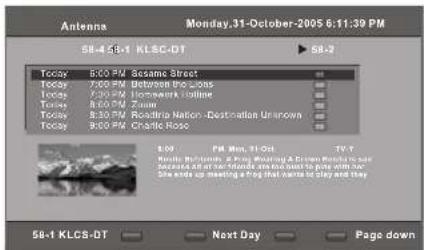
Press the ◀ or ▶ arrow button to scroll up or down the channels. Each time you pause at a channel, the program list will update with the program schedule for that channel and the window will show the live program for that channel. Press the GUIDE button to EXIT this feature.
3.4.4-Setting a Password
You control access to the Parental Control features with a password. The default password is "0000". You can change the password to any four-digit number.
To change the password:
- Press the MENU button to open the main On-Screen Display (OSD) Menu.
- Press the ▶ on the remote control until the setup menu opens.
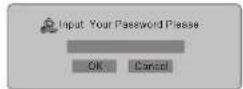
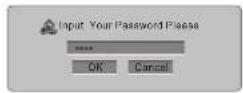
- Press ▼ button on the remote control to highlight V-Chip and press the ENTER button. The "Input your password please" window should open.
- Use the number pad to type the default password(0000), then press ENTER.
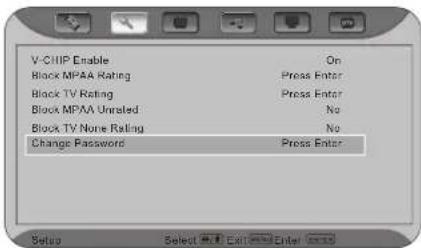
- The setup window appears, press the▼ button on the remote control repeatedly to highlight change password, then press ENTER.
- Use the number pad to type, the default password again, and press ENTER
- Use the number pad to enter the new password.
- Confirm the new password by re-entering it.
- Press the EXIT button on the remote control immediately to exit the OSD menu.


Note:
a) Please make sure to write down and store the new password in a secure place. The reset does not reset the password.
b) The DTV Parental Control password will always be the same as this one.
3.5-Using the On-Screen Display(OSD)
The remote control or the bottom control keys on the front panel of the TV can control all the function settings. The on-screen display(OSD) allows you to adjust and save contrast, brightness and other settings. The TV will save changes made to the settings, even if the TV is turned off.
3.5.1-OSD Menu Operations
The OSD consists of several menu options: Video, Setup, TV, Audio, Geometric. The main menu options may vary depending on your selected input source.
Note: Some of the main menu options may have additional sub menus, i.e. H-Position in the Geometric for VGA.
- Press the MENU button on the front of the TV or the menu button on the remote control. The Main Menu will be displayed on the TV screen.
- Use the VOL (+/-) buttons on the front of the TV or ▶ on the remote control to select one of the submenus- Video, Setup, TV, Audio, Geometric.
- Once the submenu is highlighted, use the CH(+/-) buttons on the front of the TV or ▲▼ buttons on the remote control to selection a menu option.
- Use the VOL (+/-) buttons on the front of the TV or ▶ buttons on the remote control to select. adjust the options settings.
- press the ENTER button on the remote control to confirm the feature.
- repeat steps 2 through 5 to adjust additional options with in this menu.
- Once the adjustments are completed, press the Exit button on the remote control to exit the OSD completely.

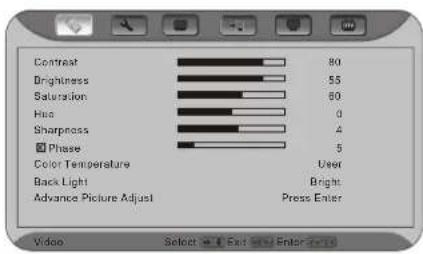
3.5.2-Video
Available for the following input sources-AV,S-Video, YPbPr1, YPbPr2, HDMI, DTV or ATV.
Contrast-Adjusts the level of white between the lightest and darkest portions of an image, If the contrast is too low, the picture appears dark and lacks detail. If The contrast is too high, the picture appears faded and lacks shadow and depth.
Brightness-Adjusts the black levels of the picture, Users may need to readjust the brightness after the TV warms up.
Saturation-Adjusts the levels of white and color in the picture. Highly saturated colors then to be deep and strong while unsaturated colors are weaker and lighter.
Hue-Adjusts to make the flesh tones more natural.
Sharpness-Adjusts the clarity of the picture. If the sharpness is set too high, hard edges in the picture appear to have a ghost image.
Phase- Adjust the phase by pressing▶, this feature is only used for YPbPr input sources.
Color Temperature-Option include user, cool, middle or warm, if you select the item of "User" and press "Enter" button, a status bar below comes up for you to adjust the color temperature to your desirable value.
Backlight - Adjust brightness of lamps.
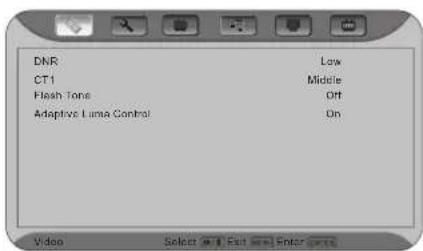
Advance Picture Adjust- Press the enter button, "Advance Picture Adjust" window appears.

DNR- Option include off/low/middle/strong, select "on" to control the sharpness and noise reduction automatically.
CTI- Option include low/middle/strong/off.
Flash Tone-Select "on" to correct the flash tone automatically.
Adaptive luma control-user selects either on or off.
3.5.3-Setup
Language-Changes the language of the On-Screen Display (OSD) menu. Options include French, Spanish or English.
V-Chip-Prevents views watching programs that are not age-appropriate, such as programs containing violence or adult language.
Blue Back-Selects "ON" to set screen to a pleasant blue background when it detects no signal available if turns on.
Closed Option- Chooses one of the following options: OFF/C1/C2/C3/C4/T1/T2/T3/T4.
Default-Resets the display back to the factory default settings.

3.5.4-V-Chip for TV
V-CHIP Enable-Turns TV and movie blocking on or off. TV Rating-Sets the level of television programs that will be blocked without typing in the password. For more information, see Section3.5.13.
Block MPAA Rating-Sets the level of movies that will be blocked without typing in the password. For more information, see Section 3.5.13
Block TV Rating- Sets the level of channel that will be blocked without typing in the password. For more information, see Section 3.5.13
Block MPAA Unrated-Select "Yes" to block unrated programs. Block TV None Rating-Select "Yes" to block TV None Rating Programs.
Change Password-Changes the password used for modifying the parental control settings or watching a program blocked by parental controls, For more information, see Section 3.4.4

3.5.5-TV
Available for the following input sources-TV
Tuner Mode-Sets the source for the tuner. Options include Air or Cable, Air sets the tuner for an antenna and Cable sets the tuner for cable or a satellite dish.
Searching-Adds all channels that have a signal to the channel list.
TV- Chooses current channels.
Channel Skip -Skips the set channel from the channel list.

Channel Name -Edit's the channel name. press ▼ button to highlight the channel name and press ENTER, the "Channel name" window appears. ◀▶ ▲▼ for select and ENTER for confirm.

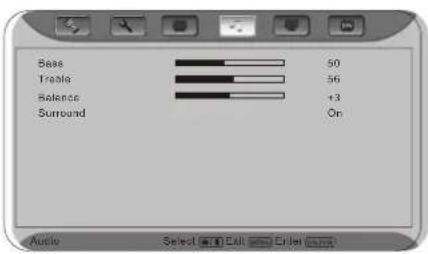
3.5-6-Audio
Bass-Adjusts the bass.
Treble-Adjusts the treble.
Balance-Adjust the balance level between the channels.
Surround-User selects either on or off.
3.5.7-Geometric
Available for the following input sources -VGA.
Contrast - Adjusts the level of white between the lightest and darkest portions of an image. If the contrast is too low, the picture appears dark and lacks detail. If the contrast is too high, the picture appears faded and lacks shadow and depth.
Brightness-Adjusts the black levels of the picture. Users may need to readjust the brightness after the LCD TV warms up.
Auto Setting -Automatically sets the position and size of the picture.
Phase- Press ◀ button to adjust phase.
Manual Clock- Press ◀ button to decrease/increase the menu clock.

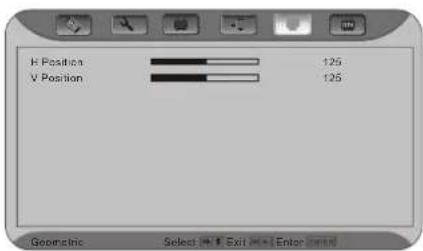
Display Adjustment- Press the ENTER button to confirm for sub-selection as shown in the OSD below then press ◀ button to adjust the position of display.
3.5.8-Temperature
The Temperature Menu Option is only available when VGA selected as the input.
C.T. R: Adjusts the red levels of the picture.
C.T. G: Adjusts the green levels of the picture.
C.T. B: Adjusts the blue levels of the picture.
Load From- Selects different mode and it's default value of R, G, B will be load.

3.5.9-Understanding Viewing Features
Your LCD TV features three viewing modes and Picture-in-Picture(PIP), Picture-by-Picture (POP) mode. You can switch viewing modes using the remote control.
3.5.10-Viewing Modes
4:3 Mode
The original 4:3 aspect ratio (1.33:1 source) is preserved, so black bars are added to the left and right of the display image. Standard TV broadcasts are displayed with a 4:3 Aspect Ratio. Movies in 4:3 Aspect Ratio may be referred to as pan-and-scan or full frame. These movies were originally filmed in 16:9(wide screen), and then modified to fit a traditional TV screen(4:3).

natural_image
Five gray circles arranged in a scattered pattern on a white background (no text or symbols)Full Mode
When watching a standard broadcast or full -frame movie in this mode, the display image is stretched proportionately to fill the TV screen. When watching a wide screen (1.78:1 source) program or movie, the display image fills the TV screen. If you are watching a wide screen (1.85:1 or 2.35:1 source) program or movie, there will still be black bars at the top and bottom.

natural_image
Five gray circles arranged in a V-shape on white background (no text or symbols)Panoramic
When watching a standard broadcast or full frame movie in this mode, the 4:3 Aspect Ratio(1.33:1 source) display image is stretched. horizontally on the left and right sides to fill the TV screen. The center of the image is not stretched.

natural_image
Five gray oval shapes arranged in a scattered pattern on a white background (no text or symbols)Note: Viewing modes settings are saved based on input. For example, you last watched AV input in full mode, and then watched TV in 4:3 mode. When you switch back to AV input, the viewing mode will return to full.
3.5.11-Picture-in-Picture(PIP)/Picture-by-Picture(POP) Mode
Your TV features PIP mode, so you can watch two pictures at the same time. When PIP is turned on, by pressing the PIP button on your Remote Control, you can display two picture at one time. One picture is displayed as the full screen (main screen) and the other picture is displayed in a small window(sub screen). The sub-screen can be set to small, medium or large.
See the diagram below for detailed information of the PIP sources
| MAIN\PIP | DTV | ATV | AV | S-Video | YPbPr1 | YPbPr2 | HDMI | VGA |
| DTV | √ | √ | √ | √ | √ | √ | ||
| ATV | √ | √ | √ | √ | √ | |||
| AV | √ | √ | √ | √ | √ | |||
| S-Video | √ | √ | √ | √ | √ | |||
| YPbPr1 | √ | √ | √ | √ | √ | |||
| YPbPr2 | √ | √ | √ | √ | √ | |||
| HDMI | √ | √ | √ | √ | √ | √ | ||
| VGA | √ | √ | √ | √ | √ |
3.5.12-Adjusting Basic PIP/POP Settings
PIP Channel
The PIP channel is independent of the main TV channel. To change the PIP channel, press the button to select sub picture and press the CH+/- button on the remote control.
Swapping PIP/POP Video
You can swap the program that is in the main picture with the program in the PIP sub-picture. To swap the main picture with the PIP sub-picture program, press SWAP on the remote control. If you press SWAP again, it will return the program to the main picture. This works the same if you are in the Picture by Picture(POP) mode.
Swapping PIP/POP Audio
You can also swap the audio between main picture and PIP sub-picture by pressing the button on your remote control. For example, if you are listening to the audio for the Main Screen and want to hear the audio from the Sub Screen you press the button; press the button to switch back. This works the same if you are in the Picture by Picture (POP)mode.
3.5.13-Using the V-Chip
The V-Chip feature prevents viewers from watching programs that are not age-appropriate, such as programs containing violence or adult language.
-
Press the MENU button to open the main On -Screen Display (OSD) Menu.
-
Press the ▶ on the remote control until the Setup menu opens.
-
Press ▼ button on the remote control to highlight V-Chip, press ENTER button.
-
Use the number pad to type the default password (0000), then press ENTER.
-
While the Parent Lock enable menu is highlighted, press the or ◀ on the remote control to select "ON" to enable the blocking features.
-
Press▼ button on the remote control to MPAA Movie Rating, and then press ENTER on the remote control to enter into the Movie Menu and the MPAA window opens.
-
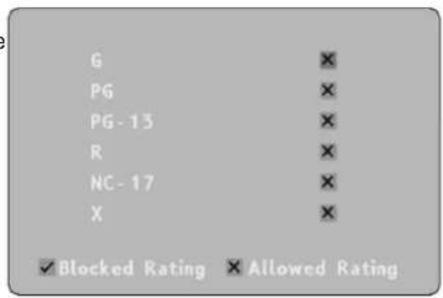
The following window will allow the user to customize the following MPAA movie ratings:
G(general audience)
PG(parental guidance suggested)
PG-13(recommended for children 13 years of age or older)
R(mature audience)
NC-17(no one under 17 years of age)
X( no one under17 years of age)
-
Press the ▲ or ▼ button on the remote control to navigate through the LCD TV menu options. Press ENTER button to block or unblock each area.
-
Press the EXIT button on the remote control to return to the submenu.
-
Press▼ button on the remote control to highlight TV Rating, and then press ENTER on the remote control to enter into the TV Rating Menu.
-
The following window will allow the user to customize the following TV ratings:
Y(all children)
Y7(older children)
G(general audience)
PG(guidance suggested)
14(strongly cautioned)
MA(mature audience)
You can also customize the TV rating for the following content:
FV(fantasy violence)
D(sexual dialog)
L(adult language)
S(sexual situations)
V(violence)


- Press the ▼▲◀ button on the remote control to navigate through the LCD TV menu options.
Press ENTER button to block or unblock each area.
13. Press the MENU button on the remote control to return to the submenu.
14. Press the EXIT button the remote control to exit the OSD menu when you are finished.
3.5.14-Setting the Sleep Timer
The Sleep Timer lets you set a time delay to turn off your LCD TV automatically.
To set the Sleep Timer using the remote control:
- Press the SLEEP button on the remote control. The Sleep Timer appears in the center of your screen.
- Press the SLEEP button one or more times to select the time you want. Options include 15,30,60,90 or 120 minutes.
To turn off the sleep time using the remote control, press the SLEEP button repeatedly until off appears.
Chapter 4- Maintenance and Troubleshooting
4.1-Maintenance
Important
- Make sure that the power cable is removed from the socket before cleaning the display.
- Do not use volatile solvent(such as toluene, rosin and alcohol) to clean the display. Such chemicals may damage the housing, screen glass and remote control, and cause the paint to peel.
Cleaning the Housing and the Remote Control
- Use a soft cotton cloth for cleaning.
- If the housing or remote control is seriously contaminated, use a soft cloth moistened with diluted neutral cleaner to clean the display. Remove water out of the cloth before cleaning to prevent water from penetrating into the housing. Wipe the display with a dry cloth after cleaning.
Cleaning the Screen
- Use a soft cotton cloth to gently clean the screen.
- The screen glass is very fragile. Do not scrape it with any sharp object. Do not press or tap the screen to avoid cracking. When the screen is seriously contaminated, use a soft cloth moistened with diluted neutral cleaner to clean display. Remove water out of the cloth before cleaning to prevent water from penetrating into the housing. Wipe the display with a dry cloth after cleaning.
4.2-Troubleshooting Guide
If the display fails or the performance changes dramatically, check the display in accordance with the following instructions. Remember to check the peripherals to pinpoint the source of the failure. If the display still fails to perform as expected, contact the dealer for assistance.
| Problem Solution | |
| The TV can not be turn ON | Check if the AC adapter is securely connected by plug it in to the TV and plug it in to the wall socket. Turn ON the power button once it is done and Green LED will indicate if it is on. Plug another electrical device (like a radio) to the power outlet to verify that the outlet is supplying the proper voltage. |
| There is no sound on the TV | Check your audio connection.Press MUTE on the remote control again, so that MUTE disappears from the screen.Check your audio settings, your TV audio may be set to SAP or minimum.Press the VOL+(Up) key on your remote control.Check to see if your speakers are turned on or off. |
| If the screen is blue | Check your input connections. |
| Blank screen appear when the power is on | Make sure the video cable supplied with the LCD display is tightly secured to the video output port on the back of the computer. If the other end of the video cable is not attached permanently to the LCD display, tightly secure it to the LCD display.Adjust brightness and contrast.If you are using a Macintosh older than G3, you will need a Macintosh adapter.Check Source settings. |
| Wrong or abnormal colors appear. | If any colors (red, green, or blue) are missing, check the video cable to make sure it is securely connected. Loose or broken pins in the cable connector could cause an improper connection.Connect the LCD display to another computer. |
| Control buttons do not work. | Press only one button at a time. |
| Remote Control does not work. | Make sure batteries are inserted correctly.Batteries could be weak. |
| There appears to be image quality issues. | TV: For best image quality,"Standard Definition" TV should be viewed as 4:3 |
| You cannot see a picture Make sure | that the power cord is plugged into a grounded electrical outlet.Make sure that the power button is turned on.Make sure that the selected input source is connected to a working input source. |
| You see a distorted picture or hear unusual sound. | You may be getting interference from electrical appliances, cars, motorcycles, or fluorescent lights, Try moving your LCD TV to another location. |
| The picture has abnormal patterns | Make sure that the input source cable is attached securely and correctly to the back of your LCD TV.Make sure that the video input source is within the range of your LCD TV.Compare the video input source's specifications with your LCD TV specifications. |
| The display image does not cover the entire screen | If you are using VGA mode, make sure that H Size and V Position in the OSD are set correctly.If you are using TV,AV,,S-Video or component (Analog HD) with 480i input, use the SCREEN button on the remote control to scroll through various screen modes. |
| You can see a picture but you cannot hear sound | Make sure that the volume is not turned down.Make sure that the sound is not muted.Make sure that your audio input source cables are connected securely and currently |
| The LCD TV has pixels that are always bright, dark, or colored. | Your LCD TV is manufactured using an extremely high level of precision technology.However, sometimes some pixels of your LCD TV may not display. Pixel defects within industry specifications are inherent to this type of product and do not constitute a defective product. |
| You see "noise" or "trash" on the screen. | When your LCD TV's digital capabilities exceed a digital broadcast signal, the signal is up-converted(increased) to match your LCD TV's display capabilities. Up-converting can cause noise or trash. |
| You switch to a different input and the screen size changes. | The LCD TV remember the viewing mode from the last time you used a particular input(AV, S-Video, Analog HD, Digital HD, VGA and TV). |
| Tips for High-Definition Users | The LCD TV is an ideal platform for viewing High Definition Content. Best Image Quality will be achieved by the HDMI Input, then YPbPr, then VGA. However, due to variances in broadcast practices, it is possible some image distortions can occur. |
| Tips for Letterbox Content Users | Letterboxed (or "Wide Screen") versions of DVD movies are most commonly formatted for standard 4:3 Television. The LCD TV has the capability of expanding this content so the entire screen is filled at the expense of image accuracy. To use this function, press the "ZOOM" key on the remote control and cycle among the available options. |
4.3-Telephone & Technical Support
Products are often returned due to a technical problem, rather than a defective product that may result in unnecessary shipping charges billed to you. Our trained support personnel can often resolve the problem over the phone. For more information on warranty service or repair, after the warranty period, please contact our Support Department at the number below.
Quality service and consistent technical support are integral parts of ASTAR's commitment to service excellence. ASTAR's service representatives are dedicated to assist you with the utmost in customer satisfaction. To better assist you, please call or contact us via email.
Call us for technical support
Monday to Friday 8:00am to 6:00 pm Pacific Time
Tel:1-877-851-2528
Web: www.astarelectronics.com
Astar Electronics Corp.
5101 Commerce Drive
Baldwin Park, CA 91706
4.4-Compliance
Caution: Always use a power cable that is properly grounded. Please use the AC cords listed below for each area.
| USA | UL |
| Canada | CSA |
| Germany | VDE |
| Britain | BASE/BS |
| Japan | Electric Appliance Control Act |
4.5-FCC Class B Radio Frequency Interference Statement
Note: This equipment has been tested and found to comply with the limits for a Class B digital device, pursuant to Part15 of the FCC Rules. These limits are designed to provide reasonable protection against harmful interference in a residential installation. This equipment generates, uses and can radiate radio frequency energy, and if not installed and used in accordance with the instructions, may cause harmful interference to radio communications. However, there i no guarantee that interference will not occur in a particular installation. If this equipment does cause harmful interference to radio or television reception, which can be determined by turning the equipment off and on, the user is encouraged to try to correct the interference by one or more of the following measures:
- Reorient or relocate the receiving antenna.
- Increase the separation between the equipment and receiver.
- Connect the equipment into an outlet on a circuit different from that to which the receiver is connected.
- Consult the dealer or an experienced radio/TV technician for help.
Notice:
- The changes or modifications not expressly approved by the party responsible for compliance could void the use's authority to operate the equipment.
- Shielded interface cables and AC power cord, if any, must be used in order to comply with the emission limits.
- The manufacturer is not responsible for any radio or TV interference caused by unauthorized modification to this equipment. It is the responsibilities of the user to correct such interference.
Specifications
| Specifications | |
| Panel | 27"Diagonal, Color TFT Active MatrixLCD |
| Resolution | 1366X768pixels (WXGA format) |
| Colors | 16.77 million colors |
| Display Compatibility | HDTV (720p) Native, 1080i |
| Signal Compatibility | 480i (SDTV), 480p(DVD/EDTV),720p(HDTV),1080i(HDTV) |
| Response Time | 8ms(typical) |
| Brightness | 600cd/m2 (typical) |
| Contrast | 1200:1(typical) |
| Viewing Angle | 178°(horizontal),178°(vertical) |
| Inputs | 2xRF(for ATSC(DTV) and NTSC(TV) inputs),1xHDMI |
| (DIGITAL HD),2xComponent(ANALOG HD1,ANALOG HD2), | |
| 1xComposite (AV),1xS-Video,1xComputer(VGA), | |
| 5xStereo Audio in (RCA),1xRS232 for service | |
| Output | 1xAudio out(RCA),1xVideo out(RCA), |
| 1digital audio optical output (DTV/ATSC Source), | |
| Features | PIP, POP, Noise Reduction, 3:2 Pull Down, 3D Comb Filter, Progressive Scan, Aspect Ratio conversion,3D D-interlacer,Gamma Correction |
| Stereo, MTS and SAP,Closed Caption,V-Chip (Parental Control) | |
| Speakers | stereo 10 W/channel integrated speakers |
| Lamp Life | 60,000 hours (half-life), (typical27 years) |
| Power | |
| Input | IEC Connector for direct power line connection |
| Voltage Range | 110-240 VAC 50-60Hz |
| Power Consumption | 200 W |
| Environment Conditions | |
| Operating | Temperature:5~35°C, Relative Humidity:10-90%, Altitude:0~14,000ft |
| Non-Operating | Temperature:-20~50°C, Relative Humidity:10-90%, Altitude:0~40,000ft. |
| Dimensions | 35.5"(W)x 17.9(H)x4.1"(D) w/o stand |
| 35.5"(W)x 20.7(H)x10.6"(D) w/ stand | |
| Net Weight | 53 Lbs w/stand,44 Lbs w/o stand |
| Certifications | UL,C-UL,FCC Class B |
Glossary-Standard Definitions
Analog TV: Today's TV system using radio frequency waves to transmit and display pictures and sound.
Aspect Ratio(4x3): Traditional TV "aspect ratio", that is, the screen's width as compared to its height. For example, a "32 inch TV screen" would be 25 inches wide and 19 inches tall.
Aspect Ratio(16x9): "Wide screen TV" aspect ratio, which is more like a movie screen than a traditional TV. For example, a "32 inch TV screen" would be 28 inches wide and 16 inches tall.
Digital TV(DTV) :Television delivered and displayed using radio frequency waves that contain information that is digitally encoded for improved quality and efficiency.
Enhanced Definition TV(EDTV): A better digital television transmission than SDTV with at least 480p, in a 16x9 or 4x3 display and Dolby digital surround sound. 480p is the quality used by most DVD players. EDTV provides 300-400,,000 pixels.
HDTV Monitor (sometimes called HDTV Ready): A set that can display HDTV programming if you have a separate HDTV tuner, HD Cable Set-Top Box or HD Satellite Set-Top -Box Receiver.
HDTV Tuner(also decoder, receiver, set-top box): A device capable of receiving and outputting HDTV signals for display. It may be stand-alone or integrated in the set.
High-Definition Television(HDTV): The best quality digital picture, wide screen (16x9) display with at least 720 progressively scanned lines(720p) or 1080 interlaced lines (1080 i) and Dolby digital surround sound. HDTV provides 900,000-2.1 million pixels.
Integrated HDTV: An HDTV that has the digital tuner built into the set. It does not need a separate set-top box to receive over -the -air DTV signals. progressively scanned lines (480p) in 16x9 or 4x3 format. 480 interlaced (480i) is the quality of today's analog TV system. SDTV provides 150-300,000 pixels.
Interlace Scan: A way to scan vertical lines onto a TV picture by scanning all the odd lines first, then filling in the even lines(this happens instantaneously).
Plug-and-Play or Digital Cable Ready: ADTV or other device for digital cable customers that plugs directly into the cable jack and does not require a separate set-top box. Plug and Play TV owners must obtain a Cable CARD from their cable company in order to view scrambled programming services.
Progressive Scan: Away to scan vertical lines onto a TV picture by scanning all the lines consecutively (progressively).
Standard Definition TV (SDTV): Basic digital television transmission that may be displayed with fewer than 480.
Source: Buying a Digital Television, CEA, HDTV Guide, 2005
NOTE: The Federal Communications Commission(FCC), the Consumer Electronics Association(CEA) and the Consumer Electronics Retailers Coalition(CERC) have made a new tip sheet available for digital television (DTV) retailers to reproduce and distribute to consumers on the sales floor. The file may be downloaded online at www.ASTAR.com. While you're there, check out the other useful information the FCC is making available to consumers interested in learning more about the analog to digital transition.

- Dear ASTAR Customer,
- Television Antenna Connection Protection
- External Television Antenna Grounding
- Lightning Protection
- Power Lines
- Opening the package
- Package Contents
- Installation Preparation
- Preparing Your LCD TV FOR Wall Mounting
- Removing the stand/base:
- Table of Contents
- Chapter 1- Basic Controls and Connections
- Chapter 2- Connecting Equipment
- Chapter 3-Setting Up to Watch TV and DTV
- Chapter 4-Maintenance and Troubleshooting
- Specifications....51
- Glossary-Standard Definitions....52
- Chapter 1 -Basic Controls and Connections
- - Front Panel Controls
- - Rear Panel Connections
- 1.3-ASTAR Remote Control Button Description
- 1.3.1-Insertion of Batteries in the Remote Control
- Precaution Tips for inserting the batteries
- 1.3.2-Remote Control Range
- 1.3.3-Precautions for the ASTAR Remote Control
- Chapter 2 - Connecting Equipment
- 2.1- Which Video Connection Should I Use?
- - Connecting Your DVD Player
- .1- Using HDMI (Digital HD)
- Connecting DVD Player(Best):
- For DVD Players with DVI:
- - Using Component (Analog HD) Video
- Connecting DVD Player(Better):
- Note:
- - Using S-Video
- Connecting DVD Player (Good):
- - Using Composite (AV) Video
- - Connecting Your HDTV Set-Top Box
- - Using HDMI (Digital HD)
- Connecting Set-Top Box (Best):
- For HDTV Set- Top Boxes with DVI:
- - Using VGA Video
- Connecting Set-Top Box (Better):
- - Connecting Your VCR or Video Camera
- -Connecting Coaxial (RF)
- 2.5.1-Using Your Antenna or Cable for DTV
- - Using Your Antenna or Cable for TV
- - Using the Antenna or Cable through Your VCR
- 2.6-Connecting an Amplifier or Speakers
- - Connecting a Computer
- Chapter 3- Setting Up to Watch TV and DTV
- - Basic LCD TV Start Up
- - Watching a TV Program
- - Adjusting Basic LCD TV Settings
- Volume
- TV Channels
- General
- 3.4.1-Parental Controls for DTV
- 3.4.2-DTV Channel Information
- Program Information
- 3.4.4-Setting a Password
- 3.5-Using the On-Screen Display(OSD)
- 3.5.1-OSD Menu Operations
- 3.5.2-Video
- 3.5.3-Setup
- 3.5.4-V-Chip for TV
- 3.5.5-TV
- 3.5-6-Audio
- 3.5.7-Geometric
- 3.5.8-Temperature
- 3.5.9-Understanding Viewing Features
- 3.5.10-Viewing Modes
- 4:3 Mode
- Full Mode
- Panoramic
- 3.5.11-Picture-in-Picture(PIP)/Picture-by-Picture(POP) Mode
- 3.5.12-Adjusting Basic PIP/POP Settings
- PIP Channel
- Swapping PIP/POP Video
- Swapping PIP/POP Audio
- 3.5.13-Using the V-Chip
- 3.5.14-Setting the Sleep Timer
- Chapter 4- Maintenance and Troubleshooting
- 4.1-Maintenance
- Important
- Cleaning the Housing and the Remote Control
- Cleaning the Screen
- 4.2-Troubleshooting Guide
- 4.3-Telephone & Technical Support
- 4.4-Compliance
- 4.5-FCC Class B Radio Frequency Interference Statement
- Notice:
- Specifications
- Glossary-Standard Definitions
Brand : Astar
Model : LTV-27HBG
Category : Television