
OD4-BRZ - Pregnant Crestron - Free user manual and instructions
Find the device manual for free OD4-BRZ Crestron in PDF.


| Product Type | Outdoor Speaker |
| Brand | Crestron |
| Model | OD4-BRZ |
| Driver Size | 4 inches |
| Impedance | 8 Ohms |
| Power Handling | 40W RMS, 80W Peak |
| Frequency Response | 70 Hz - 20 kHz |
| Sensitivity | 88 dB |
| Color | Bronze |
| Material | Weather-resistant aluminum with UV coating |
| Mounting | Wall mount, optional bracket |
| Weight | 2.3 kg (5 lbs) |
| Dimensions (W×H×D) | 140 × 190 × 140 mm |
| Weatherproof Rating | IP66 |
| Connection Type | Spring-loaded terminals |
| Input Options | 8 Ohm direct, 70V/100V transformer taps |
| Included Accessories | Mounting bracket, screws, user manual |
| Maintenance | Wipe with damp cloth; avoid solvents |
| Safety | Ensure secure mounting; do not overload amplifier |
| Repair & Spare Parts | Contact Crestron authorized dealers for grilles, drivers, brackets |
Frequently Asked Questions - OD4-BRZ Crestron
User questions about OD4-BRZ Crestron
0 question about this device. Answer the ones you know or ask your own.
Ask a new question about this device
Download the instructions for your Pregnant in PDF format for free! Find your manual OD4-BRZ - Crestron and take your electronic device back in hand. On this page are published all the documents necessary for the use of your device. OD4-BRZ by Crestron.
USER MANUAL OD4-BRZ Crestron
Reference 4 in. 2-Way Outdoor Speaker, Bronze Textured, Single
The Crestron® Reference Speaker. REFERENCE.OD4-BRZ-T-EACH made by Origin Acoustics delivers the pinnacle of performance for demanding residential installations. Select materials, top shelf components and a high-end appearance underscore the design behind each speaker. The result is a no-compromise outdoor speaker designed to be staked, directly into the ground or mounted to an exterior wall, fence post, or tree.

In the Box
1 REFERENCE OD4-BRZ-T-EACH
Additional Items
1 Ground stake
2 Wire nuts

Installation
Prepare the Site
The Crestron Reference speaker REFERENCE OD4-BRZ-T-EACH can be installed at ground level using the supplied stake. It can also be mounted to outdoor hard surfaces, such as a trellis, under an eave, on a wall on a deck, or to a post using the surface/tree mount SPKA-SMK/TREEMK-REFERENCE-OD4 (optional).
- For in-ground level installation, choose a location that will not flood and where the speaker will not be affected by an in-ground sprinkler system.
- For above-ground installation, the speaker is mounted with either the surface or tree mounting bracket (not included).
REFERENCE OD4-BRZ-T-EACH
Quick Start
Reference 4 in. 2-Way Outdoor Speaker, Bronze Textured, Single Mount the Speaker
In-Ground Installation
For in-ground installation:
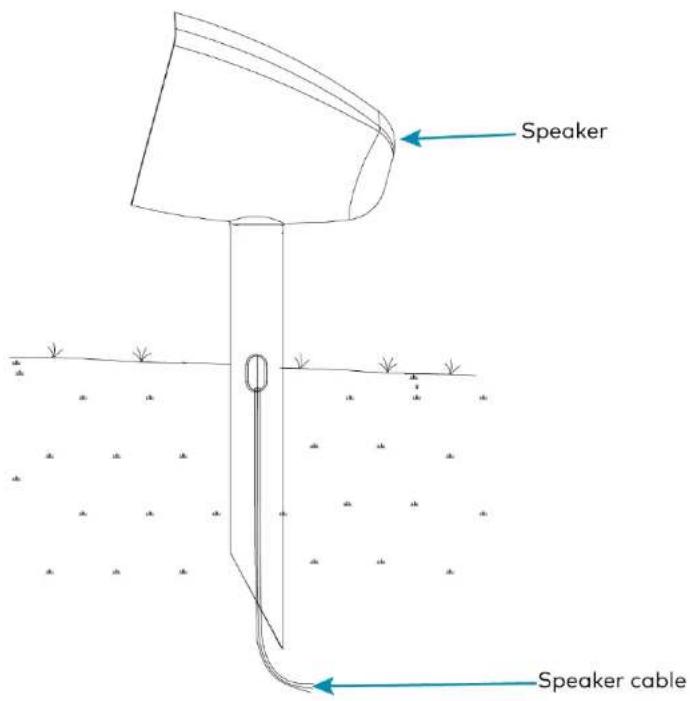
- Pull the speaker cable through the top of the stake and out either side on the bottom opening.
- Drive the ground stake (included) into the ground.
- For installation in soft soil: The stake can be installed, without excavating the soil. Push the stake down into the soil.
- For installation in hard soil: Dig a hole for the stake. Place the stake in the hole with the top cylinder of the stake above ground level. Hold the stake straight while backfilling and compacting the soil.
- Attach the speaker to the stake by turning the speaker clockwise until it is mounted properly.
REFERENCE OD4-BRZ-T-EACH
Quick Start
Reference 4 in. 2-Way Outdoor Speaker, Bronze Textured, Single
Above-Ground Installation
Use the SPKA-SMK/TREEMK-REFERENCE-OD4 optional accessory to install the speakers on a surface or a tree. This accessory must be purchased separately.
For surface mount installation:
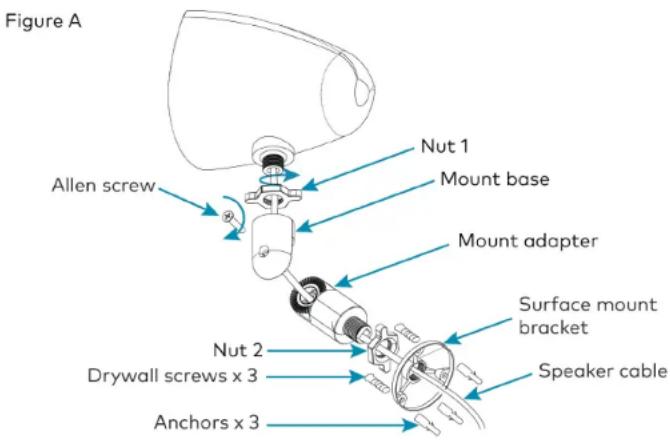
- Route the speaker cable through all the components of the knuckle adapter bracket.
- Install the knuckle adapter bracket (not included) to the speaker as shown in figure A.
NOTE: The knuckle adapter bracket comprises nut 1, mount base, mount adapter, and nut 2.
a. Turn nut 1 clockwise until it is secured to the speaker.
b. Fit the mount base onto the threaded end of the speaker, and rotate it clockwise until it is secured.
c. Attach the mount adapter to the mount base using the Allen screw.
d. Tighten nut 2 over the threaded end of the mount adapter.
- Select a suitable location to mount the surface mount bracket.
- Install the surface mount bracket as follows:
a. Place.the surface mount bracket (not included) in the mounting location.
b. Hold the surface mount bracket against the surface to mark the screw holes.
c. Drill holes at the marked screw hole locations and install three anchors (not included).
d. Route the speaker cable through the center hole and out of the cable opening on the surface mount bracket.
e. Secure the surface mount bracket to the surface using drywall screws (not included).
- Attach the speaker to the surface mount bracket by hand threading the assembled speaker to the surface mount bracket.
- For optimal sound coverage, adjust the speaker left or right and up or down.
a. Adjust the speaker left or right by adjusting the mounting base threads and nut Z.
b. Adjust the speaker up or down by first loosening the allen screw on the mount base. Adjust the angle to the desired position, then retighten the screw.
REFERENCE OD4-BRZ-T-EACH
Quick Start
Reference 4 in. 2-Way Outdoor Speaker, Bronze Textured, Single
For tree mount installation:
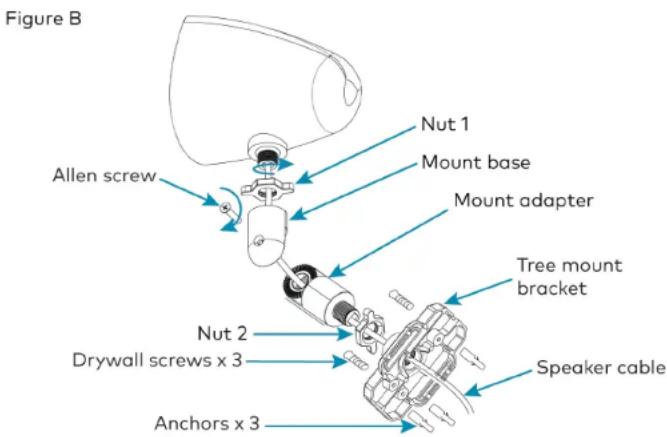
- Route the speaker cable through all the components of the knuckle adapter bracket.
- Install the knuckle adapter bracket (not included) to the speaker as shown in figure B.
NOTE: The knuckle adapter bracket comprises nut 1, mount base, mount adapter, and nut 2.
a. Turn nut 1 clockwise until it is secured to the speaker.
b. Fit the mount base onto the threaded end of the speaker, and rotate it clockwise until it is secured.
c. Attach the mount adapter to the mount base using the Allen screw.
d. Tighten nut 2 over the threaded end of the mount adapter.
- Install the tree mount bracket as follows:
a. Place the tree mount bracket (not included) in the mounting location.
b. Hold the tree mount bracket against the surface to mark the screw holes.
c. Drill holes at the marked screw hole locations and install three anchors (not included).
d. Route the speaker cable through the center hole and out of the cable opening on the tree mount bracket.
e. Secure the tree mount bracket (not included) to a tree using drywall screws (not included).
-
Attach the speaker to the tree mount bracket by hand threading the assembled speaker to the tree mount bracket.
-
For optimal sound coverage, adjust the speaker left or right and up or down.
a. Adjust the speaker left or right by adjusting the mounting base threads and nut 2.
b. Adjust the speaker up or down by first loosening the allen screw on the mount base. Adjust the angle to the desired position, then retighten the screw.
REFERENCE OD4-BRZ-T-EACH
Quick Start
Reference 4 in. 2-Way Outdoor Speaker, Bronze Textured, Single Connect the Speaker Cable
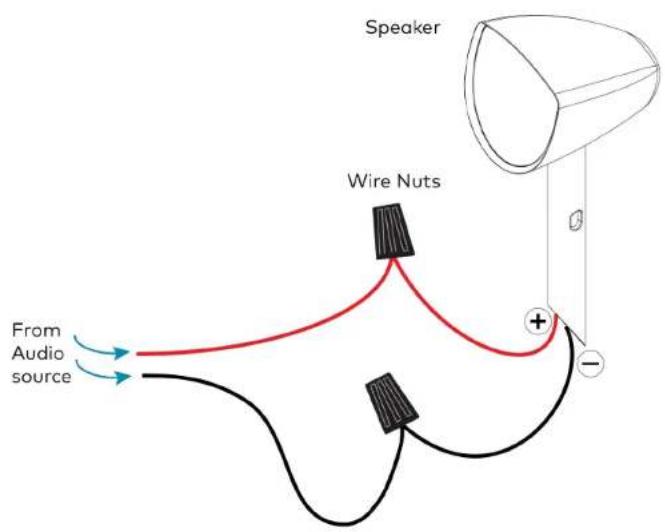
- Run the speaker cable (not included) from the audio source to the wire nut, observing all appropriate local codes.
- Run the speaker cable from the speaker location to the wire nut, observing all appropriate local codes.
NOTES:
. The speaker includes a hardwired direct-burial speaker cable.
- Make sure that the positive cable is attached to the red connection, and the negative cable is attached to the black connection.
- Each, REFERENCE OD4-BRZ-T-EACH, speaker presents a 16 ohm load to the amplifier, and is designed to be wired in parallel either with additional REFERENCE OD4-BRZ-T-EACH speakers and/or with the subwoofer included in the REFERENCE OD4-I-4-S10-BRZ-T-KIT. These speakers are also suitable replacements for the speakers in the REFERENCE OD4-I-4-S10-BRZ-T-KIT.
- Combine and twist the positive (+) cables together in a clockwise motion. Repeat this step for the negative (-) cables.
- Secure the two cables together using the wire nuts ensuring that NO COPPER is exposed.
REFERENCE OD4-BRZ-T-EACH
Quick Start
Reference 4 in. 2-Way Outdoor Speaker, Bronze Textured, Single

Visit the Product Page
Scan the QR code to visit the product page. REFERENCE OD4-BRZ-T-EACH

https://www.crestron.com/model/6511866
Additional Information
Original Instructions
The U.S. English version of this document is the original instructions. All other languages are a translation of the original instructions.
Crestron product development software is licensed to Crestron dealers and Crestron Service Providers (CSPS) under a limited nonexclusive, nontransferable Software Development Tools License Agreement. Crestron product operating system software is licensed to Crestron dealers, CSPS, and end-users under a separate End-User License Agreement. Both of these Agreements can be found on the Crestron website at www.crestron.com/legal/software_license_agreement.
The product warranty can be found at www.crestron.com/warranty.
The specific patents that cover Crestron products are listed at www.crestron.com/legal/patents.
Certain Crestron products contain open source software. For specific information, visit www.crestron.com/opensource.
Crestron and the Crestron logo are either trademarks or registered trademarks of Crestron Electronics, Inc. in the United States and/or other countries. Origin Acoustics is either a trademark or registered trademark of Origin Acoustics, Inc. in the United States and/or other countries. Other trademarks, registered trademarks, and trade names may be used in this document to refer to either the entities claiming the marks and names of their products. Crestron disclaims any proprietary interest in the marks and names of others. Crestron is not responsible for errors in typography or photography.
©2021 Crestron Electronics, Inc.
Doc. 9033B
09/09/21
- Reference 4 in. 2-Way Outdoor Speaker, Bronze Textured, Single
- In the Box
- Installation
- Prepare the Site
- REFERENCE OD4-BRZ-T-EACH
- Quick Start
- Reference 4 in. 2-Way Outdoor Speaker, Bronze Textured, Single Mount the Speaker
- In-Ground Installation
- Above-Ground Installation
- Reference 4 in. 2-Way Outdoor Speaker, Bronze Textured, Single Connect the Speaker Cable
- NOTES:
- Visit the Product Page
- Additional Information
Brand : Crestron
Model : OD4-BRZ
Category : Pregnant